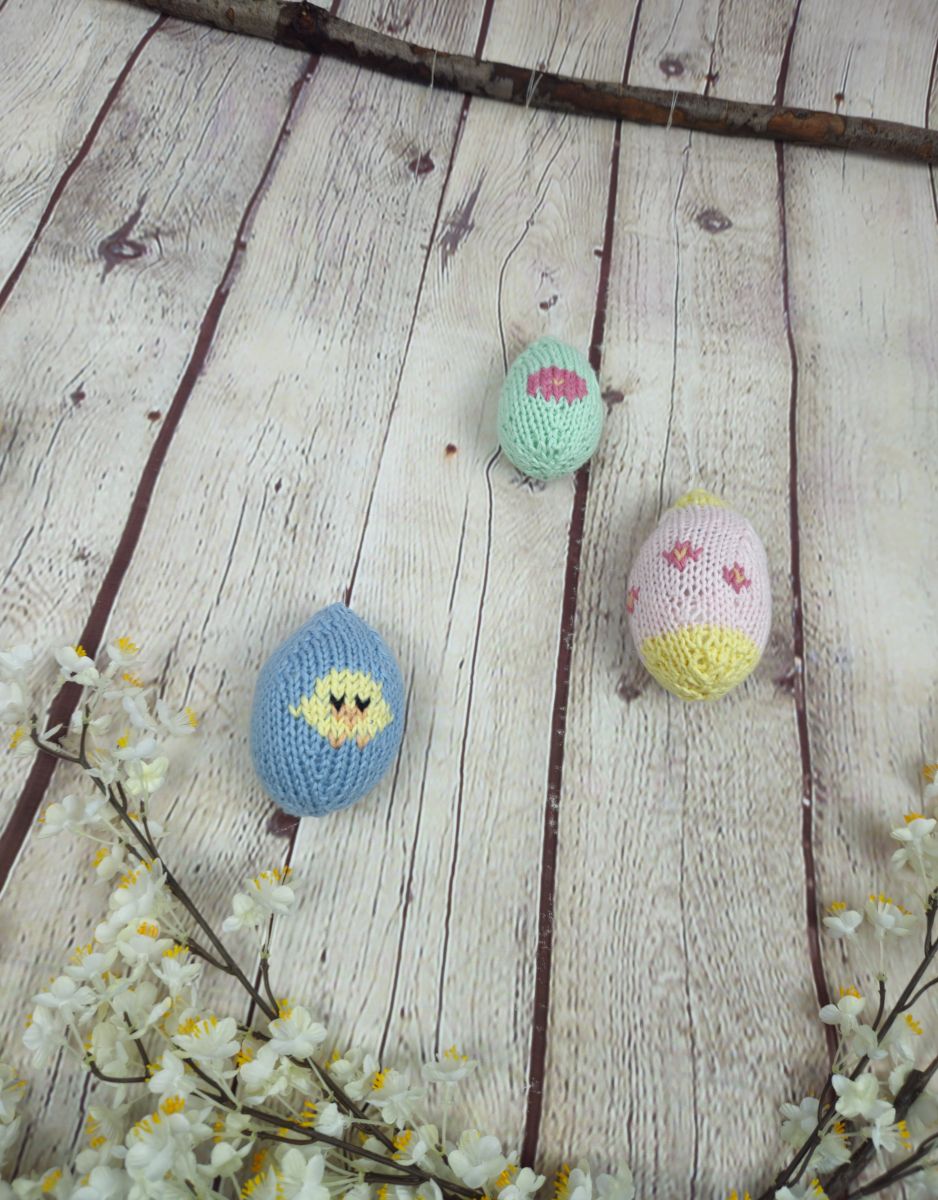
The Easter eggs are described in two different sizes and three different designs, which are added using Swiss darning.
The colours can, of course, be changed as you like and are simply suggestions.
Size:
Small Egg: The big egg is approximately 9 cm high and has a circumference from approximately 14 cm.
Big Egg: The big egg is approximately 11 cm high and has a circumference from approximately 17.5 cm.
Material:
DK Yarn (Group 3):I used yarn which had 50 gr to 105 m
Each Egg used approximately 10 gr
Some yarn for the Swiss darning
Knitting needles: 3 mm
Filling
Abbreviations:
St: Stitch
K: Knit
P: purl
Inc: Knit st in front and in the back
Dec.: knit 2 stitches together

The Small Egg:
Cast on 6 st and close to a round.
1. Round: increase each St (12 St)
2. Round: *1 K, 1 Inc* Work this 6x (18 St)
3. + 4. Round: 18 K (18 St)
5. Round: *2 K, 1 Inc* Work this 6x (24 St)
6. + 7. Round: 24 K (24 St)
8. Round: *3 K, 1 Inc* Work this 6x (30 St)
9. - 13. Round: 30 K (30 St)
14. Round: *8 K, 1 Dec* Work this 3x (27 St)
15. Round: 27 K (27 St)
16. Round: *7 K, 1 Dec* Work this 3x (24 St)
17. Round: 24 K (24 St)
18. Round: *6 K, 1 Dec* Work this 3x (21 St)
19. Round: 21 K (21 St)
20. Round: *5 K, 1 Dec* Work this 3x (18 St)
21. Round: 18 K (18 St)
22. Round: *4 K, 1 Dec* Work this 3x (15 St)
23. Round: 15 K (15 St) At this point you will start with filling the egg.
24. Round: *3 K, 1 Dec* Work this 3x (12 St)
25. Round: 12 K (12 St)
26. Round: *2 K, 1 Dec* Work this 3x (9 St)
27. Round: *1 K, 1 Dec* Work this 3x (6 St)
Finish the Egg by using a tapestry needle to pick up the last 6 stitches and pull them tight.
The Big Egg:
Cast on 6 st and close to a round.
1. Round: Increase each St (12 St
2. Round: *1 K, 1 Inc* Work this 6x (18 St)
3. + 4. Round: 18 K (18 St)
5. Round: *2 K, 1 Inc* Work this 6x (24 St)
6. + 7. Round: 24 K (24 St)
8. Round: *3 K, 1 Inc* Work this 6x (30 St)
9. + 10. Round: 30 K (30 St)
11. Round: *4 K, 1 Inc* Work this 6x (36 St)
12. - 19. Round: 36 K (36 St)
20. Round: *7 K, 1 Dec* Work this 4x (32 St)
21. + 22. Round: 32 K (32 St)
23. Round: *6 K, 1 Dec* Work this 4x (28 St)
24. Round: 28 K (28 St)
25. Round: *5 K, 1 Dec* Work this 4x (24 St)
26. Round: 24 K (24 St)
27. Round: *4 K, 1 Dec* Work this 4x (20 St)
28. Round: 20 K (20 St)
29. Round: *3 K, 1 Dec* Work this 4x (16 St)
30. Round: 16 K (16 St) At this point you will start with filling the egg.
31. Round: *2 K, 1 Dec* Work this 4x (12 St)
27. Round: *1 K, 1 Dec* Work this 4x (8 St)
Finish the Egg by using a tapestry needle to pick up the last 8 stitches and pull them tight.
The Big egg in 2 Colours:
Work this like the big Egg but start with Colour A change to colour B after the 5th round and work up to Round 24 in colour B, change then again to colour A to finish the egg.
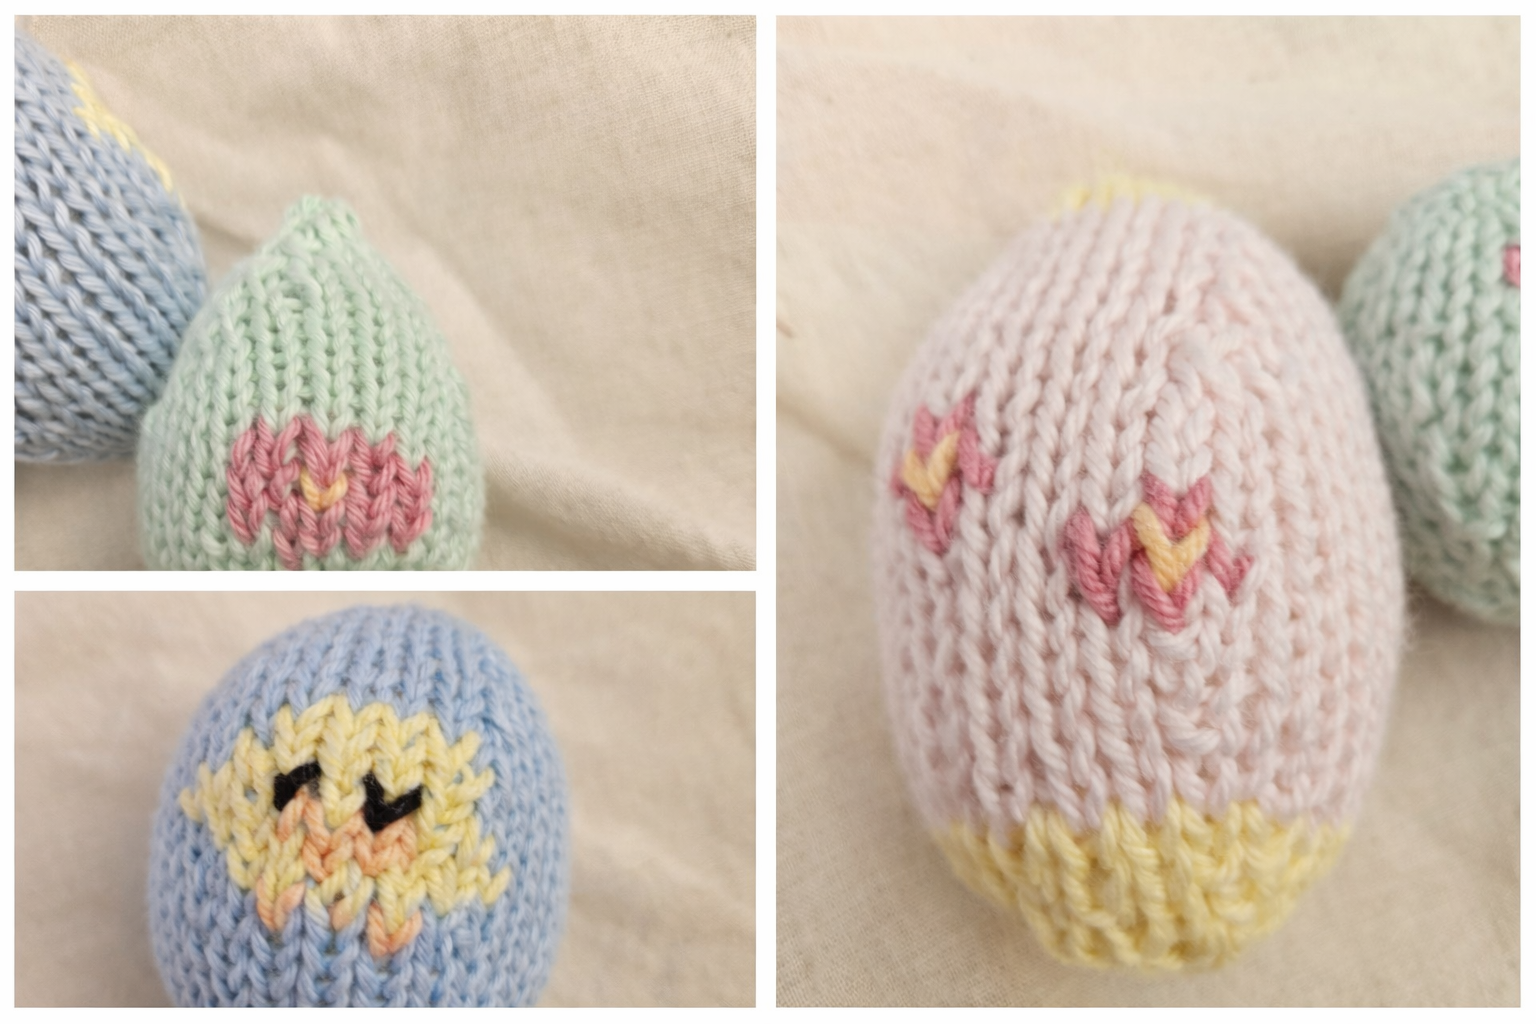
Embroidering the pattern:
Embroider the pattern onto the eggs using the Swiss darning technique, as explained below.
Use the chart as a guide to see which stitches should be embroidered in which colour.
(1).png)
Swiss darning:
Insert the needle at the base of the stitch (at the “V”) and bring the yarn up.
Then pass the needle under both legs of the stitch above and bring it out on the other side.
Next, insert the needle back at the starting point and move on to the next stitch you want to embroider.
(1).png)
If you upload a photo of your work on Instagram, please don’t forget to tag me 😊
@_lovelyyarns
You can find more free knitting and crochet patterns, tips and tricks on my blog here under “Posts”. Please don't hesitate to follow me so you don’t miss anything.
Schnell zur Zielseite
Community & Hilfe


