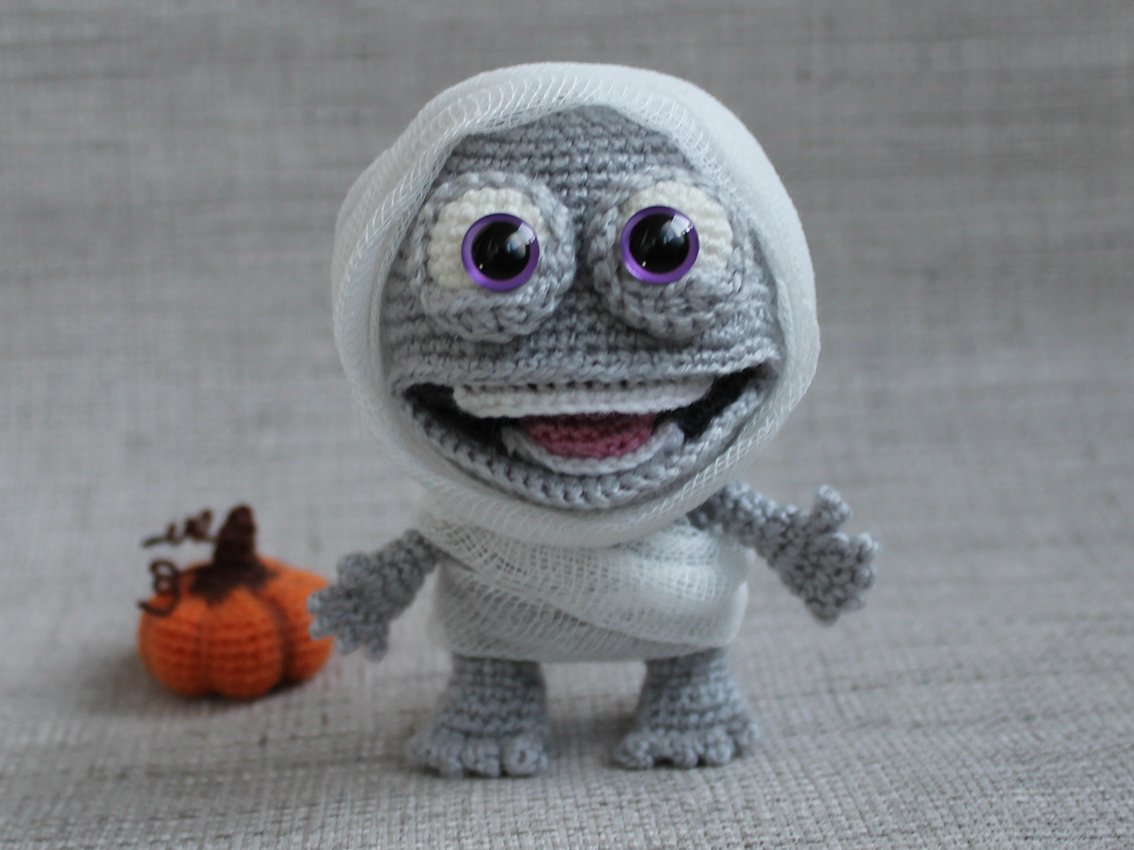
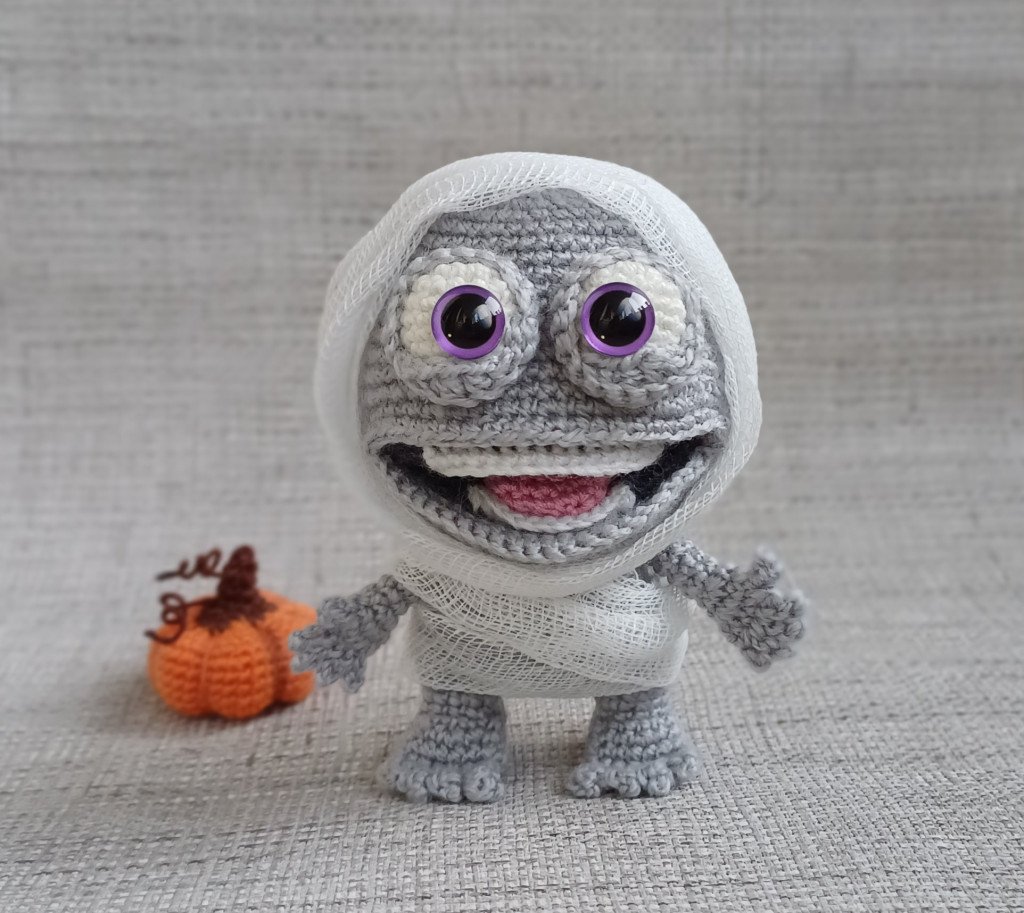
Meet my new character - the mummy. If you like the mummy, crochet it for Halloween.
Materials:
Yarn of your choice. Cotton, acrylic will do. I used acrylic yarn, 450 m/100 g. The size of my mummy is 10 cm. Depending on the thickness of yarn a finished toy size may differ.
Required yarn colors: gray, dark gray, a small amount of white and pink (or red).
- A crochet hook, I used 1,25 mm crochet hook
- Hollow fibre for stuffing
- A sewing needle, matching sewing threads
- Transparent glue (at your wish)
- A long needle for sculpting, strong thread for sculpting
- 1 pair of ready-made eyes, I used 10mm diam eyes
- thin wire (I used beading wire) approx. 20 cm (for the mouth)
- Medical bandage
Abbreviations:
ch – chain
st - stitch
sl st – slip stitch
sc – single crochet
hdc – half double crochet
inc – increase (2 sc in 1 st)
dec – decrease (single crochet two stitches together)
(...)* N times – repeat instructions in brackets N times
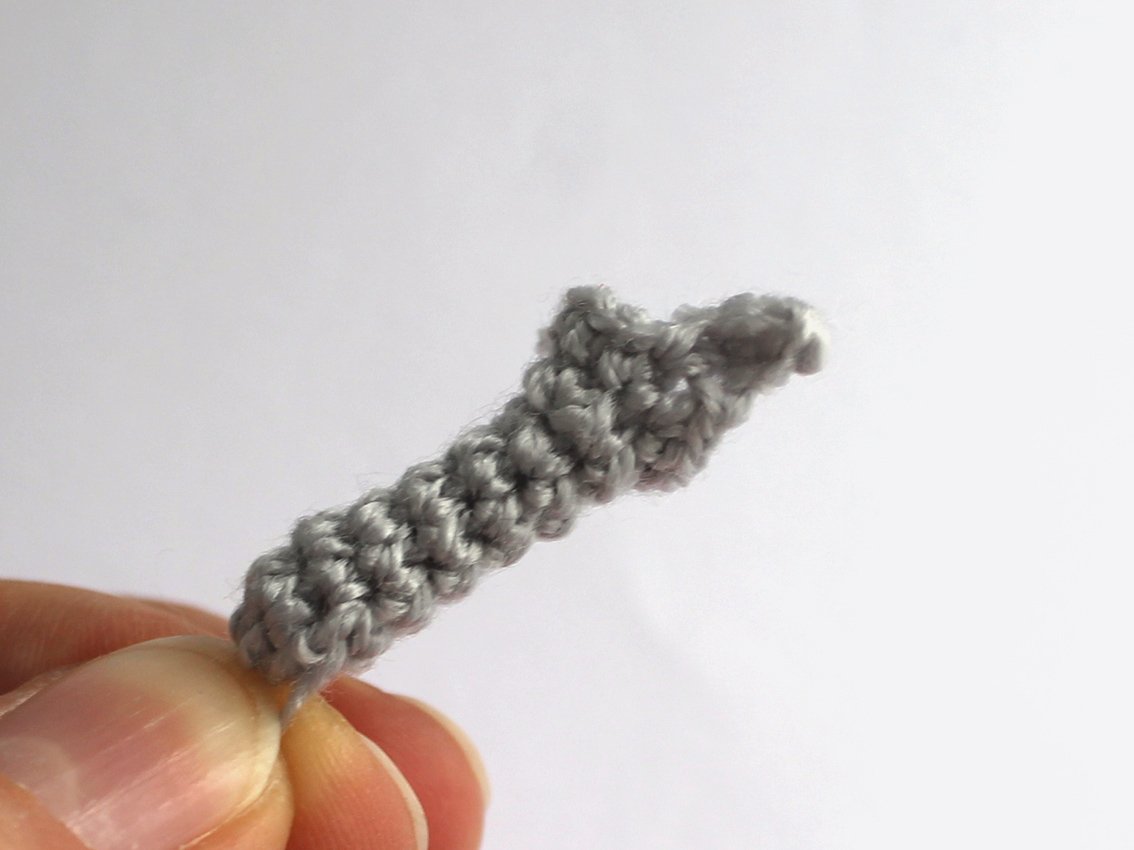
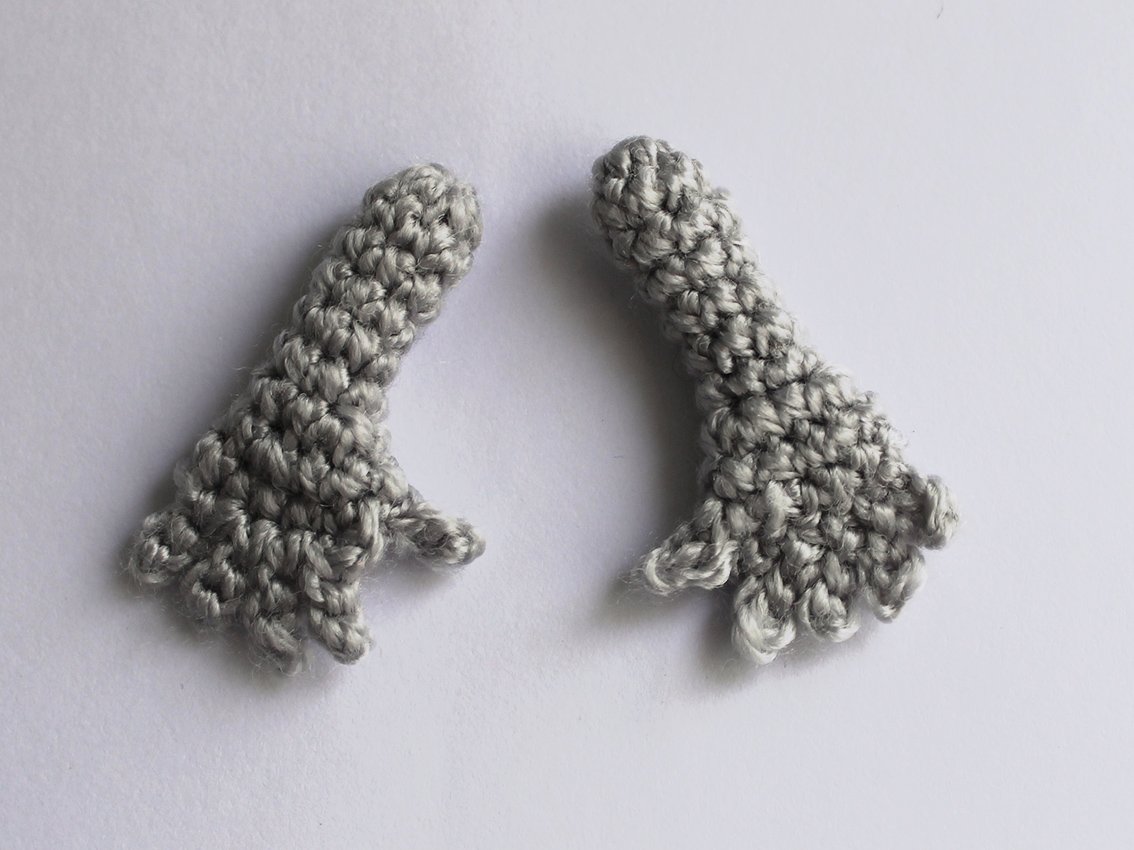
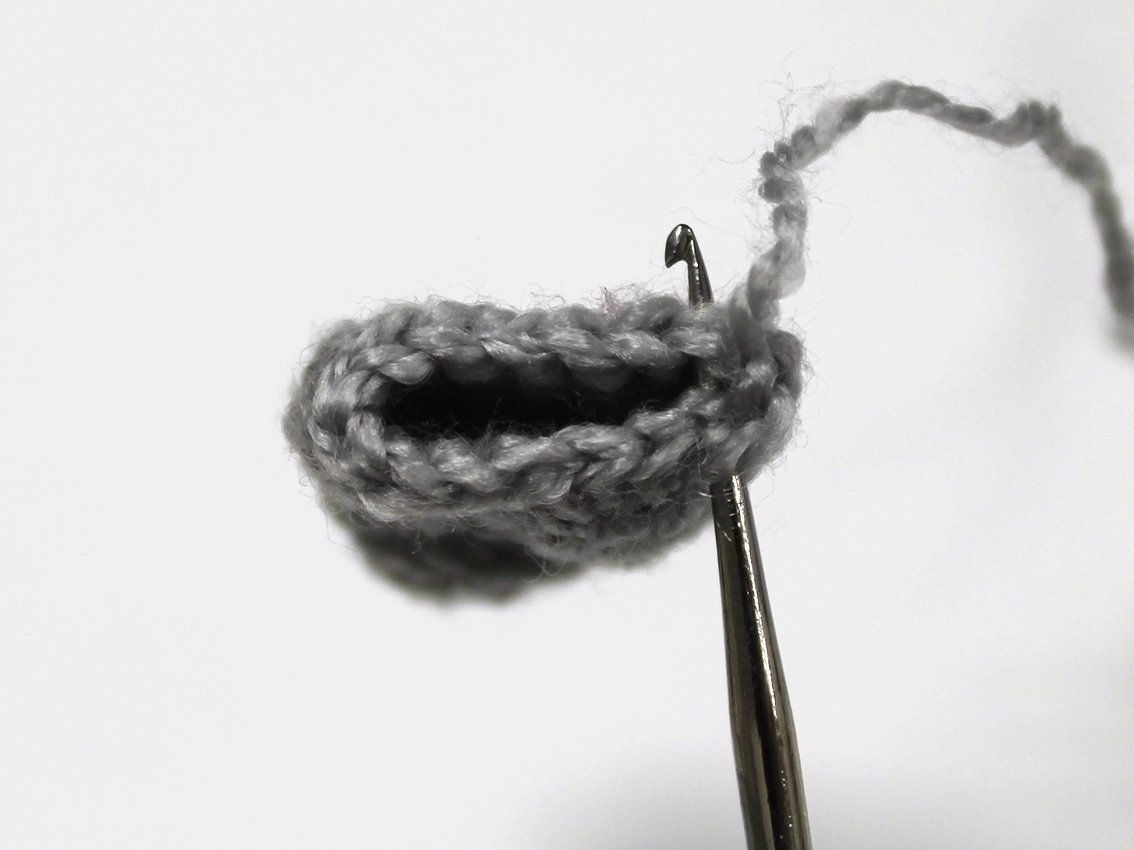
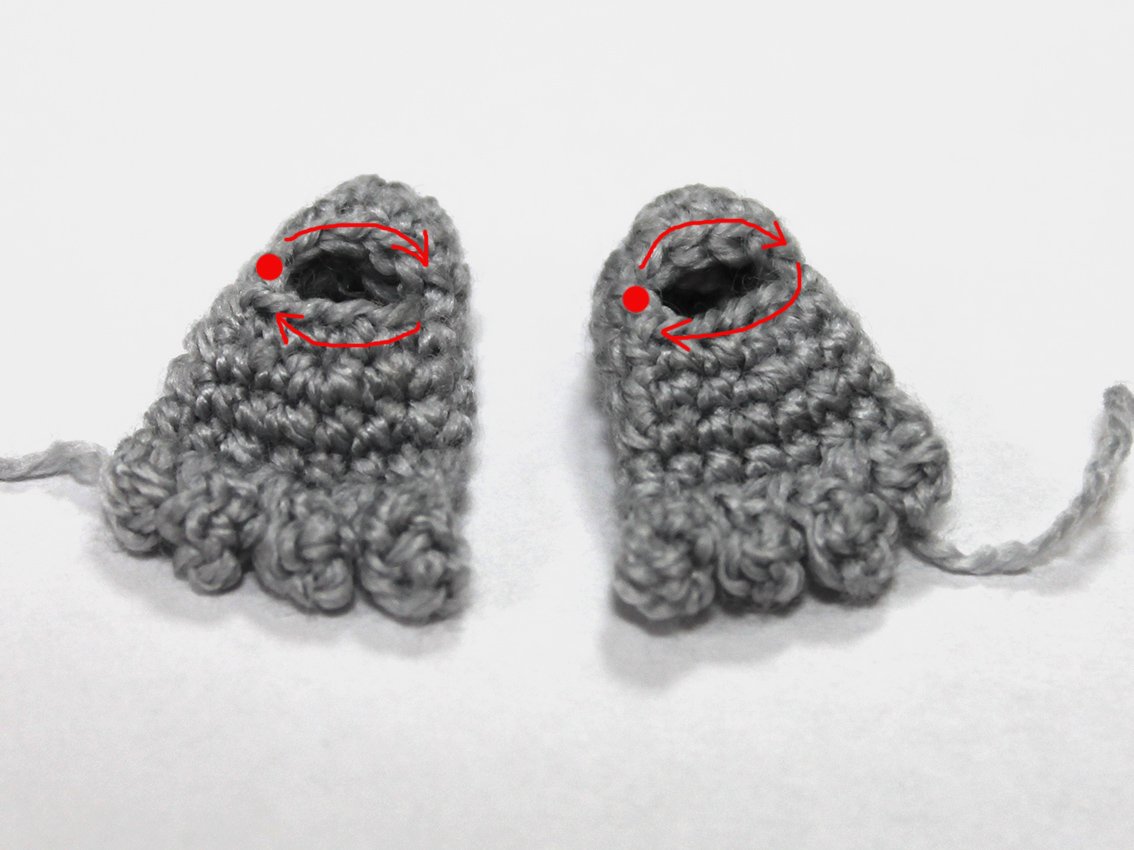
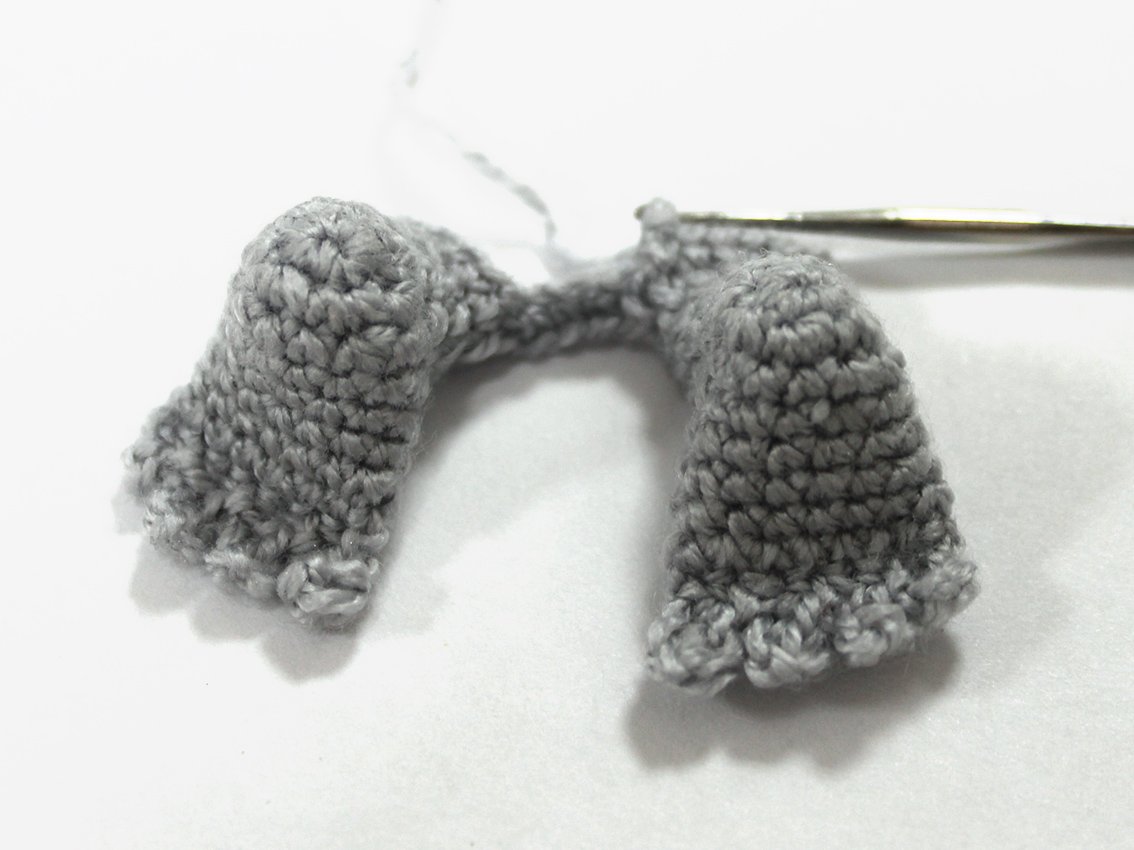
Arms (make 2)
Work with grey colour yarn.
Rnd 1. 7 sc in a Magic Ring
Rnd 2-7. 7 sc
Rnd 8. (inc, 1 sc)х 3 times, 1 inc = 11
Rnd 9. 3 sc, work 3 ch, starting from 2nd ch from hook: 2 sc - it's a thumb, continue: 6 sc, leave the last 2 stitches unworked
Add some hollow fiber (optional).
Rnd 10. Fold the part in two, work 5 sc by hooking through both edges of the part: (leave 1 loop at the beginning of the curve unworked).
Turn work.
Rnd 11. Crochet fingers: 3 ch, starting from 2nd ch from hook: 2 sl st, skip 1 loop of the palm, then into the loop of the palm 1 sl st, (3 ch, starting from 2nd ch from hook: 2 sl st, continue along the main stitches: 1 sl st)х 3 times
Fasten off, cut off any excess yarn, hide the end.
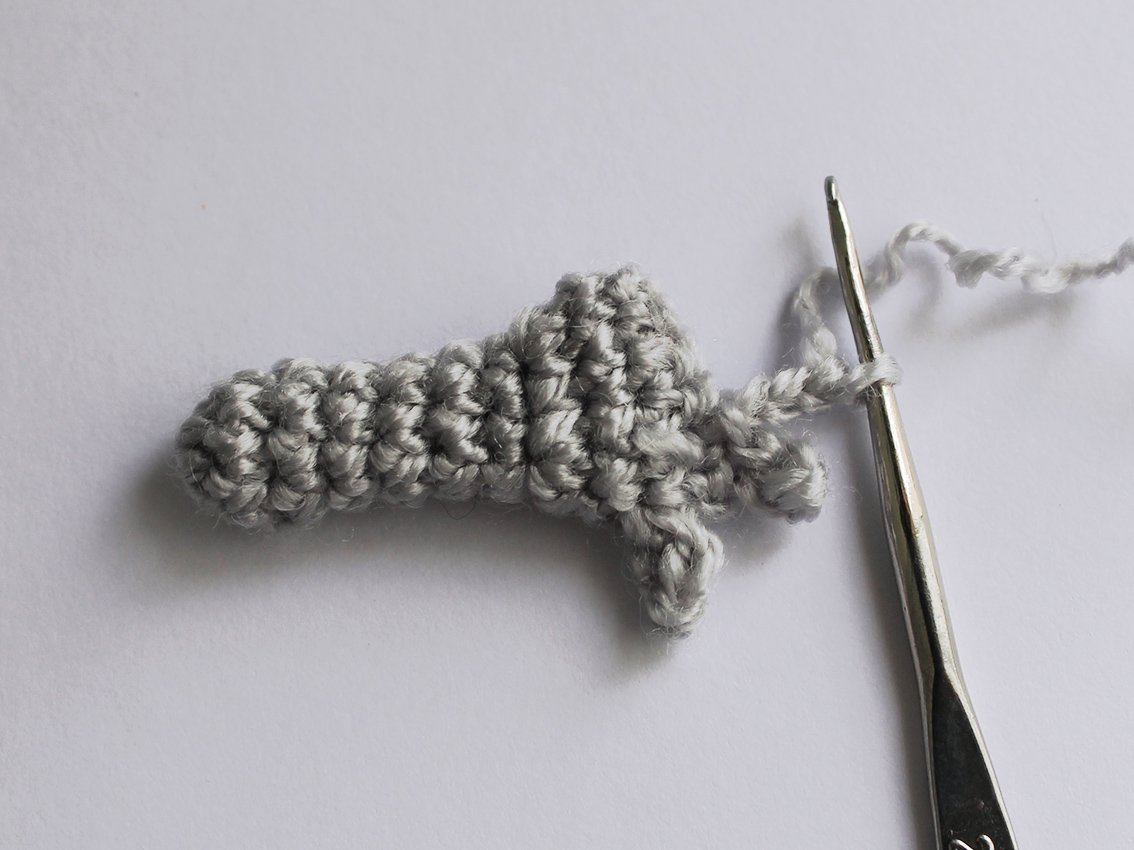
The second arm is crocheted similarly, just turn it over so that the thumb looks the other way.
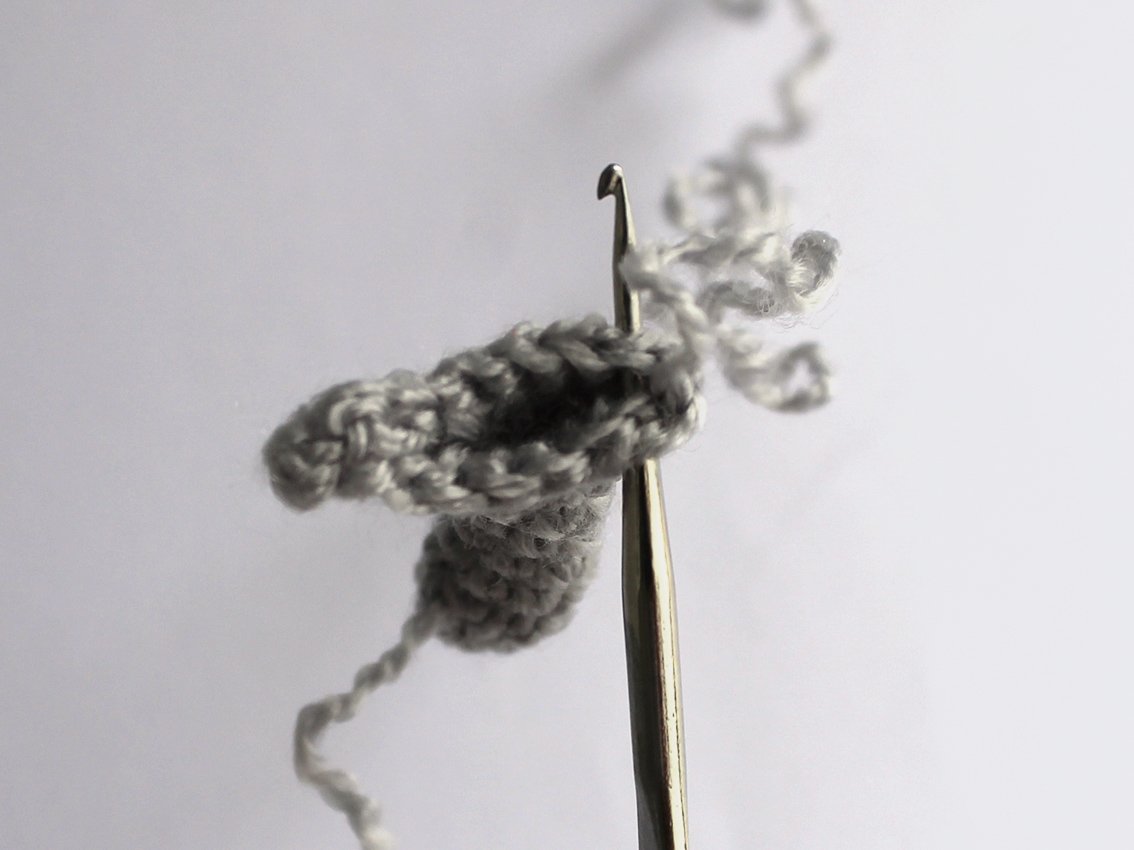
Tongue
Work with pink colour yarn.
Work 6 ch
Rnd 1. starting from 2nd ch from hook: 4 sc, 3 sc in the last stitch, continue along the other side of chain: 3 sc, inc = 12
Rnd 2. (inc, 3 sc, inc, 1 sc)× 2 times = 16
Rnd 3-6. 16 sc
Make sure the marker is on the rib, make a shift stitch if required.
Rnd 7. Fold the part in two, work 7 sc by hooking through both edges of the part: (leave 2 loops at the beginning and end of the curve unworked) = 7
Cut off yarn, leave a tail for further operation.
.JPG)
.JPG)
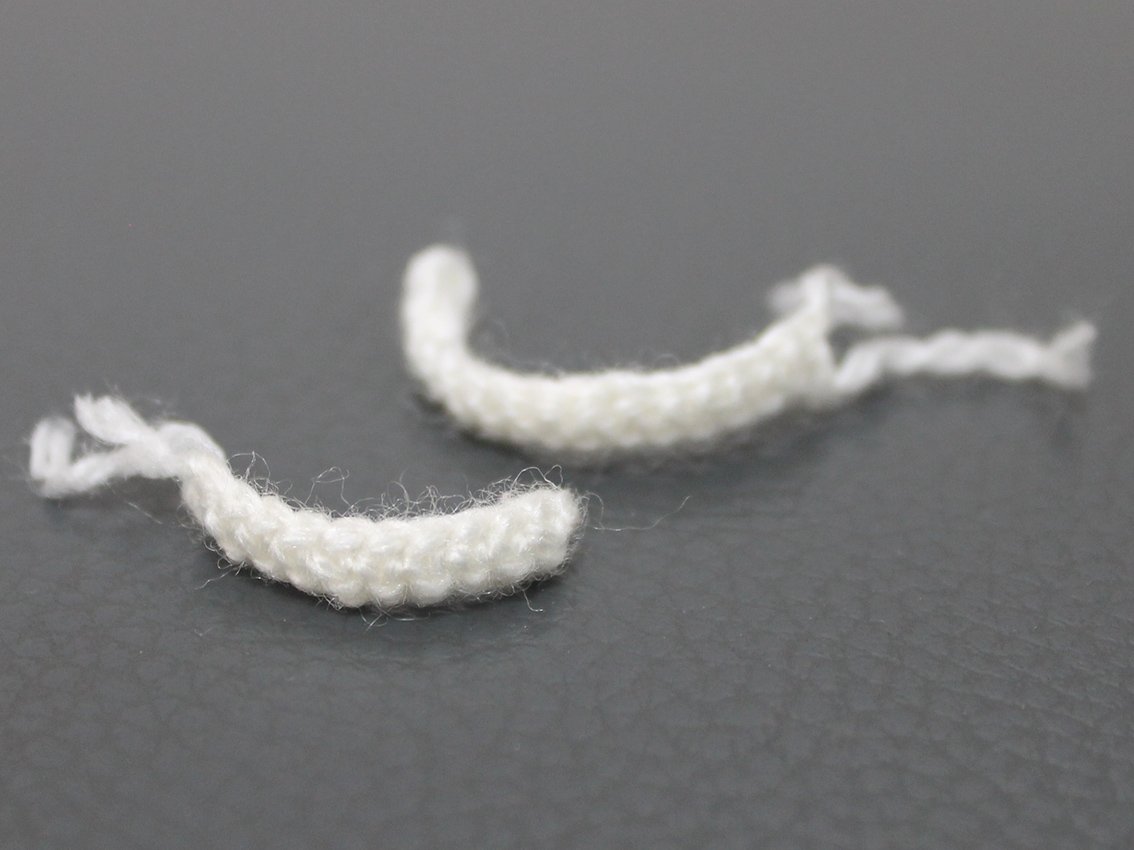
Lower row of teeth
Work with white colour yarn.
Work 11 ch
Rnd 1. starting from 2nd ch from hook: 10 sc =10
Fasten off, cut off any excess yarn.
Upper row of teeth
Work with white colour yarn
Work 17 ch
Rnd 1. starting from 2nd ch from hook: 16 sc =16
Fasten off, cut off any excess yarn.
Mouth
Work with dark grey colour yarn
Work 6 ch
Rnd 1. starting from 2nd ch from hook: 4 sc, 3 sc in the last stitch, continue along the other side of chain: 3 sc, inc =12
Rnd 2. (inc, 1 sc)× 2 times, 3 inc, 1 sc, inc, 1 sc, 2 inc =20
Rnd 3. 20 sc
Rnd 4. (2 sc, inc, 3 sc, inc, 2 sc, 3 sc in 1 loop)× 2 times =28
Rnd 5. 28 sc
Rnd 6. 3 sc, inc, 4 sc, inc, 3 sc, 2 inc, (2 sc, inc)× 3 times, 2 sc, 2 inc, 1 sc =37
Rnd 7. 37 sc
Rnd 8. 2 sc, (inc, 3 sc)× 3 times, 3 sc in 1 loop, (3 sc, inc)× 2 times, 4 sc, (inc, 3 sc)× 2 times, 3 sc in 1 loop, 1 sc =48
.JPG)
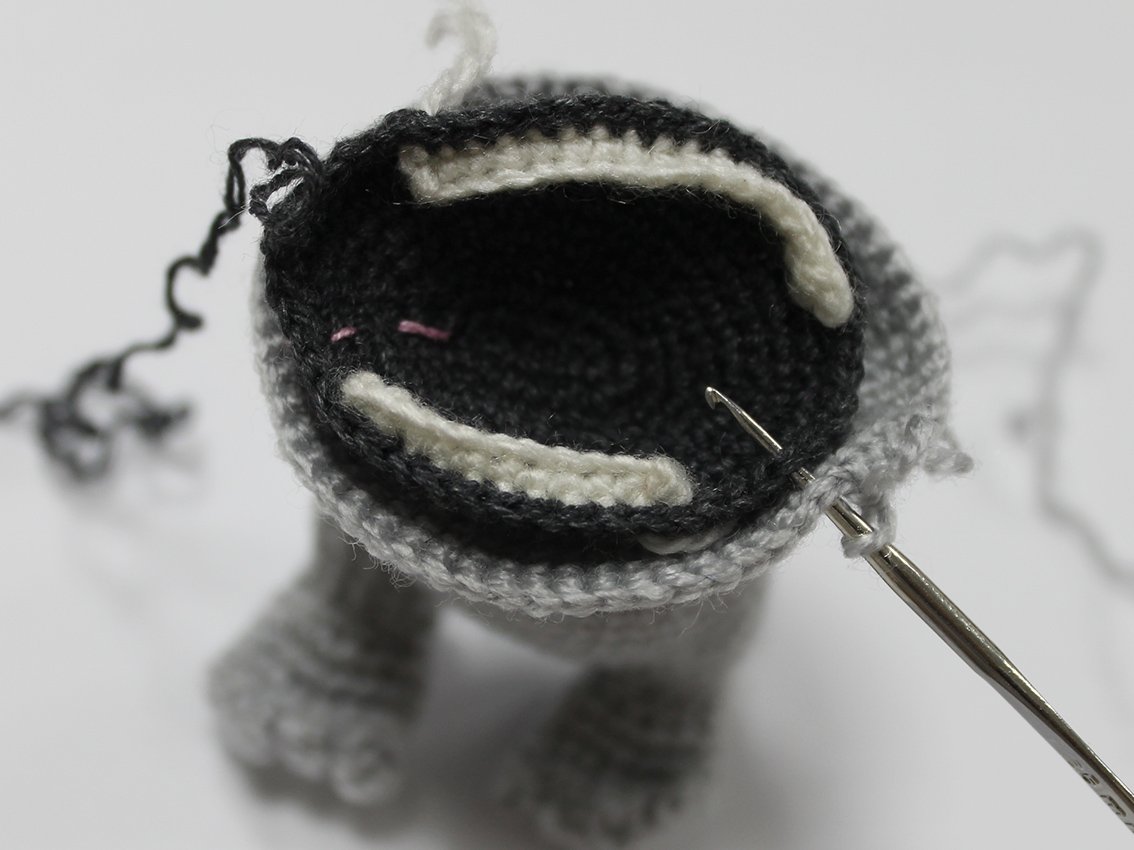
Rnd 9. 3 sc, attach the lower teeth (as shown on the photo: the front side of the teeth is directed outward), work the loops of the lower teeth and head together: 10 sc,
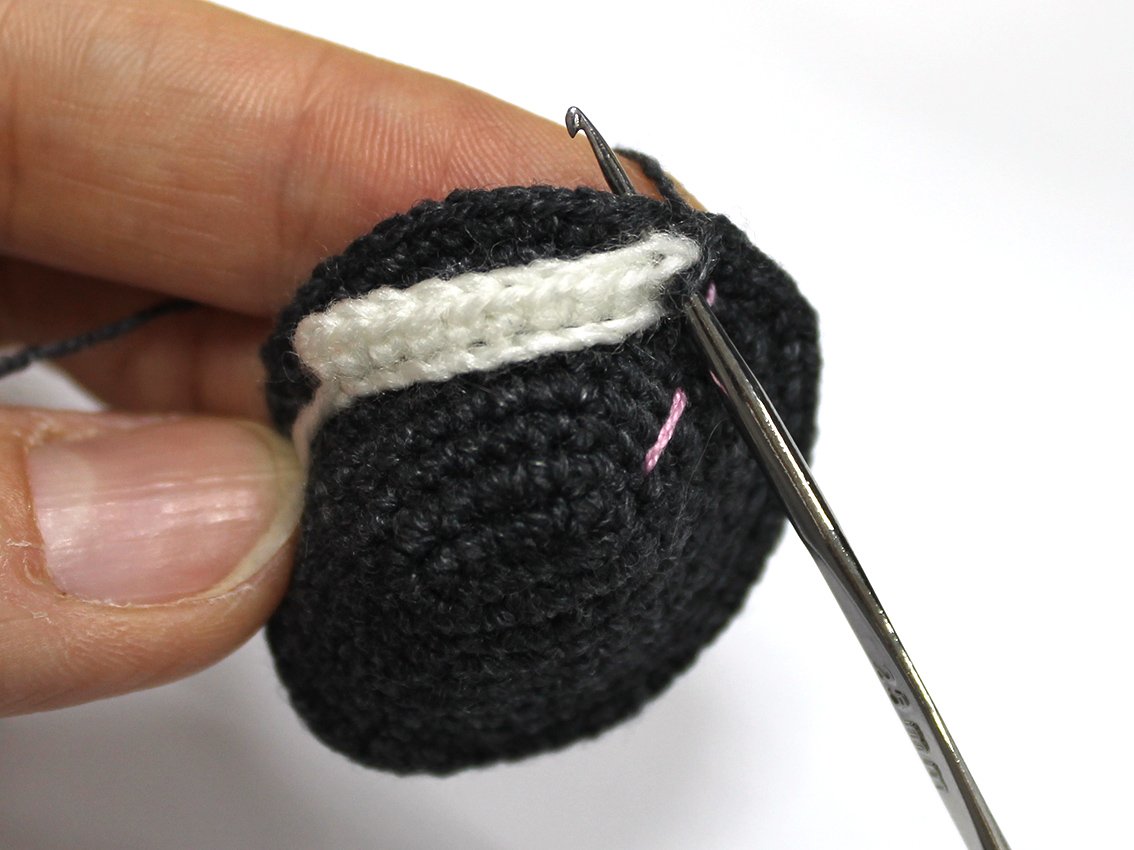
along the loops of the head: 11 sc (place a marker on 6th loop),
.JPG)
attach the upper teeth (as shown on the photo: the front side of the teeth is directed outward), work the loops of the upper teeth and head together: 16 sc, along the loops of the head: 5 sc (leave the last 3 stitches unworked) =48
.JPG)
Fasten off, cut off any excess yarn, hide the end.
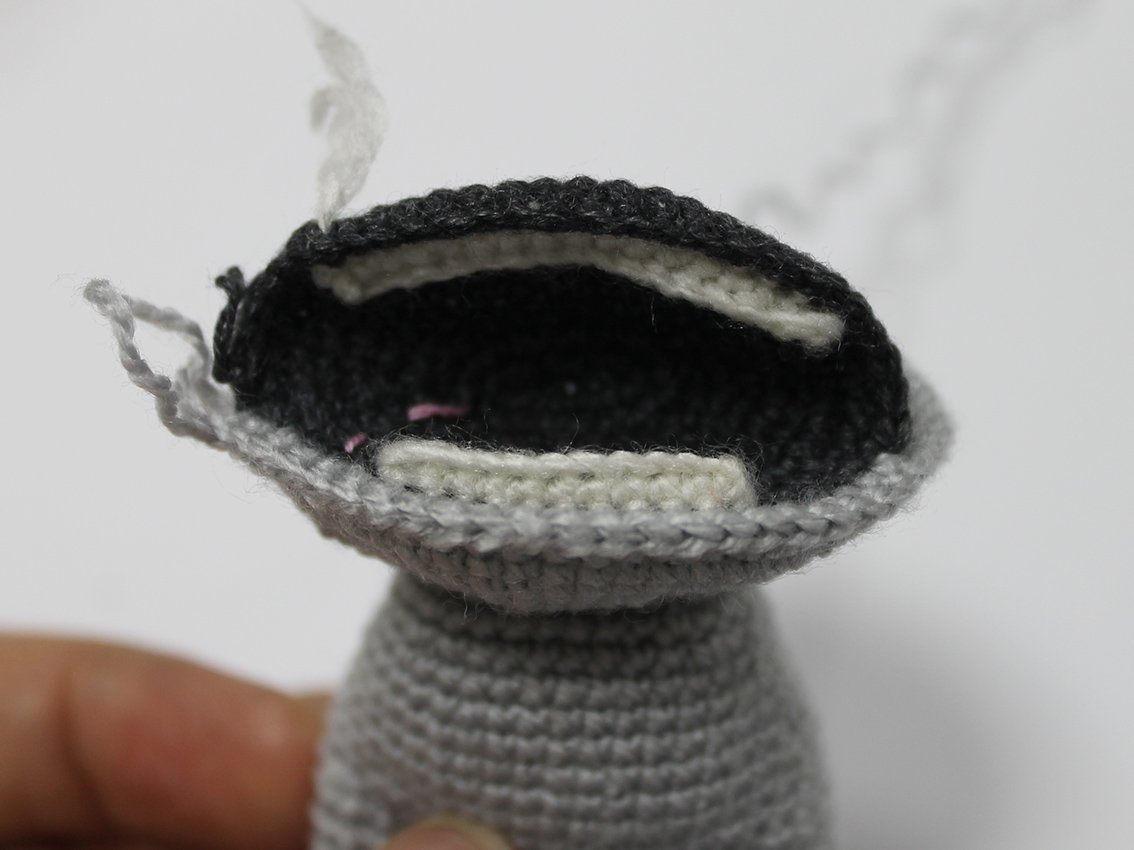
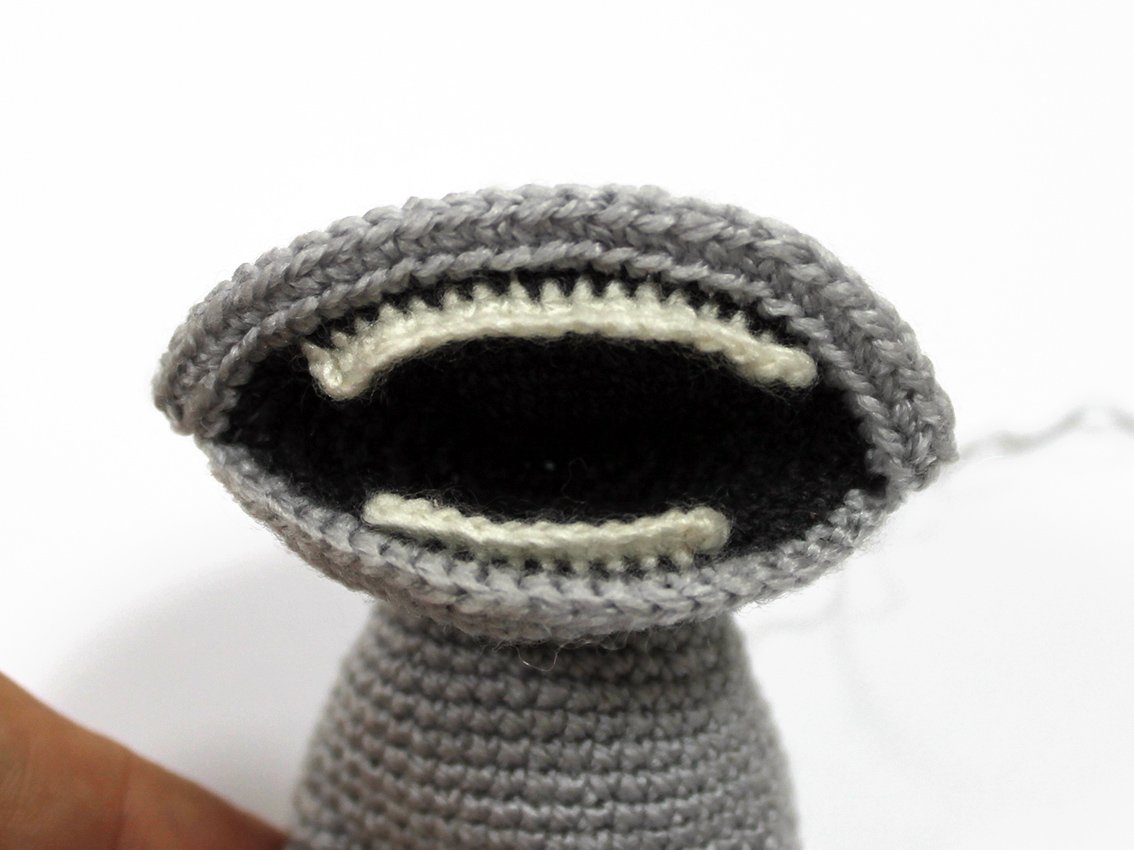
The finished mouth should look like this.
.JPG)
Foot (make 2)
Work with grey colour yarn.
Rnd 1. 6 sc in a Magic Ring
Rnd 2. inc х 6 times = 12
Rnd 3. 11 sc, 1 inc, put an additional marker here = 13
Rnd 4. work 4 ch, skip 4 loops, continue: inc, 8 sc = 10+4 ch
Rnd 5. 4 sc along the chain, continue: 10 sc = 14
Rnd 6. 2 sc, inc, 11 sc = 15
Rnd 7. 15 sc
Stuff a little.
.JPG)
The hole should be in the centre. If the beginning of the round has shifted, adjust the marker.
Rnd 8. Fold the part in two, work 7 sc by hooking through both edges of the part: (leave 1 loop at the beginning of the curve unworked), turn = 7
Next crochet the toes.

Round 9 for the right foot: work 3 ch, starting from 2nd ch from hook: 2 hdc, skip 1 loop, 1 sl st, (3 ch, starting from 2nd ch from hook: 2 sc, skip 1 loop, 1 sl st)х 2 times, 2 ch, starting from 2nd ch from hook: 1 sc, 1 sl st.
Round 9 for the left foot: work 2 ch, starting from 2nd ch from hook: 1 sc, skip 1 loop, 1 sl st, (3 ch, starting from 2nd ch from hook: 2 sc, skip 1 loop, 1 sl st)х 2 times, 3 ch, starting from 2nd ch from hook: 2 hdc, 1 sl st.
Fasten off, cut off any excess yarn, hide the end.
Left leg
Join in grey colour yarn next to the marked loop. Work 1 ch.
Rnd 1. work 12 sc around the hole in the 4th round of the foot = 12
Rnd 2. 12 sc
Rnd 3. 11 sc, mark the next loop with an additional marker.
Fasten off, cut off any excess yarn. Add some hollow fibre.
Right leg
Join in the yarn of the grey colour next to the marked loop. Work 1 ch.
Rnd 1. work 12 sc around the hole in the 4th round of the foot = 12
Rnd 2-3. 12 sc
.JPG)
Do not cut the thread! Next, crochet the body.
OBS: the legs are connected with 4 ch. Every ch has 2 half loops (front and back). In Rnd 4 you will need to work in front loops and in Rnd 5 in back loops. There must not be any hole between the legs. See photos for guidance.
Rnd 4. 5 sc, 4 ch, work into the loops of the left leg, start from the loop with a marker on: 12 sc, continue along the chain: 4 sc, continue along the loops of the right leg: 7 sc = 28+4 ch
.JPG)
.JPG)
Rnd 5. 2 sc, inc, 2 sc, along the other side of the chain: 1 sc, 2 inc, 1 sc, along the loops of the leg: 2 sc, inc, 8 sc, inc, along the loops of the tummy: 1 sc, (3 sc in 1 loop)х 2 times, 1 sc, along the loops of the leg: inc, 6 sc = 42
.JPG)
Rnd 6. 5 sc, inc, 6 sc, inc, 29 sc = 44
Align your marker so it is in the centre of the back. (I crocheted 10 sc). Keep an eye on the symmetry! Adjust as and when to keep it straight.
Rnd 7-10. 44 sc
Work 1 sc, transfer your place marker here.
Rnd 11. 35 sc, (dec, 1 sc)х 3 times = 41
Rnd 12. (1 sc, dec)х 3 times, 28 sc, dec, 2 sc = 37
Rnd 13. 2 sc, dec, 33 sc = 36
Rnd 14. 12 sc, dec, 8 sc, dec, 12 sc = 34
Rnd 15. 34 sc
.JPG)
Rnd 16. 3 sc, dec, 8 sc, dec, 4 sc, dec, 8 sc, dec, 3 sc = 30
Work 1 sc, transfer your place marker here.
Rnd 17. 10 sc, dec, 6 sc, dec, 10 sc = 28
Rnd 18. 28 sc
Add some hollow fibre.
Next crochet the head.
Rnd 19. into the front loops only: 1 sc, (inc, 2 sc)х 2 times, inc х 14 times, 2 sc, inc, 2 sc, inc, 1 sc = 46
Rnd 20. 4 sc, inc, 4 sc, 2 inc, 1 sc, (inc, 2 sc)х 7 times, inc, 1 sc, 2 inc, 4 sc, inc, 4 sc = 60
Rnd 21-24. 60 sc

Rnd 25. 19 sc, attach the mouth, as shown on the photo (the wrong sides to each other), work the loops of the head and mouth together, start from the loop with a marker on: 22 sc, work into the loops of the head: 19 sc = 60
Rnd 26. 19 sc, work into the loops of the mouth: 26 sc, work into the loops of the head: 19 sc = 64
.JPG)
Rnd 27. 19 sc, into the back loops: 26 sc, continue: 19 sc = 64
Rnd 28. 24 sc, dec, 12 sc, dec, 24 sc = 62
Work 1 sc, transfer your place marker here.
Rnd 29-30. 62 sc
At this step, sew on the tongue.
.JPG)
.JPG)
Rnd 31. 12 sc, (dec, 2 sc)х 3 times, dec, 10 sc, dec, (2 sc, dec)х 3 times, 12 sc = 54
Rnd 32. 54 sc
Rnd 33. 12 sc, (dec, 2 sc)х 2 times, 14 sc, (2 sc, dec)х 2 times, 12 sc = 50
Rnd 34. 3 sc, dec, 40 sc, dec, 3 sc = 48
Rnd 35-36. 48 sc
Rnd 37. (3 sc, dec, 3 sc)х 6 times = 42
Rnd 38. 42 sc
Rnd 39. (dec, 5 sc)х 6 times = 36
Add some hollow fibre. It’s important to properly spread the hollow firbe! To prevent the mouth from protruding outward, insert two of your fingers into it, and stuff the head around the mouth. Add a very small amount of hollow fibre under the lower jaw. Pay attention to the cheeks, stuff them more.
Rnd 40. (2 sc, dec, 2 sc)х 6 times = 30
Rnd 41. (dec, 3 sc)х 6 times = 24
Rnd 42. (1 sc, dec)х 8 times = 16
Rnd 43. dec х 8 times = 8
Cut off yarn, leave a tail for further operation.
Do not close off the loops of the last round just yet, you will do it later!
.JPG)
The sculpting of the mouth.
Mark spots 1 and 2 inside the mouth, on both sides of the tongue.
Spot 3 is on the top of the head.
.JPG)
Prepare a long needle for sculpting and a strong thread.
Insert the needle in the opening in the head (spot 3), leave a tail for further operation, take the needle out in spot #1. Insert the needle in spot #2 (the thread runs over the work), take the needle out in spot #3. Tighten the thread and make a knot.
.JPG)
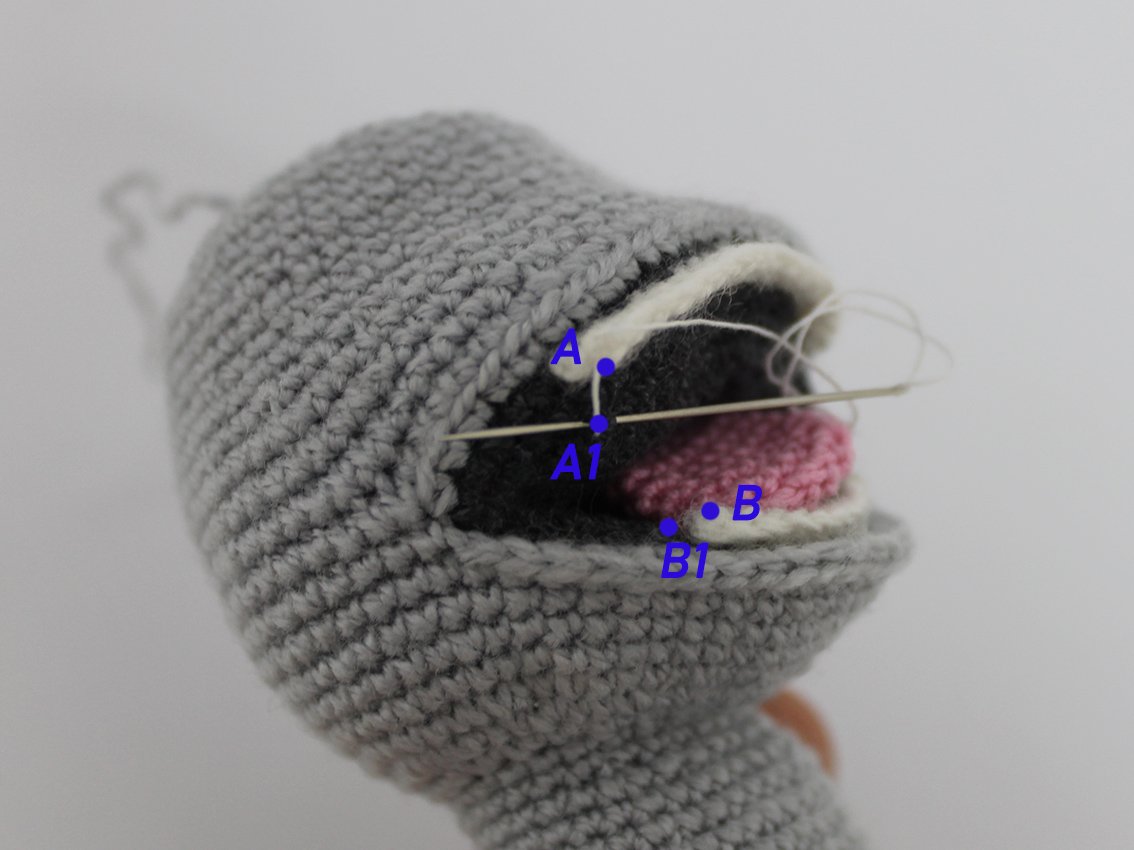
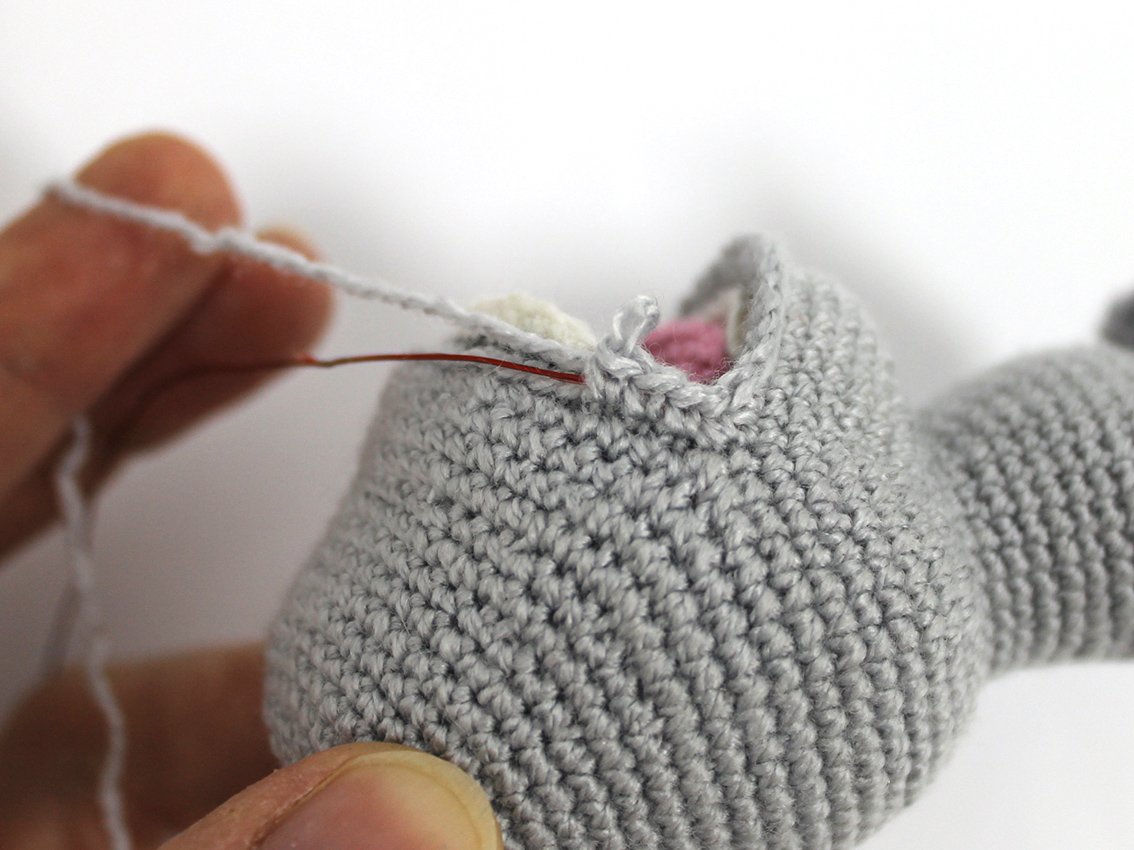
Sew the corners of the teeth a little at the back. Spot A to spot A 1, point B to spot B2, C to C2, D to D2.
Crochet the outer edge of the mouth with sc – these will be the lips. Optional: Prepare a piece of thin wire, it should be of the same length as the chain + 3cm. I used beading wire.
Attach the grey yarn in the corner of the mouth (spot 1), make 1 ch. Lay a piece of thin beading wire along the edge of the mouth, stick the end of the wire into the corner of the mouth, hide in the hollow fibre. Make one row by grabbing the loops and the wire at the same time. Thus the wire will hide on the inside.
Rnd 1. along the loops of the lower edge of the mouth: 4 sc, skip 1 loop, 12 sc, skip 1 loop, 4 sc, 1 Fm into the corner, further along the loops of the upper edge of the mouth: 4 sc, skip 1 loop, 16 sc, skip 1 loop, 4 sc = 45
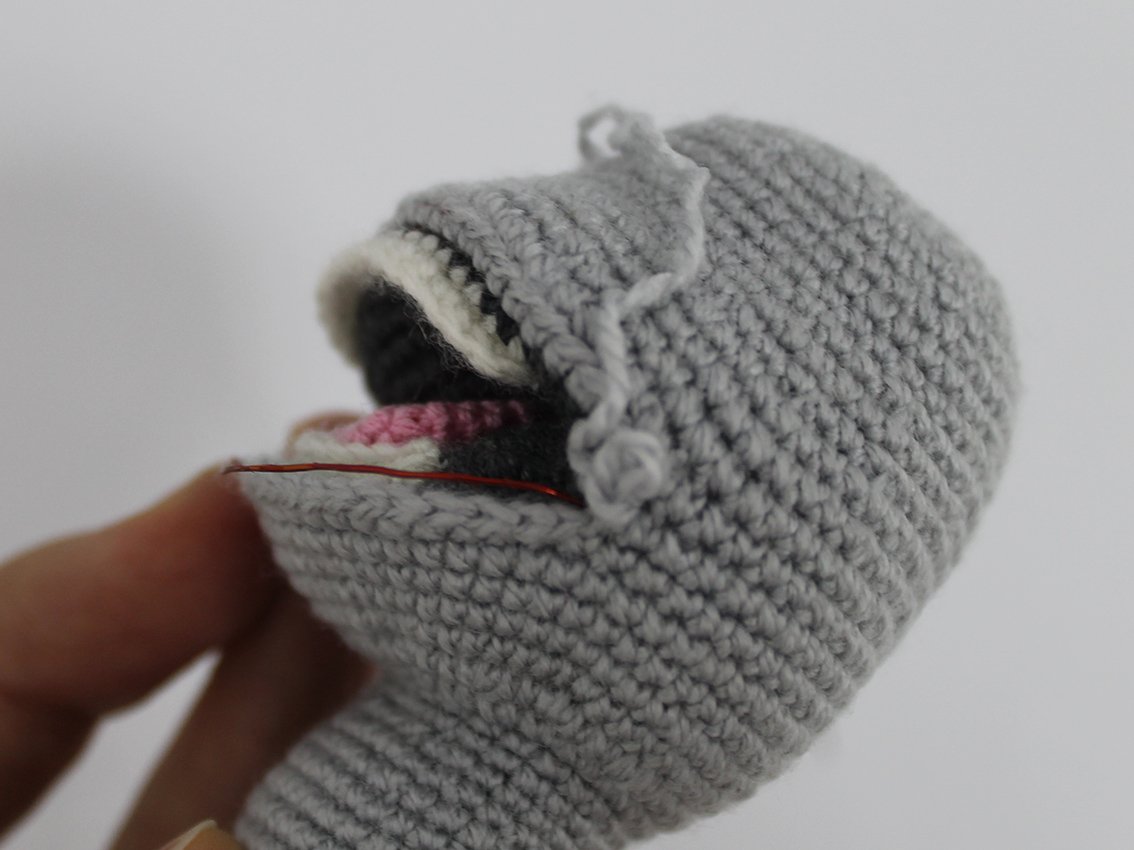
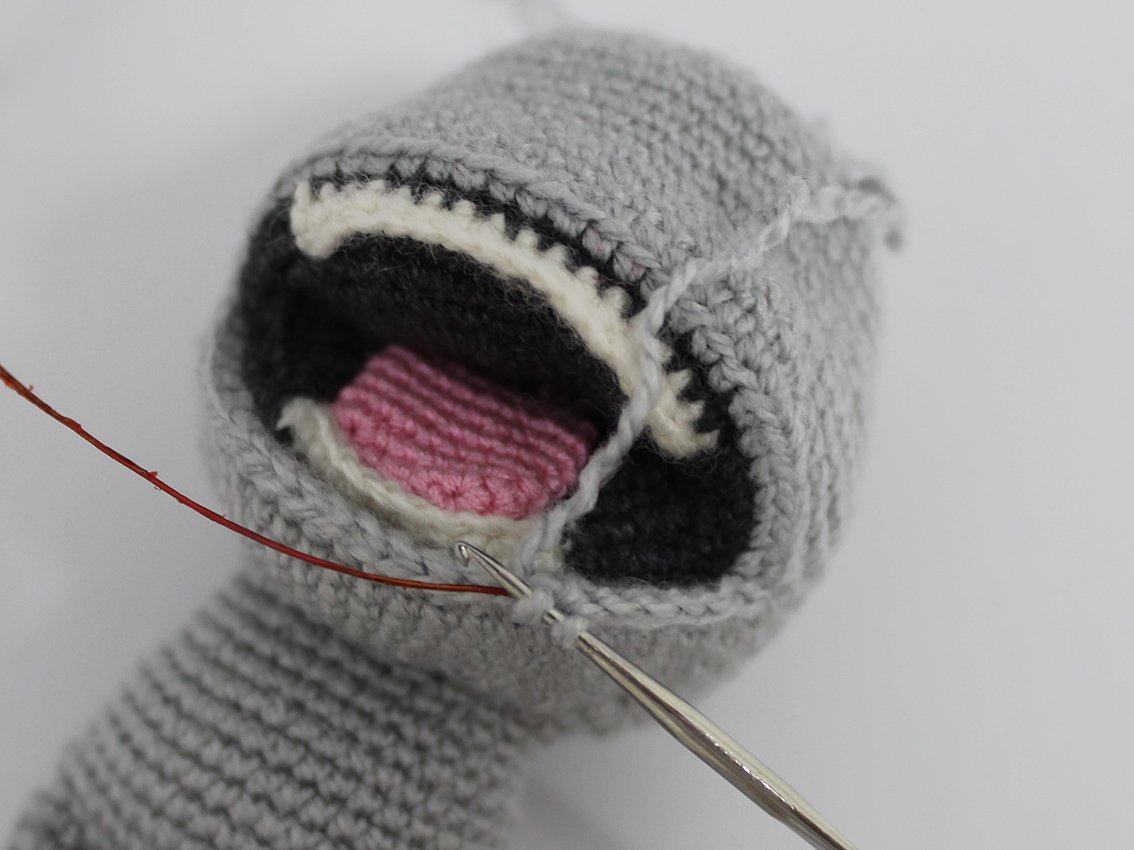
Fasten off, cut off any excess yarn, hide the end. The second end of the wire is also stick in the corner of the mouth, hide in the hollow fibre.
.JPG)
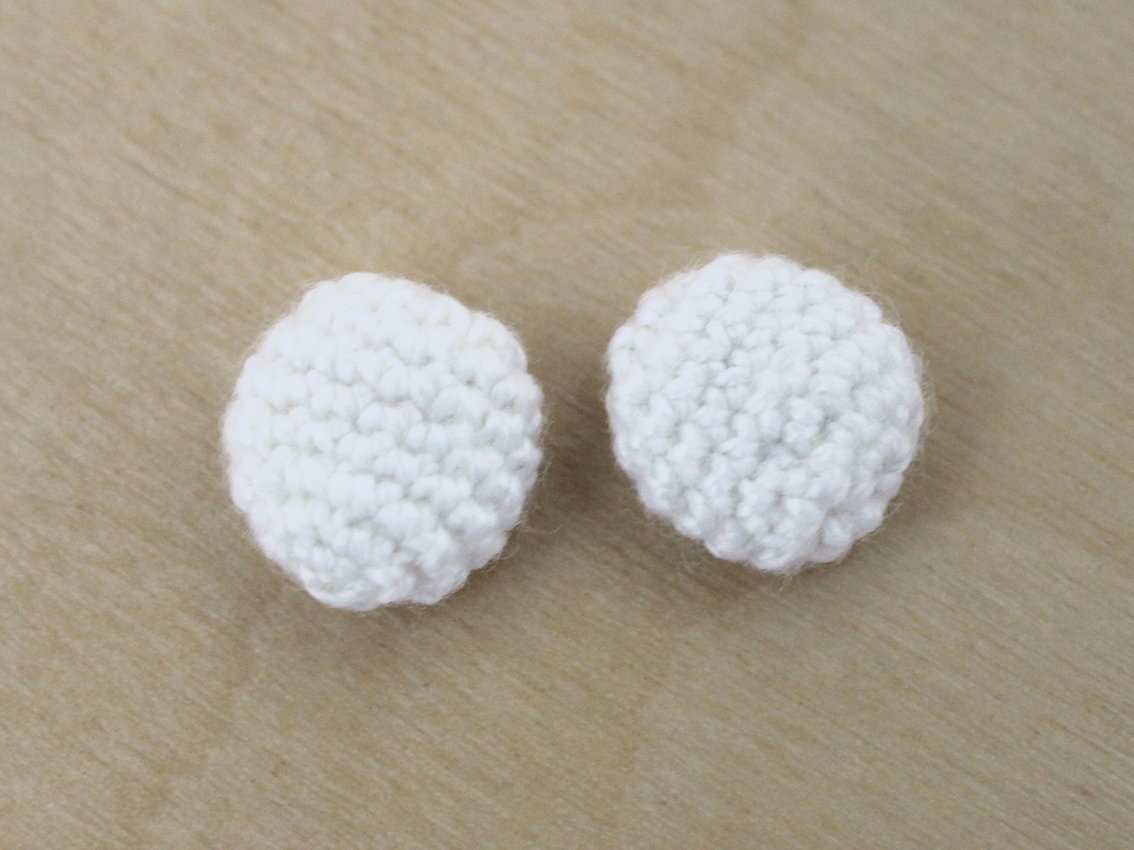
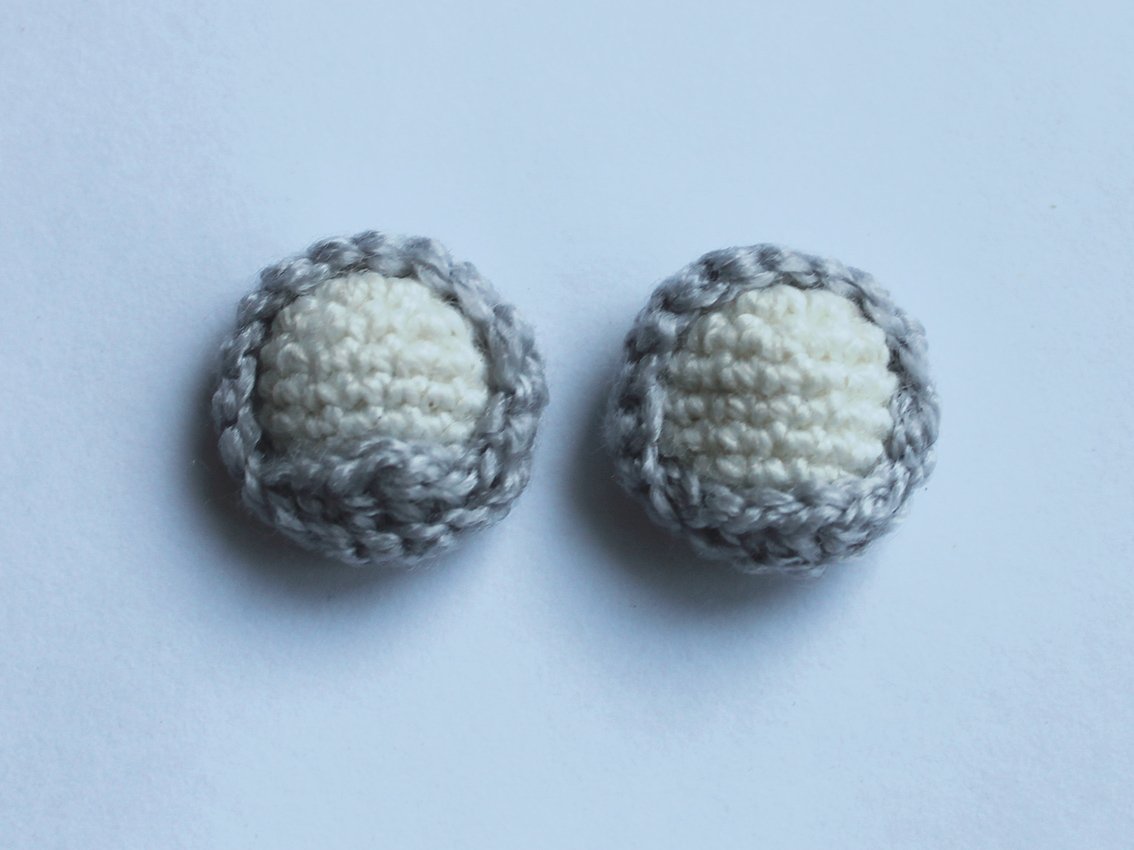
The white of the eyes (make 2)
Work with white colour yarn.
Rnd 1. 6 sc in a Magic Ring
Rnd 2. inc х 6 times = 12
Rnd 3. (inc, 3 sc)х 3 times = 15
Rnd 4-6. 15 sc
Rnd. 7. (dec, 3 sc)х 3 times = 12
Rnd 8. dec х 6 times = 6
Fasten off, cut off any excess yarn. Stuff a little (optional). Pull off the loops.
Eyelids (make 2)
Work with grey colour yarn.
Before starting crocheting, leave a tail of yarn for further operation, about 10cm long.
Work 19 ch
Row 1. starting from 2nd ch from hook: 18 sc, 1 ch, turn = 18
Row 2. skip 1 loop, into the back loops only: 1 sl st, 1 sc, 2 hdc, 1 sc, 1 sl st = 6 – this is the lower eyelid.
Fasten off, cut off any excess yarn.
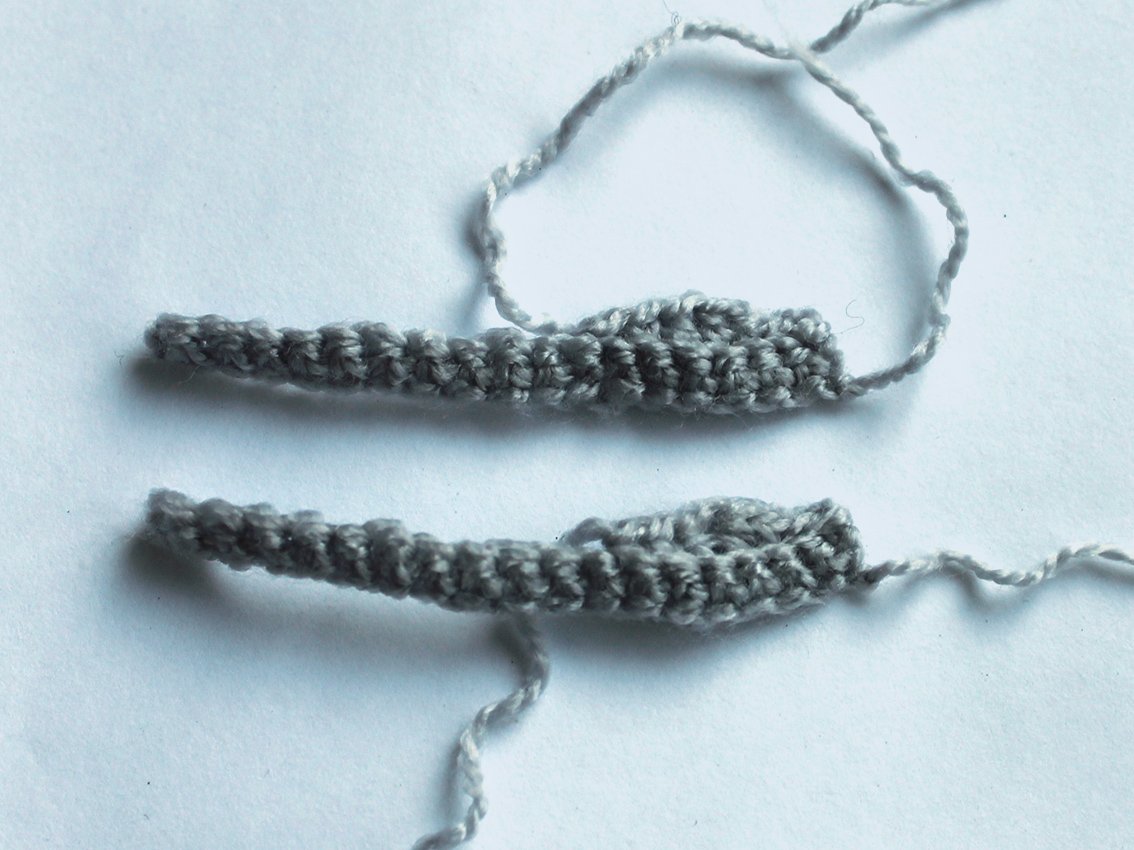
Wrap the strips of the eyelids around the circumference of the whites of the eyes. Sew them on.
Choose appropriate eyes – large, small or one small and one large to add a bit of craziness to mummy’s look.
Glue them on. Sew or glue on the eyes.
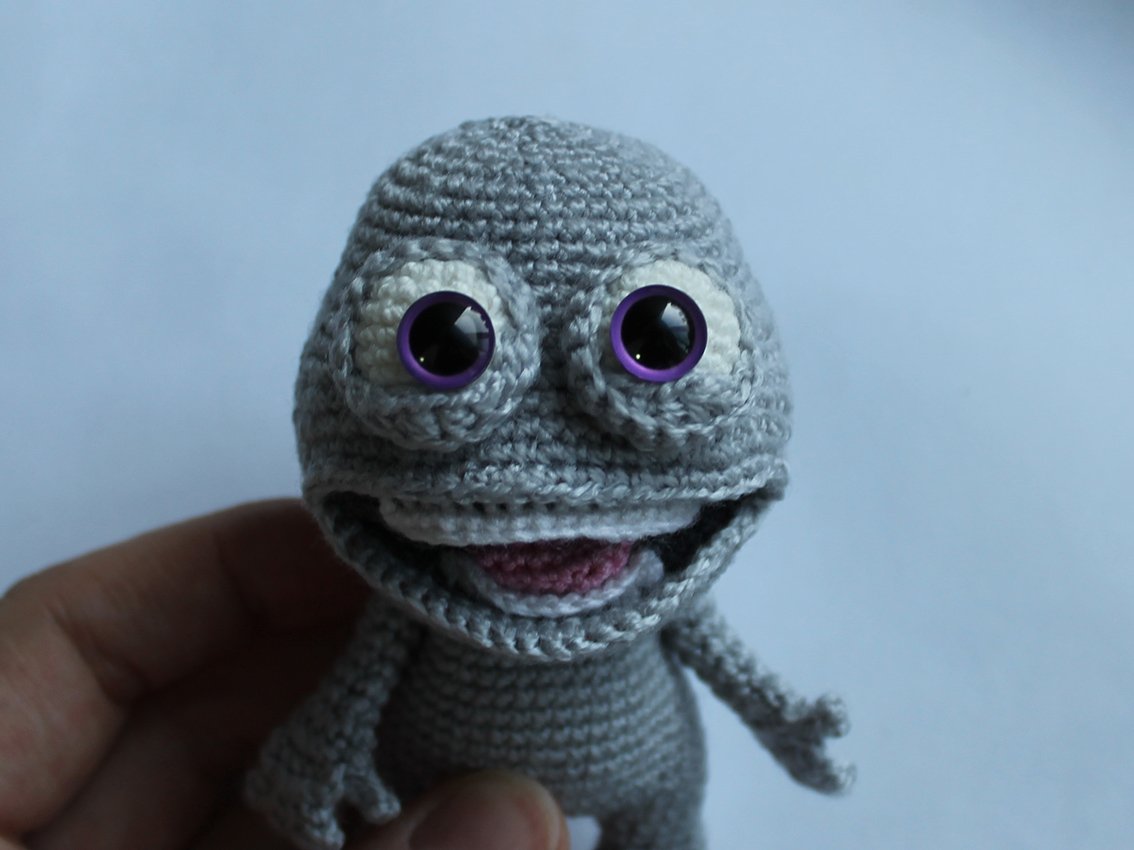
Attach and sew on the arms.
Optional: tint the edges of the eyelids and lips with dry soft pastels.
Take a long strip of a wide medical bandage. Cut it in half lengthwise. Both edges of the bandage should be bent inwards along the entire length (so that the threads do not stick out). Wrap the body and head of the mummy with a bandage. Fix the bandage with a few stitches.
The mummy is complete!