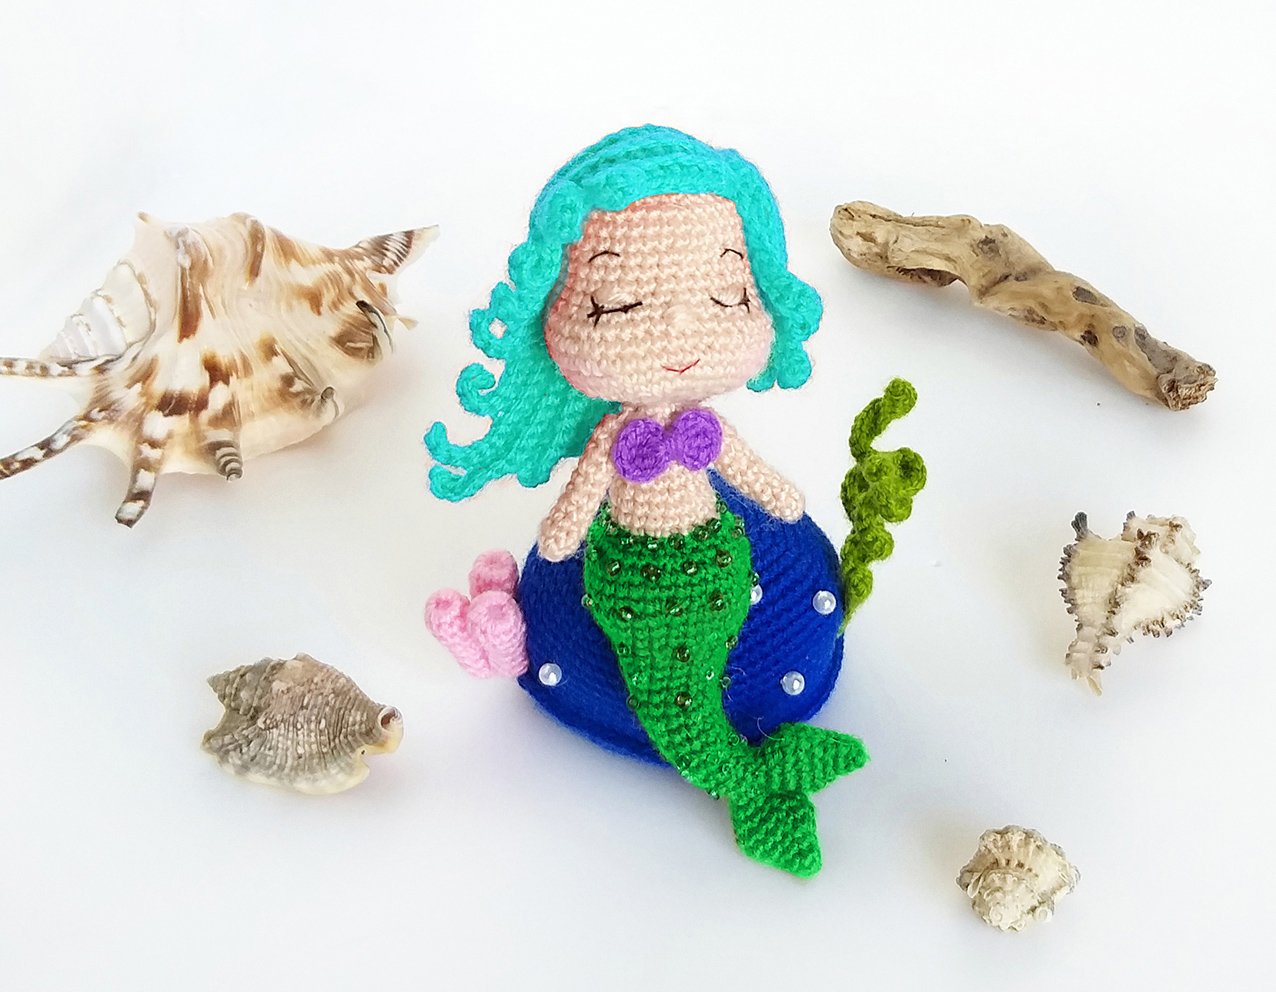
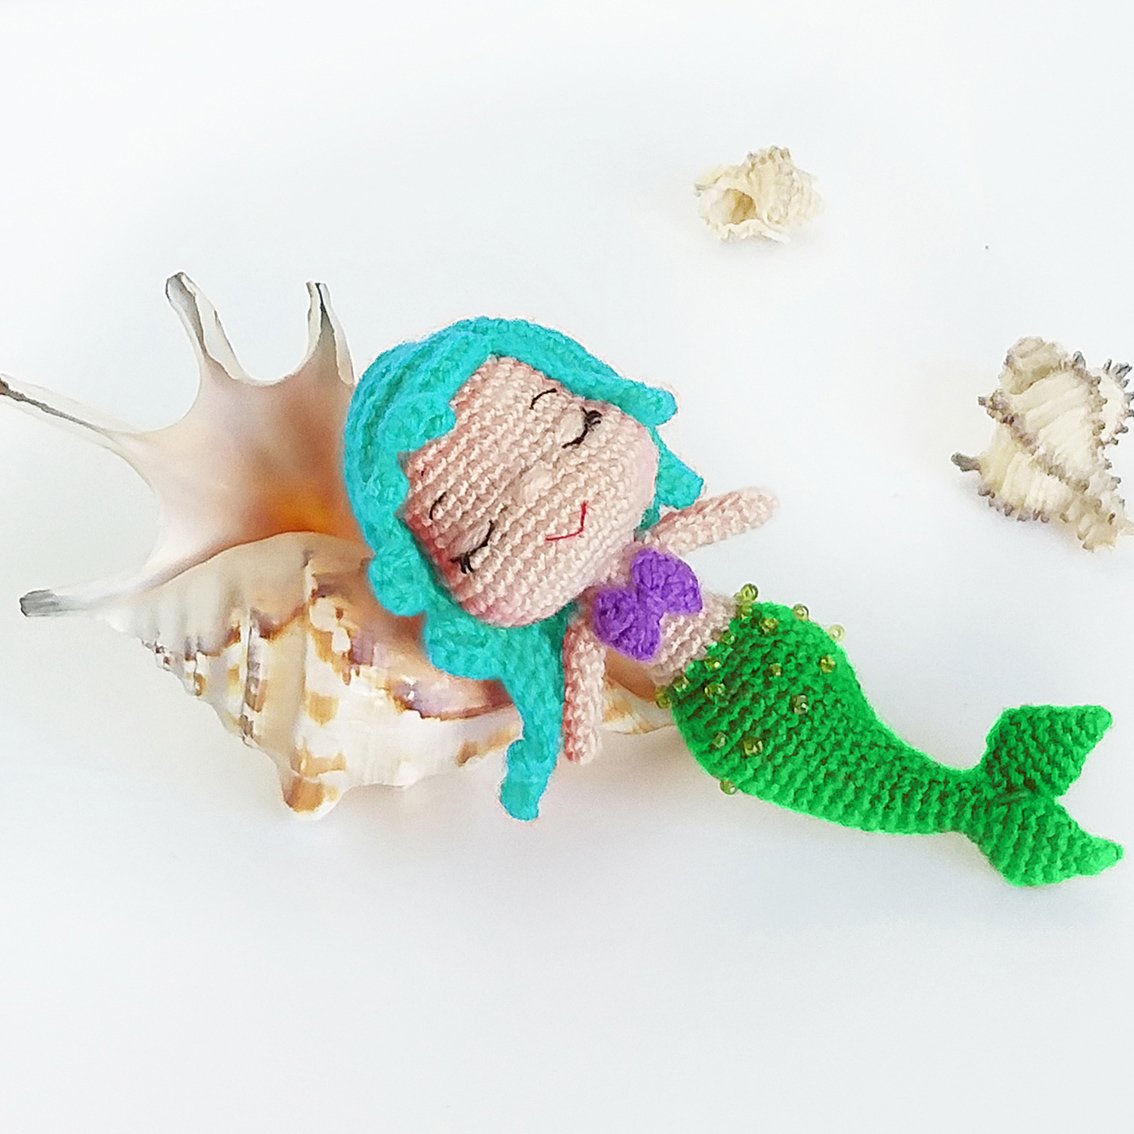
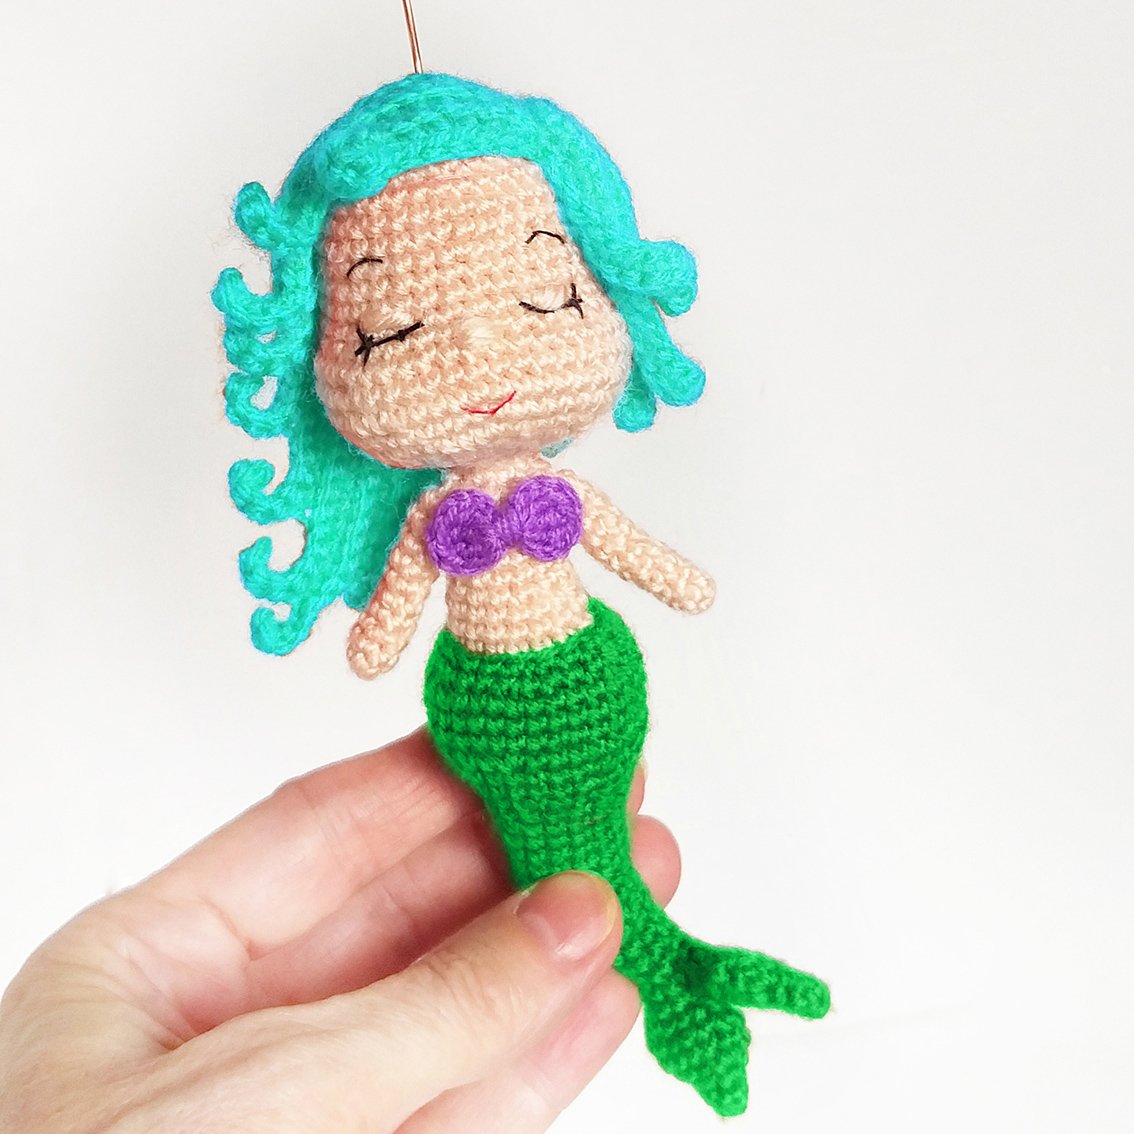
The little Mermaid
Materials:
Yarn of your choice. Cotton, acrylic will do. I used acrylic yarn, 200 m/50 g. The size of my little Mermaid is 14.0 cm. Depending on the thickness of yarn a finished toy size may differ.
Required yarn colors: nude, green, blue, pink, blue, lilac.
- A crochet hook, I used 1,25 mm crochet hook
- Hollow fibre for stuffing
- A sewing needle, matching sewing threads
- Transparent glue (at your wish)
- A piece of wire with a diameter of approx. 1mm. 20cm long (for the frame, at your wish)
- thin wire (I used beading wire) approx. 20 cm (for algae)
- For embroidery: a few threads of black colour
- For decoration - beads, sequins, sequins (at your wish)
Abbreviations:
ch – chain
st - stitch
sl st – slip stitch
sc – single crochet
hdc – half double crochet
dc - double crochet
tr - treble crochet
inc – increase (2 sc in 1 st)
dec – decrease (single crochet two stitches together)
(...)* N times – repeat instructions in brackets N times
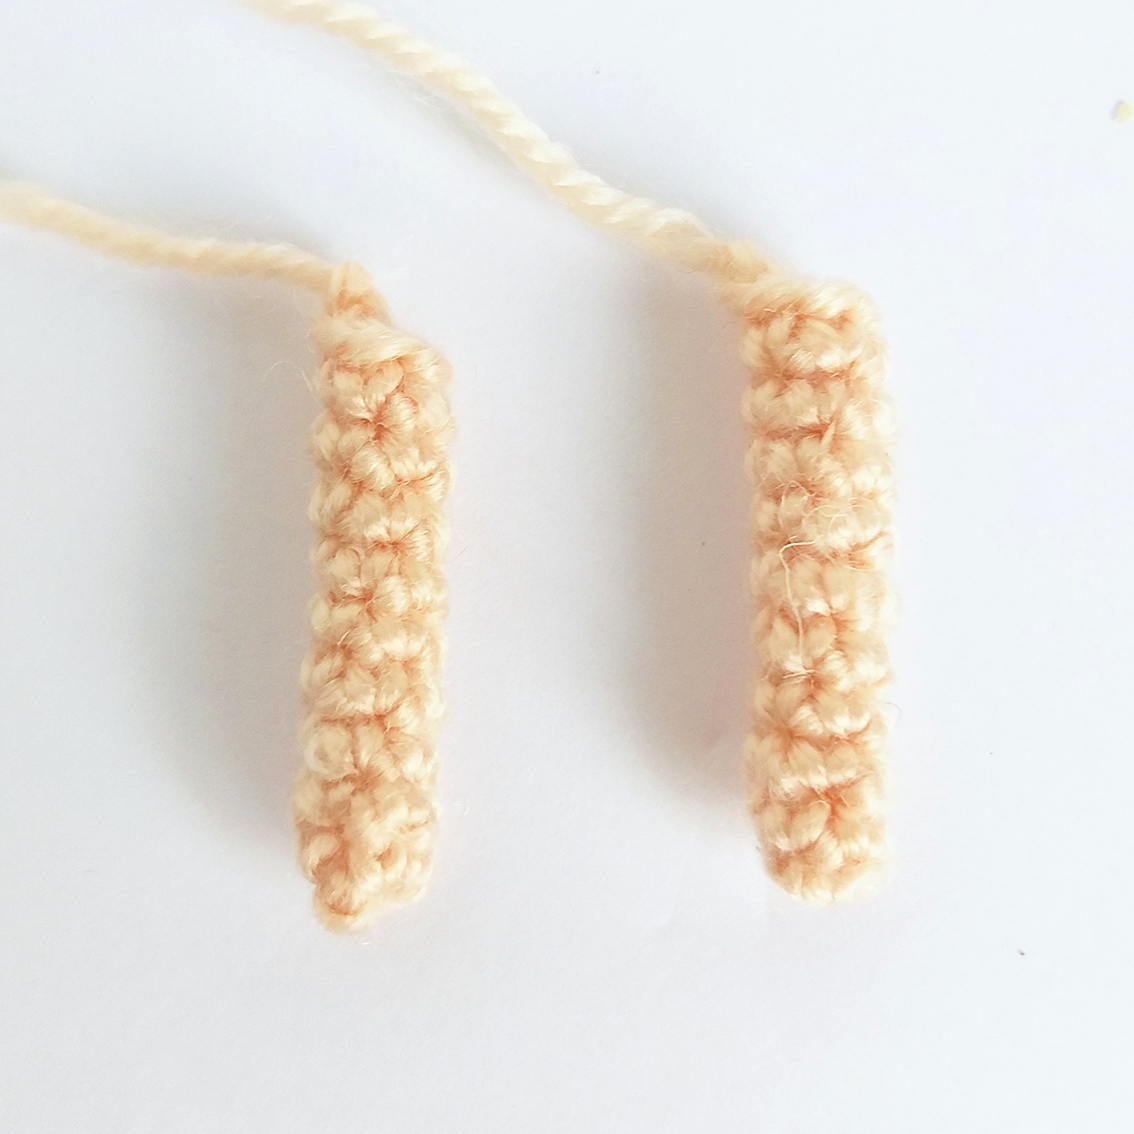
Arms (make 2)
Work with nude colour yarn.
Rnd 1. 5 sc in a Magic Ring
Rnd 2-10. (9 rounds) 5 sc
Fasten off, cut off any excess yarn.
Tail (make 2)
Work with green colour yarn.
Rnd 1. 5 sc in a Magic Ring
Rnd 2. 4 sc, inc = 6
Rnd 3. (2 sc, inc)* 2 times = 8
Rnd 4. (3 sc, 3 sc in 1 loop)* 2 times = 12
Rnd 5-6. 12 sc
Rnd 7. (3 sc, 3 sc crochet together)* 2 times = 8
Rnd 8. (2 sc, dec)* 2 times = 6
Fasten and cut off thread of Part 1, do not cut thread of Part 2.
Do not add the hollow fiber! Join the parts together:
Rnd 9. 3 sc along the loops of the first part of the tail, 6 sc along the loops of the second part of the tail, 3 sc along the loops of the first part of the tail = 12
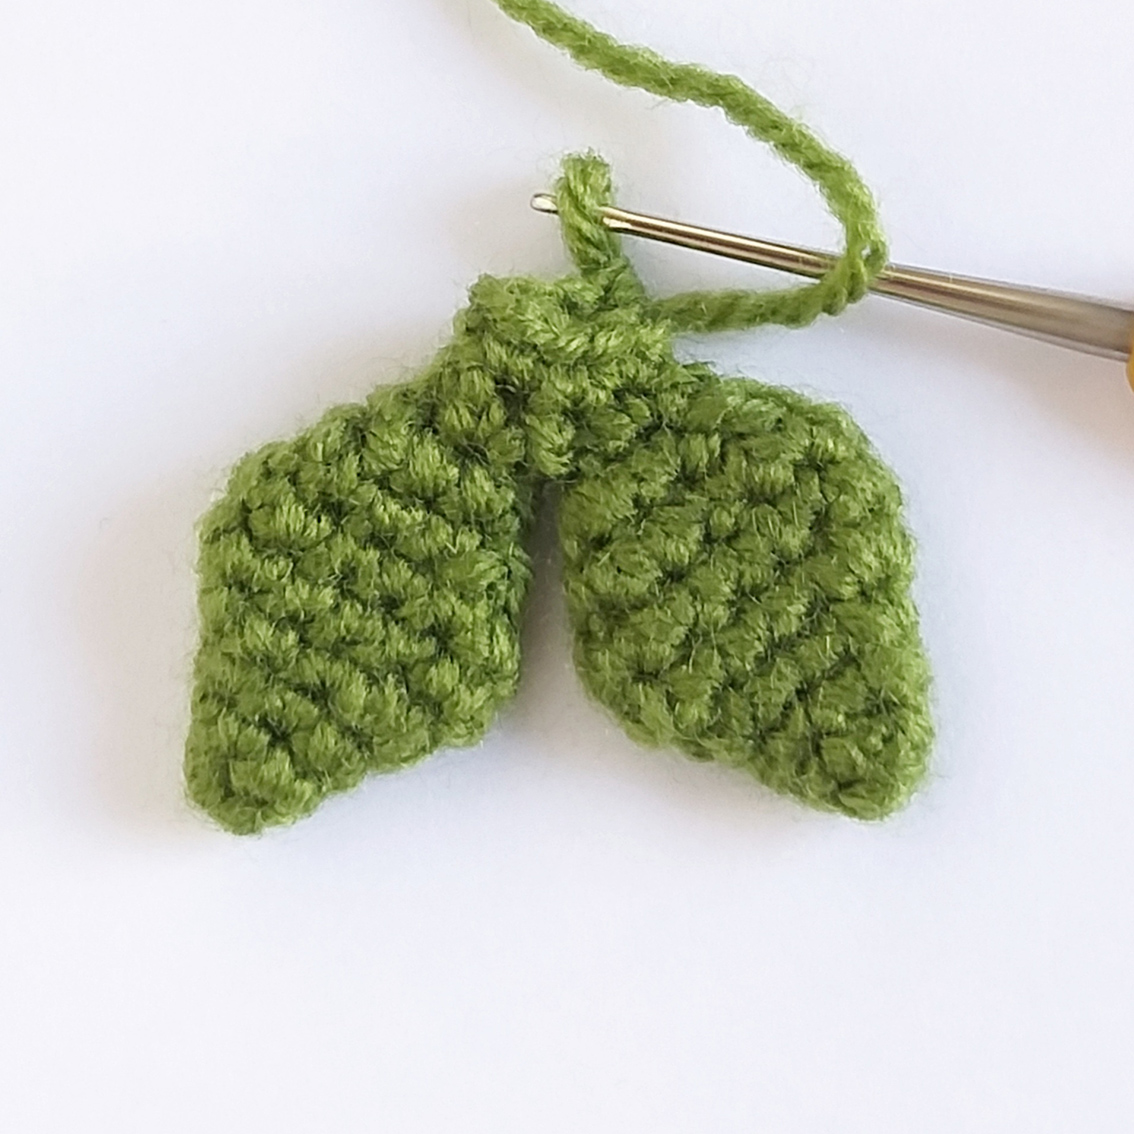
The marker goes along the side.
Rnd 10. (1 sc, dec)* 4 times = 8
Rnd 11. 6 sc, inc, 1 sc = 9
Rnd 12. 9 sc
Rnd 13. 3 sc, inc, 5 sc = 10
Rnd 14. 9 sc, inc = 11
Rnd 15. 10 sc, inc = 12
Rnd 16. 11 sc, inc = 13
Rnd 17. 12 sc, inc = 14
Rnd 18. 13 sc, inc = 15
Rnd 19. 14 sc, inc = 16
Rnd 20. 15 sc, inc = 17
Rnd 21. 16 sc, inc = 18
Rnd 22. (5 sc, inc)* 3 times = 21
Rnd 23. (6 sc, inc)* 3 times = 24
Rnd 24. (7 sc, inc)* 3 times = 27
Rnd 25. (8 sc, inc)* 3 times = 30
Rnd 26-28. (3 rounds) 30 sc
Rnd 29. (3 sc, dec)* 6 times = 24
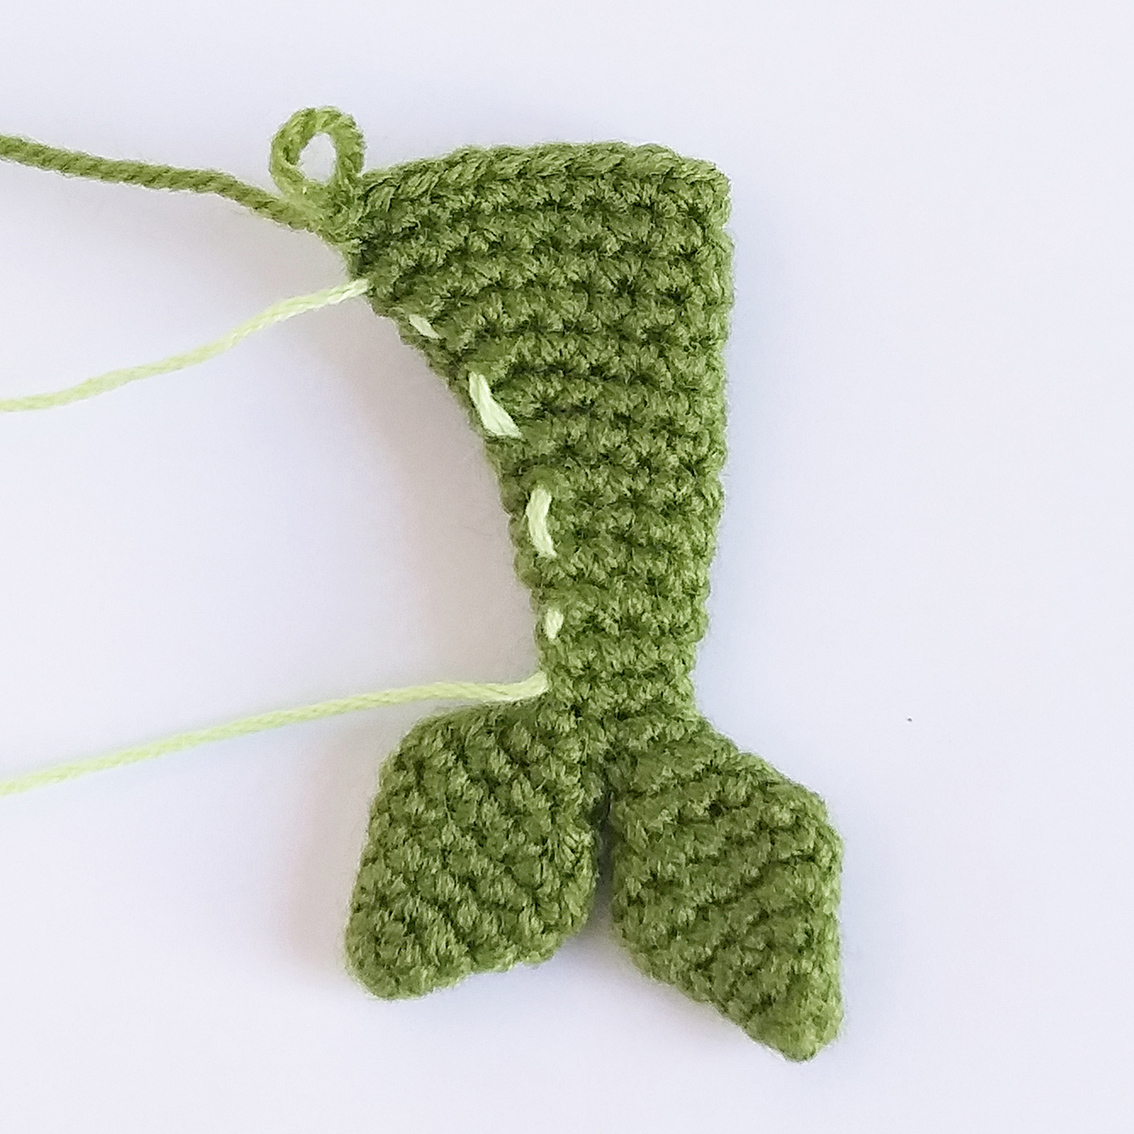
Prepare the wire and insert it into the tail (at your wish). The length is determined individually. The length of the wire will depend on the size of the toy. I used a wire with a diameter of 1 mm, 20 cm long. Insert one end of the wire into the tail, the other end of the wire is a frame for the neck and head.
Add some hollow fibre.
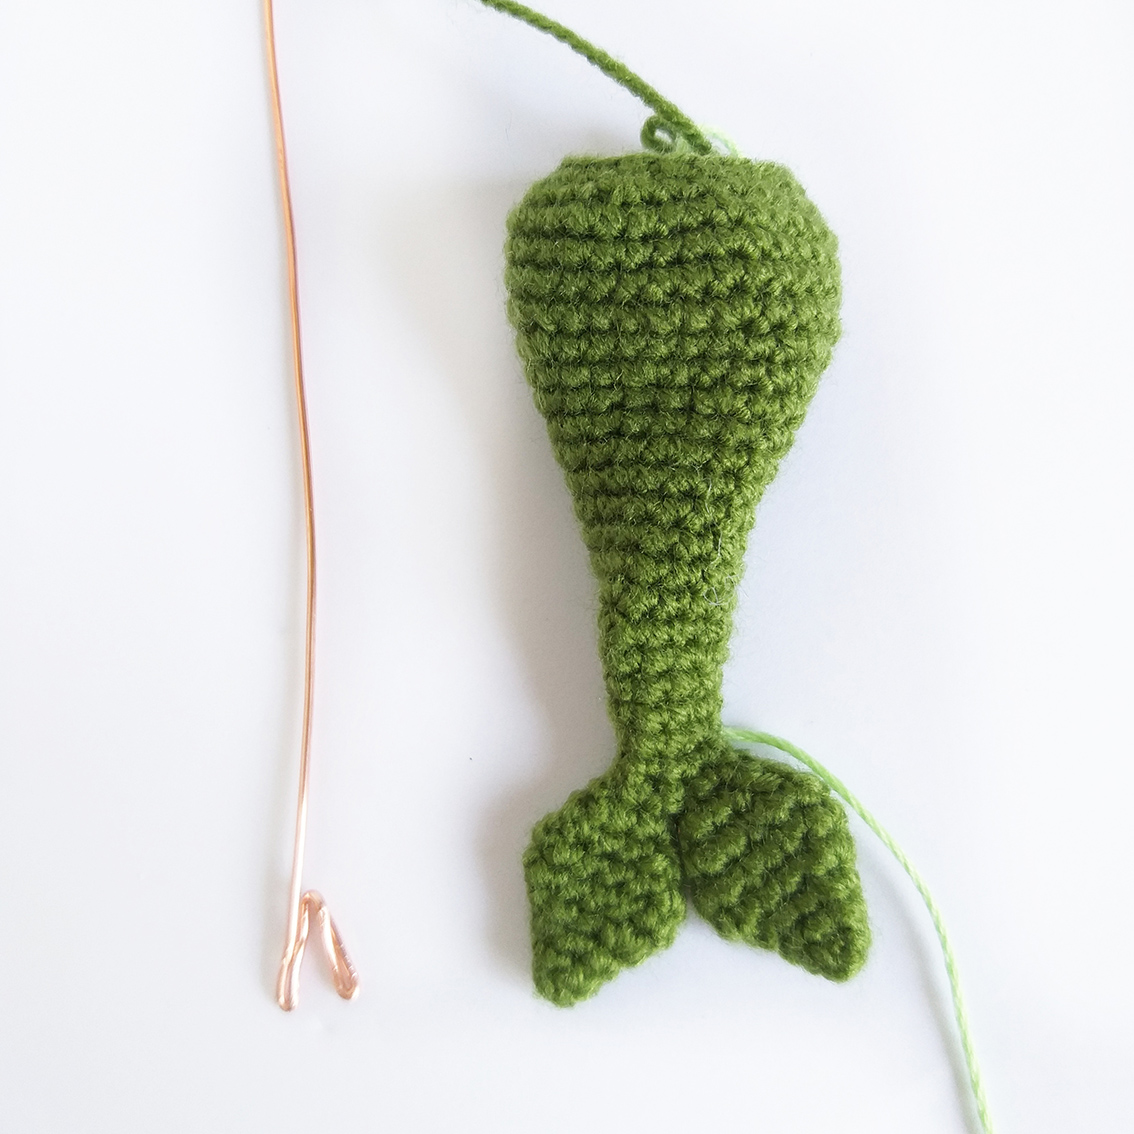
Rnd 30. (2 sc, dec)* 6 times= 18
Change to the nude colour yarn. Fasten and cut off the green colour yarn.
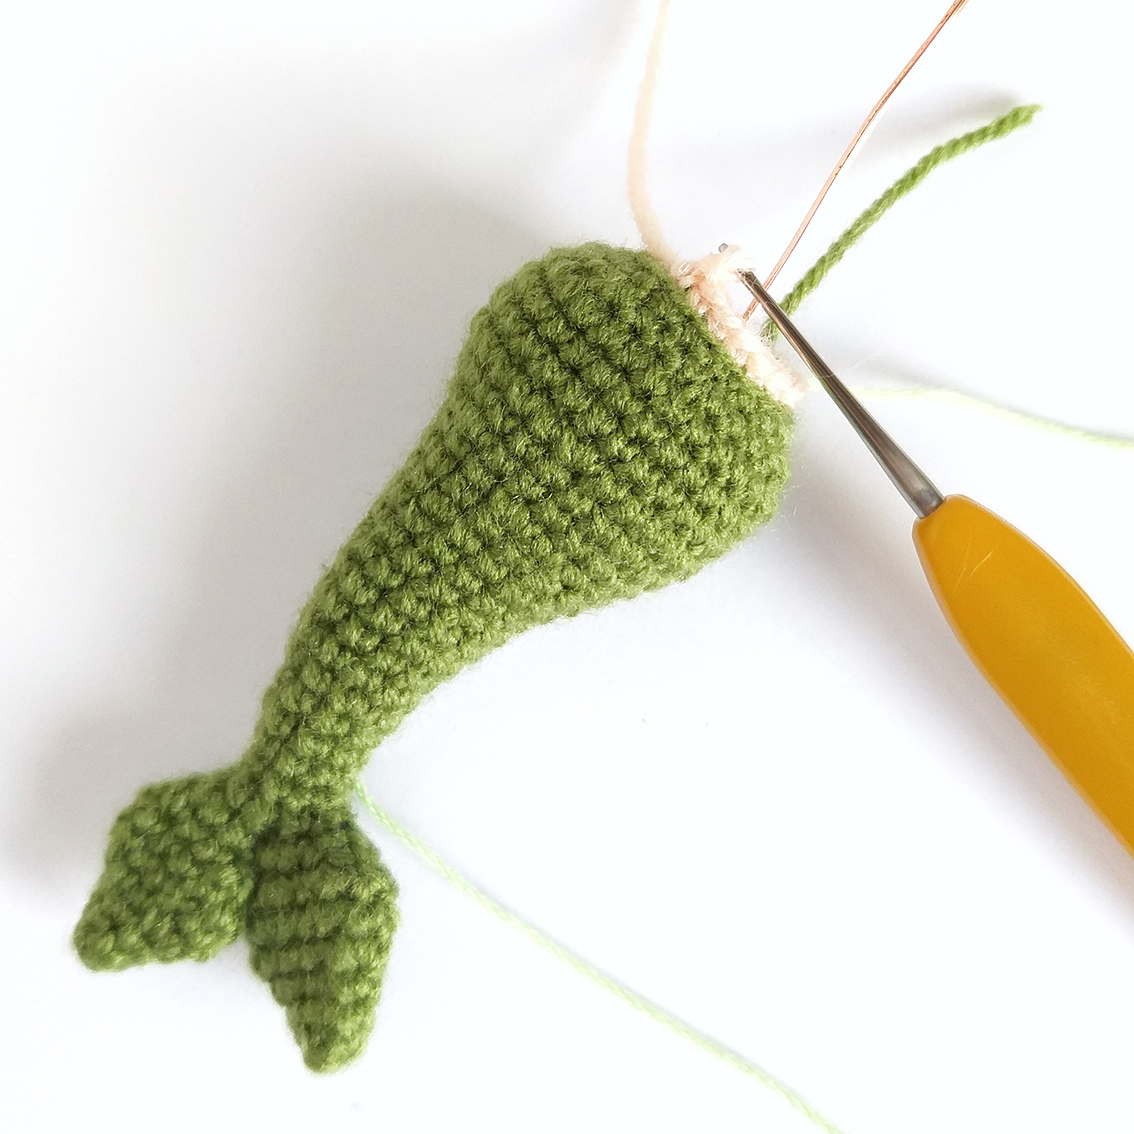
Next, we crochet the body.
Rnd 31. into the back loops only: 1 sc, dec, 7 sc, dec, 5 sc = 16
Rnd 32-33. 16 sc
Rnd 34. 2 sc, dec, 4 sc, dec, 6 sc = 14
Rnd 35. 10 sc, dec, 2 sc = 13
Rnd 36. 4 sc, dec, 7 sc = 12
Join arms to the body in the next round, keep an eye on the symmetry of the toy.
Rnd 37. (attach the arm, crochet the 1 loop of the arm and the 1 loop of the body together, 5 sc)* 2 times = 12
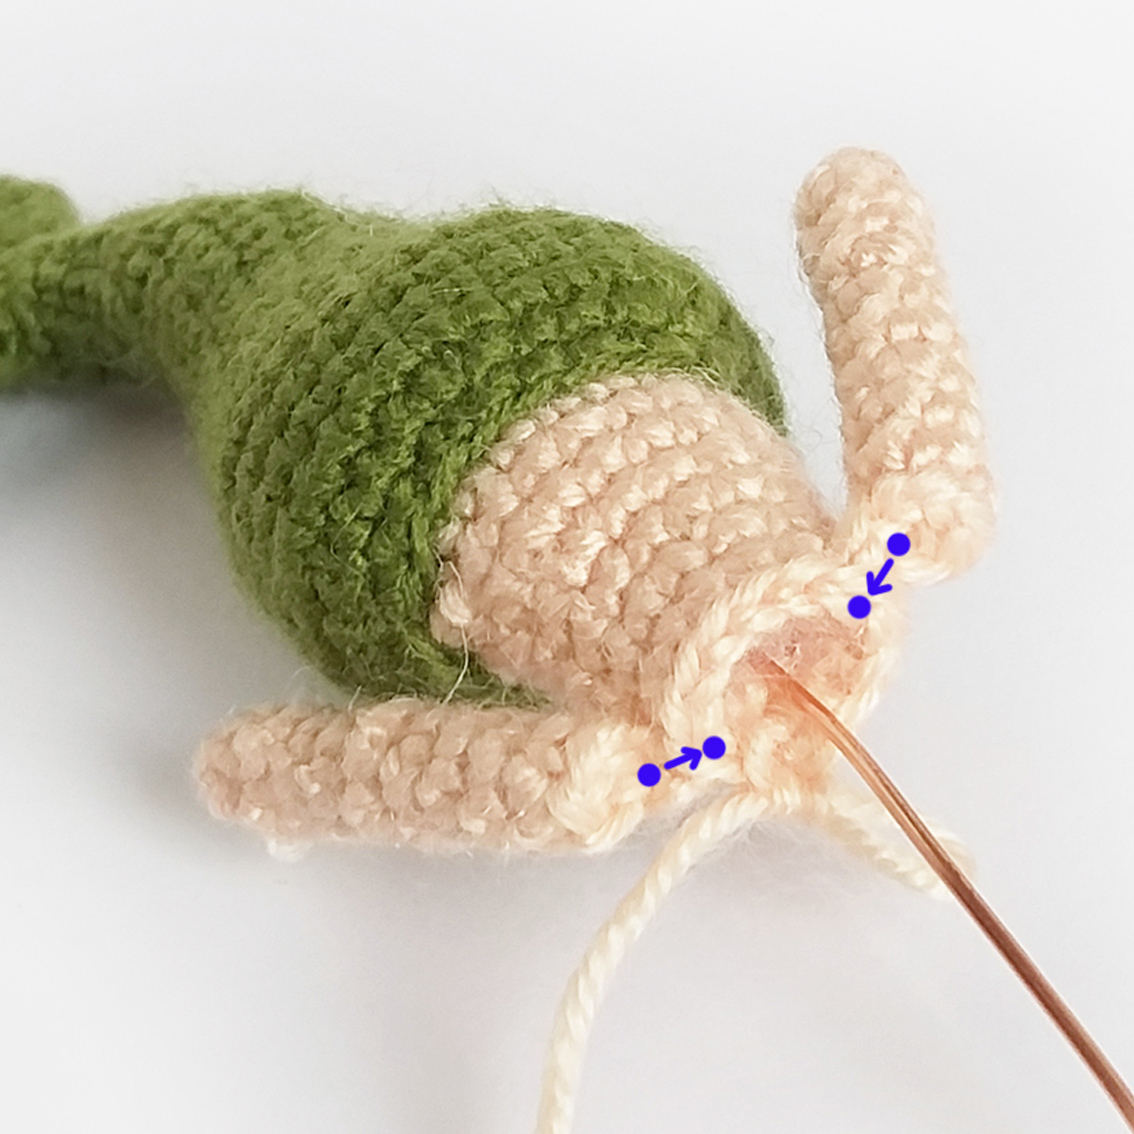
Rnd 38. (4 sc along the arm, continue work into the loops of the body: 5 sc)* 2 times = 18
Insert the wire frame into your arms (optional).

Rnd 39. 9 dec = 9
Add some hollow fibre.
Rnd 40. (1 sc, dec)* 3 times = 6
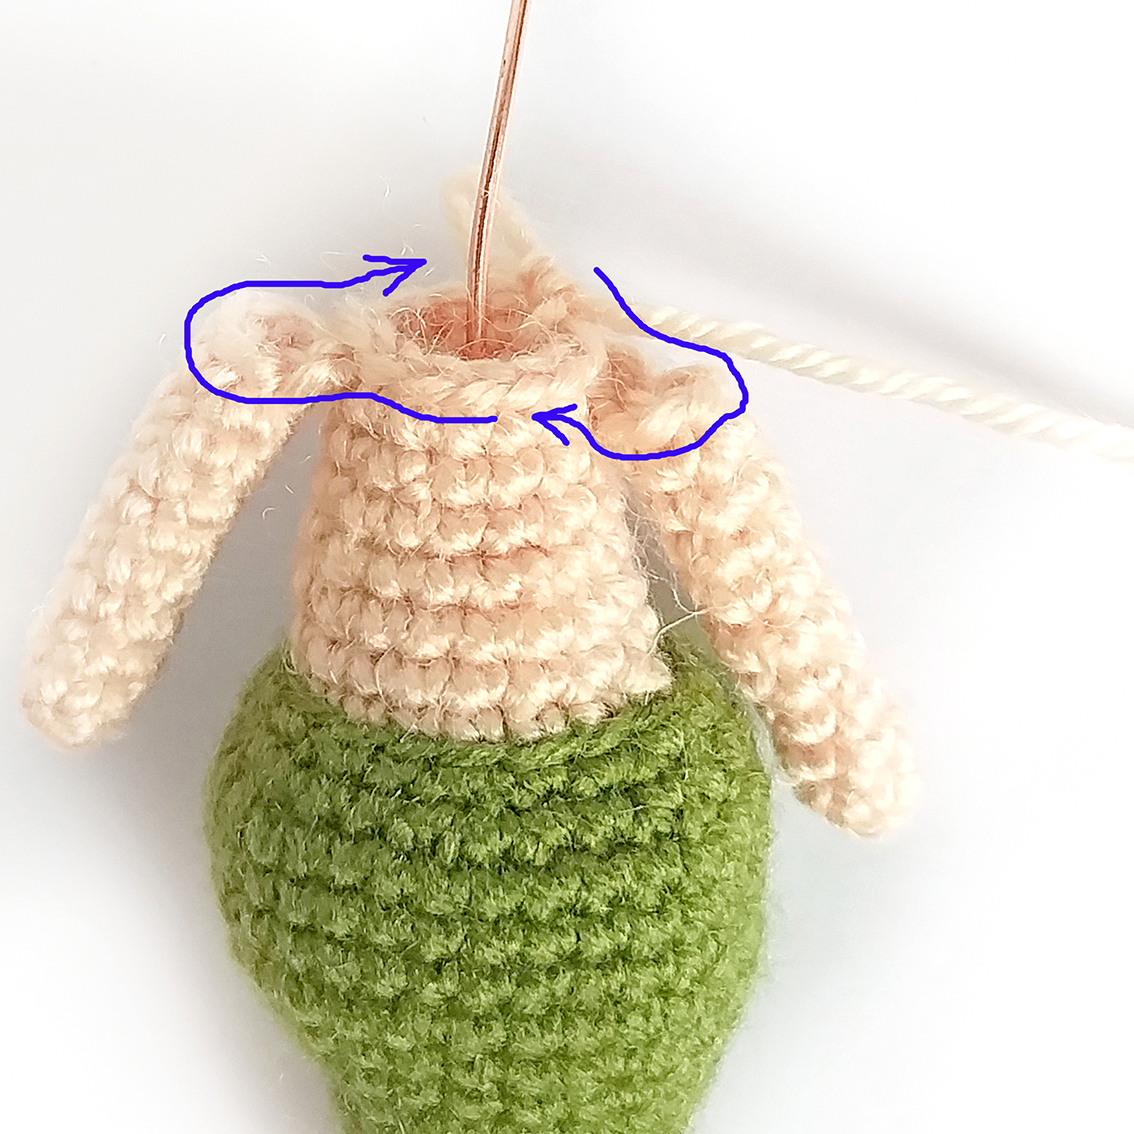
Rnd 41. 6 sc
Do not cut the thread! Next, we crochet the head.
Rnd 42. 6 inc = 12
Rnd 43. 12 inc = 24
Rnd 44. (2 sc, inc)* 8 times = 32
Rnd 45. (3 sc, inc)* 8 times = 40
Rnd 46. 12 sc, inc, 13 sc, inc, 12 sc, inc = 43
Rndы 47-50. (4 rounds) 43 sc
The marker should be in line with the middle of the back of the head. Adjust as and when to keep it straight.
Rnd 51. 10 sc, 4 dec, 6 sc, 4 dec, 11 sc = 35
Rndы 52-54. (3 rounds) 35 sc.
Rnd 55. 17 sc, inc, 17 sc = 36
Rndы 56-57. 36 sc
Rnd 58. (4 sc, dec)* 6 times = 30
Rnd 59. (3 sc, dec)* 6 times = 24
Add some hollow fibre. It’s important to properly spread the hollow firbe. Fill cheeks well.
Rnd 60. (2 sc, dec)* 6 times = 18
Rnd 61. (1 sc, dec)* 6 times = 12
Rnd 62. 6 dec = 6
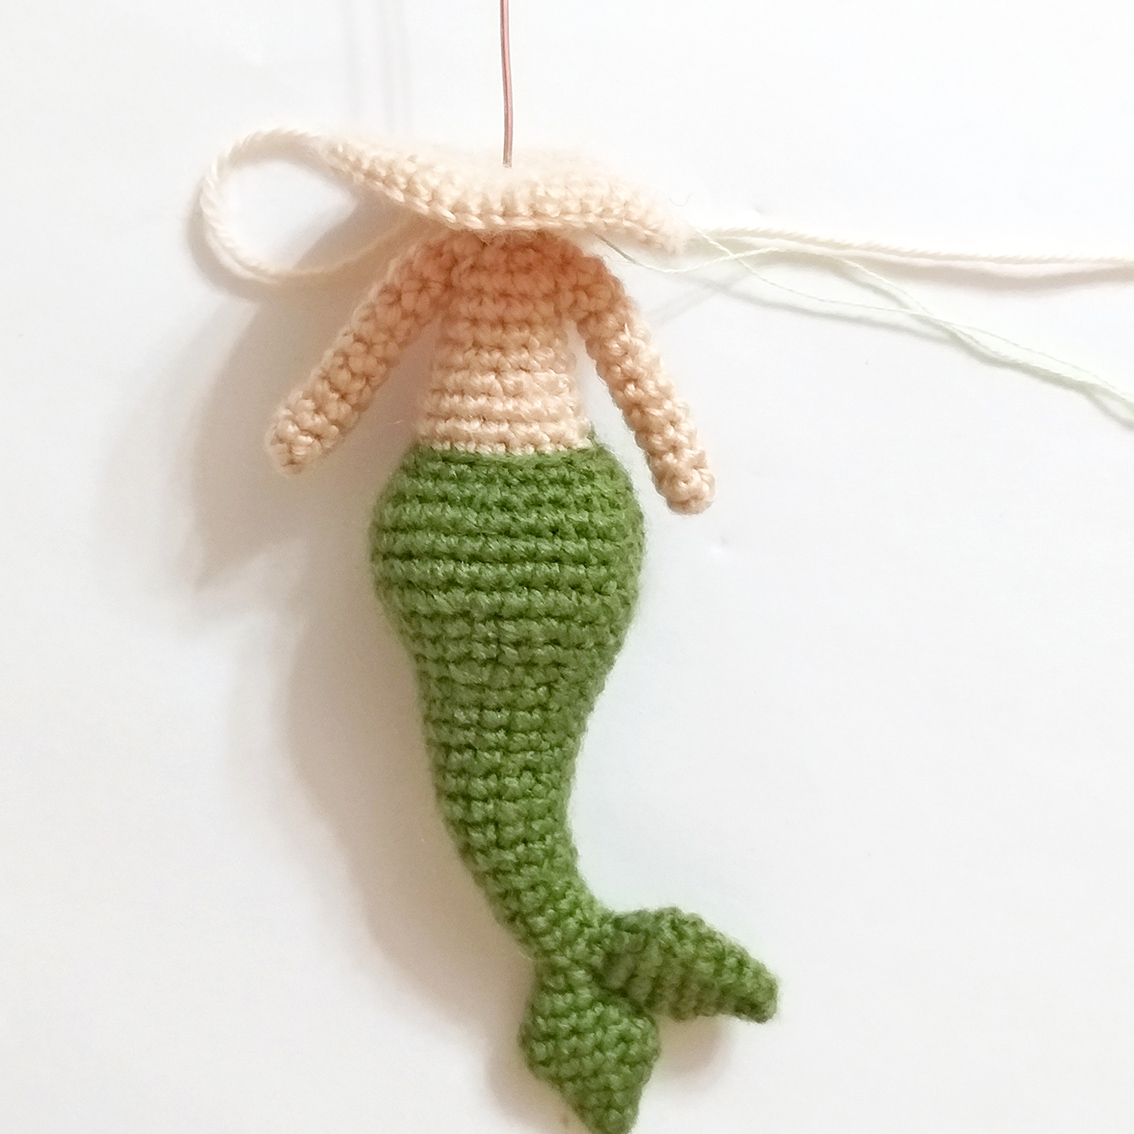
Pull off the loops. Cut the thread, hide the end.
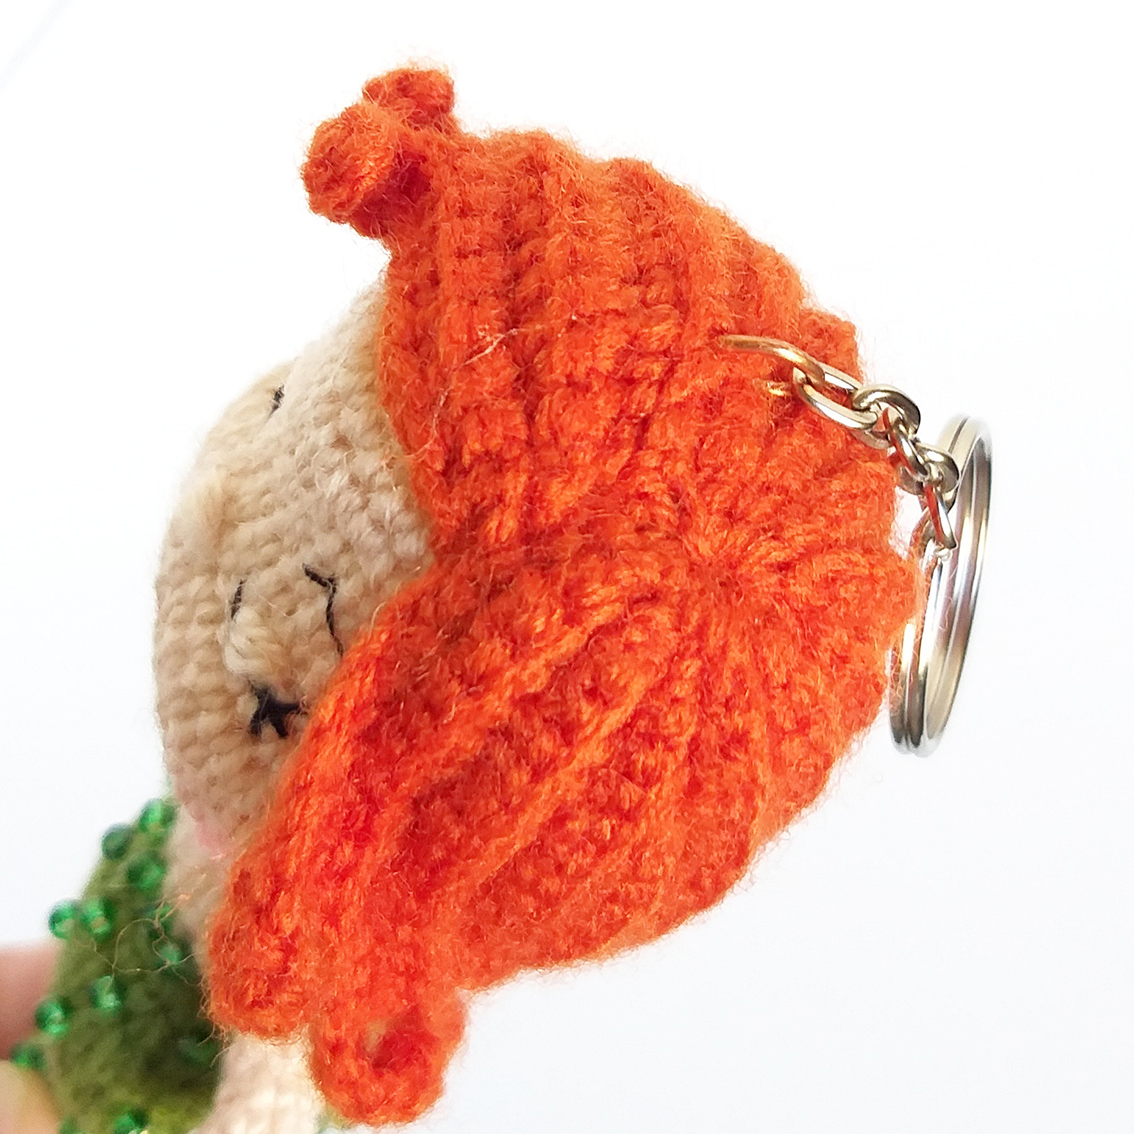
If your mermaid is a keychain, use pliers to make a loop at the end of the wire. If your mermaid is a toy, cut off the excess wire.
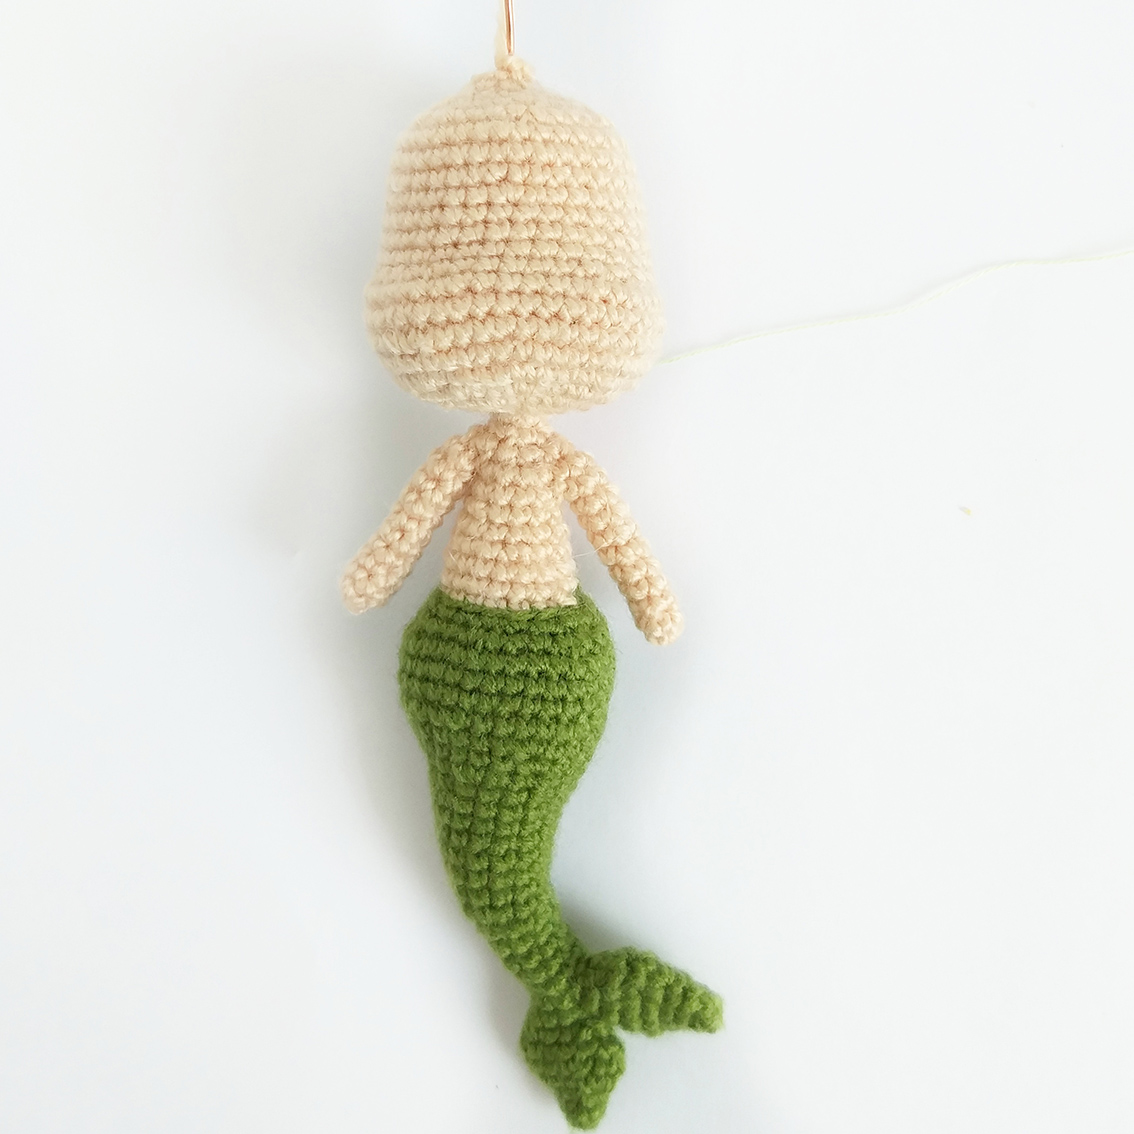
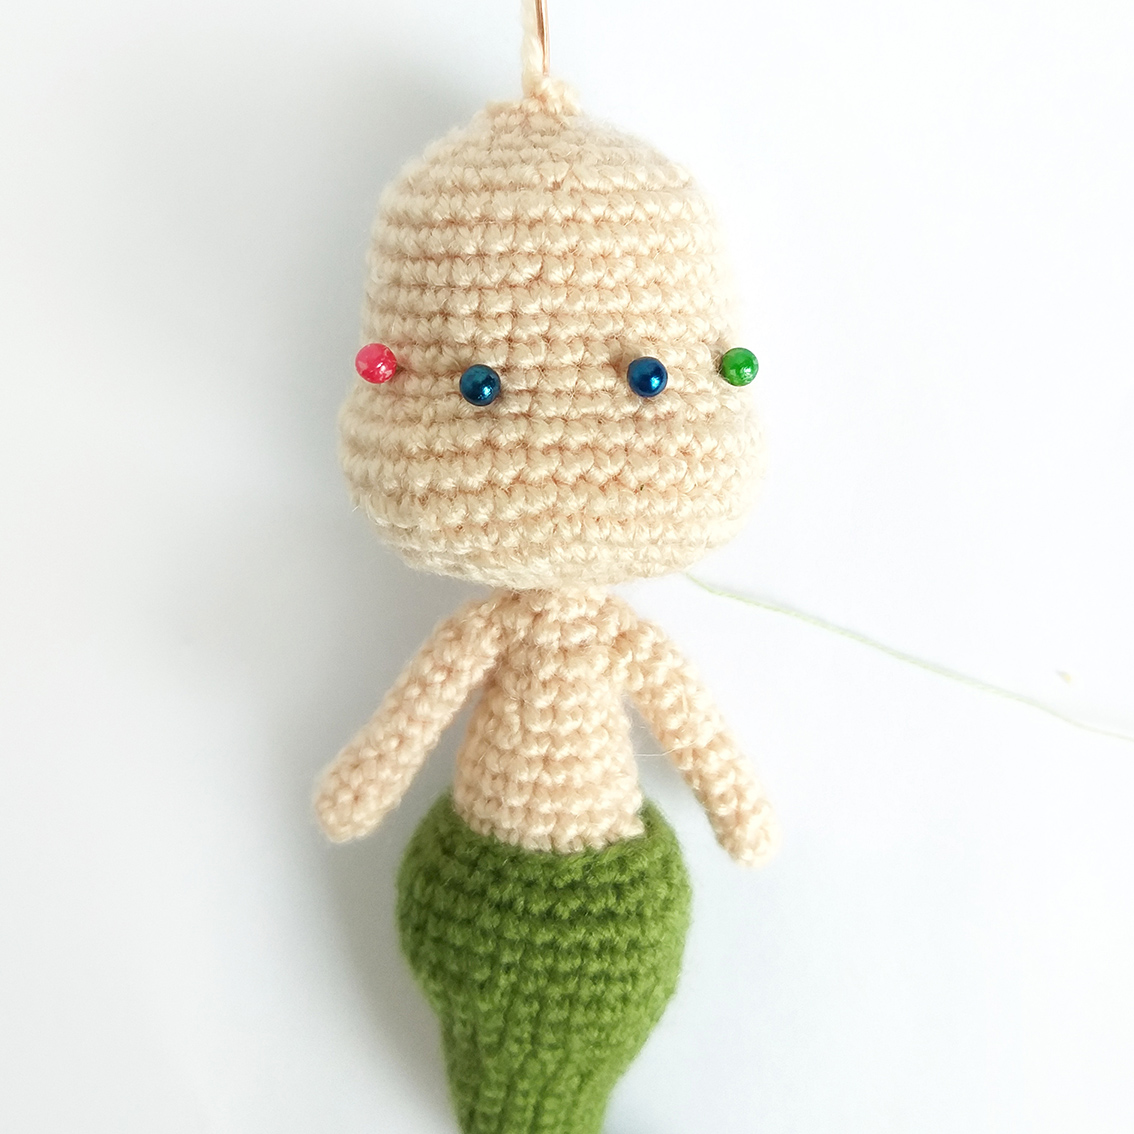
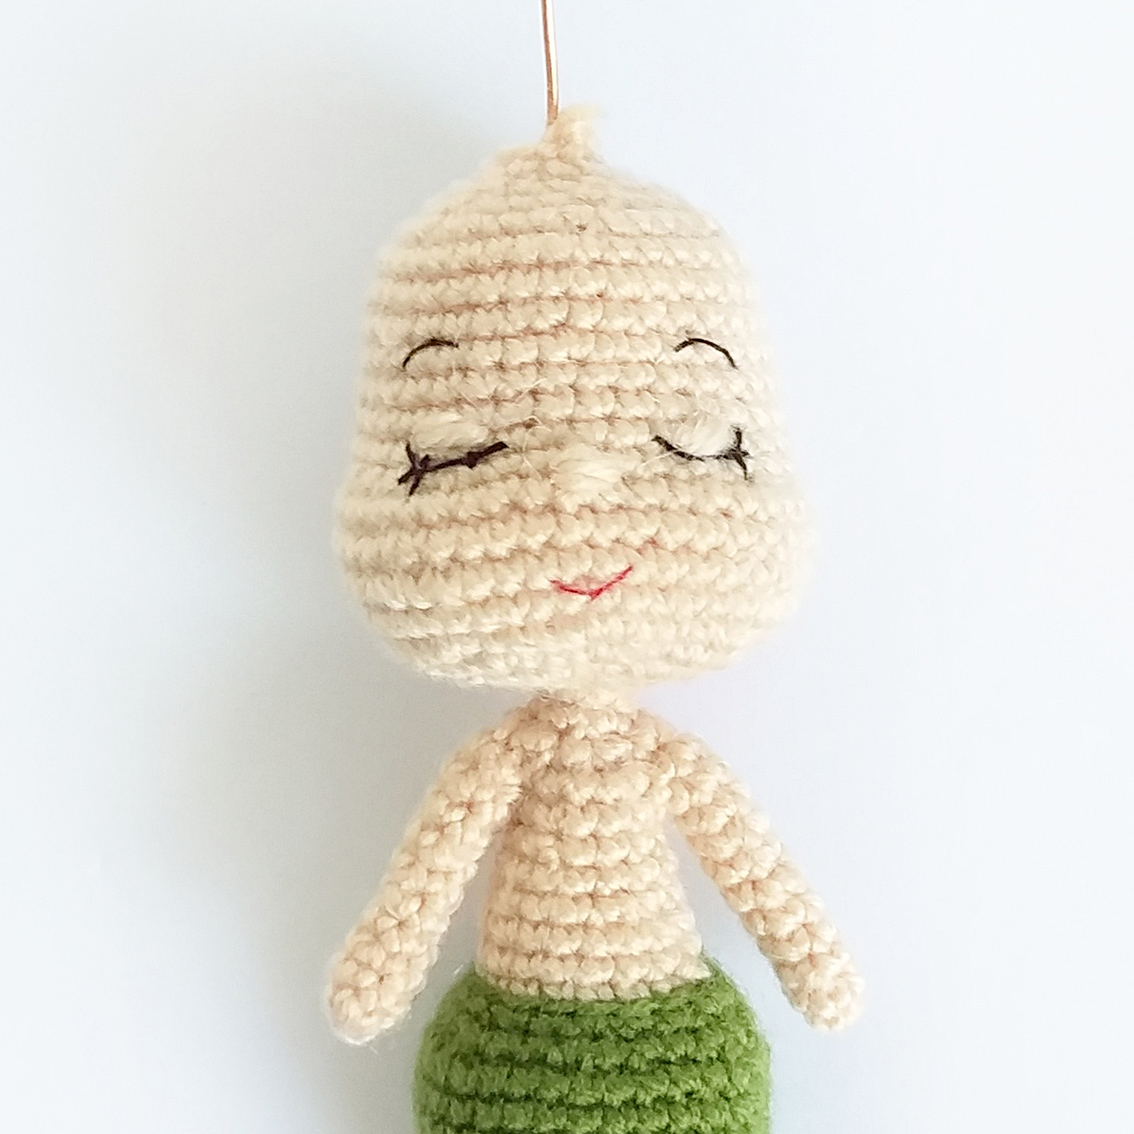
Use pins to mark the location of the eyes. Embroider the closed eyelids with nude colours yarn. Embroider a nose. Embroider eyebrows and eyelashes with black yarn. Embroider a smile.
At your discretion: you can use ready-made eyes.
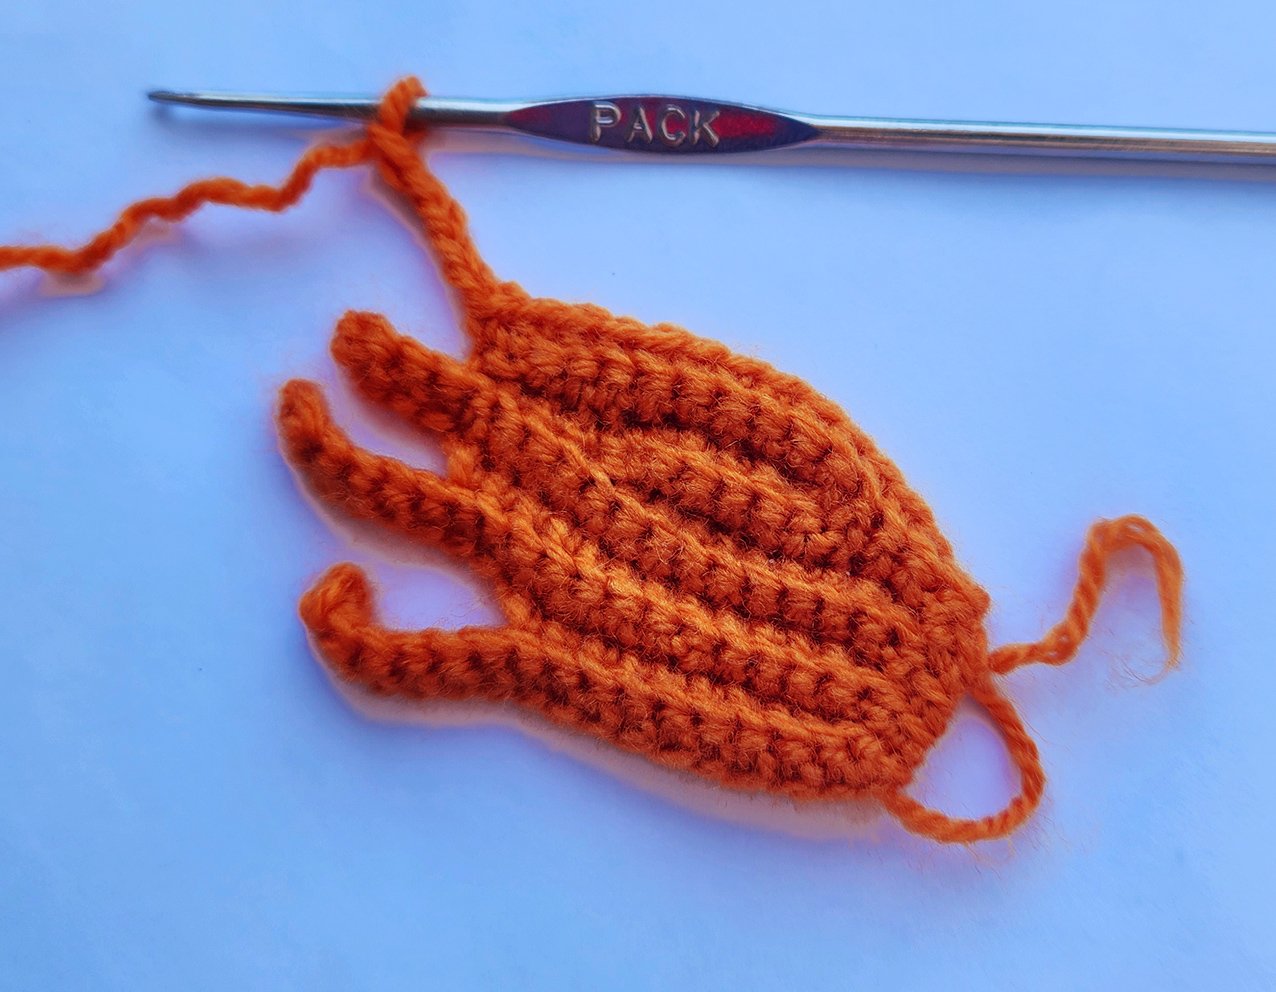
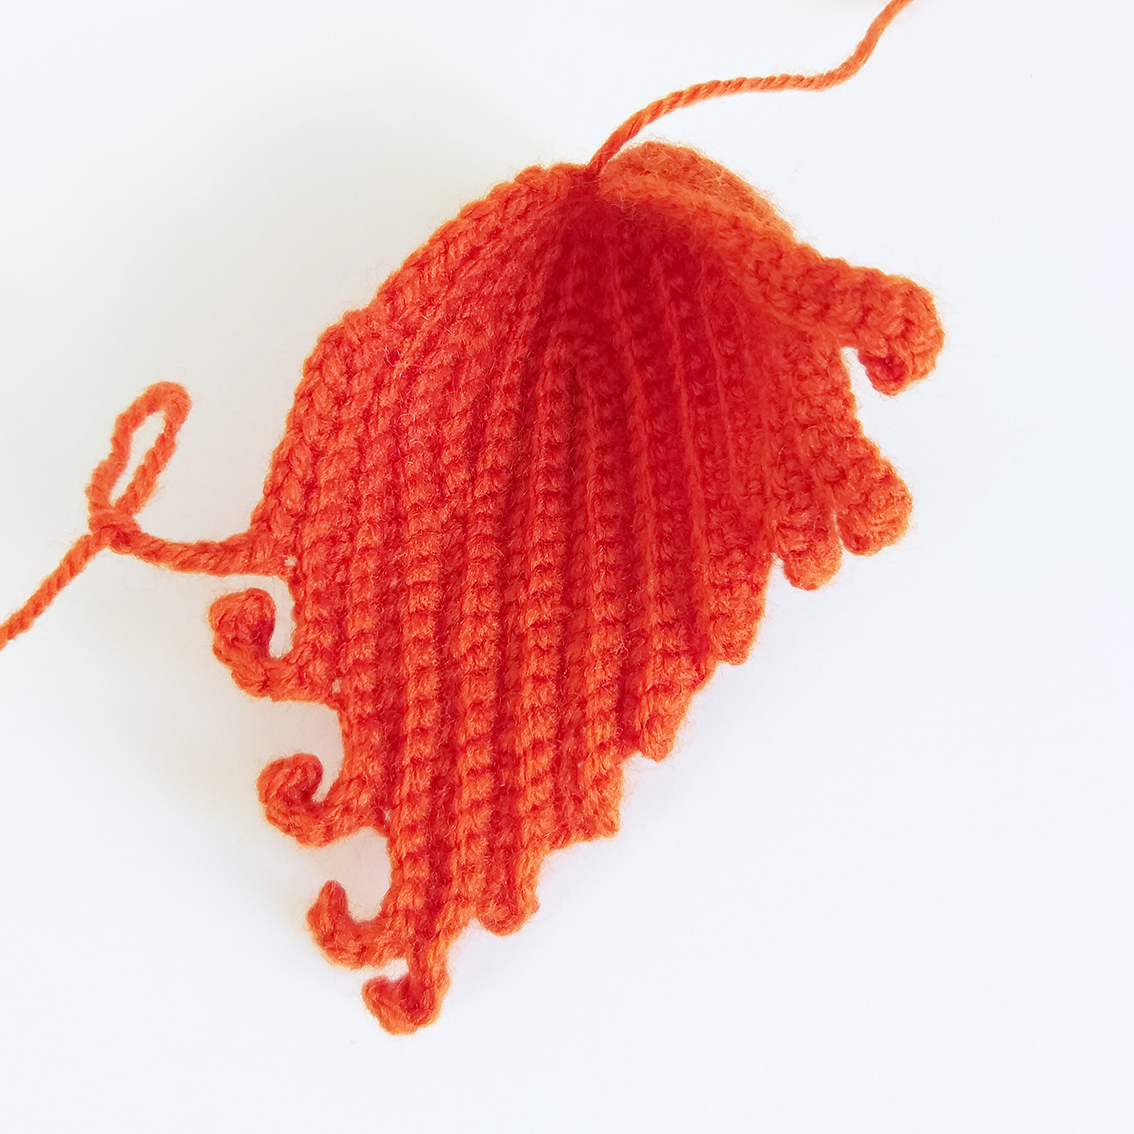
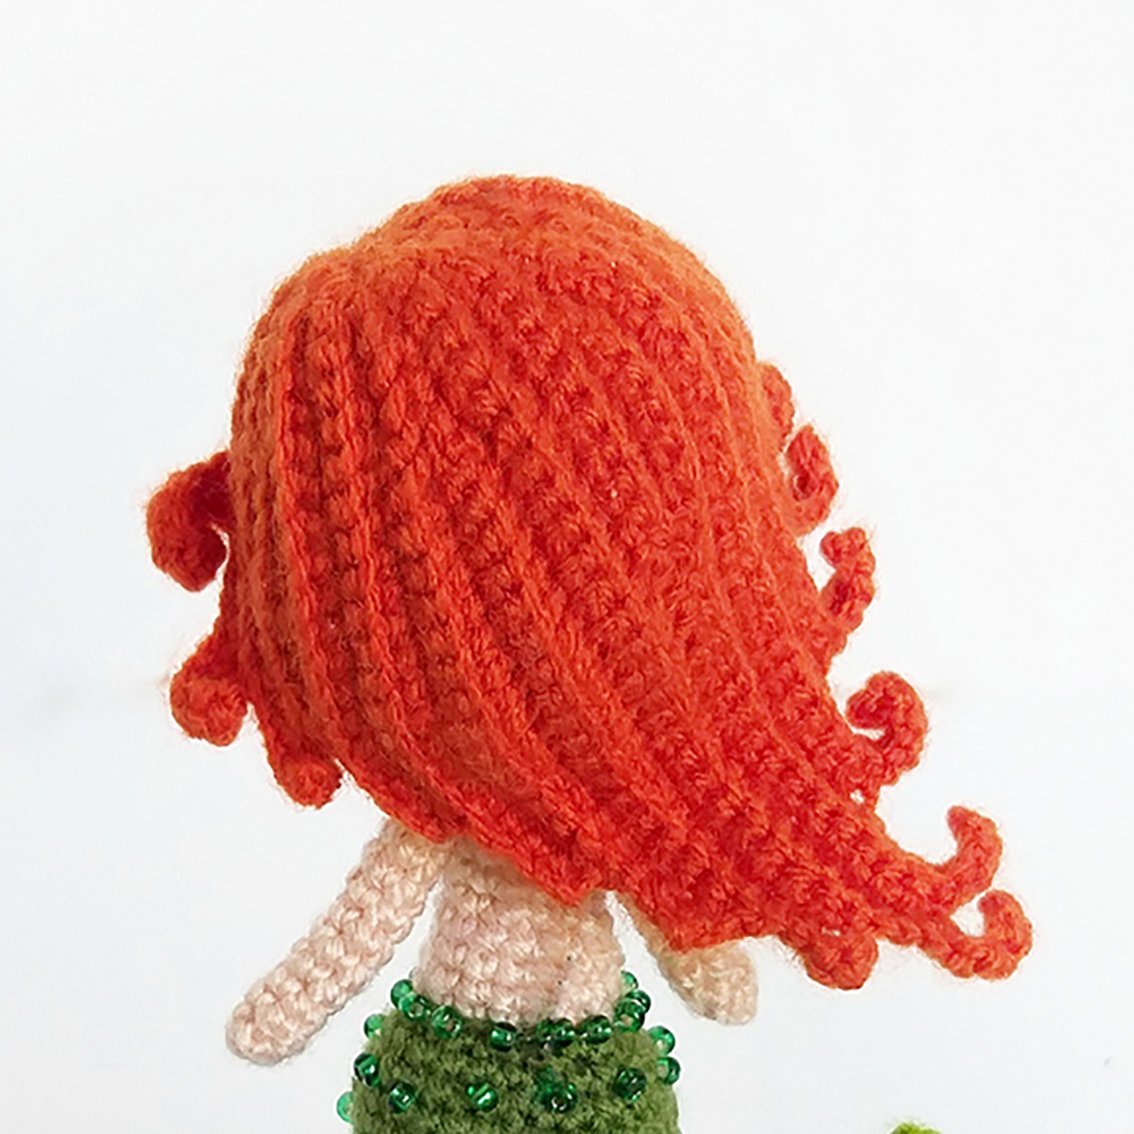
Hair (wig)
The yarn colour is at your discretion.
Since the thickness of yarn and the density of crocheting can vary, the length of the row can also vary accordingly. If necessary, you can increase the length of the chains for the locks. I recommend consistently attaching the wig to the head!
The mermaid has an asymmetrical hairstyle.
Crochet in rows. Some rows in the instructions are incomplete, meaning you do not finish the row, but turn the crocheting. At the beginning of odd rows, do not make a chain!
Pay attention, you need to create a large Amigurumi Ring and avoid tightening it, as some single crochets will be worked into it.
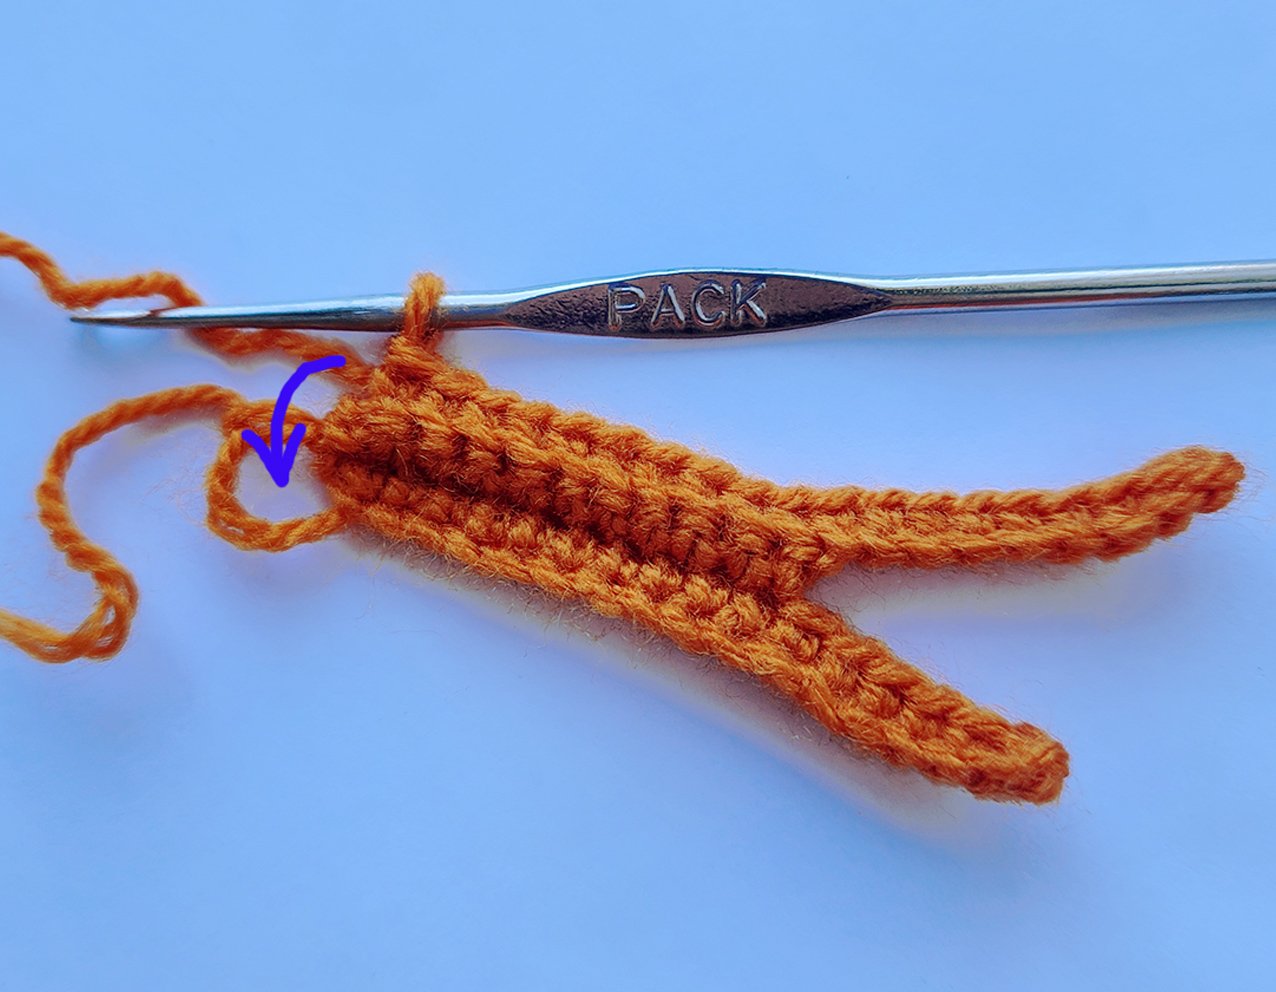
Row 1. big Magic Ring – do not tighten the loops, 16 ch, turn = 16
Row 2. starting from 2nd ch from hook: 15 sc, 1 sc in a Magic Ring, turn = 16
Furter crochet all rows into the back loops only.
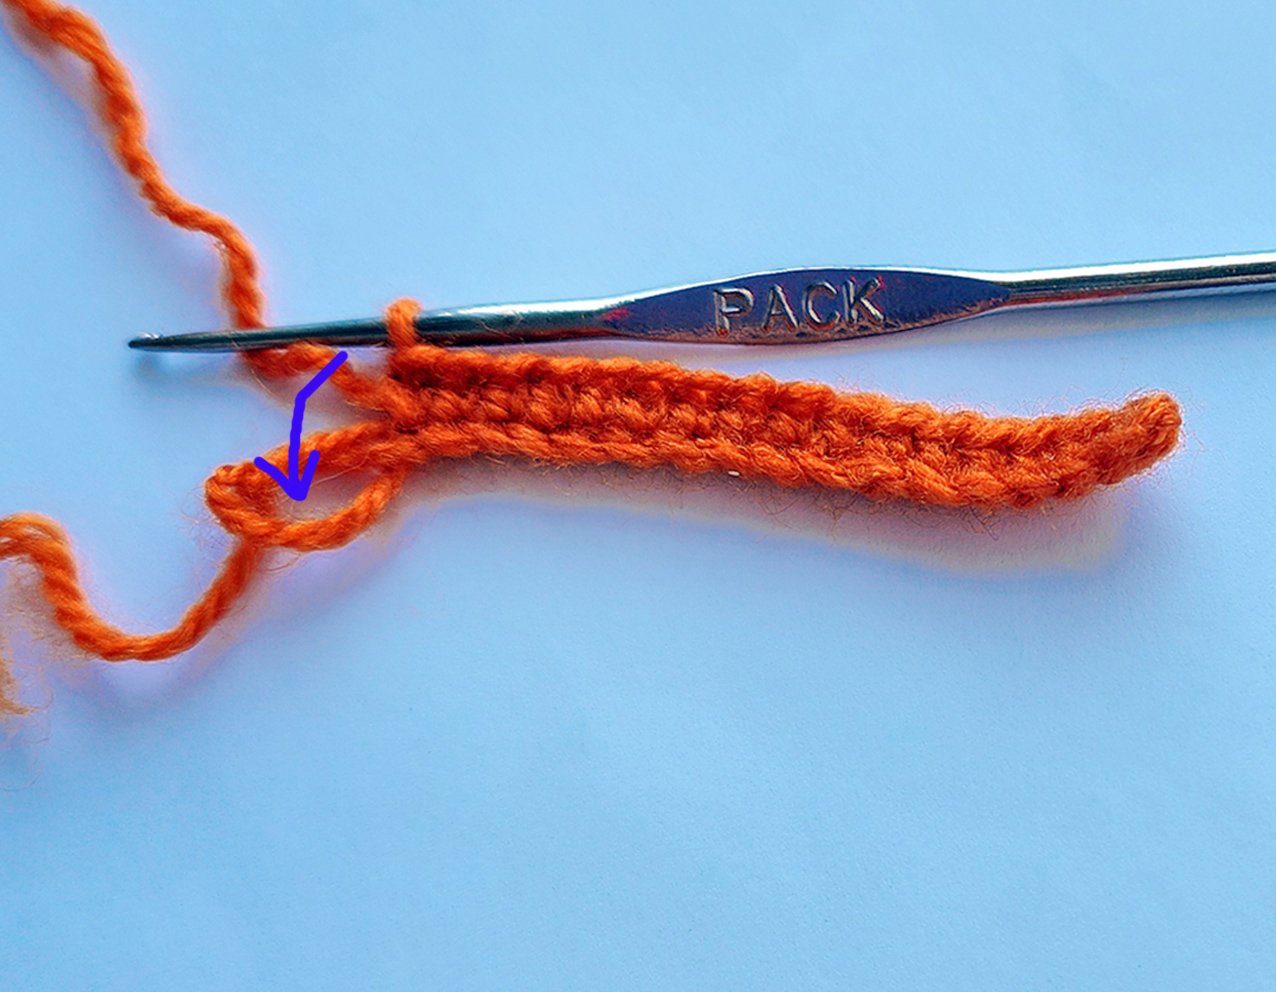
Row 3. skip the 1st loop of the previous round, 10 sc, 9 ch, turn = 19
Row 4. starting from 2nd ch from hook: 18 sc, 1 sc sc in a Magic Ring, turn = 19
Row 5. skip the 1st loop of the previous row, 13 sc, 5 ch, turn = 18
Row 6. starting from 2nd ch from hook: 17 sc, 1 sc in a Magic Ring, turn = 18
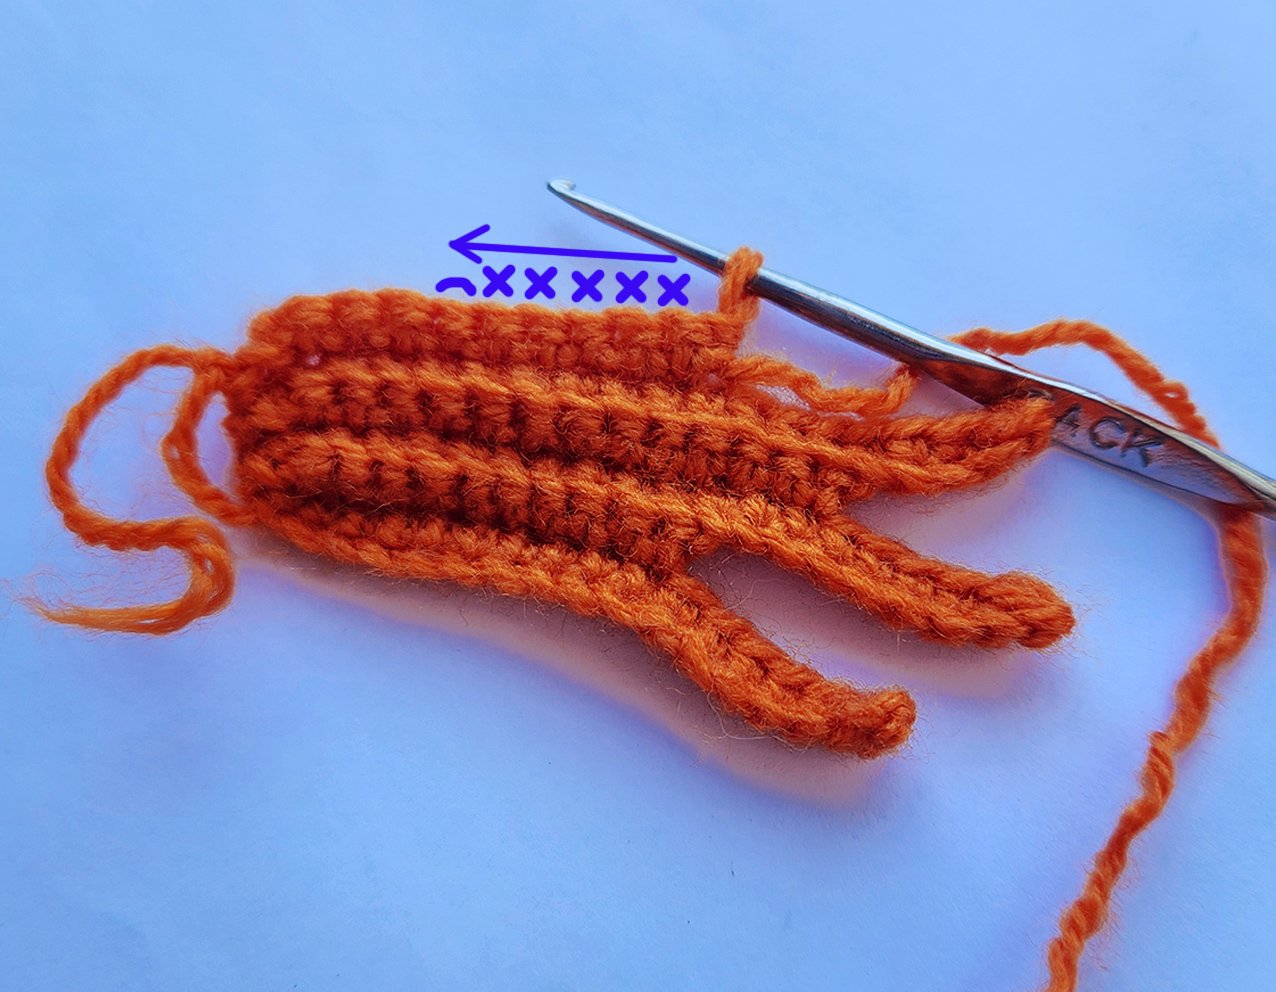
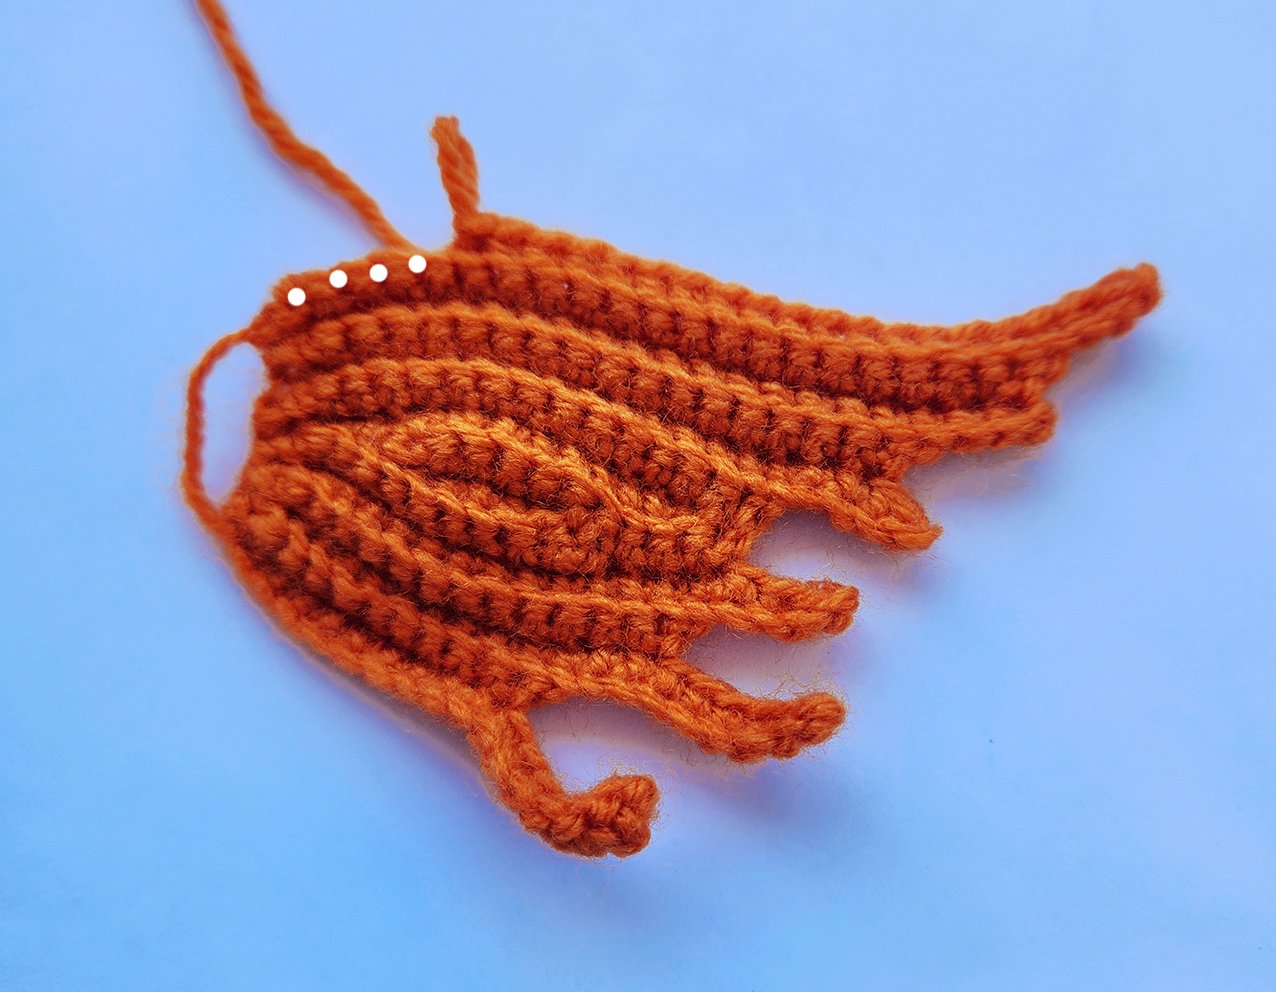
Row 7. skip the 1st loop of the previous row, 9 sc, 1 sl st, turn = 10
Row 8. skip the 1st loop of the previous row, 5 sc, 1 sl st, leave the last 3 stitches unworked, turn = 6
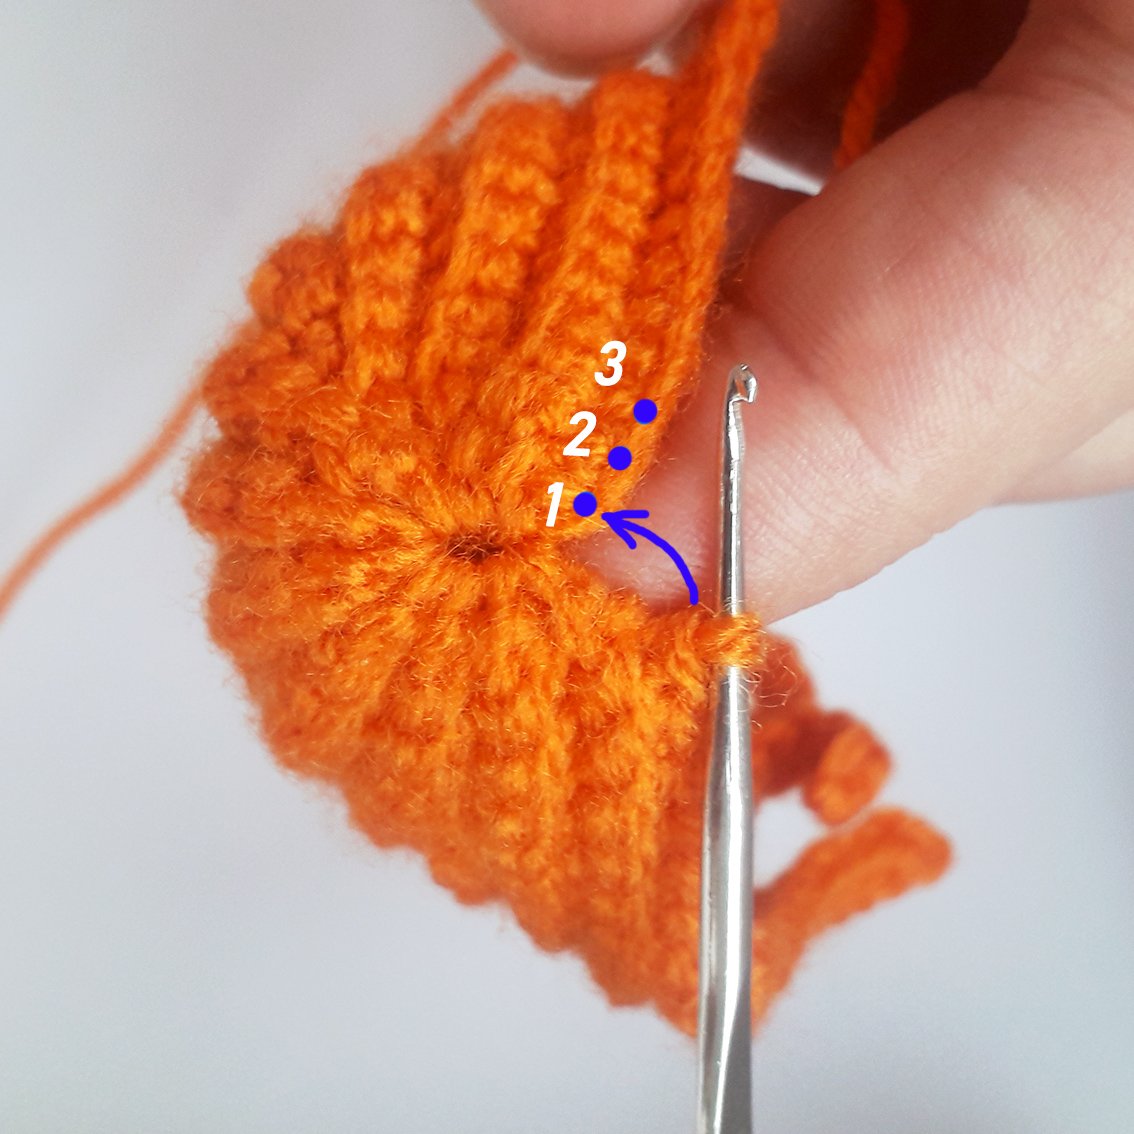
In the photo below, the 7th row is crocheted, and the 8th row is drawn schematically.
Row 9. skip the 1st loop of the previous row, 5 sc, 1 sc in the side edge of the row (see where the letter A is in the photo), 4 sc along the loops of the 6th row, turn = 10
Crocheting direction is marked with an arrow on the photo.
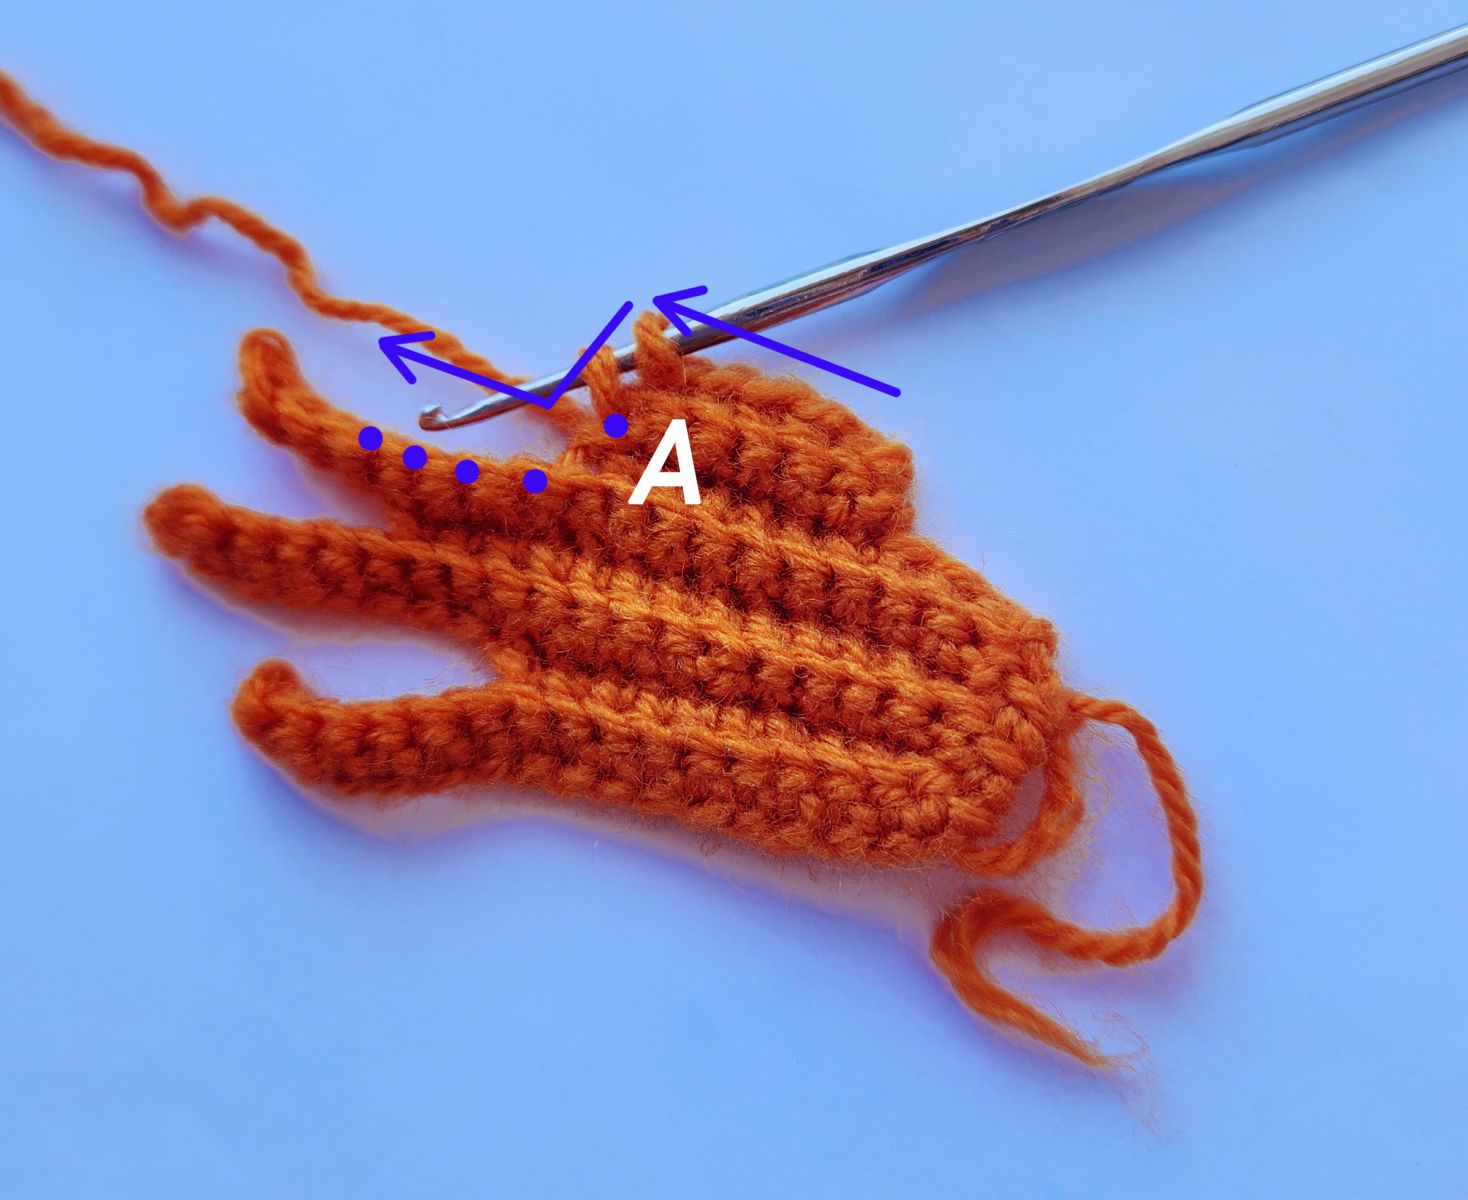
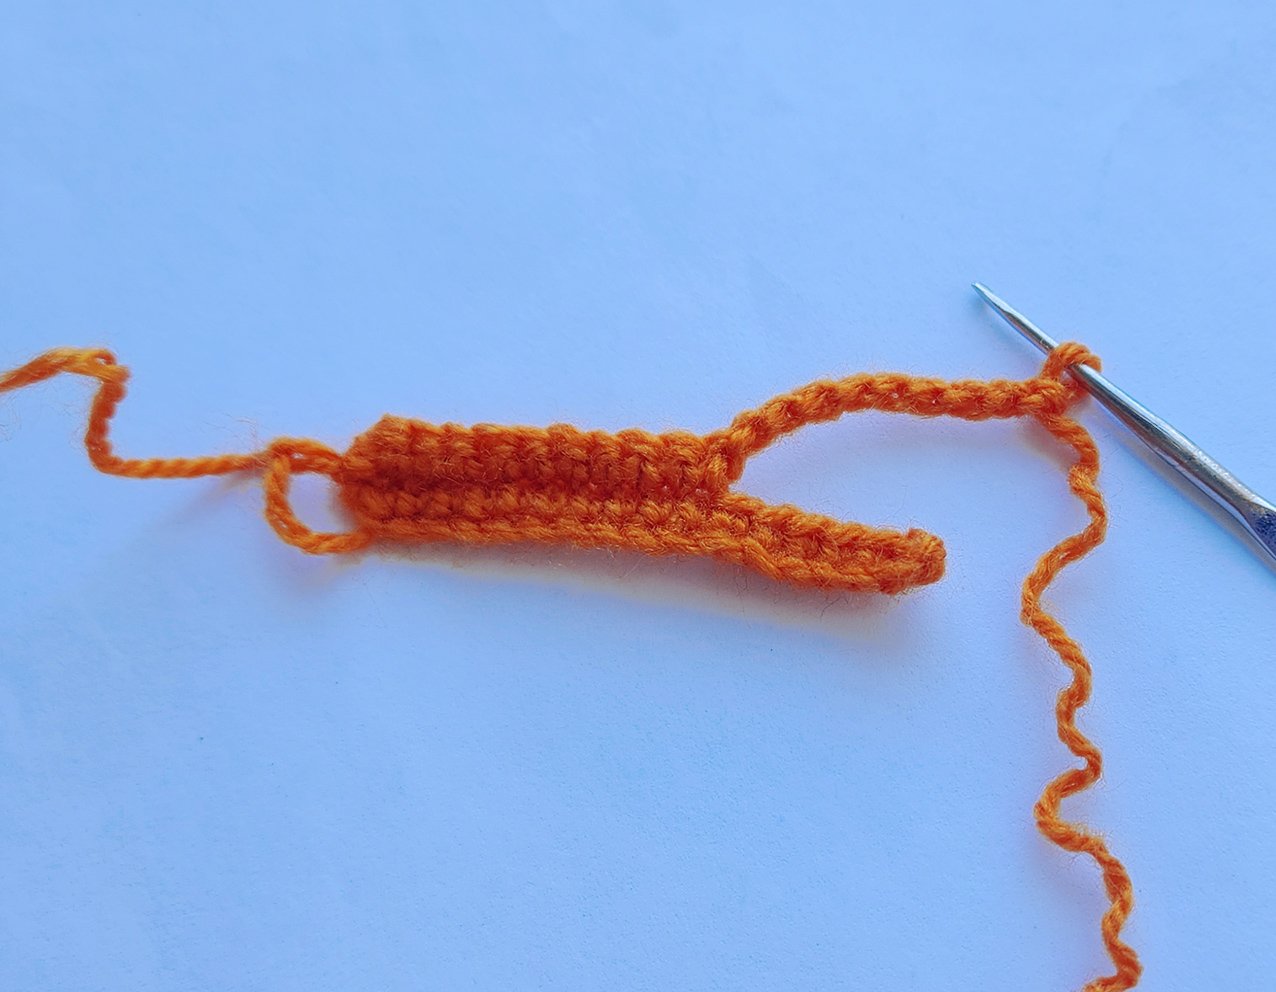
Row 10. skip the 1st loop of the previous row, 9 sc, 1 sc in the side edge of the row, 3 sc along the loops of the 8th row, 1 sc in a Magic Ring, turn = 14
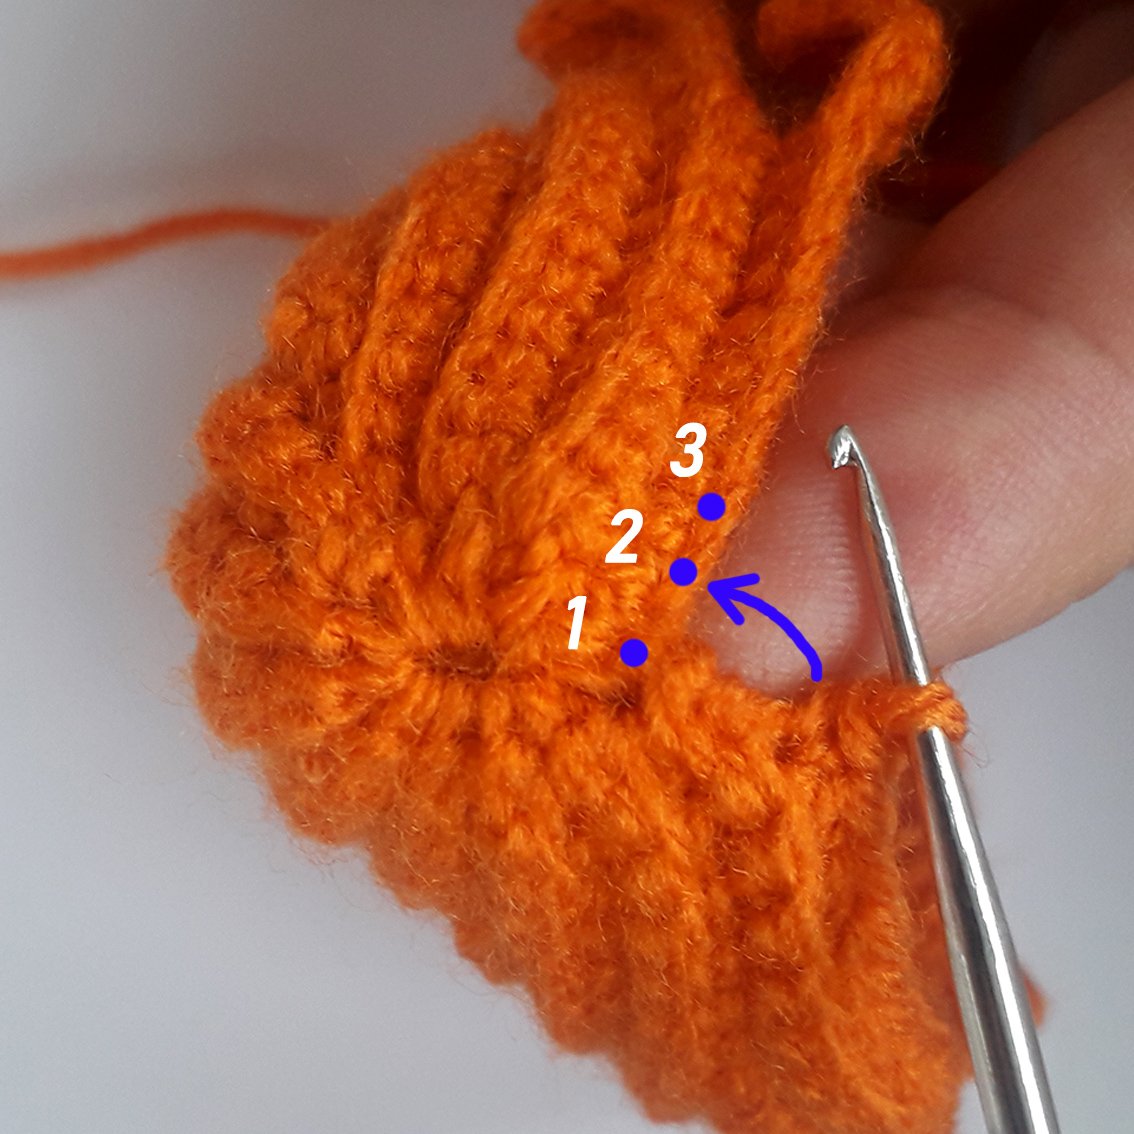
In the photo below, the 9th row is crocheted, and the 10th row is drawn schematically. Crocheting direction is marked with an arrow on the photo.
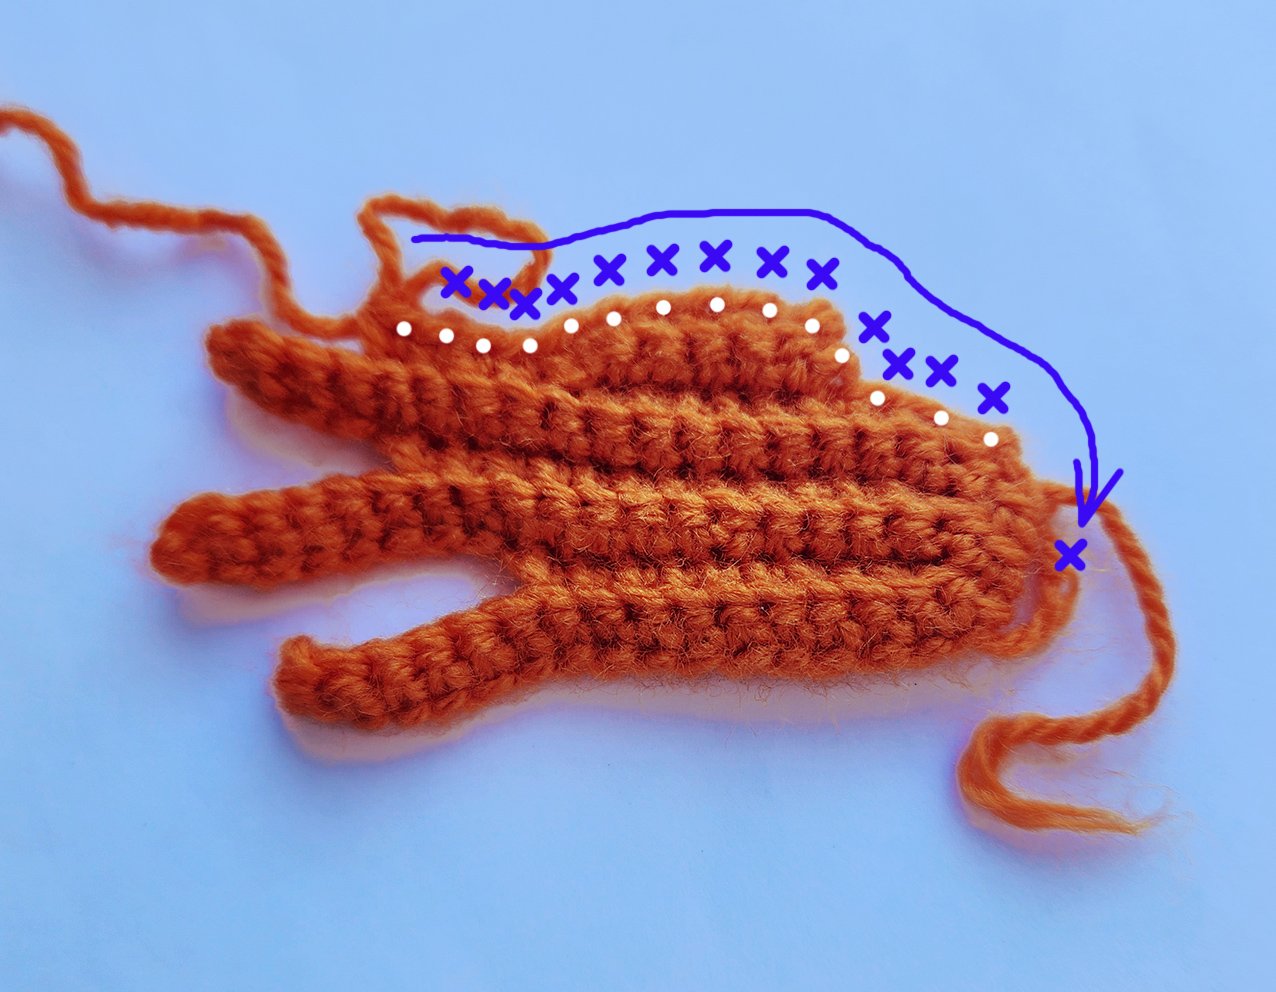
Row 11. skip the 1st loop of the previous row, 13 sc, 1 sc in the side edge of the row, 5 ch, turn = 19
Row 12. starting from 2nd ch from hook: 18 sc, 1 sc in a Magic Ring, turn = 19
Row 13. skip the 1st loop of the previous row, 17 sc, 4 ch, turn = 21
Row 14. starting from 2nd ch from hook: 20 sc, 1 sc in a Magic Ring, turn = 21
Row 15. skip the 1st loop of the previous row, 20 sc, 4 ch, turn = 24
Row 16. starting from 2nd ch from hook: 18 sc, 1 sl st, leave the last 4 stitches unworked, turn = 19
Row 17. skip the 1st loop of the previous row, 18 sc, 5 ch, turn = 23
Row 18. starting from 2nd ch from hook: 22 sc, 1 sc in the side edge of the row, 4 sc along the loops of the 16th row, 1 sc in a Magic Ring, turn = 28
Row 19. skip the 1st loop of the previous row, 25 sc, 7 ch, turn = 32
Row 20. starting from 2nd ch from hook: 31 sc, 1 sc in a Magic Ring, turn = 32
Row 21. skip the 1st loop of the previous row, 11 sc, 1 sl st, turn = 12
Row 22. skip the 1st loop of the previous row, 6 sc, 1 sl st, turn = 7
Row 23. skip the 1st loop of the previous row, 6 sc, 1 sc in the side edge of the row, 15 sc, 4 ch, turn = 26
Row 24. starting from 2nd ch from hook: 25 sc, 1 sc in the side edge of the row, 4 sc along the loops of the 22nd row, 1 sc in a Magic Ring, turn = 31
Row. 25. skip the 1st loop of the previous row, 23 sc, 5 ch, turn = 28
Row 26. starting from 2nd ch from hook: 27 sc, 1 in a Magic Ring, turn = 28
Tighten the Magic Ring now.
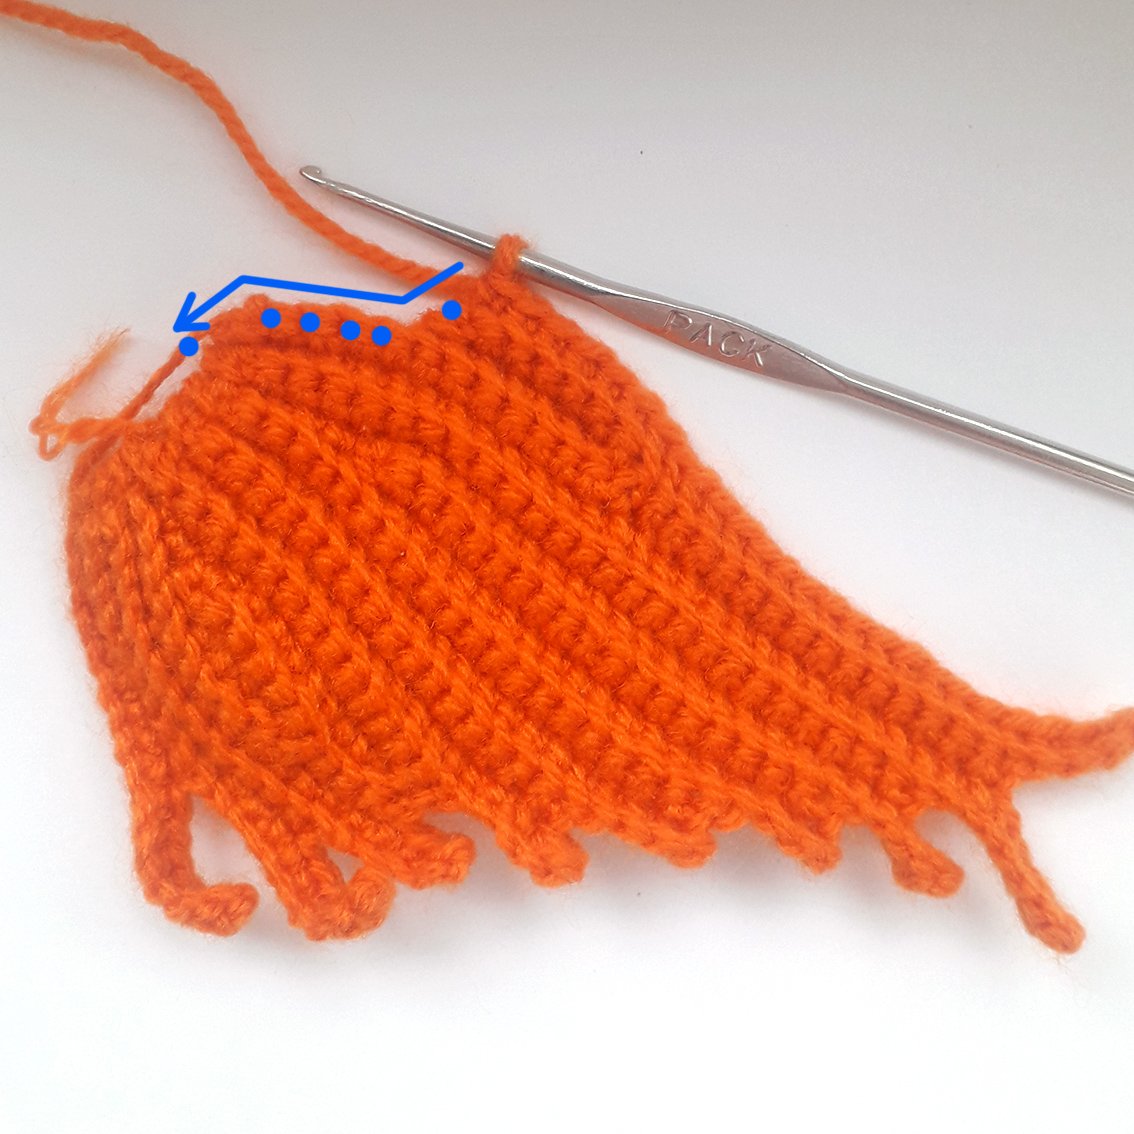
Row 27. skip the 1st loop of the previous row, 19 sc, 5 ch, turn = 24
Row 28. starting from 2nd ch from hook: 16 sc, 1 sl st, leave the last 6 stitches unworked, turn = 17
Row 29. skip the 1st loop of the previous row, 8 sc, 5 ch, turn = 13
Row 30. starting from 2nd ch from hook: 12 sc, 1 sc in the side edge of the row, 6 sc along the loops of the 28th row, 1 sc into the 1st loop of the first row (see the pictures for guidance), turn = 20
Row 31. skip the 1st loop of the previous row, 14 sc, 5 ch, turn = 19
Row 32. starting from 2nd ch from hook: 18 sc, 1 sc into the 2nd loop of the first row, turn = 19
Row 33. skip the 1st loop of the previous row, 11 sc, 5 ch, turn = 16
Row 34. starting from 2nd ch from hook: 15 sc, 1 sc into the 3rd loop of the first row, turn = 16
Row 35. skip the 1st loop of the previous row, 8 sc, 4 ch, turn = 12
Row 36. starting from 2nd ch from hook: 11 sc, 1 sl st into the 3rd loop of the first row = 12
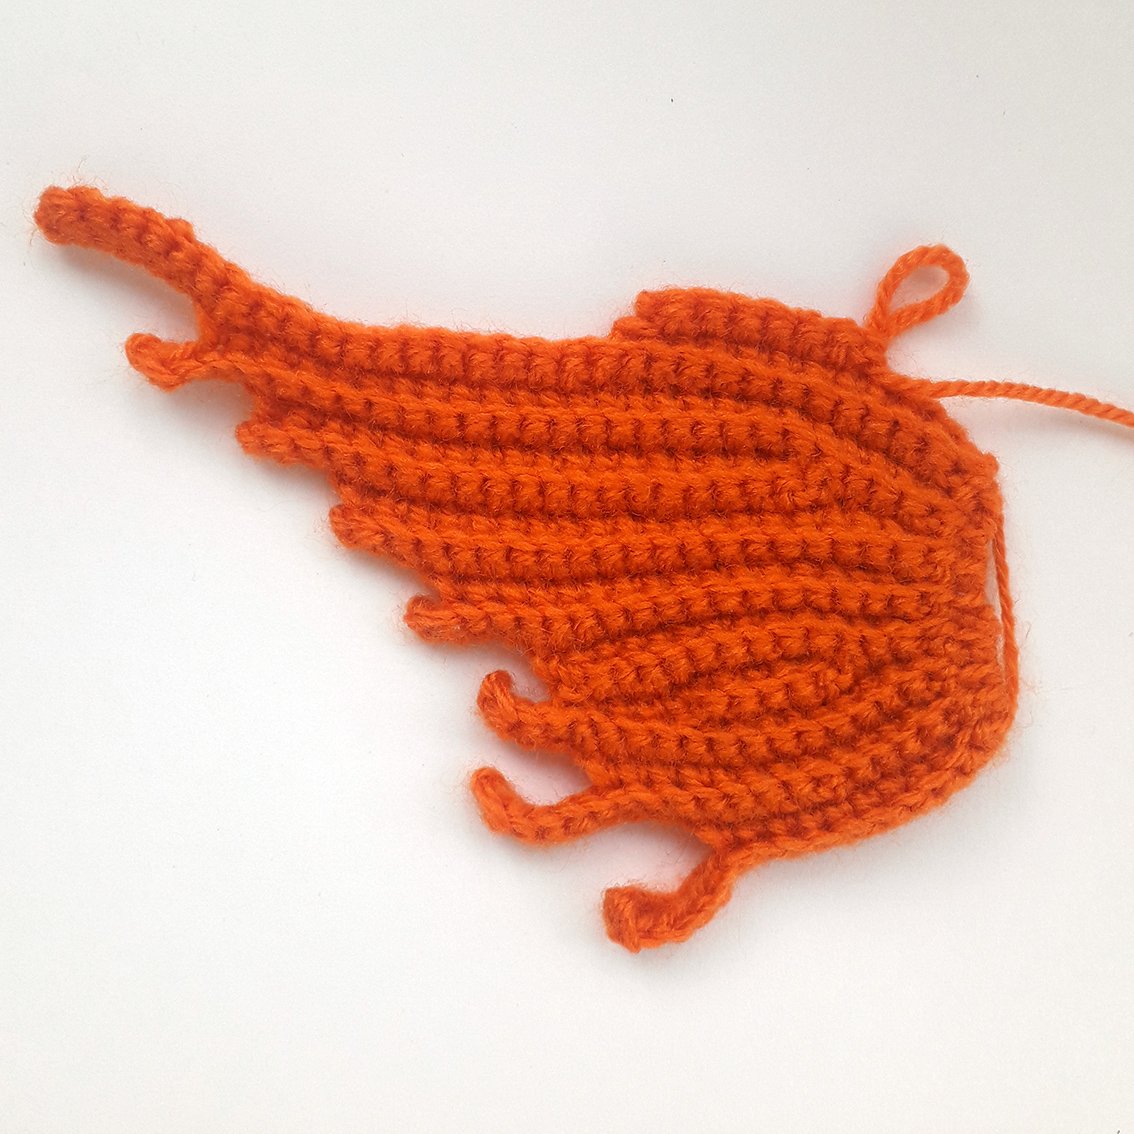
Cut off yarn, leave a tail for further operation.
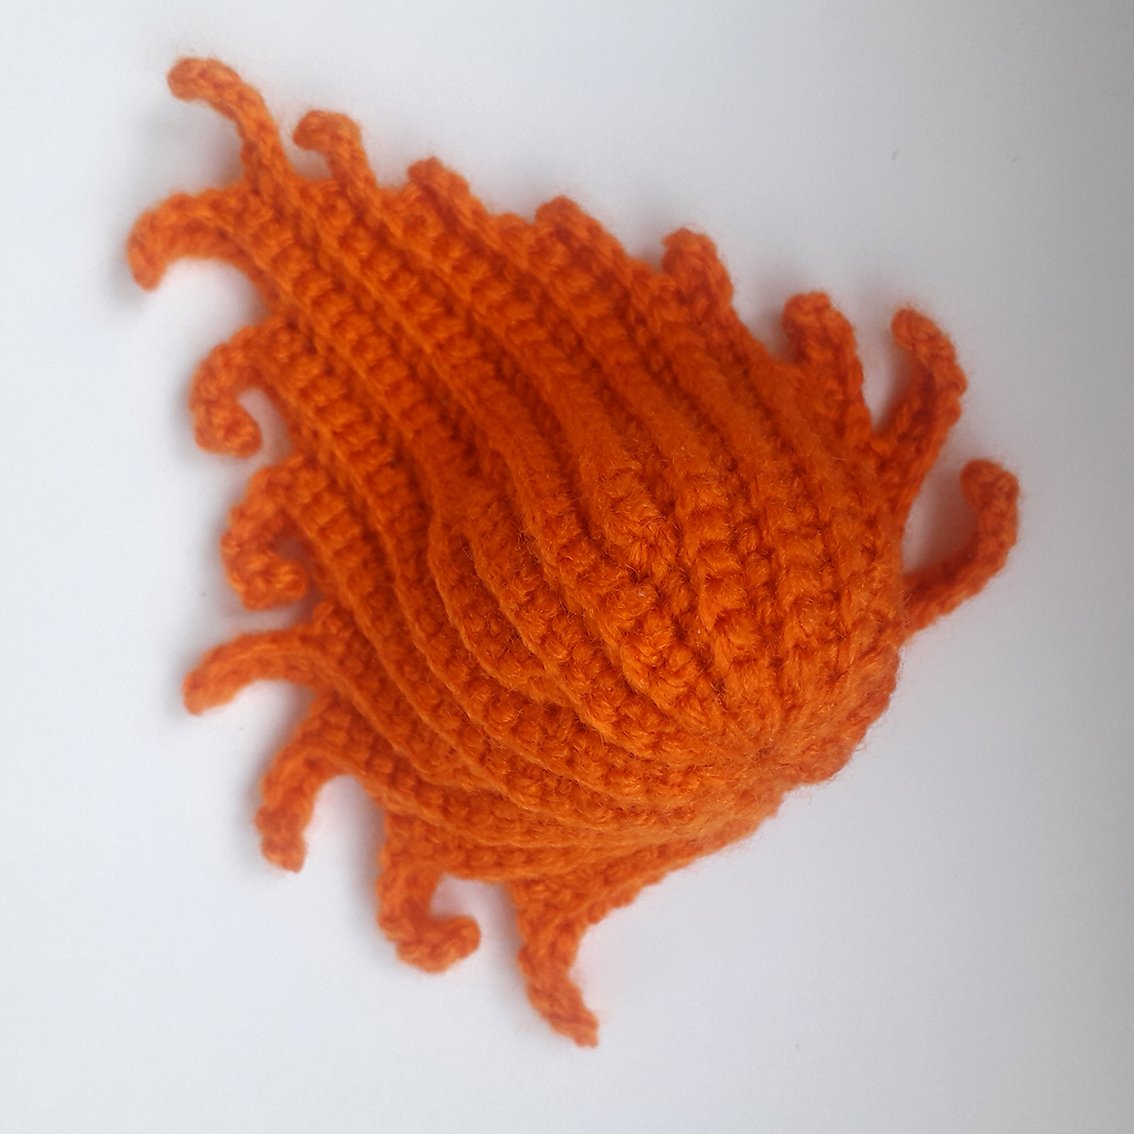
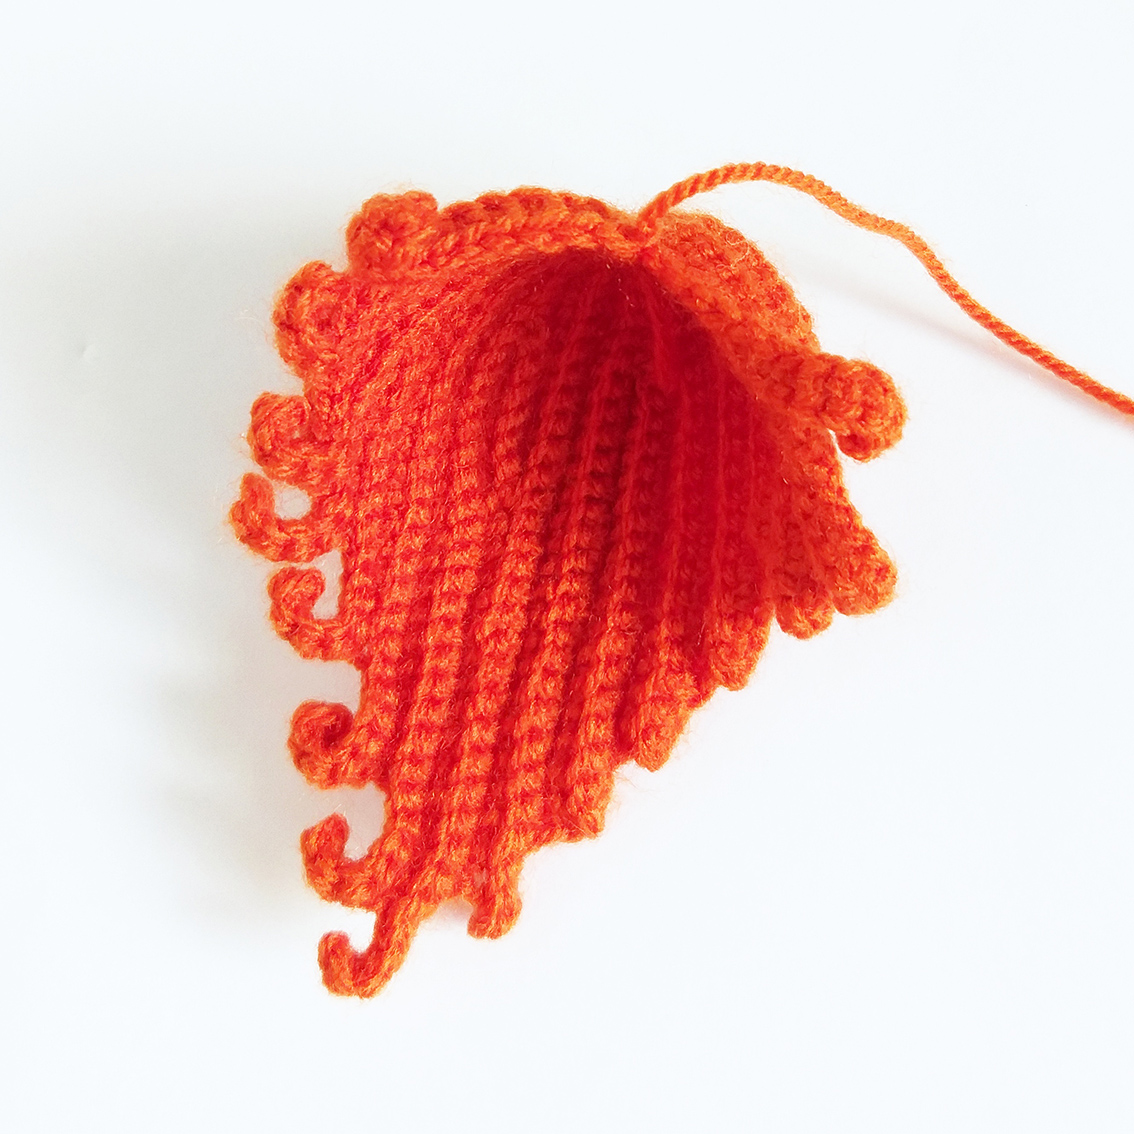
Sew or glue.
If your mermaid is a keychain, then after attaching the hair from the protruding wire, make a loop at the end of the wire. Use pliers. Cut off the excess wire.
Bodice
The yarn colour is at your discretion.
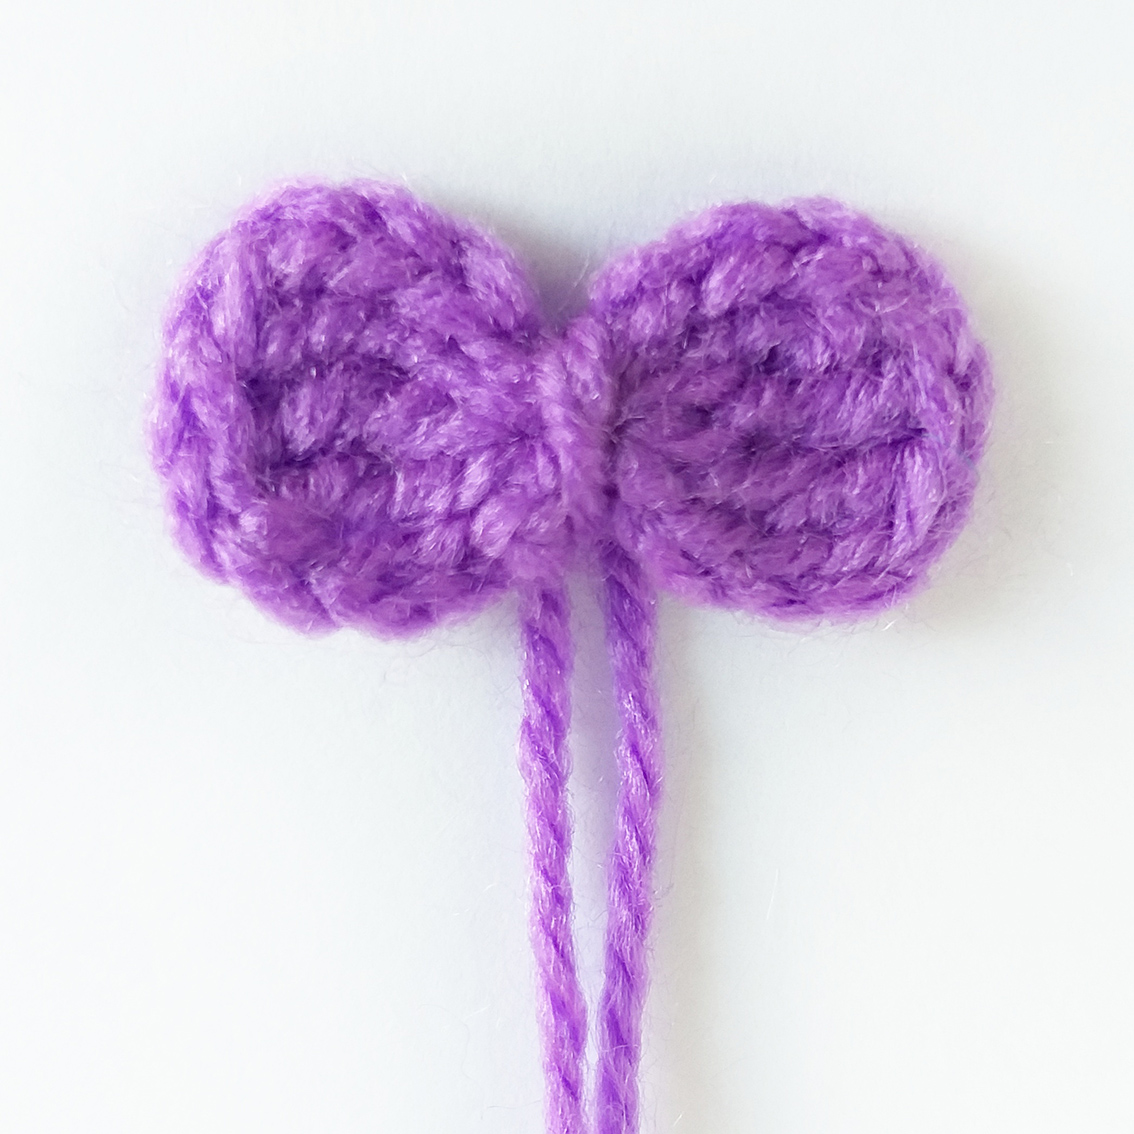
Make a big Magic Ring – do not tighten the loops, there should be a circle.
Rnd 1. (all crochet in a Magic Ring: 3 ch, 4 tr, 3 ch, 1 sc)*2 times
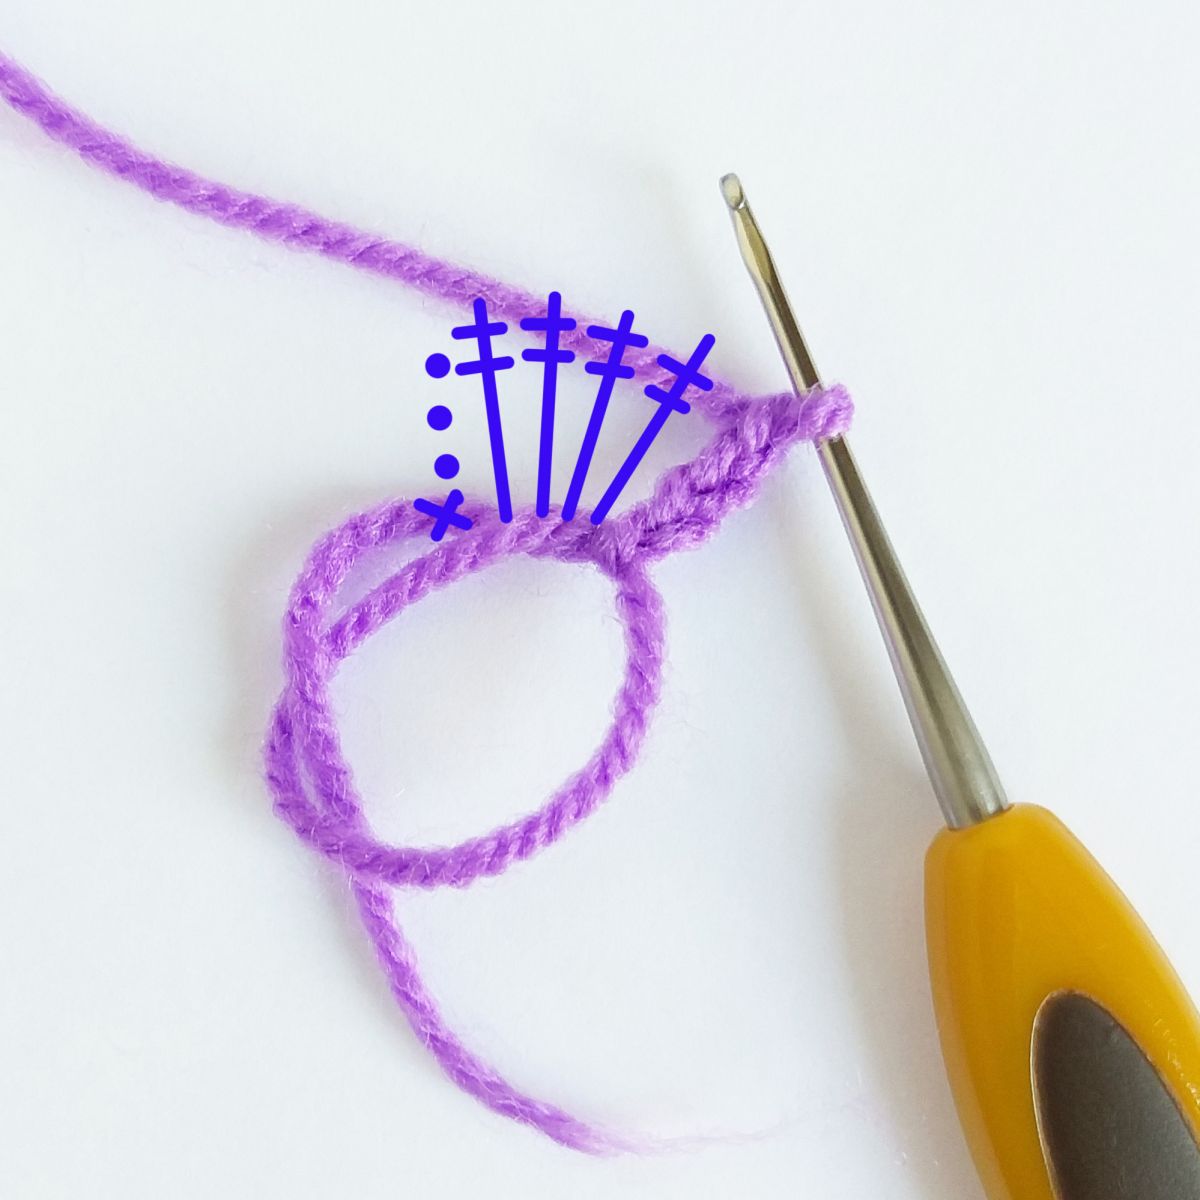

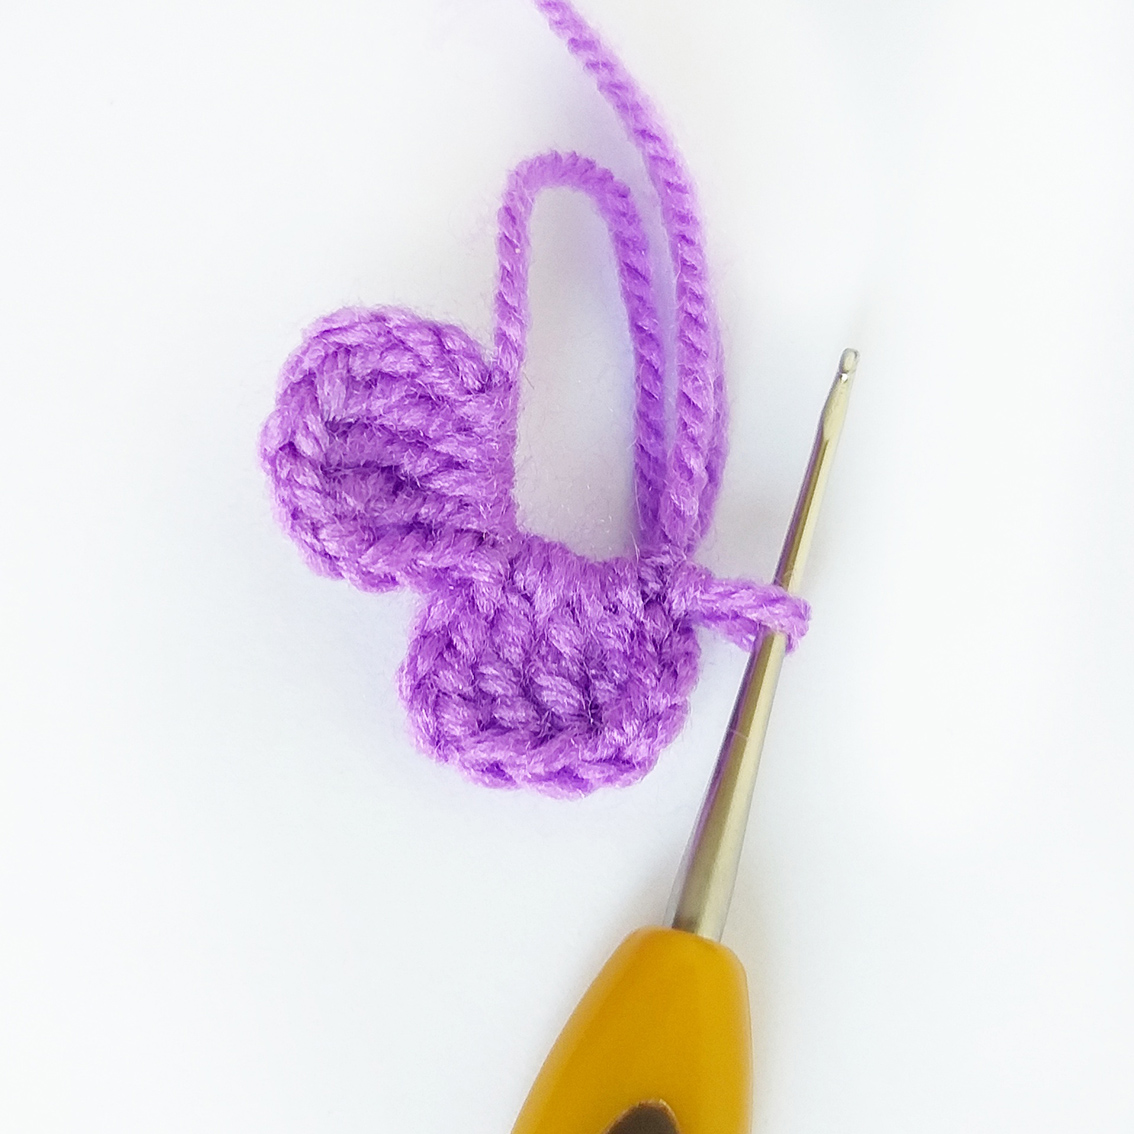
Tighten the Magic Ring now. Cut off yarn, leave a tail for further operation. Tie it in the middle with a thread, secure and fasten off. Sew or glue the bodice.
Decor the tail and bodice with beads (on request).
Stone, lower part
The yarn colour is at your discretion.
Rnd 1. 6 sc in a Magic Ring
Rnd 2. 6 inc = 12
Rnd 3. (1 sc, inc)* 6 times = 18
Rnd 4. (2 sc, inc)* 6 times = 24
Rnd 5. (3 sc, inc)* 6 times = 30
Rnd 6. (2 sc, inc, 2 sc)* 6 times = 36
Rnd 7. (5 sc, inc)* 6 times = 42
Rnd 8. (3 sc, inc, 3 sc)* 6 times = 48
Rnd 9. (7 sc, inc)* 6 times = 54
Rnd 10. (4 sc, inc, 4 sc)* 6 times = 60
Rnd 11. (9 sc, inc)* 6 times = 66
Fasten off, cut off any excess yarn.
Cut out a circle from a thick piece of cardboard according to the size of the finished part.
Stone, upper part
Rnd 1. 6 sc in a Magic Ring
Rnd 2. 6 inc = 12
Rnd 3. (1 sc, inc)* 6 times = 18
Rnd 4. (2 sc, inc)* 6 times = 24
Rnd 5. (3 sc, inc)* 6 times = 30
Rnd 6. (2 sc, inc, 2 sc)* 6 times = 36
Rnd 7. (5 sc, inc)* 6 times = 42
Rnd 8. (3 sc, inc, 3 sc)* 6 times = 48
Rnd 9. (7 sc, inc)* 6 times = 54
Rnd 10. (4 sc, inc, 4 sc)* 6 times = 60
Rnd 11. (9 sc, inc)* 6 times = 66
Rnd 12-21. (10 rounds) 66 sc
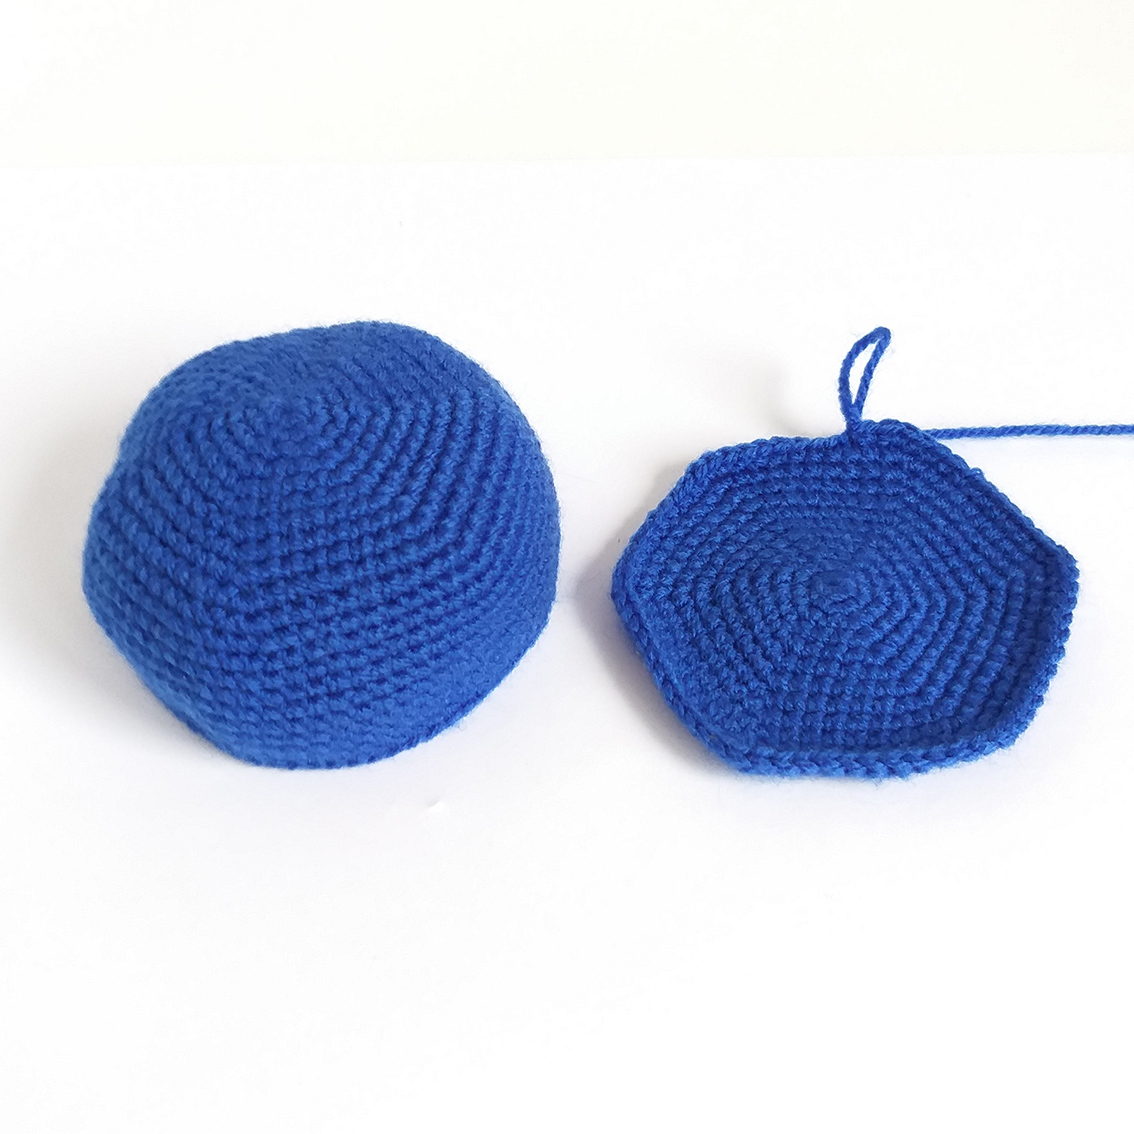
Join both parts together. Add some hollow fibre, insert the cardboard bottom inside. Work 66 sc hooking through both parts. Fasten off, cut off any excess yarn, hide the end.
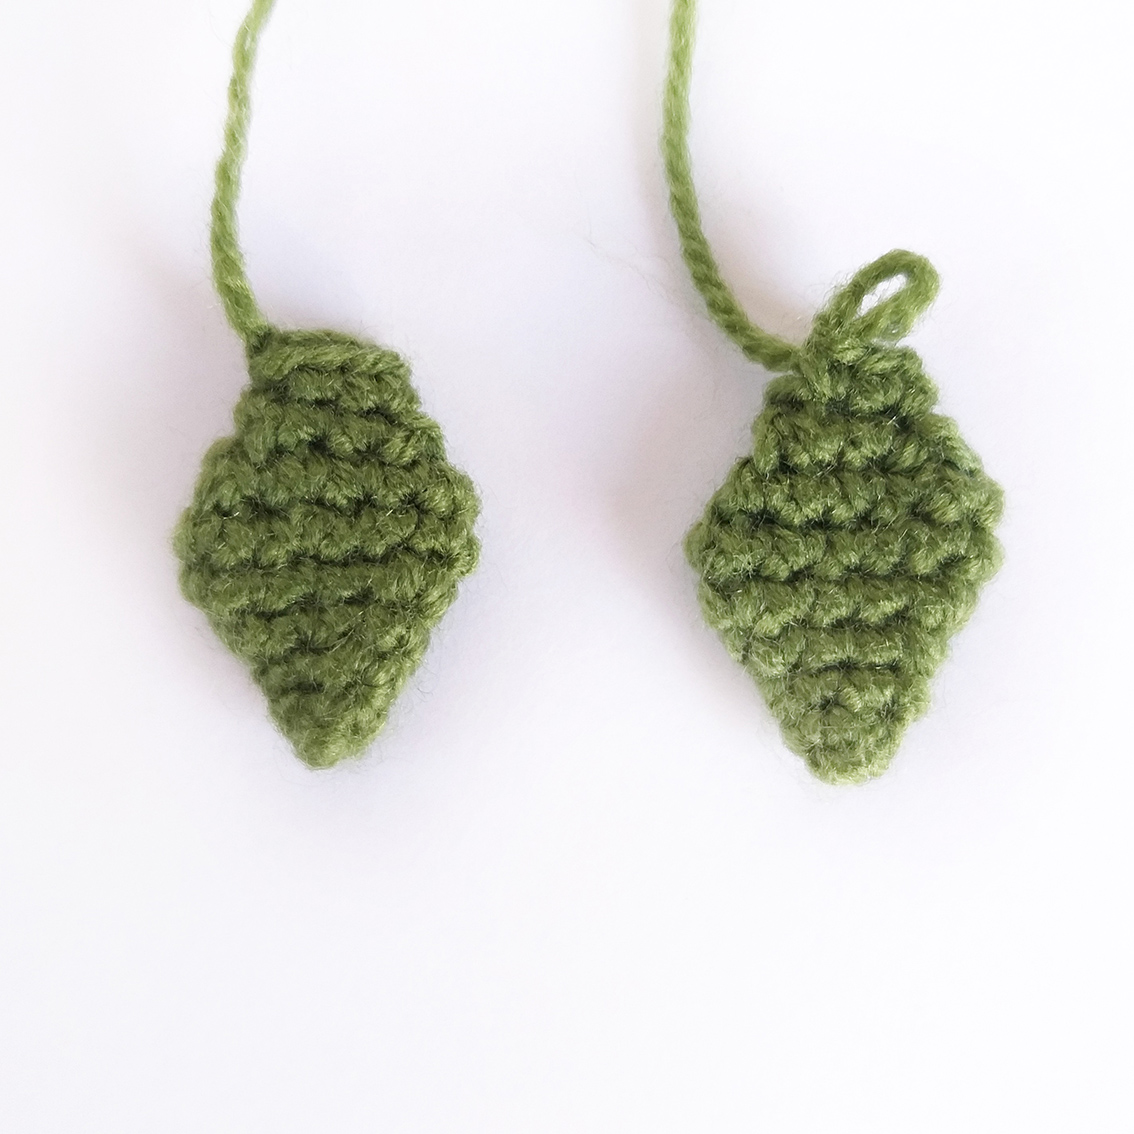
Seaweed (make 2-3)
Work with green colour yarn.
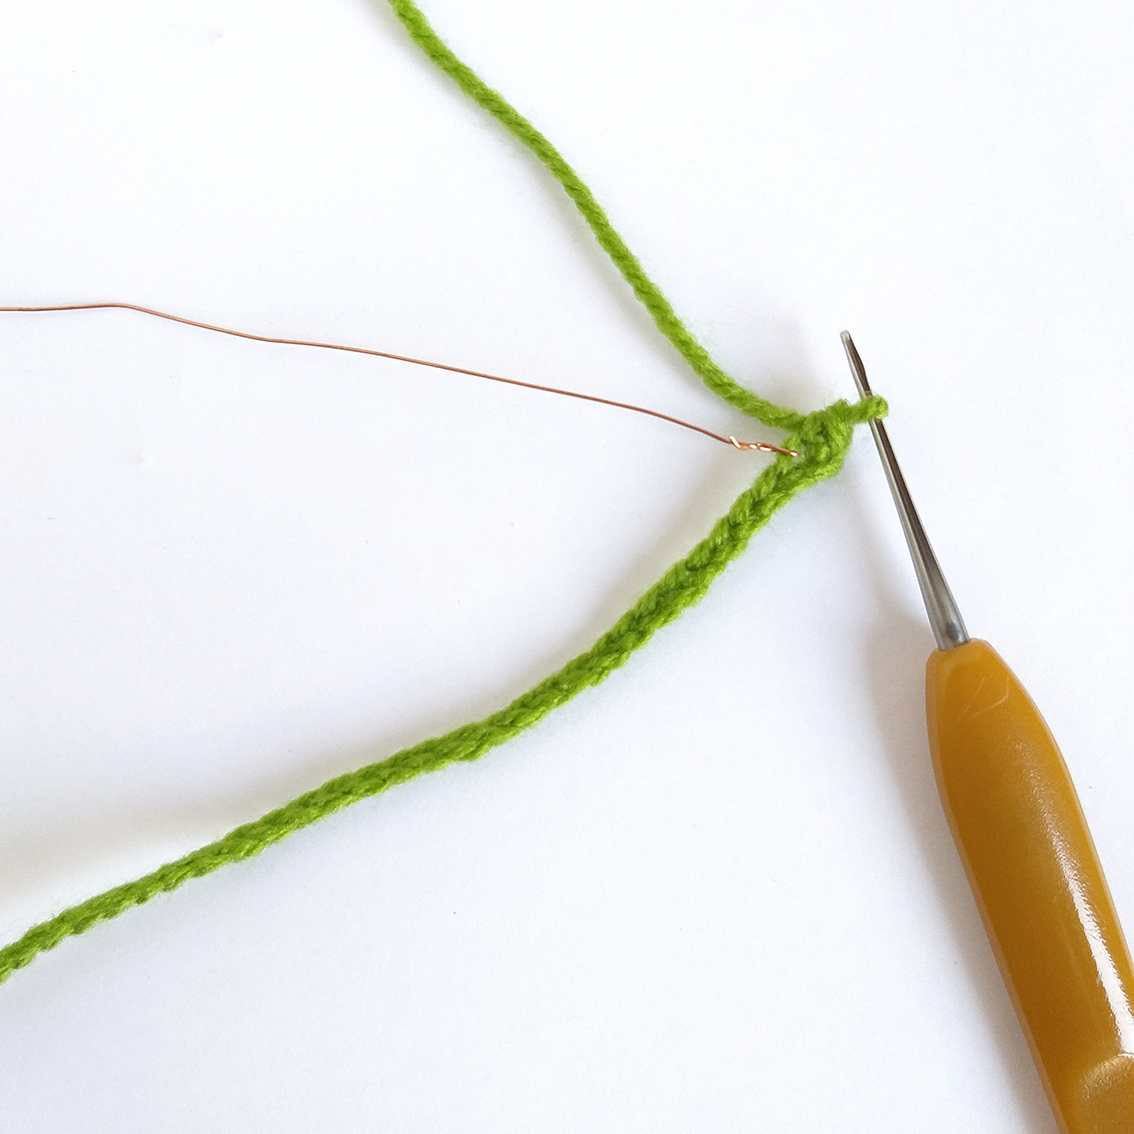
Work 35 ch. Prepare a piece of thin wire, it should be of the same length as the chain. I used beading wire. Make a loop on the end of the wire. Attach it to 1st stitch. Make one row by grabbing the loops and the wire at the same time. Thus the wire will hide on the inside.
Row 1. starting from 2nd ch from hook: 4 sc, (1 inc, 1 sc)* 15 times = 49

Cut off yarn, leave a tail for further operation. Twist the seaweed to form a spiral. Sew it to the stone.

Sea sponge (make 3)
Work with pink colour yarn.
Rnd 1. 9 sc in a Magic Ring
Rnd 2-3. 9 sc
Rnd 4. 2 sc, dec, 5 sc = 8
Rnd 5-6. 8 sc
Rnd 7. 4 sc, dec, 2 sc = 7
Rnd 8-9. 7 sc
Fasten off, cut off any excess yarn. Stuff a little.
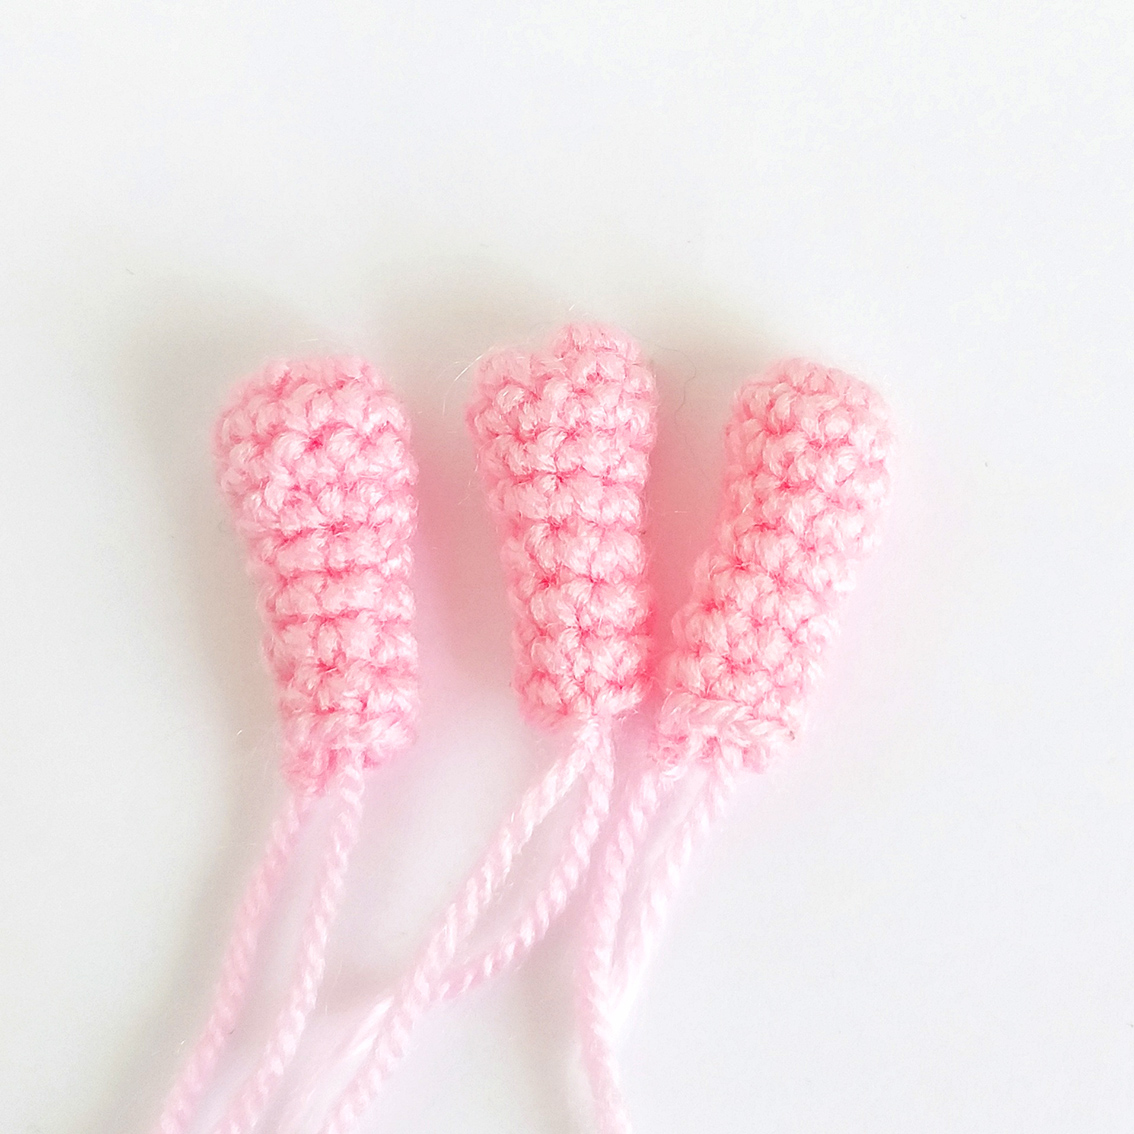
Sew them to the stone.
Decor stone with beads (on request).
Fix the mermaid on a stone (sew, glue or make a support from a wire).
Your little mermaid is completed!