Materials:
- Same thickness yarn of your choice (acrylic, cotton or wool).
- Yarn of the following colours is required: grey, white, blue and red. Also, small amount of thin white colour cotton yarn for the tusks.
Tusks can be molded from polymer clay.
For the fish: a small amount of yarn of different colours.
I used acrylic yarn, 200 m/50 g. The height of my walrus is 12 cm. Depending on the thickness of yarn a finished toy size may differ.
- Crochet hooks in two sizes. I used No.1.5 and No. 1.0
- A sewing needle
- Hollow fibre for stuffing
- For eyes: a small amount of white yarn, 2 beads, I used 6mm diam half-beads or 1 pair of ready-made eyes
- Ready made nose in black
- For embroidery: a few threads of black and white
- A few glass granules - for the balance of the figure
- All purpose clear transparent glue, e.g. UHU
Abbreviations:
ch – chain
st - stitch
sl st – slip stitch
sc – single crochet
hdc – half double crochet
dc - double crochet
tr - treble crochet
inc – increase (2 sc in 1 st)
dec – decrease (single crochet two stitches together)
(...) x N times – repeat instructions in brackets N times
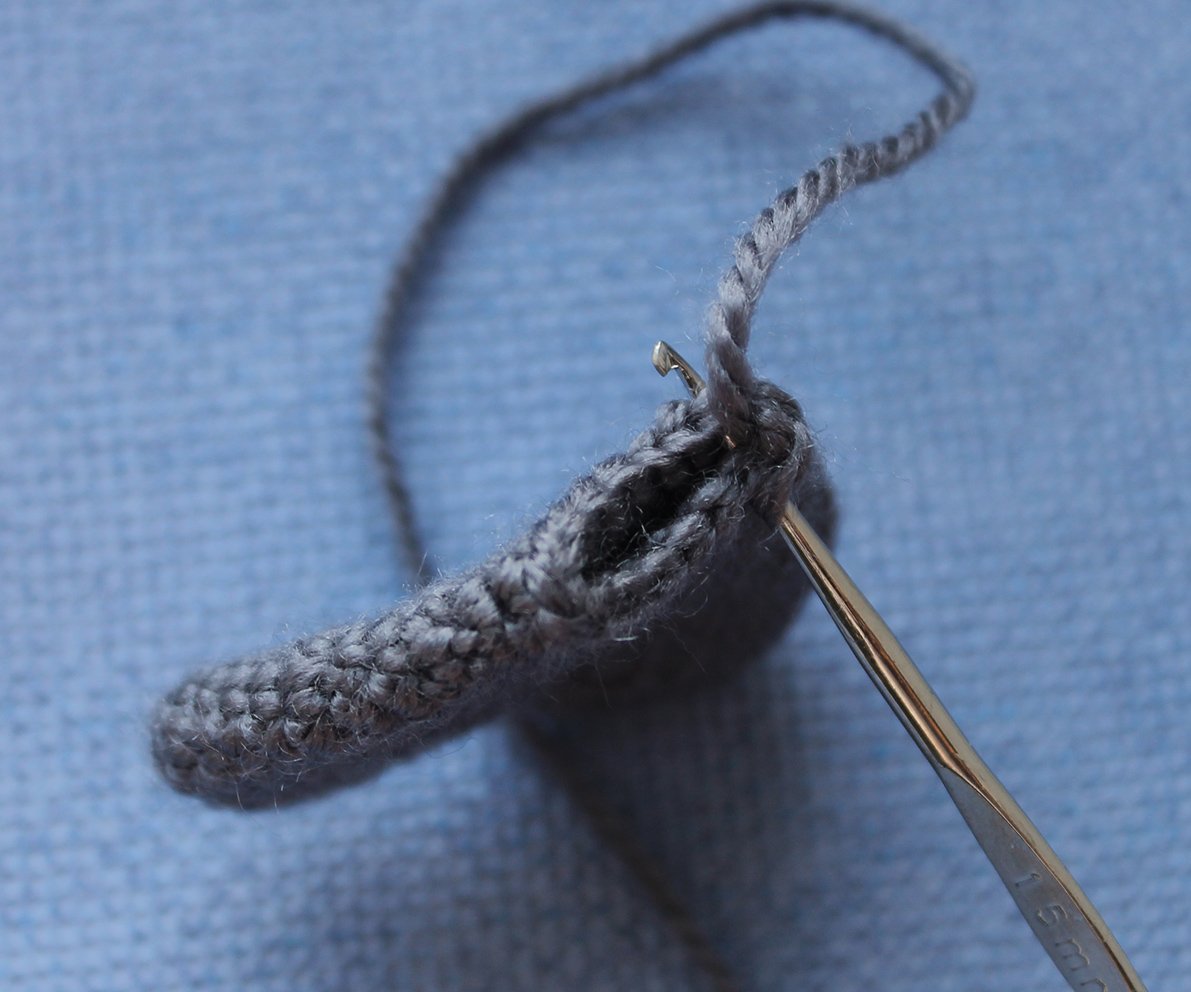
Flipper (make 2)
Work with grey colour yarn.
10 ch
Row 1: starting from 3rd ch from hook: 3 hdc, 3 sc, 2 sl st, 1 ch, turn (8)
Row 2: 2 sl st, 3 sc, 2 hdc, 2 hdc in 1 loop, 2 ch, turn (9)
Row 3: 2 hdc in 1 loop, 3 hdc, 3 sc, 2 sl st, 1 ch, turn (10)
Row 4: 2 sl st, 4 sc, 3 hdc, 2 hdc in 1 loop, 2 ch, turn (11)
Row 5: 2 hdc in 1 loop, 3 hdc, inc, 6 sc, 1 вп, crochet from A to B: 3 sc (16)
Fasten off, cut off.
.JPG)
Head – body
Start with grey colour yarn.
Rnd 1: 6 sc in a Magic Ring
Rnd 2: 6 inc (12)
Rnd 3: (3 sc, 3 inc)× 2 times (18)
Rnd 4: 3 sc, (1 sc, inc)× 3 times, 3 sc, (1sc, inc)× 3 times (24)
Rnd 5: 5 sc, inc, 3 sc, inc, 7 sc, inc, 3 sc, inc, 2 sc (28)
Rnd 6: 7 sc, inc, 1 sc, inc, 11 sc, inc, 1 sc, inc, 4 sc (32)
Rnd 7: 9 sc, inc, 15 sc, inc, 6 sc (34)
Rnd 8: 8 sc, inc, 3 sc, inc, 12 sc, inc, 3 sc, inc, 4 sc (38)
Work 2 sc, transfer your place marker here – this is the middle of the head from behind.
Rnd 9: 38 sc
Rnd 10: 9 sc, inc, 18 sc, inc, 9 sc (40)
Rnd 11: 40 sc
Rnd 12: 10 sc, inc, 19 sc, inc, 9 sc (42)
Rnd 13: 42 sc
.JPG)
Rnd 14: 10 sc, inc, 20 sc, inc, 10 sc (44)
Rnd 15: 42 sc, 2 sl st (44)
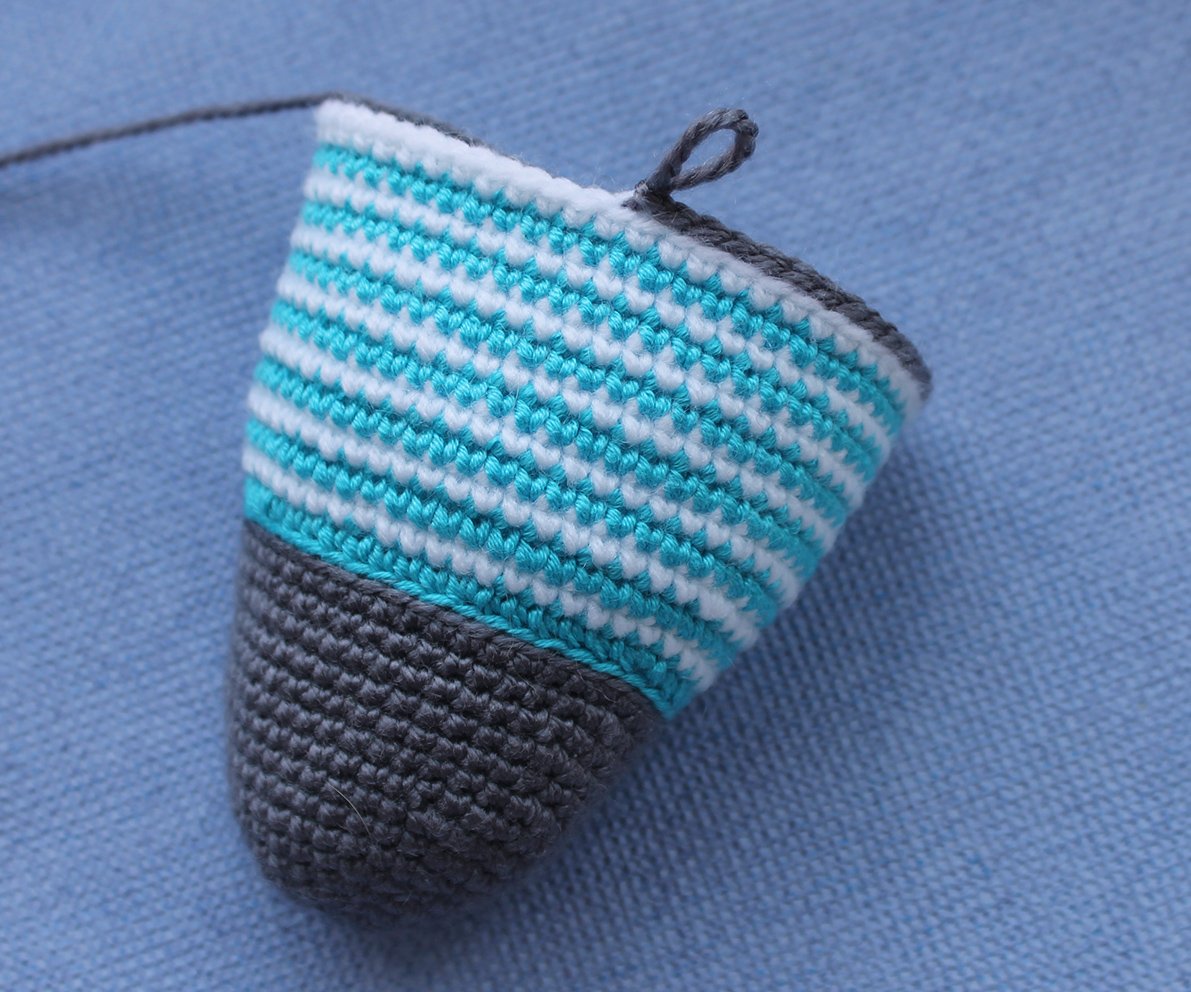
Change to blue yarn.
Rnd 16: into the back loops only: 44 sl st
Rnd 17: into the back loops only: 11 sc, inc, 5 sc, inc, 8 sc, inc, 5 sc, inc, 11 sc (48)
Work 1 sl st, transfer your place marker here. Change to white yarn.
Rnd 18: 4 sc, inc, 38 sc, inc, 4 sc (50)
Change to blue yarn.
Rnd 19: 50 sc
Then change the yarn in each round.
Rnd 20 white yarn: (5 sc, inc)× 2 times, 26 sc, (inc, 5 sc)× 2 times (54)
Rnd 21 blue yarn: 54 sc
Rnd 22 white yarn: 54 sc
Rnd 23 blue yarn: 54 sc
.JPG)
.JPG)
Rnd 24 white yarn: 54 sc
Rnd 25 blue yarn: 54 sc
Rnd 26 white yarn: 54 sc
Rnd 27 blue yarn: 49 sc, inc, 2 sc, inc, 1 sc (56)
Rnd 28 white yarn: 1 sc, inc, 2 sc, inc, 51 sc (58)
Rnd 29 blue yarn: 52 sc, (inc, 2 sc)× 2 times (60)
Rnd 30 white yarn: (2 sc, inc)× 2 times, 54 sc (62)
Change to grey yarn. Fasten off and cut off the white and blue yarn.
Rnd 31: into the back loops only: 62 sl st
Rnd 32: into the back loops only: 3 sc, inc, 54 sc, inc, 3 sc (64)
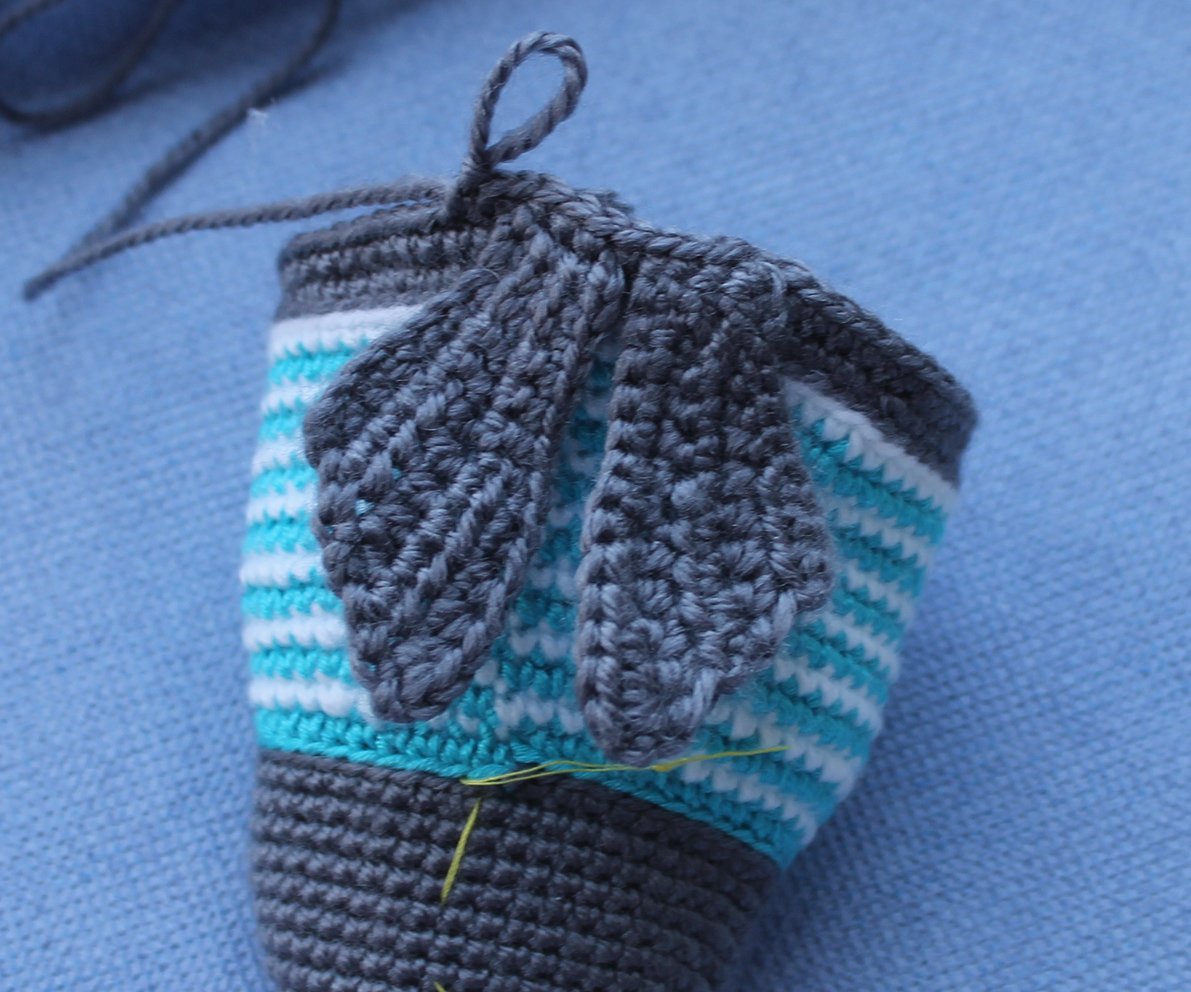
Rnd 33: 61 sc, attach the 1st flipper, work the loops of the flipper and the loops of the body together: 3 sc (64)
Work 1 sc, transfer your place marker here.
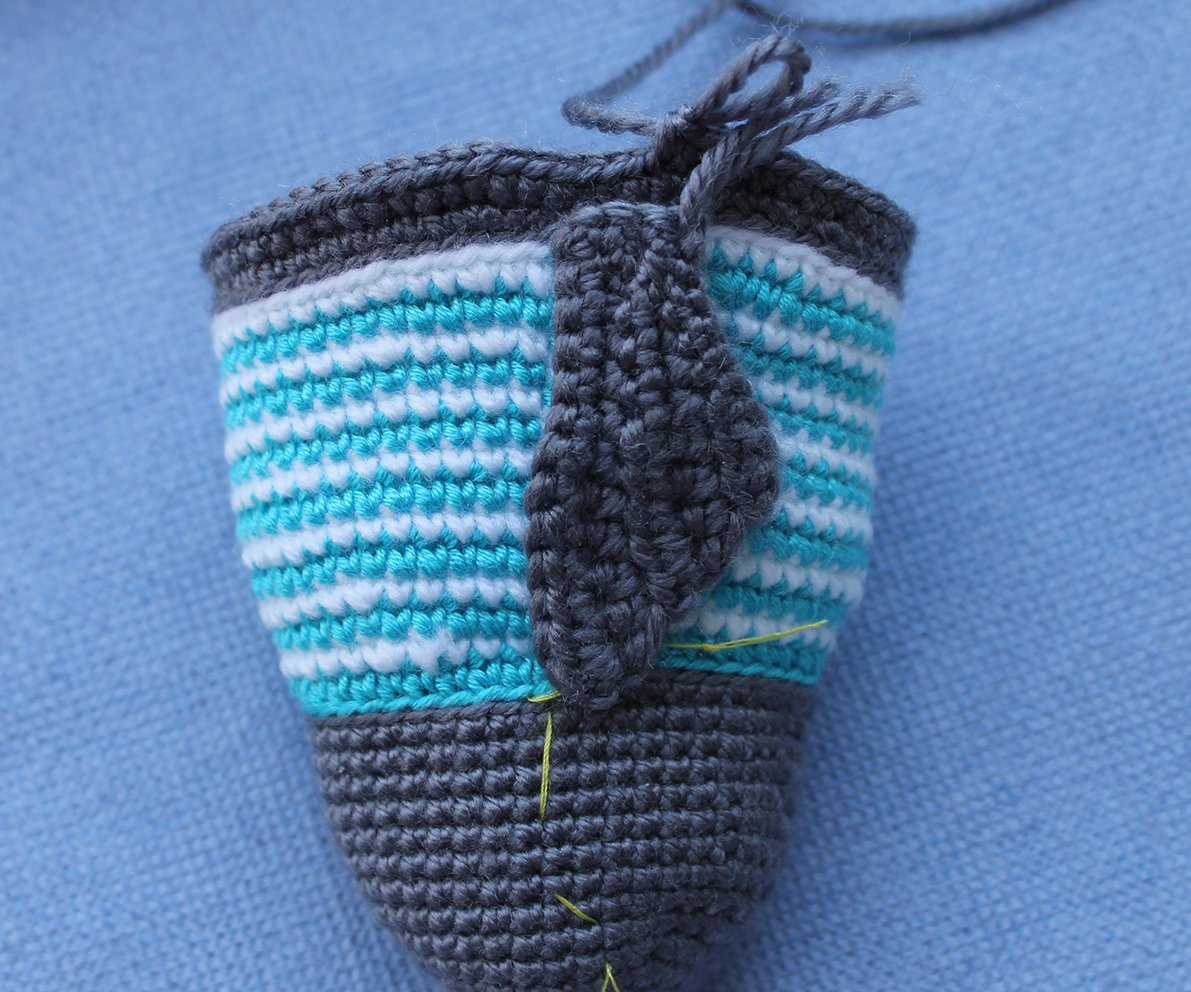
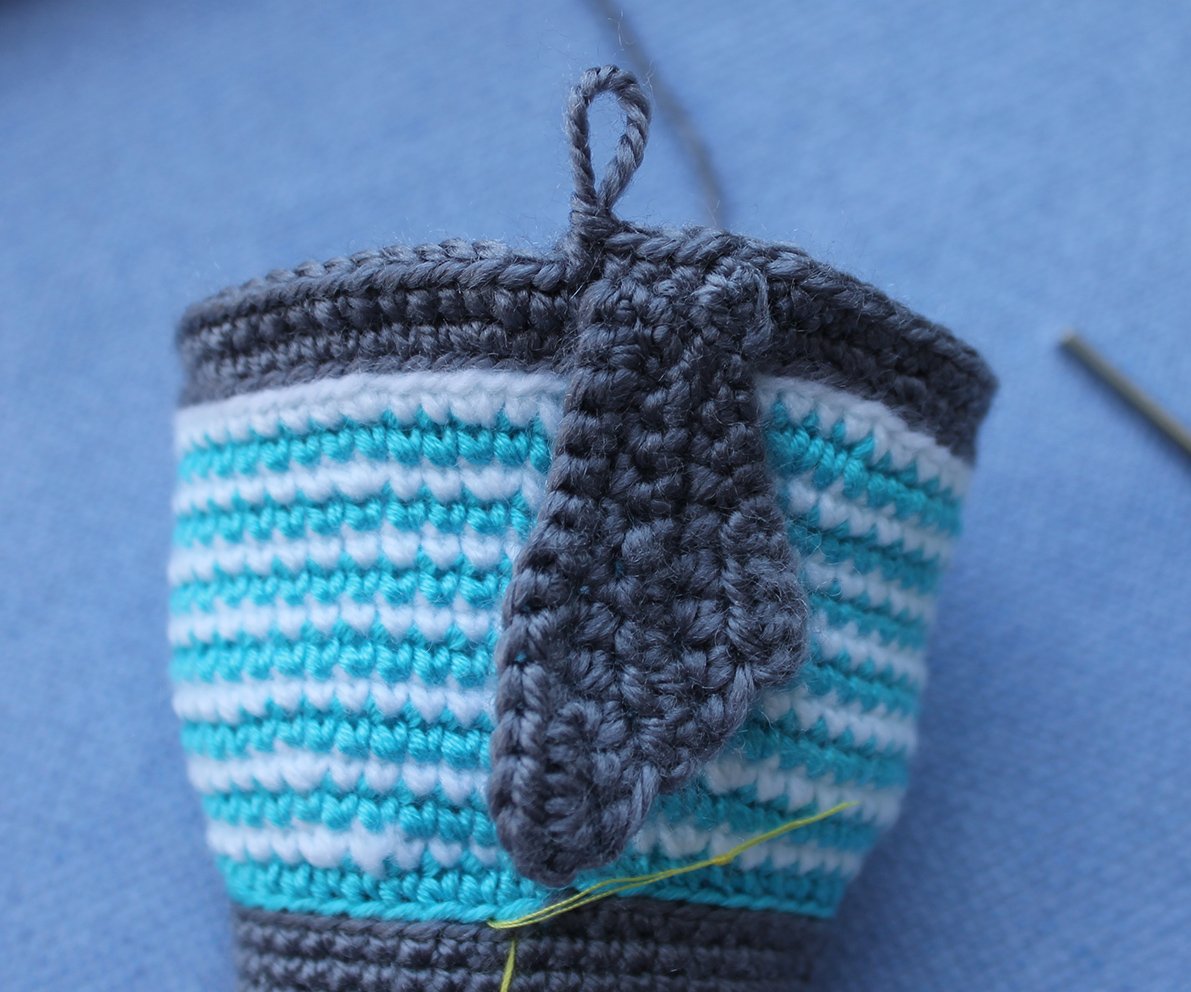
Rnd 34: attach the 2nd flipper, work the loops of the flipper and the loops of the body together: 3 sc, continue: (dec, 6 sc)× 7 times, dec, 3 sc (56)
Rnd 35: (dec, 5 sc)× 8 times (48)
Rnd 36: (2 sc, dec, 2 sc)× 8 times (40)
Rnd 37: (dec, 3 sc)× 8 times (32)
Rnd 38: (1 sc, dec, 1 sc)× 8 times (24)
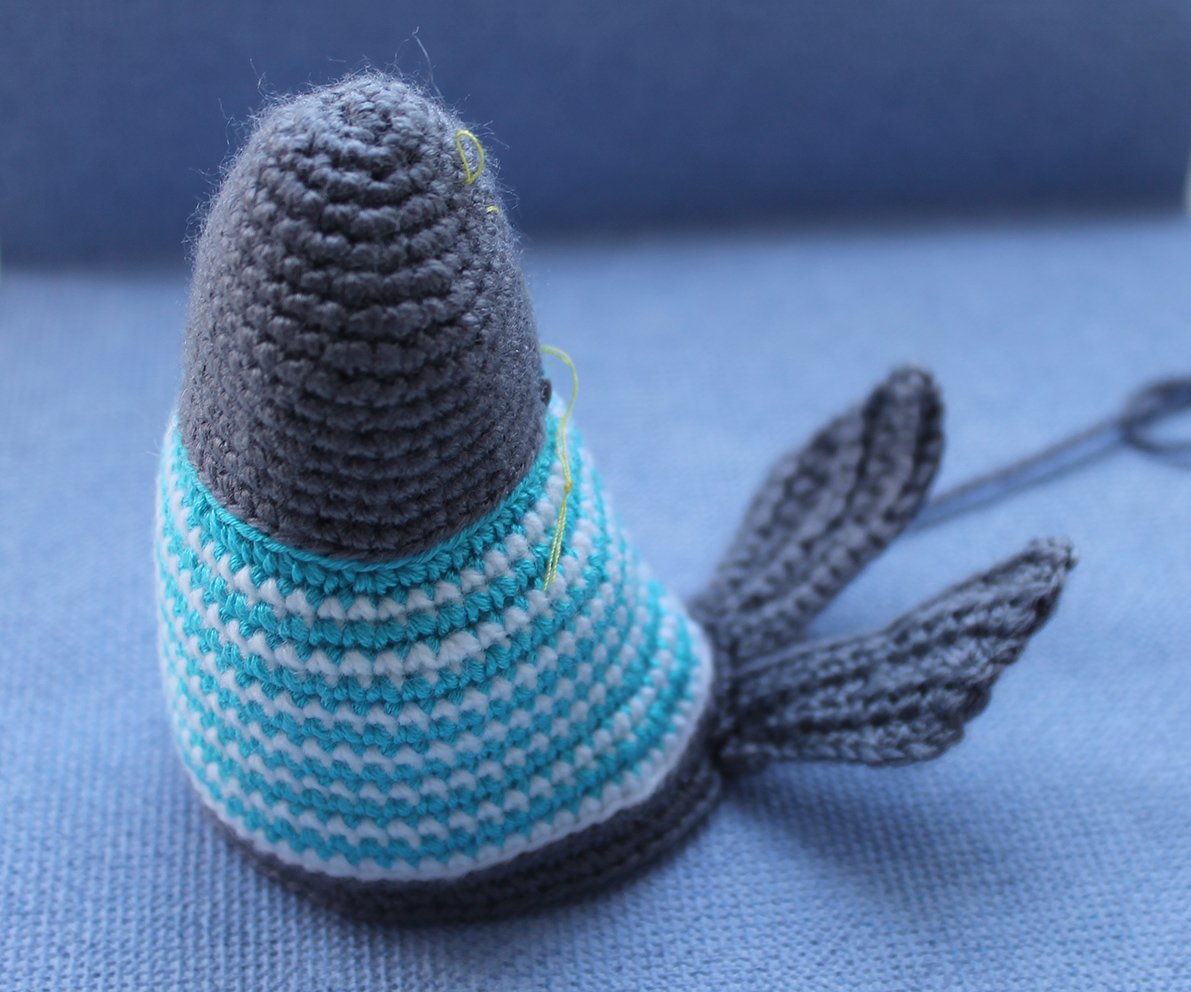
Add some hollow fibre. Add some glass granules to the back (they can be replaced with beads) to ensure stability.
Rnd 39: (dec, 1 sc)× 8 times (16)
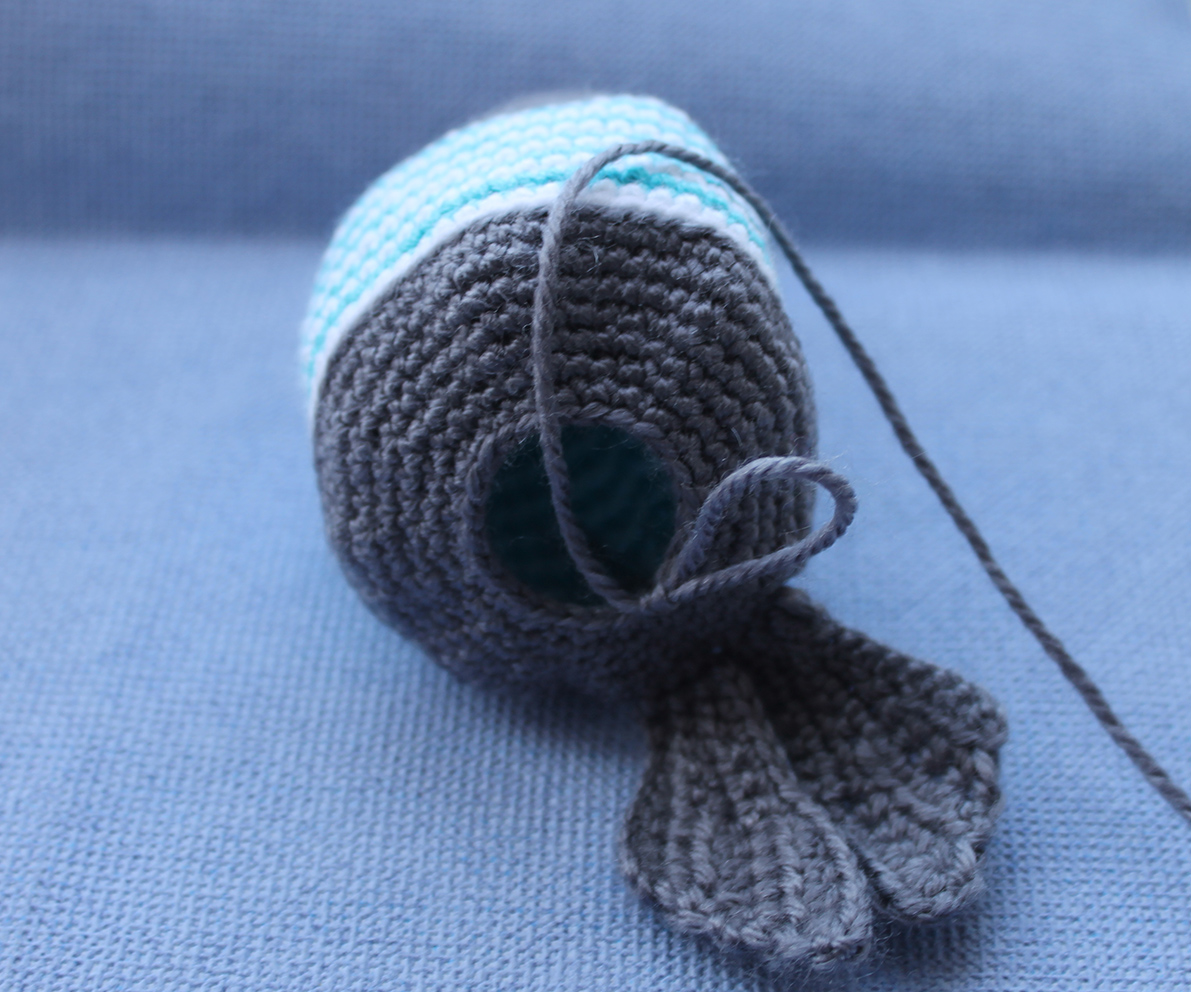
Rnd 40: 8 dec (8)
Fasten off, cut off. Pull off the loops, hide the end.
It’s important to properly spread the hollow firbe (see photo for guidance).
.JPG)
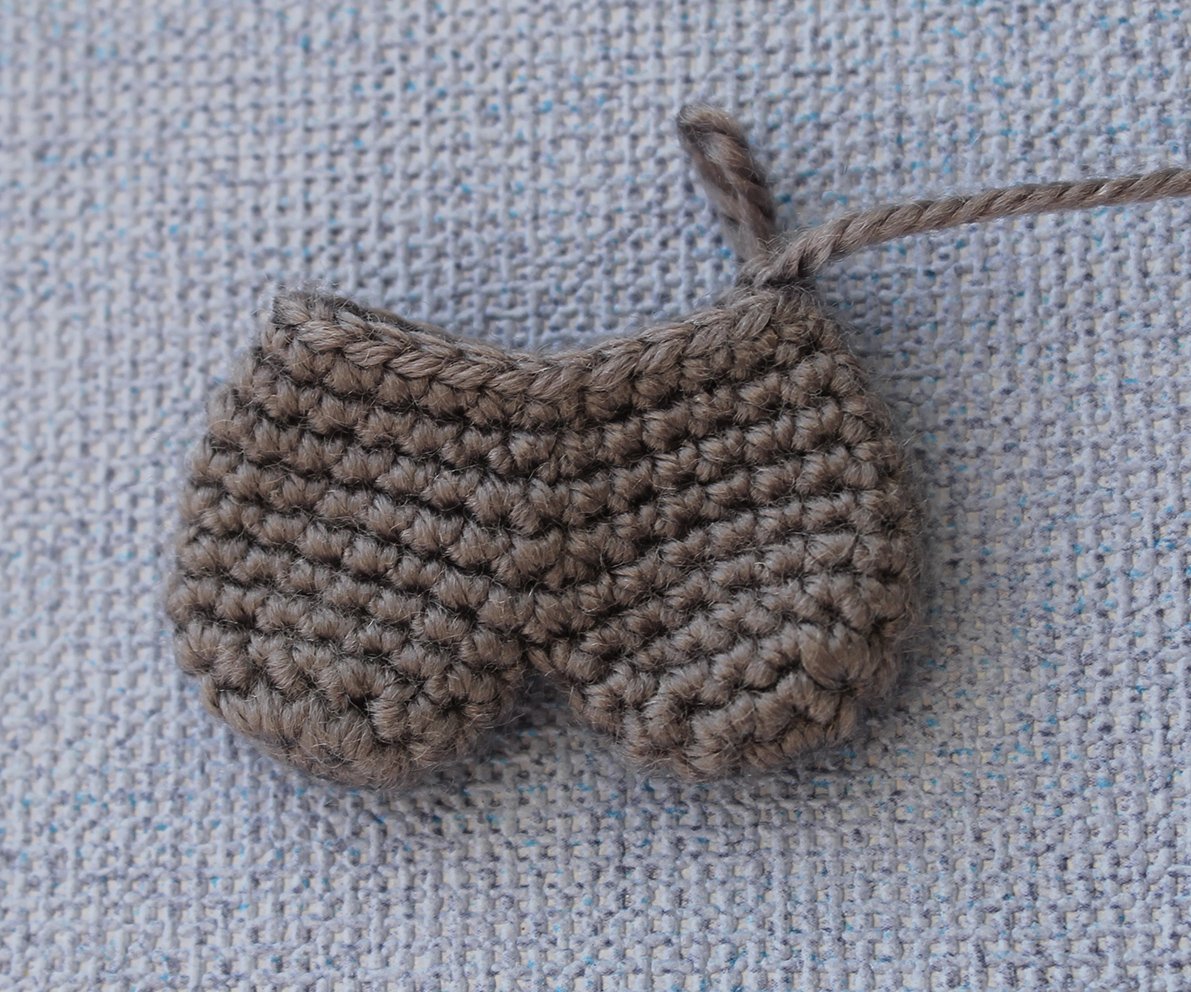
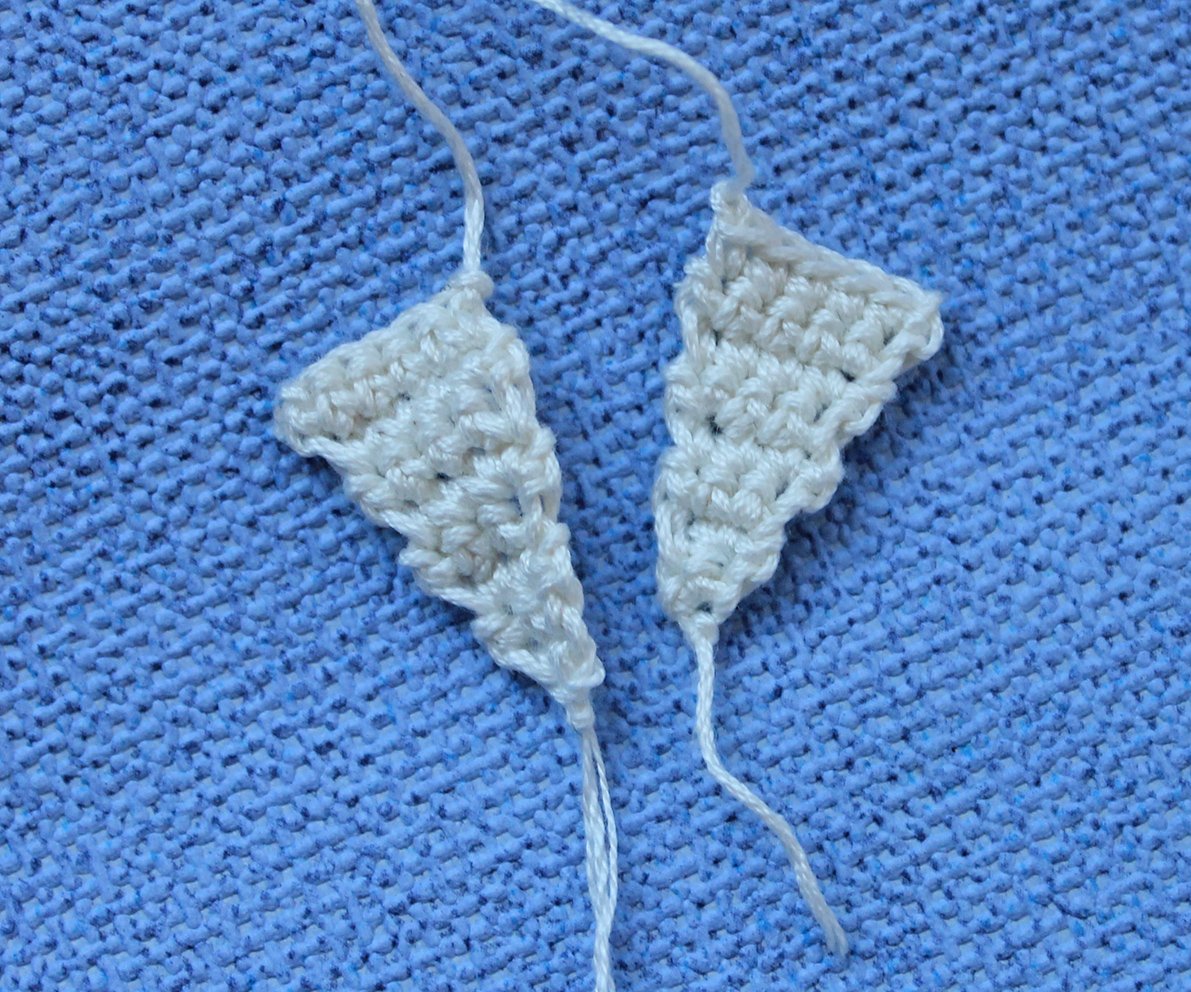
Front flippers (make 2)
Work with grey colour yarn. Work 11 ch.
Row 1: starting from 3rd ch from hook: 3 hdc, 3 sc, 3 sl st, 1 ch, turn (9)
Row 2: 3 sl st, 5 sc, inc, 2 ch, turn (10)
Row 3: 2 hdc in 1 loop, 3 hdc, 3 sc, 3 sl st, 1 ch, turn (11)
Row 4: 3 sl st, 7 sc, inc, 2 ch, turn (12)
Row 5: 2 hdc in 1 loop, 3 hdc, 6 sc, 2 sl st (13)
Cut off yarn, leave a tail for sewing.
Muzzle
Work with grey colour yarn.
Rnd 1: 6 sc in a Magic Ring
Rnd 2: 6 inc (12)
Rnd 3: (inc, 2 sc)× 4 times (16)
Rnd 4: 16 sc
Crochet 2 such parts. Fasten and cut off thread of Part 1, do not cut thread of Part 2.

Rnd 5: work into the loops of the 1st part: 8 sc, work into the loops of the 2nd part: 16 sc, work into the loops of the 1st part: 8 sc (32)
The marker goes along the side. Adjust as and when to keep it straight.
Rnd 6: 32 sc
Rnd 7: 7 sc, dec, 14 sc, dec, 7 sc (30)
Rnd 8: 30 sc
Work 1 sc, transfer your place marker here.
Rnd 9: (6 sc, dec) × 2 times, (5 sc, dec) × 2 times (26)
Rnd 10: 5 sc, dec, 11 sc, dec, 6 sc (24)
Work 1 sc, transfer your place marker here.
Rnd 11: (4 sc, dec)× 4 times (20)
Rnd 12: 9 sc, dec, 7 sc, dec (18)
Rnd 13: 4 sc, dec, 7 sc, dec, 3 sc (16)
Work 1 sc, transfer your place marker here.
Add a small amount of hollow fibre.
Rnd 14: fold the part in two, work 7 sc by hooking through both edges of the part: (leave 2 loops at the beginning and end of the curve unworked) (7)
Fasten off, cut off.
Attach the muzzle to the head, make sure its upper part is in line with Rnd 11. Sew it on with hidden stitches.
.JPG)
.JPG)
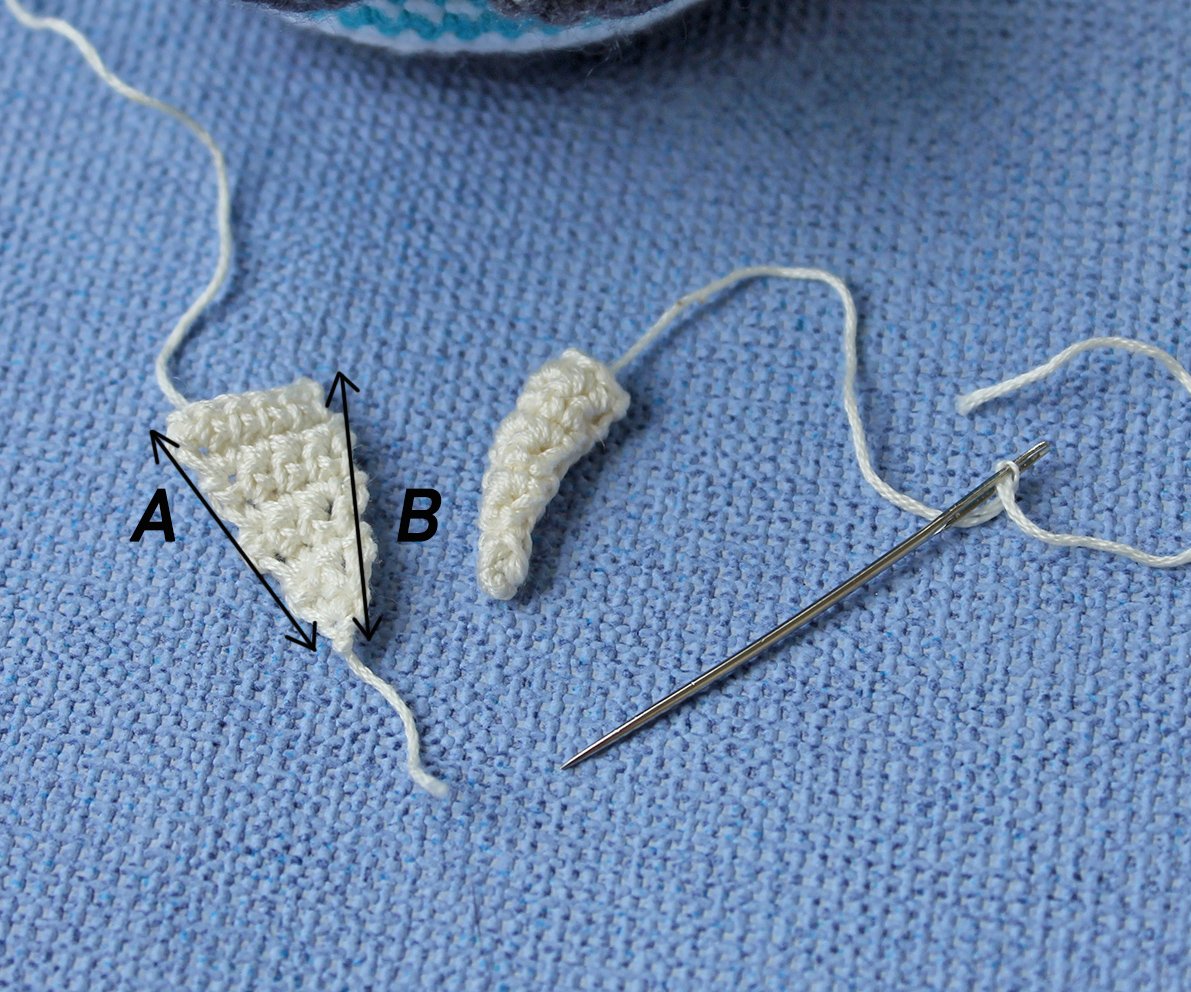
Tusks (make 2)
Take a smaller hook. Work 2 ch with thin white yarn.
Row 1: starting from 2nd ch from hook: inc, 1 ch, turn (2)
Row 2: 2 sc, 1 ch, turn (2)
Row 3: 1 sc, inc, 1 ch, turn (3)
Row 4: 3 sc, 1 ch, turn (3)
Row 5: inc, 2 sc, 1 ch, turn (4)
Row 6: 4 sc, 1 ch, turn (4)
Row 7: 3 sc, inc, 1 ch, turn (5)
Row 8: 5 sc
Cut off yarn, leave a tail for sewing.
Sew sides A and B (see photo for guidance).
Tusks can be molded from polymer clay and glued.
Mouth
Work with grey colour yarn. 4 ch
Row 1: starting from 2nd ch from hook: 1 sc, 2 hdc in 1 loop, 1 sc (4)
Cut off yarn, leave a tail for sewing.
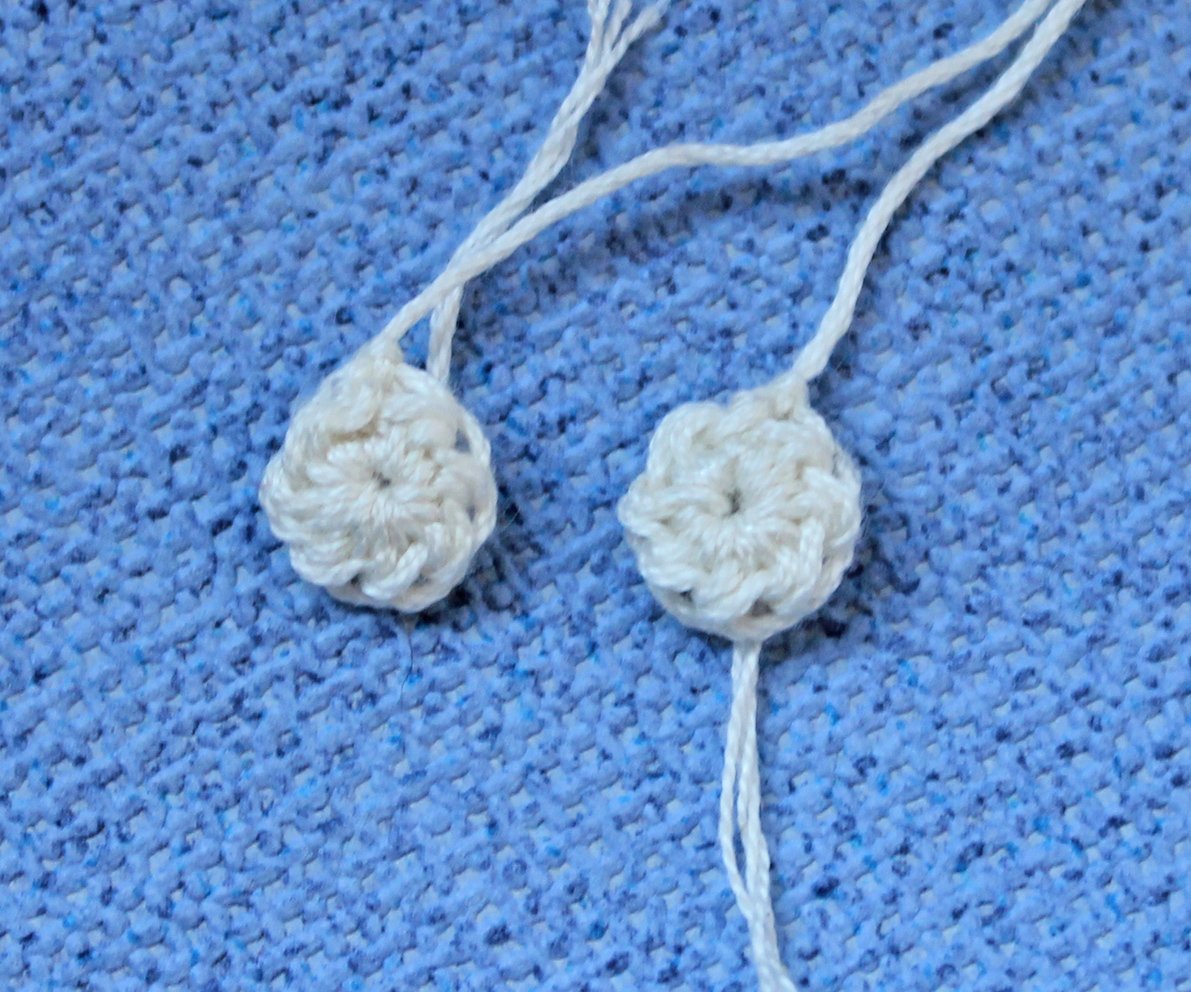
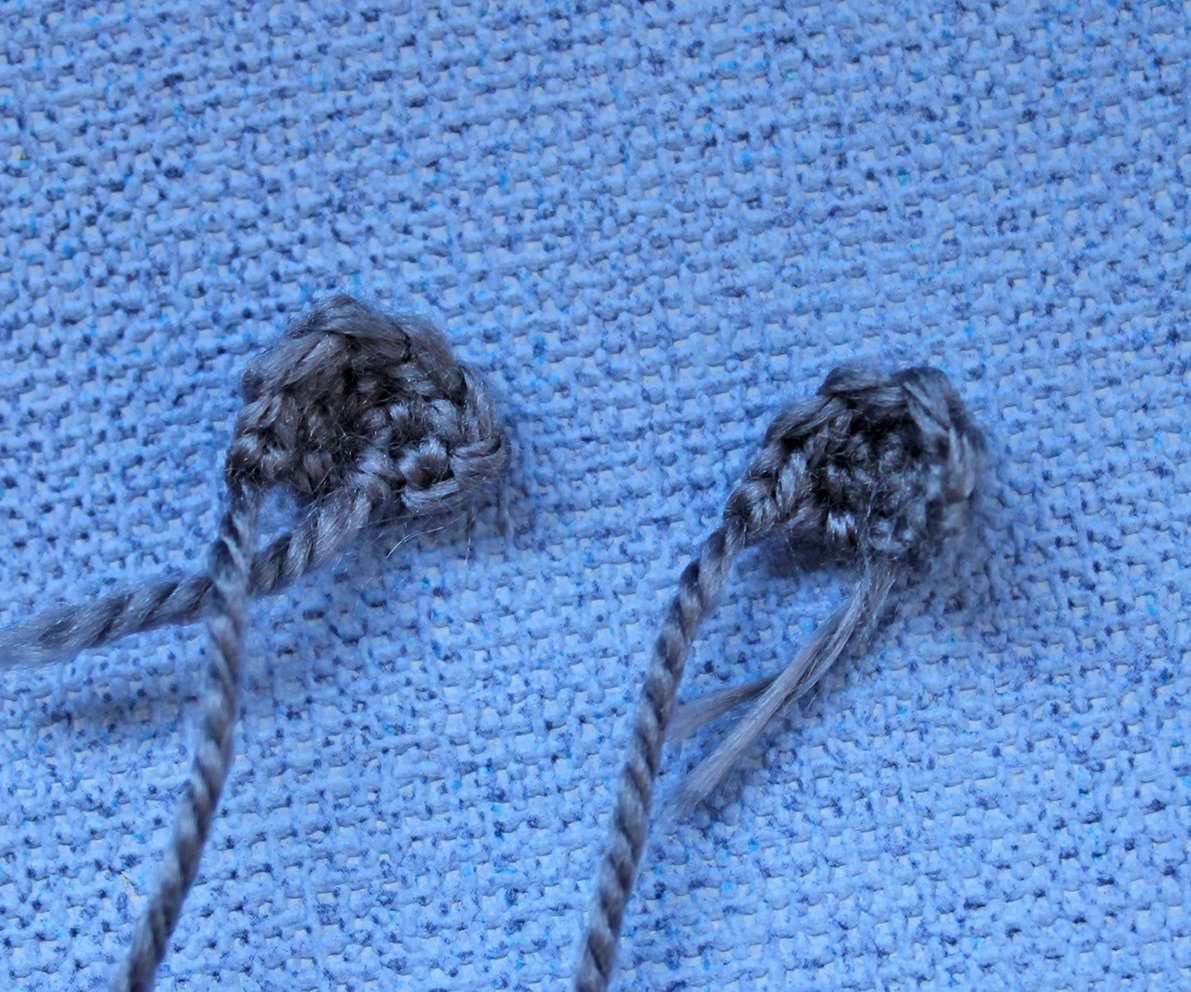
Eyes (make 2)
Take a smaller hook. Work 3 ch with thin white yarn.
Rnd 1: starting from 3rd ch from hook: 7 hdc, join into a ring with a sl st(7)
Fasten off, cut off.
Ear (make 2)
Work with grey colour yarn.
Row 1: 5 sc in a Magic Ring, 1 ch, turn (5)
Row 2: 5 sc
Fasten off, cut off.
Assembly and Decoration
Embroider a black line on the muzzle as shown. Sew the mouth and tusks on. Glue the nose on.
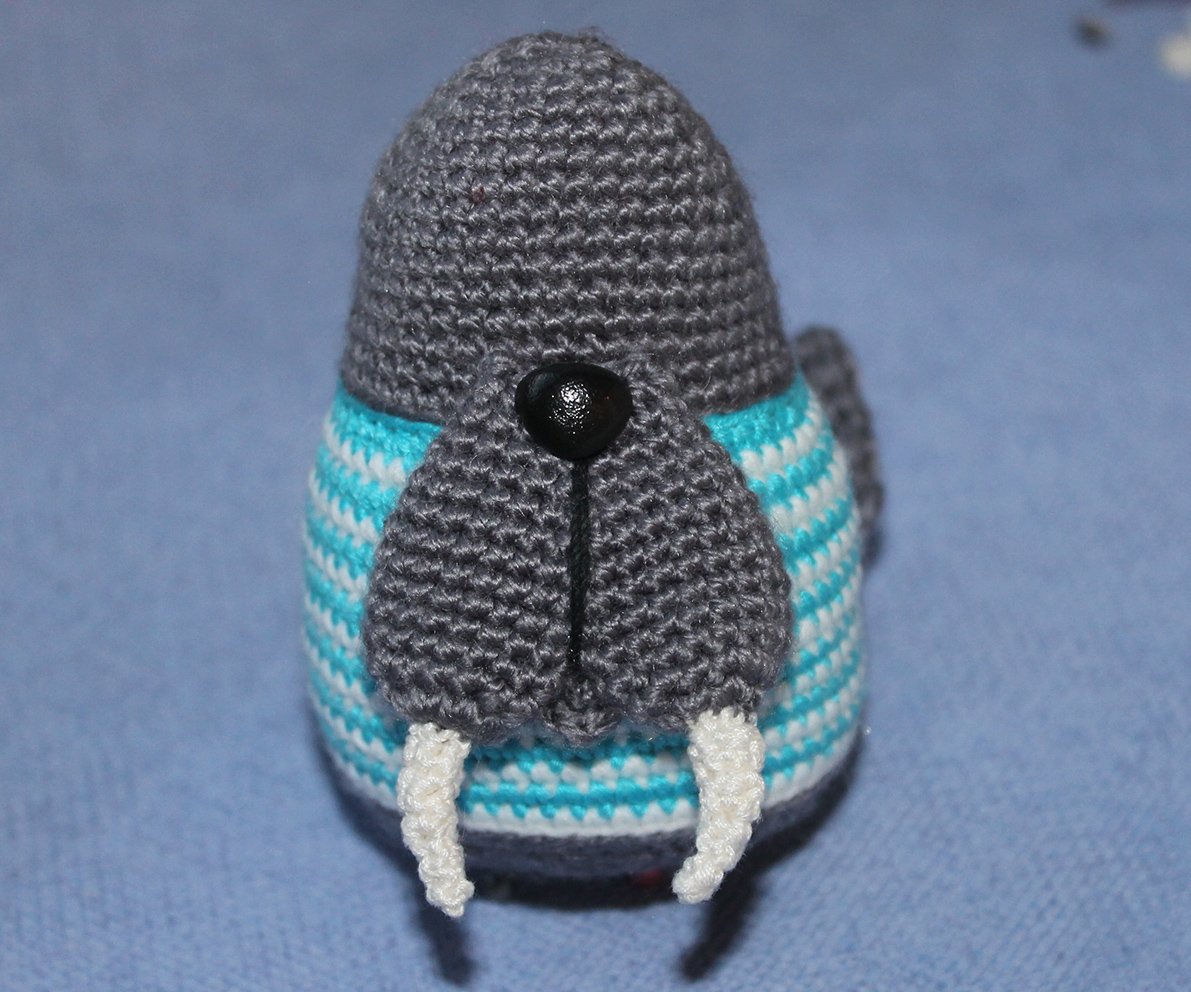
Glue the eyes. Glue the pupils – black beads.
The eyes can be molded from polymer clay or use ready-made eyes.
.JPG)
Attach the ears to the head. Sew them on.
Sew the flippers on.
Embroider a mustache with a white thread.
.JPG)

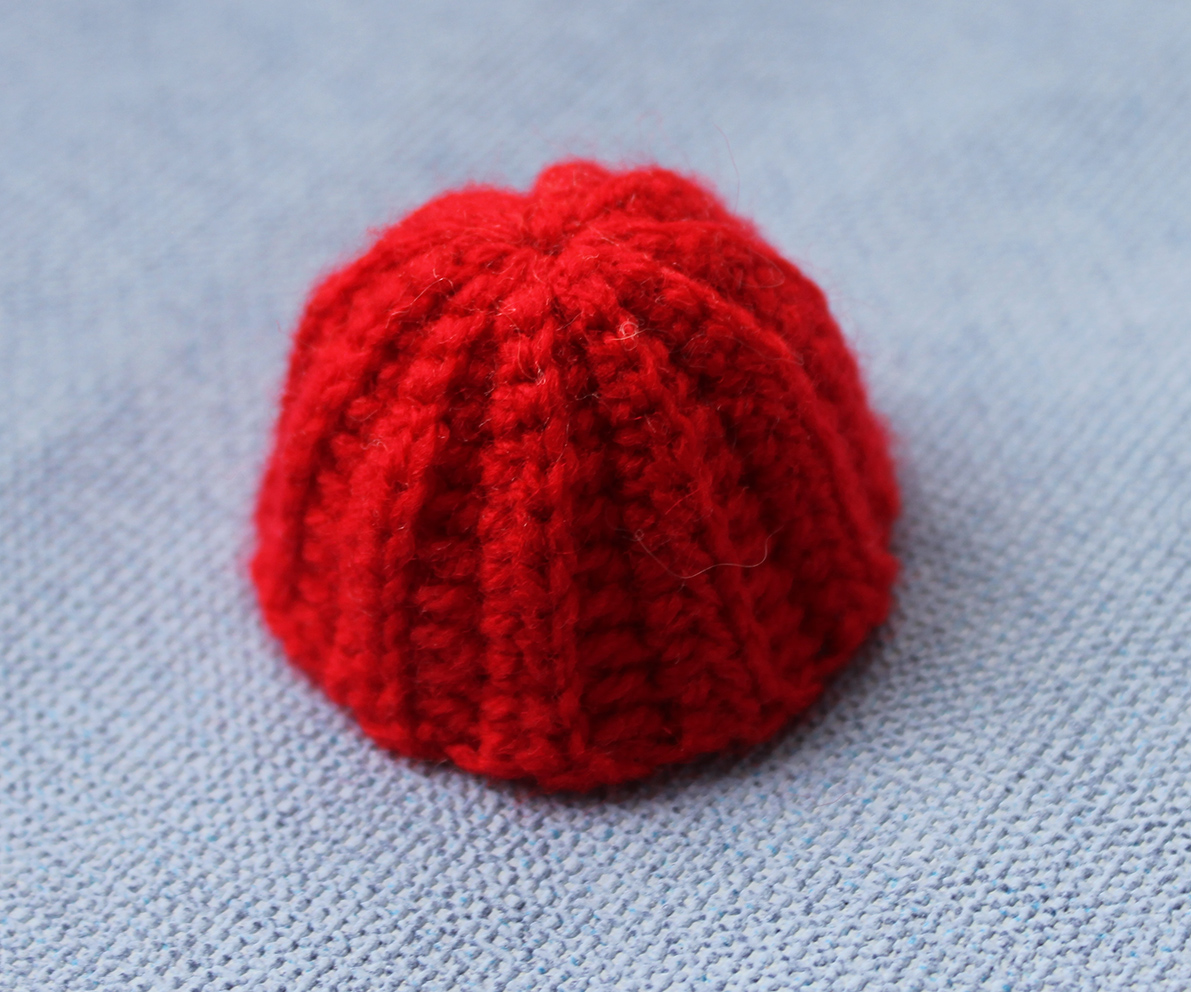
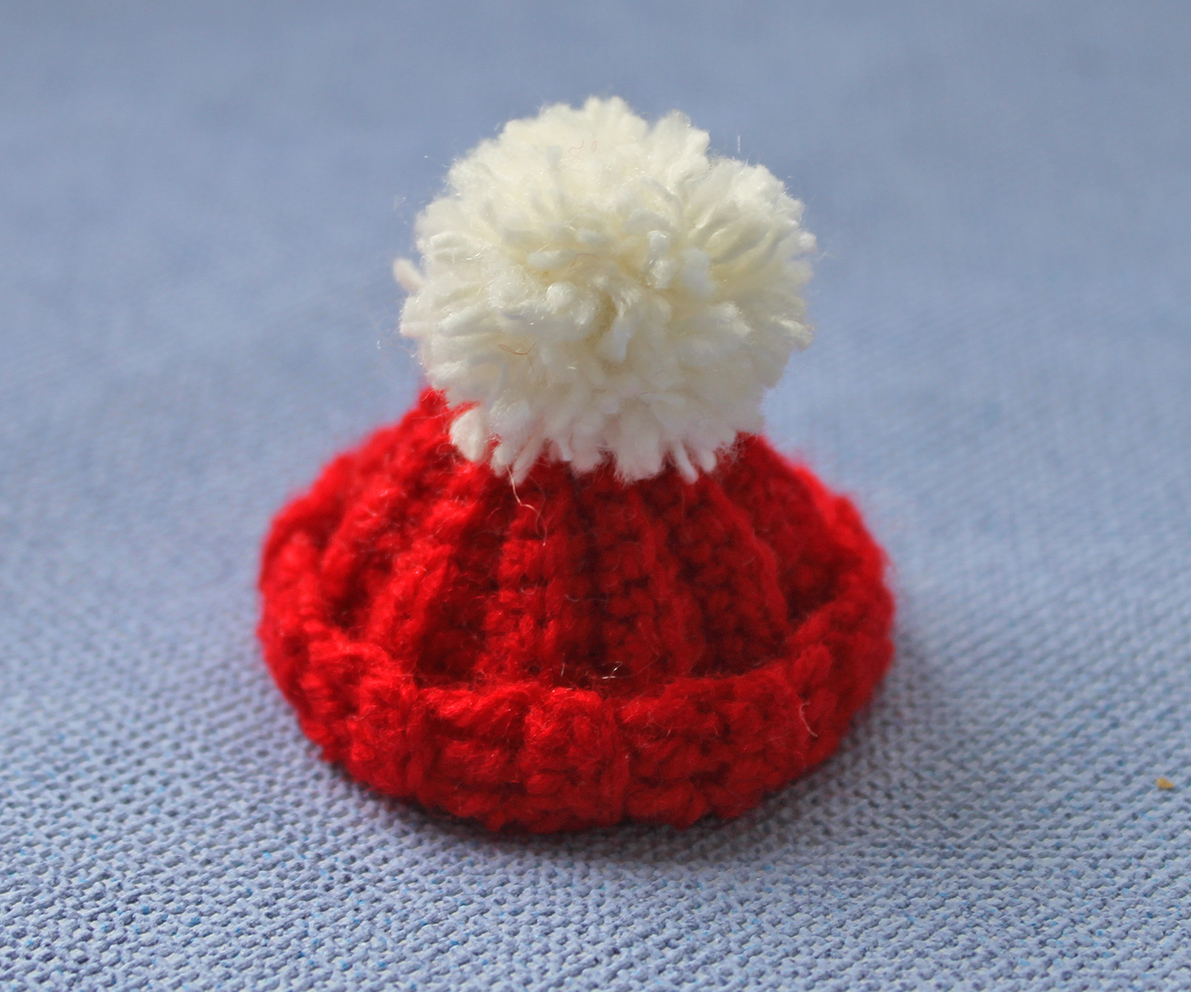
Cap
Work with red colour yarn.
Crochet in rows. Work 12 ch.
Row 1: starting from 2nd ch from hook: 4 sc, 7 hdc, 2 ch, turn (11)
Furter crochet all rows into the back loops only!
Row 2: 7 hdc, 4 sc, 1 ch, turn (11)
Row 3: 4 sc, 7 hdc, 2 ch, turn (11)
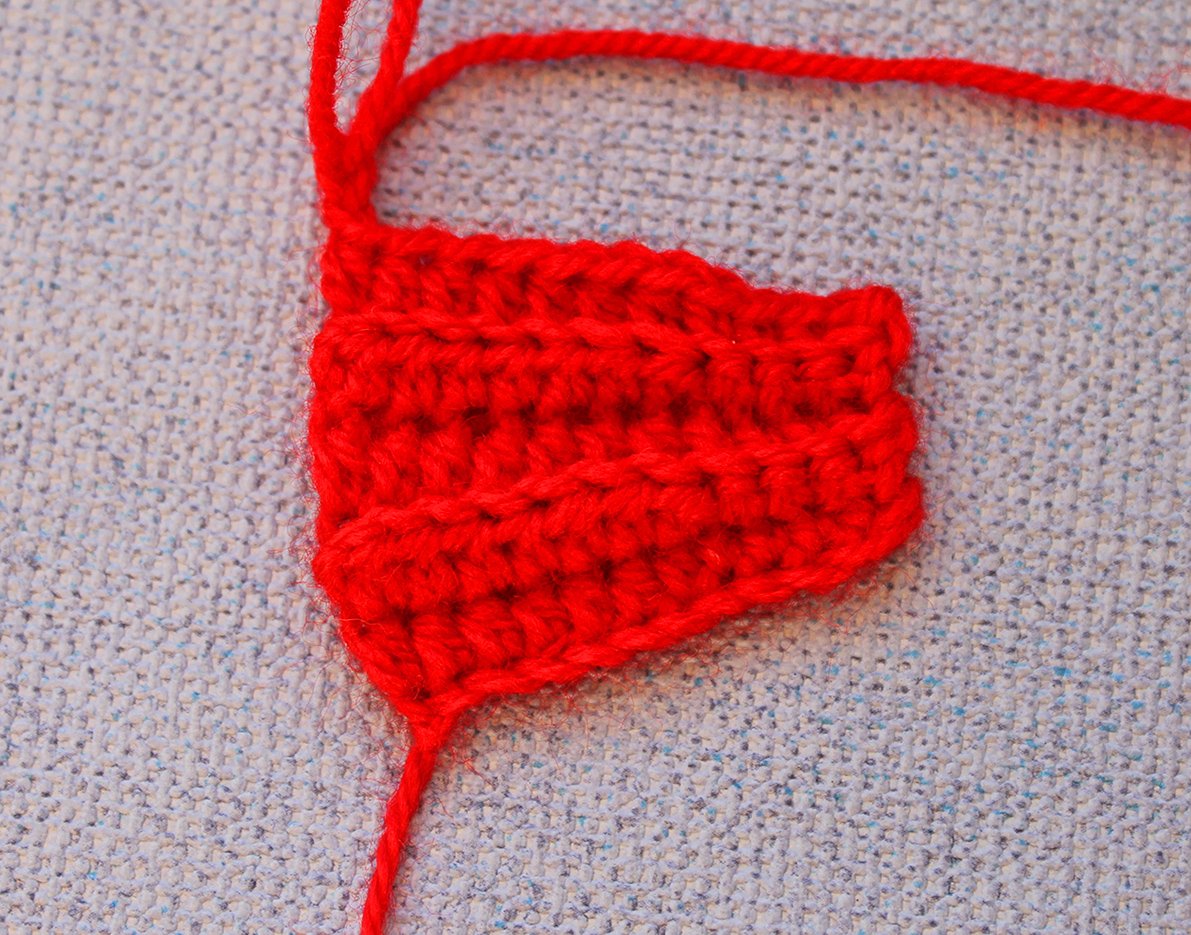
Repeat the 2nd and 3rd rows up to the 20nd row.
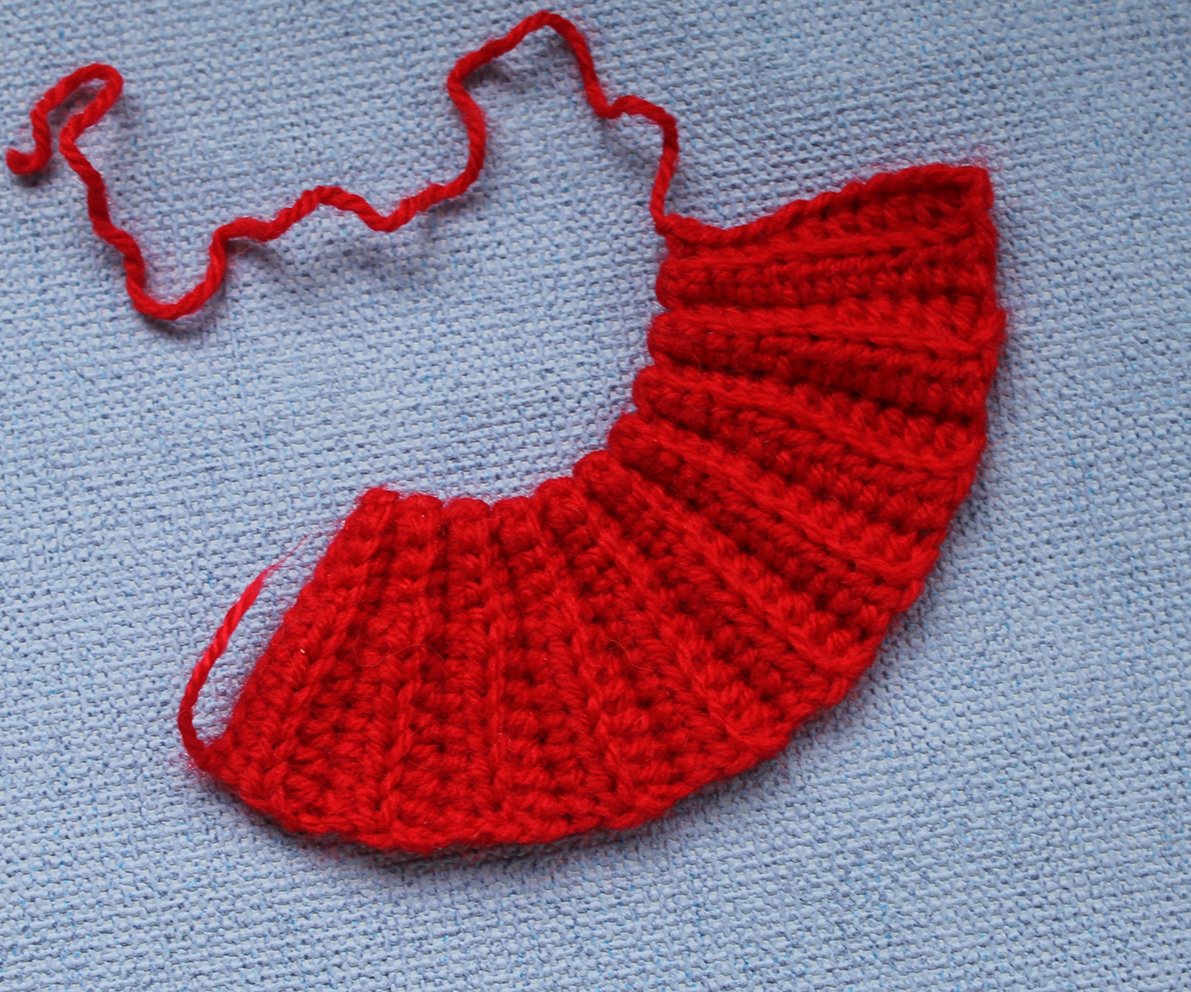
Join part into a circle and sew the beginning and end together. Thread the opening and pull together.
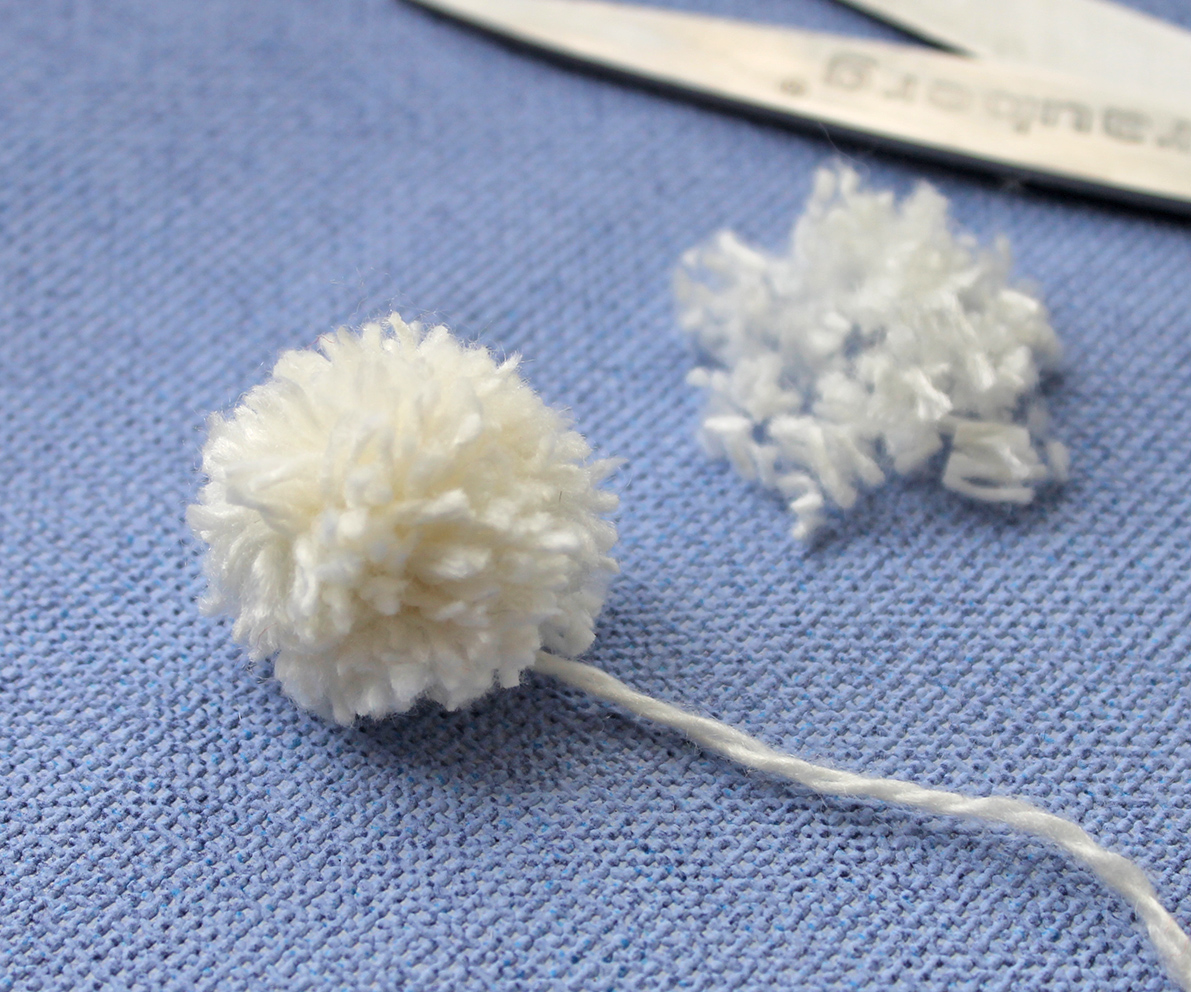
Pompom
Wind the yarn onto a fork. Tie it tight in the middle.
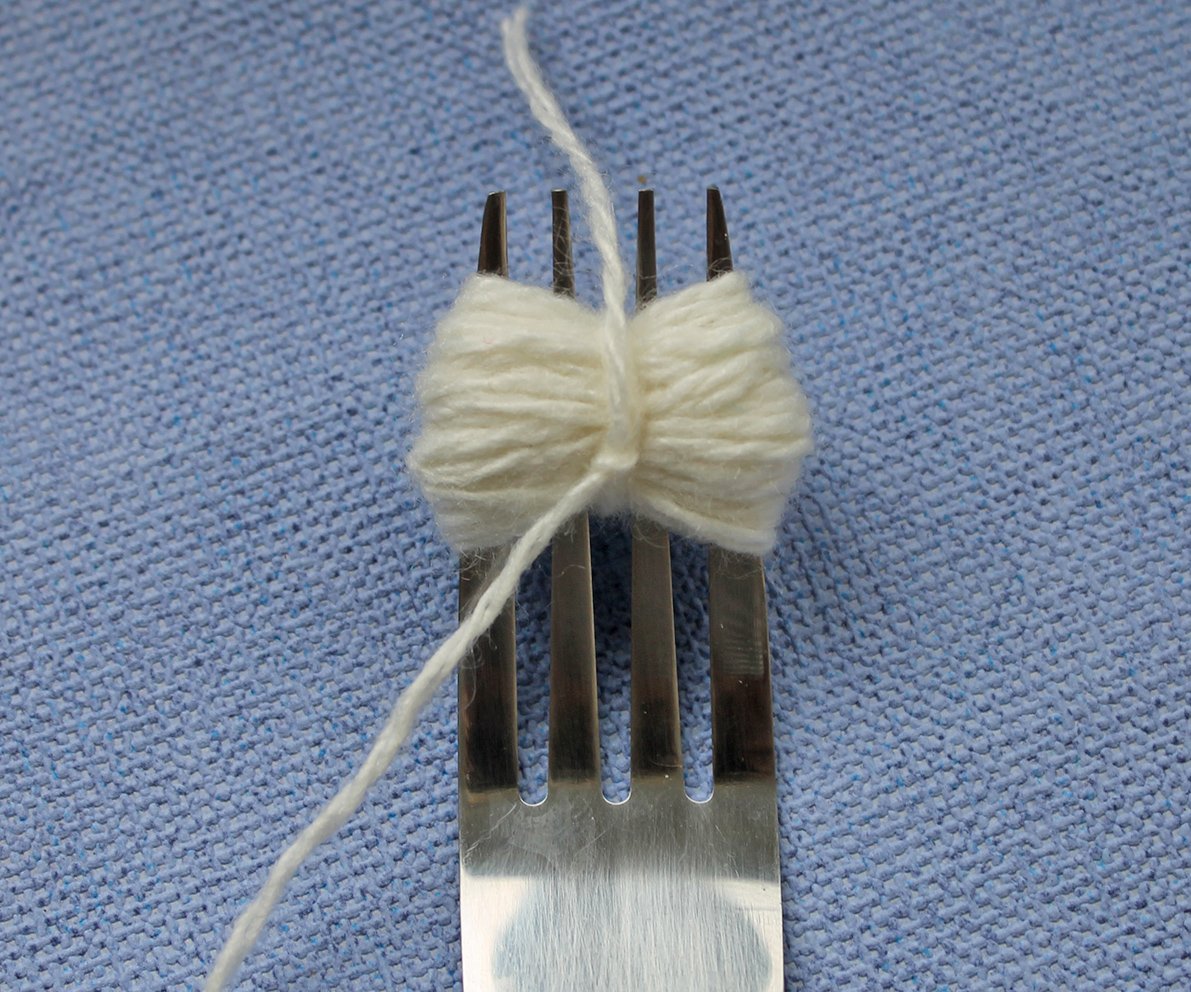
Remove from the fork, cut the edges. Use scissors to trim the pompom, make it round. Sew it to the hat.
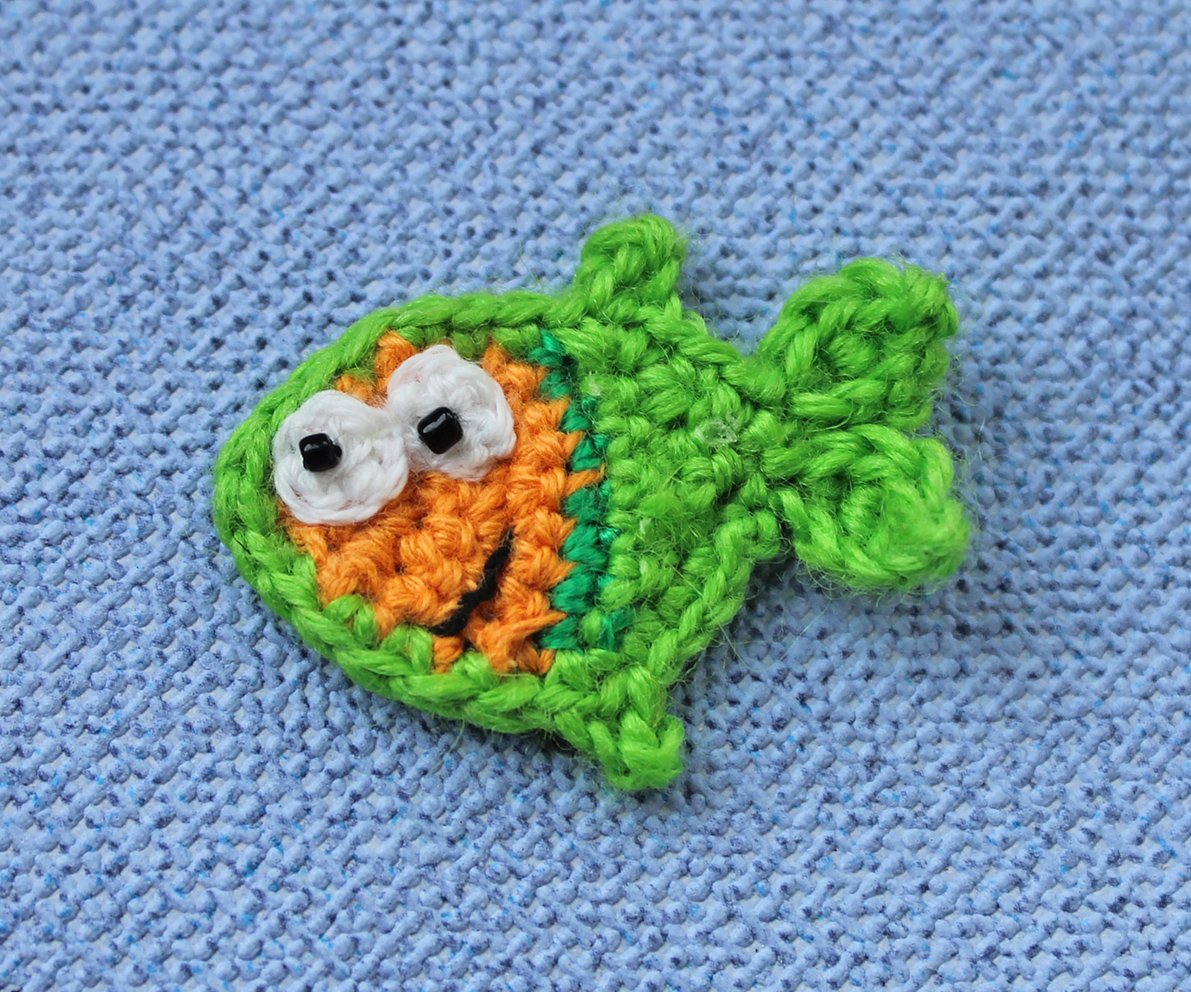
Fish
Choose 3 matching colours. I have colour A – yellow, colour B – dark green, colour C – green.
Start with the colour A.
Work 2 ch
Row 1: starting in 2nd ch from hook: 2 sc, 1 ch, turn (2)
Row 2: 2 inc, 1 ch, turn (4)
Row 3: 1 sc, 2 inc, 1 sc, 1 ch, turn (6)
Row 4: 2 sc, 2 inc, 2 sc, 1 ch, turn (8)
Row 5-6: dec, 1 sc, 2 inc, 1 sc, dec, 1 ch, turn (8)
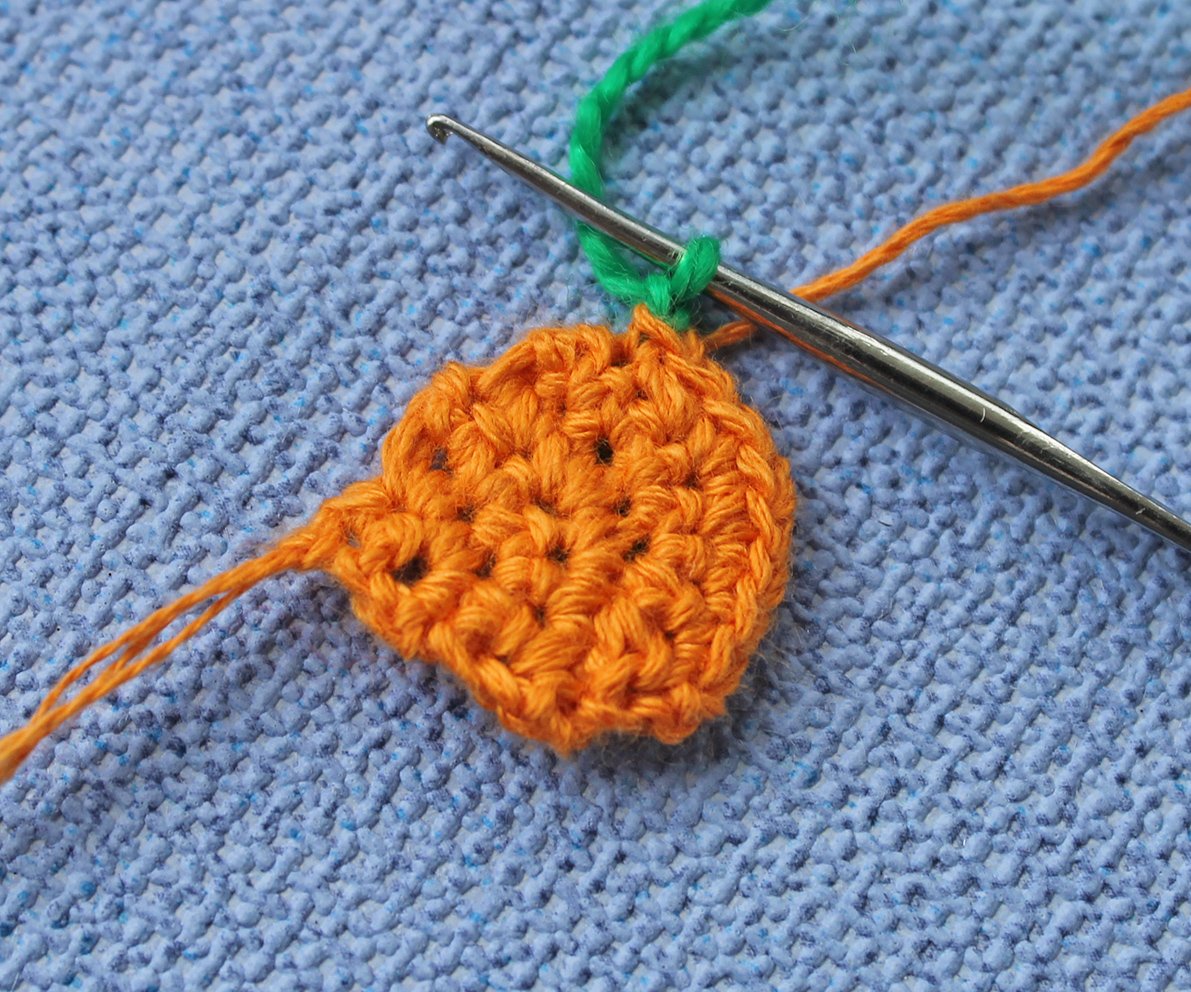
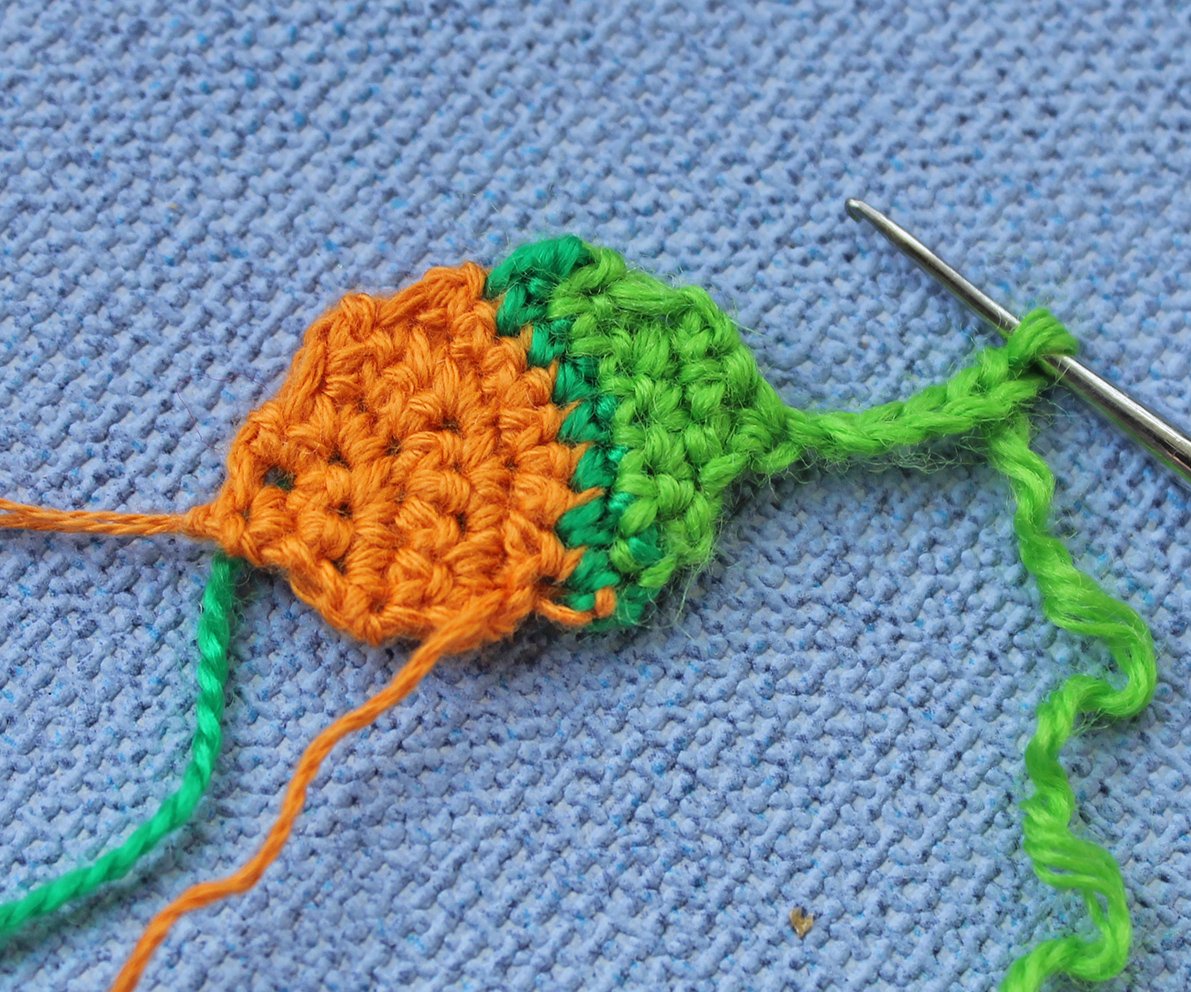
Change the yarn to colour B.
Row 7: 8 sc, 1 ch, turn (8)
Change the yarn to colour C.
Row 8: dec, 4 sc, dec, 1 ch, turn (6)
Row 9: dec, 2 sc, dec, 1 ch, turn (4)
Row 10: 2 dec, turn (2)
Row 11: crochet tail: (6 ch, from the 2nd ch from hook: 1 sl st, 1 dc, 1 tr, 1 dc, 1 sl st; 1 sl st in the next loop)х 2 times
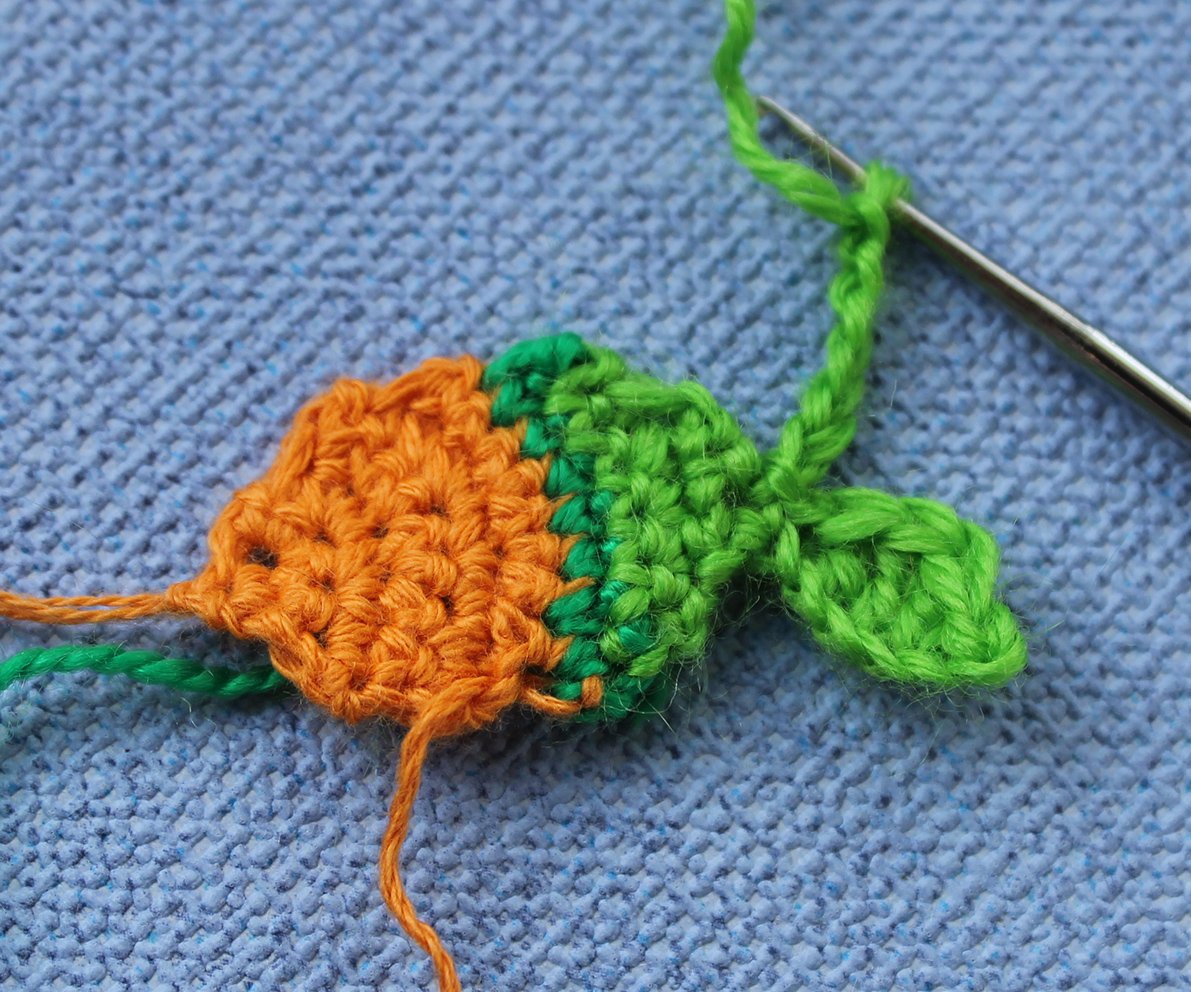
Row 12: crochet the fish around: 3 sc, crochet a fin - 3 ch, from the 2nd ch from hook 2 hdc; continue 16 sc, crochet a fin - 3 ch, from the 2nd ch from hook 2 hdc; continue 3 sc
Fasten off, cut off.
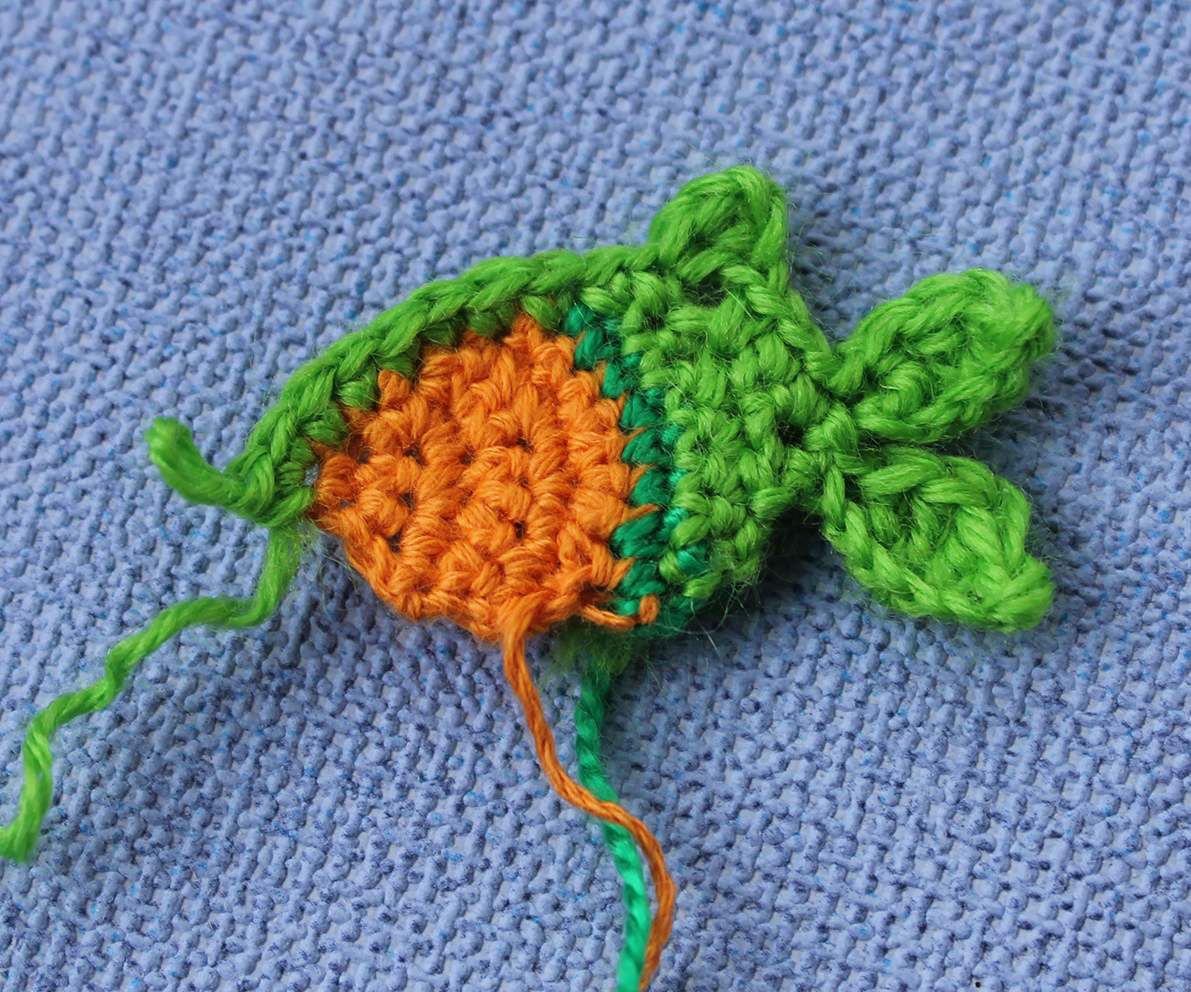
Eyes (make 2)
Work with white colour yarn.
Rnd 1: 6 sc in a Magic Ring
Fasten off, cut off.
Sew on the eyes. Sew the pupils – black beads. Embroider a smile.
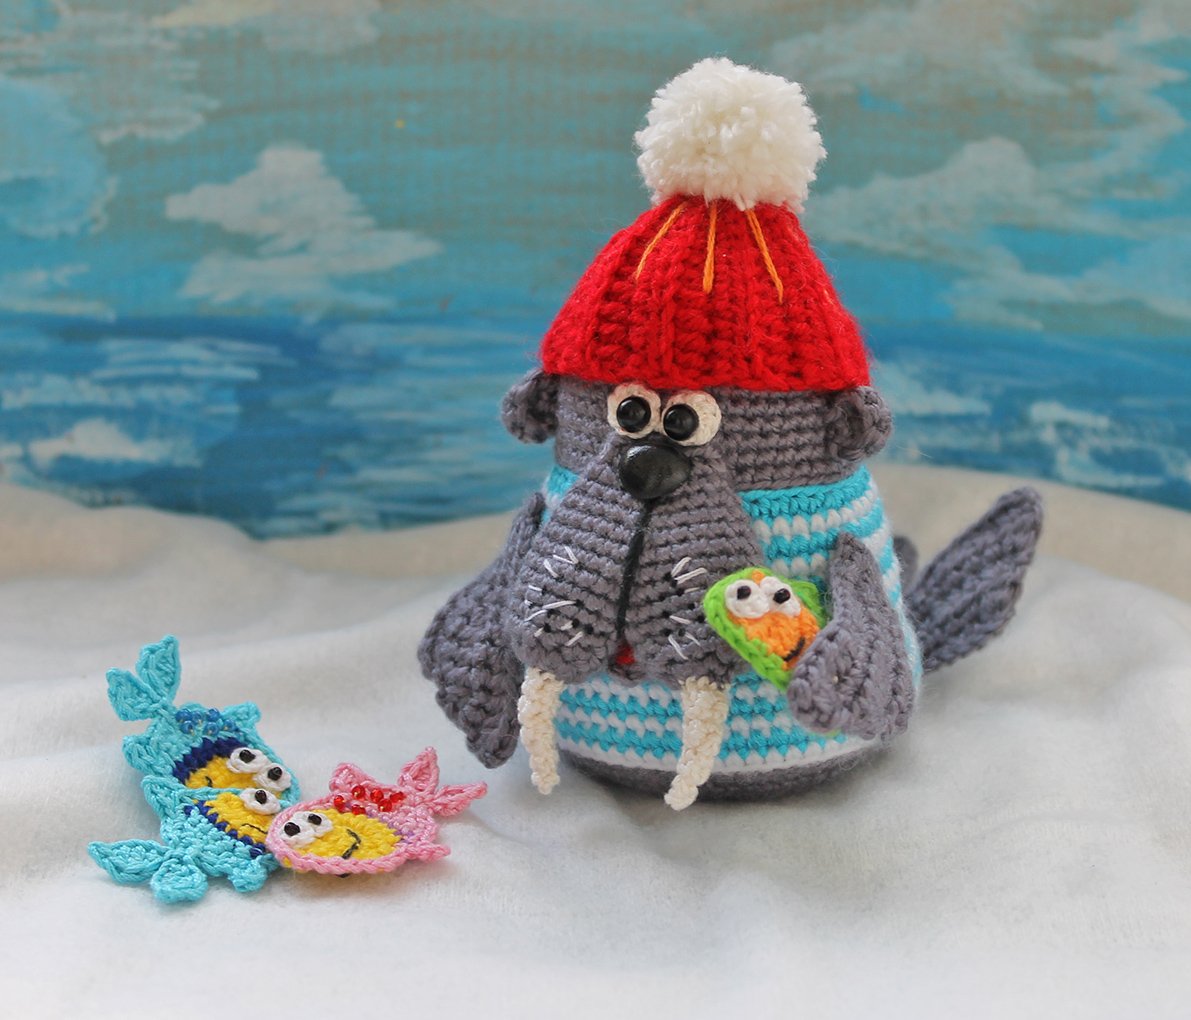
Attach the fish to the walrus flipper. Dress a hat on the walrus.
Your walrus is completed!