Who’s in charge of stocking the fridge? Perhaps you need a little helper? This fun magnet could serve as a cheerful reminder. The apple with magnets attaches easily to the fridge, and the worm, which acts as a hook, can bend almost as if it were alive.
I’ve designed it in two versions so you can choose between crochet and knitting. That way, you can decide for yourself which technique suits you best and which result appeals to you most.
.JPG)
You will need the following materials for knitting:
– cotton yarn YarnArt begonia 50 gr /170 m
– spokes 2,5
– needle, scissors, magnets, wires about 15 – 18 cm, holofiber filler, piece of rectangular shape plastic sheet.
.JPG)
Abbreviations:
CO – cast on
K – knit
P – purl
inc – increase
dec – decrease
When knitting, I only used two knitting needles and sewed the pieces together at the end. Therefore, my odd rows consist of knit stitches and my even rows consist of purl stitches. However, if you want to knit with three or four needles, then knit all pieces continuously with knit stitches.
Caterpillar (green melange)
Cast on 24 stitches onto one knitting needle.
1. 24 K
2. 24 P
3. 24 K
4. 24 P
5. 24 K
6. 24 P
7. 24 K
8. 24 P
9. 24 K
10. 24 P
11. (2 K, 1 dec) х 6 = 18 K
12. 18 P
13. (1 K, 1 dec) х 6 = 12 K
14. 12 P
15. (1 K, 1 inc) х 6 = 18 K
16. 18 P
17. (2 K, 1 inc) х 6 = 24 K
18. 24 P
19. 24 K
20. 24 P
21. 24 K
22. 24 P
23. 24 K
24. 24 P
25. 24 K
26. 24 P
27. (2 K, 1 dec) х 6 = 18 K
28. 18 P
29. (1 K, 1 dec) х 6 = 12 K
30. 12 P
31. (1 K, 1 inc) х 6 = 18 K
32. 18 P
33. (2 K, 1 inc) х 6 = 24 K
34. 24 P
35. 24 K
36. 24 P
37 24 K
38. 24 P
39. 24 K
40. 24 P
41. 24 K
42. 24 P
43. (2 K, 1 dec) х 6 = 18 K
44. 18 P
45. (1 K, 1 dec) х 6 = 12 K
46. 12 P
47. (1 K, 1 inc) х 6 = 18 K
48. 18 P
49. (2 K, 1 inc) х 6 = 24 K
50. 24 P
51. 24 K
52. 24 P
53. 24 K
54. 24 P
55. 24 K
56. 24 P
57. 24 K
58. 24 P
59. (2 K, 1 dec) х 6 = 18 K
60. 18 P
61. (1 K, 1 dec) х 6 = 12 K
62. 12 P
63. (1 K, 1 inc) х 6 = 18 K
64. 18 P
65. (2 K, 1 inc) х 6 = 24 K
66. 24 P
67. 8 K, 3 inc, 2 K, 3 inc, 8 K = 30 K
68. 30 P
69. 30 K
70. 30 P
71. 30 K
72. 30 P
73. 30 K
74. 30 P
75. 8 K, 3 dec, 2 K, 3 dec, 8 K = 24 K
76. 24 P
77. 24 K
78. 24 P
79. 24 K
80. 24 P
81. 24 K
82. 24 P
83. (2 K, 1 dec) х 6 = 18 K
84. 18 P
85. (1 K, 1 dec) х 6 = 12 K
86. 12 P
87. 6 dec = 6 K
88. 6 P
Transfer the stitches onto a needle and pull them tight. Cut the yarn, leaving a small tail for further work. Sew the piece together.
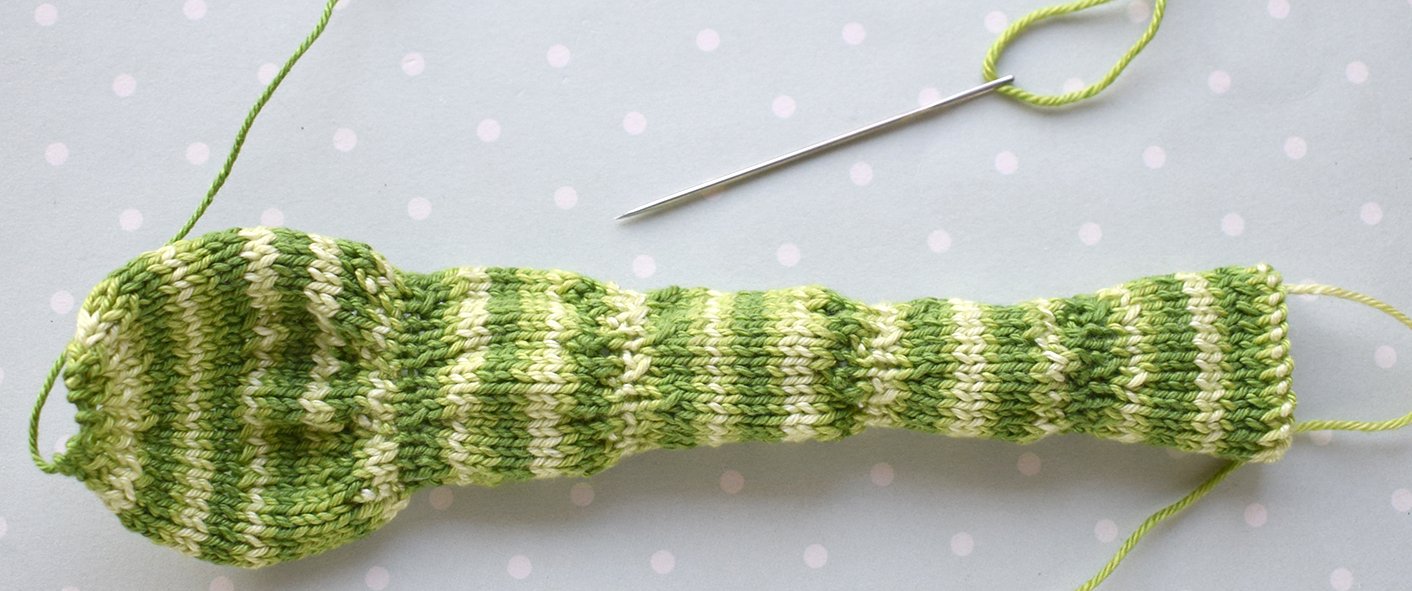
Insert a piece of wire into the finished piece and gradually add stuffing as you go. The wire should be approximately 7–10 cm longer than the body of the caterpillar.
Tip: To allow the caterpillar to bend easily later on, try not to add stuffing into the narrower parts of the body. You may find it helpful to fill the head first. Then, gently hold the narrow section with your fingers and add stuffing to the next wider segment. Continue in this way, filling each segment step by step while using your fingers to keep the narrow sections from being stuffed.
.JPG)
Hole in the apple (light brown color)
Cast on 8 stitches onto one knitting needle.
1. 8 inc = 16 K
2. 16 P
3. (1 K, 1 inc) х 8 = 24 K
4. 24 P
5. (2 K, 1 inc) х 8 = 32 K
6. 32 P
7. (3 K, 1 inc) х 8 = 40 K
8. 40 P
9. (4 K, 1 inc) х 8 = 48 K
10. 48 P
Transfer the stitches onto a needle and pull them tight. Cut the yarn, leaving a small tail for further work. Sew the piece together.
.JPG)
Apple (yellow color)
Cast on 8 stitches onto one knitting needle.
1. 8 inc = 16 K
2. 16 P
3. (1 K, 1 inc) х 8 = 24 K
4. 24 P
5. (2 K, 1 inc) х 8 = 32 K
6. 32 P
7. (3 K, 1 inc) х 8 = 40 K
8. 40 P
9. (4 K, 1 inc) х 8 = 48 K
10. 48 P
11. (5 K, 1 inc) х 8 = 56 K
12. 56 P
13. (6 K, 1 inc) х 8 = 64 K
14. 64 P
15. (7 K, 1 inc) х 8 = 72 K
16. 72 P
17. (8 K, 1 inc) х 8 = 80 K
18. 80 P
19. (9 K, 1 inc) х 8 = 88 K
20. 88 P
21. (10 K, 1 inc) х 8 = 96 K
22. 96 P
23. (11 K, 1 inc) х 8 = 104 K
24. 104 P
25. (12 K, 1 inc) х 8 = 112 K
26. 112 P
27. 112 K
28. 112 P
29. 112 K
30. 112 P
31. 112 K
32. 112 P
33. 112 K
34. 112 P
35. 112 K
36. 112 P
37. (12 K, 1 dec) х 8 = 104 K
38. 104 P
39. (11 K, 1 dec) х 8 = 96 K
40. 96 P
41. (10 K, 1 dec) х 8 = 88 K
42. 88 P
43. (9 K, 1 dec) х 8 = 80 K
44. 80 P
45. (8 K, 1 dec) х 8 = 72 K
46. 72 P
If you are knitting with 4 needles, it is recommended to pause your work here to allow space for assembling the internal parts of the piece. Once that is complete, return to these instructions to finish knitting the piece.
47. (7 K, 1 dec) х 8 = 64 K
48. 64 P
49. (6 K, 1 dec) х 8 = 56 K
50. 56 P
51. (5 K, 1 dec) х 8 = 48 K
52. 48 P
53. (4 K, 1 dec) х 8 = 40 K
54. 40 P
55. (3 K, 1 dec) х 8 = 32 K
56. 32 P
57. (2 K, 1 dec) х 8 = 24 K
58. 24 P
59. (1 K, 1 dec) х 8 = 16 K
60. 16 P
61. 8 dec = 8 K
62. 8 P
63. 4 dec
Transfer the stitches onto a needle and pull them tight. Cut the yarn, leaving a small tail for further work. Sew the piece together. Sew the piece, but not all the way through.
.JPG)
.JPG)
Cut two plastic circles that match the diameter of your finished piece.
.JPG)
Now we begin assembling the apple. Add a small amount of stuffing for a bit of volume, then gently press it down and place the first plastic circle inside.
.JPG)
.JPG)
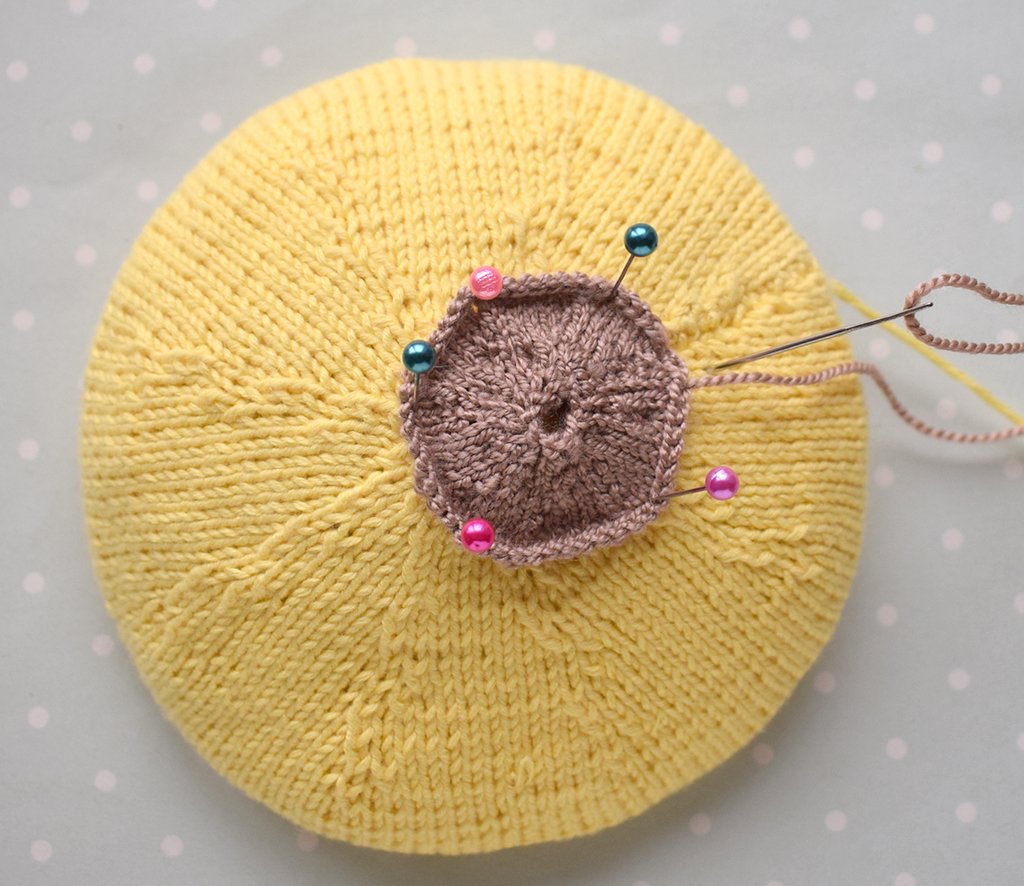
On the right side, sew the “apple hole” detail in place — either centered or slightly off to one side, as you prefer (please refer to the photo for guidance).
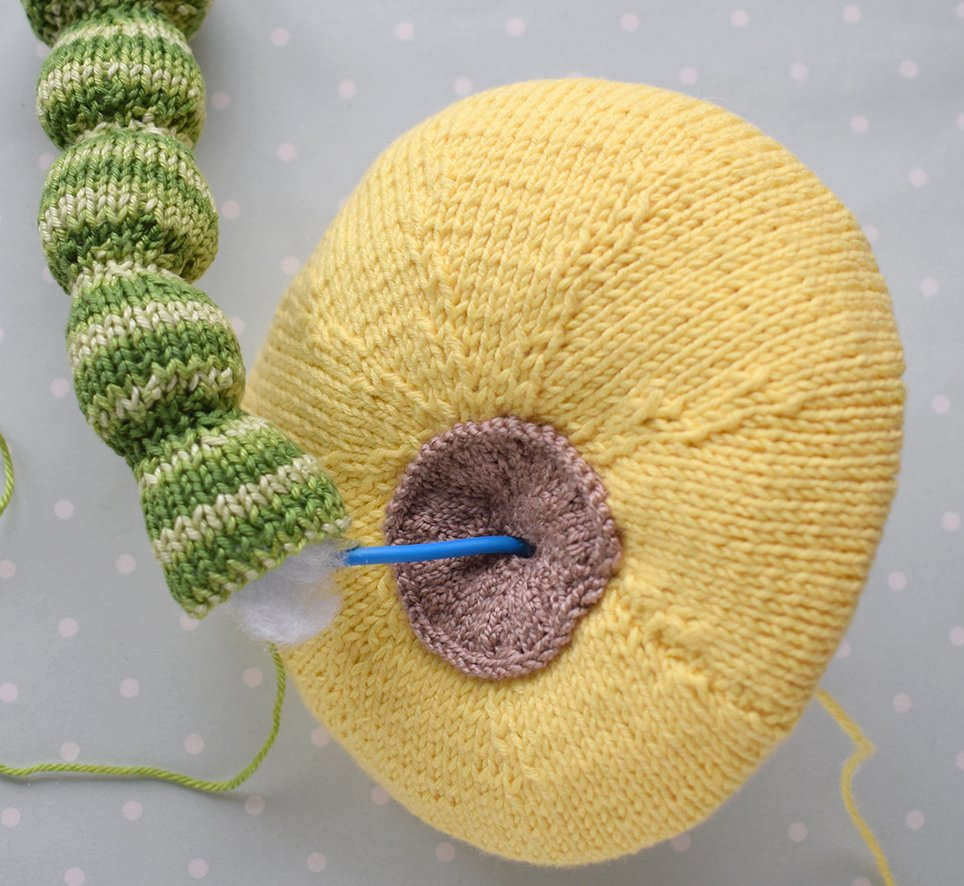
Next, attach the caterpillar to the apple. Using the remaining length of wire, carefully pass it through the entire piece, going through the center of the “apple hole” detail. On the plastic side, bend the wire slightly to secure it in place.
.JPG)
Sew the caterpillar to the apple, then use the second plastic circle to reinforce the structure.
.JPG)
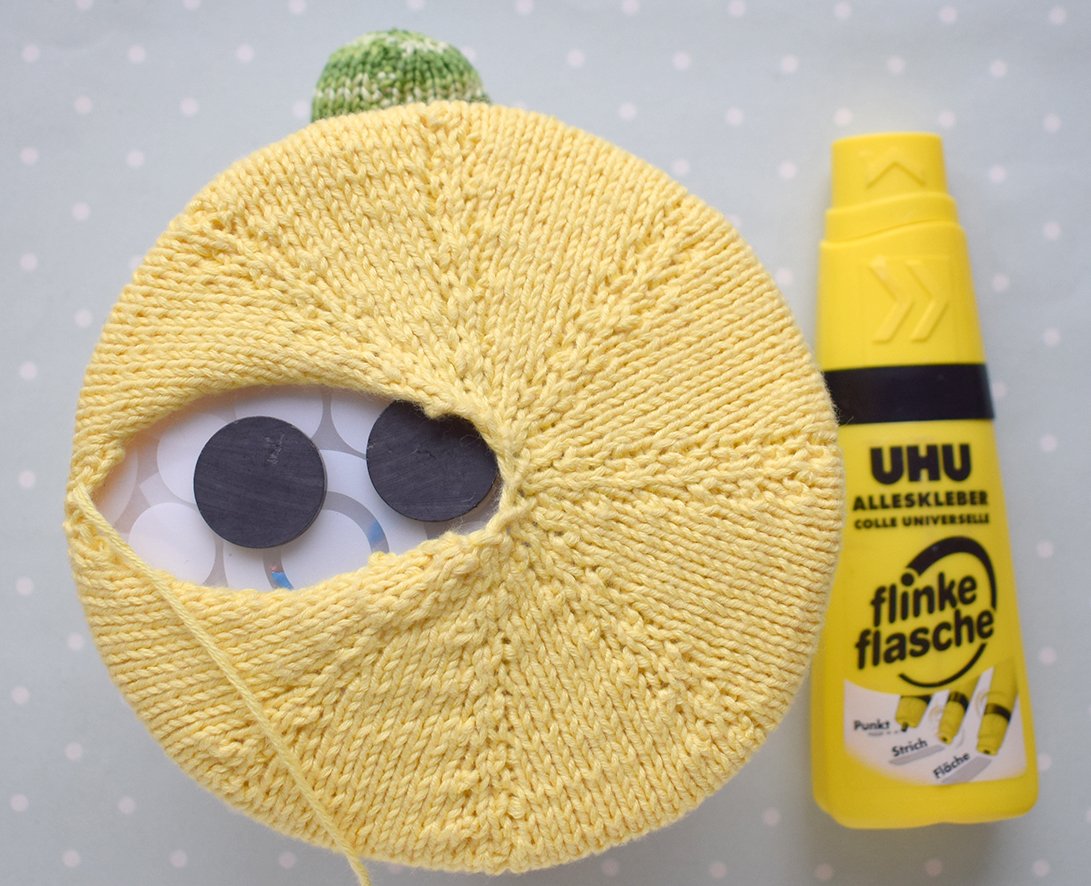
Glue magnets onto this circle. Since magnets can vary in strength, and considering the thickness of your crocheted fabric, you may need to use two or three magnets. After that, you can continue crocheting to complete this part.
Eyes (white, 1 pc)
Cast on 10 stitches onto one knitting needle.
1. 10 K
2. 10 P
Cast off, cut the thread and fasten. To leave the small end of thread for further operation.
.JPG)
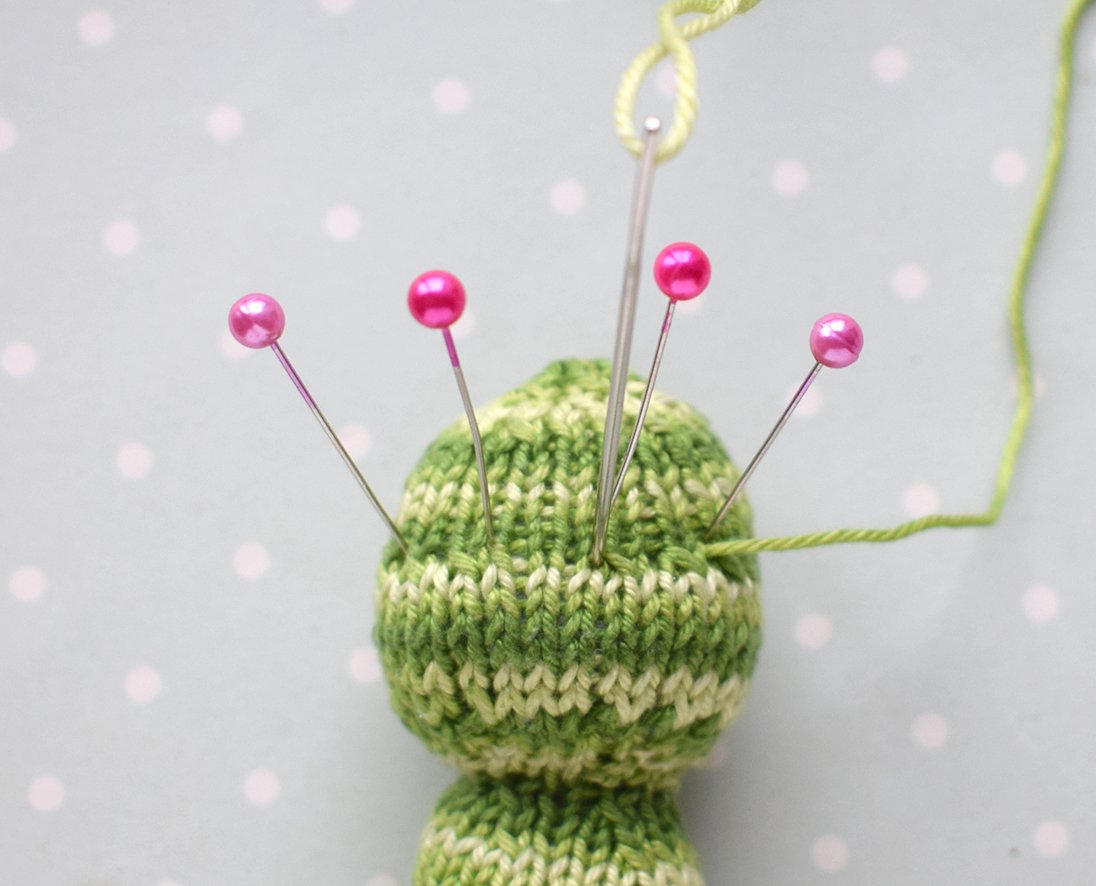
Now we will shape the caterpillar’s head. In round 75, where the decreases were made, create two small tightening stitches to define the placement of the eyes.
.JPG)
Sew the eye piece in place, then make a stitch in the center to divide it into two halves.
.JPG)
Using a short length of black yarn, embroider the eyes. Wrap the yarn 5–7 times around the needle and pull it through to form the eyes. You may also add a small smile line to the side for extra charm.
.JPG)
.JPG)
Apple stalk/stick (brown, 1 pc)
Cast on 6 stitches onto one knitting needle.
1. 6 K
2. 6 P
3. 6 K
4. 6 P
5. 6 K
6. 6 P
7. 6 K
8. 6 P
9. (1 K, 1 inc) х 3 = 9 K
10. 9 P
11. 9 K
12. 9 P
13. 9 K
14. 9 P
15. 9 K
16. 9 P
17. (2 K, 1 inc) х 3 = 12 K
18. 12 P
19. 12 K
20. 12 P
21. 6 dec = 6 K
Transfer the stitches onto a needle and pull them tight. Cut the yarn, leaving a small tail for further work. Sew the piece together. Stuff the piece occasionally while sewing.
.JPG)
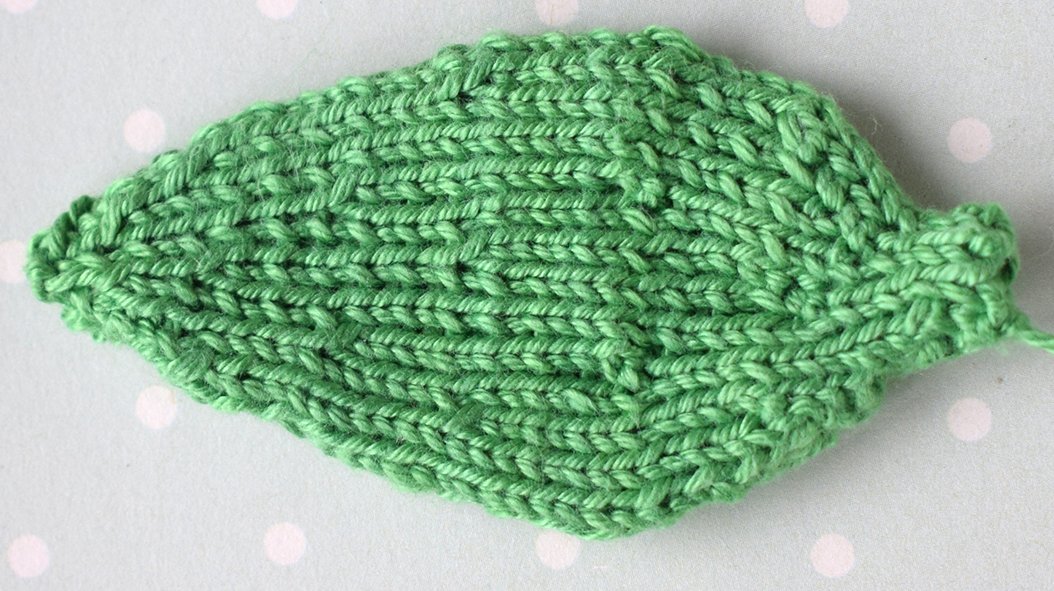
Leaf (green, 1 pc)
Cast on 9 stitches onto one knitting needle.
1. 9 K
2. 9 P
3. 9 K
4. 9 P
5. (1 K, 1 inc) х 3 = 12 K
6. 12 P
7. (1 K, 1 inc) х 6 = 18 K
8. 18 P
9. (2 K, 1 inc) х 6 = 24 K
10. 24 P
11. 24 K
12. 24 P
13. 24 K
14. 24 P
15. (3 K, 1 inc) х 6 = 30 K
16. 30 P
17. 30 K
18. 30 P
19. 30 K
20. 30 P
21. 30 K
22. 30 P
23. (3 K, 1 dec) х 6 = 24 K
24. 24 P
25. 24 K
26. 24 P
27. 24 K
28. 24 P
29. (2 K, 1 dec) х 6 = 18 K
30. 18 P
31. 18 K
32. 18 P
33. 18 K
34. 18 P
35. (1 K, 1 dec) х 6 = 12 K
36. 12 P
37. 12 K
38. 12 P
39. 6 dec = 6 K
40. 6 P
41. 3 dec = 3 K
Transfer the stitches onto a needle and pull them tight. Cut the yarn, leaving a small tail for further work. Sew the piece together. Stuff the piece occasionally while sewing. Leave the part without holofiber filler.
.JPG)
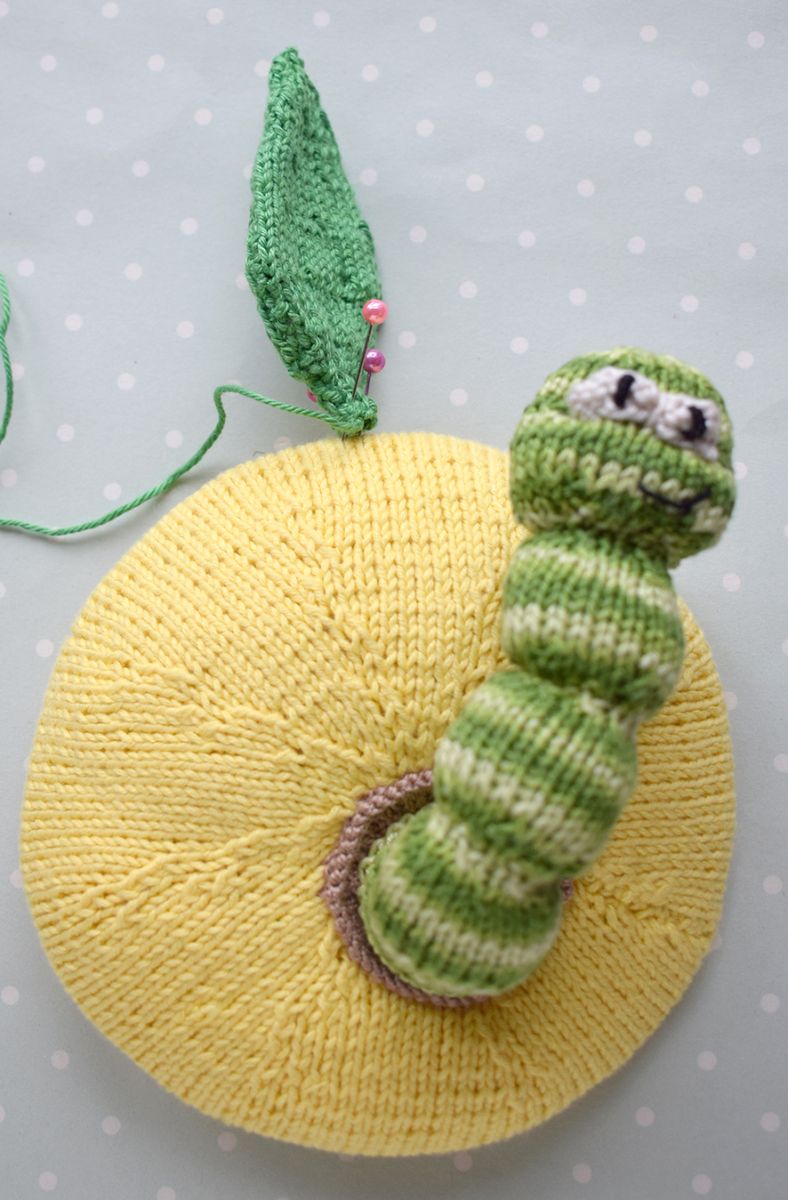
Sew the apple leaf to the top part. Then, to give the apple a more natural shape, pass a needle through the entire piece from the top to the bottom and gently pull the yarn to slightly draw the top closer to the base. A long needle is especially helpful for this step. Sew the stem next to the leaf.
.JPG)
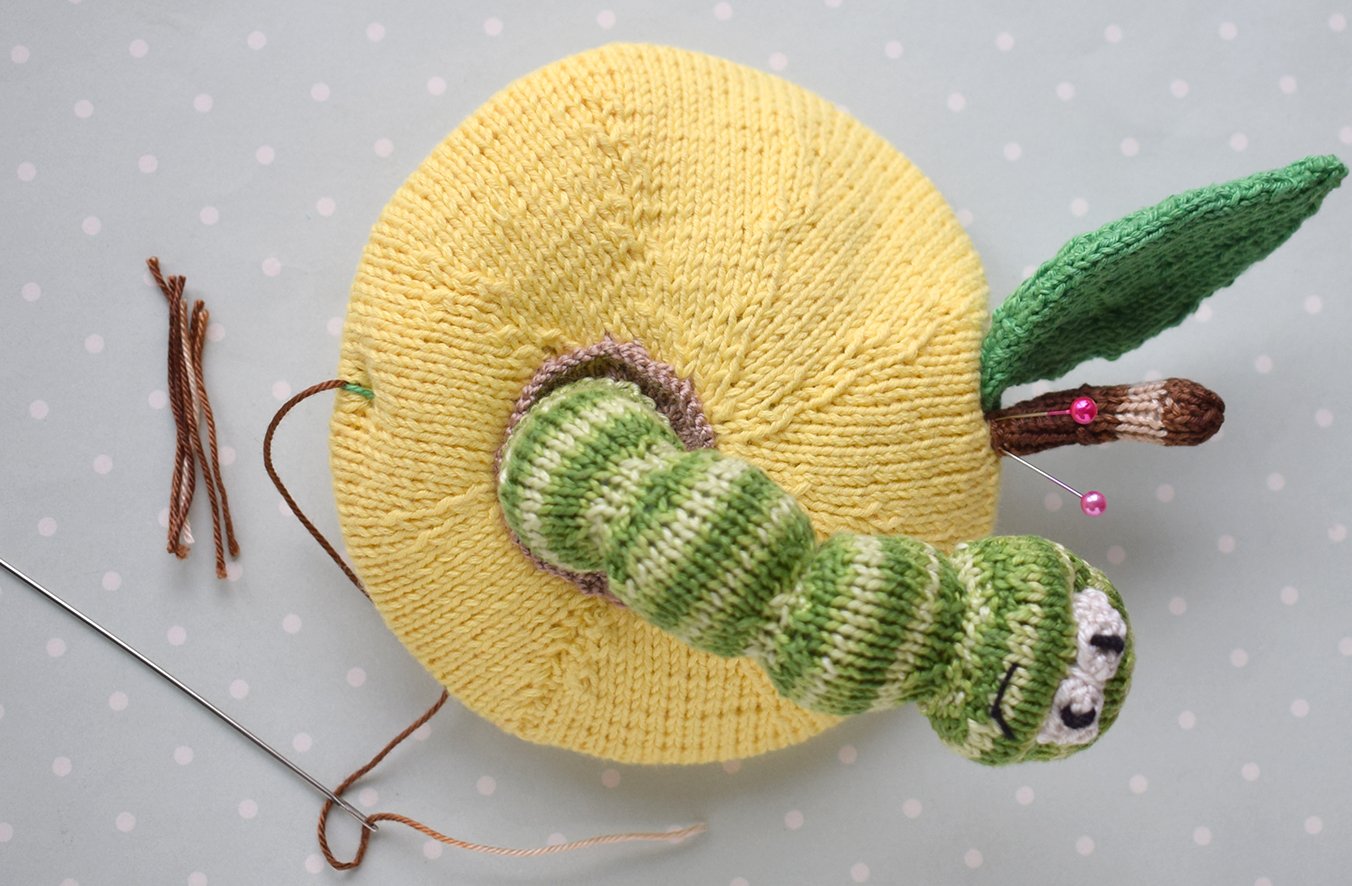
At the bottom, add a few short strands of brown yarn. Trim them so they resemble the remains of a dried apple blossom.
.JPG)
And here you have your new cheerful little character. I hope it will bring you joy and be a lovely addition to your creations.
.JPG)


