.JPG)
.JPG)
My knitted monster – an original handbag for little monster fans. With these instructions, you can knit a very special handbag – a real eye-catcher for children who love monsters! The bag looks like a little monster that either swallows candy or keeps your secrets safe. The unusual mouth, formed by a bag frame, gives the monster a unique expression. I find the round, sad-looking eyes particularly charming – they make the face even more expressive and lovable.
If you also like crocheting: Link
Design it to suit your taste: Monsters are wonderful to customize – each one looks different and has its own character. That's why this project is also ideal for using up leftover yarn, as long as the lengths of yarn are reasonably similar. For my pink monster, for example, I used only leftovers and simply knitted them together. This not only creates a unique creature, but also a sustainable project with personality.
Note on knitting technique
I only used two knitting needles when knitting and sewed the individual pieces together at the end. This means that my odd rows consist of knit stitches and my even rows consist of purl stitches – classic back-and-forth knitting. However, if you want to knit in rounds with three or four needles, you can work all rows with knit stitches throughout. This results in an even stitch pattern and saves you from having to sew the pieces together at the end.
You will need the following materials to knitting:
– any yarn of your choice 100 gr /100 m
– spokes 2, 5
– Needle, scissors, glue, eye buttons or black eyes to sew on, purse frame
.JPG)
Abbreviations:
CO – cast on
K – knit
P – purl
inc – increase
dec – decrease
This version of the monster is slightly larger because I used a different, thicker wool. The bag frame is also larger than in the crocheted version above. In my example, it measures 8.5 cm in width and 4.5 cm in height.
Of course, you can adjust the size to suit your project, depending on the yarn, knitting needles, and bag frame you are using.
Body
For the main part of the body, I chose a bright fuchsia color.
Cast on 6 stitches onto one knitting needle.
1. 6 inc = 12 stitches
2. (1 inc, 1 P) х6 = 18 stitches
3. (1 inc, 2 K) х 6 = 24 stitches
4. 24 P
5. (1 inc, 3 K) х 6 = 30 stitches
6. 30 P
7. (1 inc, 4 K) х 6 = 36 stitches
8. 36 P
9. (1 inc, 5 K) х 6 = 42 stitches
10. 42 P
11. (1 inc, 6 K) х 6 = 48 stitches
12. 48 P
13. (1 inc, 7 K) х 6 = 54 stitches
14. 54 P
15. (1 inc, 8 K) х 6 = 60 stitches
16. 60 P
17. 60 K
18. 60 P
19. 60 K
20. 60 P
21. 60 K
22. 60 P
23. 60 K
24. 60 P
.JPG)
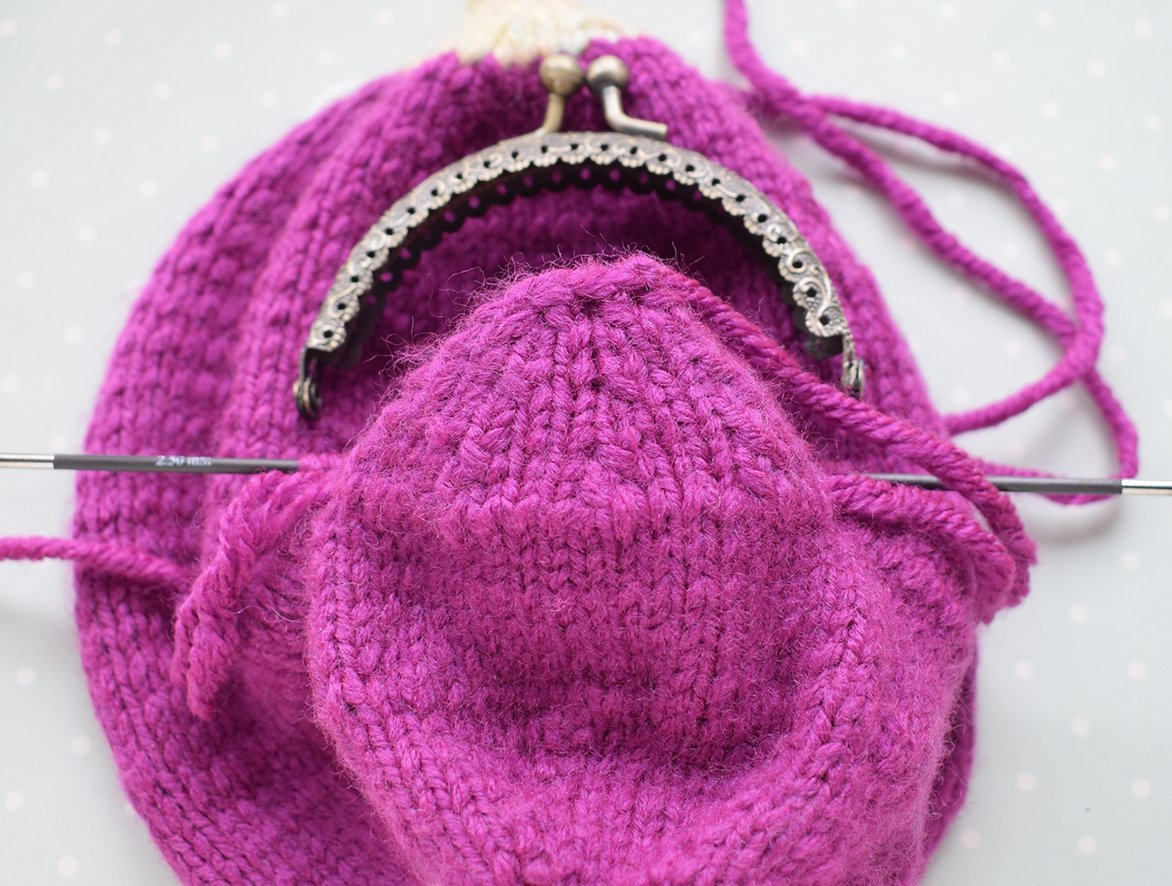
25. 20 K, take an additional needle and knit 20 stitches using this needle, 20 K = 60 K
At this point, the stitches are already divided for the monster's mouth.
.JPG)
It is important to ensure that the chosen bag frame fits the knitting project. Try inserting the frame into the intended opening after row 26 – it should fit exactly. If the opening is too large or too small, you can adjust the number of chain stitches accordingly. For example: If the pocket frame is smaller than the opening, simply chain as many stitches as the frame is long. Make sure that the monster's “mouth” is as centered as possible – this ensures a harmonious overall look.
But: These are monsters! And they can be a little crooked. A slightly crooked mouth can even give the monster its own unique, charming expression.
26. 20 P, then pick up 20 additional stitches as shown in the photo — total 20 P = 60 stitches. I wrap the working yarn twice around the thumb of my left hand, then pass the working yarn under the first loop, catching the second loop on the thumb. Pull the yarn through to create a stitch.
This is how we create the opening for the clasp. In the photo, I show how I added the extra stitches. You may have another method that works better for you.
.JPG)
.JPG)
.JPG)
.JPG)
.JPG)
.JPG)
.JPG)
.JPG)
.JPG)
Continuing with the knitting, in round 25, first leave 20 stitches on the auxiliary needle. Then continue working with the stitches that were newly created in row 26. This creates an opening for the mouth.
27. 60 K
28. 60 P
29. 60 K
30. 60 P
.JPG)
31. 60 K
32. 60 P
33. 60 K
34. 60 P
35. 60 K
36. 60 P
37. 60 K
38. 60 P
39. 60 K
40. 60 P
41. 60 K
42. 60 P
43. 60 K
44. 60 P
45. 60 K
46. 60 P
47. 60 K
48. 60 P
49. 60 K
50. 60 P
51. (8 K, 1 dec) х 6 = 54 stitches
52. 54 P
53. 54 K
54. 54 P
55. (7 K, 1 dec) х 6 = 48 stitches
56. 48 P
57. 48 K
58. 48 P
59. (6 K, 1 dec) х 6 = 42 stitches
60. 42 P
61. 42 K
62. 42 P
63. (5 K, 1 dec) х 6 = 36 stitches
64. 36 P
65. (4 K, 1 dec) х 6 = 30 stitches
66. 30 P
Then I changed the yarn color for part of the hair—I particularly liked the version with the yellow tones.
67. (3 K, 1 dec) х 6 = 24 stitches
68. 24 P
69. (2 K, 1 dec) х 6 = 18 stitches
70. 18 P
71. (1 K, 1 dec) х 6 = 12 stitches
72. 12 P
73. 6 dec = 6 stitches
74. 6 P
Carefully bind off the remaining stitches, secure the yarn, and then cut it. Sew the piece together.
.JPG)
.JPG)
Mouth (2 parts)
In row 25 of the main piece, 20 stitches remain on the needle. Join the yarn and continue knitting.
1. 20 P
2. (3 K, 1 dec) х 4 = 16 K
3. 16 P
4. (2 K, 1 dec) х 4 = 12 K
5. 12 P
6. 12 K
7. 12 P
8. (1 K, 1 dec) х 4 = 8 K
9. 8 P
10. 8 K
11. 8 P
12. 4 dec = 4 K
Carefully bind off the remaining stitches, secure the yarn, and then cut it. Leave a long end of the thread for further work.
.JPG)
For row 26, cast on 20 stitches onto the needle and continue knitting the upper half of the mouth.
1. 20 P
2. (3 K, 1 dec) х 4 = 16 K
3. 16 P
4. (2 K, 1 dec) х 4 = 12 K
5. 12 P
6. 12 K
7. 12 P
8. (1 K, 1 dec) х 4 = 8 K
9. 8 P
10. 8 K
11. 8 P
12. 4 dec = 4 K
Carefully bind off the remaining stitches, secure the yarn, and then cut it. Leave a long end of the thread for further work.
.JPG)
Ears (2 pieces in the main color)
Cast on 9 stitches onto one knitting needle.
1. 9 K
2. 9 P
3. 9 K
4. 9 P
5. (1 inc, 2 K) х 3 = 12 stitches
6. 12 P
7. (1 inc, 1 K) х 6 = 18 stitches
8. 18 P
9. 18 K
10. 18 P
11. 18 K
12. 18 P
13. 18 K
14. 18 P
15. (1 dec, 1 K) х 6 = 12 stitches
16. 12 P
17. 12 K
18. 12 P
19. 6 dec = 6 K
20. 6 P
Carefully bind off the remaining stitches, secure the yarn, and then cut it. Sew the piece together. Leave the part without filler.
.JPG)
Eyes (2 pieces)
Part I in white.
Cast on 3 stitches onto one knitting needle.
1. 1 inc, 1 K, 1 inc = 5 K
2. 5 P
3. 5 inc = 10 K
4. 10 P
5. 10 K
6. 10 P
7. 10 K
8. 10 P
9. 10 K
10. 10 P
11. 10 K
12. 10 P
13.5 dec = 5 K
14. 5 P
15. 1 dec, 1 K, 1 dec = 3 K
Carefully bind off the remaining stitches, secure the yarn, and then cut it. Leave the part without filler.
.JPG)
Eyes (2 pieces)
Part II in blue.
Cast on 3 stitches onto one knitting needle.
1. 1 inc, 1 K, 1 inc = 5 K
2. 5 P
3. 5 K
4. 5 P
5. 5 K
6. 5 P
7. 1 dec, 1 K, 1 dec = 3 K
Carefully bind off the remaining stitches, secure the yarn, and then cut it. Leave the part without filler.
.JPG)
ASSEMBLY
Sew the closure (pocket frame) to the mouthpiece.
.JPG)
Attaching the eyes and ears – this is how I do it:
First, I sew the blue parts onto the white eye areas, shifting them slightly upwards towards the edge – this gives the eyes more expression. Then I attach the finished eyes to the upper part of the handbag, which I like to refer to as the “head.” I try out different positions until the figure has exactly the character I have in mind.
I sew the ears onto the sides of the head – here, too, I like to check the placement, depending on whether I want my monster to look cheeky, curious, or dreamy.
For the eyes, I sometimes use buttons in different shapes and colors. When shopping, I always keep my eyes open—I often find great button variations that fit my projects perfectly. I've tried several eye options. Just take a look at what you have at home—and use what suits your character best.
When attaching or sewing on the eyes, please take special care to ensure that they are securely fastened – especially if the monster is intended for small children. There is a risk of swallowing if small parts are loosely attached.
You are responsible for ensuring that the toy is child-safe. Please check carefully that all parts are stable and securely attached.
.JPG)
.JPG)
I made the hair from yellow yarn scraps, attaching them to the part of the head that was knitted in yellow. Cut several yarn pieces about 10 cm long and attach them randomly, like a fringe. Then I lightly brushed these strands — I liked how fluffy it became.
.JPG)
.JPG)
Embroidering teeth
You can create the teeth inside the mouth, which makes it fun to open the clasp and see them. Or, the face might look more expressive if you embroider the row of teeth on the outside of the mouth, as shown in the Embroidering teeth You can embroider the teeth inside the mouth—this makes it particularly exciting to open the fastener and discover the little teeth.
Or you can decide to place the row of teeth on the outside of the mouth, as shown in the photo. This gives the face more expression and character.
Especially with a monster like this, a little irregularity is fine—perfectly even teeth are not necessary here. On the contrary: a slightly crooked or playful look makes the monster really charming! photo. For a monster like this, it actually looks better if the teeth aren’t perfectly even.
.JPG)
To give the face more expression, I added a few eyebrow stitches with black thread and painted on white dots with paint.
.JPG)
.JPG)
I hope this unusual little purse helps you collect lots of candy or other interesting treasures—and maybe even changes her expression to a happier one.
.JPG)
I would love to see the characters you have designed! Feel free to use all kinds of colors—each color can develop its own personality and charm.
.JPG)


