Forum Categories
Quick to Target
Browse Categories
Community & Help

Live blog: my first pair of bloomers for Lisann

6027 Posts Recent Started
Thursday, March 17, 2022 at 10:27 AM
Hello everyone,

Since Inge (Akela) has been so diligently sharing her homemade children’s clothes and offering expert tips, I’d like to give sewing clothes for everyday use a try myself.

My first project will be a pair of bloomers for my new granddaughter, Lisann . You don’t need much fabric, and she’ll always grow into them anyway, just in case I don’t quite get the sizing right. Anyone who’d like to follow along with my first sewing project is warmly invited to read, comment, and offer feedback. I’m a sewing beginner and grateful for any tips and advice on how I could do it better or differently. At the same time, this will serve as my cheat sheet for next time.

So here we go!

Step 1:
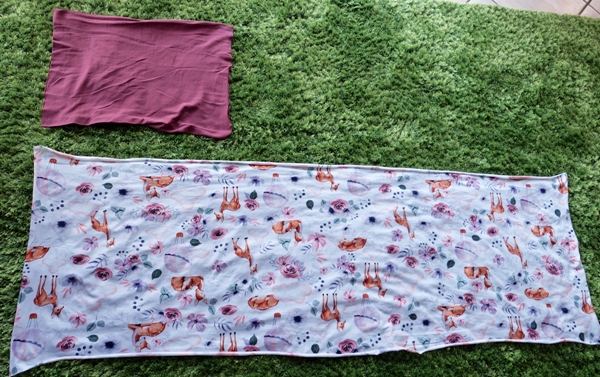
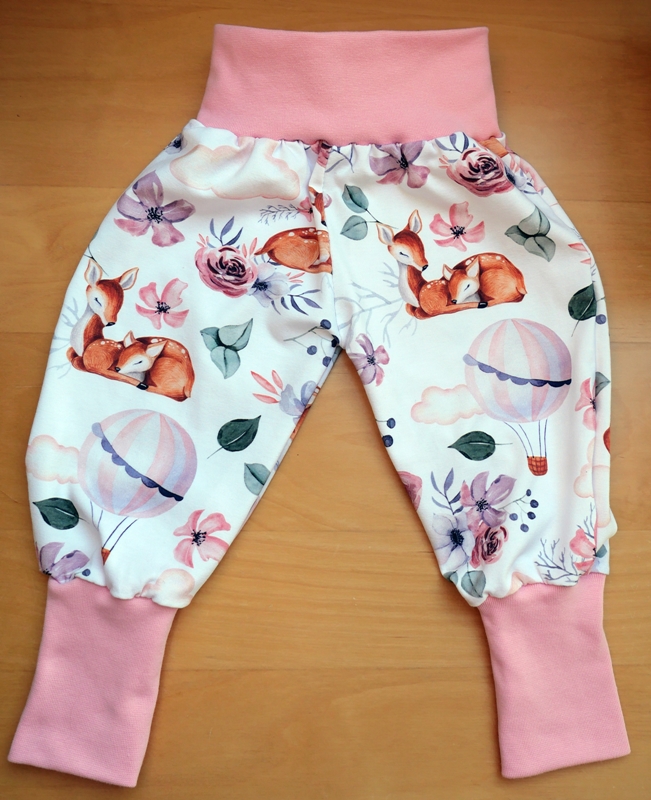
Since bloomers are usually made of jersey fabric and ribbing —probably because of the desired stretch—I went online to look for fabric. I’d prefer to see and feel the fabric in person, but we don’t have a fabric store nearby. I found my fabrics on Etsy: a jersey fabric with cute fawns and a color-coordinated ribbing fabric in rosewood.


At first, I thought I could get started right away. But no—you always have to wash the fabrics first (on a gentle cycle) because some fabrics shrink a bit when washed. And if you want them to fit properly later, you have to take this preparatory step. Then let them dry flat.


Question: Do you also need to iron the (jersey) fabric after it dries? Or should you always iron all fabrics after pre-washing?

Probably yes. So I’ll go ahead and do that now. Then I’ll check back here with my next step. See you later.

Best regards, Ina

2681 Posts Recent Started
Thursday, March 17, 2022 at 11:41 AM
Oh, lovely!

(Warning: all exemplary sewists, please look away for a moment :D)

Personally, I usually don’t pre-wash or iron fabrics for baby/children’s clothes, especially for harem pants or similar items. 

Harem pants in particular are so loose-fitting that 1–2 cm doesn’t matter.
So far, they’ve always fit.
Pssst :P 

2681 Posts Recent Started
Thursday, March 17, 2022 at 11:41 AM
By the way, I think the fabric is sooooooo beautiful! 

6027 Posts Recent Started
Thursday, March 17, 2022 at 11:49 AM
So, here I am again—now with a bit more experience.

Well, I can answer the question from above myself: Ironing is a must! The wrinkles from washing simply have to go.

Step 2
Ironing


Step 3:
Transfer the pattern onto the fabric

Oh, that really cost me some nerves just now. Yes, you pros are probably laughing about it. But I made a big mistake. Okay, I have to get through it now. So Ina, next time please pay attention and do it like this:

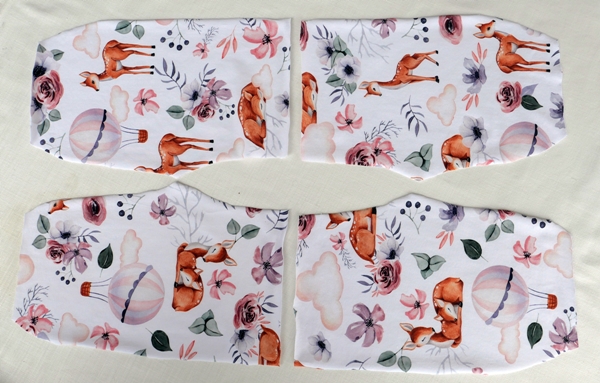
Place the cut-out pattern for the desired clothing size (for me, sweet little 60) on the wrong side of the jersey fabric along the grainline . You can tell the grainline pretty well if you stretch the fabric a little. It’s knitted, after all, and the stitches then pull lengthwise.

Fold the jersey fabric over beforehand. Then pin the pattern in place with straight pins. Then cut out around the pattern with a 1 cm seam allowance. A longer pair of scissors would be better for this.

Since you have a right and a left leg, you have to fold it over for the pattern for the second leg.

Now my mistake:
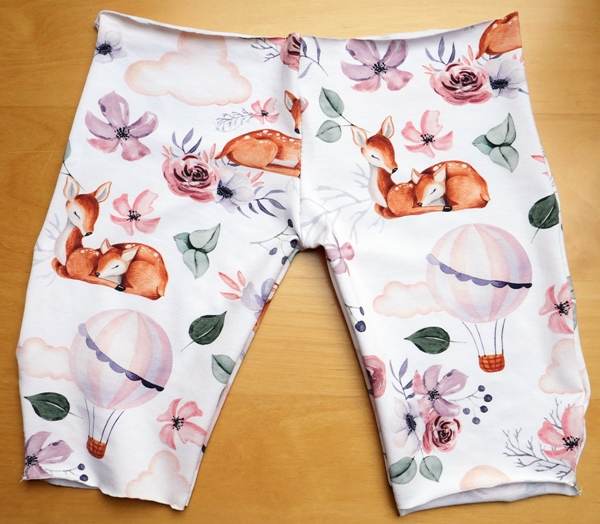
I wanted to place the pretty fawns on the front. Because I laid the pattern piece down the wrong way around, they are now upside down on one of the 4 pieces! With such small sizes, it’s very easy to get confused about where the top (the waistband) and the bottom are. So now it’s happened. Since the fabric was tight, I can’t cut out a new piece. It will have to stay like that now. But it will go on the back—it’s my first attempt, after all. So I recommend small floral patterns to all beginners; then it doesn’t matter.

I could have practiced first with some random fabric, but no, my stubborn head wanted the pretty one! The baby probably won’t mind.


This is what my work looks like by now:


See you later.

Best, Ina

6027 Posts Recent Started
Thursday, March 17, 2022 at 11:51 AM
Thanks, Tina, for your comment. My first instinct was to skip the ironing, too. But as a beginner, you always want to do everything by the book. Thanks for reading along here.

Best regards, Ina

6027 Posts Recent Started
Thursday, March 17, 2022 at 11:56 AM
I have another question:

Is it better to lay out the pattern 4 times individually and cut all around it with a 1 cm seam allowance, or to fold the fabric over along any edge and then cut 2 layers of fabric at once? Is the folding done because it increases the chance that both pieces will match better in size?

Personally, because of the placement of the motifs, I preferred the version with the 4 motifs. That way I could see better where each motif was located.

Thank you very much for your answer. Best, Ina

2606 Posts Recent Started
Thursday, March 17, 2022 at 12:24 PM
Hi Ina,
the fabric is sooooo beautiful!
I’ve been following along here because I’d like to try something like this myself someday.
What’s confusing me are your 4 pieces. Isn’t it easier with 2 pieces? Or am I missing something here?

5117 Posts Recent Started
Thursday, March 17, 2022 at 12:31 PM
No, it’s better to lay the fabric on the fold and then pin the pattern there with both layers of fabric on top of each other; that way, you’re always guaranteed that the pattern pieces will fit and none of them will be too big or too small.
It’s great that you’re giving it a try, and as for the upside-down fawn—that’s just how it is; it’s happened to me too. You can just say that the boy is looking down at the pants from above, so then the fawn isn’t upside down after all, but the right way up for him :-);-)
As for pre-washing, I never pre-wash fabric because I come from an industrial tailoring background—nothing gets pre-washed there either; there’s simply no time for it.  In all the time I’ve been sewing, I’ve only had something shrink on me once because of that, in the truest sense of the word—but never otherwise.
You always have to expect a few mishaps when you start sewing; it happens to everyone, and anyone who says it’s never happened to them is lying. With really good and expensive fabrics, I’d first sew a test piece from a cheaper fabric—but it should have the same texture as the original. I even do that when I have to sew something really nice, like a ball gown or something.

Best regards, Inge

23136 Posts Recent Started
Thursday, March 17, 2022 at 2:13 PM
Nice thread, and the fabric is great.

3415 Posts Recent Started
Thursday, March 17, 2022 at 2:18 PM
I sewed a really adorable pair of pants for Lotti when she was about 7 or 8 months old, with little fish on them.
And it wasn’t until I put them on her for the first time that I noticed the fish on the front were all floating belly-up 😂

The pants are going to be so cute!
And the deer doing a headstand is doing yoga 😁

3415 Posts Recent Started
Thursday, March 17, 2022 at 2:20 PM
I don’t pre-iron jersey either.
And I don’t necessarily pre-wash it either. I usually just add one to two millimeters, because the shrinkage rate is actually quite low.

23136 Posts Recent Started
Thursday, March 17, 2022 at 2:42 PM
@Nina,
what’s a “Spieler”?

5117 Posts Recent Started
Thursday, March 17, 2022 at 2:43 PM
a little pair of Josefa play pants; there’s plenty of room in them for playing and romping around

Best regards, Inge

23136 Posts Recent Started
Thursday, March 17, 2022 at 2:45 PM
What’s the difference between a jumper, a onesie, bloomers, and a romper?

3415 Posts Recent Started
Thursday, March 17, 2022 at 2:46 PM
@Josefa: It’s basically a playsuit with short legs and sleeves—or no sleeves at all. It’s nice and roomy around the diaper area and the legs.
Take a look in my shop—I have a crocheted playsuit there.

13194 Posts Recent Started
Thursday, March 17, 2022 at 3:59 PM
Great thread, Ina. I still have a lot to learn here. You picked out a really pretty fabric. Yeah, the deer are just doing yoga. ;-) I’m sure Lisann won’t mind. I can’t wait to see the finished pants.

23136 Posts Recent Started
Thursday, March 17, 2022 at 4:00 PM
@Nina, it looks great.

3415 Posts Recent Started
Thursday, March 17, 2022 at 6:42 PM
Thanks, Josefa 😊

6027 Posts Recent Started
Friday, March 18, 2022 at 1:04 PM
Hello everyone, here I am again.

@alle

Thank you so much for your helpful tips and comments. What I’m taking away from them for myself:

Note to Ina:

1. You can skip prewashing jersey or stretchy fabrics (especially for children’s clothing).
2. Always place the pattern on the fabric fold (so the fabric is folded over) and use one pattern piece to cut out 2 fabric pieces.

@Petra
I think there are also patterns where the center seam is omitted. I can imagine that well too; after all, you save two seams. That would of course be easier to make in terms of the pattern. But all the little pants I looked at have a seam in the middle. I’ll definitely try one sometime where there’s basically no seam in the front and back, only at the sides.

And this is how it continues:

Step 4:
Now it’s time to sew. I did that yesterday, and it really frayed my nerves. So far I had only sewn non-stretch fabrics with the straight stitch on my sewing machine. That was easy. BUT jersey is stretchy and needs a different stitch, otherwise it pulls together and you get wavy edges. This is NOT what it should look like. Here I sewed with a normal zigzag stitch (so, not a stretch stitch):
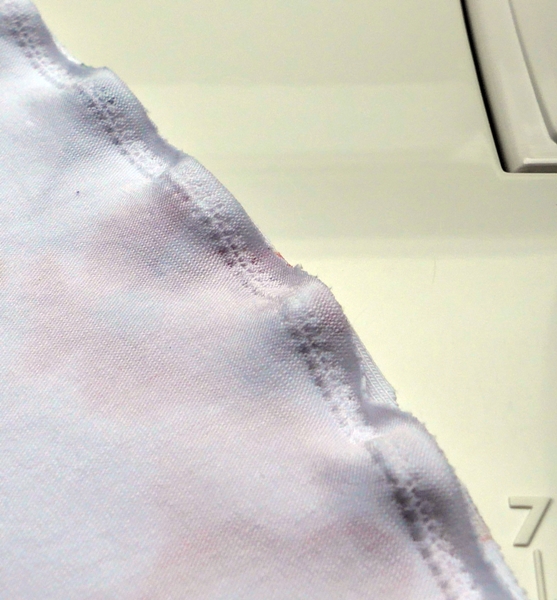


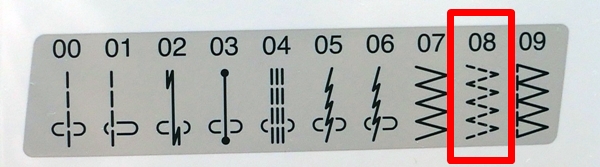
I experimented with a test piece of my jersey fabric to see which stitch and stitch width would give the best result. There are probably lots of stitch types, but for me the "stretch stitch" won. Luckily my machine has such a stitch. Because of the interruptions in the zigzag, it allows for movement.

Question:

According to the internet, stitch no. 9 is a "pseudo-overlock stitch." It looks kind of similar to my no. 8. Does anyone know what it’s for? Can it also do "stretchy," even though it’s "pseudo"? The interruptions in the stitch are at the sides and not completely through the whole seam pattern. I haven’t tried it now because I was happy that no. 8 worked. I have a regular sewing machine, not an overlock.


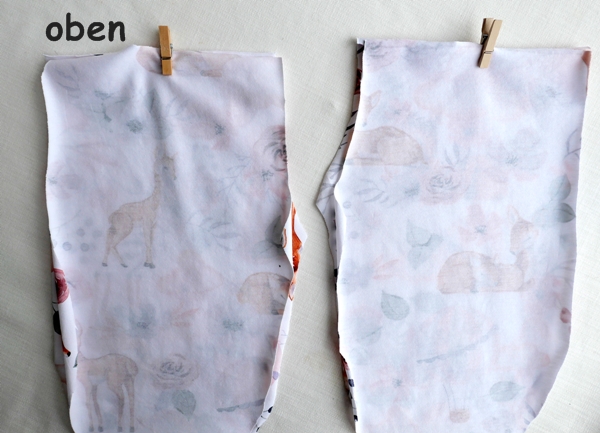
Then I placed my 4 individual pant legs on top of each other and marked the "top" with a clip. So I wouldn’t get mixed up again.


Next comes pinning the first seam with pins.
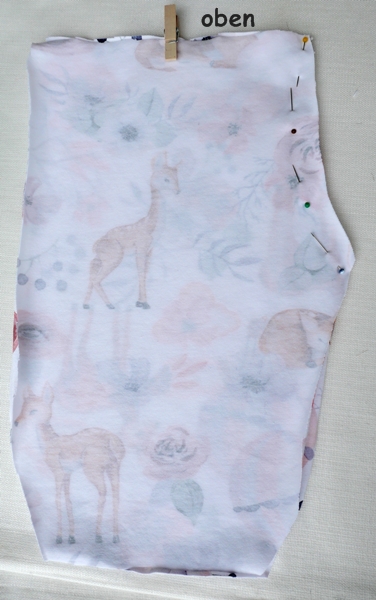


Then the sewing actually began. I set the stretch stitch with stitch length 4 and stitch width 1.5. Well, that is certainly different on every sewing machine too. You have to test it on the particular fabric. For the next pair of pants, I would try setting smaller stitches here. The reason follows later. So here is my choice:
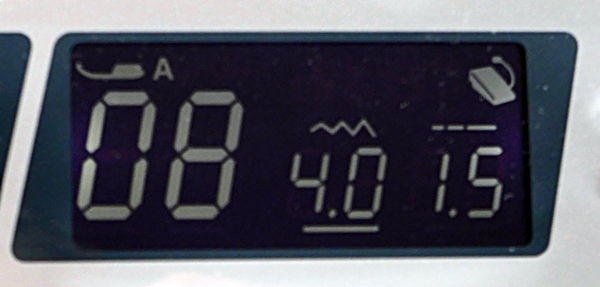


Now let’s start! Very obediently, I first locked the seam: so I sewed a few stitches forward with the straight stitch, then back again. Then I set my stretch stitch and off I went.


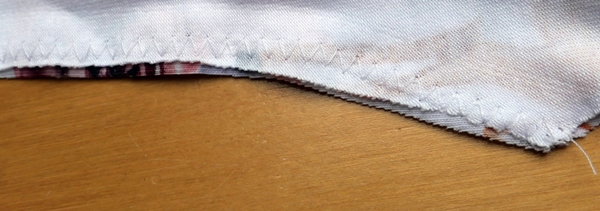
This is roughly what the seam looks like then.
You can see I didn’t get around the curve very well, and the fabrics shifted slightly too.
Because of the curve problems, I would set smaller stitches next time. I think then I’d get around it better, right?

Question:
Small stitches or large stitches, or what do you do to get around a curve better with a zigzag stitch? Does the seam mind if you stop in the middle and change the stitch? So can you adjust the size within one seam?


After I had also sewn the seam on the other leg, I tried to neatly cut off the excess fabric next to the seam. Jersey doesn’t fray, and you also don’t want to have more fabric at the seams than necessary.

Question:

Do you also cut off the excess fabric beside the seam? And do you just do that with normal scissors? The fabric sometimes curls up, so you can hardly get hold of the fine little bit that needs cutting off. Or do you just leave it on, since it’s inside and no one will see it?

So, and because that worked well, I carried on right away. Then I sewed together the inner leg seam (I’m sure it’s actually called something else). 
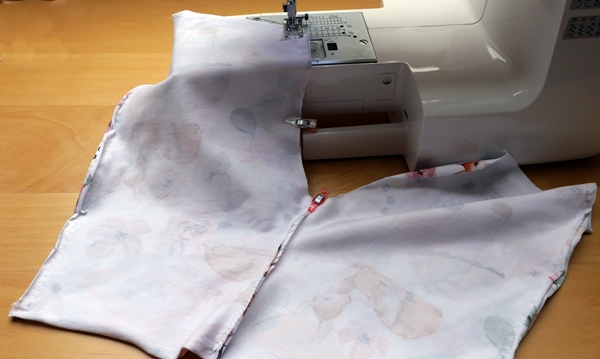


After that I placed the two pieces, now sewn together in the middle, on top of each other and closed the two outer sides with a seam. But here a problem came up at the end of the seam:

Although the fabric was exactly the same length, at the end of the seam about 1 cm of fabric was left over on the underside. Annoying. But I didn’t want to unpick the seam again. So I simply cut off the overhang. For jersey pants for babies that’s probably okay, but for bigger people one leg would now be longer than the other.

On the other side I had sewn from bottom to top, so I started with the pant edges lying exactly on top of each other. The tiny overhang at the top by the waistband probably won’t bother anyone if I cut it off there.

Note to Ina:

Whenever possible, always sew seams from bottom to top. But that requires spatial thinking and inwardly goes against me. But if it helps the result, so be it.

Question:
You pros, do you all always sew from a bottom edge upward? Or does it just not happen to you that at the end the two fabrics lying on top of each other are no longer the same length? That’s surely caused by the pull of the sewing machine or the feed or the fabric. But that’s too complicated for me. I don’t want to adjust anything on my machine; we don’t know each other well enough yet :-)
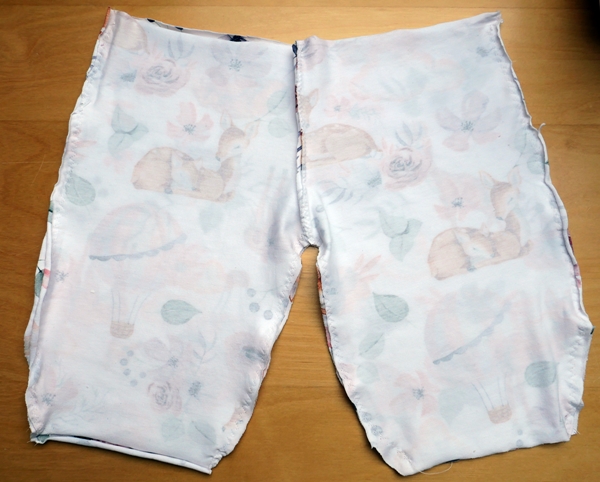


At that point I was already pretty happy and worn out from the tension. But for a first piece, the result is okay so far, right?


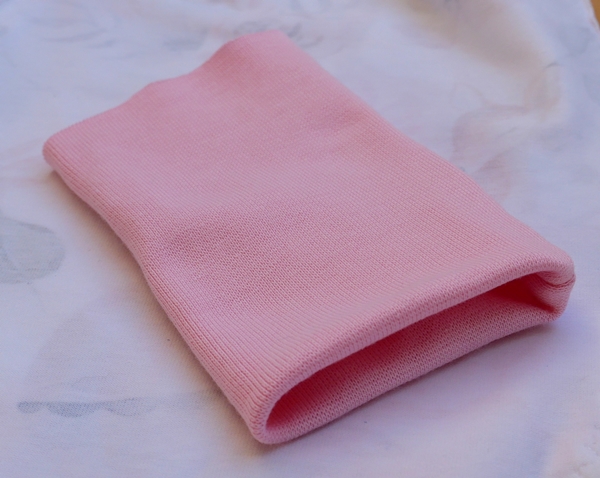
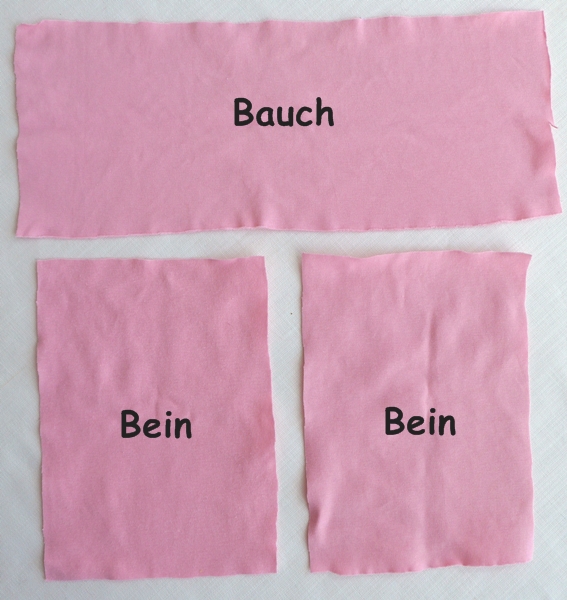
In the evening I then cut the cuffs. This is special cuff fabric, also stretchy. It is always folded over, and the folded side is what you see later at the edge.

Here too you have to pay very close attention. What is the grainline? The whole thing has to be stretchy in the right direction. And then it also gets folded together twice. So first, a dry run on the table. I changed my mind again about the color because the fabric I had originally planned to use was somehow too thick.

Question:
How do you distinguish between cuff fabrics? Do you simply collect lots of them over time and then choose the right one, or can you distinguish between "summer cuff fabric" and thicker "winter cuff fabric"? A beginner just buys "cuff fabric."


So, enough writing. Now it’s your turn: to read and comment. Thank you so much for your support with my first project. I now have to quickly make lunch, otherwise my husband will starve. And this afternoon I’ll keep working on the baby pants :-))

Best wishes from Ina

5117 Posts Recent Started
Friday, March 18, 2022 at 1:24 PM
first of all, the stitch number 8 that you’re showing there is the elastic zigzag stitch, ideal for jersey, but stitches 5 and 6 also work for stretchy fabrics, and I always sew from top to bottom, rarely in the other direction, because with some cuts you have to ease in the extra width there is in order to guarantee the necessary freedom of movement. Easing works like this: you have to let the *too much* fabric run loosely through the machine, while pulling the *too short* piece—which it actually isn’t—through nice and taut; that takes some practice. If necessary, guide the fabric a bit with scissors, and watch your fingers, because they don’t look so great in children’s clothing ;-) :-)
With cuff fabric, there are sturdier, i.e. thicker ones, and lighter, i.e. thinner ones. I often use leftover jersey for cuffs if the color matches the piece, and often different-colored ones look good too, making it an eye-catcher.
Since I sew with a coverstitch or overlock machine, cutting off the excess seam allowance takes care of itself, but you can spare yourself that if you get used to sewing your seam allowance only presser-foot-width and cut it out accordingly from the start. That also takes a little practice, but it comes automatically the more you sew.
Choose the stitch so that it can handle curves easily without having to change the stitch size, and even if you choose a slightly larger stitch, you can leave it and sew the curve slowly with it. When sewing curves, always make sure you have a straight section under the presser foot; that way you can sew any curve quite easily and well.

Best, Inge

6027 Posts Recent Started
Friday, March 18, 2022 at 5:54 PM


Dear Inge, thank you very much for your reply.

I’ve never used stitch 5 or 6 before. It looks so “messy,” which is probably why I’ve never tried it. But I did everything right with the elastic zigzag stitch.

Thank you also very much for your explanations about cuff fabric, trimming the excess at the hem, and sewing around corners. I think it’s great that you can also use jersey as cuff fabric—it’s stretchy, after all.

If you always sew from top to bottom—which feels much more natural to me—then I’ll do it that way too. The other way round is somehow harder for me because it feels backwards. You just have to learn it first and gain some sewing experience to know when you need to pull the fabric slightly (top or bottom) so that both pieces of fabric end up aligned at the end. I still need to practice sewing slowly around curves and also “staying on track” while sewing. I already know that the seam allowance should end right next to the presser foot. But just to be safe, I probably always leave a little more space there. Sometimes the machine does something different from what I want, and then it drifts off and I have to correct it. Good thing the seams are on the inside :-)

I’ll tell you in a moment how things went with my pants. I still have to edit the pictures. So, see you in a moment.

Best regards, Ina

6027 Posts Recent Started
Friday, March 18, 2022 at 6:50 PM
So, here I am again. So this is how it continued:

Step 5
Sewing on the cuffs


This was the step I was most nervous about, because the narrow elastic cuffs somehow have to be sewn neatly and tidily onto the wide pants. But you can’t do without them.

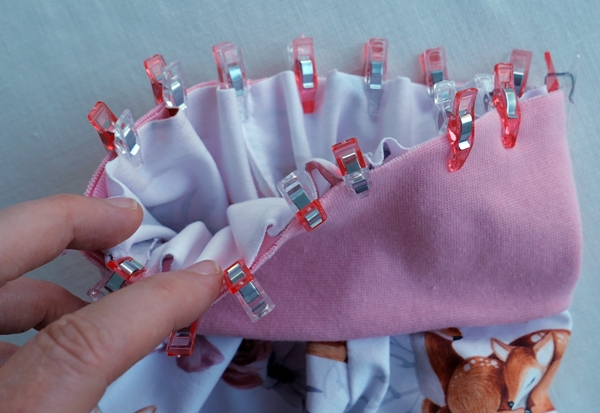
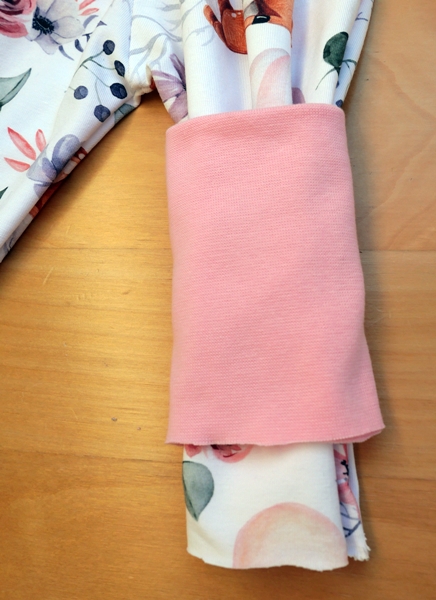
I folded the cut-out cuff pieces and sewed them together into a tube. Since these seams don’t need to be stretchy, I chose the straight stitch, backstitching at the beginning and end so the seam wouldn’t come undone. Then turn it right side out again and pull it over the pants, which are also turned right side out.


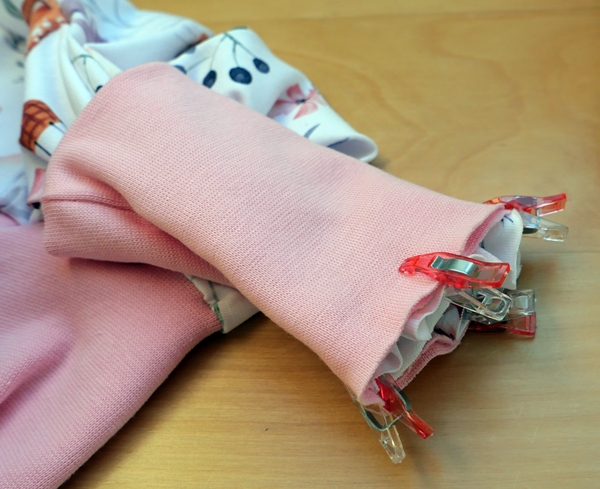
After that I used fabric clips to clip the 3 layers of fabric together. It didn’t work at all with pins. In any case, the pants are wider than the cuff—that’s how it’s supposed to be. You basically have to distribute the extra jersey fabric evenly around the cuff.


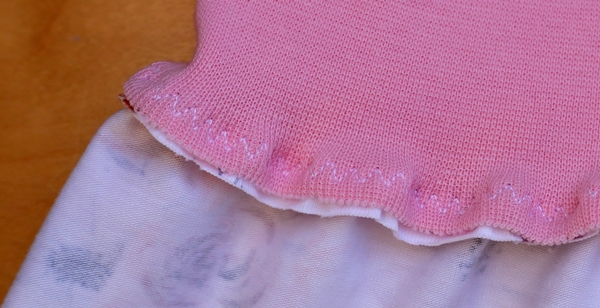
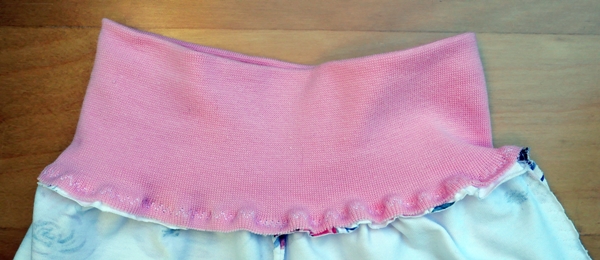
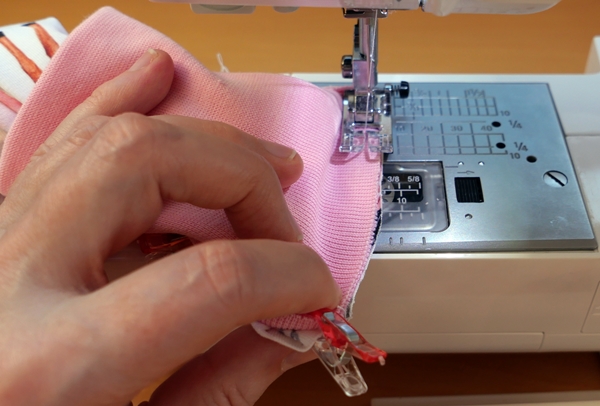
Then came sewing these 3 layers together—I was pretty nervous about that. Everything was quite tight, plus 3 layers of fabric, and I also had to pull on the cuff fabric while sewing so there wouldn’t be any wrinkles. But it really went much better than expected! At first I thought it would be a battle between the sewing machine and me, but no, it bravely held its own against my pulling and produced a proper seam. I used my elastic zigzag stitch again. This time, though, in size 3—that somehow seems more suitable to me.

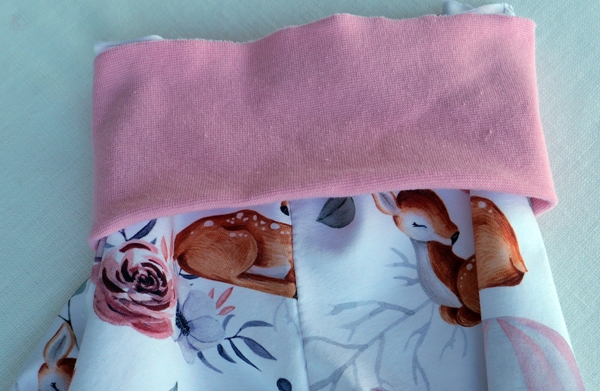
I then cut off the excess fabric on the jersey with scissors. You can still see it in the picture.


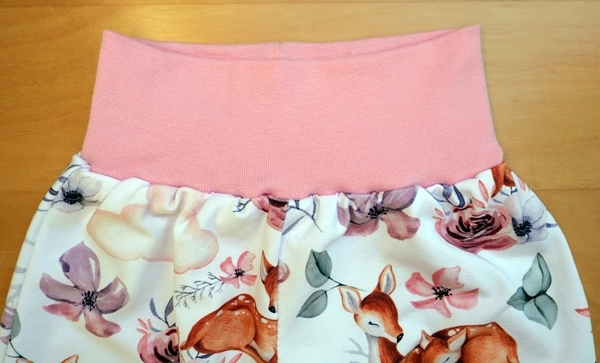
Turned right side out, I already liked it very much. Maybe next time I would make the waistband a bit higher. But I’ll have to talk to Lisann’s mom about how she would like it. 


Last came the cuffs for the legs. In principle, they’re made the same way. So turn the cuff tubes inside out and pull them over the pant legs. Then pin them with fabric clips. Here 4 are enough, and here too I started with the inseam aligned with the cuff seam . That way all the seams are always on the inside of the leg.


Because of the small size, the sewing here was a bit difficult to handle. But here, too, it ultimately went better than expected. You just have to keep pulling the cuff fabric taut while sewing so that, visually, both fabrics are basically the same length.


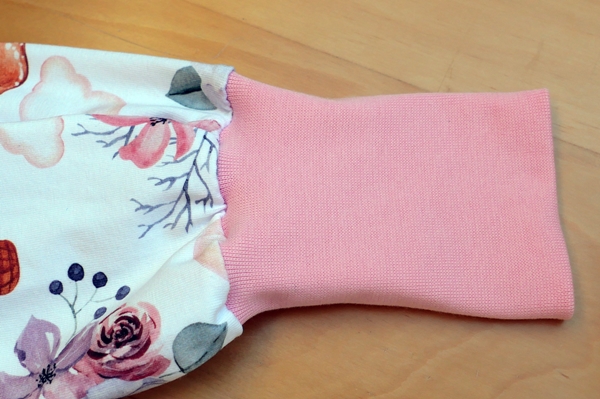
After both cuffs were sewn on, I cut off the excess seam allowances here too with scissors. When you turn the cuff back over, you can see the result:


Well, and just like that, the pants are finished! My first self-sewn baby pants have seen the light of day:


You can surely imagine that more in other sizes will now follow. Lisann needs more than one pair of pants, after all, and she’s growing and needs them in different sizes. So I can keep busily sewing pants. It’s good practice, too. 

And when I’ve had enough of pants, I’ll tackle a new sewing project. I’ll definitely present that to you again as a live blog and work on it together with you to figure out the best way to do it. Sewing really is a wonderful hobby, once you know how. In any case, I’ve made a start and I’m very proud of my first piece.

Thank you very much for your tips and advice.

Best wishes - Ina

3415 Posts Recent Started
Friday, March 18, 2022 at 7:14 PM
Great job! The pants look great!

2606 Posts Recent Started
Friday, March 18, 2022 at 8:50 PM
Oooh, Ina,
those are such adorable pants for little Lisann.
I’m already looking forward to your next steps.
Best wishes, Petra 

5117 Posts Recent Started
Friday, March 18, 2022 at 11:32 PM
Neat work, Ina—the pants turned out really great, and the little one will feel comfortable in them.
If you’re looking for a pants pattern with only side seams to sew, check out Klimperklein Summer Pants; it’s a multi-size pattern and super easy to sew.

Best regards, Inge

3415 Posts Recent Started
Saturday, March 19, 2022 at 8:44 AM
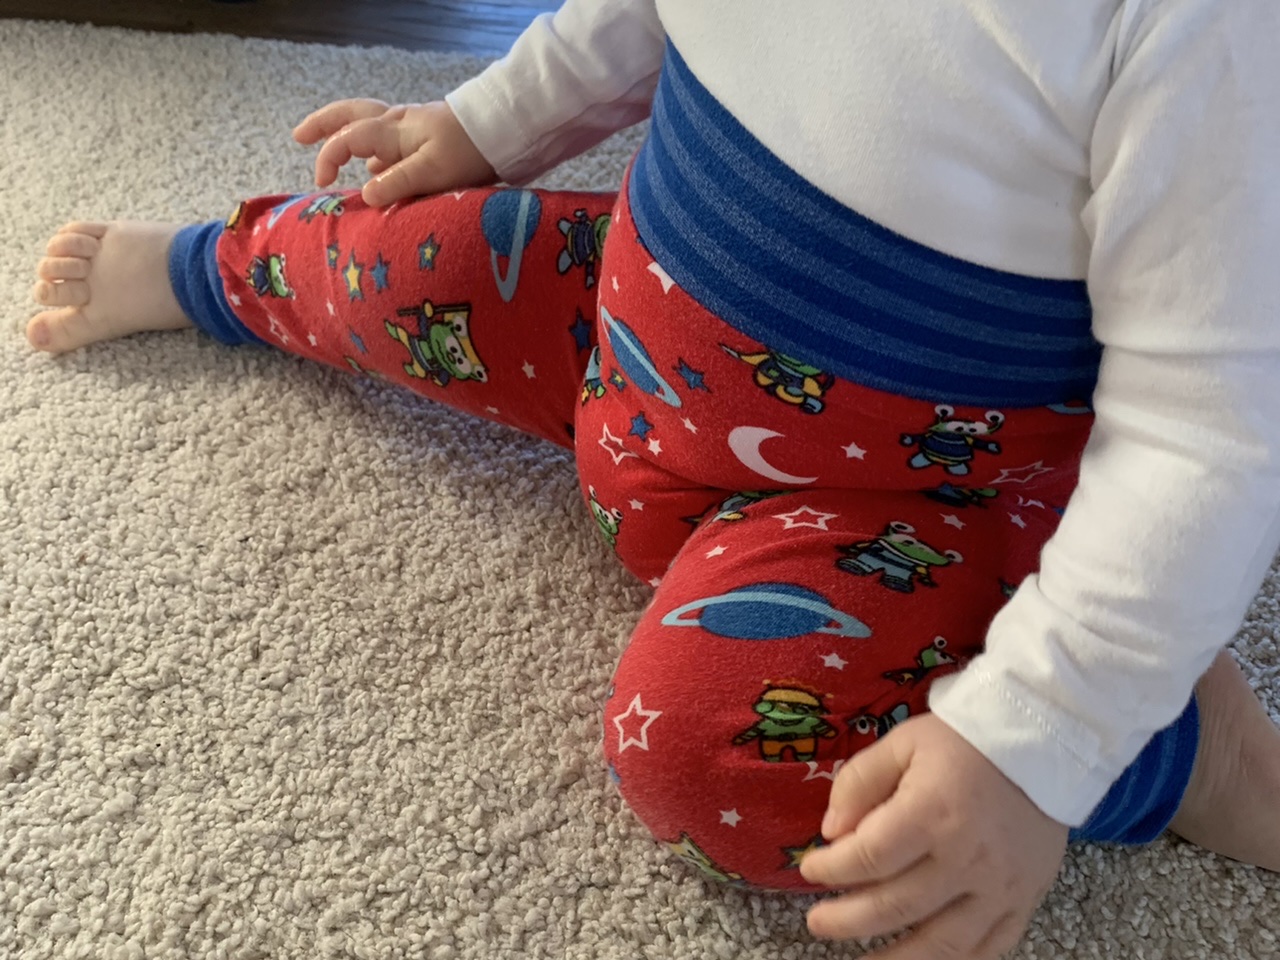
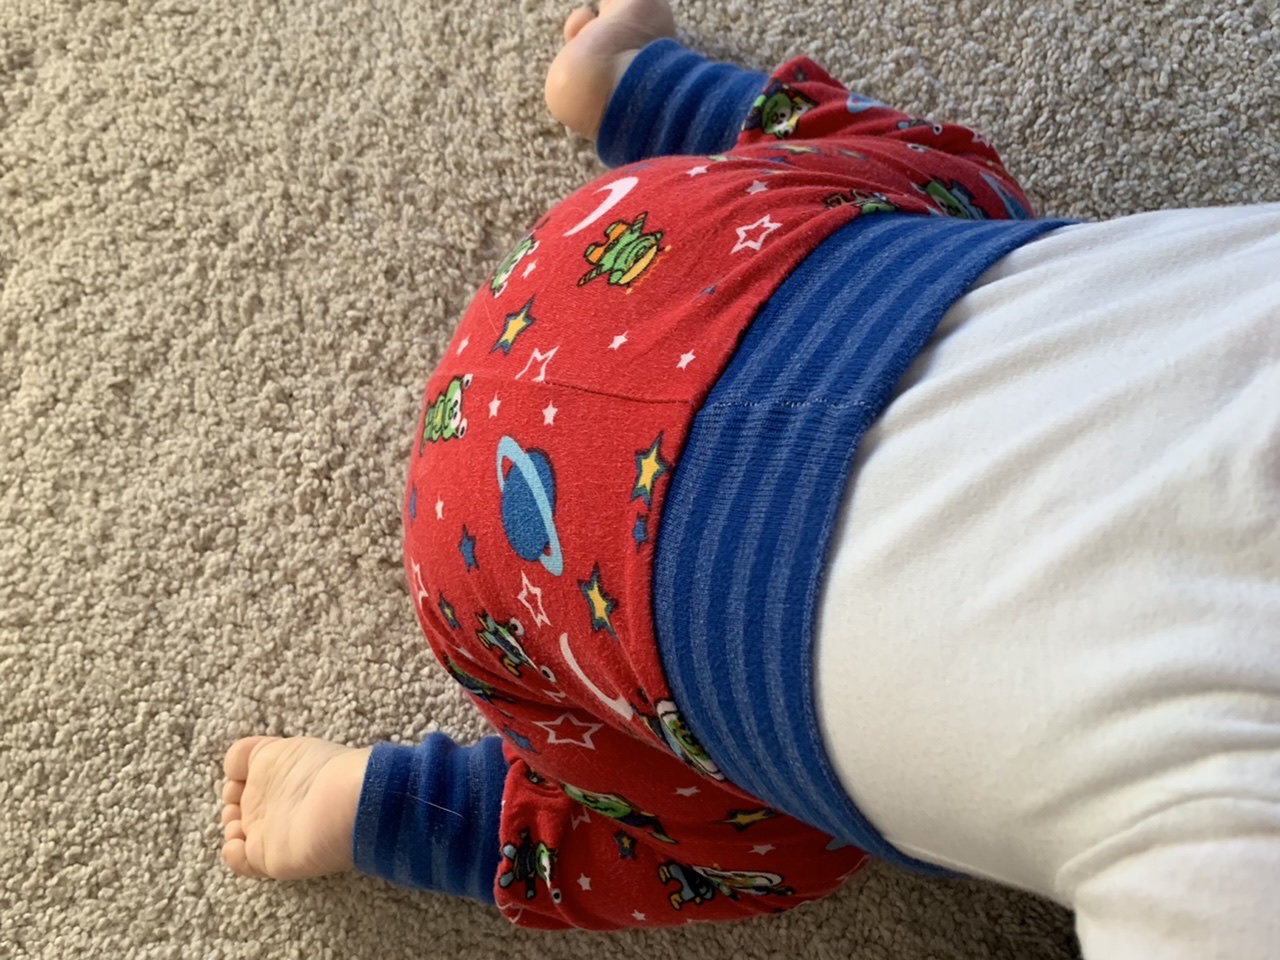
This is an RAS that Quentin is wearing right now. It’s a very simple pattern that’s available as a free pattern in the smaller sizes.


6027 Posts Recent Started
Saturday, March 19, 2022 at 8:46 AM
Thank you, my dears, for your compliments.

Dear Inge, that’s a great tip! That’s exactly the kind of pattern with just two side seams I would have been looking for online today. My next pair of pants will be just like that. And now I’m off to Klimperklein. The fabric is already laid out.

I wish you all a lovely, sunny day.
Warm regards, Ina

6027 Posts Recent Started
Saturday, March 19, 2022 at 10:57 AM
Dear Nina, what does “RAS” mean? Quentin’s pants look super comfortable and colorful.

Best wishes, Ina

3415 Posts Recent Started
Saturday, March 19, 2022 at 11:09 AM
Hey there,

That’s the name of the pants pattern.
Just Google “RAS pants” or “RAS sewing pattern.”

And yes, there are little aliens, stars, and stuff like that on it. It’s nice and colorful.
And the pattern seems to be very comfortable—the kids always loved wearing these pants. I’ve sewn them in all kinds of sizes.

6027 Posts Recent Started
Saturday, March 19, 2022 at 11:20 AM
Thanks for your reply. I think my next pair of pants will be a RAS. I already have the fabric ready.

Best regards, Ina

Write Reply

Please register or Log in!

Latest comments

10 actual comments last by Moderator
1 actual comment last by Moderator
83 actual comments last by Silvia1967
25 actual comments last by veronika-t15
3 actual comments last by Libelle11
69 actual comments last by Silvia1967
1 actual comment last by Schnuckelina
1 actual comment last by CreatOwl
1 actual comment last by Moderator
5 actual comments last by kruemel-monster
5 actual comments last by Akela
92 actual comments last by Akela
6 actual comments last by SabinesFadenspiel

Currently popular

83 actual comments last by Silvia1967
25 actual comments last by veronika-t15
Show all

Popular patterns

Top patterns from Natalija from the Crochet category!
Top patterns from Ladycraftbyzey from the Crochet category!
Top patterns from smartstitches_diy from the Crochet category!
Top patterns from elke-eder from the Crochet category!
Top patterns from NiggyArts from the Crochet category!
Top patterns from NataliSkill from the Crochet category!
Top patterns from stricken-im-trend from the Knitting category!
Top patterns from made-by-anja from the Crochet category!
Top patterns from stricken-im-trend from the Crochet category!
Top patterns from Haekelweltmitherz from the Crochet category!
Top patterns from _petitbonnet_ from the Crochet category!
Top patterns from KuemaTutorials from the Crochet category!
More top patterns

Free patterns

Top patterns from MorbenDesign from the category!
Top patterns from jennysideenreich from the category!
Top patterns from MorbenDesign from the category!
Top patterns from Hobbii from the category!
Top patterns from MorbenDesign from the category!
Top patterns from Hobbii from the category!
Top patterns from MorbenDesign from the category!
Top patterns from Hobbii from the category!
Top patterns from Miralay from the category!
Top patterns from MorbenDesign from the category!
Top patterns from NataliSkill from the category!
Top patterns from ternuraamigurumi from the category!
Top patterns from Dianas-kleiner-Haekelshop from the category!
Top patterns from christina-lemberger from the category!
Top patterns from KuemaTutorials from the category!
Top patterns from Hobbii from the category!
Top patterns from martina-supova from the category!
Top patterns from Hobbii from the category!
Top patterns from MorbenDesign from the category!
Top patterns from DIY-4U from the category!
Top patterns from Colorfuldreams from the category!
More free patterns

Win shopping credit every month!

42 prizes / total value €300: 30×€5, 10×€10, 2×€25 – simply activate the newsletter. No purchase necessary. Unsubscribe at any time. Prizes are awarded as Crazypatterns shopping credit. Learn more