Does this sound familiar? You’re sitting there comfortably, and stitch by stitch, your multicolored project is taking shape. You’re enjoying the pattern that’s emerging—maybe Fair Isle, double-faced, or a crocheted pattern—and suddenly you realize:
Oh no, why are my fingers stained? Or: Why are my light-colored stitches stained?
Yes, exactly. Yarn that bleeds is a real challenge, especially with multicolored projects. Not just while knitting or crocheting, but especially when caring for the finished project. In this article, I’ll explain why this happens, when it’s normal, and how you can reliably protect your projects.
Why Does Yarn Bleed? A Simple Explanation of the Causes
Color bleeding depends heavily on the type of fiber, the dye, the dyeing method, and the finishing process. It is usually caused by excess dye in the yarn or poor dye fixation in the yarn.
High Risk of Color Transfer
- These materials are more likely to bleed color:
- Cotton (100%)
While cotton absorbs dyes well, they are often not extremely firmly bound, especially in lower-cost production. - Viscose
Highly absorbent absorbs a lot of dye, but also releases it more easily (especially during washing). - Linen
Similar to cotton, often slightly less so, but also prone to fading.
Moderate Risk of Color Transfer
- Blended yarns (e.g., cotton + polyester)
The polyester content helps stabilize the color somewhat, but the natural fiber component may still bleed. - Wool
May lose color, especially if not cared for properly (water that is too hot, incorrect detergent).
Low Risk of Color Transfer
These fibers are generally more colorfast:
- Polyester (100%)
Dyed with special dyes that bond very firmly to the fiber hardly any color bleeding. - Polyamide / Nylon
Also relatively colorfast. - Acrylic
Good colorfastness, similar to polyester.
👉More important than the yarn blend alone: Even with “safe” materials, problems can arise if:
- Cheap or poor-quality dye was used
- The dye was not properly set
- The colors are very bold and dark (blue, red, black).
Hand-dyed yarns sometimes tend to bleed. Gradient yarns can also bleed.
Why Wool that Bleeds Color is Problematic in Multicolored Projects
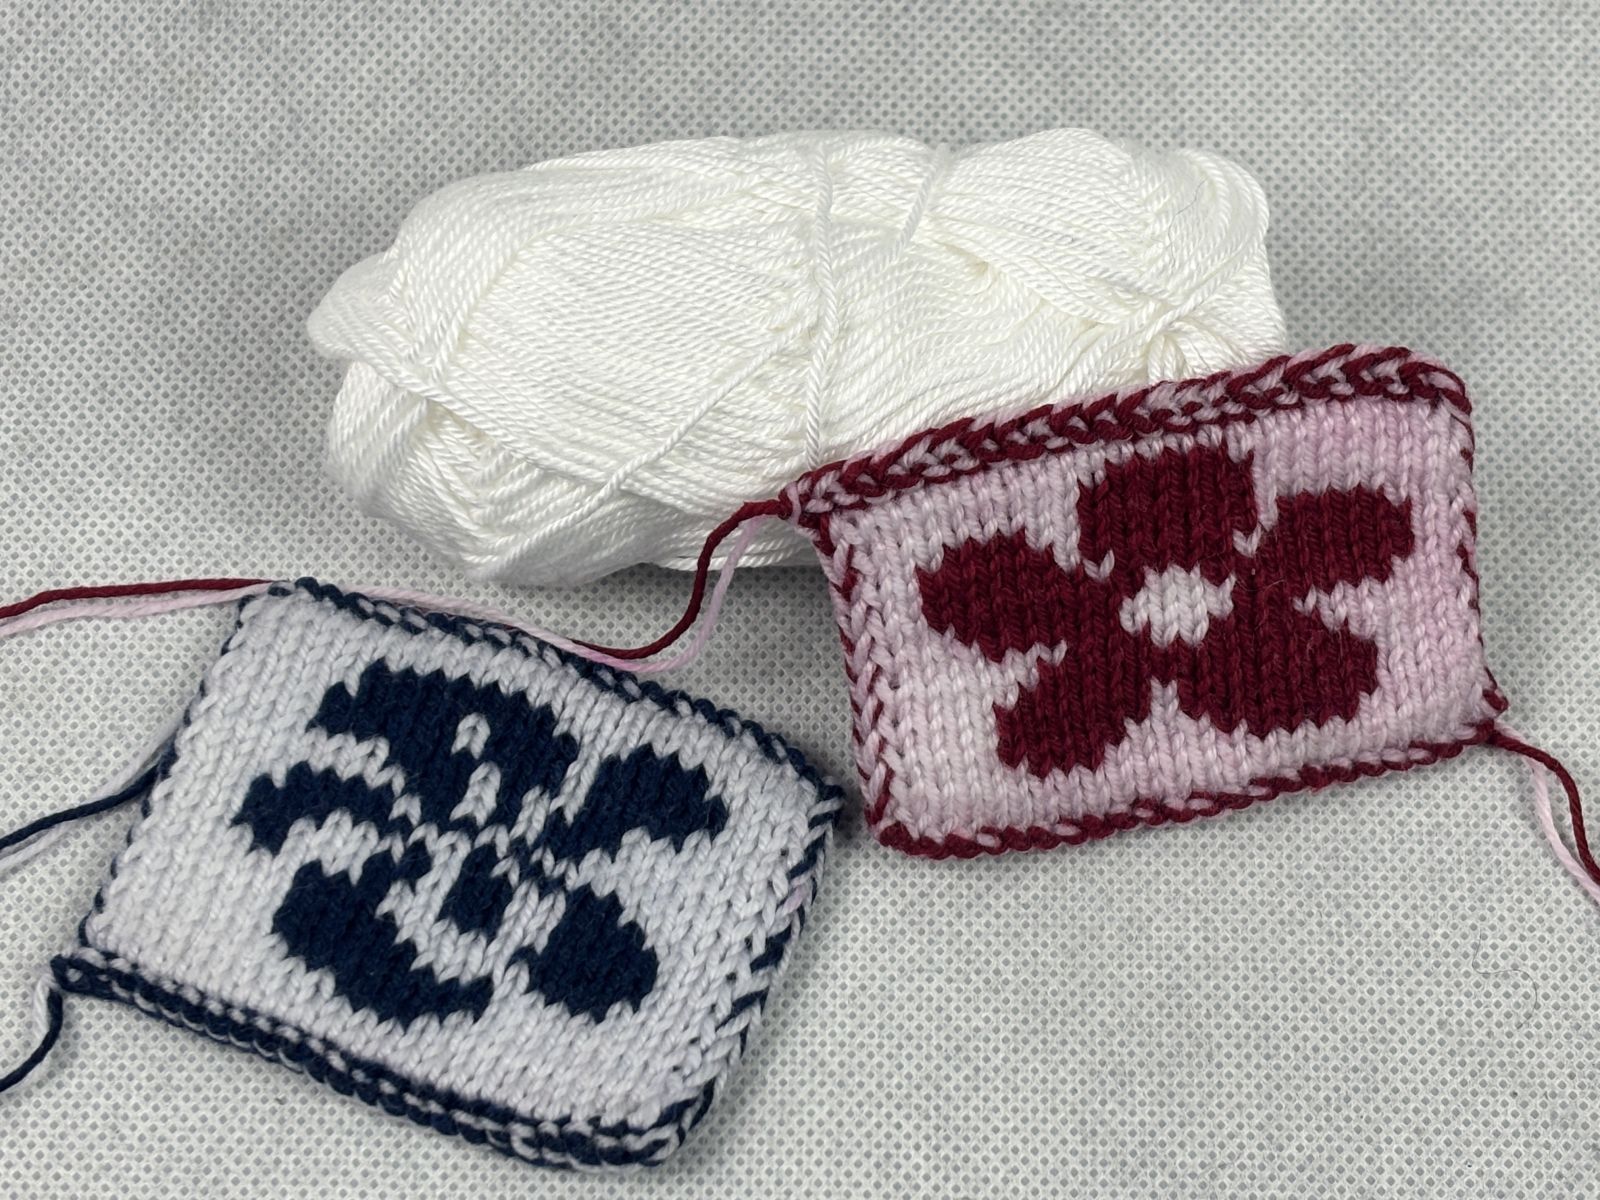
While color bleeding is often just unsightly in single-color projects, it can really ruin the pattern in multicolor projects:
- Dye can transfer to your hands, needles, or lighter-colored stitches while knitting. Light-colored stitches turn gray or pink, and light-colored areas become blotchy
- Contrasts lose their clarity
- Patterns appear blurry
This effect is particularly noticeable in Fair Isle, double-faced, or multicolored crochet.
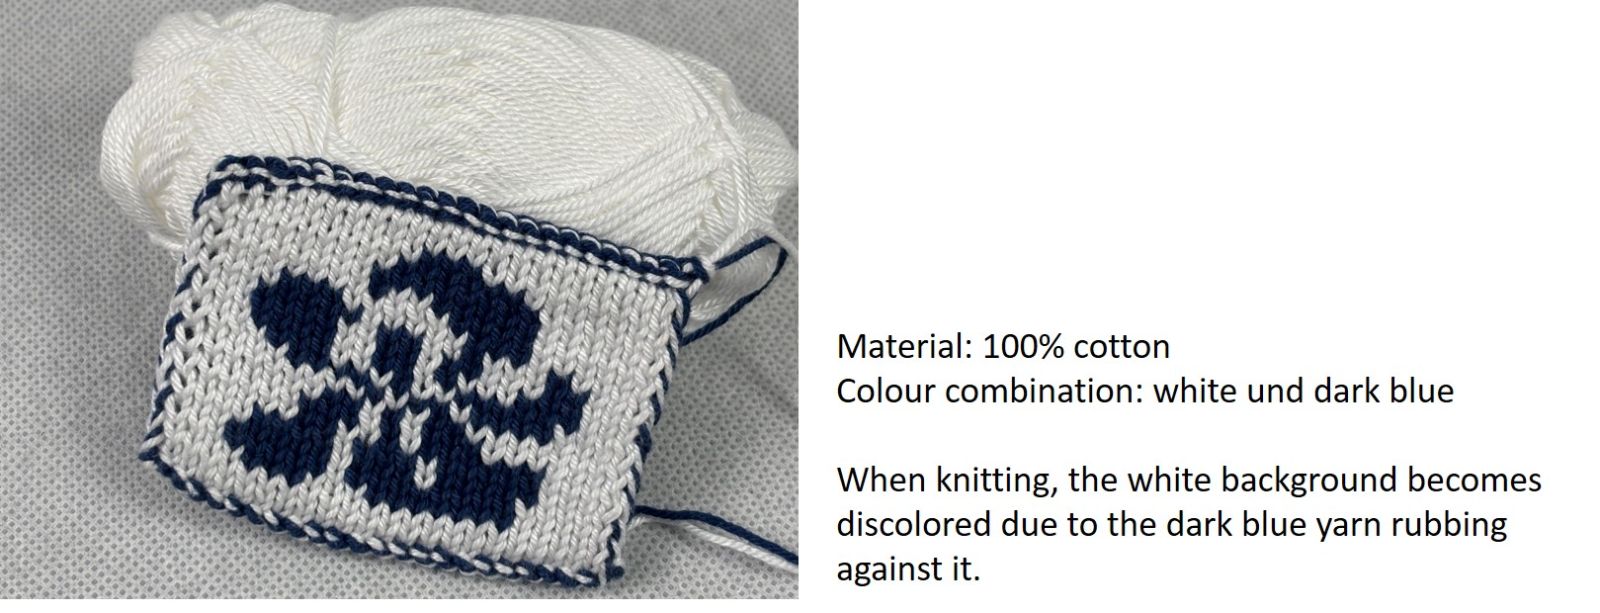
You don't always notice while knitting or crocheting that a yarn is bleeding. Often, the yarn only starts to bleed when it gets wet. This can happen while you're knitting or crocheting (due to sweat from your hands), but it's also quite possible that you won't notice it until the first wash.
Particularly Affected: Fair Isle, Double-Face, and Multicolored Crochet
Basically, this applies to all multicolored knitting and crochet techniques. However, the finer and smaller the pattern, the worse the disaster if the yarn bleeds. Under certain circumstances, the beautifully knitted patterns may not even be recognizable anymore.
Double-Faced Knitting
Two colors lie directly on top of each other (two sides of the fabric). If one color bleeds, it stains the other side. This results in stains. In addition, the adjacent light-colored stitches become stained. The beautiful pattern is then ruined on both sides of the work.
Fair Isle / Norwegian Pattern
Many small areas of color with strong contrasts. A color that bleeds can immediately “smudge” the pattern.
Multicolored Crochet
The threads are often close together. Moisture causes the dye to spread quickly to light-colored areas.
Wool Bleeds Color—What Should You Do Before Knitting or Crocheting?
The most important step: test it first. This saves hours of work and frustration.
Testing the Yarn
This yarn test gives you an initial indication of whether your yarn bleeds or not:
- Cut a small piece of yarn from the skein
- Form it into a “mini skein” and wet it (holding it under the faucet is enough, as long as you make sure the yarn is completely soaked)
- Place the “mini-strand” on a white piece of absorbent paper (e.g., paper towel or toilet paper) to dry. Press the “mini-strand” carefully flat against the paper so that the thread is in direct contact with it
- Check to see if the paper changes color. Give the yarn enough time to bleed. Sometimes it takes a while for the color transfer to become visible
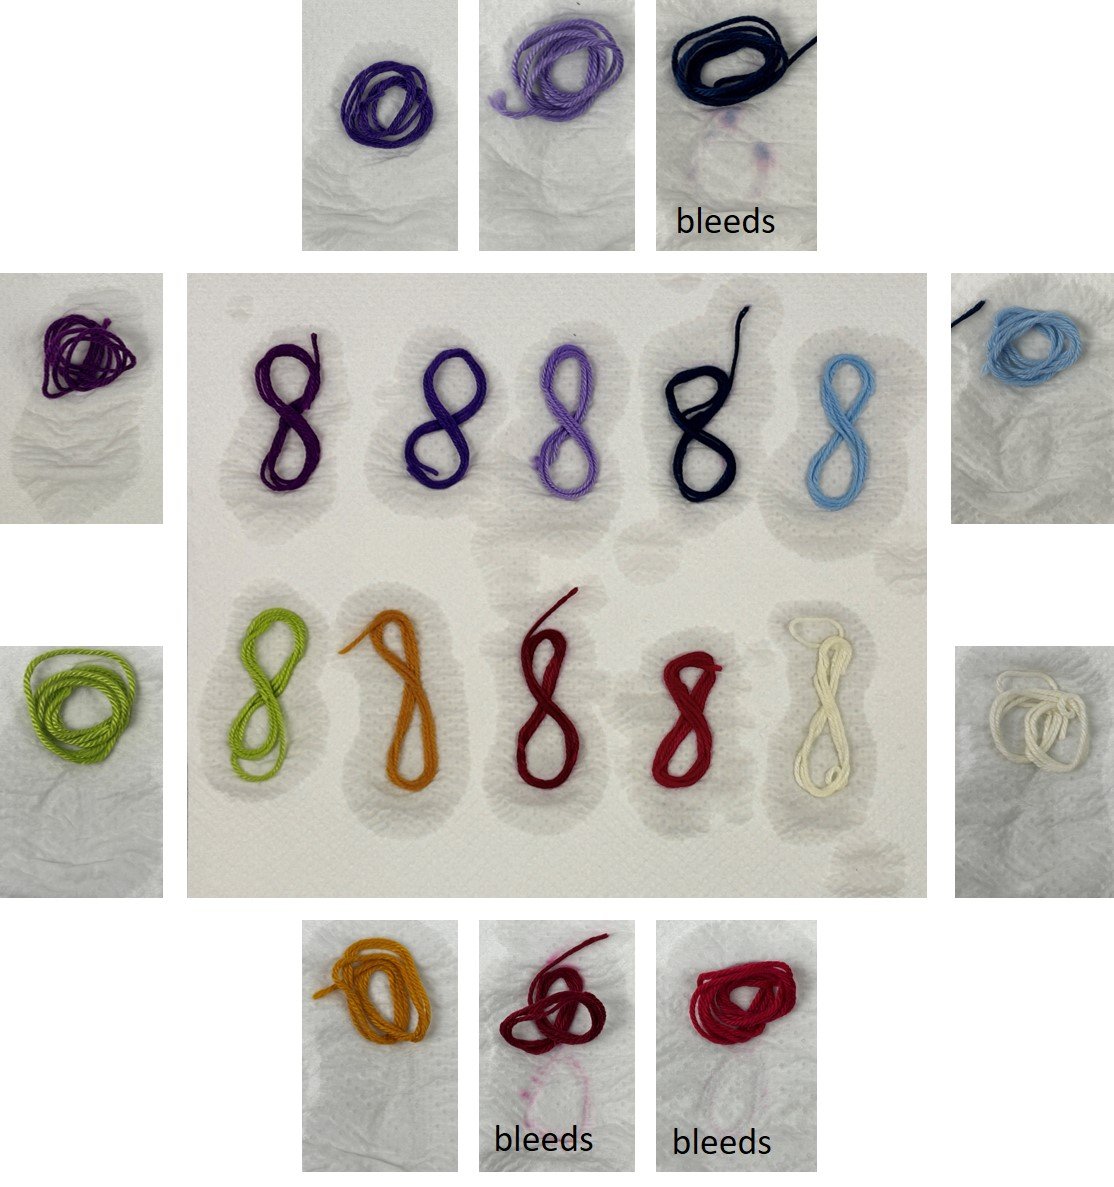
👉Tip: While it’s less common, even lighter colors can sometimes bleed. That’s why I would never simply assume that a color won’t bleed in a multicolored project. I recommend testing all the colors you plan to use in a project.
Testing the Stitch Gauge
This is the ultimate test to see how your yarn will hold up after washing.
👉Tip: If the yarn test has already shown that one of your yarns bleeds, I would recommend washing it before doing the swatch test and, if necessary, treating it with vinegar as described below under “If the wool bleeds: These solutions really help.” This way, you can be sure that your yarn no longer bleeds after washing.
Here's how to do the stitch gauge test:
- Knit or crochet a small swatch using all the colors together
- Soak it in lukewarm water
- See if the water changes color
- See if the lighter stitches change color
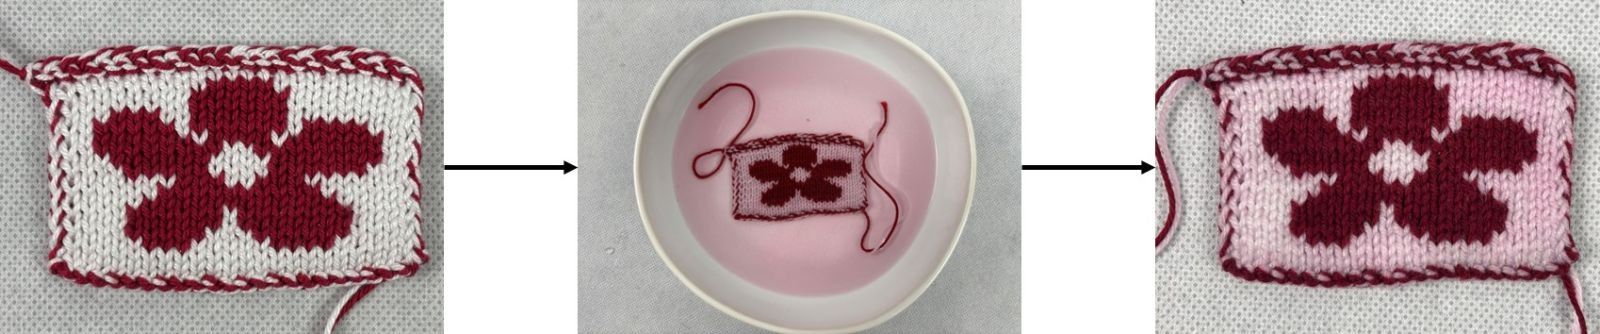
👉Important: Don't just test individual colors; work the combination you plan to use into a swatch.
When Wool Bleeds: These Solutions Really Help
1. Rinse before use
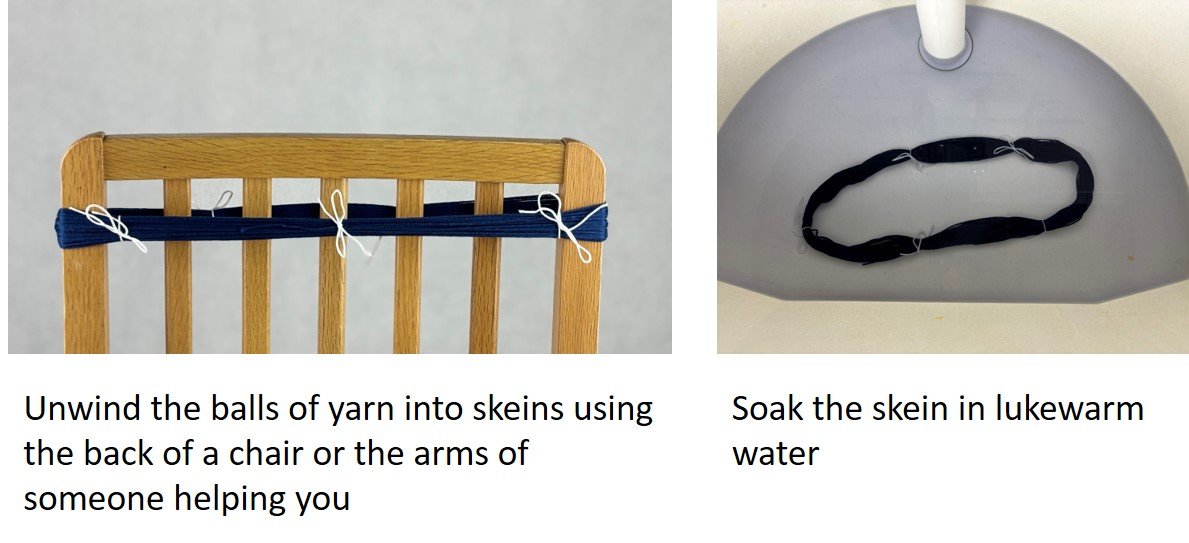
- Unwind the ball of yarn into skeins
- Balls of yarn often don’t wash out very well because water can’t circulate around the yarn as easily
- Tie the skeins together at various points using easily removable knots. This will prevent the yarn from tangling during the washing process
-
- Soak the skeins in lukewarm to warm water
- Follow the manufacturer’s washing instructions regarding temperature
- For the first soak, I recommend soaking the yarn for at least 20 minutes to ensure it is completely saturated
- Gently swish the yarn back and forth (do not rub) while it is soaking
- The yarn is fully saturated when no more air bubbles form on its surface.

- Repeat several times until the water remains clear
2. Vinegar Bath as a Supplementary Measure
If the water still isn’t clear after 5–6 rinses, it may mean that the dyes haven’t set properly. Vinegar can help set the color better with some dyes.
- Prepare the vinegar bath: 1 part vinegar to 4 parts lukewarm water
- Soak the yarn
- Gently rock the yarn back and forth (do not rub) while soaking
- If necessary: repeat several times until the water remains clear
3. Reconsider your Color Choice
- Use strong contrasts (dark/light) only after testing
- Tone-on-tone combinations are usually a safer choice
Help! The Yarn in my Finished Project is Bleeding. Can I Still Save it??
The first wash is crucial. If yarn bleeds, it usually does so during the first wash. After that, it often stabilizes. A knitted piece can often still be saved, but how well this works depends on the timing, the intensity of the bleeding, and the material. I’ll walk you through what’s possible step by step:
- Take action immediately
If you notice that a color is bleeding—the sooner, the better.
- For a freshly knitted item: immediately soak it in plenty of cold or lukewarm water
- Do not rub or wring it out
- If necessary, use one or more color-catching cloths
- Change the water quickly
- Do not let the dye set—otherwise it will penetrate deeper into the fibers
- Carefully rinse off any excess color
- Change the water until it runs clear
- You may want to use a mild wool detergent
- Do not rub or wring—just gently press
- Optional: a fixing bath (e.g., a vinegar-water solution can help set the bleeding dye)
- Save light-colored stitches
If the light-colored areas have discolored:
- Soaking briefly in cold water with wool detergent can reduce minor discoloration
- For more severe discoloration, a wool color remover may help—be sure to test it on a small area first
- Dry & then stabilize
- Lay the knitted item flat to dry
- If necessary, repeat the setting process after drying
Important principle
“The faster you act, the more you can save.”
With wool that bleeds very heavily, a perfect result cannot be guaranteed, but most mild to moderate cases can be significantly improved.
Conclusion: How to Protect your Multicolored Knitting Projects
Knitting or crocheting with multiple colors is a lot of fun—but yarn that bleeds can ruin a project. You can avoid disappointment by testing your yarn before using it.
👉Remember: “What’s knitted together should also be tested together.“
If you follow these steps consistently, your patterns will remain clear, the colors will stay vibrant, and your enjoyment of the project will remain undiminished.
✅ Checklist: Multicolored Knitting Without any Unpleasant Surprises
(perfect for printing)
Before Starting:
☐ Have I tested all the yarns for colorfastness?
☐ Did I test the colors together (not just individually)?
☐ Did I wash a small swatch?
☐ Will the water remain clear or only slightly colored?
When a yarn bleeds:
☐ Did I wash it beforehand?
☐ Have I tried a fixing bath (e.g., with vinegar)?
☐ I've decided: should I keep using it or replace it?
When choosing colors:
☐ Did I deliberately check for strong contrasts (light/dark)?
☐ Am I sure that the dark color won't bleed?
Before washing the finished project for the first time:
☐ Should I wash this item separately?
☐ Should I use cold or lukewarm water?
☐ Do I avoid soaking for a long time?


