Size:
Approx. 20 cm, with the ears 😊
Gauge:
Is not that important if you use a DK yarn you should have a similar sized Bunny. I used a yarn which had 75m with 50gr.
Material:
4 x 2.5 mm knitting needles
Cotton Yarn in DK in
Beige Approx. 35 gr.
a bit in pink for the face and a bit in rose for the tail.
Safety eyes approx. 8 mm
(if you knit this as a toy for a small child, please consider sewing on the eyes instead of using safety eyes.)
Toy stuffing
Sewing Needle
Scissors
A small piece of cardboard cut into a circle with approx. 3 cm diameter (helps with stability and is inserted at the very bottom before adding the stuffing).
Abbreviations:
St: Stitch
K: Knit
P: purl
Inc: Knit st in front and in the back
Dec.: knit 2 stitches together
M1: Pick up the strand between the stitches (the bar between stitches) and knit it through the back loop.
Sl1kpsso: slip 1 stitch as if knit, knit 1 stitch and pass slipped over
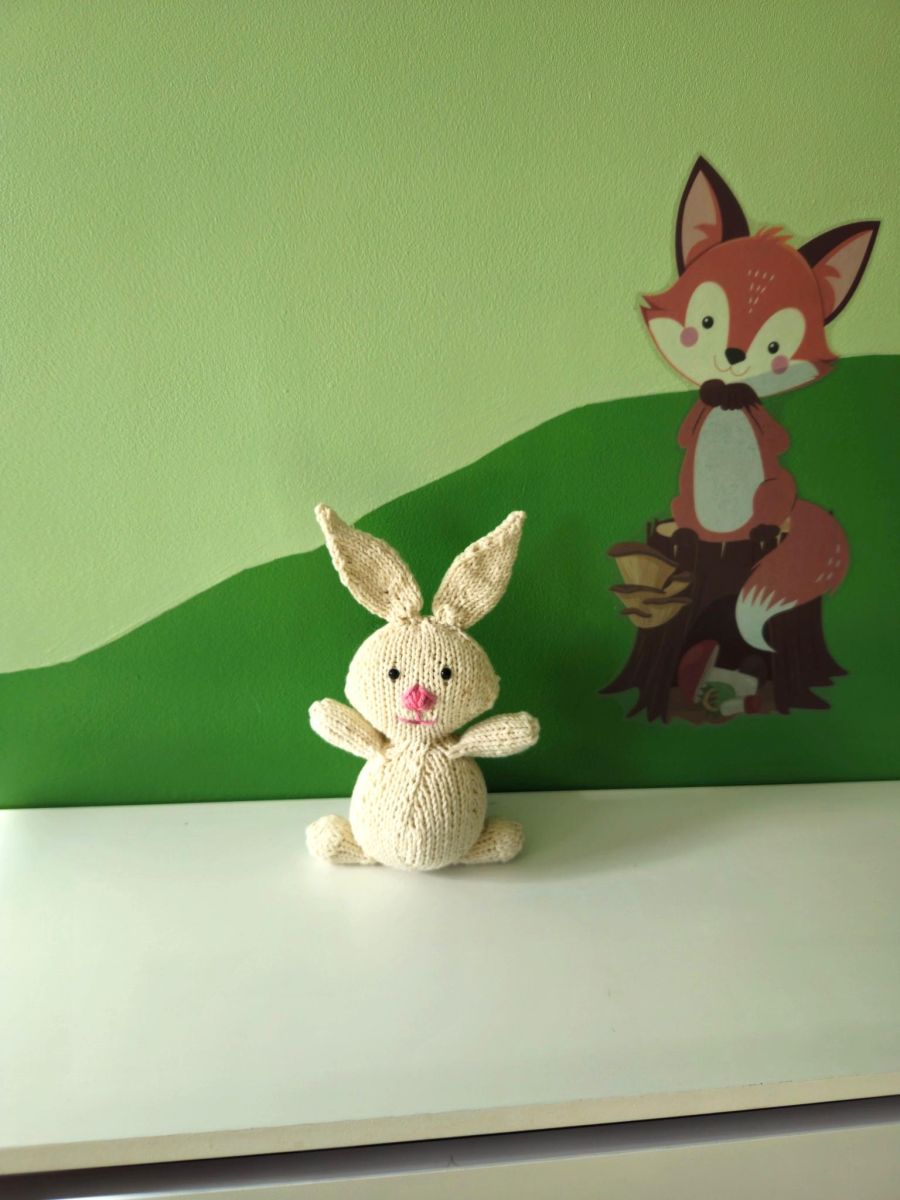
Knit your own adorable decorative bunny – both of my boys absolutely love them and adopted theirs straight away.
You can, of course, create a whole bunny family in various beautiful colour combinations.
The pattern does require a bit more experience in parts, especially when it comes to attaching the
arm, the ears and the sewing on of the face.
.jpg)
The feet (Work this 2x)
Cast on 12 stitches and divide them evenly onto 3 needles (you can use 4 if you are used to working with 4 needles). Then join the stitches to work in the round, making sure they are not twisted.
1. – 7. Round: 12 K (12 St)
8. Round: *1 K, 1 Inc * Work this 6x (18 St)
9. - 11. Round: 18 K (18 St)
12. Round: * Knit 2 stitches together* Work this 9x (9 St)
Cast off all stitches.
Cut the yarn and weave in the starting end of the feet. Then add a small amount of stuffing to the feet, making sure not to overfill them. Finally, sew the ends of the feet closed.
.jpg)
The Arms (Work this 2x)
Cast on 6 stitches and divide them evenly onto 3 needles. Then join the stitches to work in the round.
1. Round: 6 K (6 St)
. Round: *1 K, 1 Inc* Work this 6x (12 St)
3. - 15. Round: 12 K (12 St)
Cut the yarn without casting off. Place the first 3 and the last 3 stitches onto one needle, and the remaining 6 stitches onto another needle.
Pull the first 6 stitches slightly tighter and lightly stuff the arms with a small amount of filling.
Set the work aside.
.jpg)
The Ears (Work this 2x)
Cast on 6 stitches and divide them evenly onto 3 needles. Then join the stitches to work in the round.
1. Round: K 6 (6 St)
2. Round: *K 1, 1 Inc* Work this 6x (12 St)
3. – 6. Round: K 12 (12 St) (4 Rounds)
7. Round: K 3, M1, K 6, M1, K 3 (14 St)
8. Round: K 14 (14 St)
9. Round: K 3, M1, K 8, M1, K 3 (16 St)
10. - 12. Round: K 16 (16 St) (4 Rounds)
13. Round: K 6, Dec, K 6, Dec (14 St)
14. + 15. Round: K 14 (14 St)
16. Round: K 5, Dec, K 5, Dec (12 St)
17. Round: K 12 (12 St)
18. Round: K 4, Dec, K 4, Dec (10 St)
19. Round: K 10 (10 St)
20. Round: K 3, Dec, K 3, Dec (8 St)
21. Round: K 8 (8 St)
22. Round: K 2 Re, Dec, K 2, Dec (6 St)
23. Round: K 6 (6 St)
24. Round: K 1, Dec, 1 Re, Dec (4 St)
25. Round: K4 (4 St)
26. Round: Dec, Dec (2 St)
27. Round: Pass the second-to-last stitch over the last St (1 St)
Pull the yarn through the last stitch and weave in the end.
.jpg)
The Body
Cast on 6 stitches and divide them evenly onto 3 needles (you can use 4 if you are used to working with 4 needles). Then join the stitches to work in the round, making sure they are not twisted.
1. Round: Increase each stitch (12 St)
2. Round: *1 K, 1 Inc* Work this 6x (18 St)
3. Round: *2 K, 1 Inc* Work this 6x (24 St)
4. Round: 24 K (24 St)
5. Round: *3 K, 1 Inc* Work this 6x (30 St)
6. Round: 30 K (30 St)
7. Round: *4 K, 1 Inc* Work this 6x (36 St)
8. Round: 36 K (36 St)
9. Round: *5 K, 1 Inc* Work this 6x (42 St)
10. Round: 42 K (42 St)
11. Round: *6 K, 1 Inc* Work this 6x (48 St)
12.- 16. Round: 48 K (48 St) (5 Rounds)
17. Round: *6 K, 1 Dec* Work this 6x (42 St)
18. + 19. Round: 42 K (42 St)
20. Round: *5 K, 1 Dec* Work this 6x (36 St)
21. +22. Round: 36 K (36 St)
23. Round: *4 K, 1 Dec* Work this 6x (30 St)
24 + 25. Round: 30 K (30 St)
26. Round: *3 K, 1 Dec* Work this 6x (24 St)
At this point, you will start with filling the Bunny. If you want to use the cardboard for the base, insert it first and then fill with stuffing. Make sure to keep adding stuffing from here on.
27. Round: The arms are attached in this round
Knit the first 3 stitches of the round.
Then hold the finished arm against the next 6 stitches and knit 3 stitches together each time (1 stitch from each arm needle and 1 stitch from the body). Repeat this 6 times in total. Knit the next 6 stitches. Then attach the second arm in the same way.
Finally, knit the last 3 stitches to complete the round. (24 st)
28. Round: K 24 (24 St)
29. Round: *K 2, 1 Dec* Work this 6x (18 St)
30. Round: *K 1, 1 Dec* Work this 6x (12 St)
31. Round: K 12 (12 St)
32. Round: *K 2, 1 Inc, 1 Inc, K 4, 1 Inc, 1 Inc, 2 Re (16 St)
33. Round: *K 3, 1 Inc, 1 Inc, K 6, 1 Inc, 1 Inc, 3 Re (20 St)
34. Round: *K 4, 1 Inc, 1 Inc, K 8, 1 Inc, 1 Inc, 4 Re (24 St)
35. Round: *K 5, 1 Inc, 1 Inc, K 10, 1 Inc, 1 Inc, 5 Re (28 St)
36. Round: *K 6, 1 Inc, 1 Inc, K 12, 1 Inc, 1 Inc, 6 Re (32 St)
37. Round: *K 7, 1 Inc, 1 Inc, K 14, 1 Inc, 1 Inc, 7 Re (36 St)
38. Round: *K 8, 1 Inc, 1 Inc, K 16, 1 Inc, 1 Inc, 8 Re (40 St)
39. Round: *K 9, 1 Inc, 1 Inc, K 18, 1 Inc, 1 Inc, 9 Re (44 St)
40.+41. Round: K 44 (44 St)
42. Round: K 9, k2tog, sl1kpsso, K 18, k2tog, sl1kpsso, K 9 (40 St)
43. Round: K 40 (40 St)
44. Round: K 8, k2tog, sl1kpsso, K 16, k2tog, sl1kpsso, K 8 (36 St)
Place a marker in Round 44 to mark the position for the eyes. I placed a Marker on the 3rd and 3rd last stitch.
45. Round: K 36 (36 St)
46. Round: K 7, k2tog, sl1kpsso, K 14 Re, k2tog, sl1kpsso, K 7 (32 St)
47. Round: K 32 (32 St)
48. Round: K 6, k2tog, sl1kpsso, K 12, k2tog, sl1kpsso, 6 K (28 St)
49. Round: K 28 (28 St)
I recommend inserting the eyes here in Round 44 if you are using safety eyes; otherwise, it will become too tight. Add a little more stuffing at this point as well.
50. Round: K 5, k2tog, sl1kpsso, K 10, k2tog, sl1kpsso, K 5 (24 St)
51. Round: K 24 (24 St)
52. Round: K 4, k2tog, sl1kpsso, K 8, k2tog, sl1kpsso, K 4 (20 St)
53. Round: K 20 (20 St)
54. Round: K 3, k2tog, sl1kpsso, K 6, k2tog, sl1kpsso, K 3 (16 St)
55. Round: *k 2 tog* Work this 6x (8 M)
Finish the knitted Bunny by using a tapestry needle to pick up the last 8 stitches and pull them tight.
Finally, weave in the remaining yarn ends inside the body and sew the little feet to the bottom. And the Ears on the top
.jpg)
Work the Bunny Tail:
I made a small Pompom for this. For this, I’ve cut a piece of cardboard approximately 5 cm high and about 12 cm long. Then I wrapped a pink yarn around it until I was happy with the fullness. Next, I tied it tightly in the middle with an extra piece of yarn and cut the loops on both sides. After that, I trimmed the pom-pom into shape and attached it to the back of the bunny.
.jpg)
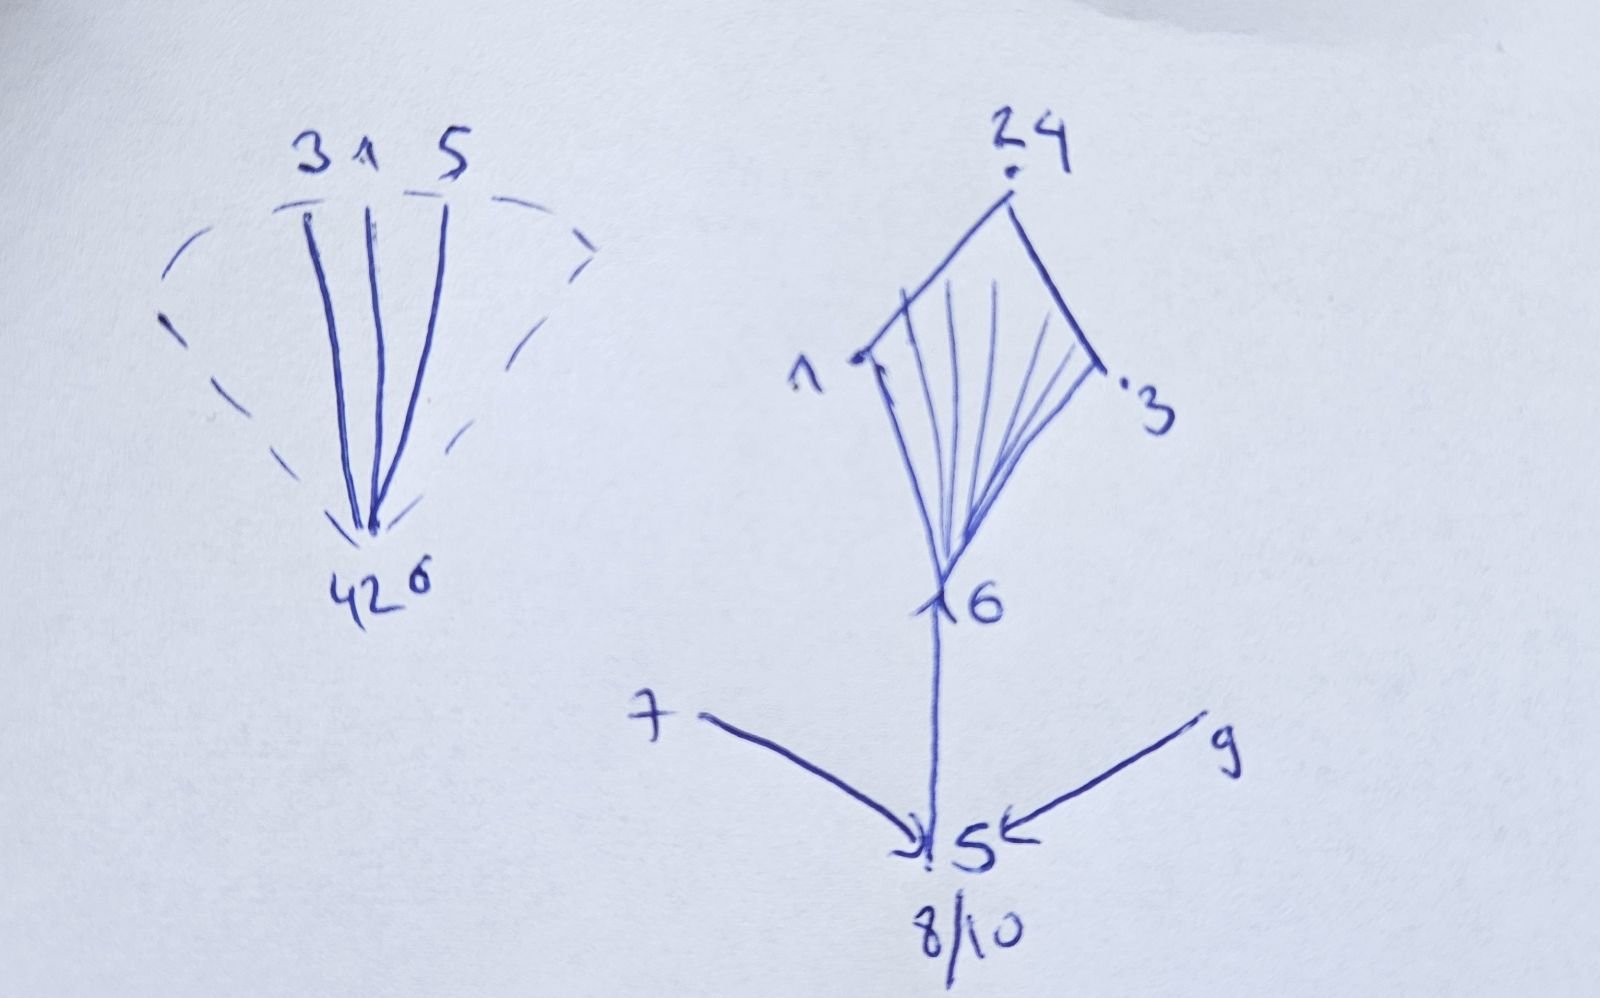
Sew the bunny’s face:
Start the nose in the centre, approximately 2 rows below the eyes. I have added a small diagram to show how I stitched the nose.
Begin at point 1 and work your way outwards to the left and right, always returning to the lower centre point (points 2, 4 and 6). Repeat this until the nose reaches your desired size and is nicely filled.
Then add two stitches at the top (see second diagram: point 1 to 2 and point 3 to 4) to create a neat outline.
Finally, bring the yarn downwards (point 5 to 6) and embroider the mouth: from point 7 to 5/8 and from point 9 to 5/10 to form the corners of the mouth.
I hope you enjoyed this pattern. If you knit it, I would love to hear your feedback or read your comment. Feel free to share your project on Instagram and tag me: @_lovelyyarns
You can find many more free knitting and crochet patterns on my blog at Crazypatterns under “Posts.” Make sure to follow me so you don’t miss anything.


