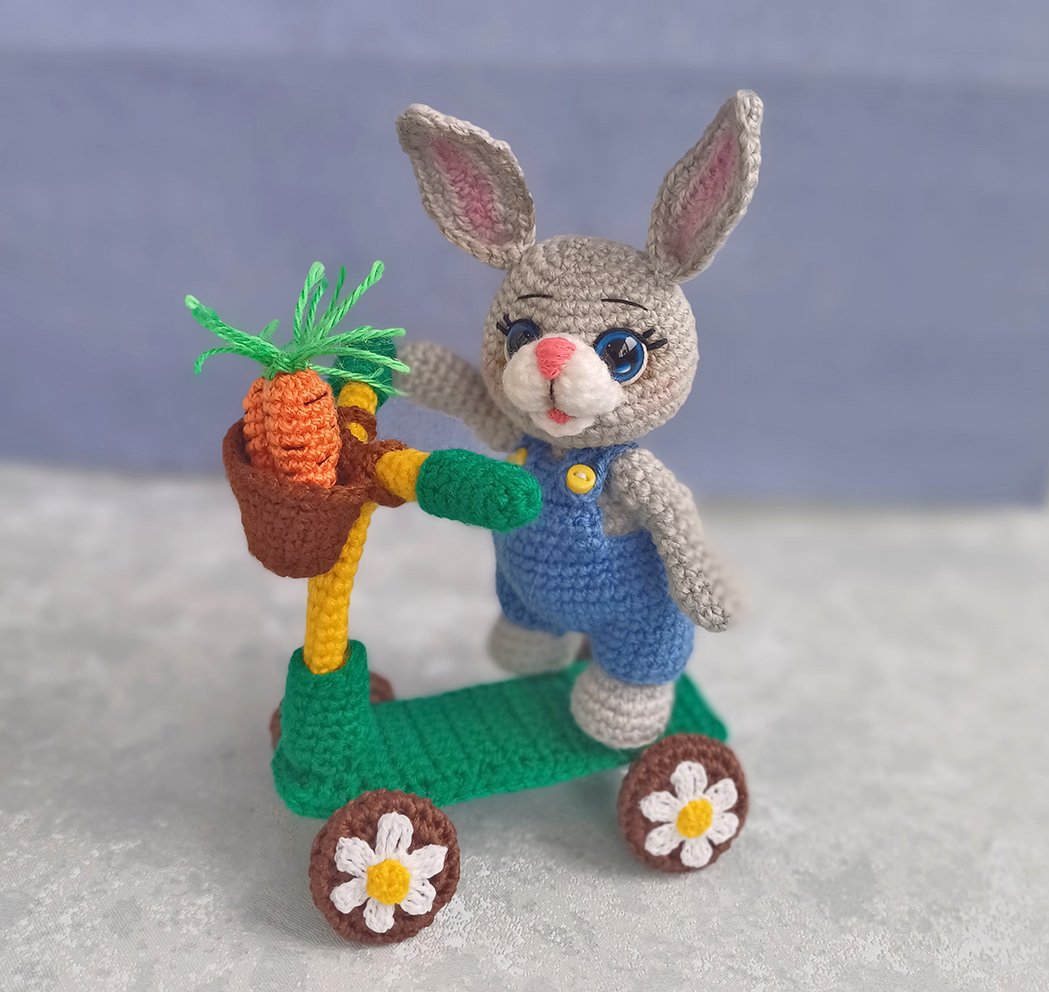
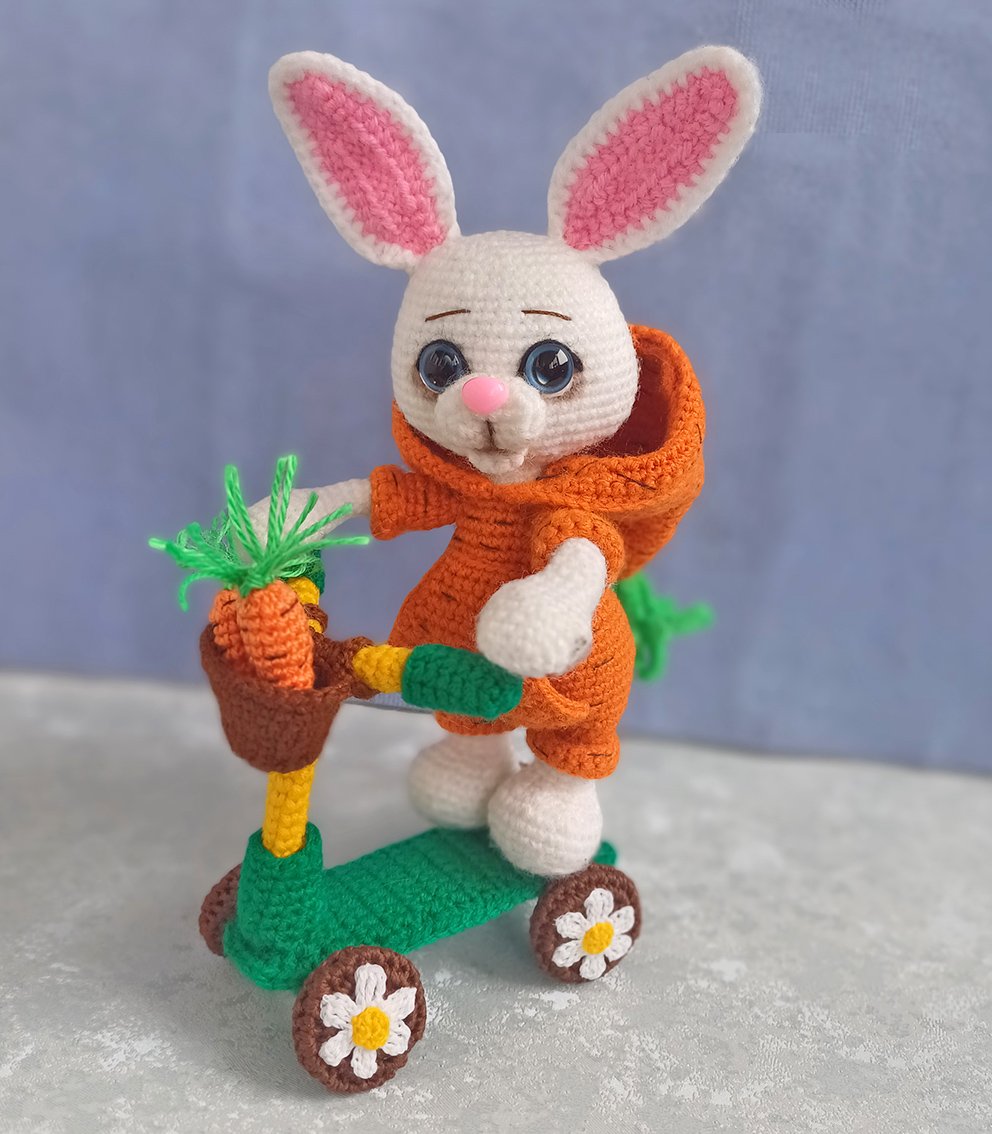
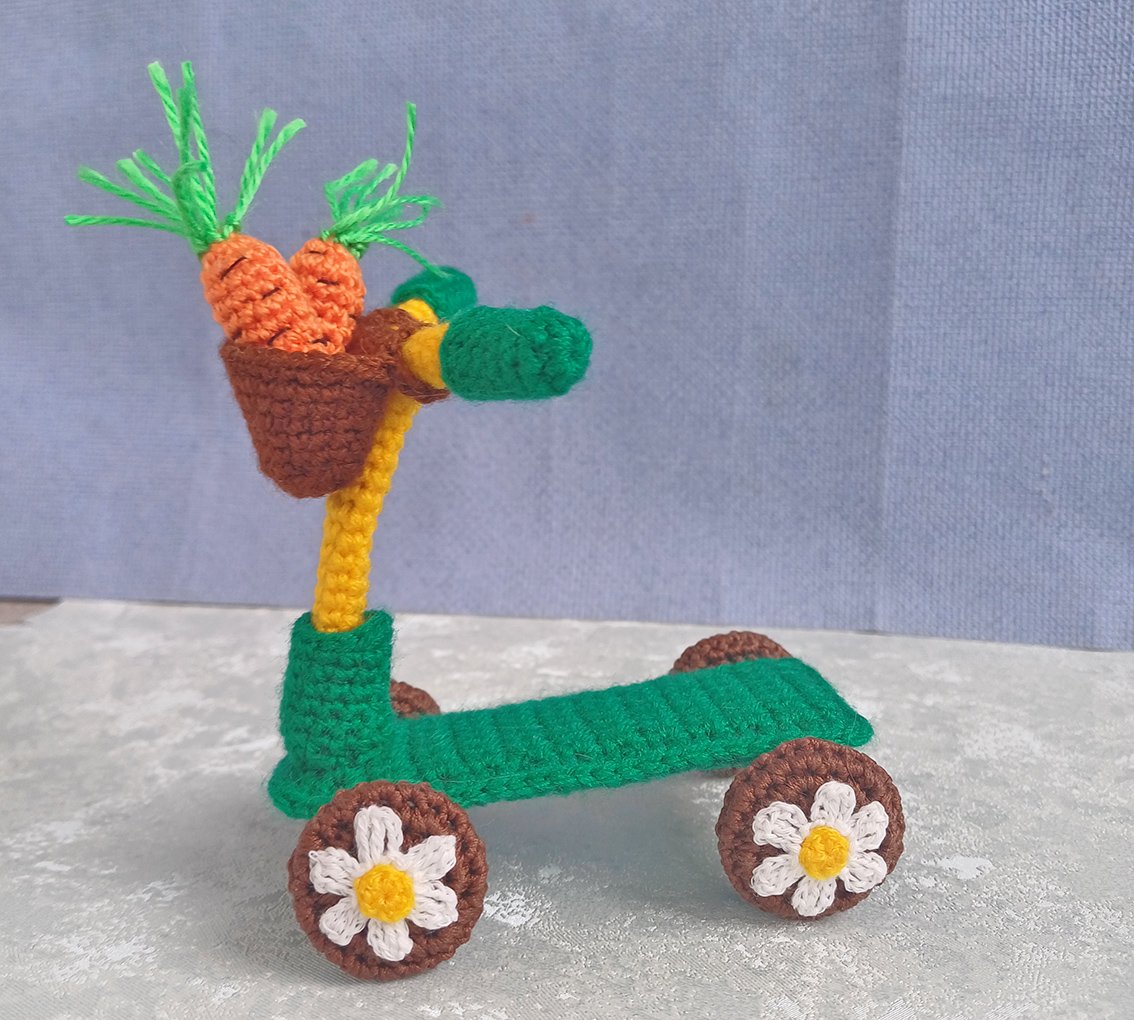
Toy Scooter
Crocheting level – Easy
Materials:
You can choose the yarn at your discretion, of a similar composition and thickness. Acrylic or cotton will do. I used 200 m/50g acrylic yarn. Yarn consumption depends on its thickness and a crochet hook size. My scooter is 10 cm high. Depending on the thickness of yarn, the finished toy size may differ.
Yarn of the following colours is required:
For a scooter: Choose 2 matching colours, I have green and yellow.
For wheels: brown, yellow. Also, small amount of thin cotton yarn for the flowers. Please pay attention to yarn thickness. The yarn to make the flowers should be twice as thin.
For baskets and carrots: brown, orange, green.
- A crochet hook, I used 1,5 mm crochet hook;
- A sewing needle, matching sewing threads;
- Hollow fibre for stuffing (only for carrots);
- For embroidery: a few threads of black;
- All purpose clear transparent glue, e.g. UHU (optional);
- A piece of wire with a diameter of 1.5mm approx. 30cm long. Use the wire that bends easily but keeps its shape;
- 4 buttons with a diameter of 2.5 – 3 cm;
- A piece of thick cardboard;
- Cocktail tube or sushi stick;
- Scissors.
This scooter is suitable for a small toy, such as this bunny like this, pattern at the link https://www.crazypatterns.net/en/items/78651/bunny-in-overalls
or for this bunny https://www.crazypatterns.net/en/items/69599/easter-bunny-in-carrot-tracksuit
Abbreviations:
ch – chain
st - stitch
sl st – slip stitch
sc – single crochet
hdc – half double crochet
dc - double crochet
inc – increase (2 sc in 1 st)
dec – decrease (single crochet two stitches together)
(...) x N times – repeat instructions in brackets N times
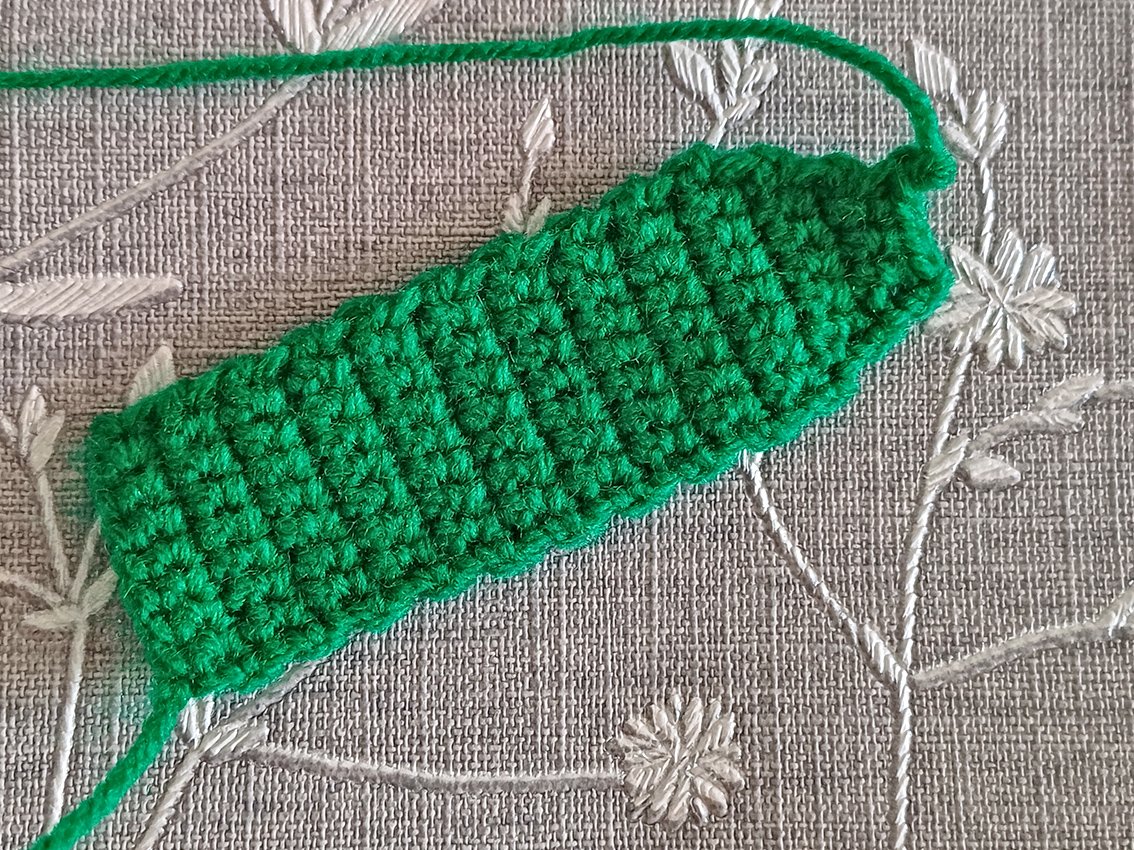
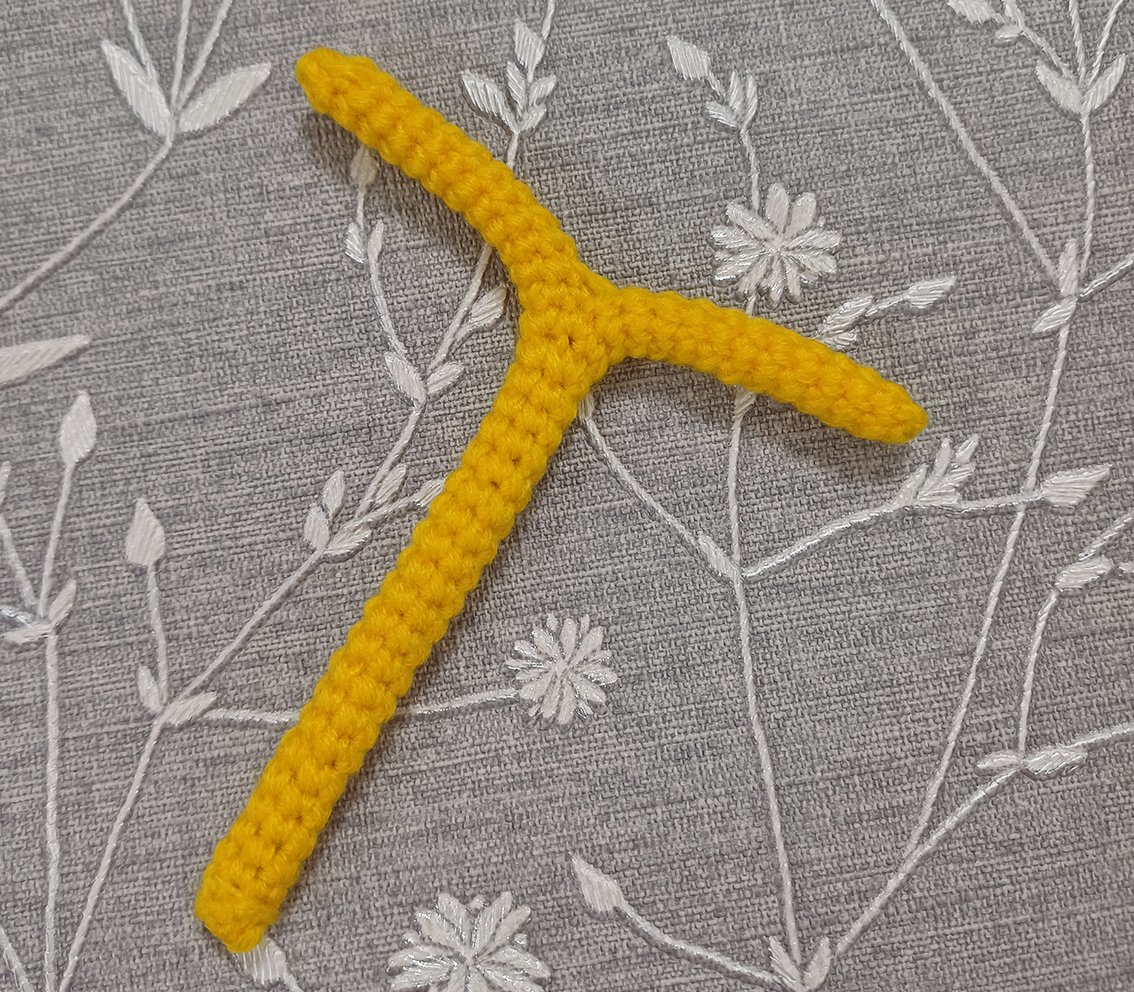
Deck - Scooter platform
The yarn colour is at your discretion. I chose the green color.
Work 9 ch
Row 1. starting from 2nd ch from hook: 8 sc, 1 ch, turn work = 8
Row 2-20. 8 sc, 1 ch, turn work = 8
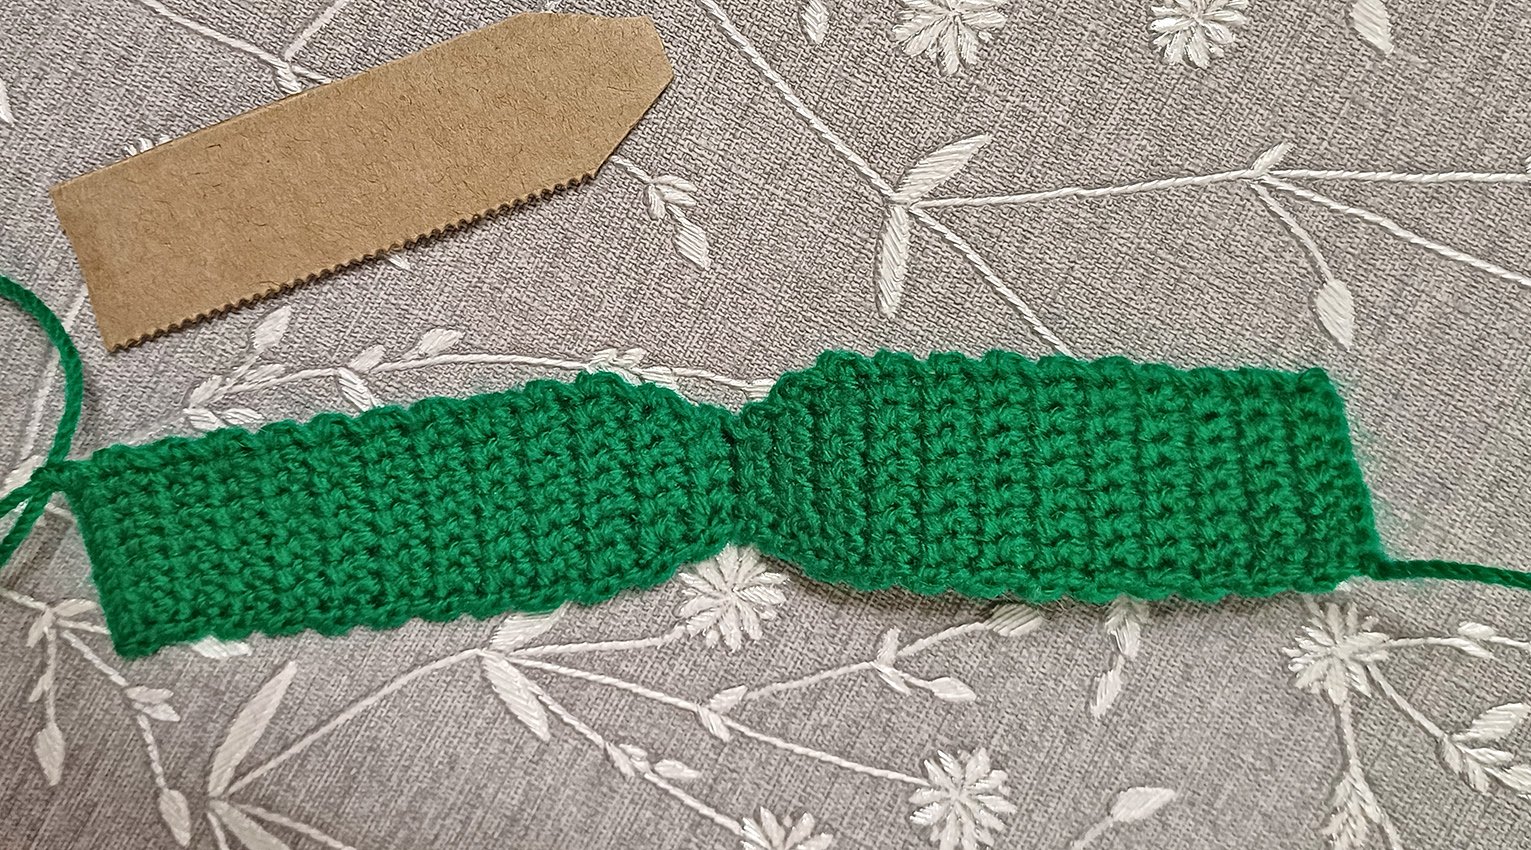
Row 21. skip 1 loop, 5 sc, skip 1 loop, 1 sc, 1 ch, turn work = 6
Row 22. 6 sc, 1 ch, turn work = 6
Row 23. skip 1 loop, 3 sc, skip 1 loop, 1 sc, 1 ch, turn work = 4
Row 24. 4 sc, 1 ch, turn work = 4
Cut out a part a thick piece of cardboard according to the size of the finished part.
Row 25. Into the back loops only: 4 sc, 1 ch, turn work = 4
Row 26. 1 inc, 2 sc, 1 inc, 1 ch, turn work = 6
Row 27. 6 sc, 1 ch, turn work = 6
Row 28. 1 inc, 4 sc, 1 inc, 1 ch, turn work = 8
Row 29 - 47. 6 sc, 1 ch, turn work = 8
Row 48. 8 sc, Do not turn! Fold the detail in half.
Insert the cardboard part inside. Work around with sc by hooking through both edges of the part.
Fasten off, cut off any excess yarn, hide the end.

Handlebar support.
The yarn colour is at your discretion. I chose the green color.
Rnd 1. 6 sc in a Magic Ring
Rnd 2. 6 inc = 12
Rnd 3. Into the back loops only: 12 sc
Rnd 4-8. 12 sc
Rnd 9. 11 sc, 1 sl st = 12
Fasten off, cut off any excess yarn, hide the end.

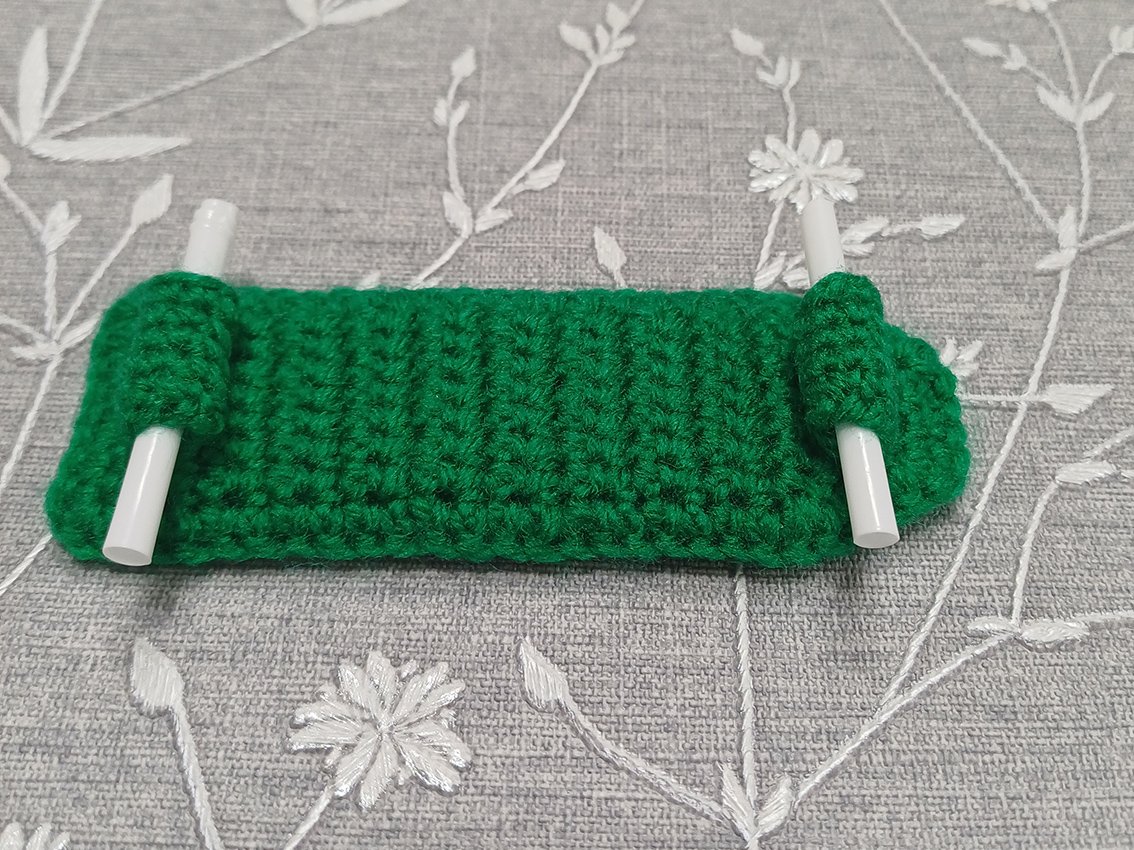
Wheel axle mounting (make 2)
The yarn colour is at your discretion. I chose the green color.
Rnd 1. work 7 ch, join into a ring with a sl st, 1 sc in each loop = 7
Rnd 2- 4. 7 sc
Rnd 5. 6 sc, 1 sl st = 7
Fasten off, cut off any excess yarn, hide the end.
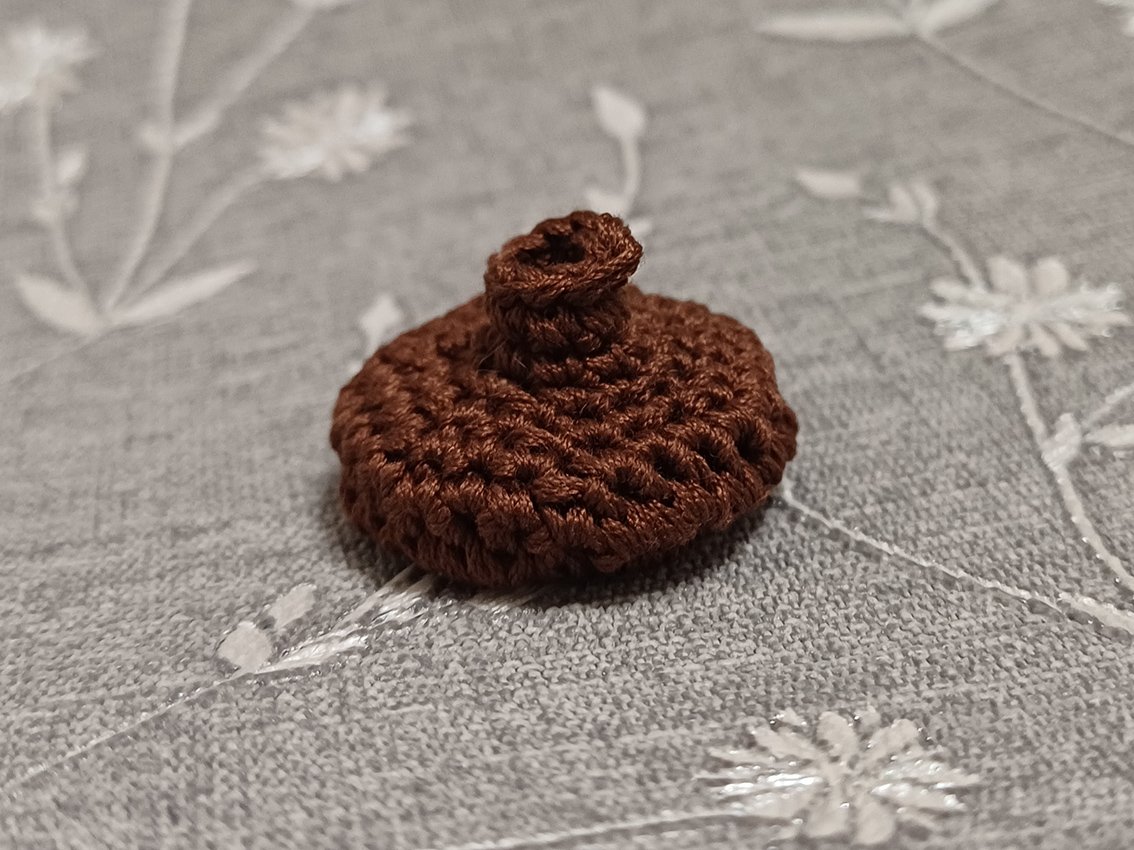
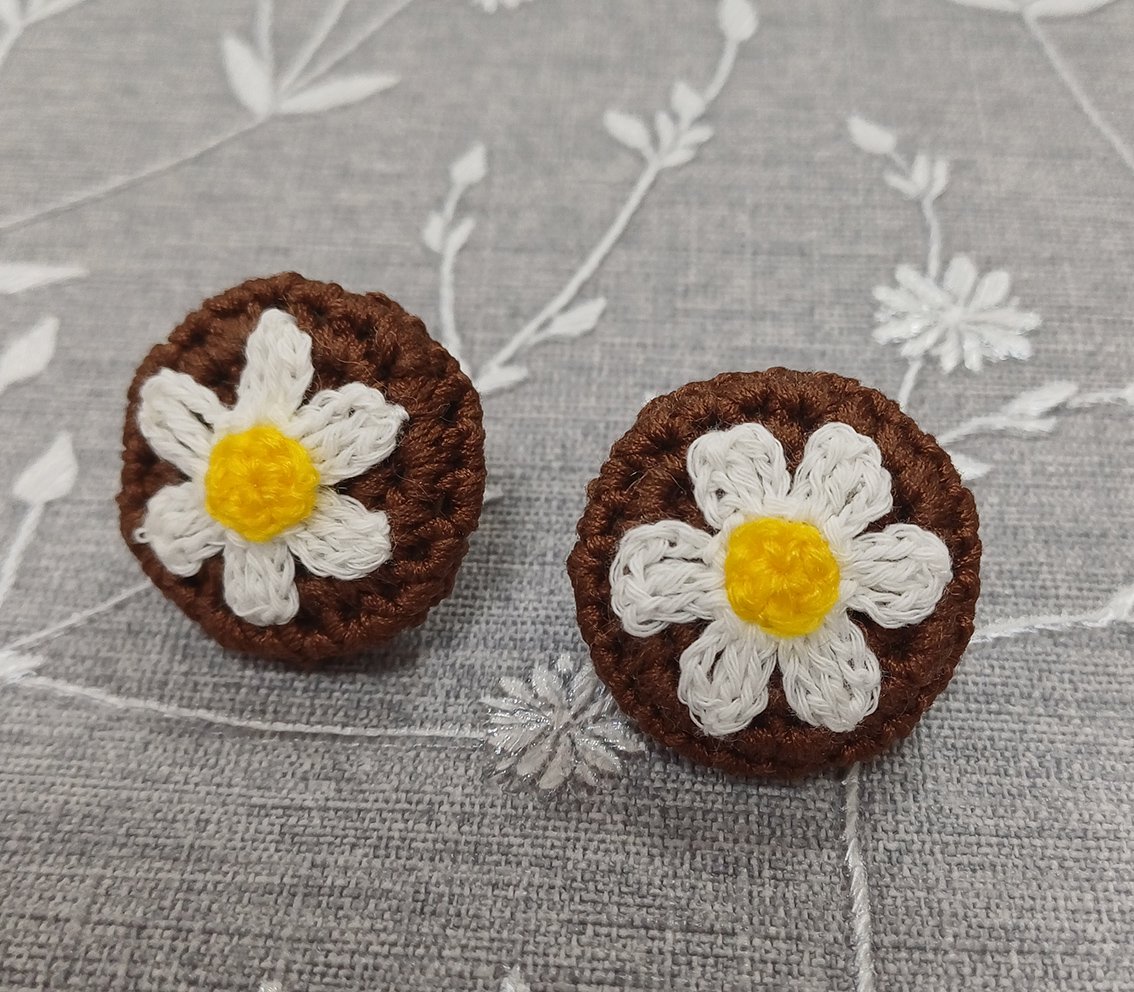
Wheel (make 4)
Work with brown colour yarn.
Rnd 1. 7 sc in a Magic Ring
Rnd 2. 7 inc = 14
Rnd 3. (1 sc, 1 inc) х 7 times = 21
Rnd 4. (1 sc, 1 inc, 1 sc) х 7 times = 28
Try the circle to the button see if it fits well. Reduce or increase the number of rounds if required.
Rnd 5. 28 sc
Insert the button inside the wheel cover.

Rnd 6. (skip 1 loop, 3 sc) х 7 times = 21
Rnd 7. (skip 1 loop, 2 sc) х 7 times = 14
Rnd 8. (skip 1 loop, 1 sc) х 7 times = 7
Rnd 9. into the front loops only: 7 sc
Rnd 10. 7 sc
Rnd 11. 5 sc, 2 sl st = 7
Fasten off, cut off any excess yarn, hide the end.
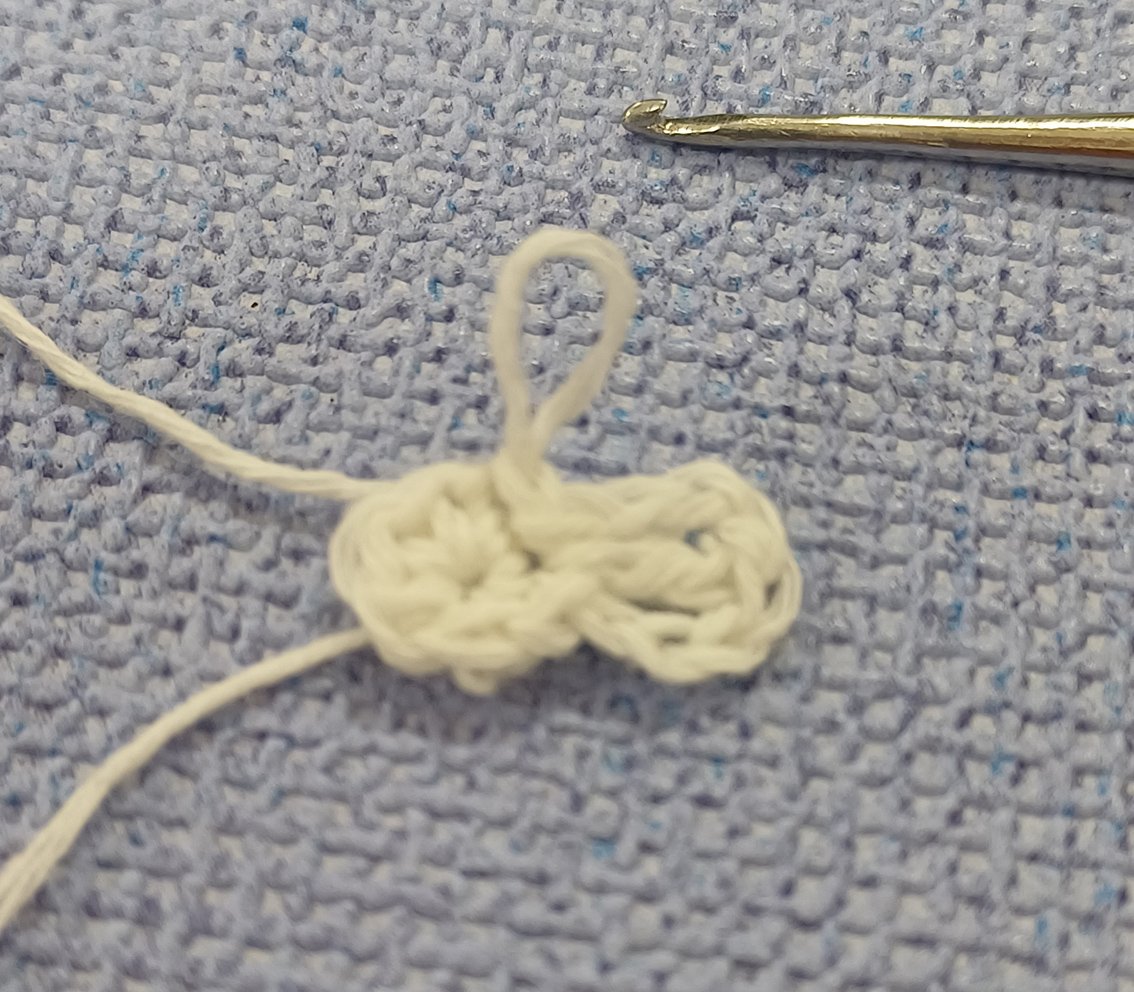
Wheel decor (flowers) – make 4
The yarn colour is at your discretion. I chose the white color.
Please pay attention to yarn thickness. The yarn to make the flowers should be twice as thin.
Rnd 1. 6 sc in a Magic Ring, join in 1st and the last loops with the sl st = 6
Rnd 2. In one loop: 1 sl st, 3 ch, 1 dc, 3 ch, 1 sl st - It turned out petal.
Crochet 6 petals until the end of the round.
Fasten off, cut off any excess yarn, hide the end.
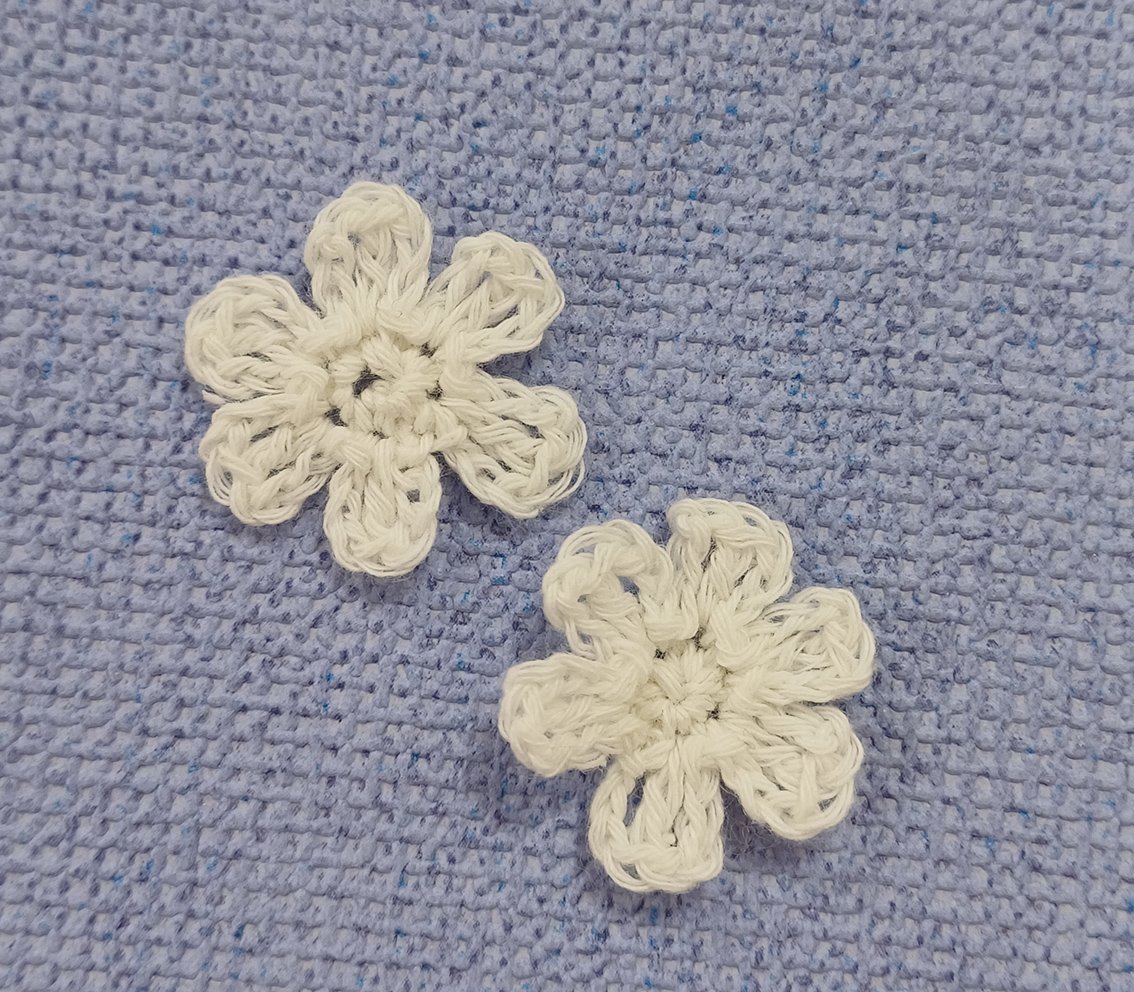
The middle of the flower (make 4)
Work with yellow colour yarn.
Rnd 1. 6 sc in a Magic Ring
Fasten off, cut the thread, leaving tail for sewing.
Sew flowers to the wheels.
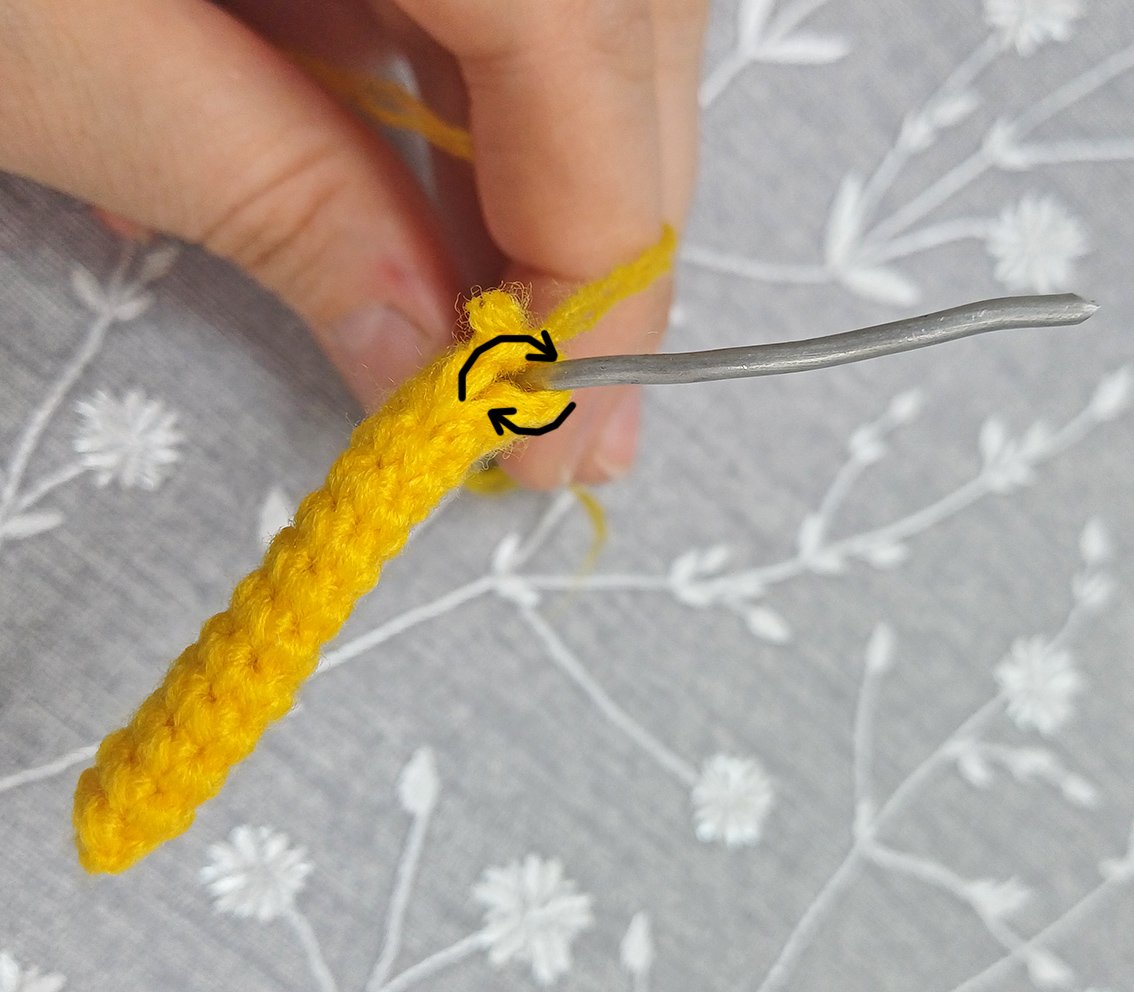
Handle Bars
The yarn colour is at your discretion. I chose the yellow color.
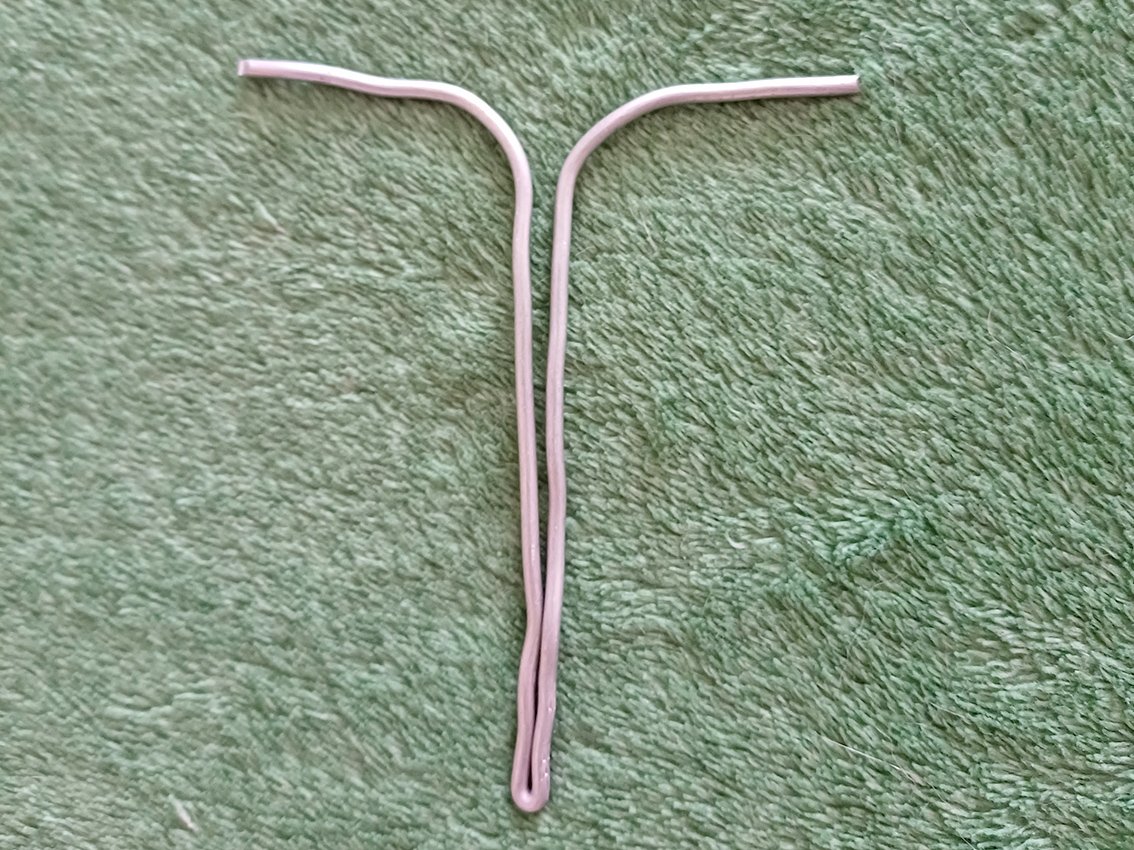
Prepare a long piece of thick wire. Bend the wire, as shown in my photo. Use pliers to tightly squeeze the spots where wire got bent.
Rnd 1. 6 sc in a Magic Ring
Rnd 2-15. 6 sc
Rnd 16. (2 sc, 1 inc) х 2 times = 8
Rnd 17. (3 sc, 1 inc) х 2 times = 10
Insert the wire into the tube. Next, we will divide the loops into 2 parts. Next, we crochet around the wire. See the pictures for guidance
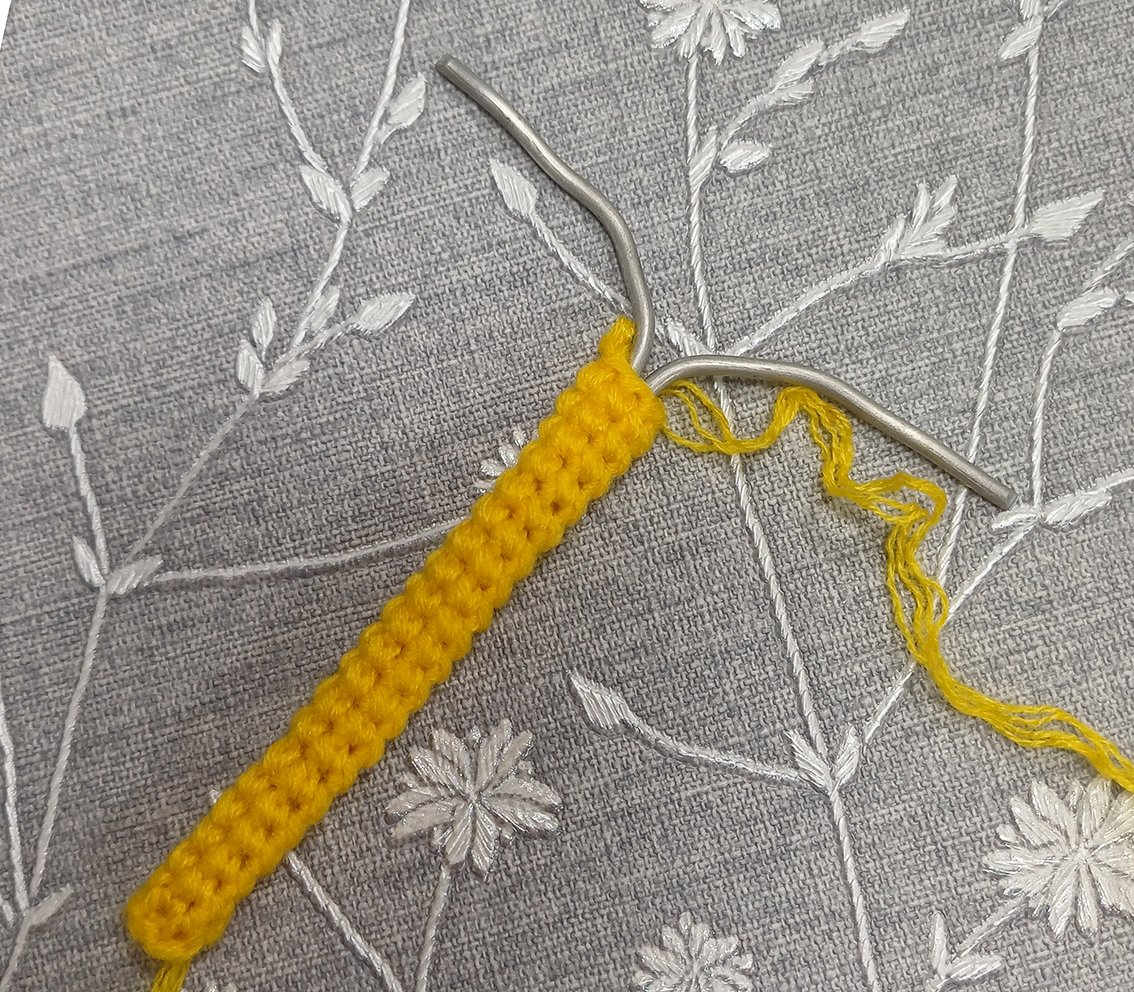
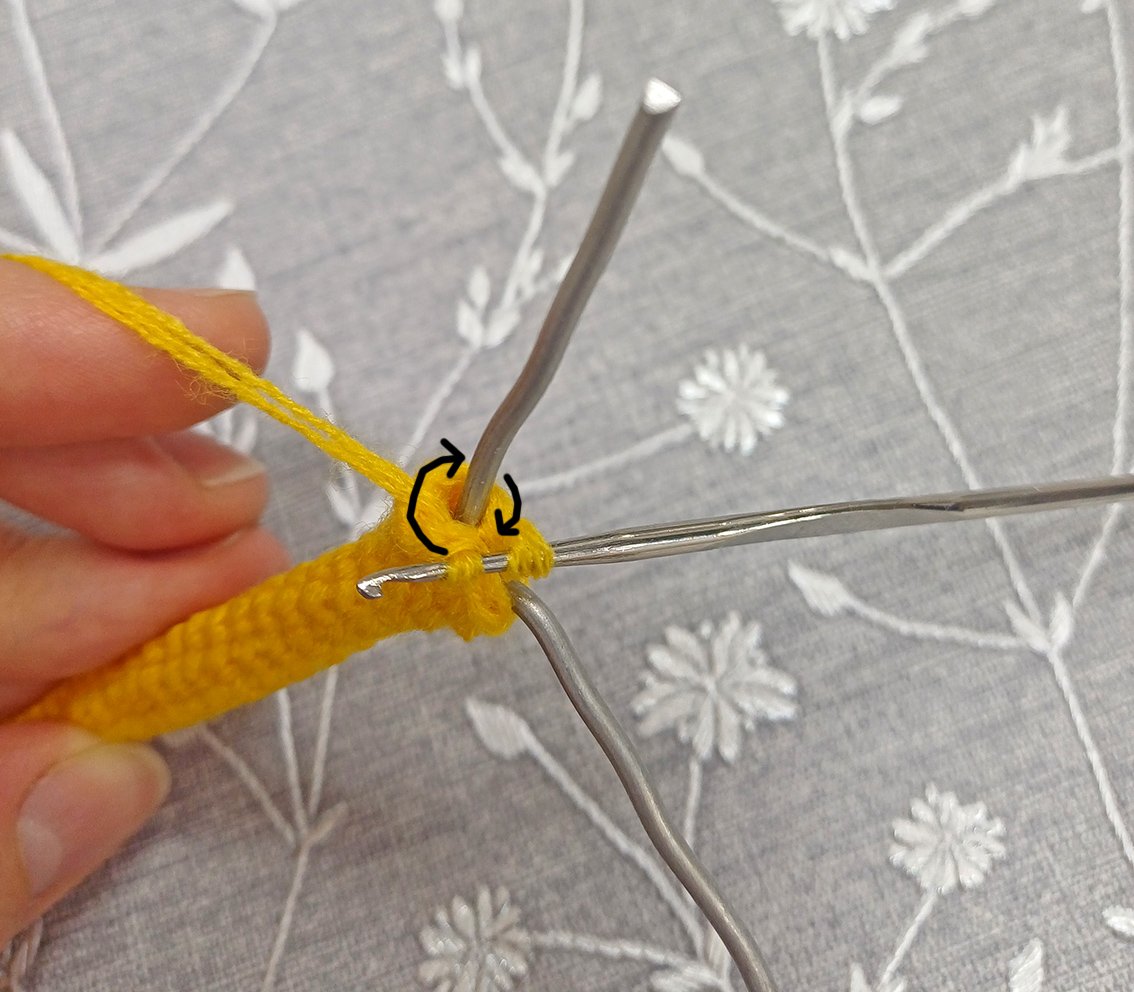
Rnd 18. 1 sc, 1 inc, 2 sc, skip 5 loop, 1 sc = 6
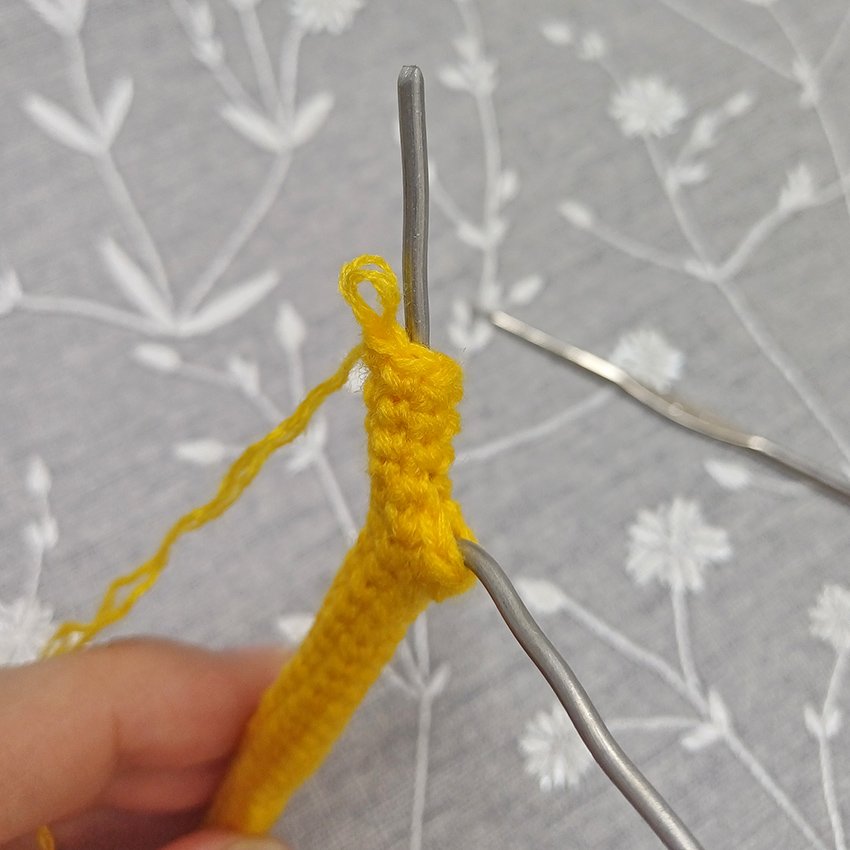
Rnd 19- 28. 6 sc
Cut off the excess wire.
Cut the thread. Pull off the loops, hide the end.
Attach the yarn to the remaining loops of the 17th round. Crochet the second part around the wire.
Rnd. 18. 2 sc, 1 inc, 2 sc = 6
Rnd 19- 28. 6 sc
Cut off the excess wire.
Cut the thread. Pull off the loops, hide the end.
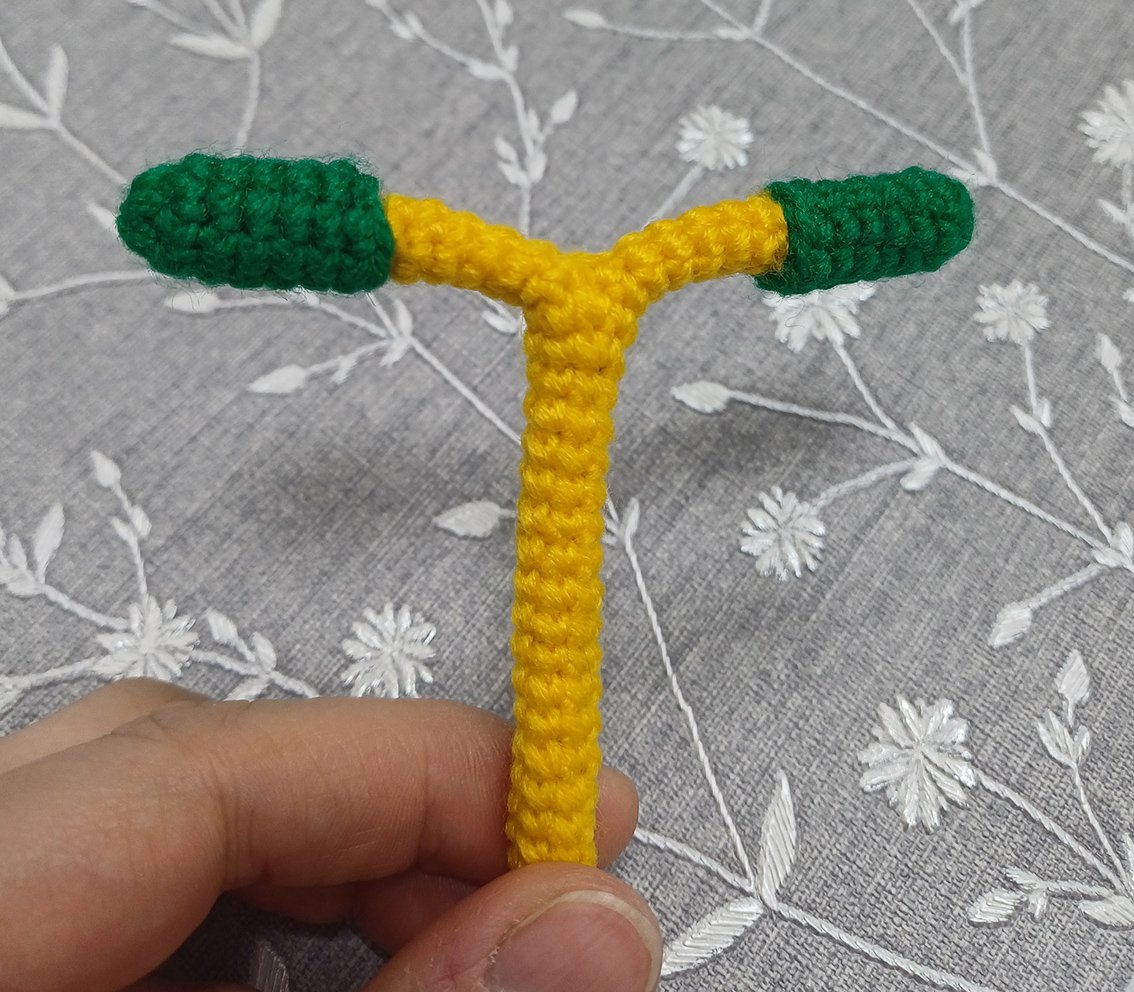
Handle Bar Grips (make 2)
The yarn colour is at your discretion. I chose the green color.
Rnd 1. 8 sc in a Magic Ring
Rnd 2-6. 8 sc
Rnd 7. 7 sc, 1 sl st = 8
Fasten off, cut off any excess yarn, hide the end.
Insert these grips onto the Handle Bars.
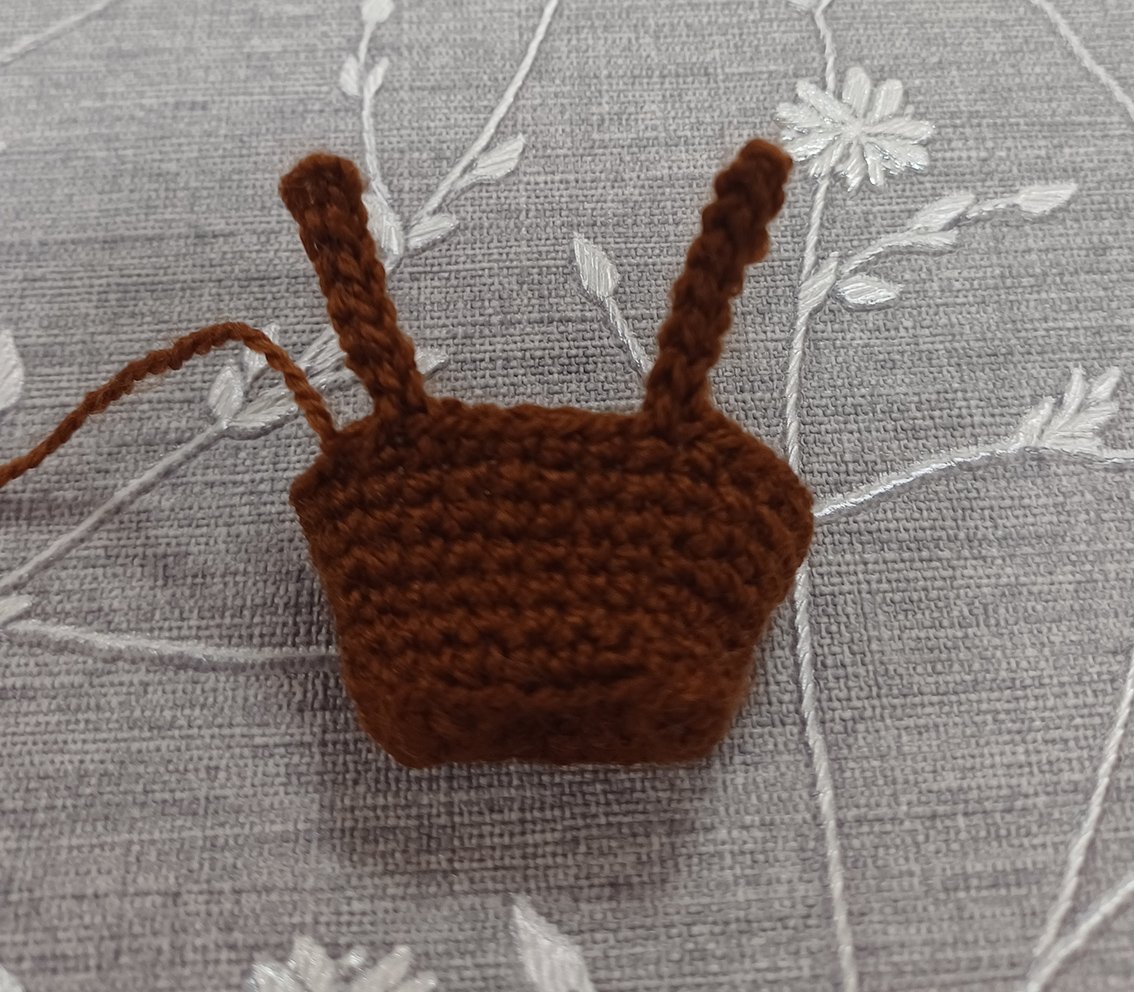
Basket.
Work with brown colour yarn.
Work 5 ch
Row 1. starting from 2nd ch from hook: 1 sc, 2 inc, 1 sc, 1 ch, turn work = 6
Row 2. (1 inc, 1 sc) х 3 times, 1 ch, turn work = 9
Cut out a part a thick piece of cardboard according to the size of the finished part.
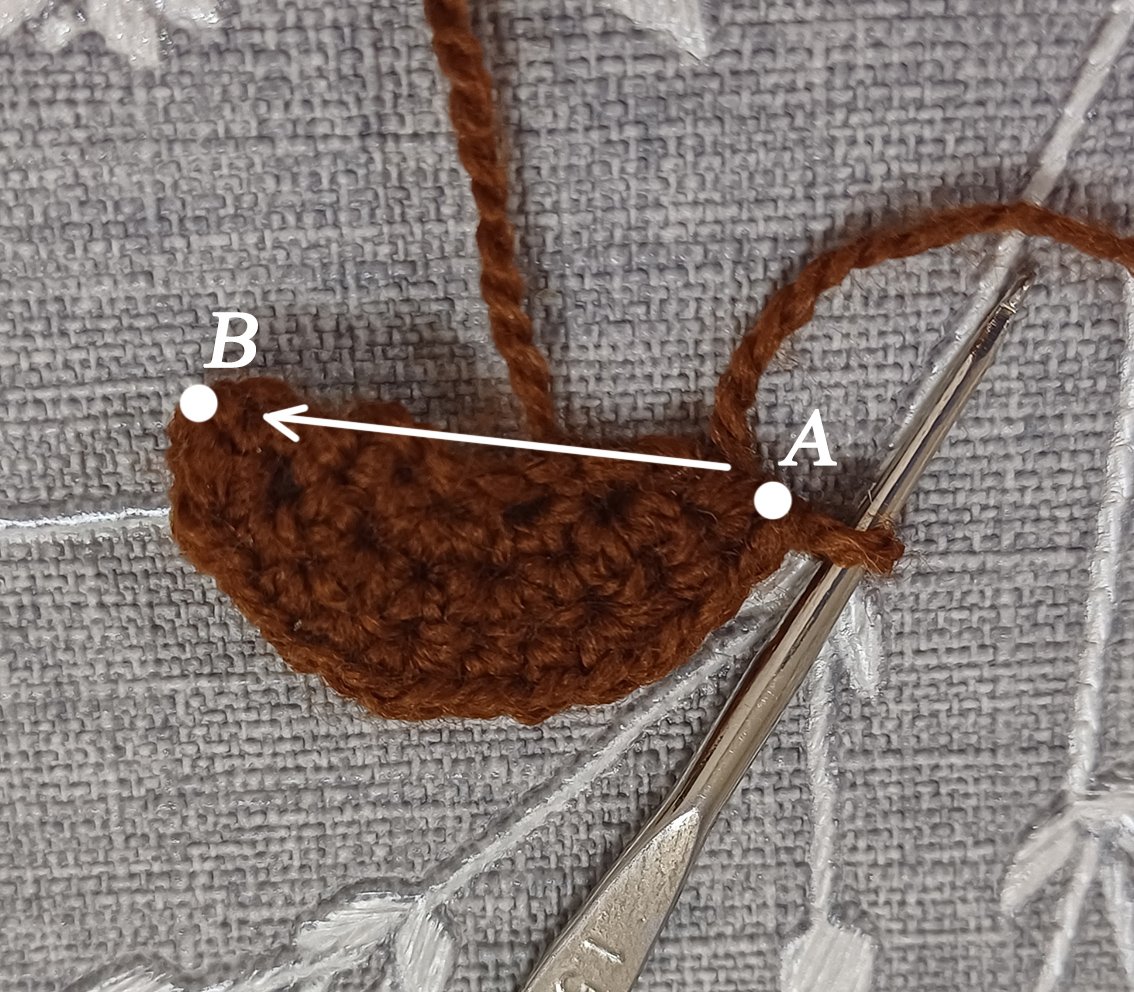
Rnd 3. (1 inc, 2 sc) х 3 times, crochet from A to B: 8 sc = 20
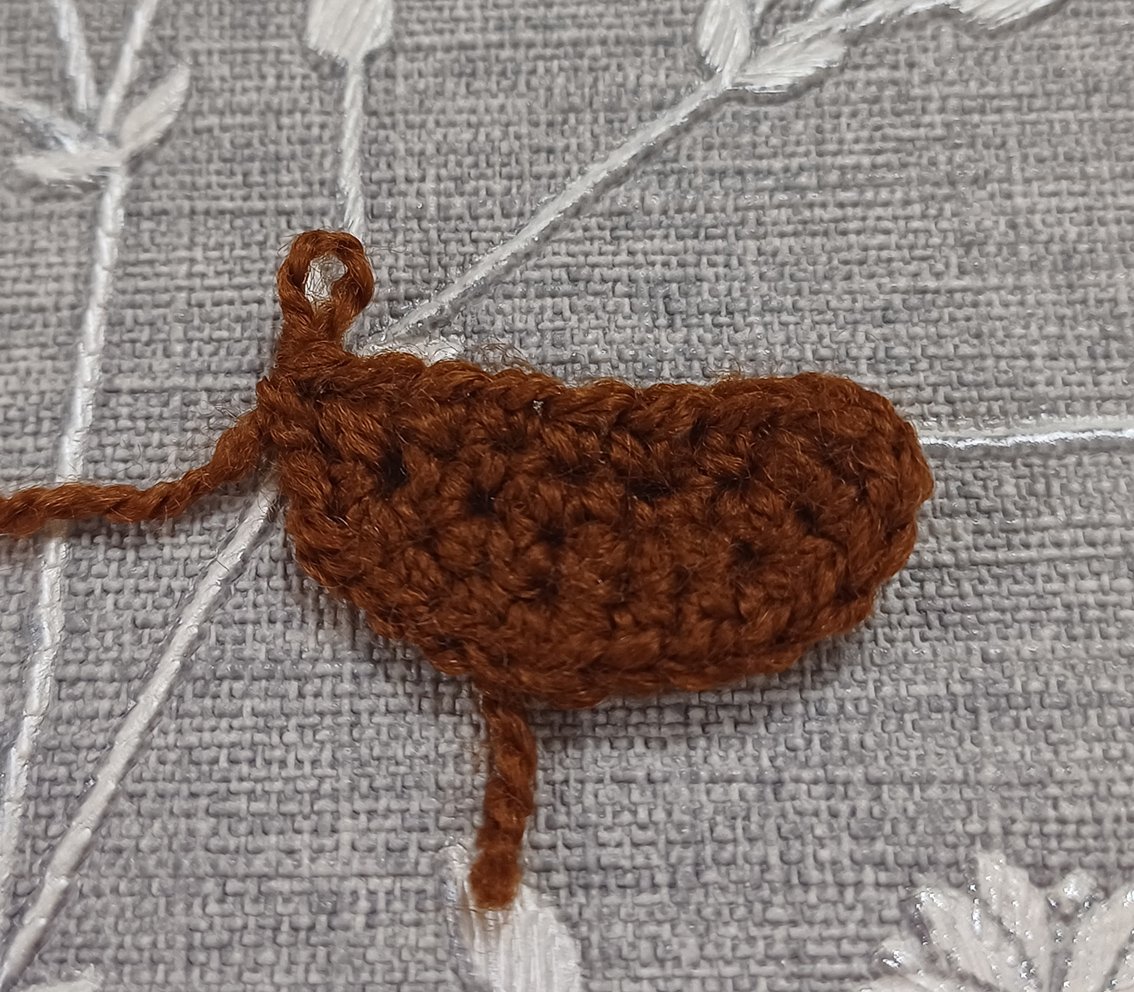
Continue in rounds.
Rnd 4. Into the back loops only: 20 sc
Rnd 5. 1 inc, 10 sc, 1 inc, 8 sc = 22
Rnd 6. 22 sc
Rnd 7. 1 inc, 3 sc, 1 inc, 4 sc, 1 inc, 3 sc, 1 inc, 8 sc = 26
Work 1 sc, transfer your place marker here.
Rnd 8. 26 sc
Rnd 9. 1 inc, 4 sc, 1 inc, 6 sc, 1 inc, 4 sc, 1 inc, 8 sc = 30
Rnd 10. 22 sc, 9 ch, starting from 2nd ch from hook: 8 sl st - this is the handle of the basket, continue along the loops of the basket: 6 sc, 9 ch, starting from 2nd ch from hook: 8 sl st - this is the handle of the basket, along the loops of the basket: 1 sc, 1 sl st.
Fasten off, cut the thread, leaving tail for sewing.
Insert the cardboard bottom inside.
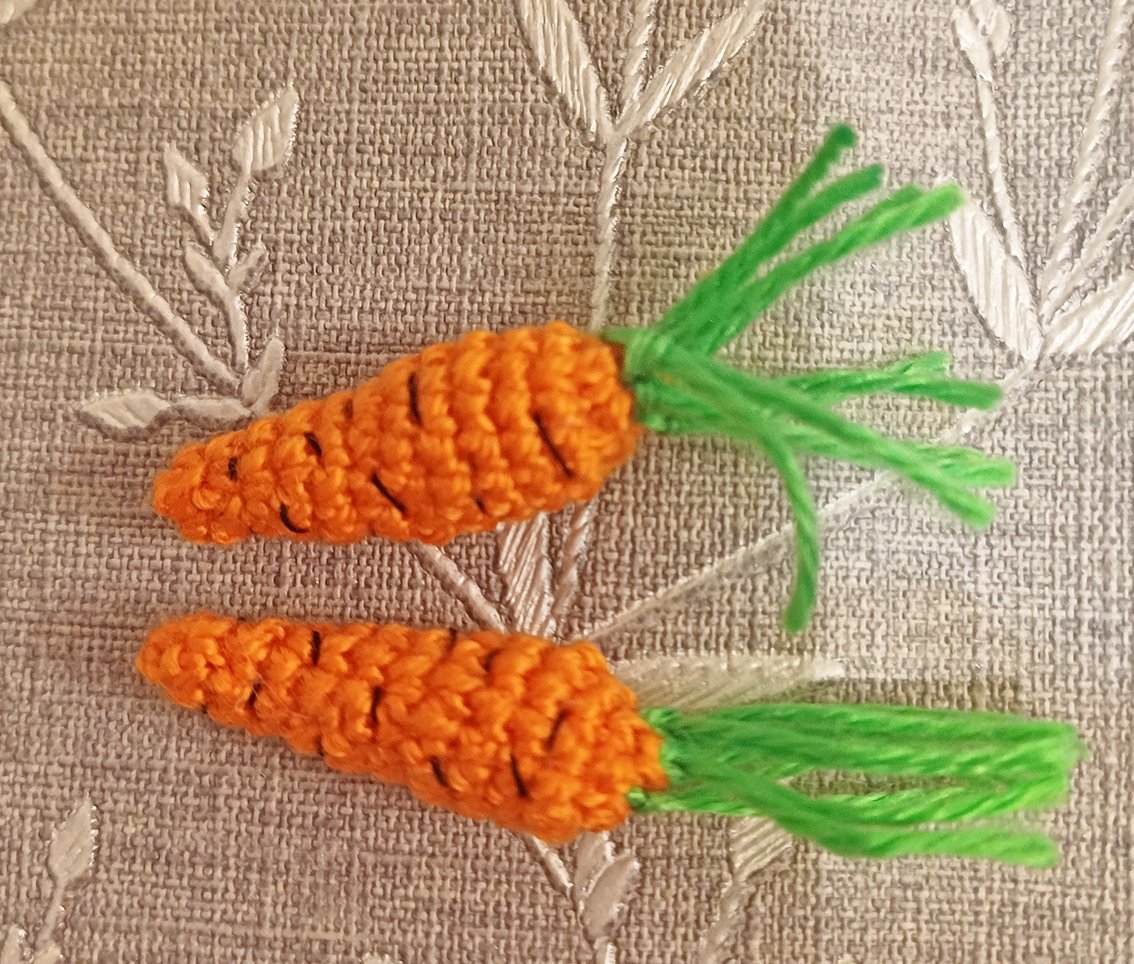
Carrot (make 2-3)
Work with orange colour yarn.
Rnd 1. 4 sc in a Magic Ring
Rnd 2. 1 inc, 3 sc = 5
Rnd 3. 1 inc, 4 sc = 6
Rnd 4. 6 sc
Rnd 5. (1 inc, 2 sc) х 2 times = 8
Rnd 6. 8 sc
Rnd 7. (1 inc, 3 sc) х 2 times = 10
Rnd 8-9. 10 sc
Rnd 10. (1 inc, 4 sc) х 2 times = 12
Rnd 11-12. 12 sc
Rnd 13. 6 dec = 6
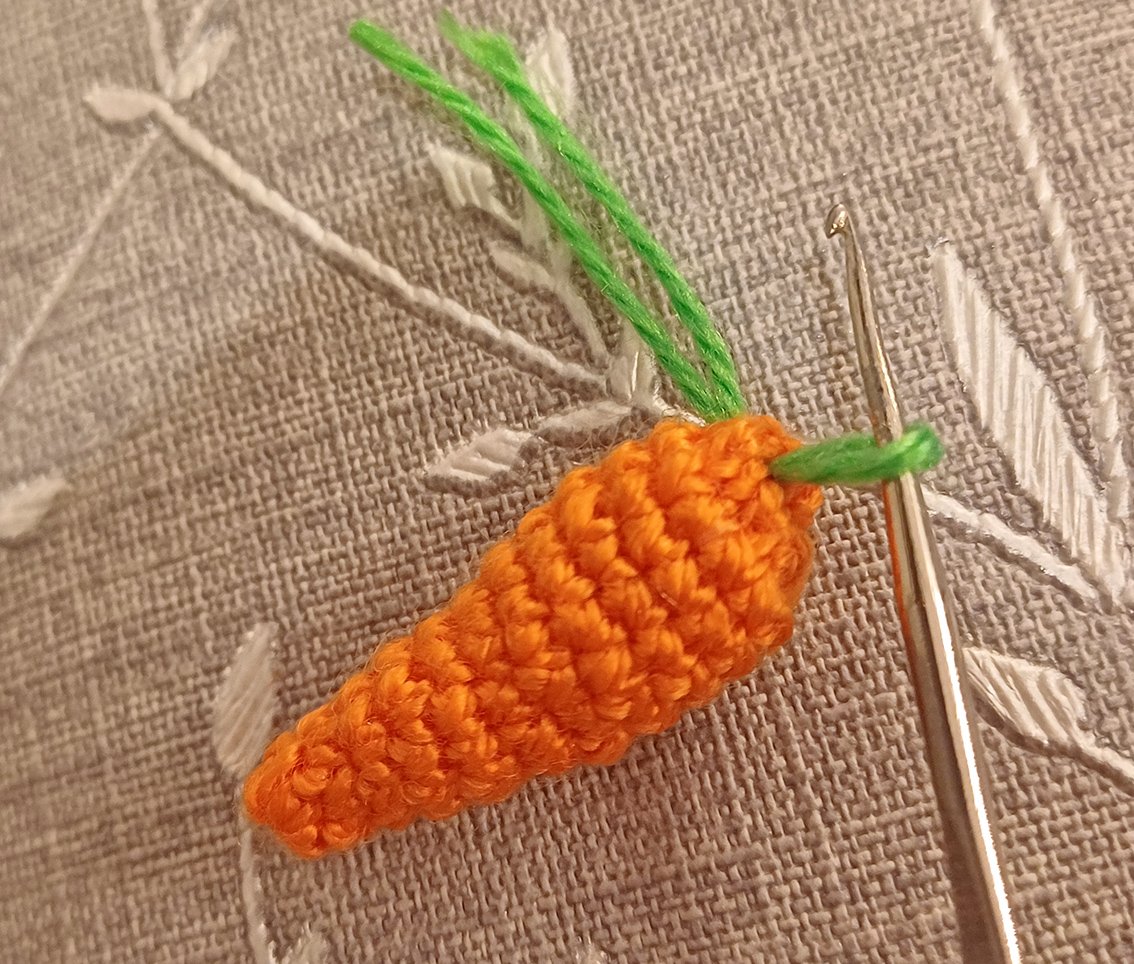
Cut the thread. Add some hollow fiber. Pull off the loops, hide the end.
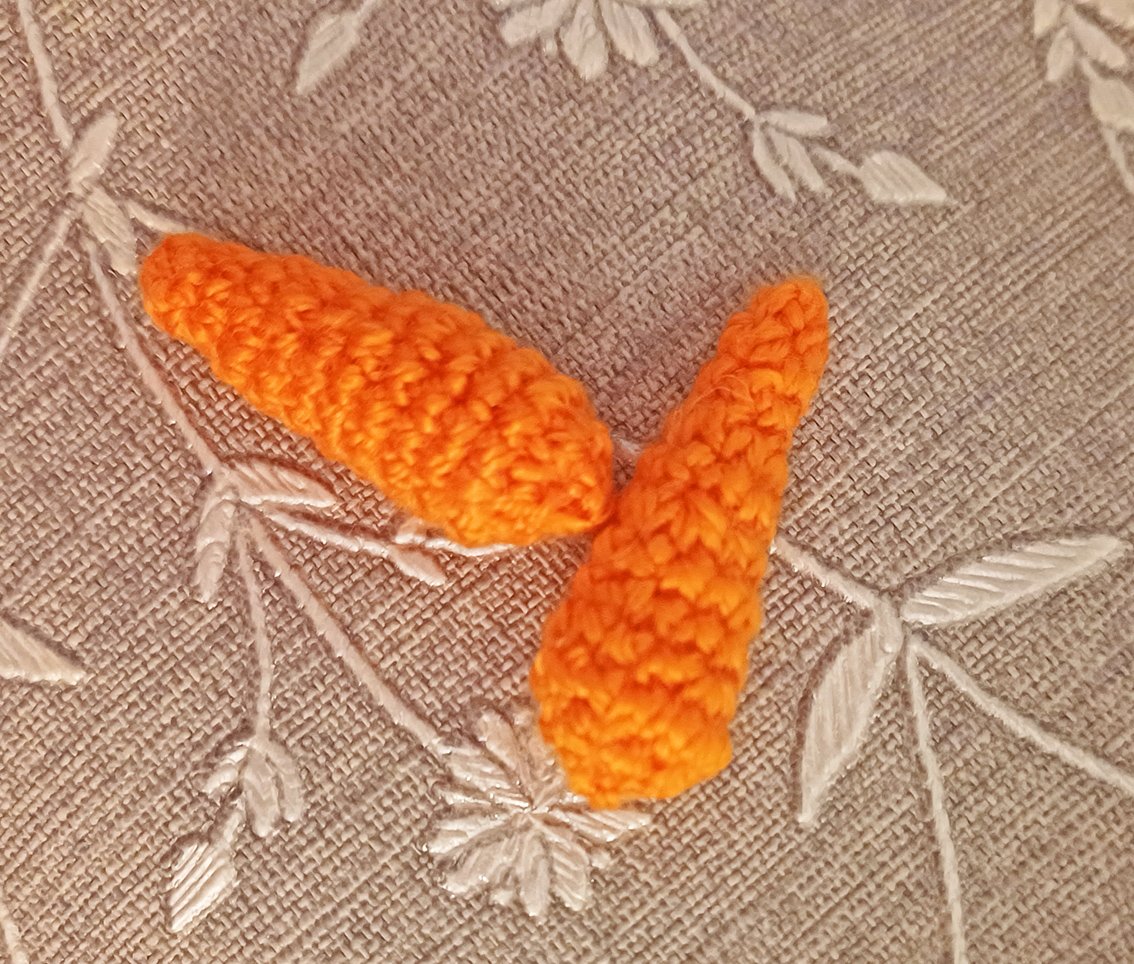
Attach green strings - carrot tops. Embroider some horizontal stripes with a black colour yarn/thread.
Assembling the scooter
Sew wheel axle mounting to the platform, on both sides of it. Sew a handlebar support on the other side of the platform, in the narrow part.
Cocktail straws or sushi sticks can be used as axles for the wheels. Cut 2 pieces of the required length from them. Insert them into the mounting from the bottom of the platform. Slide the wheels onto the axle. You can also secure them with glue if needed.
Insert the Handle Bar. Sew a basket to it. Put the carrots in the basket.
The scooter is completed!
.jpg)


