Little Rooster
.JPG)
Materials:
Yarn of your choice. Acrylic, wool, velour or cotton will do. Choose 2 matching colours. I used 450 m/100g acrylic yarn in brown and beige colours. You will also need red, yellow and light brown cotton yarn. The consumption of yarn is small.
The height of my rooster is 12 cm. Depending on the thickness of yarn a finished toy size may differ.
- A crochet hook, I used 1,25 mm crochet hook;
- Hollow fibre for stuffing;
- A sewing needle, matching sewing threads;
- A long needle for sculpting, strong thread for sculpting;
- For eyes: 2 half-beads, I used 6mm diam half-beads or 1 pair of ready-made eyes (Choose the size individually. It depends on the size of your toy);
- For embroidery: a few threads of brown (or black) and white
- At your wish: A piece of grey polymer clay for beak (In this pattern, there is a variation of a crochet beak);
- Wire with a diameter of 1mm (2 pieces of 30 cm);
- Adhesive fabric tape/plaster;
- Transparent glue.
Abbreviations:
ch – chain
sl st – slip stitch
sc – single crochet
hdc – half double crochet
dc – double crochet
inc – increase (2 sc in 1 st)
6 inc – 6 increases in sequence
dec – decrease (single crochet two stitches together)
6 dec – 6 decreases in sequence
(...) x N times – repeat instructions in brackets N times
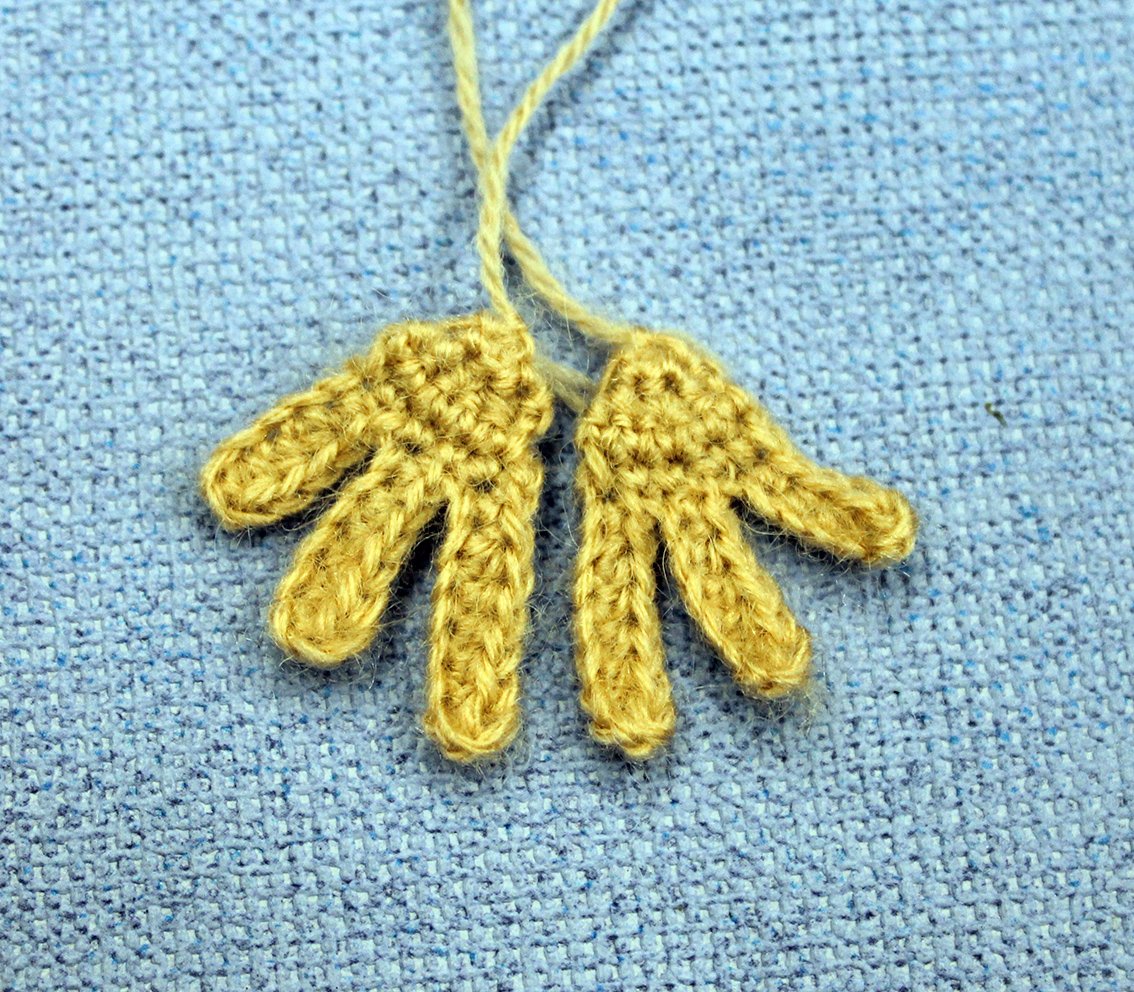
Legs (make 2)
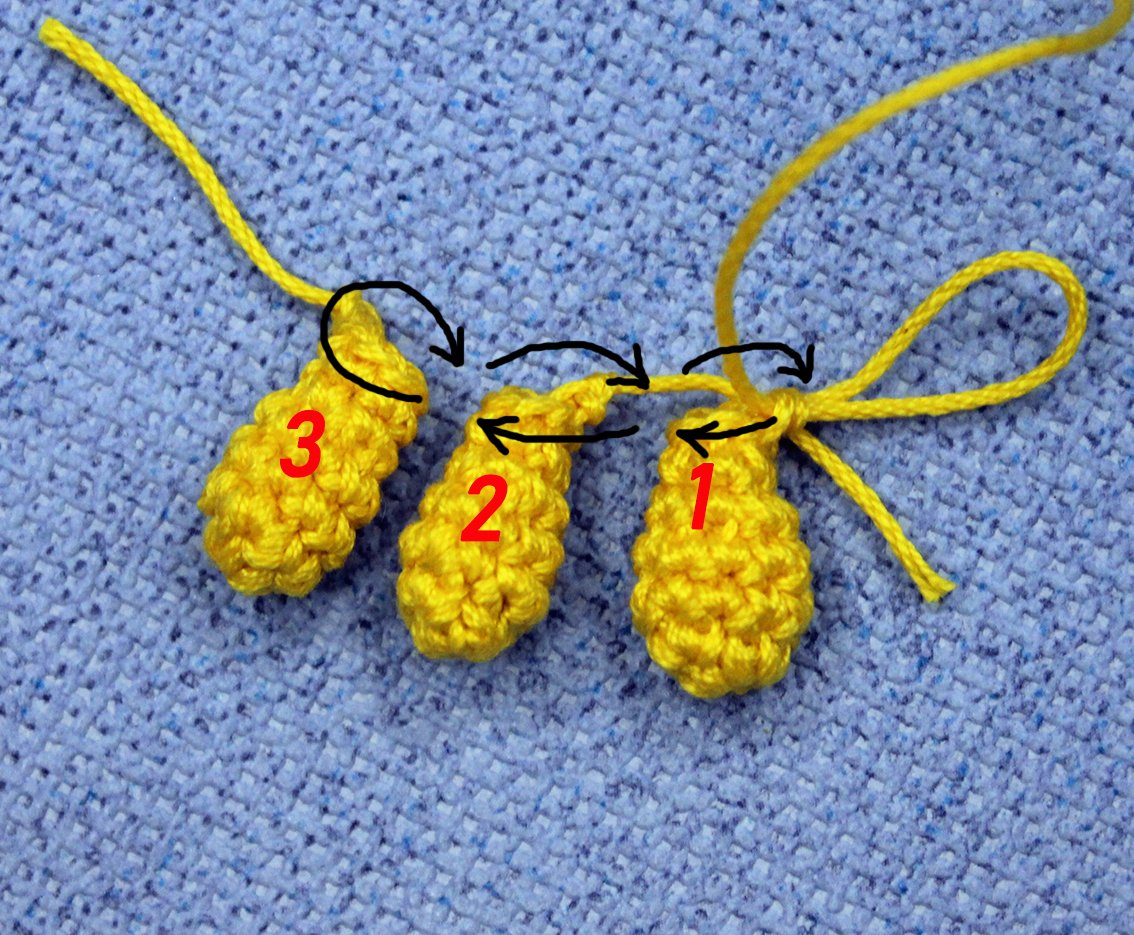
Work with yellow colour cotton yarn. The legs consist of toes and feet. First crochet the toes (3 for each leg):
Rnd 1. 6 sc in a Magic Ring
Rnd 2. (1 inc, 1 sc)× 3 times = 9
Rnd 3-4. (2 rounds) 9 sc
Rnd 5. (1 dec, 1 sc)× 3 times = 6
Rnd 6. 6 sc
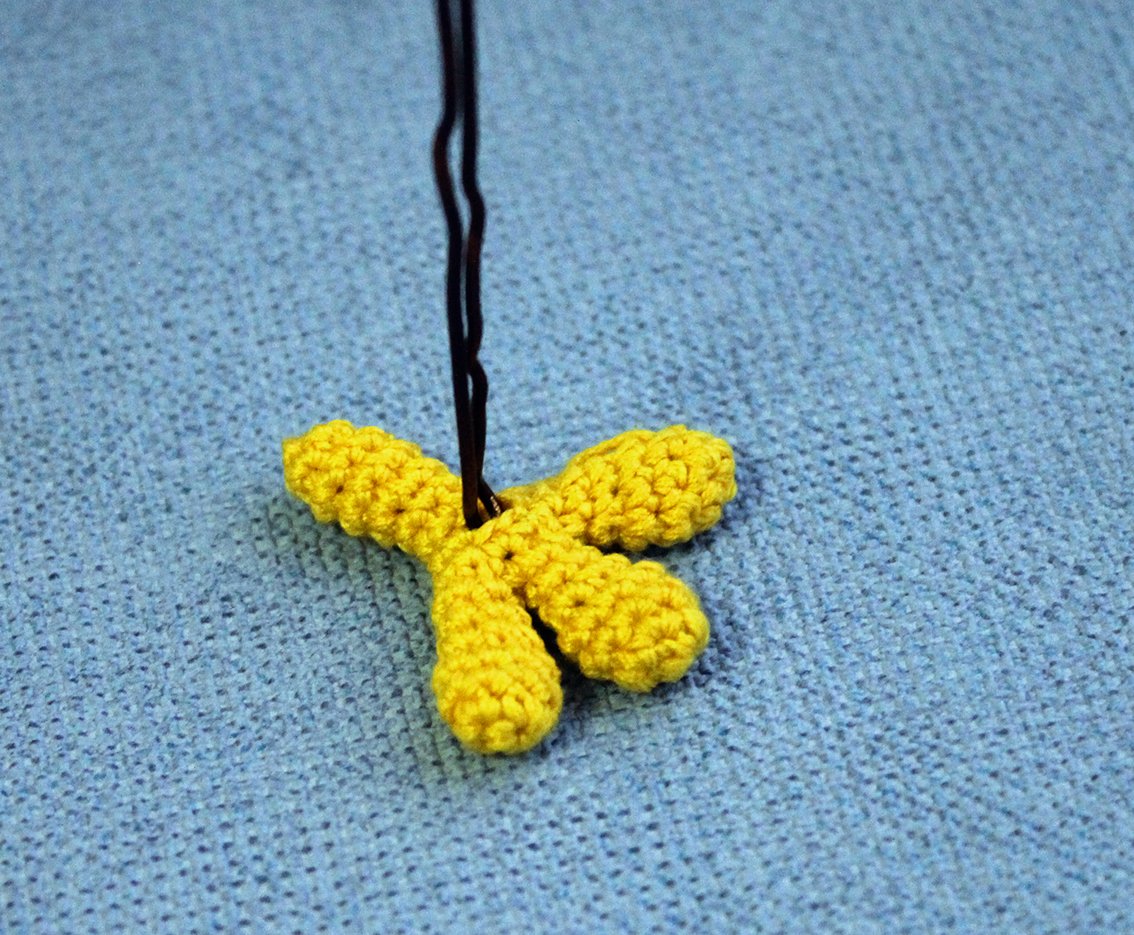
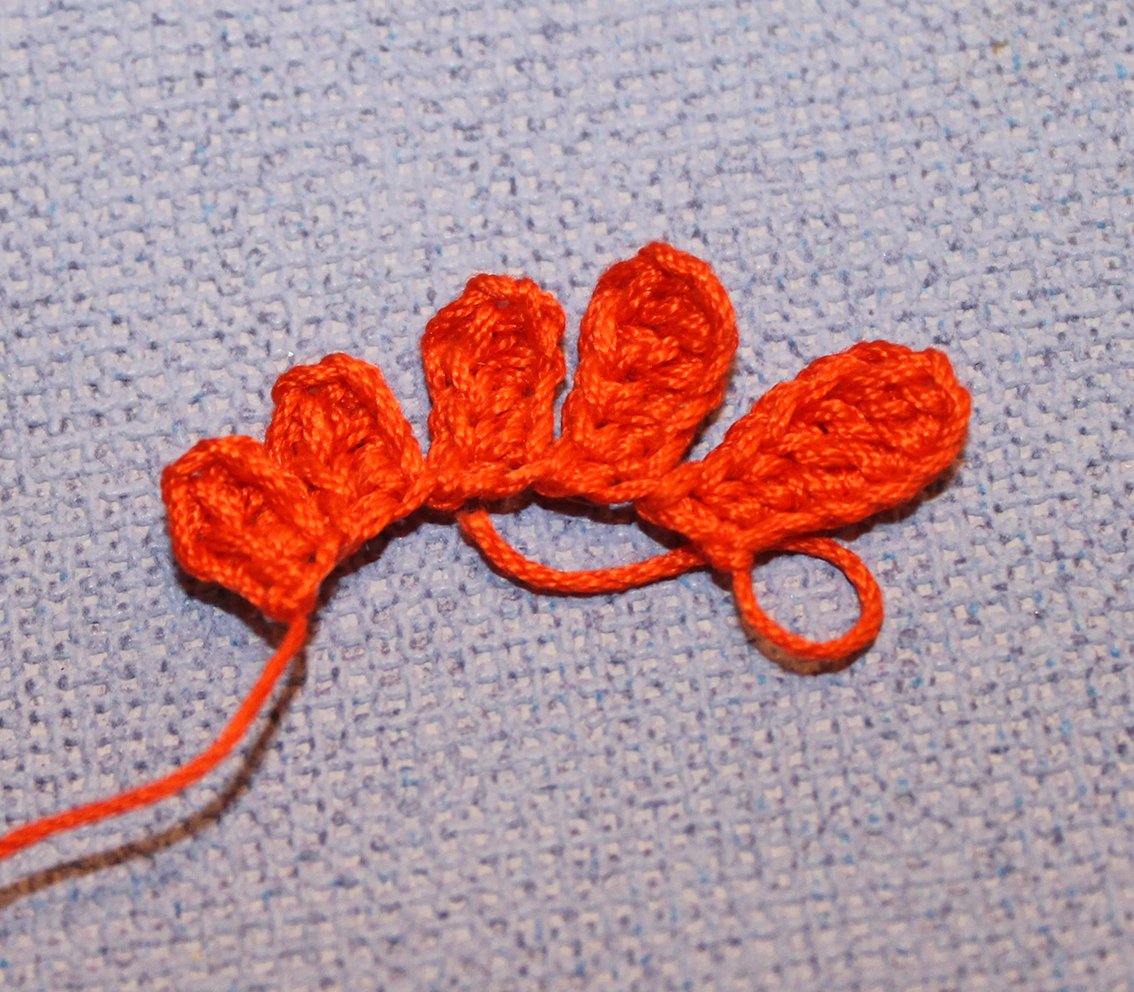
Fasten and cut off the thread on two of the toes. Leave the thread on toe no. 3 and continue crocheting. See the pictures for guidance:
Rnd 7. work into the loops of the 1st toe 3 sc, work into the loops of the 2nd toe 3 sc, work into the loops of the 3rd toe 6 sc, work into the loops of the 2nd toe 3 sc, work into the loops of the 1st toe 3 sc = 18
Rnd 8. (1 dec, 1 sc)× 6 times = 12
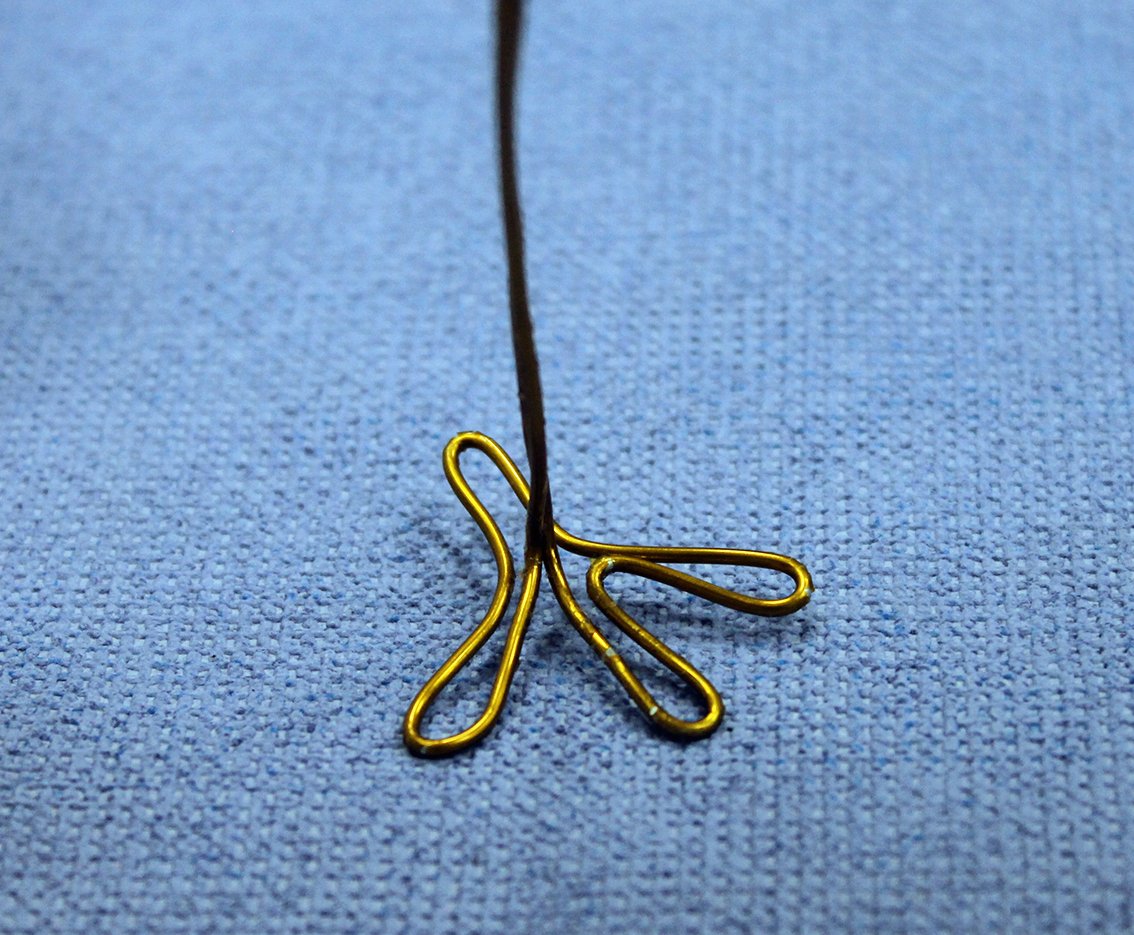
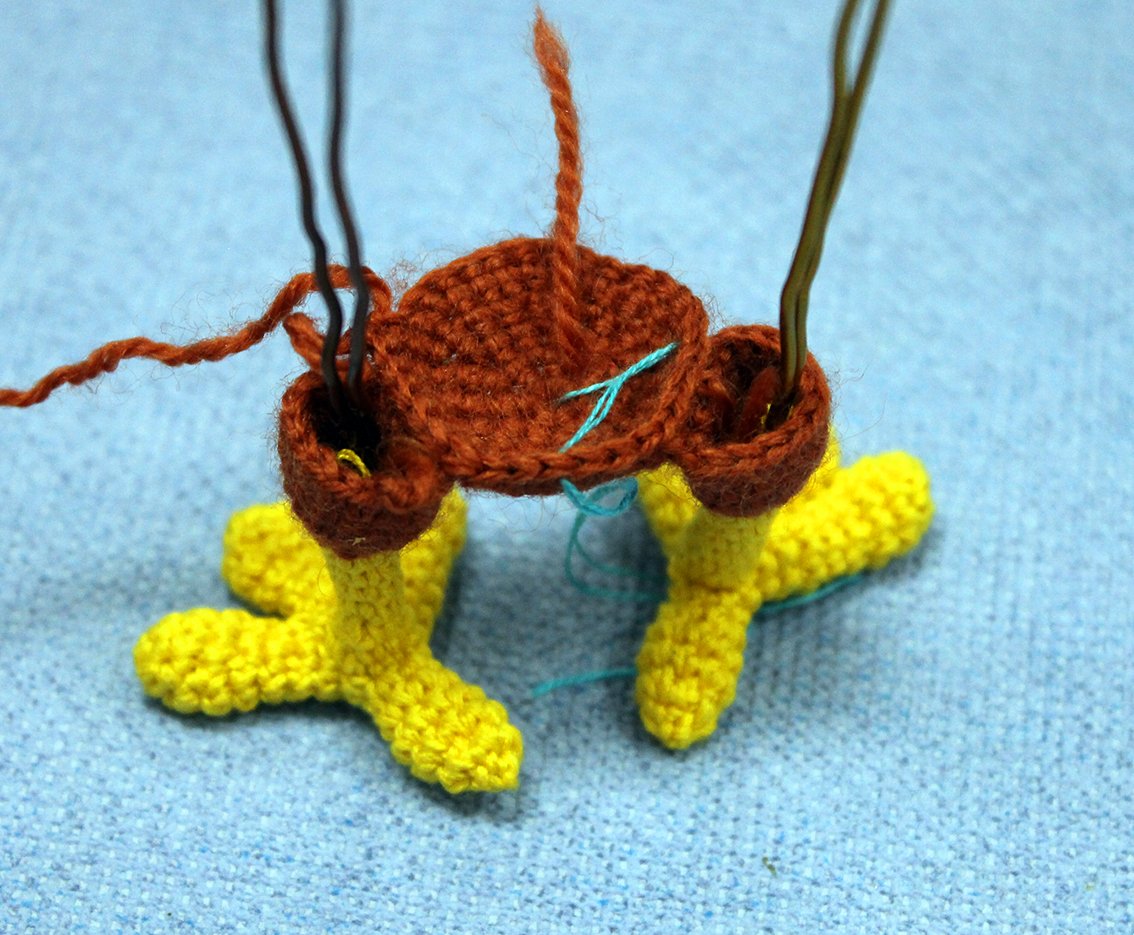
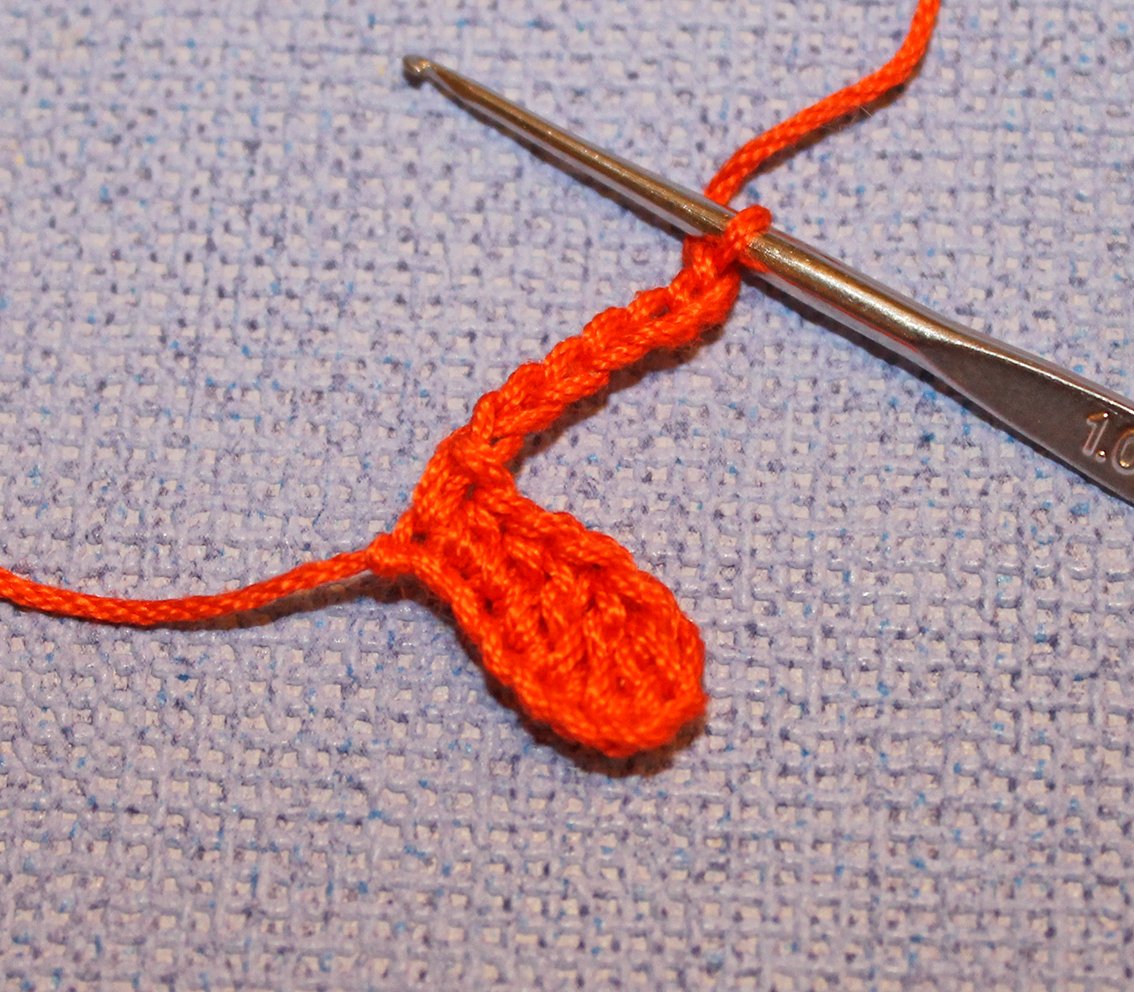
Making a wire frame.
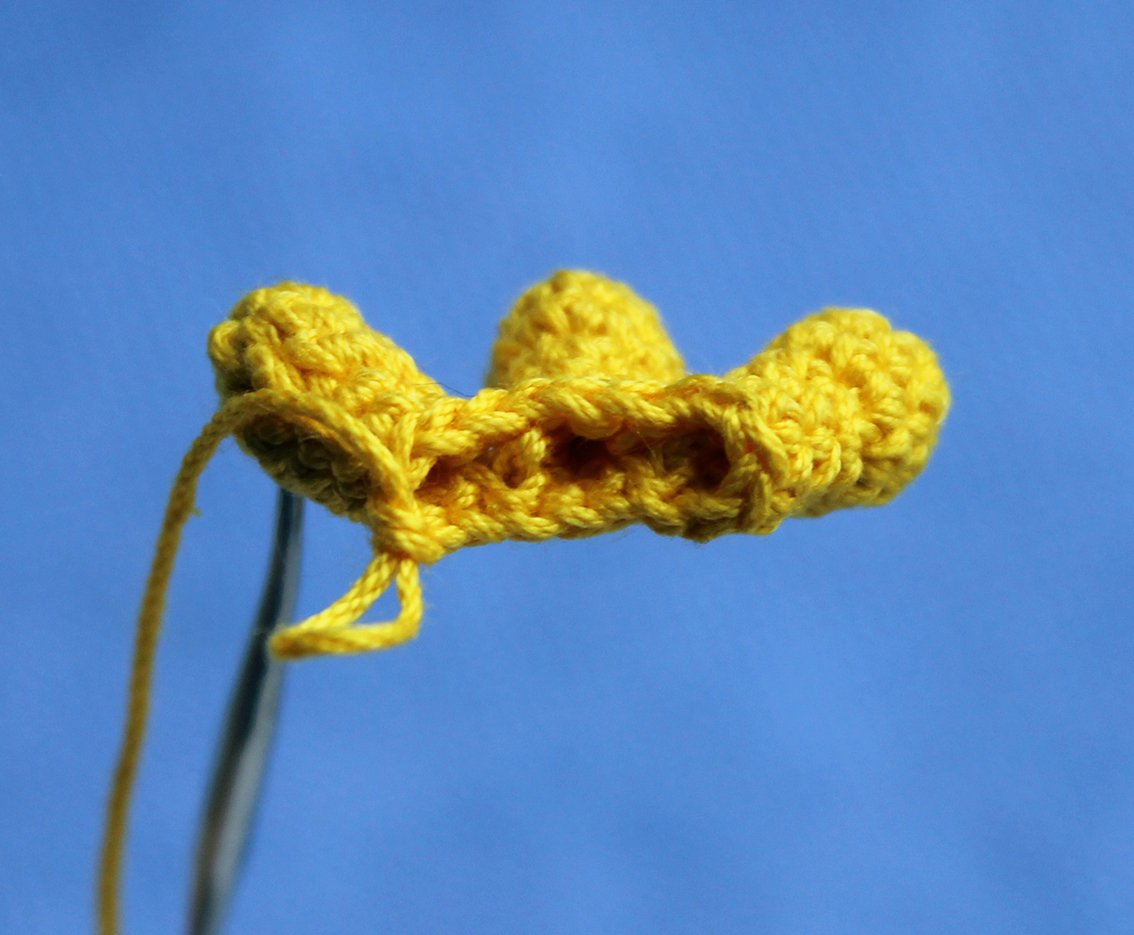
Step 1. Prepare 2 pieces of wire which is approx. 1,0 mm thick and 30 cm long each, fold them in half. Fold the wire to 2 cm – this is the frame for the middle toe.
Step 2. On each side of the middle toe, fold the wire for the frame of the first, third toes, as well as for the rear toe (see photo for guidance).
.JPG)
Step 3. Twist the ends of the wire together to a height of about 5 cm – this is a frame for the lower leg.
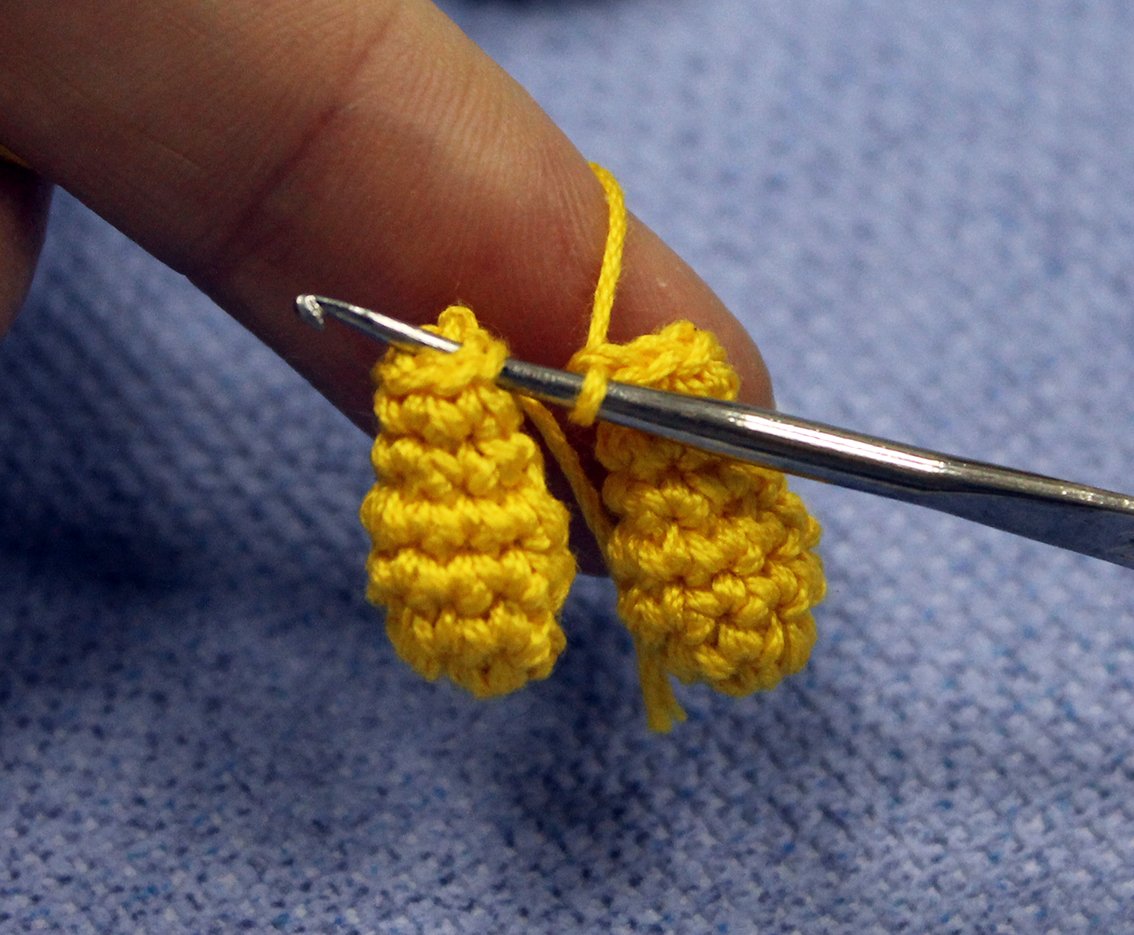
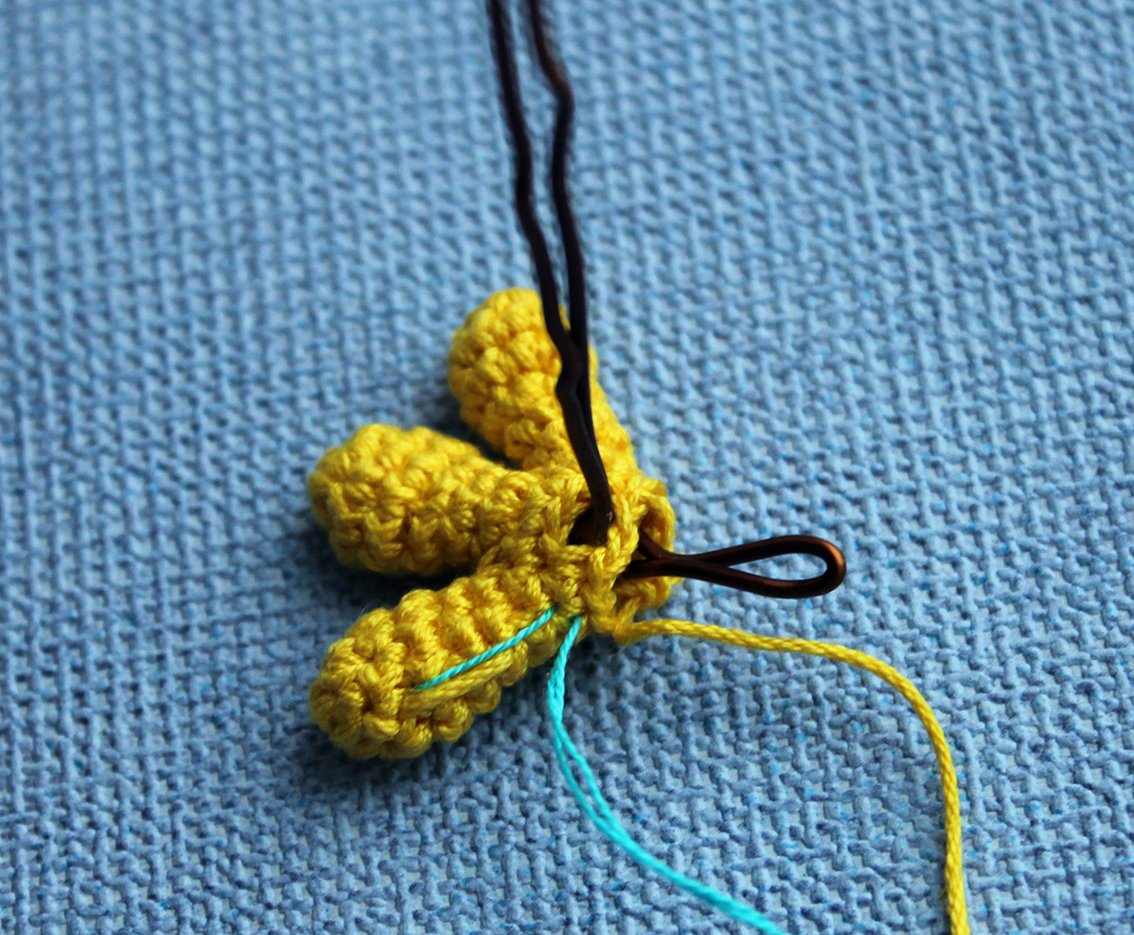
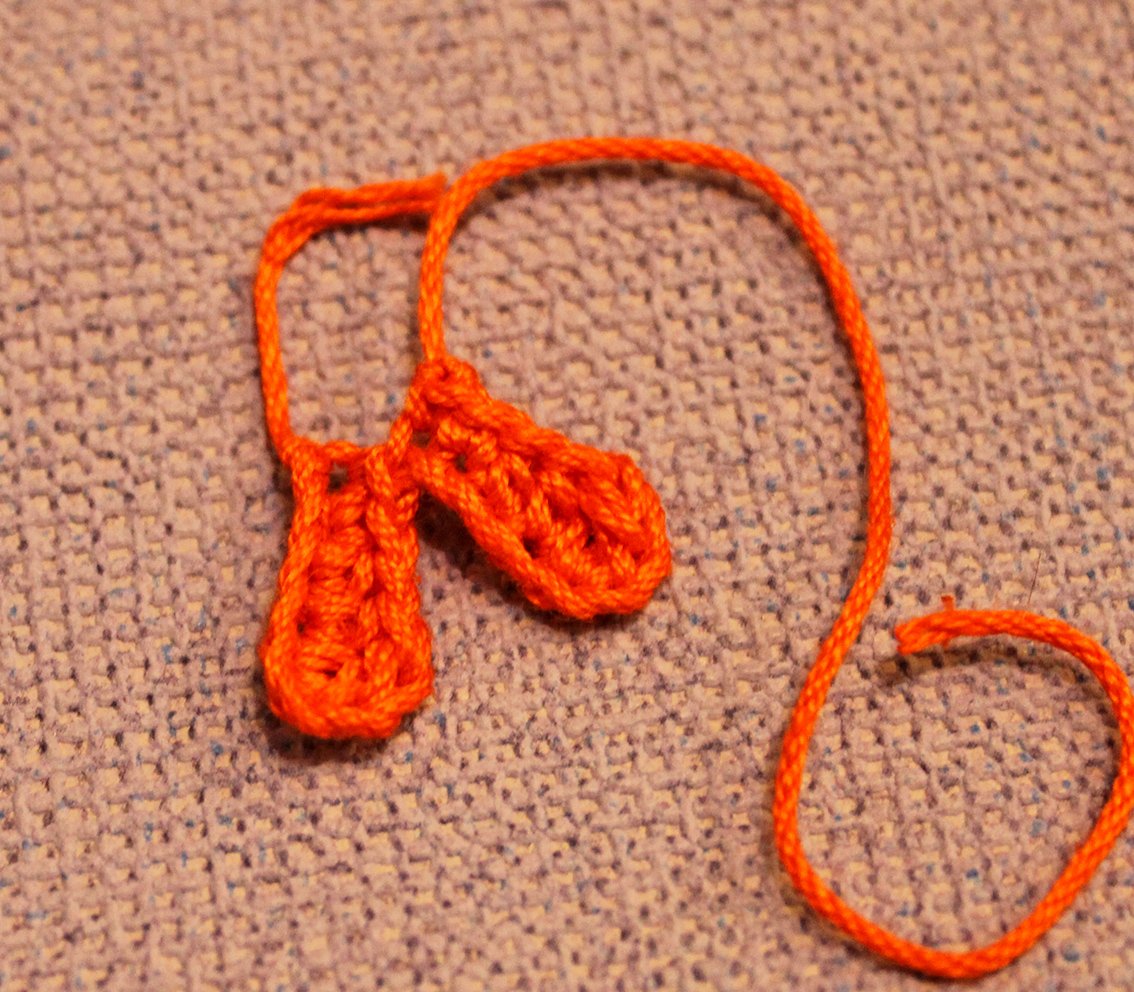
Step 4. Fix it with a Band-Aid. Insert the wire frame into the toes, continue crocheting.
Rnd 9. 2 sc, work 2 ch, skip 2 loop, at this point, take the wire out (see photo for guidance), (2 sc, 1 dec)× 2 times = 10
Rnd 10. 1 dec, 2 sc along the chain, (1 dec, 1 sc)× 2 times = 7
Rnd 11. 7 sc
Rnd 12. 1 inc, 2 sc, 1 inc, 3 sc = 9
Rnd 13-14. (2 rounds) 9 sc
Rnd 15. (1 dec, 1 sc)× 3 times = 6
Fasten off, cut off any excess yarn, hide the end.
Drumstick
Start with yellow colour cotton yarn.
Rnd 1. work 6 sc around the hole in the 9th round of the foot = 6
Rnd 2-7. (6 rounds) 6 sc

Change to the brown colour yarn.
Rnd 8. 6 inc = 12
Rnd 9. (3 sc, 1 inc)× 3 times = 15
Rnd 10-11. (2 rounds) 15 sc
Bind off, cut off any excess yarn. Add some hollow fibre.
The second leg is crocheted similarly. Place an additional marker on 2nd stitch from the main marker for the right leg and 12th stitch from the main marker for the left leg.

Body
Crochet with brown colour yarn.
Rnd 1. 6 sc in a Magic Ring
Rnd 2. 6 inc = 12
Rnd 3. (1 sc, 1 inc)х 6 times = 18
Rnd 4. (2 sc, 1 inc)х 6 times = 24
Rnd 5. (3 sc, 1 inc)х 6 times, attach the right leg to the body, start with the loop with the additional marker on, work 5sc hooking through the loops of the leg and the body; continue along the loops of the body and work 3 sc, move place marker – a new round will start from here = 30
Rnd 6. 3 sc, attach the left leg to the body, start with the loop with the additional marker on, work 5 sc hooking through the loops of the leg and the body; continue along the loops of the body: (2 sc, 1 inc)× 4 times, 2 sc, work into loops of the right leg: 10 sc, continue along the loops of the body: 3 sc = 39
Rnd 7. 3 sc, work into the loops of the left leg: 10 sc, continue along the loops of the body: 1 sc, 1 inc, (4 sc, 1 inc)× 3 times, 13 sc, 1 inc = 49
Rnd 8. 1 inc, 12 sc, (1 inc, 6 sc)× 3 times, 1 inc, 14 sc = 54
Rnd 9. 53 sc, 1 inc = 55
Rnd 10. 1 inc, 54 sc = 56
Rnd 11-12. (2 rounds) 56 sc
Work 1 sc, transfer your place marker here.
Rnd 13. 8 sc, 1 dec, 36 sc, 1 dec, 3 sc, 1 dec, 1 sc, 1 dec = 52
Rnd 14. 1 dec, 1 sc, 1 dec, 41 sc, (1 dec, 1 sc)× 2 times = 48
Rnd 15. (1 sc, 1 dec)× 2 times, 8 sc, (1 dec, 3 sc)× 5 times, 5 sc, 1 dec, 2 sc = 40
Rnd 16. 2 sc, 1 dec, 8 sc, (1 dec, 3 sc)× 3 times, 1 dec, 11 sc = 35
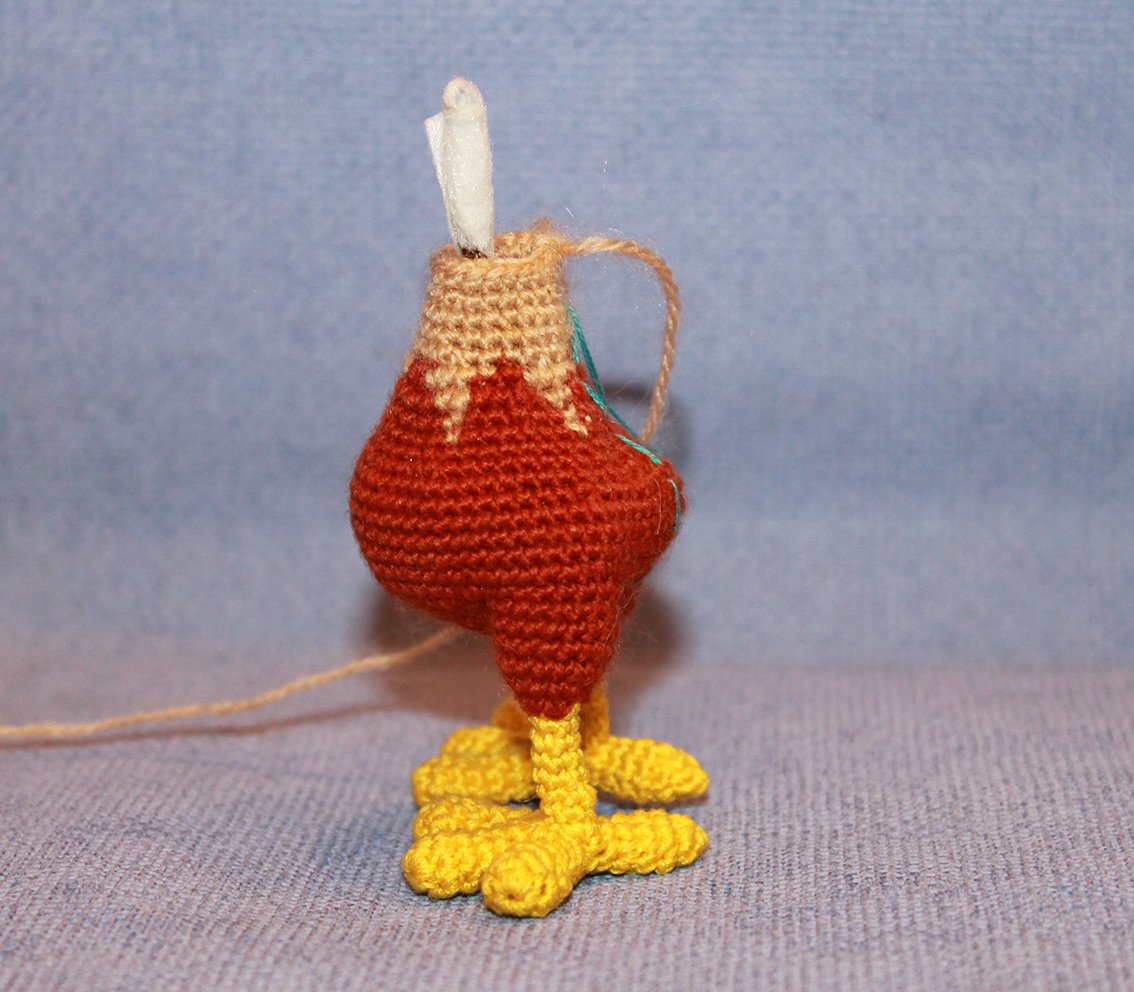
Add some hollow fibre.
.JPG)
Continue making the breast and neck using two colours.
Rnd 17. brown colour yarn: 3 sc, (beige colour yarn: 1 sc, brown colour yarn: 6 sc)× 4 times, beige colour yarn: 1 sc, brown colour yarn: 3 sc = 35
Work 1 sc with brown yarn, transfer your place marker here.
Rnd 18. brown: 2 sc, (beige: 1 sc, brown: 2 sc, 1 dec, 2 sc)× 4 times, beige: 1 sc, brown: 2 sc, 1 dec = 30
Rnd 19. brown: 2 sc, (beige: 2 sc, brown: 4 sc)× 4 times, beige: 2 sc, brown: 2 sc = 30
Rnd 20. brown: 1 sc, (beige: 4 sc, brown: 1 dec)× 4 times, beige: 4 sc, brown: 1 sc = 26
Continue with beige colour yarn alone. Fasten off and cut off the brown yarn.
Rnd 21. (3 sc, 1 dec)× 5 times, 1 sc = 21
Rnd 22-23. (2 rounds) 21 sc
Rnd 24. (1 dec, 5 sc)× 3 times = 18
Rnd 25-27. (3 rounds) 18 sc
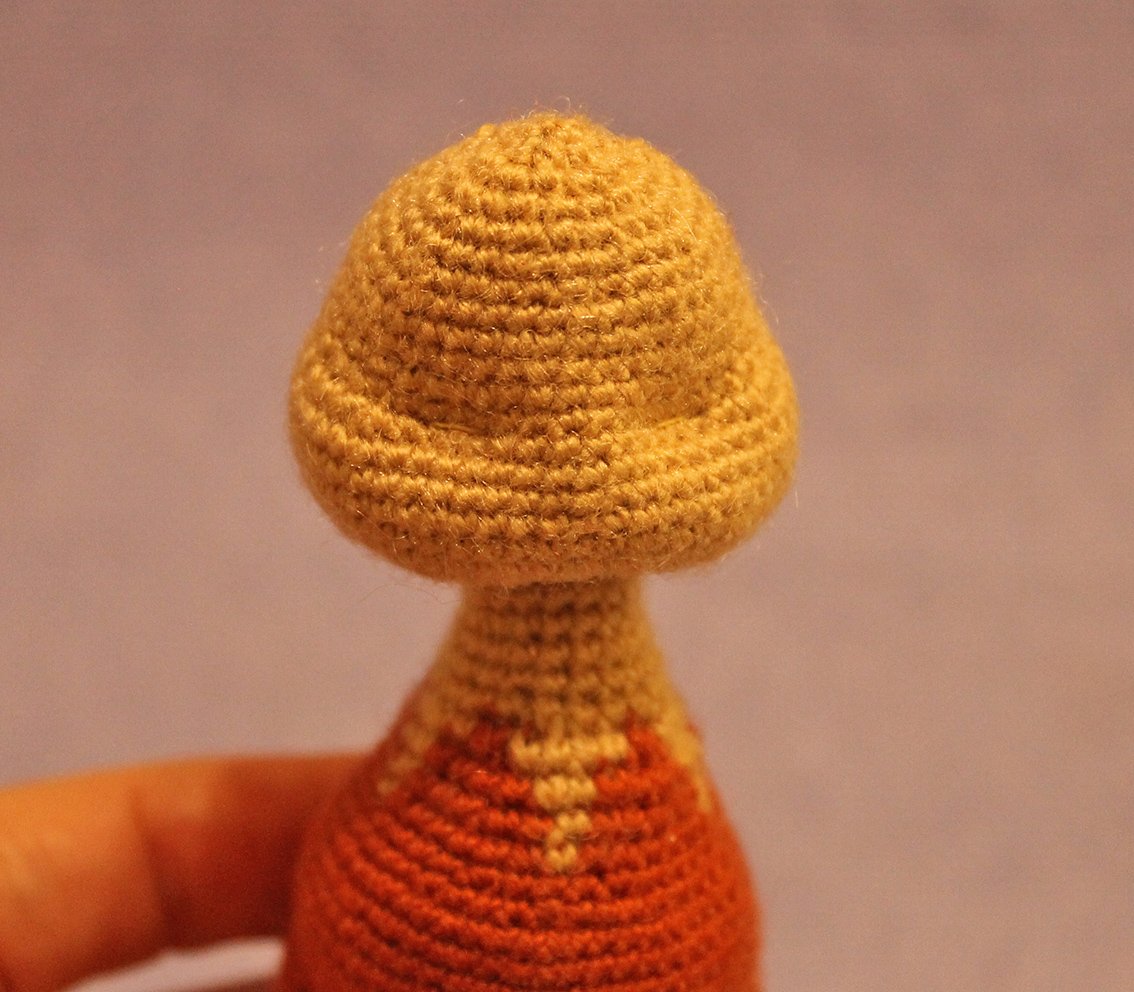
Do not cut the thread! Add some hollow fibre. Next, we crochet the head.
Rnd 28. (1 sc, 1 inc)× 9 times = 27
Rnd 29. (1 inc, 1 sc)× 2 times, 3 inc, (1 sc, 1 inc)× 6 times, 1 sc, 3 inc, 1 sc, 1 inc, 2 sc = 42
Rnd 30. 7 sc, (1 inc, 1 sc)× 4 times, 12 sc, (1 sc, 1 inc)× 4 times, 7 sc = 50
Rnd 31-35. (5 rounds) 50 sc
Rnd 36. 7 sc, (1 dec, 2 sc)× 3 times, 12 sc, (2 sc, 1 dec)× 3 times, 7 sc = 44
Rnd 37. 10 sc, 1 dec, 1 sc, 1 dec, 14 sc, 1 dec, 1 sc, 1 dec, 10 sc = 40
Rnd 38. 40 sc
Rnd 39. 4 sc, (1 dec, 8 sc)× 3 times, 1 dec, 4 sc = 36
Rnd 40-41. (2 rounds) 36 sc
Rnd 42. (1 dec, 4 sc)× 6 times = 30
Rnd 43. 30 sc
Rnd 44. (1 dec, 3 sc)х 6 times = 24
Rnd 45. (1 sc, 1 dec, 1 sc)х 6 times = 18
Rnd 46. (1 dec, 1 sc)х 6 times = 12
Add some hollow fibre.
Rnd 47. 6 dec = 6
Fasten off, cut off any excess yarn. Do not close off the loops of the last round just yet, you will do it later. You will do embroidery and decorate the face first and then hide yarn ends inside!
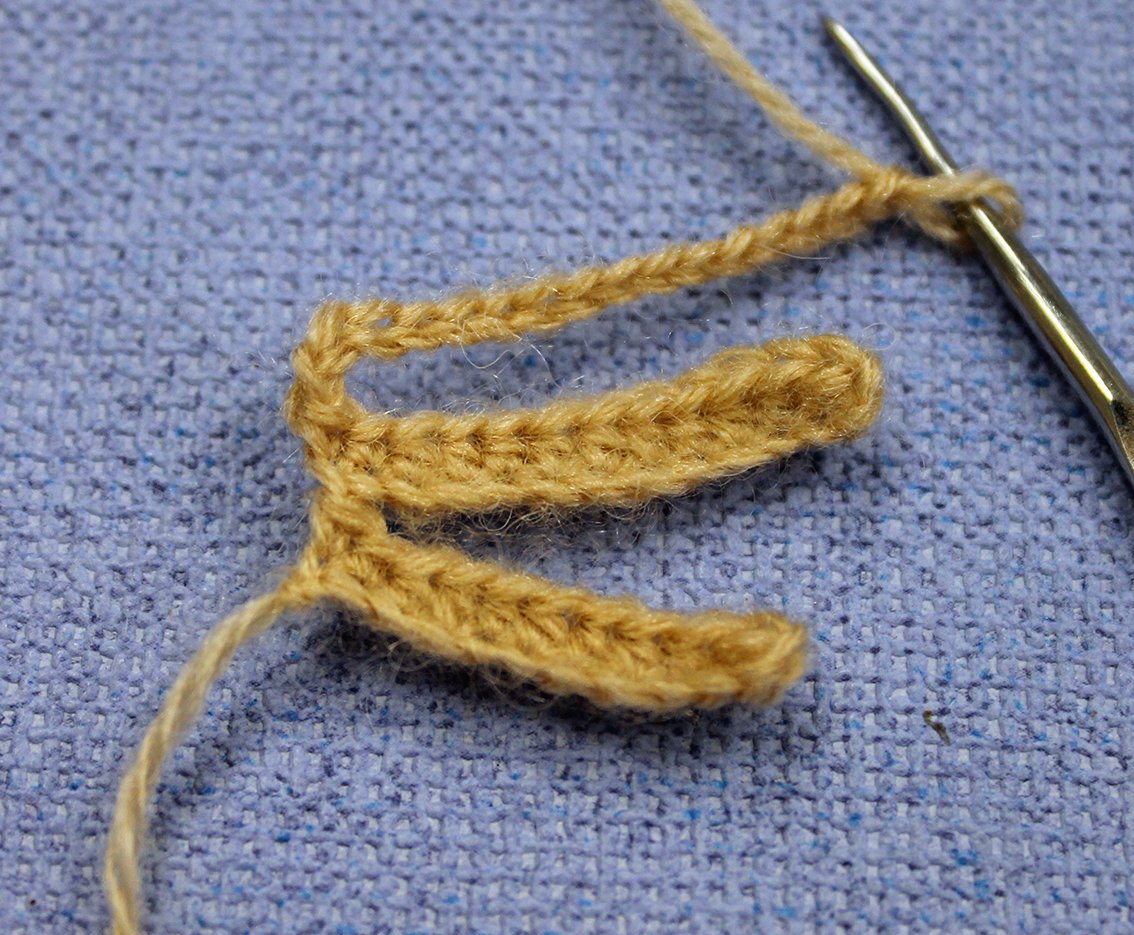
Tail
Crochet feathers with beige yarn. You can choose any other colour.
Row 1. Work 12 ch, starting from 3rd ch from hook: 10 hdc,
work 14 ch, starting from 3rd ch from hook: 12 hdc,
work 16 ch, starting from 3rd ch from hook: 14 hdc,
work 14 ch, starting from 3rd ch from hook: 12 hdc,
work 12 ch, starting from 3rd ch from hook: 10 hdc
Fasten off, cut the thread, leaving long tail for sewing.
.JPG)
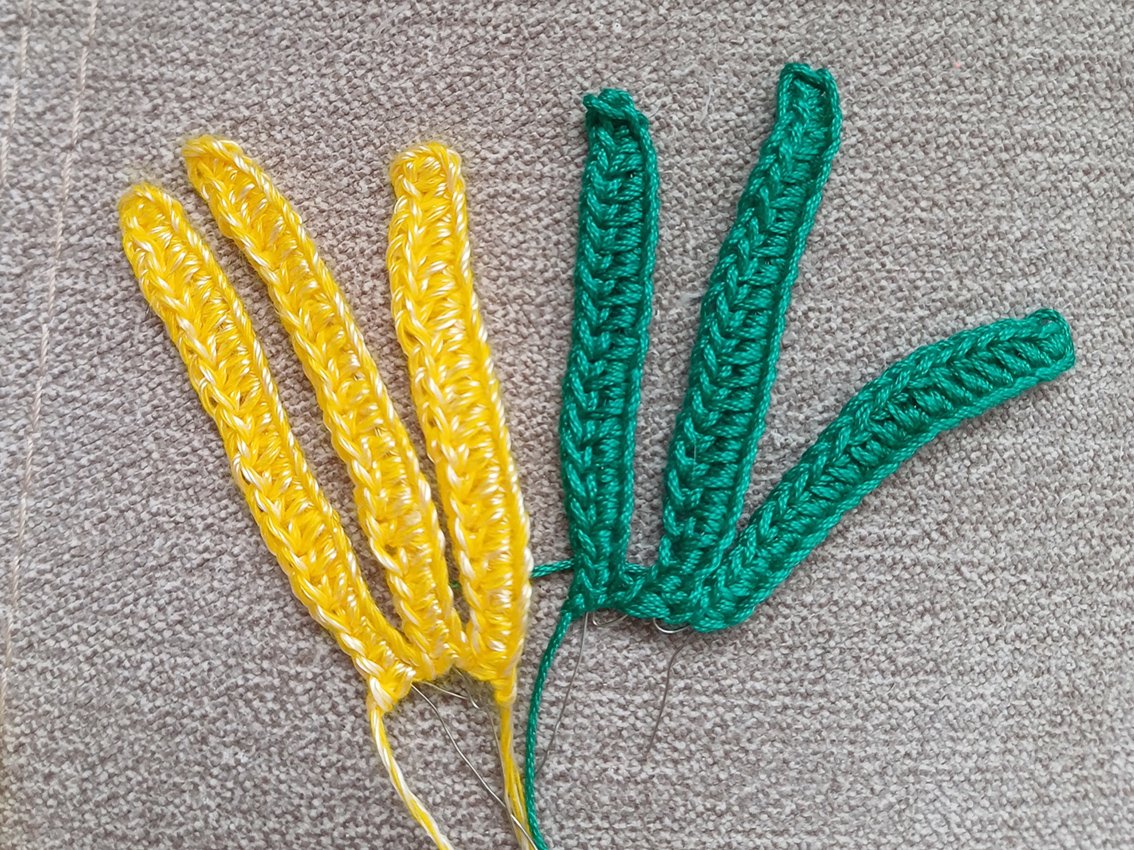
A variant of a long tail on a wire frame.
Choose 2 matching colours. I chose yellow and green. Crochet 2 parts.
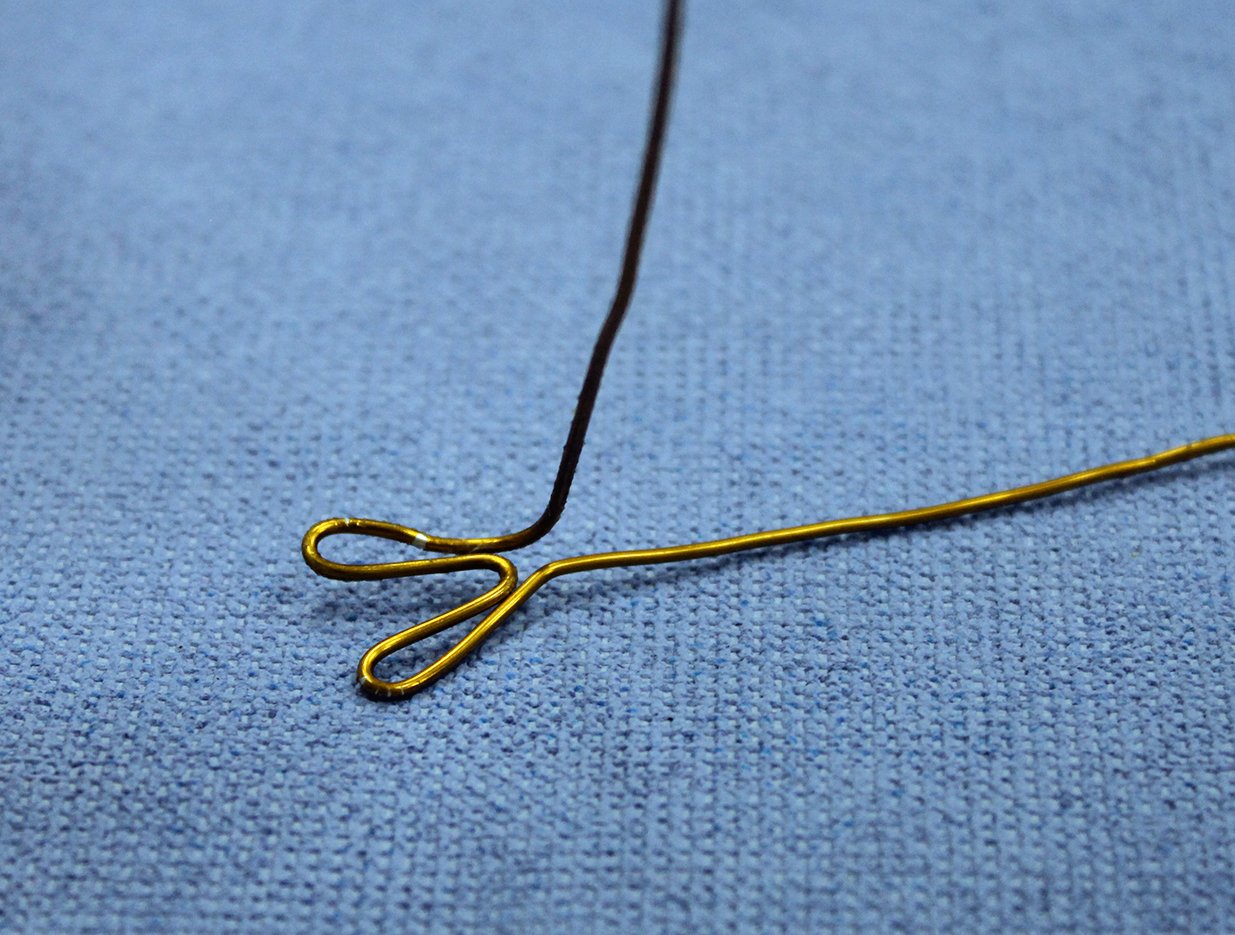
Crochet the 1st feather. Work 20 ch. Attach a thin wire the same length bent in half. I use wire for beads. In its loop crochet 1 fixing sc. Look at the photo. Further crochet 19 hdc, capturing the loops of the chain and wire. The wire is inside the detail.
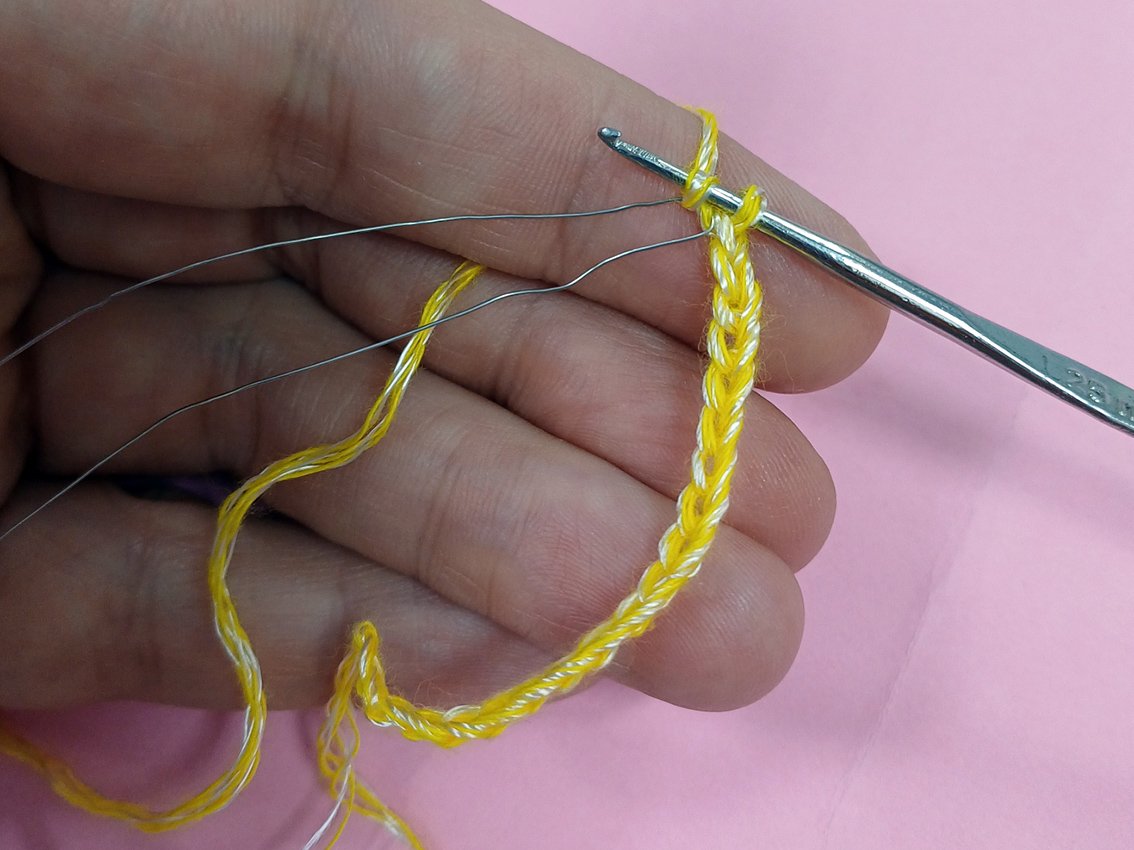
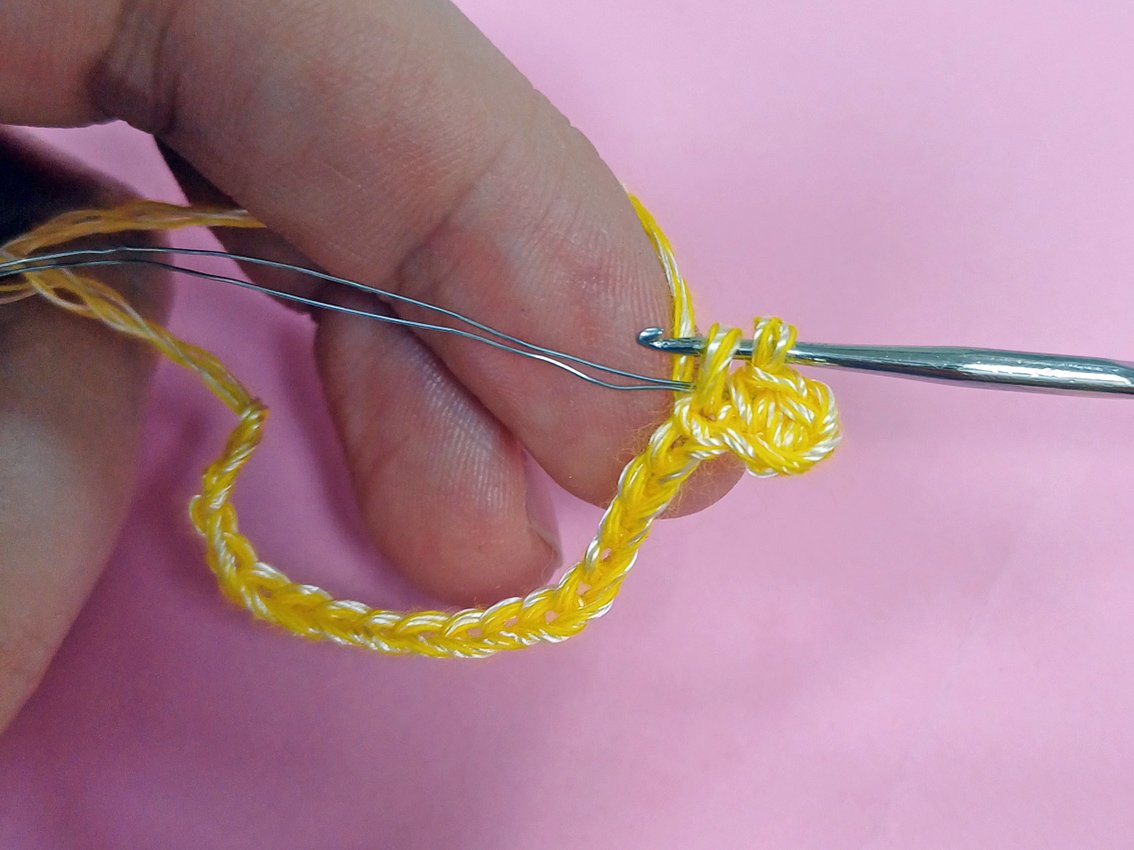
Do not cut the wire! Crochet the 2nd feather. Work 23 ch. Attach a thin wire the same length bent in half. In its loop crochet 1 fixing sc.
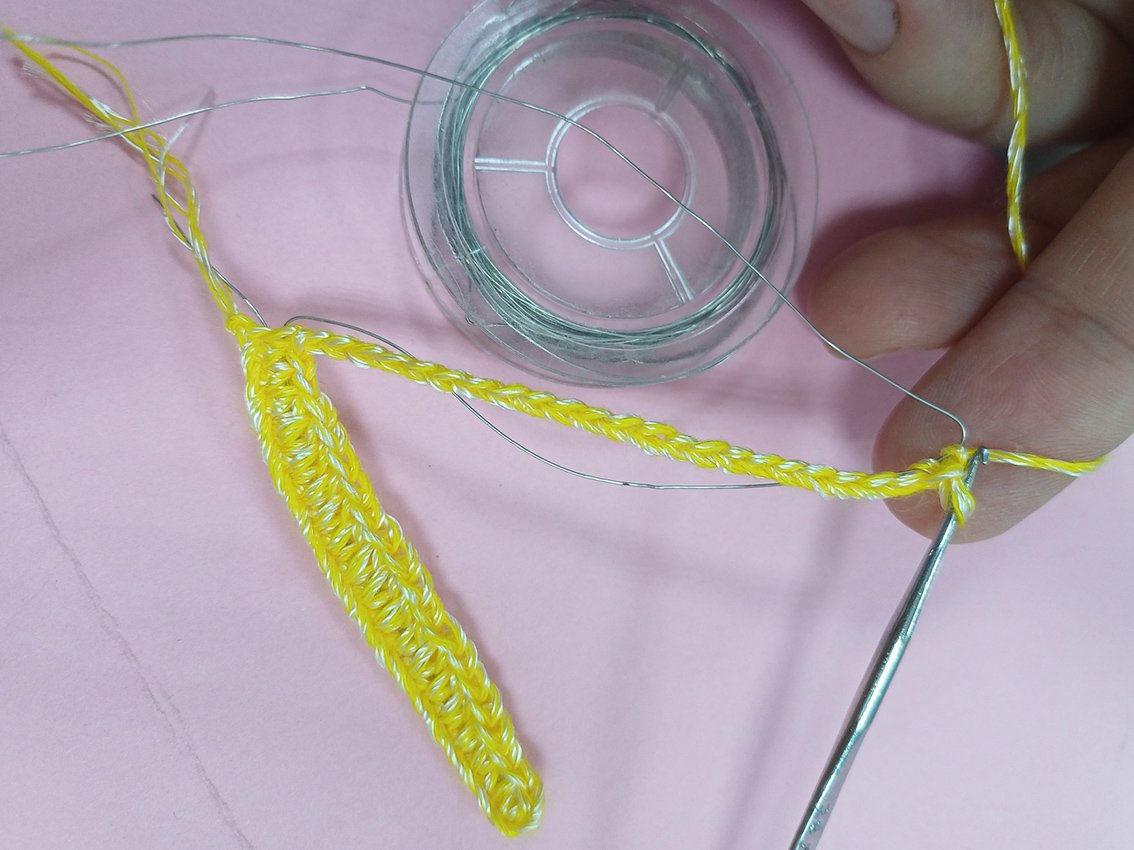
Further crochet 22 hdc, capturing the loops of the chain and wire. The wire is inside the detail.
Crochet the 3rd feather. Work 20 ch. Attach a thin wire the same length bent in half. In its loop crochet 1 fixing sc. Further crochet 19 hdc, capturing the loops of the chain and wire.
Fasten off, cut off. Cut the wire.
Right wing
Crochet feathers with beige yarn.
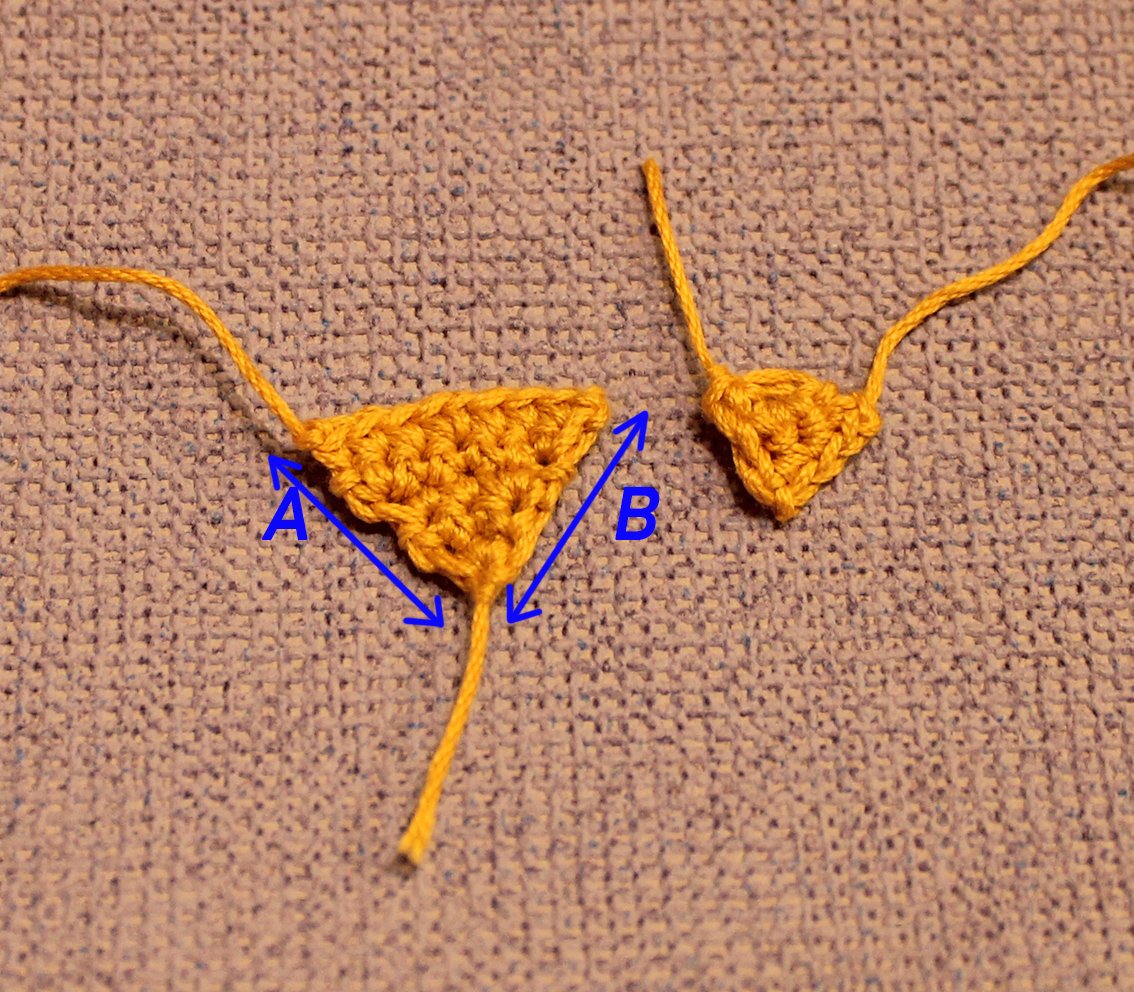
Row 1. work 7 ch, starting from 3rd ch from hook: 5 hdc, work 8 ch, starting from 3rd ch from hook: 6 hdc, work 9 ch, starting from 3rd ch from hook: 7 hdc, do not turn!
Row 2. Crochet from A to B: 6 sc, 1 ch, turn = 6
.JPG)
Row 3. 6 sc, 1 ch, turn = 6
Row 4. 3 dec, 1 ch, turn = 3
Row 5. 3 sc together = 1
Fasten off, cut the thread, leaving long tail for sewing.
Left wing
Crochet feathers with beige yarn.
Row 1. work 9 ch, starting from 3rd ch from hook: 7 hdc, work 8 ch, starting from 3rd ch from hook: 6 hdc, work 7 ch, starting from 3rd ch from hook: 5 hdc, do not turn!
Row 2. Crochet from A to B: 6 sc, 1 ch, turn = 6
Row 3. 6 sc, 1 ch, turn = 6
Row 4. 3 dec, 1 ch, turn = 3
Row 5. 3 sc together = 1
Fasten off, cut the thread, leaving long tail for sewing.
Comb
Crochet with red colour yarn.
Row 1. work 8 ch, starting from 3rd ch from hook: 2 dc, 2 hdc, 2 sc,
work 7 ch, starting from 3rd ch from hook: 1 dc, 2 hdc, 2 sc,
work 6 ch, starting from 3rd ch from hook: 1 dc, 2 hdc, 1 sc,
work 5 ch, starting from 3rd ch from hook: 2 hdc, 2 sc, again work 5 ch, starting from 3rd ch from hook: 2 hdc, 2 sc
Fasten off, cut the thread, leaving long tail for sewing.
Beard
Crochet with red colour yarn.
Row 1. work 7 ch, starting from 3rd ch from hook: 1 dc, 2 hdc, 2 sc, again work 7 ch, starting from 3rd ch from hook: 1 dc, 2 hdc, 2 sc
Fasten off, cut the thread, leaving long tail for sewing.
Assembly and Decoration
Find the points for sculpting as follows. See the photo for guidance.
Spot 0 is on the top of the head.
Points 1 & 2, 3 & 4 are in the 38th round of the head, 3 stitches between them.
Points 5 & 6 are in the middle of the neck, between the 27th and 28th rounds, with 1 stitch between them.
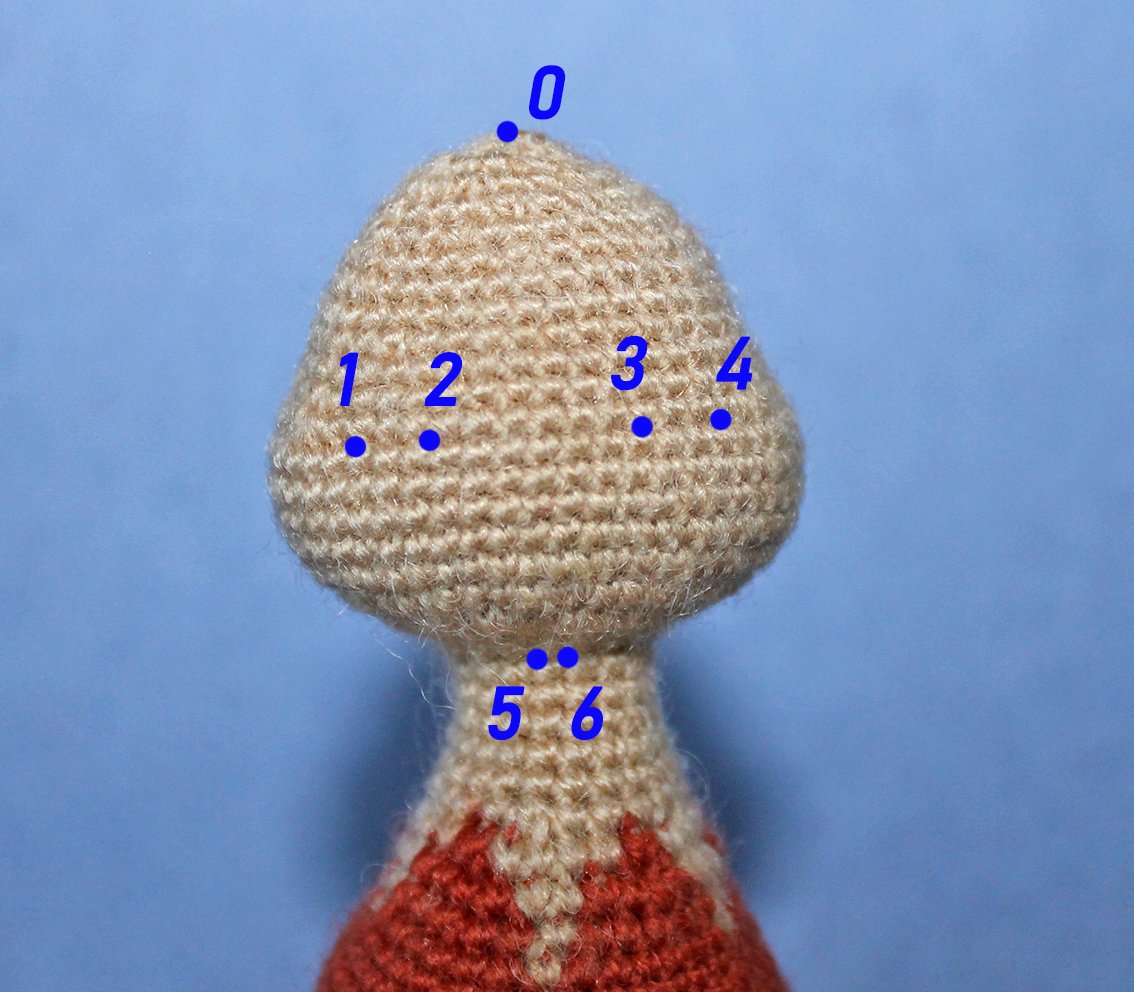
Prepare a long needle for sculpting and a strong thread, make a knot.
Insert the needle in the opening in the head (spot 0), hide the knot in the hollow fibre, take the needle out in spot 6 on the neck. Make a very tiny stitch to fasten the thread.
Insert the needle out in spot 6, take the needle out in spot 2 (thread runs inside the head). Insert the needle in spot 1 (thread runs over the work), take it out in spot 5. Tighten the thread, help with the fingers to keep it in place. Make a short stitch and a knot. Repeat the tightening once more.
Repeat sculpting for the left eye socket. Points #5-3-4-6.
Hide the end.
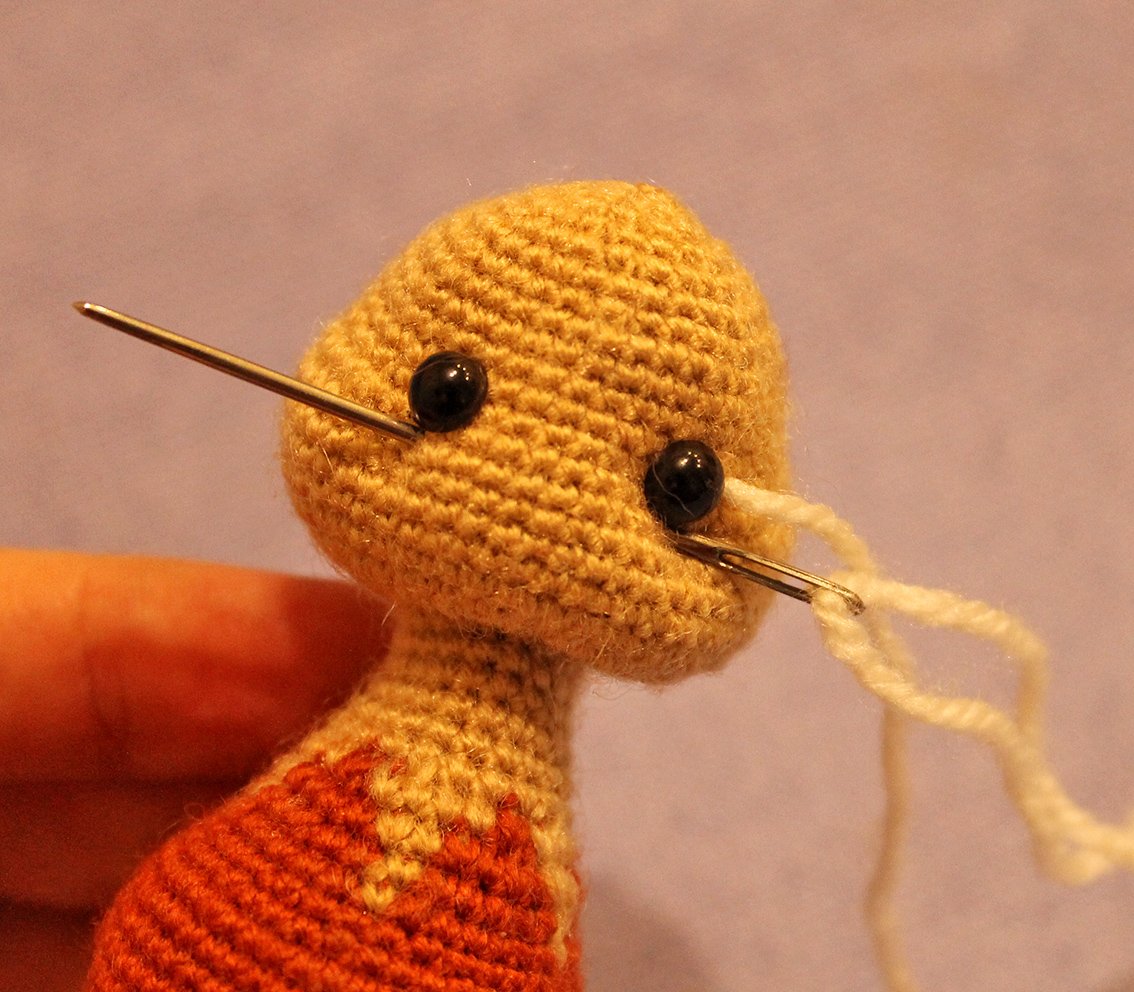
Glue the eyes into the eye sockets.
Embroider the whites of the eyes with white colour yarn. See the photo for guidance. Insert the needle in the opening on the head to hide the ends. Do not forget to pull the loops on the head top once you have finished to embroider. Embroider eyelids with brown (or black) colour thread. I embroidered with a thread folded in two.
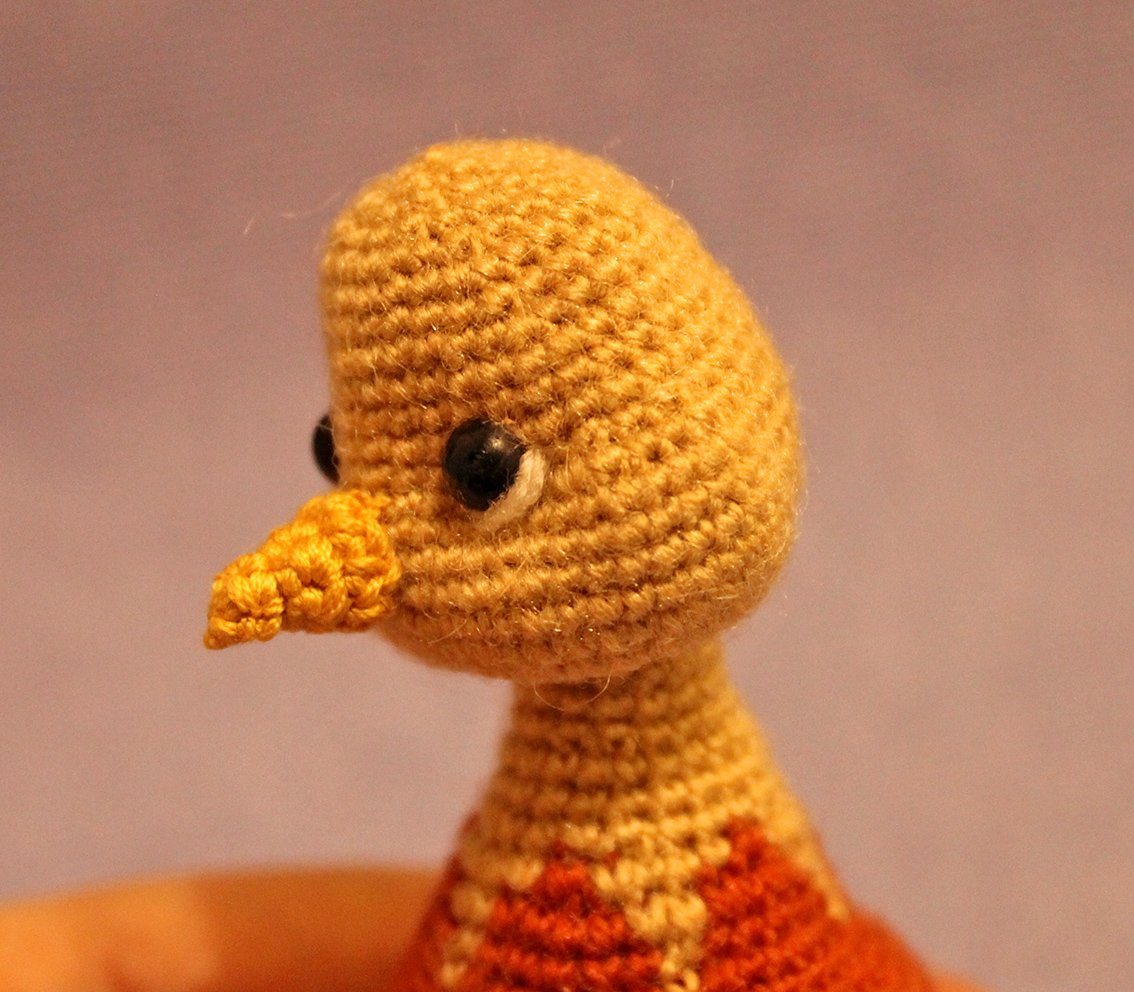
Beak
The 1st version of the beak. Crocheted beak
Crochet with grey or light brown yarn. Tip: Take a thin cotton yarn.
Row 1. 2 ch, in 2nd ch from hook: 3 sc, 1 ch, turn = 3
Row 2. 3 sc, 1 ch, turn = 3
Row 3. 1 inc, 1 sc, 1 inc, 1 ch, turn = 5
Row 4. 1 inc, 3 sc, 1 inc, 1 ch, turn = 7
Row 5. 3 sc, 1 inc, 3 sc = 8
Fasten off, cut the thread, leaving long tail for sewing.
Sew sides A and B. Add a piece of hollow firbe. Sew the beak to the head. Using a contrasting colour yarn/thread embroidery a line to divide the beak into two parts.
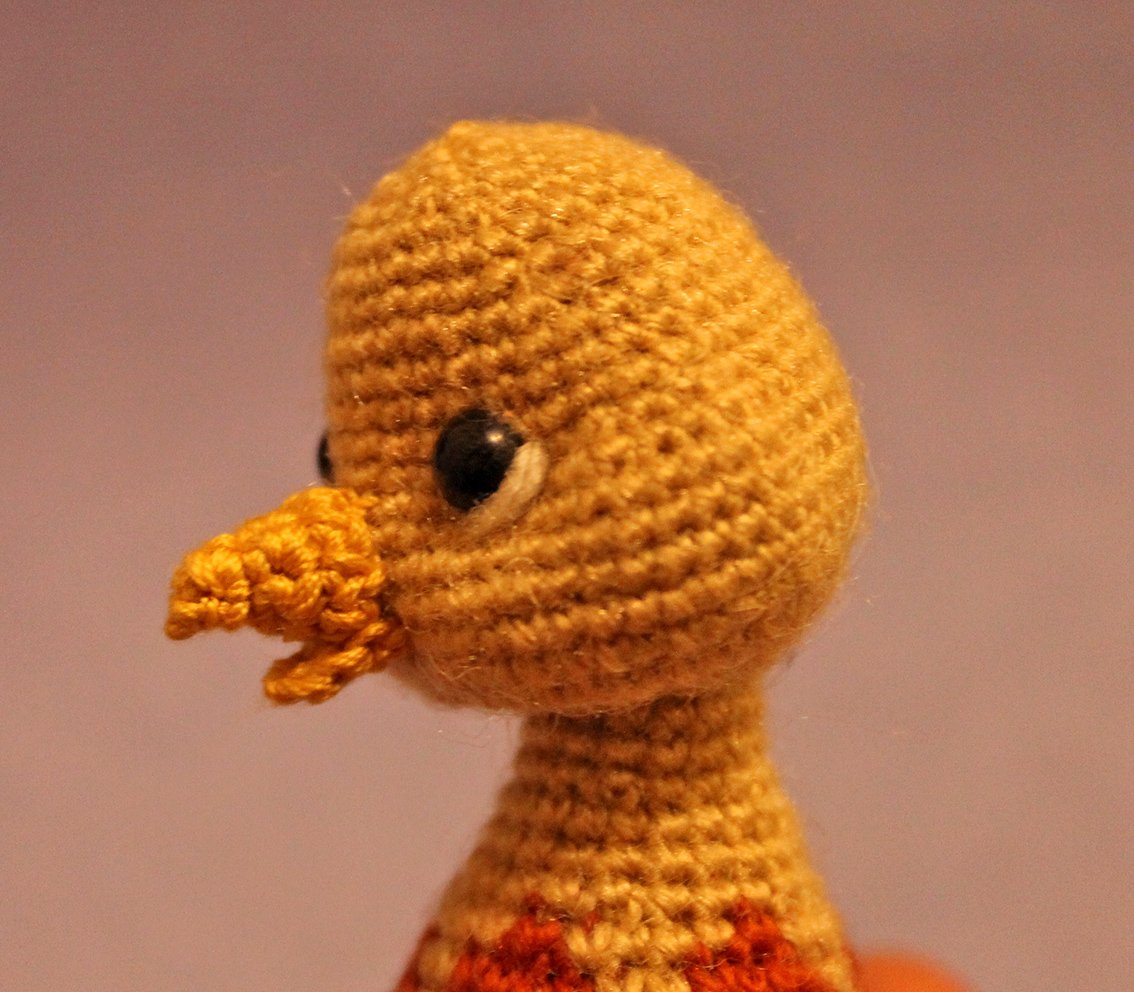
The 2nd variant of the beak is open. To do this, crochet another part, the lower one.
Row 1. 2 ch, in 2nd ch from hook: 2 sc, 1 ch, turn = 2
Row 2. 1 inc, 1 sc = 3
Fasten off, cut the thread, leaving long tail for sewing. Sew it on.
The 3rd version of the beak, made of polymer clay.
Using some polymer/self-hardening clay make a triangular beak. Shape the nose bridge with your fingers, bend the tip downwards, make a line with a toothpick to divide the beak into two parts. Using a toothpick make the nostrils at the upper part of the beak. Bake your polymer clay following the instructions on the package or leave your self-hardening clay to dry as long as required. Cover the beak with some varnish.
I used polymer clay by Fimo. Instead of baking I chose to boil the beak in water for 10 minutes. Should you decide to boil your clay make sure you do not use the same casserole for making food.
.jpg)
Attach the comb and beard to the rooster with some dressmaking pins.
Sew the comb and beard to the head.
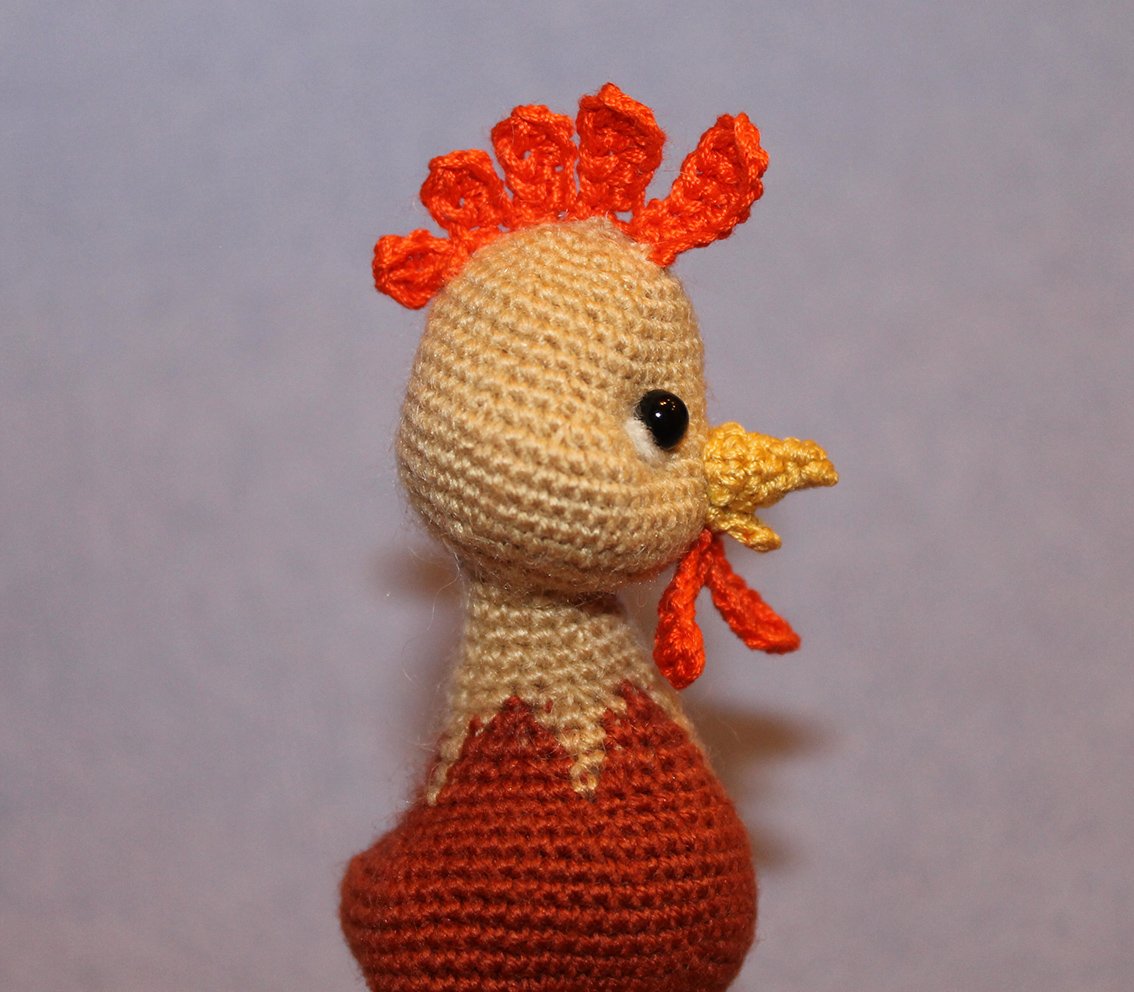
Sew the wings to the sides, pierce through the initial ch of the wings. Make sure you position the long feather at the bottom. Sew the tail to the body.
You may tint your rooster with any suitable means. Should you choose to make the rooster with fluffy yarn you may want to brush it with a hook and loop tape or a pet brush.
Your rooster is completed!
.JPG)


