
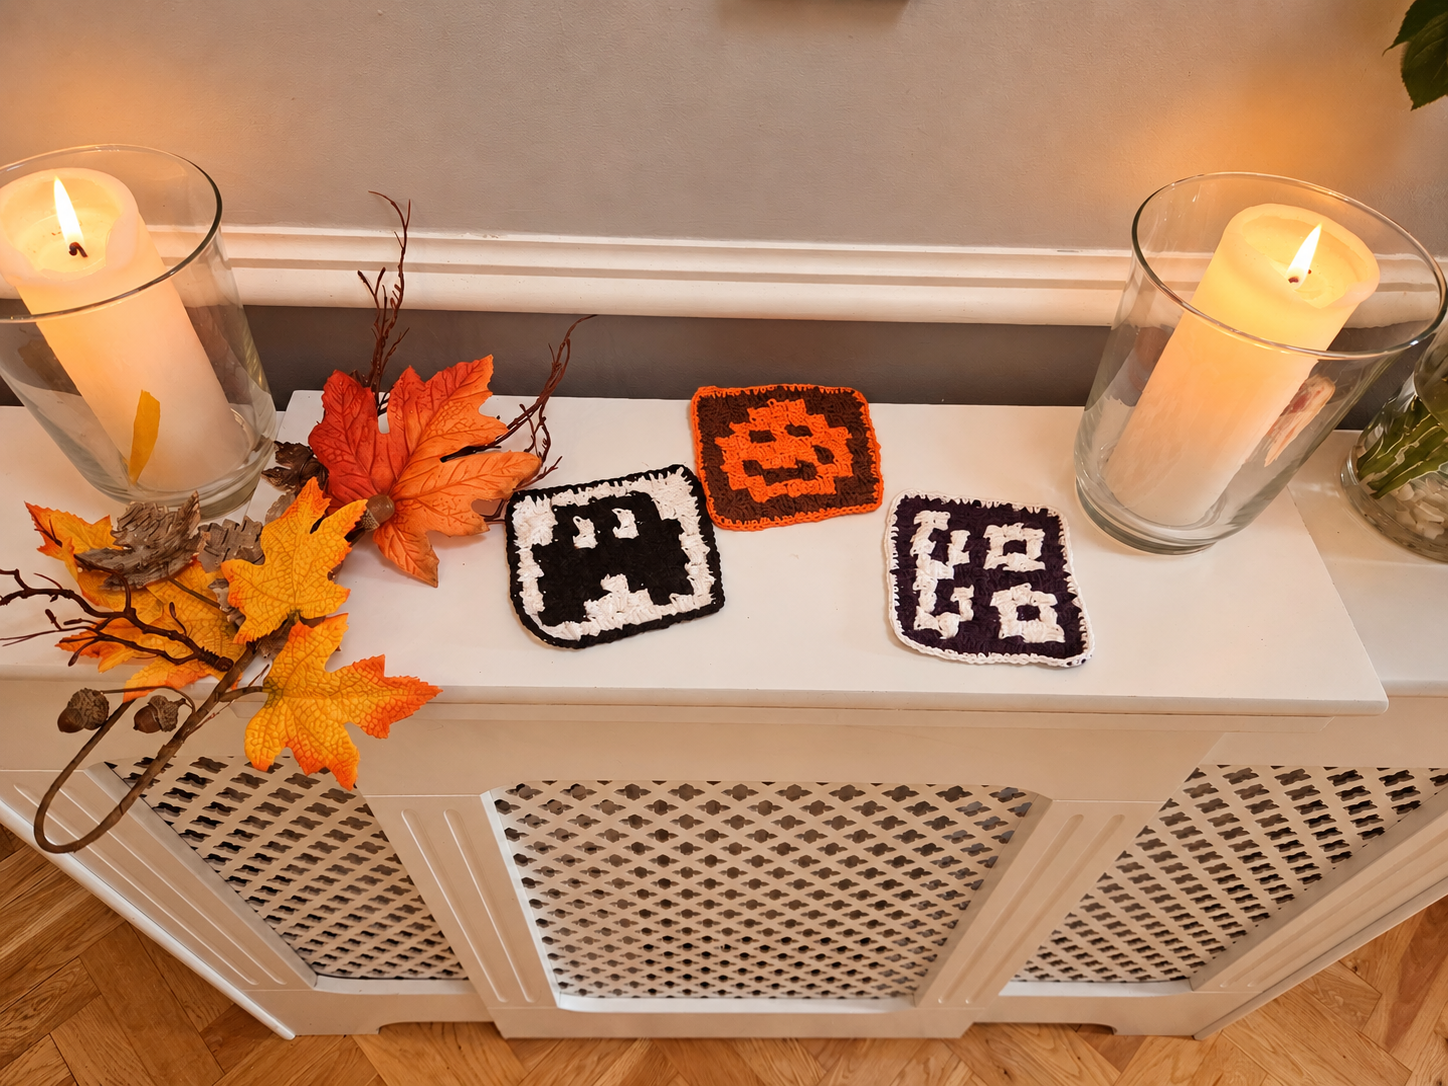
This is a free crochet pattern for three Halloween table decorations that are also perfect as coasters. They are worked using the C2C technique. Basic knowledge of this technique is required, as the pattern does not explain step by step how C2C crochet works.
But don’t worry if you are new to C2C. You can find a great blog post here that shows you exactly how C2C crochet works:
https://www.crazypatterns.net/de/blog/4837/how-to-work-c2c-a-beginner-s-guide-to-the-corner-to-corner-crochet-technique
Size:
Approx. 11 x 11 cm
With yarn of the same gauge, 9 x 9 blocks in the C2C pattern measure 10 x 10 cm.
Material:
DK yarn (50gr. = 125 m) in the following colours:
White: 14 gr. (W)
Black: 7 gr. (B)
Violet: 7 gr. (V)
Brown: 7 gr. (B)
Orange: 5 gr. (O)
(if you use a different weighted yarn you might need more or less of the yarn)
Crochet hook 3 mm
The Pattern is written in US terms:
St: Stitch
Ch: Chain
Slst: Slip stitch
CH: Chain stitch
DC: Double Crochet
SS: Slip Stitch
Block: A Block always consists of the beginning Ch and the 3 Double Crochet.
Info:
For each row, I briefly indicate whether it is an increase or decrease row, followed by how the row begins (6 chain stitches or 3 slip stitches and 3 chain stitches).
As an example for this:
Row 9: Increase: ch 6, 1 B, 4 S, 1 Br, 3 S (9 blocks)
This means that row 9 is an increase row. It begins with 6 chain stitches, followed by the blocks: 1 block in blue, 4 blocks in sand, 1 block in brown, and 3 blocks in sand. In total, the row consists of 9 blocks.
Colour change:
Work the last double crochet until just before the end, but do not pull through the final loop yet. Yarn over with the new colour and complete the double crochet with the new colour. Always let the unused yarn fall to the back side.
The Pumpkin:
In Orange and Brown
.png)
1. Row:
Cast on 6 Ch and work the first Block in Sand.
2. Row:
Increase: 6 Ch, 2 B (2 Blocks)
3. Row:
Increase: 6 Ch, 3 B (3 Blocks)
4. Row:
Increase: 6 Ch, 1 B, 2 O, 1 B (4 Blocks)
5. Row:
Increase: 6 Ch, 1 B, 3 O, 1 B (5 Blocks)
6. Row:
Increase: 6 Ch, 1 B, 1 O, 2 B, 1 O, 1 B (6 Blocks)
7. Row:
Increase: 6 Ch, 1 B, 3 O, 1 B, 1 O, 1 B (7 Blocks)
8. Row:
Increase: 6 Ch, 1 B, 1 O, 1 B, 3 O, 2 B (8 Blocks)
9. Row:
Increase: 6 Ch, 2 B, 1 O, 1 B, 3 O, 1 B (9 Blocks)
10. Row:
Decrease: 3 Slst + 3 Ch, 1 B, 1 O, 1 B, 3 O, 2 B (8 Blocks)
11. Row:
Decrease: 3 Slst + 3 Ch, 1 B, 2 O, 1 B, 2 O, 1 B (7 Blocks)
12. Row
Decrease: 3 Slst + 3 Ch, 1 B, 4 O, 1 B (6 Blocks)
13. Row:
Decrease: 3 Slst + 3 Ch, 1 B, 3 O, 1 B (5 Blocks)
14. Row:
Decrease: 3 Slst + 3 Ch, 4 B (4 Blocks)
15. Row:
Decrease: 3 Slst + 3 Ch, 3 B (3 Blocks)
16. Row:
Decrease: 3 Slst + 3 Ch, 2 B (2 Blocks)
17. Row:
Decrease: 3 Slst + 3 Ch, 1 B (1 Block)
Cut off the thread and sew the Ends. How to work the Border is explained at the very end.
.jpg)
The Ghost:
In Black and White
.png)
1. Row:
Cast on 6 Ch and work the first Block in White.
2. Row:
Increase: 6 Ch, 2 W (2 Blocks)
3. Row:
Increase: 6 Ch, 1 W, 1 B, 1 W (3 Blocks)
4. Row:
Increase: 6 Ch, 1 W, 2 B, 1 W (4 Blocks)
5. Row:
Increase: 6 Ch, 1 W, 2 B, 2 W (5 Blocks)
6. Row:
Increase: 6 Ch, 2 W, 3 B, 1 W (6 Blocks)
7. Row:
Increase: 6 Ch, 1 W, 3 B, 3 W (7 Blocks)
8. Row:
Increase: 6 Ch, 1 W, 5 B, 2 W (8 Blocks)
9. Row:
Increase: 6 Ch, 2 W, 1 B, 1 W, 4 B, 1 W (9 Blocks)
10. Row:
Decrease: 3 Slst + 3 Ch, 1 W, 4 B, 1 W, 1 B, 1 W (8 Blocks)
11. Row:
Decrease: 3 Slst + 3 Ch, 1 W, 2 B, 1 W, 2 B, 1 W (7 Blocks)
12. Row:
Decrease: 3 Slst + 3 Ch, 1 W, 2 B, 1 W, 1 B, 1 W (6 Blocks)
13. Row:
Decrease: 3 Slst + 3 Ch, 1 W, 3 B, 1 W (5 Blocks)
14. Row:
Decrease: 3 Slst + 3 Ch, 2 W, 1 B, 1 W (4 Blocks)
15. Row:
Decrease: 3 Slst + 3 Ch, 3 W (3 Blocks)
16. Row:
Decrease: 3 Slst + 3 Ch, 2 W (2 Blocks)
17. Row:
Decrease: 3 Slst + 3 Ch, 1 W (1 Block)
Cut off the thread and sew the Ends. How to work the Border is explained at the very end.
.jpg)
The Boo:
In Violet and White
.png)
1. Row:
Cast on 6 Ch and work the first Block in Violet.
2. Row:
Increase: 6 Ch, 2 V (2 Blocks)
3. Row:
Increase: 6 Ch, 1 V, 1 W, 1 V (3 Blocks)
4. Row:
Increase: 6 Ch, 1 V, 2 W, 1 V (4 Blocks)
5. Row:
Increase: 6 Ch, 1 V, 1 W, 1 V, 1 W, 1 V (5 Blocks)
6. Row:
Increase: 6 Ch, 2 V, 2 W, 2 V (6 Blocks)
7. Row:
Increase: 6 Ch, 1 V, 1 W, 1 V, 1 W, 3 V (7 Blocks)
8. Row:
Increase: 6 Ch, 1 V, 2 W, 2 V, 2 W, 1 V (8 Blocks)
9. Row:
Increase: 6 Ch, 1 V, 1 W, 1 V, 1 W, 1 V, 1 W, 1 V, 1 W, 1 V (9 Blocks)
10. Row:
Decrease: 3 Slst + 3 Ch, 1 V, 1 W, 3 V, 2 W, 1 V (8 Blocks)
11. Row:
Decrease: 3 Slst + 3 Ch, 1 V, 1 W, 1 V, 3 W, 1 V (7 Blocks)
12. Row:
Decrease: 3 Slst + 3 Ch, 1 V, 1 W, 1 V, 1 W, 2 V (6 Blocks)
13. Row:
Decrease: 3 Slst + 3 Ch, 3 V, 1 W, 1 V (5 Blocks)
14. Row:
Decrease: 3 Slst + 3 Ch, 1 V, 2 W, 1 V(4 Blocks)
15. Row:
Decrease: 3 Slst + 3 Ch, 1 V, 1 W, 1 V (3 Blocks)
16. Row:
Decrease: 3 Slst + 3 Ch, 2 V (2 Blocks)
17. Row:
Decrease: 3 Slst + 3 Ch, 1 V (1 Block)
Cut off the thread and sew the Ends.
.jpg)
Work the border:
For the border, I used the “pattern colour” for each design, so orange for the pumpkin, black for the ghost and white for the Boo. This creates a nice contrast.
I simply attached the yarn somewhere with a slip stitch and then worked single crochet stitches all the way around. I worked one single crochet into each stitch and 2 single crochet stitches along each side of a double crochet. In the corners, I always worked 1 chain stitch.
I finished the border by joining with a slip stitch into the first single crochet.
I hope you did enjoy my pattern, If you crochet this pattern I would appreciate a comment how you got along and if you upload a photo of your make on Instagram, please don’t forget to tag and follow me @_lovelyyarns
You can find a lot more free crochet and knitting patterns here on my Blog on Crazypatterns just click on the tap posts on the very top of this entry. And if you like follow me on Crazypatterns so you won’t miss any new blog entries with free Patterns.
Schnell zur Zielseite
Community & Hilfe


