
Butterflies have always fascinated me as a motif. Maybe because they are delicate and eye-catching at the same time – and because their shape translates so beautifully into stitches.
That’s how my crochet top BUTTERFLY came about a few years ago. The large-scale lace pattern resembles little butterflies, and to this day, that’s exactly what I love most about this top.
And because butterflies apparently don’t let go of me that easily, they found their way onto my needles again later – this time knitted. But I’ll come back to that later. 😉
Today, let’s start with the crochet BUTTERFLY.
I originally wrote the pattern for sizes S–XL and designed it with a fairly close fit. Today, I would do that a little differently.
Not the pattern – that can stay exactly as it is. 🦋
But why should BUTTERFLY only work as a close-fitting top?
This airy pattern is perfect for a top with a little more room. Or a little more length. Or even a relaxed tunic to throw on in summer when you’re sitting in the garden or heading to the beach.
So first, you’ll find the complete free pattern for the original BUTTERFLY in sizes S - XL.
And then we’ll make something a little different out of it.
I’ll show you how to make BUTTERFLY to your own measurements without worrying about standard sizes – wider, longer, or both. In the end, you decide exactly how you want your top to fit.
Because that’s exactly the idea behind my initiative:
Style knows no size. 💛
🦋 The BUTTERFLY Crochet Top
.png)
BUTTERFLY is a lightweight summer top featuring a striking, large-scale lace pattern.
What makes it special is not only the look, but also its simple construction.
The Front and Back are worked identically without any increases or decreases. The pieces are then joined, and the short sleeves are crocheted directly onto the armholes.
This makes BUTTERFLY a lovely summer project where the pattern itself gets to take centre stage.
What You’ll Need
For the original design, I used PRO LANA RIKOTTO.
Yarn requirements:
- Size S: approx. 125 g / 450 m (492 yds)
- Size M: approx. 175 g / 630 m (689 yds)
- Size L: approx. 225 g / 810 m (886 yds)
- Size XL: approx. 300 g / 1,080 m (1,181 yds)
Crochet hooks: 4.0 mm (UK 8 / US G-6) and 3.5 mm (UK 9 / US E-4)
You will also need a yarn needle for weaving in the ends and joining the pieces, as well as a pair of scissors.
If You’d Like to Use a Different Yarn
If the original yarn is no longer available or you would simply prefer to use a different summer yarn, that’s no problem at all.
The name on the yarn label is less important than the characteristics of the yarn – and, above all, whether your chosen substitute gives you the required gauge.
I’ve explained in detail how to find a suitable yarn substitute in my #StitchWisdom article:
👉 #StitchWisdom: Original Yarn Discontinued? 6 Steps to Find the Right Yarn Substitute
For BUTTERFLY, I would choose a comfortable summer yarn that feels good against the skin and allows the open butterfly pattern to show beautifully.
And then, unfortunately, there’s no getting around it:
The gauge swatch – yes, again 😄
Especially when making a garment, your gauge doesn’t just determine whether your finished top will have the intended measurements.
For BUTTERFLY, we’ll need it for something else later on too: it will help you easily adapt the top to your own measurements.
For the main pattern:
1 pattern repeat in width = approx. 10 cm (4 in)
1 pattern repeat in height = approx. 10 cm (4 in)
Those two little numbers are going to come in pretty handy later on.
Abbreviations
This pattern uses UK crochet terminology. The corresponding US terms are shown in brackets.
To help you follow the instructions and crochet charts easily, here are the abbreviations used throughout the pattern:
ch – chain
sl st – slip stitch
dc (US sc) – double crochet
htr (US hdc) – half treble crochet
tr (US dc) – treble crochet
ttr (US tr) – triple treble crochet
qtr (US dtr) – quadruple treble crochet
st – stitch
hook – crochet hook
edge st – edge stitch
[ … ] – repeat the instructions within the square brackets continuously
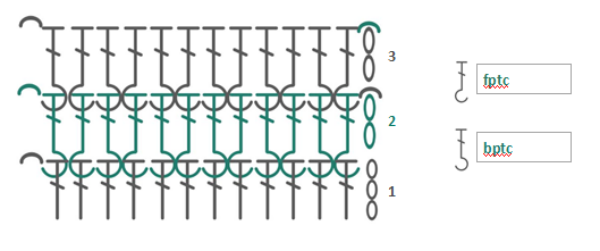
fptc (US fpdc) – front post treble crochet:
Yarn over once, insert the hook from front to back and then to front again around the post of the treble crochet in the previous row, and complete the treble crochet as usual.
bptc (US bpdc) – back post treble crochet:
Yarn over once, insert the hook from back to front and then to back again around the post of the treble crochet in the previous row, and complete the treble crochet as usual.
Pattern A – The Butterfly Pattern
The main pattern is worked row by row.
The stitch count is a multiple of 26 + 13 stitches.
One complete pattern section initially consists of 12 rows. To continue in height, Rows 5–12 are then repeated as indicated in the pattern.
Row 1
Ch 15 and work 1 dc into the last foundation ch. This creates the first loop, which also replaces the edge st.
Then ch 15, skip 12 sts of the foundation row and work 1 tr into the next st.
Now repeat continuously:
[ Ch 15, skip 12 sts and work 1 dc, ch 15 and 1 more dc into the next st. Then ch 15 again, skip 12 sts and work 1 tr into the next st. ]
Row 2
Ch 5 to replace the edge st.
Then ch 3 and work 1 dc into the first ch-15 space of the previous row.
Now repeat continuously:
[ Ch 7, work 7 tr into the ch-15 loop of the previous row, ch 7, 1 dc into the next ch-15 space, ch 7 and 1 dc into the next ch-15 space. ]
To finish, ch 7 and work 4 tr into the last ch-15 loop of the previous row.
Row 3
Ch 1 to replace the edge st.
Then work 1 dc, 1 htr and 2 tr into the same st.
Now repeat continuously:
[ Ch 3, 1 dc into the next ch-7 space, ch 6, 1 dc into the next ch-7 space, ch 6, 1 dc into the next ch-7 space and ch 3.
Then work 2 tr into the same st, 1 htr, 3 dc, 1 htr and 2 tr into the same st. ]
To finish, ch 3, work 1 dc into the next ch-7 space, ch 6 and 1 dc into the 5th ch of the edge st of the previous row.
Row 4
Ch 5 to replace the edge st.
Then ch 3, work 1 dc into the first ch-6 space of the previous row and ch 5.
Now repeat continuously:
[ Work 2 tr into the same st, 1 htr, 1 dc, 3 sl st, 1 dc, 1 htr and 2 tr into the same st.
Then ch 5, work 1 dc into the next ch-6 space, ch 7, 1 dc into the next ch-6 space and ch 5. ]
To finish, work 2 tr into the same st, 1 htr, 1 dc and 2 sl st.
Row 5
Ch 6 to replace the edge st.
Skip 4 sts and work 1 ttr into the last tr of the previous row. Then ch 15.
Now repeat continuously:
[ Work 1 dc, ch 15 and 1 more dc into the next ch-7 space. Then ch 15.
Now work 1 ttr into the first tr of the previous row, 1 qtr into the centre sl st of the previous row and 1 ttr into the last tr of the previous row, and work these 3 sts together. Then ch 15. ]
To finish, work 1 dc, ch 7 and 1 ttr into the 5th ch of the edge st of the previous row.
Row 6
Ch 3 to replace the edge st.
Work 3 tr into the end loop of the previous row.
Now repeat continuously:
[ Ch 7, work 1 dc into the next ch-15 space, ch 7, 1 dc into the next ch-15 space, ch 7 and 7 tr into the next ch-15 loop of the previous row. ]
To finish, ch 7, work 1 dc into the next ch-15 space, ch 3 and 1 ttr into the 6th ch of the edge st of the previous row.
Row 7
Ch 1 to replace the edge st.
Then ch 6, work 1 dc into the first ch-7 space of the previous row and ch 3.
Now repeat continuously:
[ Work 2 tr into the same st, 1 htr, 3 dc, 1 htr and 2 tr into the same st.
Then ch 3, work 1 dc into the next ch-7 space, ch 6, 1 dc into the next ch-7 space, ch 6, 1 dc into the next ch-7 space and ch 3. ]
To finish, work 2 tr into the same st, 1 htr and 2 dc.
Row 8
Ch 1 to replace the edge st.
Then work 1 sl st, 1 dc, 1 htr and 2 tr into the same st.
Now repeat continuously:
[ Ch 5, work 1 dc into the next ch-6 space, ch 7, 1 dc into the next ch-6 space and ch 5.
Then work 2 tr into the same st, 1 htr, 1 dc, 3 sl st, 1 dc, 1 htr and 2 tr into the same st. ]
To finish, ch 5, work 1 dc into the next ch-6 space, ch 3 and 1 ttr.
Row 9
Ch 15 and work 1 dc into the ttr of the previous row. This creates another loop, which also replaces the edge st.
Now repeat continuously:
[ Ch 15.
Then work 1 ttr into the first tr of the previous row, 1 qtr into the centre sl st of the previous row and 1 ttr into the last tr of the previous row, and work these 3 sts together.
Then ch 15 and work 1 dc, ch 15 and 1 more dc into the next ch-7 space. ]
To finish, ch 15. Then work 1 ttr into the first tr of the previous row and 1 qtr into the edge st of the previous row, and work these 2 sts together.
Row 10
Ch 5 to replace the edge st.
Then ch 3, work 1 dc into the first ch-15 space of the previous row and ch 7.
Now repeat continuously:
[ Work 7 tr into the next ch-15 loop of the previous row, ch 7, 1 dc into the next ch-15 space, ch 7, 1 dc into the next ch-15 space and ch 7. ]
To finish, work 4 tr into the end loop of the previous row.
Row 11
Ch 1 to replace the edge st.
Then work 1 dc, 1 htr and 2 tr into the same st.
Now repeat continuously:
[ Ch 3, work 1 dc into the next ch-7 space, ch 6, 1 dc into the next ch-7 space, ch 6, 1 dc into the next ch-7 space and ch 3.
Then work 2 tr into the same st, 1 htr, 3 dc, 1 htr and 2 tr into the same st. ]
To finish, ch 3, work 1 dc into the next ch-7 space, ch 6 and 1 dc into the 5th ch of the edge st of the previous row.
Row 12
Ch 5 to replace the edge st.
Then ch 3, work 1 dc into the first ch-6 space of the previous row and ch 5.
Now repeat continuously:
[ Work 2 tr into the same st, 1 htr, 1 dc, 3 sl st, 1 dc, 1 htr and 2 tr into the same st.
Then ch 5, work 1 dc into the next ch-6 space, ch 7, 1 dc into the next ch-6 space and ch 5. ]
To finish, work 2 tr into the same st, 1 htr, 1 dc and 2 sl st.
To continue in height, repeat Rows 5–12 continuously.
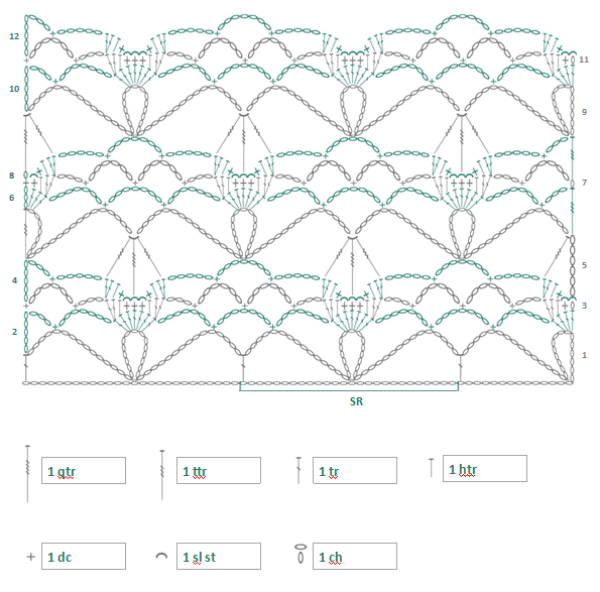
Crochet Chart
In addition to the written instructions, you can also use the crochet chart as a guide.
For this particular pattern, it is definitely worth taking a look at the chart. With all those chain spaces, the row-by-row instructions may seem more complicated at first than the pattern actually is to crochet. The chart makes it much easier to see how the individual chain spaces come together and how the little butterflies gradually begin to take shape.
Pattern B – Ribbing in Post Stitches
For the small sleeves, a simple ribbing pattern using front and back post treble crochet stitches is worked.
Round 1:
Ch 3 to replace the first tr, then work 1 tr into each st and join the round with a sl st.
Round 2:
Ch 2 to replace the first tr. Then alternate 1 fptc and 1 bptc around. Join the round with a sl st.
Round 3:
Work as for Round 2.
Then repeat Round 2 as required.
Crochet Chart
Let’s Start Crocheting
The top is basically worked in Pattern A without any increases or decreases.
The Front and Back are identical.
Front
Using a 4.0 mm crochet hook, ch:
S: ch 93
M: ch 119
L: ch 145
XL: ch 171
First, work 2 preparation rows in dc. In the 1st row, work the first dc into the 3rd ch from the hook.
Then change to Pattern A.
Work Rows 1–12 of the butterfly pattern once in full.
Then continue in the pattern repeat of Rows 5–12:
Sizes S and M: work a total of 29 additional rows
Sizes L and XL: work a total of 37 additional rows
Always finish with Pattern Row 9.
Then work the following finishing row:
Ch 5 to replace the edge st.
Then ch 3 and work 1 dc into the first ch-15 space of the previous row.
Next, ch 7 and work 1 dc into the next ch-15 loop of the previous row.
Now repeat continuously:
[ Ch 7 and work 1 dc into the next ch-15 space of the previous row.
Then ch 7 and work 1 dc into the next ch-15 loop.
Ch 7 once more and work 1 dc into the following ch-15 loop. ]

Back
Work the Back in the same way as the Front.
Finishing
First, wet block both pieces and allow them to dry completely.
Then place the Front and Back together with the wrong sides facing each other.
Sew the side seams from the bottom edge up to the armholes.
Then sew the shoulder seams, leaving the centre open for the neckline.
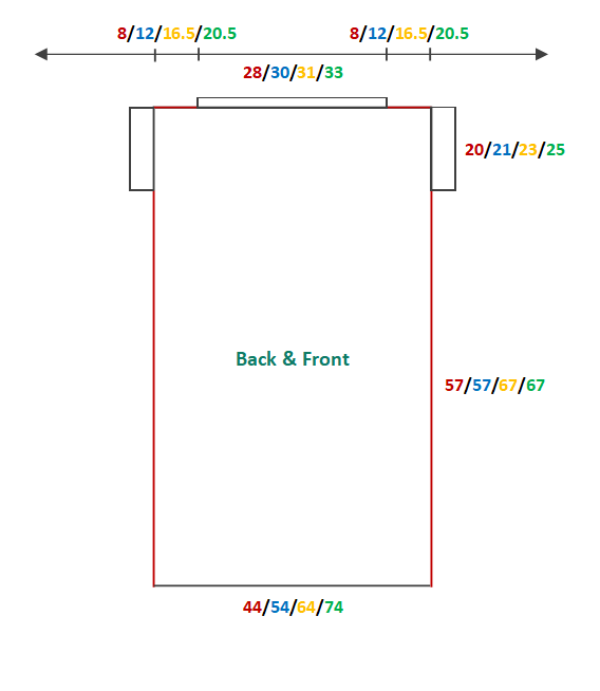
Schematic
The schematic shows all the important measurements for your size. All measurements are given in cm.
Please note that the schematic is not drawn to scale – always use the stated measurements rather than the proportions of the drawing as your guide.
The red lines indicate where the Front and Back will be sewn together.
Sleeves
Using a 3.5 mm crochet hook, work
64 / 68 / 74 / 80 tr
evenly around the armholes for sizes S / M / L / XL and join to work in the round.
Then work 5 rounds in Pattern B.
Finally, work 3 rounds of dc around the neckline and weave in all ends carefully.
And with that, your classic BUTTERFLY Summer Top is finished.
💛 Style Knows No Size – Your BUTTERFLY, Your Measurements
So, now we’re going to do something with BUTTERFLY that wasn’t part of the original pattern. 😄
When I first designed the top, I intended it to have a fairly close fit. I still like it that way – but today, I would also make a second version.
A little wider, a little longer and with a lovely relaxed fit.
The butterfly pattern is actually perfect for this. I can easily imagine BUTTERFLY as a longer tunic worn over slim trousers or shorts. Or as an airy top for relaxing in the garden. And, of course, as a beach cover-up over a bikini or swimsuit.
And I’m definitely not going to create a size chart from XS to 5XL for that. 😉
Because we don’t need one.
We’ll simply use your measurements.
.png)
Measurements Instead of Size Stress
The easiest way to do this is with a little trick: grab a top from your wardrobe that fits the way you like it.
Not necessarily your favourite one – we only need it for measuring. 😄
Lay it flat and measure the width from one side edge to the other.
Now you can decide how you want your new BUTTERFLY to fit. About the same width? A little more relaxed? Or would you like to turn it into a really loose, oversized tunic?
With the butterfly pattern, we can use the individual pattern repeats as a guide. With the gauge of the original design, one pattern repeat measures approximately 10 cm (4 in) in width.
That already gives you a good starting point:
| Desired Width | Foundation Chain |
|---|---|
| approx. 44 cm (17.3 in) | ch 93 |
| approx. 54 cm (21.3 in) | ch 119 |
| approx. 64 cm (25.2 in) | ch 145 |
| approx. 74 cm (29.1 in) | ch 171 |
| approx. 84 cm (33.1 in) | ch 197 |
| approx. 94 cm (37 in) | ch 223 |
You already know the first four values from the original pattern. For even more width, we simply continue the pattern, as the stitch count for BUTTERFLY is a multiple of 26 + 13 stitches.
This gives us, for example, 197 ch for a width of approximately 84 cm (33.1 in), or 223 ch for approximately 94 cm (37 in).
But – and here it comes again – your gauge matters. 😄
The measurements in the table only work if your yarn, hook and personal crochet tension give you approximately the same gauge as the original.
If your pattern repeat isn’t 10 cm (4 in) wide, that’s no problem at all. Simply measure your own repeat and use that measurement for your calculations.
And How Long Should BUTTERFLY Be?
You have plenty of freedom here too.
Depending on the size, the original top is approximately 57 cm (22.4 in) or 67 cm (26.4 in) long. If you like that length, simply keep it as it is.
If you’d like to turn it into a tunic or dress, just keep crocheting.
Maybe you only want a few extra centimetres. Maybe you’d like BUTTERFLY to reach mid-thigh. And if you’re making a really airy beach cover-up, of course, it can be even longer.
Again, the pattern itself is a useful guide: with the original gauge, one pattern repeat measures approximately 10 cm (4 in) in height. This gives you a good idea before you start of how many additional pattern sections you might want to add.
And every now and then, you’re also allowed to simply hold the piece up against yourself and see whether you like the length. Not everything in life has to be calculated. 😉
🦋 Your Relaxed BUTTERFLY Tunic
If you now feel like trying the wider version, let’s quickly go through the steps together.
- Take a top with a width you like and measure it flat from one side edge to the other.
- Crochet a gauge swatch in the BUTTERFLY pattern and measure one complete pattern repeat.
- Decide how wide you want your BUTTERFLY to be and choose the corresponding number of pattern repeats. Remember our formula: a multiple of 26 + 13 stitches.
- Now crochet two identical rectangles in your desired width and length.
- Once both pieces are finished, block them and allow them to dry completely.
- Then sew the shoulder seams, leaving as much space open in the centre for the neckline as feels comfortable for you.
- Finally, sew the side seams from the bottom upwards. How far you close them depends on how large you want your armholes to be.
And when it comes to the sleeves, you have a choice again.
If you’ve made your BUTTERFLY nice and wide, you can simply leave the armholes as they are. The extra width naturally creates a relaxed, dropped-shoulder sleeve.
If you prefer a finished edge, work the post-stitch ribbing around the armholes just as you did for the original BUTTERFLY.
You can do the same with the neckline: either leave it plain or follow the original version and finish it with a few rounds of dc.
And that brings us right back to what I mean by “Style knows no size.”
You can crochet the original BUTTERFLY exactly as I designed it back then. Maybe that closer-fitting shape is exactly right for you.
Or perhaps you’d prefer it wider. Or longer. Or as a tunic.
Then that’s exactly what we’ll make it.
Because in the end, you shouldn’t have to fit into a particular size.
The garment should fit you. Not the other way around. 💛
🧶 And If You Prefer Knitting …
I already gave it away at the beginning: one BUTTERFLY simply wasn’t enough for me. 😄
So, some time later, the butterflies found their way onto my needles once again – but this time onto my knitting needles.
.png)
The result is a completely different summer top, but once again, little butterflies are hidden within the lace pattern – the very detail that gave the design its name. 🦋
And here’s the pattern in English.
I recently revisited this BUTTERFLY as well. The original knitting pattern has been completely revised and restructured, with additional explanations on how to customise the fit to your own measurements.
🧶 Now It’s Your Turn!
Maybe you’ll crochet BUTTERFLY just as it was originally designed. Maybe yours will be wider, longer or even become an airy tunic. Or perhaps, after all these butterflies, you’re one of those who would rather pick up the knitting needles after all. 😉
Whatever your BUTTERFLY ends up looking like: experiment, make changes and adapt it until it feels just right for you. After all, that’s exactly what our stitches are for. 💛
📸 If you crochet or knit BUTTERFLY, I’d love to see your finished projects here on CrazyPatterns.
I always love seeing how differently the same idea can turn out – which colours you choose, which yarns you use and what you might do completely differently from what I originally had in mind.
✨ And if you enjoy my posts, I’d be delighted if you followed me here on CrazyPatterns. That way, you won’t miss any new #FreeStitches with free knitting and crochet patterns or new #StitchWisdom posts with tips, ideas and practical know-how about knitting and crochet.
.png)
🧡 Perhaps you'll also enjoy exploring more articles on my CrazyPatterns blog - or maybe you'll discover your next favourite pattern in my shop.
I hope you have lots of fun crocheting, knitting, experimenting – and, of course, creating your very own BUTTERFLY. 🦋
All the best,
Kathrin with Emma & Muki
Photos, designs & content © Kathrin | stricken-im-trend.com


