
There are patterns that begin at a desk. And then there are patterns that begin with a person.
This one definitely belongs to the second category.
Many years ago, my best friend had a baby. Of course, I didn't want to give her just any gift. I wanted to make something personal. Something from the heart that might be cherished for years and perhaps bring a smile to her face when we look back on it one day.
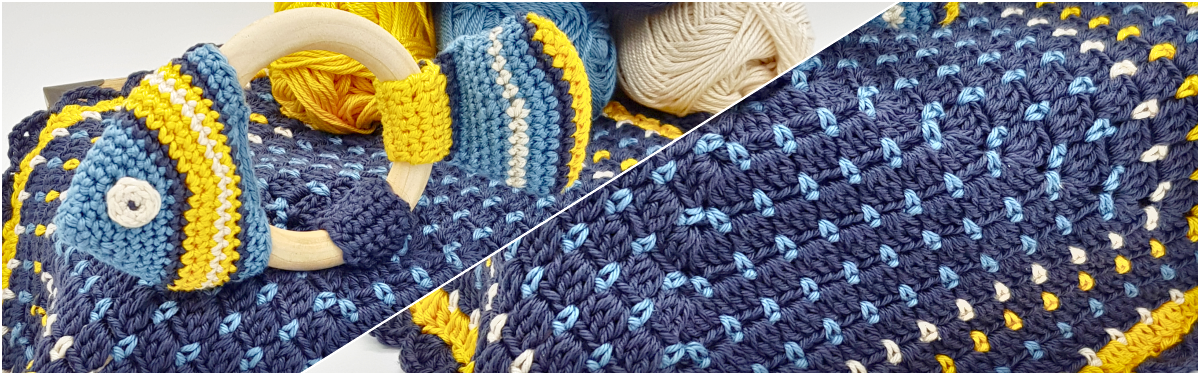
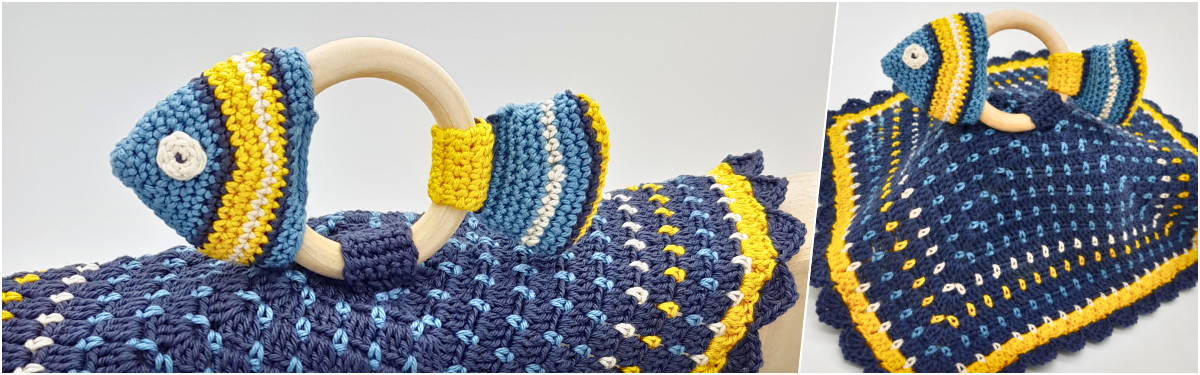
That's how this little fish-shaped baby lovey came to life.
Why a little fish?
There's a very personal reason for that. 😊
It's a little inside joke between my best friend and me – and I think some stories are simply meant to remain our own little secrets.
Many years later, the daughter of my ex-husband's partner – yes, I know... 😂 – had a little boy named Leano. When I heard his nursery was going to have a nautical theme, this little lovey immediately came back to mind.
I took the old pattern out of the drawer, crocheted the little fish once again and couldn't help smiling. Some ideas simply never grow old.
At that moment, I thought how sad it would be if only one baby ever got to enjoy this little lovey.
And that's exactly why today feels like the perfect time to share this pattern with you.
When Little Hands Grow Bigger
Leano is one year old now.
At first, the wooden ring had one very clear purpose: it was a teething ring. That's exactly what it was designed for. 😊
But over time, the little fish found a whole new purpose.
Today, Leano lovingly calls him "Lo".
And the wooden ring?
It has become the perfect little handle. Whether he's carrying him through the living room, out into the garden, or taking him to bed – "Lo" is usually right there with him.
It always makes me smile to see how naturally children decide what a toy or baby lovey is meant to be. Things we adults carefully plan often take on a completely new meaning through the eyes of a child.
That's exactly what I love about handmade gifts.
They don't just accompany a baby's first months – they grow along with the little personalities who love them. And sometimes, they even end up with a name of their own.
🐟 The Free Crochet Pattern
That's exactly why, from today on, this little fish officially has the name "Lo." ❤️
I'm truly delighted to share his story and the complete crochet pattern with you today.
I wish you lots of fun crocheting your own "Lo" and hope that he, too, will soon accompany a little one through life and become a much-loved companion.
And now, let's get started!
Materials Used
Online Linie 165 SANDY
Colours:
- No. 003 (corn yellow)
- No. 004 (natural)
- No. 064 (anthracite)
- No. 226 (indigo)
Of course, you can use any yarn you like – especially leftover yarn from previous projects.
Just make sure it is suitable for babies and young children.
Yarn Requirements
- No. 003: approx. 13 g = approx. 31.2 m (34.1 yds)
- No. 004: approx. 8 g = approx. 19.2 m (21.0 yds)
- No. 064: approx. 50 g = approx. 120.0 m (131.2 yds)
- No. 226: approx. 14 g = approx. 33.6 m (36.7 yds)
Crochet hook:
2.50 mm (UK 12 / US C-2)
You will also need:
- Untreated wooden ring made from natural wood | Outer diameter: 7 cm, inner diameter: 4.5 cm
- Yarn needle
- Polyester fibrefill (toy stuffing)
Finished Size
- Lovey: approx. 28 × 28 cm (11 × 11 in)
- Fish: approx. 15 × 7 cm (5.9 × 2.8 in)
Abbreviations: (UK Terms)
- ch = 1 chain
- dc (US sc) = 1 double crochet (US single crochet)
- tr (US dc) = 1 treble crochet (US double crochet)
- sl st = 1 slip stitch
- st / sts = stitch / stitches
- Magic Ring = Make a magic ring (or join 6 ch with 1 sl st to form a ring)
- [ … ] = Repeat the stitches enclosed in brackets
- Y x [ … ] = Repeat the sequence in brackets Y times
Lovey:
Crochet Chart (Diagram)
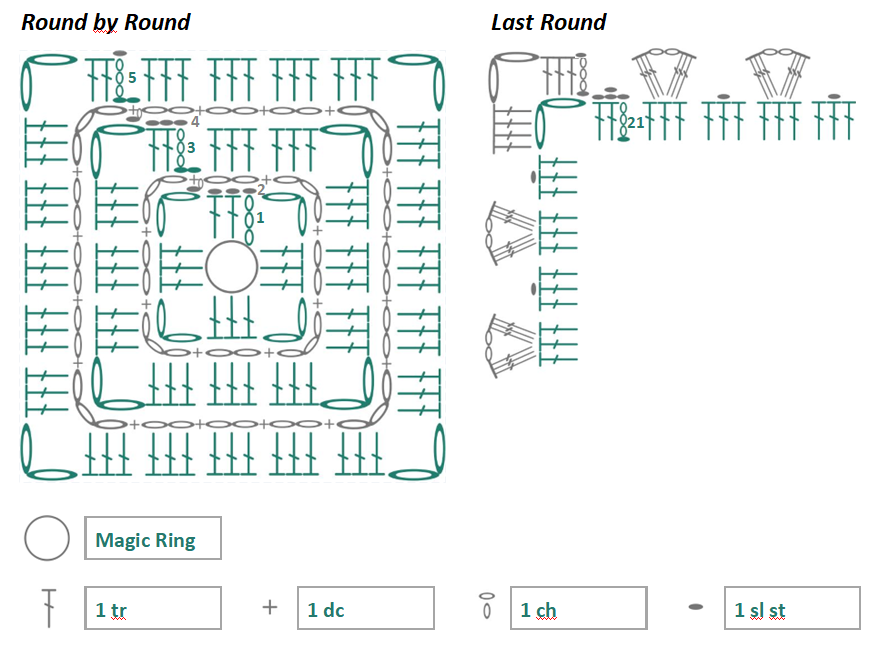
Round by Round:
Foundation Round: 1 Magic Ring
Round 1:
ch 3 (counts as first tr), 2 tr, ch 2,
[ 3 tr, ch 2 ], join with 1 sl st to close the round.
Round 2:
3 sl st, ch 1, 1 dc into the previously made sl st, ch 3,
[ 1 dc, ch 2, 1 dc, ch 3 ],
1 dc, ch 2, join with 1 sl st to close the round.
Round 3:
1 sl st, ch 3 (counts as first tr) into the previously made sl st, 2 tr, ch 2,
[ 9 tr, ch 2 ],
6 tr, join with 1 sl st to close the round.
Round 4:
3 sl st, ch 1, 1 dc into the previously made sl st, ch 3, 1 dc,
3× [ ch 2, 1 dc ], ch 3, 1 dc,
3× [ ch 2, 1 dc ], ch 3, 1 dc,
3× [ ch 2, 1 dc ], ch 3, 1 dc,
2× [ ch 2, 1 dc ], ch 2, join with 1 sl st to close the round.
Round 5:
1 sl st, ch 3 (counts as first tr) into the previously made sl st, 2 tr, ch 2,
[ 15 tr, ch 2 ],
12 tr, join with 1 sl st to close the round.
Continue by alternating Rounds 2 and 3 following the same principle.
Final Round:
3 sl st, ch 3 (counts as first tr) into the previously made sl st, 3 tr, ch 2,
4 tr, [ 1 sl st, 3 tr + ch 2 + 3 tr, …, 1 sl st, ch 2 ],
[ 1 sl st, 3 tr + ch 2 + 3 tr, …, 1 sl st ],
join with 1 sl st to close the round.
Instructions:
First, crochet the lovey in rounds and set it aside.
Next, crochet the fish. The head, part of the tail fin, and the eyes are worked in rounds. Unless otherwise stated, each round begins with ch 1 and ends with 1 sl st into the first ch.
The remaining part of the tail fin is worked in rows. Each row begins with 1 turning chain.
Finally, attach the fish with the wooden ring to the centre of the lovey.
Colour Sequence:
- Colour A: No. 064 (anthracite)
- Colour B: No. 226 (indigo)
- Colour C: No. 004 (natural)
- Colour D: No. 003 (corn yellow)
Assembly:
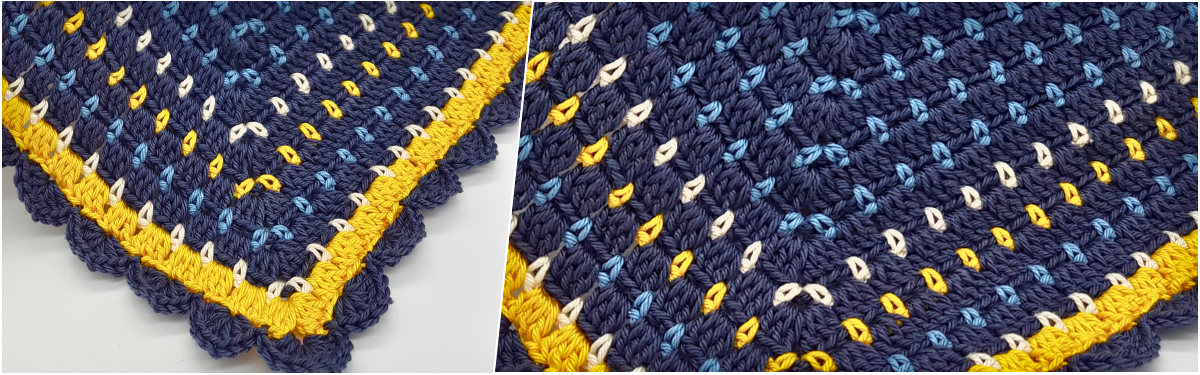
Lovey:
Work the baby lovey according to the crochet instructions above using the following colour sequence:
Magic Ring: Colour A
Round 1: Colour A
Round 2: Colour B
Round 3: Colour A
Round 4: Colour B
Round 5: Colour A
Round 6: Colour B
Round 7: Colour A
Round 8: Colour B
Round 9: Colour A
Round 10: Colour B
Round 11: Colour A
Round 12: Colour B
Round 13: Colour A
Round 14: Colour C
Round 15: Colour A
Round 16: Colour D
Round 17: Colour A
Round 18: Colour B
Round 19: Colour A
Round 20: Colour C
Round 21: Colour D
Round 22: Colour A (final round)
Fish:
Crochet the fish on the wooden ring according to the following instructions.
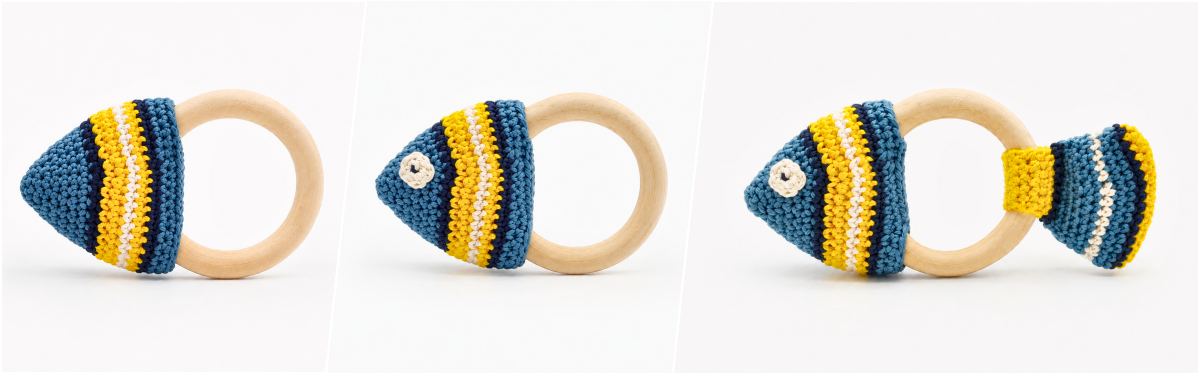
Head:
Round 1:
Using Colour B, ch 4. Starting in the 2nd ch from the hook:
2 dc in first st, 1 dc, 3 dc in last st,
continue along the opposite side of the foundation chain:: 2 dc (= 8 sts)
Round 2:
2 dc in first st, 7 dc (= 9 sts)
Round 3:
Increase in every 3rd st (= 12 sts)
Round 4:
Increase in every 4th st (= 15 sts)
Round 5:
Increase in every 5th st (= 18 sts)
Round 6:
Increase in every 6th st (= 21 sts)
Round 7:
Increase in every 7th st (= 24 sts)
Round 8:
Increase in every 8th st (= 27 sts)
Round 9:
Using Colour A, increase in every 9th st (= 30 sts)
Round 10:
Using Colour D, increase in every 10th st (= 33 sts)
Round 11:
Increase in every 11th st (= 36 sts)
Round 12:
Using Colour C, increase in every 12th st (= 39 sts)
Round 13:
Using Colour D, dc every 12th and 13th sts together (= 36 sts)
Round 14:
Using Colour A, dc every 11th and 12th sts together (= 33 sts)
Round 15:
Using Colour B, 33 dc (= 33 sts)
Round 16:
33 dc (= 33 sts)
Fasten off, leaving a long tail for sewing.
Eyes: (make 2)
Round 1:
Using Colour C, ch 2, work 6 dc into the first ch.
Fasten off, leaving a long tail for sewing.
Tail Fin:
Round 1:
Using Colour D, ch 14. Starting in the 2nd ch from the hook:
2 dc in first st, 11 dc, 3 dc in last st,
continue on the opposite side of the foundation chain: 12 dc (= 28 sts)
Round 2:
Using Colour A, 28 dc (= 28 sts)
Round 3:
Using Colour B, 28 dc (= 28 sts)
Round 4:
28 dc (= 28 sts)
Round 5:
Using Colour C, dc every 6th and 7th sts together (= 24 sts)
Round 6:
Using Colour B, 24 dc (= 24 sts)
Round 7:
dc every 5th and 6th sts together (= 20 sts)
Round 8:
20 dc (= 20 sts)
Round 9:
20 dc (= 20 sts)
Lay the tail fin flat and stuff lightly with polyester filling.
Using Colour A, work 10 dc along one side of the round only (= Row 1). Leave the remaining stitches of the round unworked.
From this point onwards, work in rows.
Row 2:
Using Colour D,
dc 2 sts together,
6 dc,
dc 2 sts together (= 8 sts)
Row 3:
8 dc (= 8 sts)
Row 4:
dc 2 sts together,
4 dc,
dc 2 sts together (= 6 sts)
Rows 5–9:
6 dc (= 6 sts)
Row 10:
2 dc in first st,
4 dc,
2 dc in last st (= 8 sts)
Row 11:
8 dc (= 8 sts)
Row 12:
Using Colour A,
2 dc in first st,
6 dc,
2 dc in last st (= 10 sts)
Fasten off, leaving a long tail for sewing.
Finishing:
Stuff the head lightly with polyester filling and fold it around the wooden ring.
Align the final round evenly and sew it closed using the long tail left at the end of the work.
Fold the rows of the tail fin around the wooden ring and sew Row 12 to Row 1.
Finally, sew the eyes in place and embroider the pupils using Colour A.
Place the lovey diagonally with the right side facing up.
Using Colour A, work a total of 6 dc from the centre outwards along Round 1 of the lovey.
Next, work 7 rows of dc.
Finally, position the wooden ring and attach it to the opposite side of the lovey, again working along Round 1.
Weave in all loose ends neatly.
A Little Wish from Me
Before we finish, I'd like to leave you with a few thoughts.
You probably know most of these already – but I simply sleep a little better knowing I've mentioned them anyway. 😊
When it comes to projects for babies and young children, it's about much more than beautiful colours, a lovely pattern, or a nice photo. The things we create with our own hands often become treasured companions for little ones, and that's exactly why I believe we also carry a special responsibility.
Babies discover the world with all their senses. They grab, cuddle, and naturally put many things into their mouths. That's why it's worth taking extra care when choosing materials and finishing your project.
These are the things that matter most to me:
- Use only high-quality yarns that are specifically suitable for babies and young children.
- Choose untreated or certified wooden rings or teething rings that are designed for babies.
- Weave in all yarn ends securely and check regularly that everything is still firmly attached.
- Avoid small parts that could become a choking hazard, such as buttons, beads, safety eyes, or loose embellishments.
- Wash the baby lovey regularly according to the care instructions of the yarn you have used. A little companion that is cuddled, chewed, and taken everywhere deserves a good wash from time to time.
- After every wash, take a moment to carry out a quick safety check. Make sure all seams are secure, no yarn ends have come loose, and the baby lovey shows no signs of wear before it goes back into little hands.
And finally, one small personal tip:
I always wash handmade baby gifts one more time before wrapping them. That's not only because of the baby, but also because of my two four-legged helpers, Emma and Muki. 😄 Even though they don't actually help with my crochet projects, the occasional dog hair somehow still finds its way onto the finished piece. Giving it a final wash simply makes me feel even better about gifting it.
A handmade gift should not only bring joy – it should also be a safe companion.
Because, in the end, the most beautiful thought is knowing that a baby lovey made with love may become a small part of someone's childhood.
💙 A Little Companion Rarely Comes Alone...
If you've enjoyed crocheting Lo and would like to create another heartfelt project, I'd love for you to meet my little bunny LORIS.
Just like Lo, he was created with lots of love – as a little friend to cuddle, comfort, and cherish.
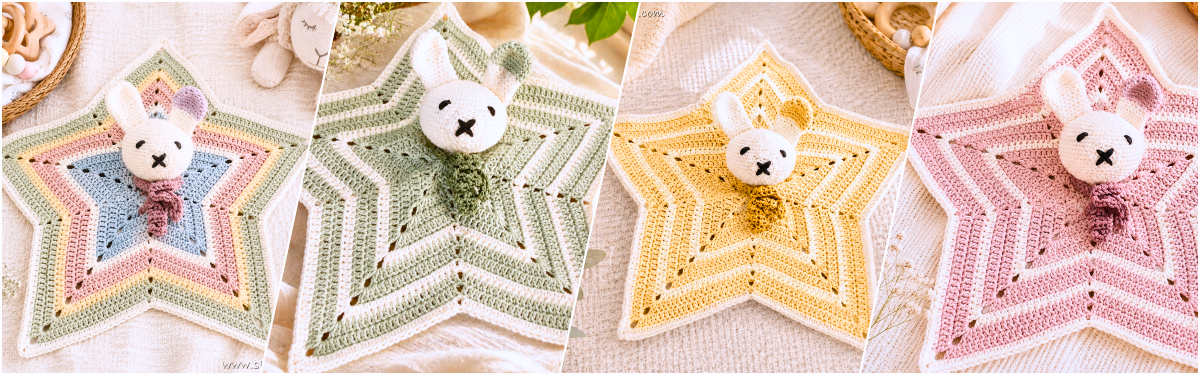
Perhaps LORIS will soon become part of your own family's story.
Simply click on the image to go directly to the crochet pattern.
When I design my patterns, I often think about the person first and the stitches second.
Perhaps that's exactly why some projects will always hold a very special place in my heart.
Sometimes, knitting and crochet are about so much more than stitches, rows, or finished projects.
They're about the stories behind them, the people we create them for, and the memories that grow with every handmade gift.
🧶 What about you?
Have you ever designed or made a knitting or crochet project for one very special person? Is there a handmade gift that you still remember with a smile today?
I'd love to hear your stories, memories, and experiences in the comments.
📸 If you crochet your own Lo, I'd love to see your finished baby loveys here on CrazyPatterns.
It always makes me so happy to see the beautiful colour combinations, little details, and personal touches you add to make each project your own.
✨ And if you've enjoyed my articles, I'd be delighted if you followed me here on CrazyPatterns. That way, you won't miss any new blog posts, heartfelt projects, or crochet and knitting patterns.
.png)
🧡 Perhaps you'll also discover a few more articles in my CrazyPatterns blog or find another pattern you'll enjoy in my shop.
With love,
Kathrin, Emma & Muki
Photos, designs & content © Kathrin | stricken-im-trend.com


