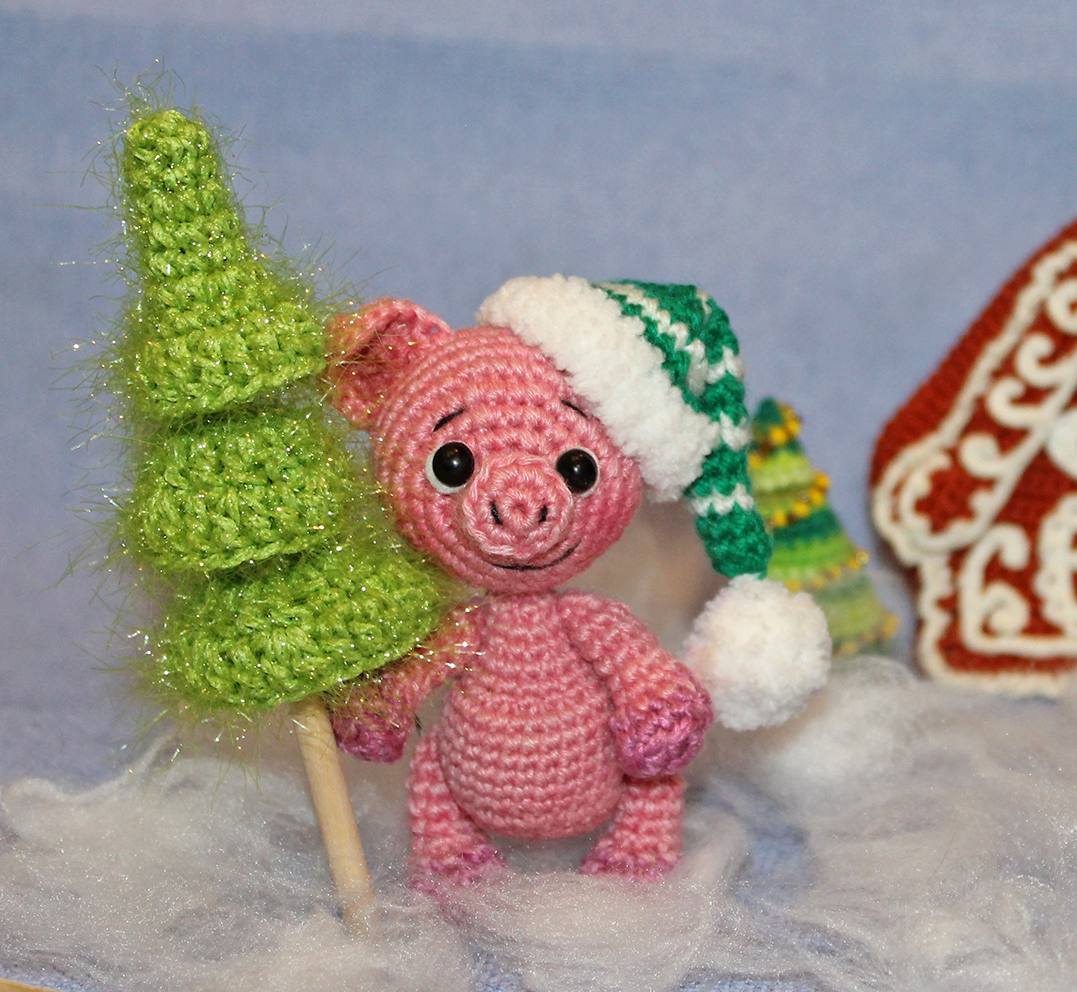
New Year's composition with a piglet
Materials:
You can choose the yarn at your discretion, of a similar color, composition and thickness. Cotton, acrylic, wool will do. I used 400 m/100g acrylic yarn. Yarn consumption depends on its thickness and a crochet hook size. The height of my piglet is 10 cm. Depending on the thickness of yarn a finished toy size may differ.
You can use any leftover yarn, as the amount needed is minimal. Yarn of the following colours is required:
For the piglet: dark pink or brown and pink.
For the cap: green, white and fluffy white
For the Christmas tree: green (it is better to choose textured yarn).
- A crochet hook, I used 1,25 mm crochet hook;
- A sewing needle, matching sewing threads;
- For embroidery: a few threads of brown or black;
- Hollow fibre for stuffing;
- All purpose clear transparent glue, e.g. UHU;
- For eyes: 2 half-beads or 1 pair of ready-made eyes (Choose the size individually. It depends on the size of your toy);
- A wooden stick for the trunk. I used a sushi chopstick;
- Suitable means for tinting (pink). I used a watercolor pencil (optional).
Abbreviations:
ch – chain
sl st – slip stitch
sc – single crochet
hdc – half double crochet
dc – double crochet
inc – increase (2 sc in 1 st)
6 inc – 6 increases in sequence
dec – decrease (single crochet two stitches together)
6 dec – 6 decreases in sequence
(...) x N times – repeat instructions in brackets N times
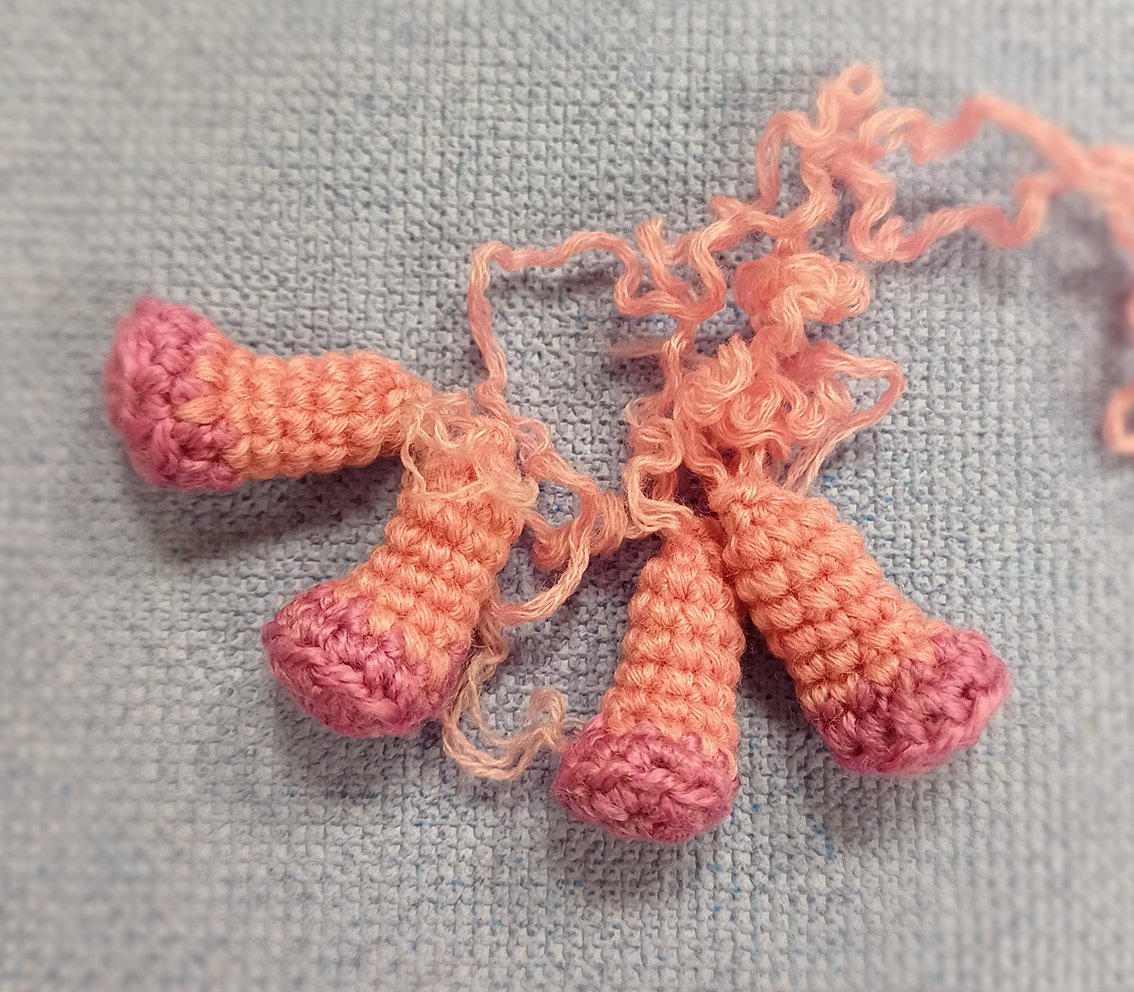
Paws (make 4)
Start with dark pink colour yarn.
Rnd 1: 6 sc in a Magic Ring
Rnd 2: 6 inc = 12
Rnd 3: into the back loops only 12 sc
Change to pink yarn
Rnd 4: 3 sc, 1 dec, 1 sc, 1 dec, 4 sc = 10
Rnd 5: 4 sc, 1 dec, 4 sc = 9
Rnd 6-9: (4 rounds) 9 sc
Add some hollow fibre.
Rnd 10: (single crochet three stitches together) х 3 times = 3
Pull off the loops. Cut the thread, hide the end.
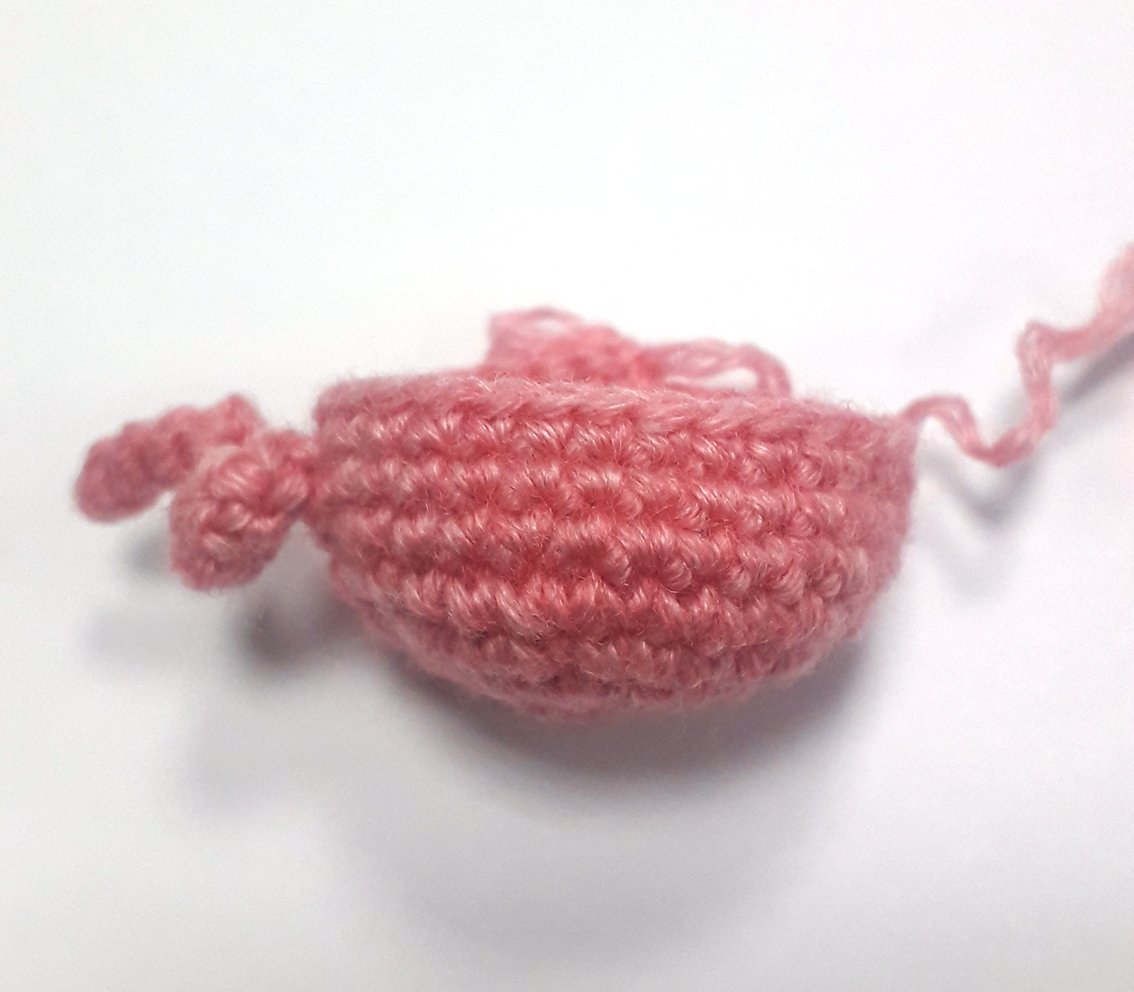
Body
Work with pink colour yarn.
Rnd 1: 6 sc in a Magic Ring
Rnd 2: 6 inc = 12
Rnd 3: (1 sc, 1 inc) х 6 times = 18
Rnd 4: (1 sc, 1 inc, 1 sc) х 6 times = 24
Rnd 5: (3 sc, 1 inc) х 6 times = 30
Rnd 6: 29 sc, 1 sl st, work 10 ch, starting from 2nd ch from hook: 3 sl st, (1 inc, 1 sc) х 3 times - It's a tail

Rnd 7-8: (2 rounds) 30 sc
Rnd 9: 26 sc, 2 dec = 28
Rnd 10: 2 dec, 24 sc = 26
Rnd 11: 26 sc
Rnd 12: 8 sc, 5 dec, 8 sc = 21
Rnd 13-14: (2 rounds) 21 sc
Add some hollow fibre.
Rnd 15: (1 dec, 1 sc) х 7 times = 14
Rnd 16: 14 sc
Rnd 17: 7 dec = 7
Add some hollow fibre.
Fasten off, cut the thread, leaving approx. 20-30 cm long tail for sewing.
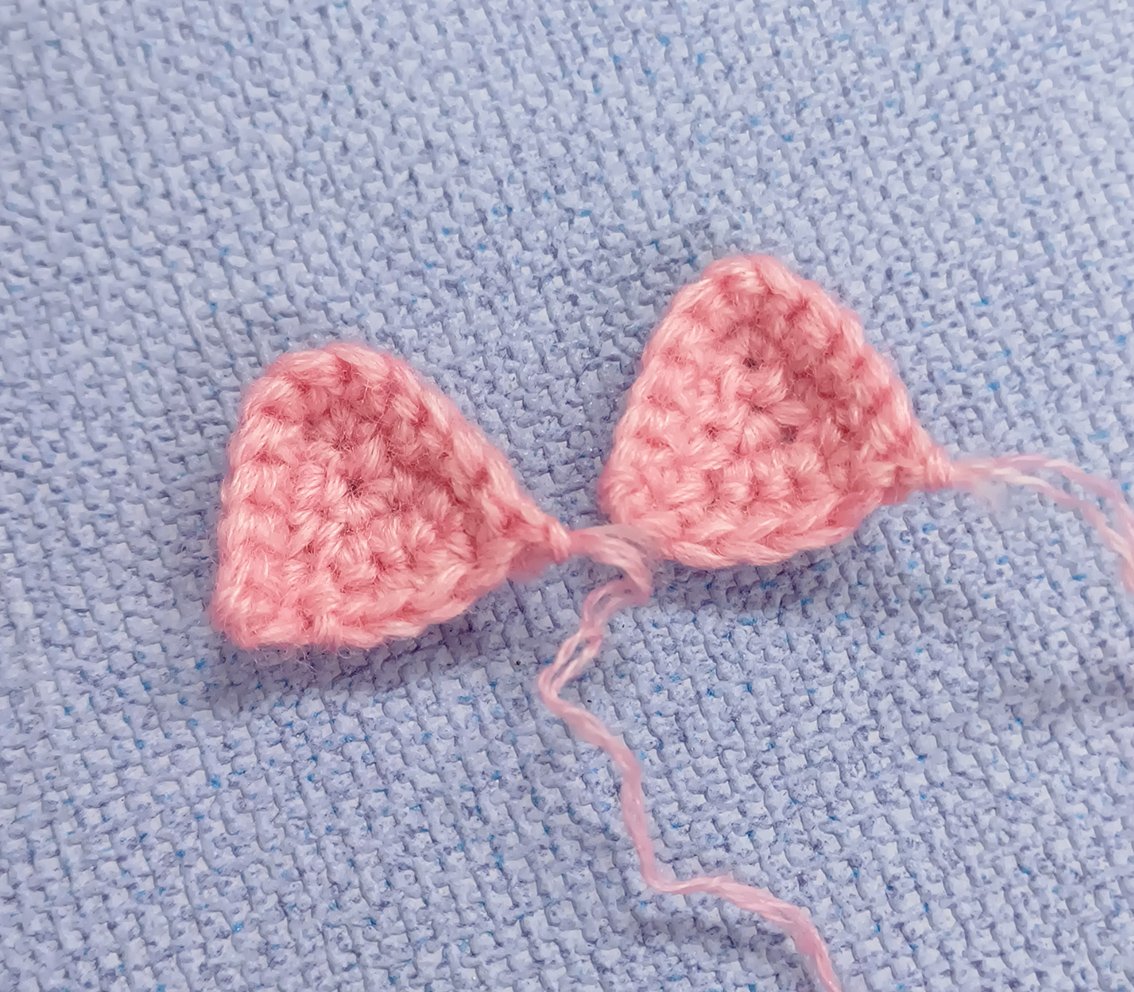
Ear (make 2)
Work 2 ch
1 Row. starting from 2nd ch from hook: 1 sc, 1 ch, turn = 1
2 Row. 1 inc, 1 ch, turn = 2
3 Row. 2 inc, 1 ch, turn = 4
4 Row. 4 sc, do not turn, crochet from A to B: 5 sc, 2 sc into point B, crochet from B to C: 5 sc
Fasten off, cut off.

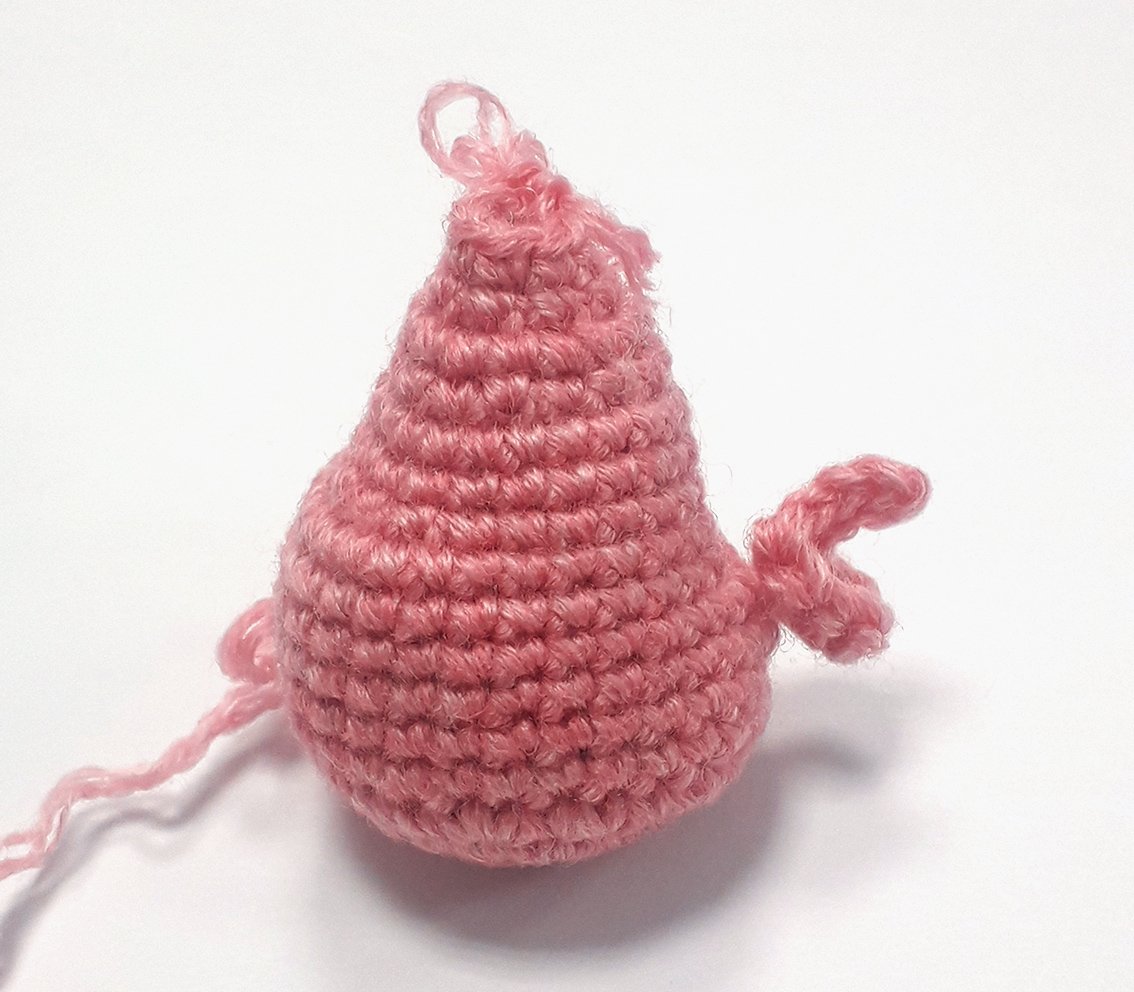
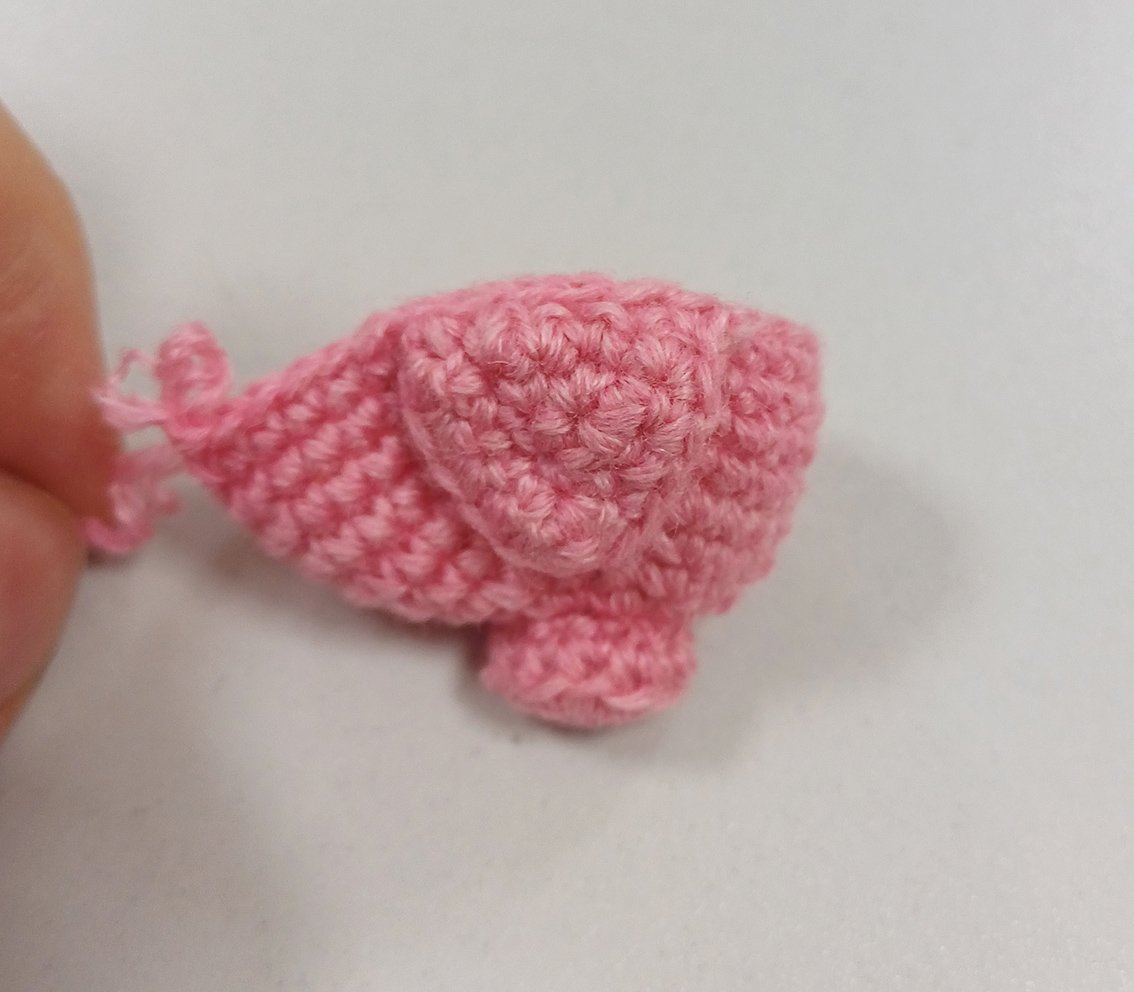
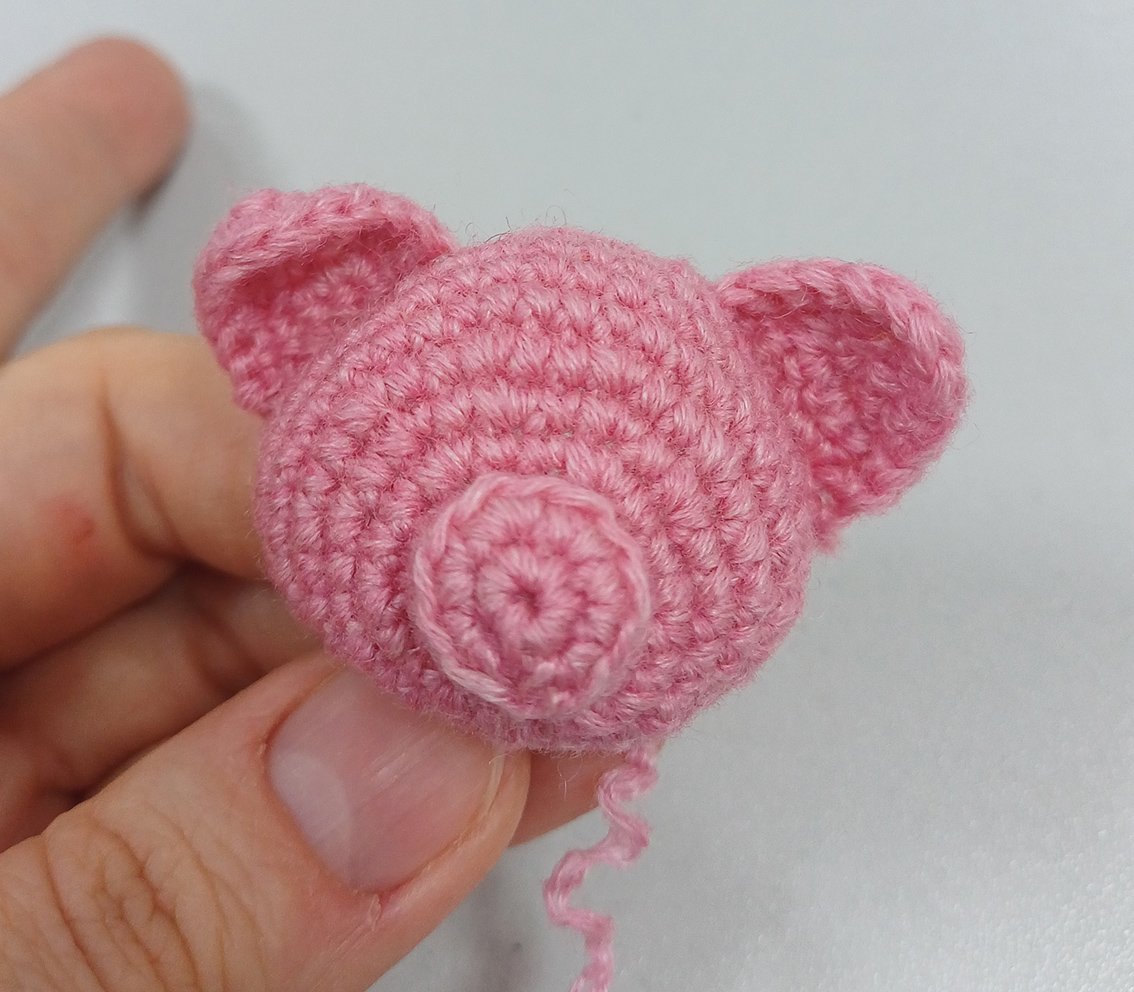
Head
Rnd 1. 6 sc in a Magic Ring
Rnd 2. 6 inc = 12
Work 1 sl st, transfer your place marker here
Rnd 3. into the back loops only 12 sc
Rnd 4. (2 sc, 1 dec) х 3 times = 9
Rnd 5. into the front loops only 9 inc = 18
Rnd 6. (1 sc, 1 inc, 1 sc) х 6 times = 24
Rnd 7. 6 sc, (1 inc, 1 sc) х 6 times, 6 sc = 30
Rnd 8. 7 sc, (1 inc, 2 sc) х 5 times, 1 inc, 7 sc = 36
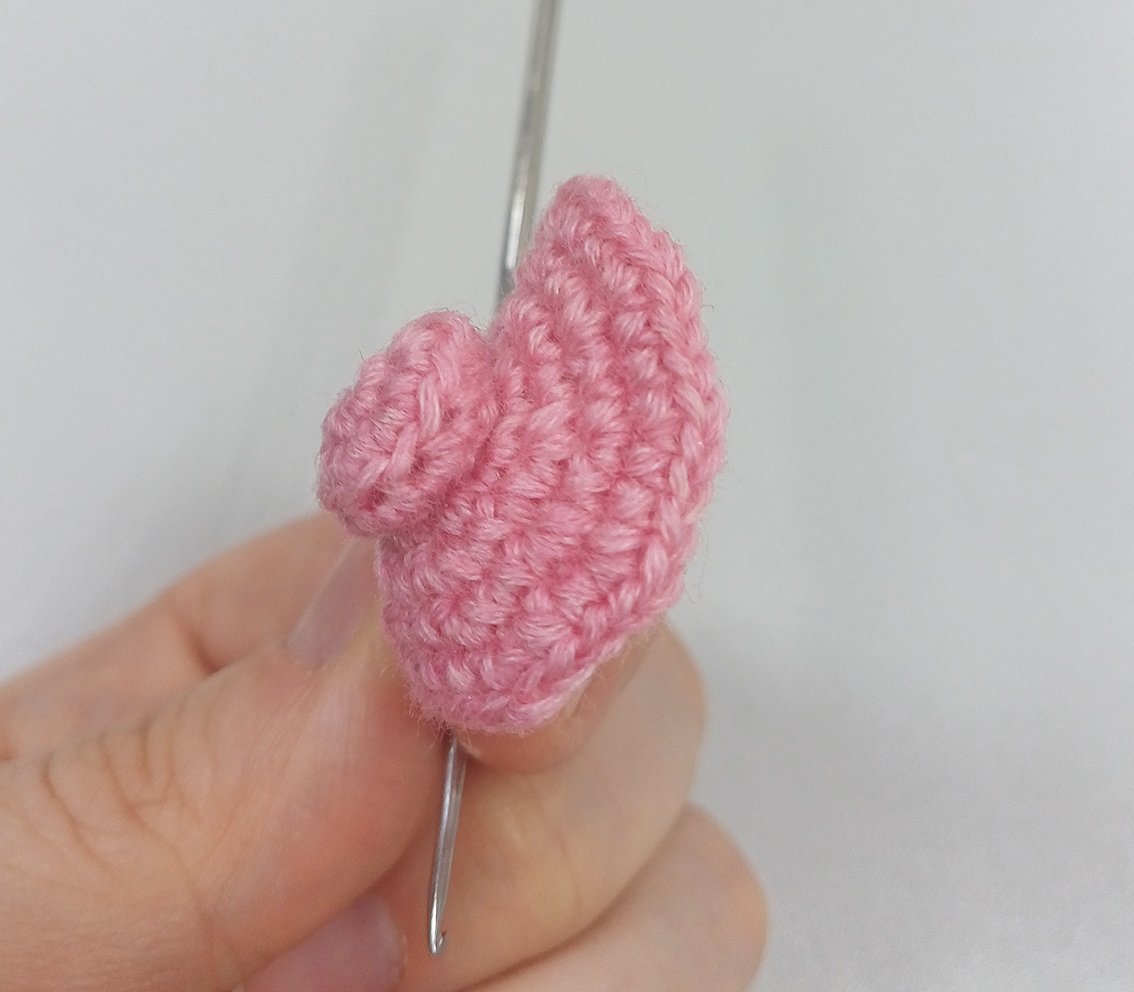
Rnd 9-10. (2 rounds) 36 sc
Join ears to the head in the next round, keep an eye on the symmetry of the toy.
Rnd 11. 9 sc, attach first ear, work the loops of the head and ear together: 6 sc, work into the loops of the head: 6 sc, attach second ear, work the loops of the head and ear together: 6 sc, work into the loops of the head: 9 sc = 36
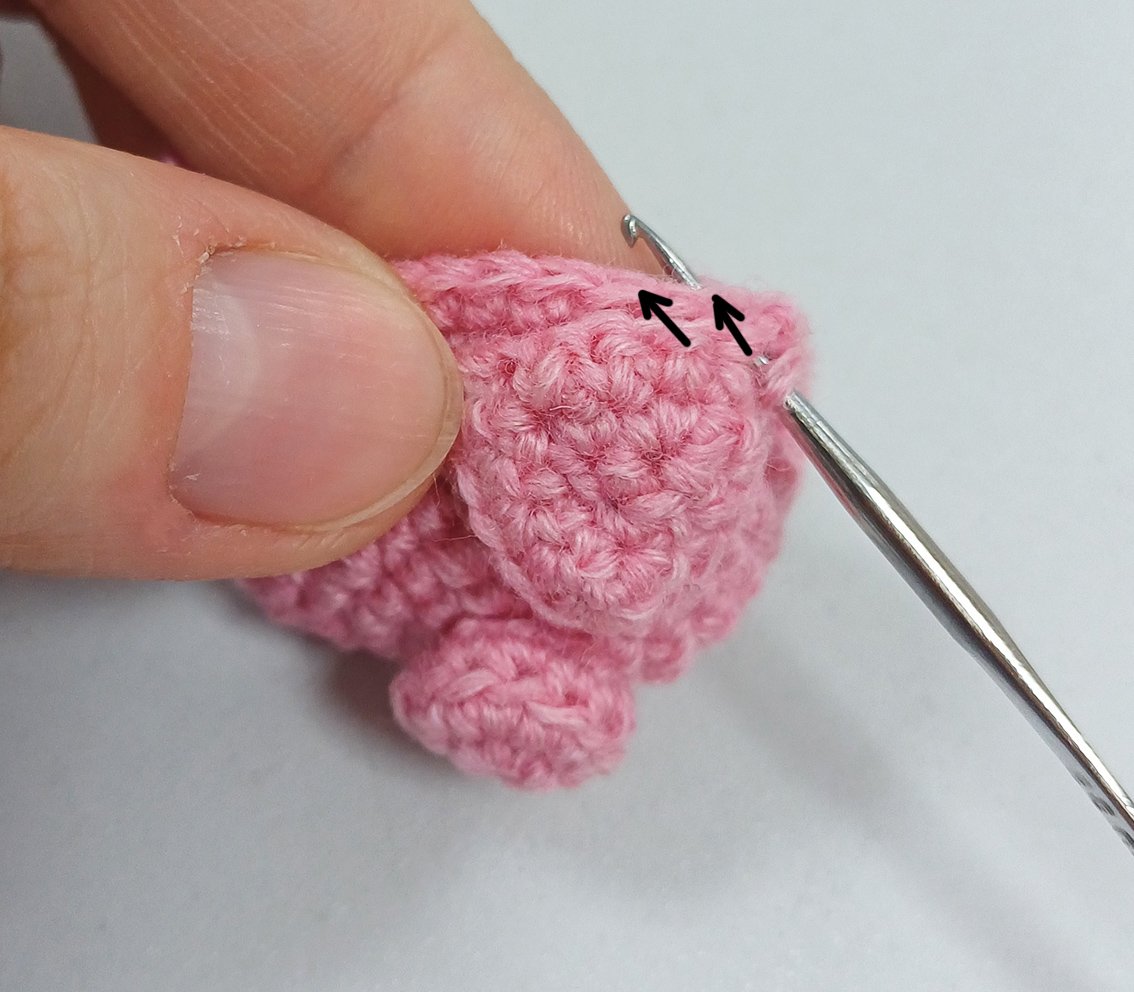
Rnd 12-13. (2 rounds) 36 sc
Rnd 14. 2 sc, 1 dec, (4 sc, 1 dec) х 5 times, 2 sc = 30
Rnd 15. 30 sc
Add some hollow fibre.
Rnd 16. (1 dec, 3 sc) х 6 times = 24
Rnd 17. 1 sc, 1 dec, (2 sc, 1 dec) х 5 times, 1 sc = 18
Rnd 18. (1 sc, 1 dec) х 6 times = 12
Rnd 19. 6 dec = 6
Add some hollow fibre.
Do not close off the loops of the last round just yet, you will do it later. You will do embroidery first and then hide yarn ends inside!
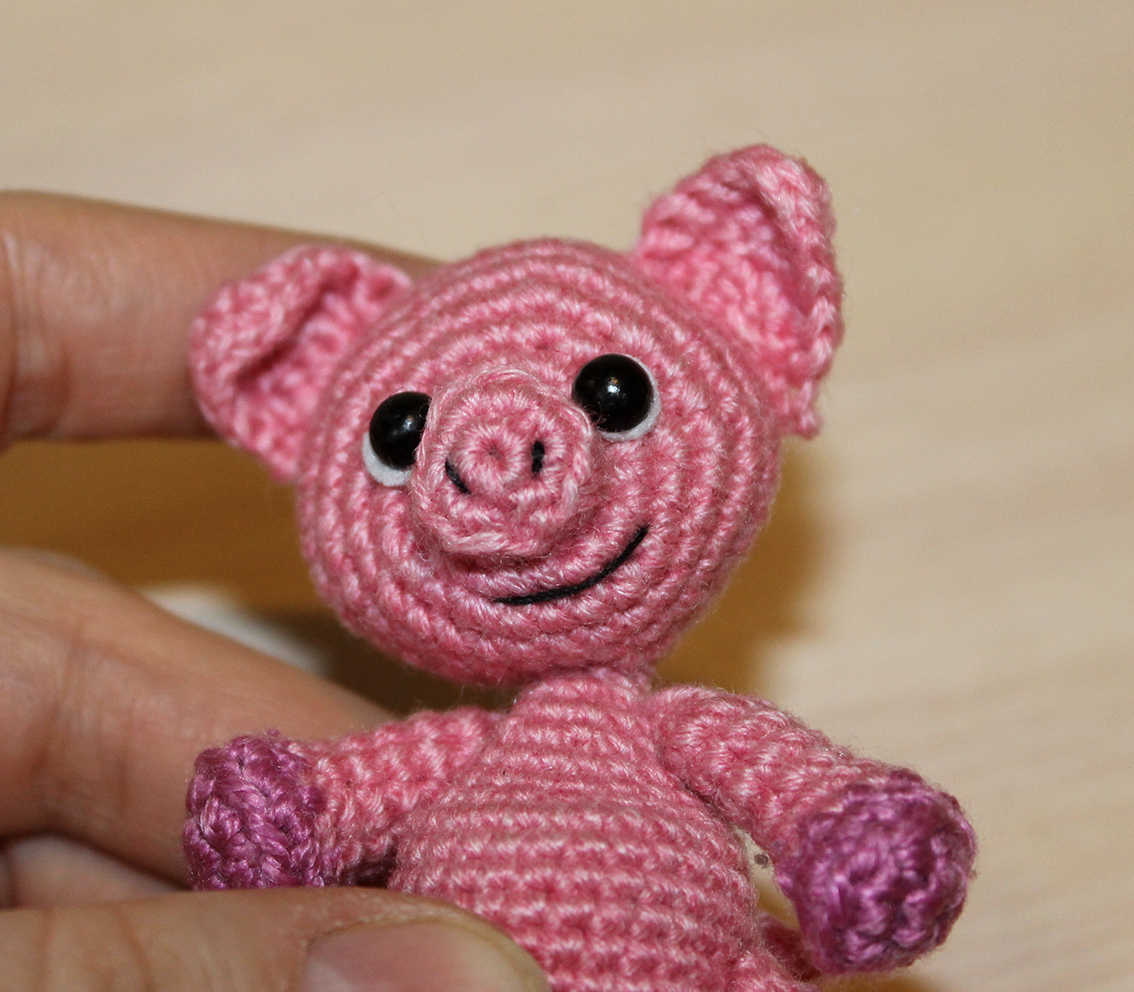
Sew the head to the body.
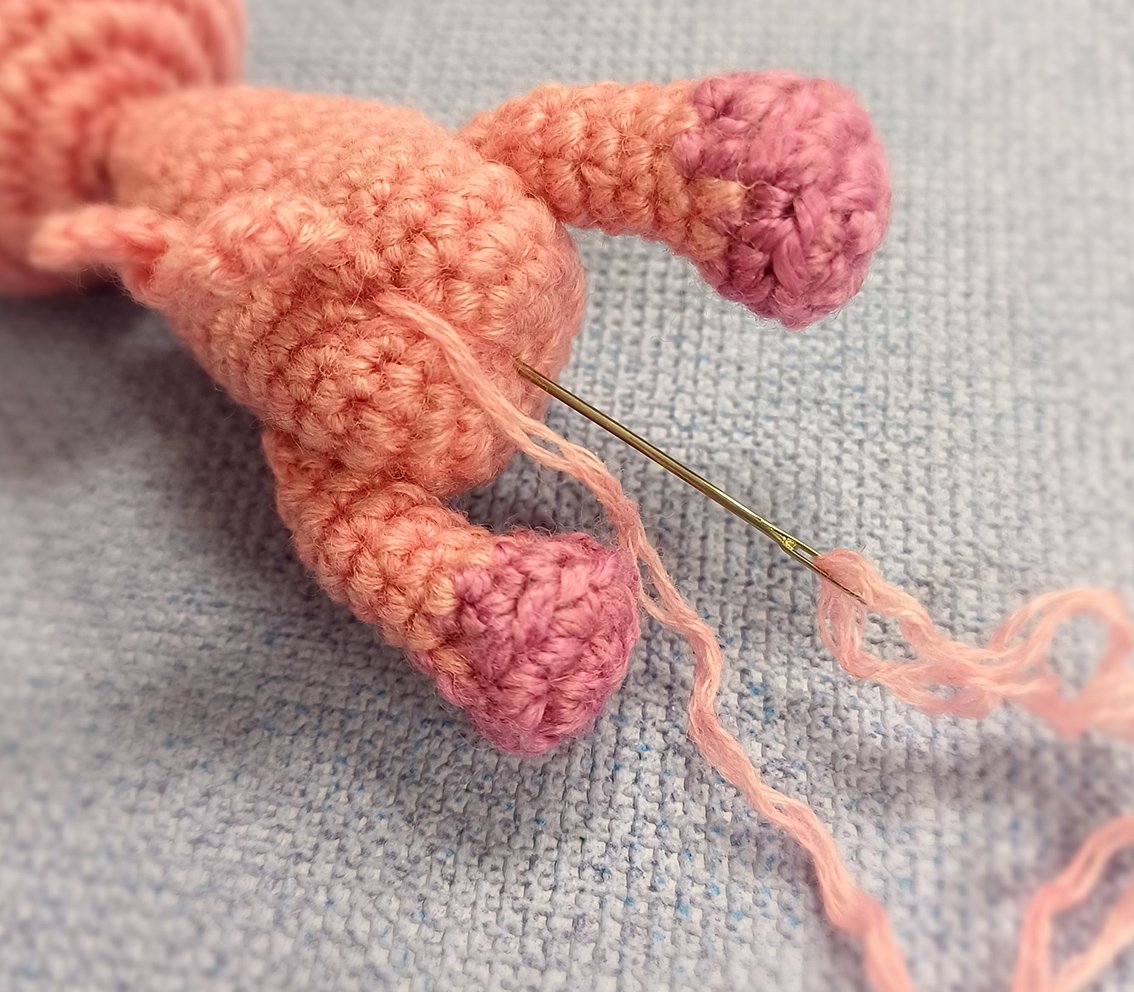
Attach and sew on the paws.
Choose the right eyes. You can choose ready-made eyes, make them out of polymer clay, paint with paints, crochet or embroider with yarn.
My design option: Take a pair of half – beads or ready - made eyes. Take a piece of white felt and cut out 2 circles to make the whites of the eyes. They should be slightly larger in diam than the beads. Glue the eyes on. Make sure the side of the white felt is showing.
.JPG)
Embroider the nostrils and eyebrows with stitches with brown colour yarn.
Embroider a smile with black colour yarn. Use your imagination to create a unique facial expression for your piglet.
Insert the needle in the opening on the head to hide the ends. Do not forget to pull the loops on the head once you have finished to embroider.
Optional: Tint the cheeks and inside the ears with pink dry soft pastels. I used a watercolor pencil.
Optional: sculpt the buttocks. Insert the needle below the tail, take it out at the centre bottom, tighten and repeat once more. Tighten, bind off, hide the end of the thread inside.
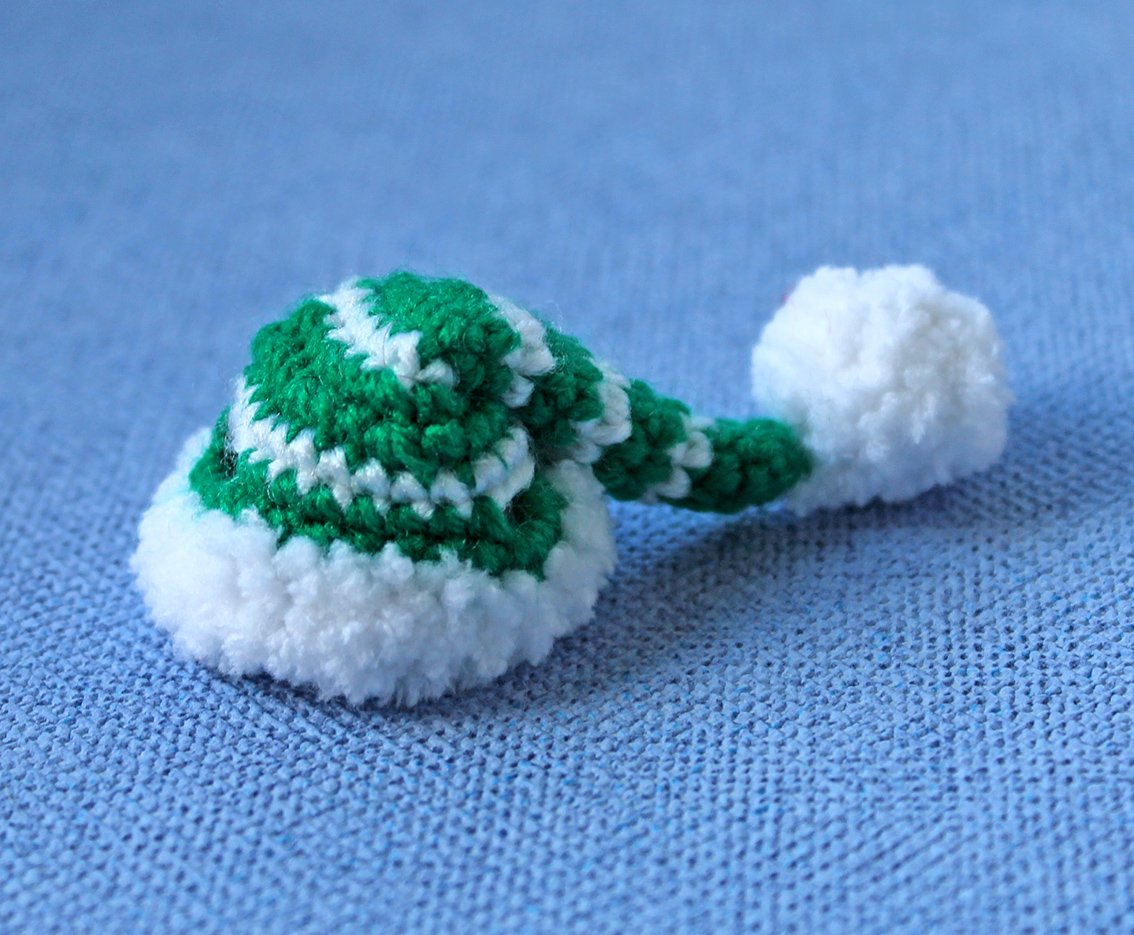
Cap
Start with green colour yarn.
Rnd 1. 6 sc in a Magic Ring
Rnd 2. 6 sc
Rnd 3. 5 sc, 1 inc = 7
Change to white yarn
Rnd 4. 7 sc
Change to green yarn
Rnd 5. 6 sc, 1 inc = 8
Rnd 6. 8 sc
Change to white yarn
Rnd 7. (1 inc, 3 sc) х 2 times = 10
Change to green yarn
Rnd 8-9 (2 rounds). 10 sc
Change to white yarn
Rnd 10. (1 inc, 4 sc) х 2 times = 12
Change to green yarn
Rnd 11-12 (2 rounds). 12 sc
Change to white yarn
Rnd 13. 12 sc
Change to green yarn
Rnd 14. 3 sl st, 2 inc, (1 sc, 1 inc) х 3 times, 1 inc = 18
Rnd 15. 4 sl st, 1 sc, 1 inc, 3 sc, 1 inc, 2 sc, 1 inc, 3 sc, 1 inc, 1 sc = 22
Change to white yarn
Rnd 16. 22 sc
Change to green yarn
Rnd 17. (10 sc, 1 inc) х 2 times = 24
Rnd 18. 24 sc
Rnd 19. 2 sc, change to white fluffy yarn: 22 sc = 24
Rnd 20. (6 sc, 1 dec) х 3 times = 21
Fasten off, cut off any excess yarn, hide the end.
Pompom
Work with white fluffy colour yarn.
Rnd 1. 6 sc in a Magic Ring
Rnd 2. (1 inc, 1 sc) х 3 times = 9
Rnd 3. 9 sc
Rnd 4. (1 dec, 1 sc) х 3 times = 6
Stuff a little. Fasten off, cut the thread, leaving approx. 20-30 cm long tail for sewing.
Sew the pompom on. I decided to leave a short piece of thread between the end of the cap and the pompom.
Fold the top part of the cap and fix it in the desired position by sewing the tip of the cap to the white fluffy edge part.
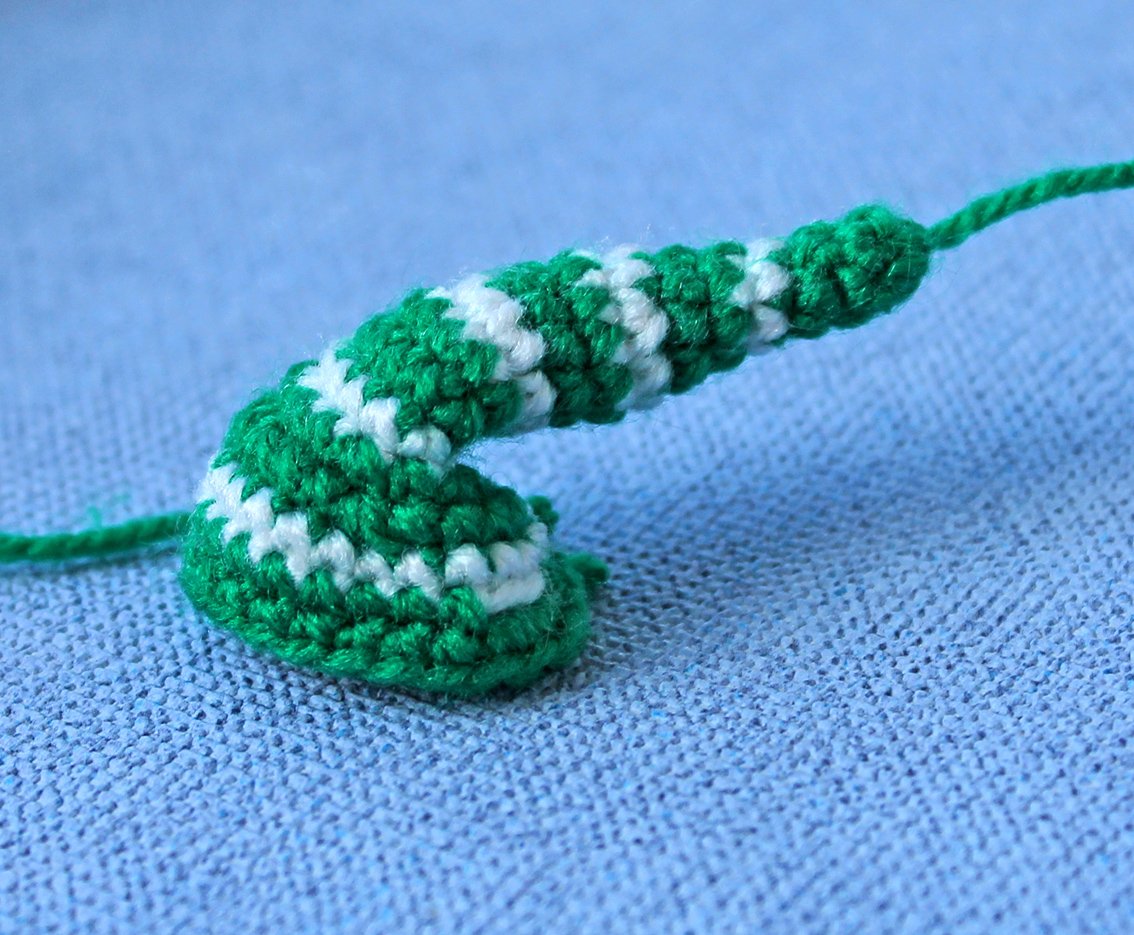
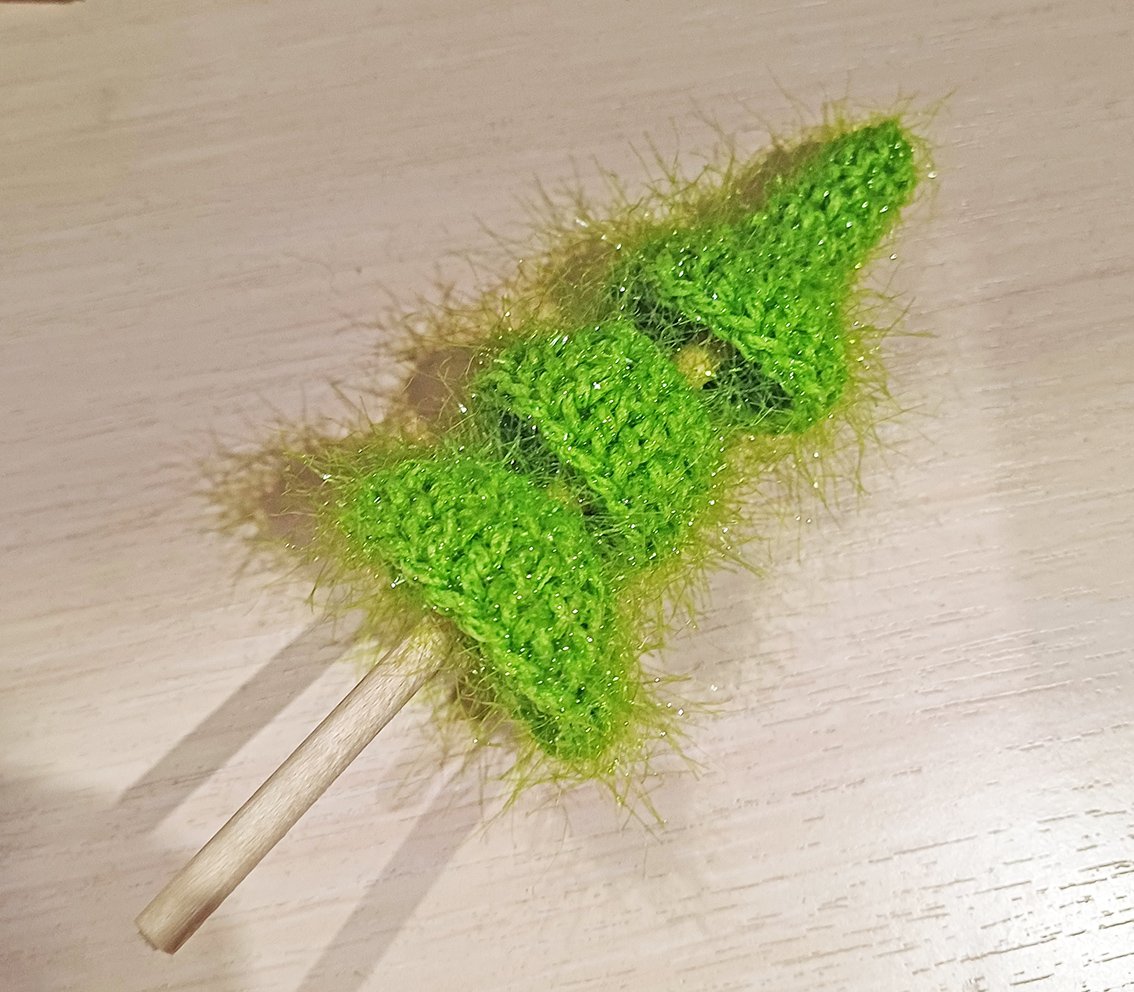
Fir tree trunk
Take a sushi stick for the trunk. Cut off a piece about 10 cm long from it.
Christmas tree
Work with green colour yarn. I used textured yarn with lurex.
The top of the Christmas tree
Rnd 1. 6 sc in a Magic Ring
Rnd 2-3 (2 rounds). 6 sc
Rnd 4. (1 inc, 2 sc) х 2 times = 8
Rnd 5-6 (2 rounds). 8 sc
Rnd 7. (1 inc, 1 sc) х 4 times = 12
Rnd 8. 11 sc, 1 sl st = 12
Rnd 9. 3 ch, (1 dc, 2 dc in 1 loop) х 6 times, join into a ring with a sl st = 18
Fasten off, cut off any excess yarn, hide the end.
Middle tier
Rnd 1. 8 sc in a Magic Ring - do not tighten the loops, there should be a hole through which the trunk of the Christmas tree. Join in 1st and the last loops with the sl st.
Rnd 2. 3 ch, (1 dc, 2 dc in 1 loop) х 4 times, join into a ring with a sl st = 12

Rnd 3. 3 ch, (1 dc, 2 dc in 1 loop) х 6 times, join into a ring with a sl st = 18
Fasten off, cut off any excess yarn, hide the end.
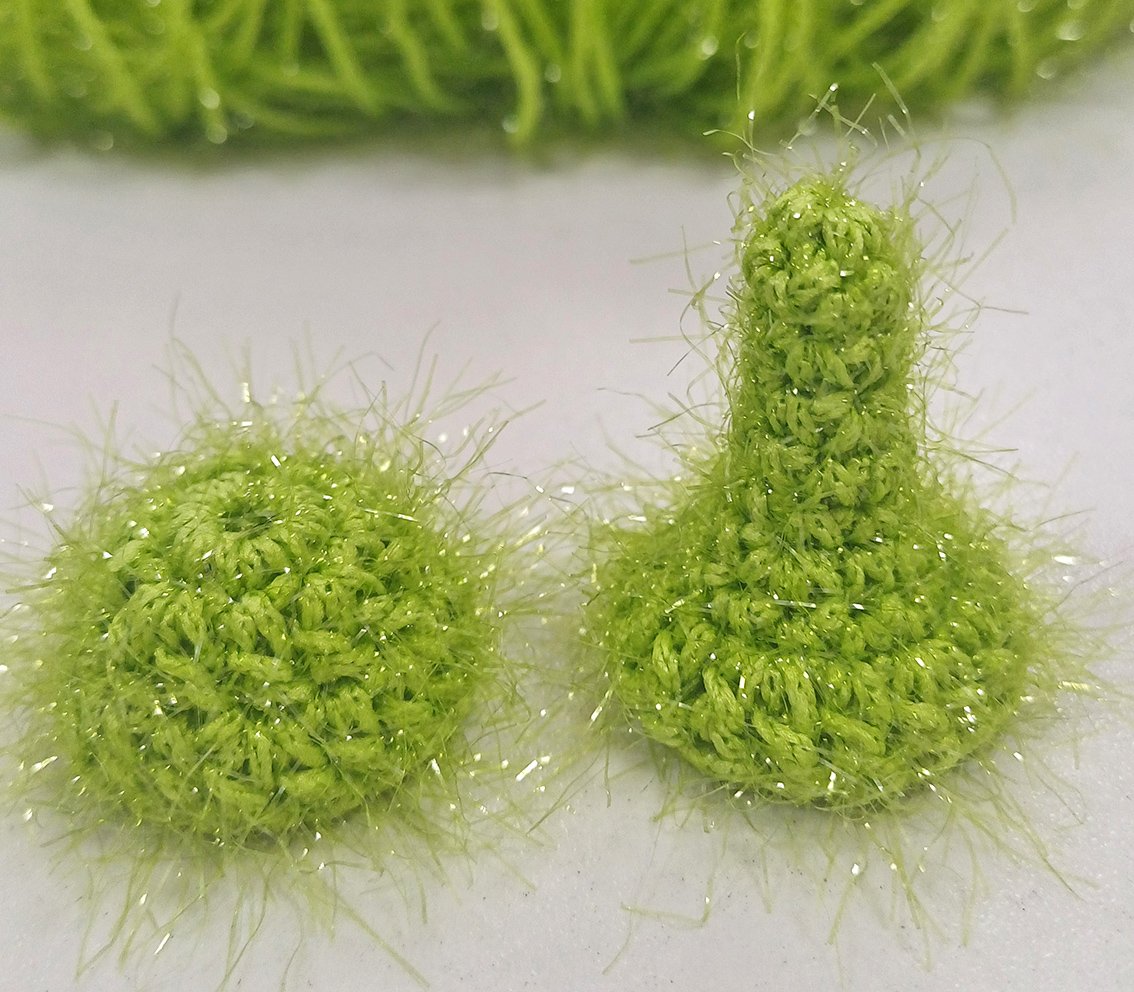
The lower tier of the Christmas tree
Rnd 1. 9 sc in a Magic Ring - do not tighten the loops, there should be a hole through which the trunk of the Christmas tree. Join in 1st and the last loops with the sl st
Rnd 2. 3 ch, (2 dc in 1 loop, 1 dc) х 4 times, 2 dc in 1 loop, join into a ring with a sl st = 14
Rnd 3. 3 ch, 2 dc in 1 loop, (1 dc, 2 dc in 1 loop) х 6 times, 2 dc in 1 loop, join into a ring with a sl st = 22
Fasten off, cut off any excess yarn, hide the end.
String the tiers onto the trunk (it's the same principle as for the pyramid toy). Fix the tiers with a drop of glue. Decorate as desired.
Attach the Christmas tree to the piglet's paw with a few stitches.
The New Year's composition with a piglet is completed! Happy New Year!
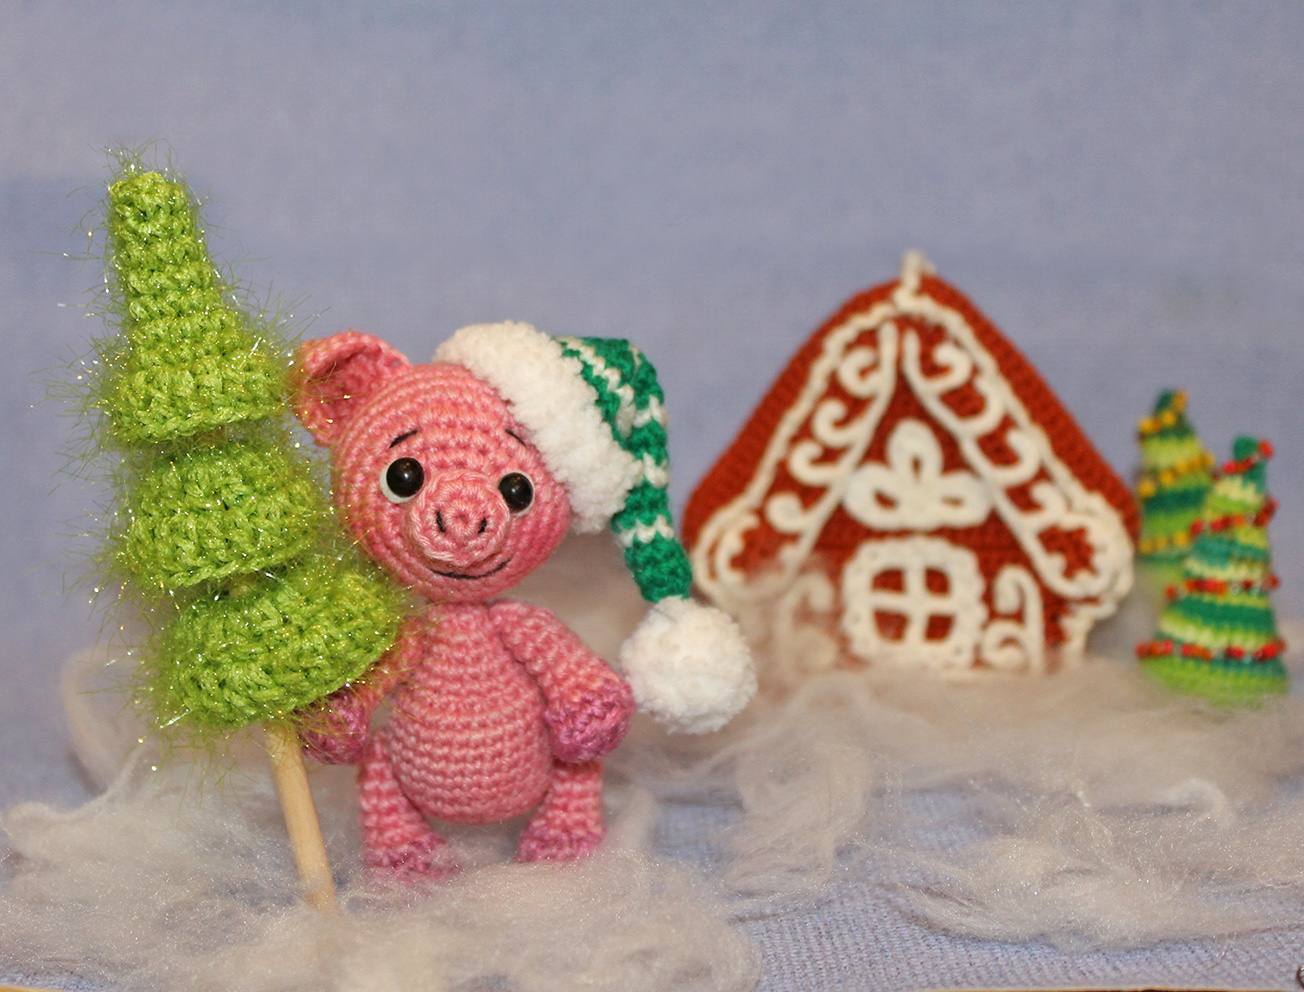
You will find the pattern of Gingerbread house in my store. https://www.crazypatterns.net/en/items/56558/gingerbread-house


