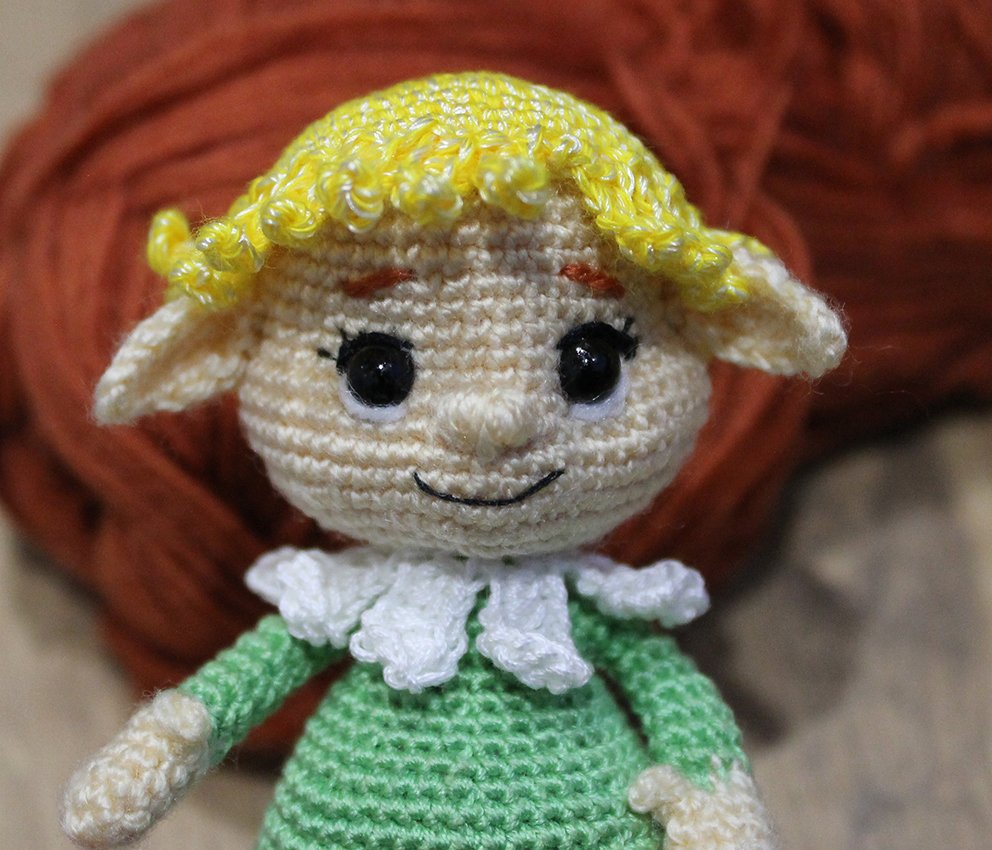
The elf in the strawberry hat
.JPG)
Materials:
You can choose the yarn at your discretion, of a similar color, composition and thickness. Acrylic or cotton will do. I used 400 m/100g acrylic yarn. Yarn consumption depends on its thickness and a crochet hook size. The height of my elf is 10 cm. Depending on the thickness of yarn a finished toy size may differ.
Yarn of the following colours is required: beige, green, brown, red, yellow and white.
- A crochet hook, I used 1,5 mm crochet hook;
- A sewing needle, matching sewing threads;
- A long needle for sculpting, strong thread for sculpting;
- Hollow fibre for stuffing;
- For eyes: 2 half-beads or 1 pair of ready-made eyes (Choose the size individually. It depends on the size of your toy);
- For embroidery: a few threads of black, brown and white
- All purpose clear transparent glue, e.g. UHU;
- Optional: A piece of wire with a diameter of 1mm (two pieces of 10 cm each) – for the arm frame.
Abbreviations:
ch – chain
sl st – slip stitch
sc – single crochet
hdc – half double crochet
dc – double crochet
inc – increase (2 sc in 1 st)
6 inc – 6 increases in sequence
dec – decrease (single crochet two stitches together)
6 dec – 6 decreases in sequence
(...) x N times – repeat instructions in brackets N times
Arms (make 2)
Start with beige colour yarn.
Rnd 1. 6 sc in a Magic Ring
Rnd 2. (2 inc, 1 sc)× 2 times = 10
Rnd 3-4. (2 rounds) 10 sc
Rnd 5. 2 sc, 3 ch, starting from 2nd ch from hook: 2 sc - it's a thumb, continue: 3 sc, 1 dec, 3 sc = 9
.JPG)
Rnd 6. 1 dec, 6 sc, 1 sl st = 8
Change to green yarn.
.JPG)
Rnd. 7-10. (4 rounds) 8 sc
Add such an amount of hollow fibre that the part remains flat.
Rnd 11. 6 sc, 1 dec = 7
Rnd 12. 7 sc
Rnd 13. 3 sc, 1 dec, 2 sc = 6
Rnd 14-15. (2 rounds) 6 sc
Bind off, cut off any excess yarn.
.JPG)
Prepare 2 pieces of wire approx. 10 cm, bend it in half. Wrap some adhesive fabric tape around those.
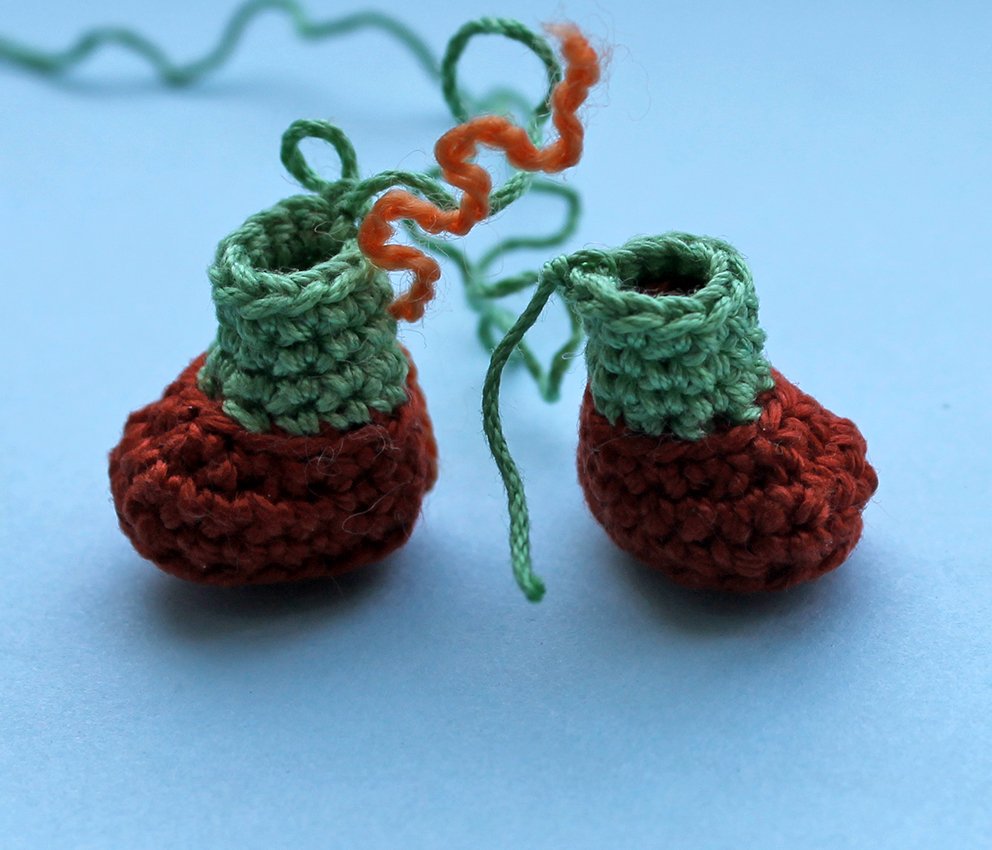
Legs (make 2)
Start with brown colour yarn.
Work 5 ch
Rnd 1. starting from 2nd ch from hook: 3 sc, 4 sc in the last stitch, continue along the other side of chain: 2 sc, 1 inc = 11
Rnd 2. 1 inc, 2 sc, 4 inc, 3 sc, 1 inc = 17
Rnd 3. into the back loops only: 7 sc, 1 inc, 1 sc, 1 inc, 7 sc = 19
Rnd 4. 19 sc
Insert an insole from carboard or a piece of plastic for more stability (optional).
Rnd 5. 4 sc, 5 dec, 4 sc, 1 sl st =14
Add some hollow fibre.
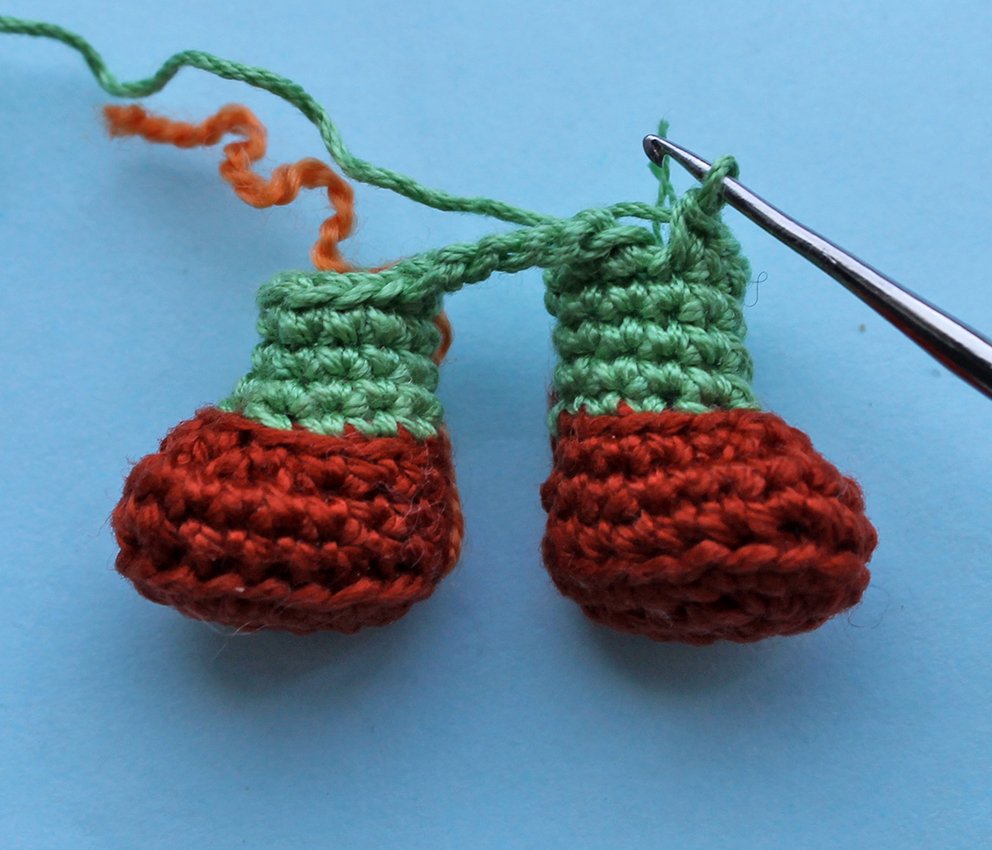
Change to green yarn.
.JPG)
Rnd 6. into the back loops only: 4 sc, 3 dec, 4 sc =11
Rnd 7-9. (3 rounds) 11 sc
Fasten and cut off thread on Part1. Place an additional marker on 9th stitch from the main marker. This will be the left leg. Do not cut off thread on Part2 (right leg), continue we crochet the body.
OBS: the legs are connected with 4 ch. Every ch has 2 half loops (front and back). In Rnd 10 you will need to work in front loops and in Rnd 11 in back loops. There must not be any hole between the legs. See photos for guidance.
Rnd 10. 3 sc along the loops of right leg, work 4 ch, attach the left leg to the body, start with the loop with the additional marker on: 11 sc, continue along the chain: 4 sc, continue along the loops of right leg: 8 sc = 26+ 4 ch
Rnd 11. 1 inc, 2 sc, along the other side of the chain: 4 inc, work into the loops of the left leg: 2 sc, (1 inc, 1 sc) ×2 times, 1 inc, 3 sc, 1 inc, continue: 1 sc, (3 sc in 1 loop)× 2 times, 1 sc, 1 inc, 3 sc, (1 inc, 1 sc)× 2 times = 46
.JPG)
.JPG)
.JPG)
Rnd 12. (5 sc, 1 inc)× 2 times, 15 sc, 1 inc, 7 sc, 1 inc, 10 sc = 50
Rnd 13-16. (4 rounds) 50 sc
Align your marker so it is in the centre of the back. I made 10 sc.
From here the marker should be in line with the centre of the back. Adjust as and when to keep it straight.

Rnd 17. 42 sc, 1 dec, 6 sc = 49
Rnd 18. 6 sc, 1 dec, 41 sc = 48
Rnd 19. 41 sc, 1 dec, 2 sc, 1 dec, 1 sc = 46
Work 1 sc, transfer your place marker here.
.JPG)
Rnd 20. 1 sc, 1 dec, 2 sc, 1 dec, 10 sc, 1 dec, 11 sc, 1 dec, 14 sc = 42
Rnd 21. 38 sc, 1 dec, 2 sc = 41
Rnd 22. 2 sc, 1 dec, 10 sc, 1 dec, (4 sc, 1 dec)× 2 times, 13 sc = 37
Rnd 23. 37 sc
Rnd 24. 14 sc, 1 dec, 2 sc, 1 dec, 2 sc, 1 dec, 9 sc, 1 dec, 2 sc = 33
Rnd 25. 2 sc, 1 dec, 25 sc, 1 dec, 2 sc = 31
Add some hollow fibre.
Rnd 26. 2 sc, 1 dec, 7 sc, (1 dec, 3 sc)× 2 times, 8 sc = 27
Work 1 sc, transfer your place marker here.
Rnd 27. 27 sc
Join arms to the body in the next round, keep an eye on the symmetry of the toy.
Rnd 28. 5 sc, attach the left arm, make sure the thumb is facing forward, work 3 sc hooking through the loops of the arm and the body, continue along the loops of the body and work 11 sc, attach the other arm to the body, make sure the thumb is facing forward, work 3 sc hooking through the loops of the arm and the body; continue along the loops of the body and work: 5 sc =27
.JPG)
.JPG)
Rnd 29. 1 sc, 1 dec, 2 sc, work into the loops of the arm: 3 sc, continue along the loops of the body: 2 sc, 1 dec, 3 sc, 1 dec, 2 sc, work into the loops of the arm: 3 sc, continue along the loops of the body: 2 sc, 1 dec, 1 sc = 23
.JPG)
.JPG)
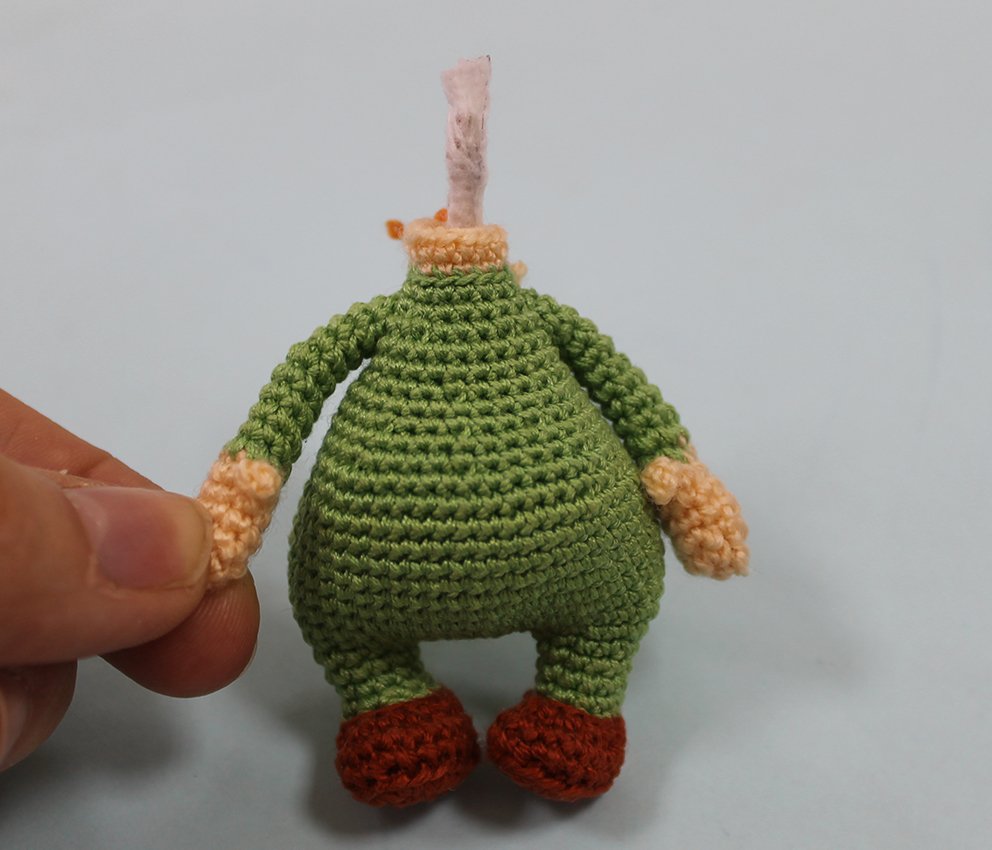
Insert the wire into arms. Twist the ends of the wires together. Wrap some adhesive fabric tape around those.
Rnd 30. 2 sc, 1 dec, 3 sc together, 1 dec, 5 sc, 1 dec, 3 sc together, 1 dec, 2 sc = 15
Rnd 31. 15 sc
Change to beige yarn. Fasten and cut off the green colour yarn.
Rnd 32. 15 sc into the back loops only
Rnd 33. 15 sc
Work 1 sc, transfer your place marker here.
Add some hollow fibre.
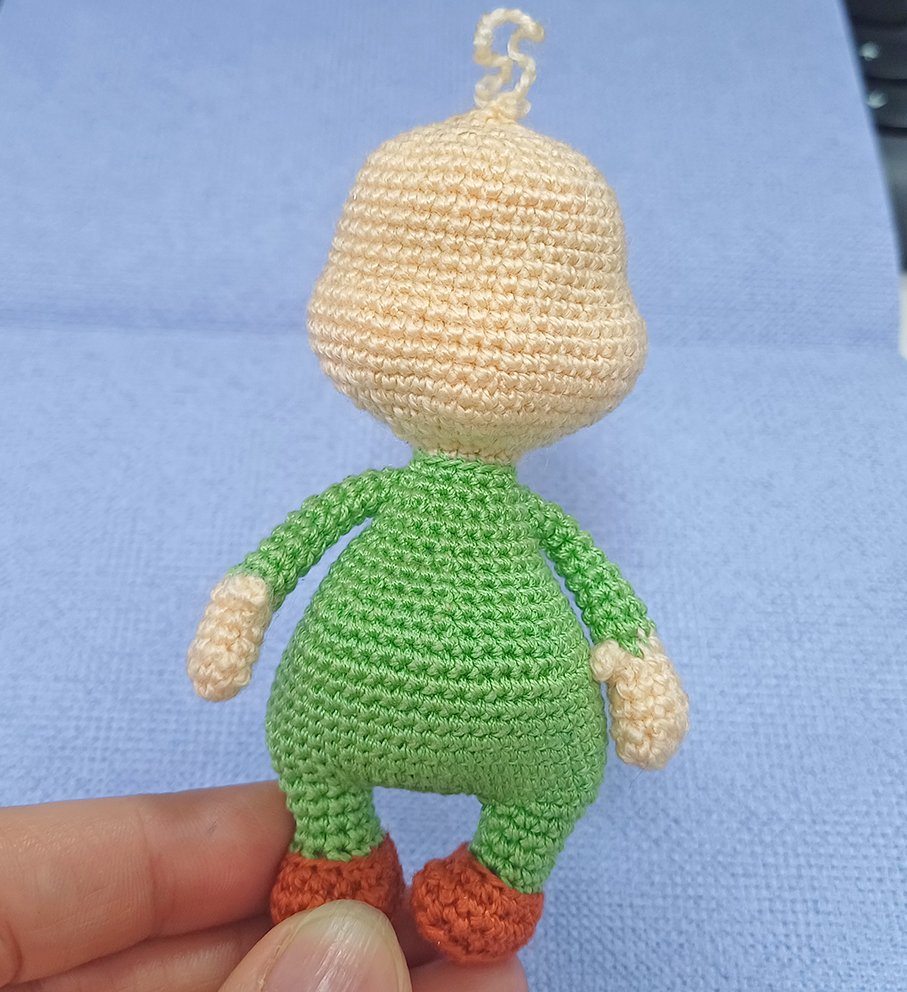
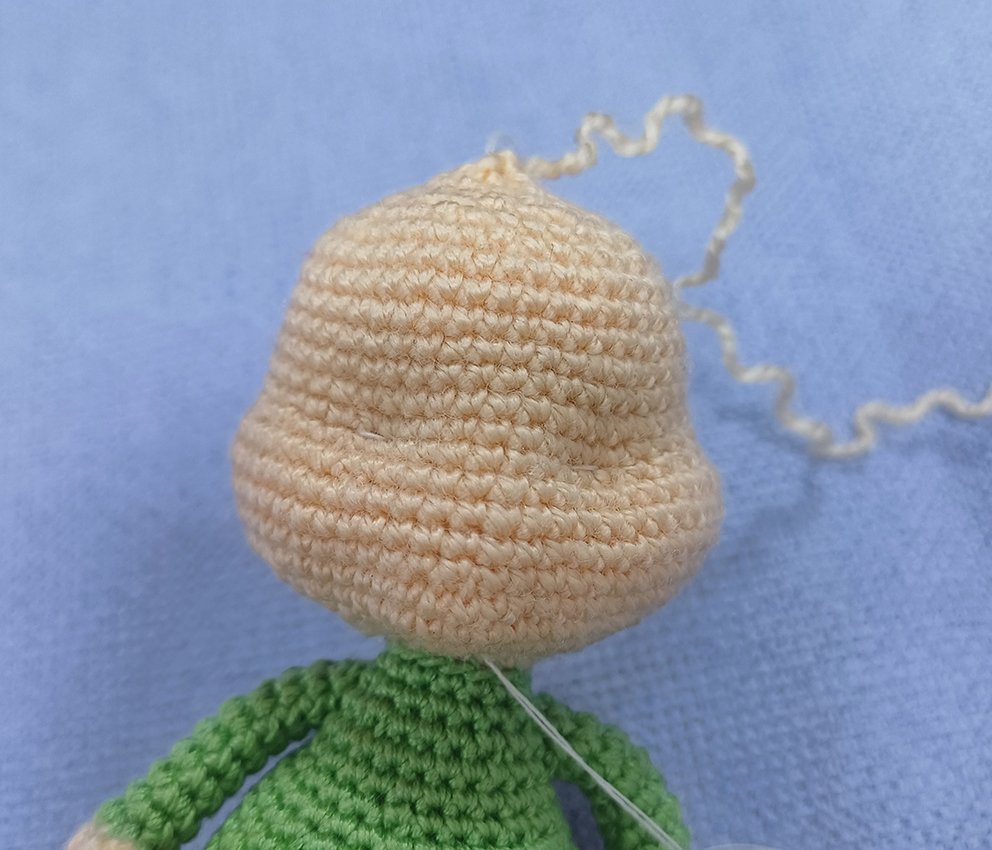
Do not cut the thread! Next, we crochet the head.
Rnd 34. (1 inc, 1 sc)× 3 times, 3 inc, (1 sc, 1 inc)× 3 times = 24
Rnd 35. 1 sc, 1 inc, 1 sc, 3 inc, 4 sc, 3 inc, 4 sc, 3 inc, 1 sc, 1 inc, 2 sc = 35
Rnd 36. 6 sc, 1 inc, 1 sc, (1 inc, 7 sc)× 2 times, 1 inc, 1 sc, 1 inc, 8 sc = 40
Rnd 37. 1 inc, 6 sc, (1 sc, 1 inc)× 3 times, 12 sc, (1 inc, 1 sc)× 3 times, 9 sc = 47
Rnd 38. 9 sc, (1 inc, 2 sc)× 2 times, 1 inc, 15 sc, 1 inc, (2 sc, 1 inc)× 2 times, 9 sc = 53
Rnd 39. 26 sc, 1 dec, 25 sc = 52
Work 1 sc, transfer your place marker here.
Rnd 40-42. (3 rounds) 52 sc
Rnd 43. 10 sc, (1 dec, 1 sc)× 3 times, 1 dec, 10 sc, (1 dec, 1 sc)× 3 times, 1 dec, 10 sc = 44
Rnd 44. 5 sc, 1 dec, 30 sc, 1 dec, 5 sc = 42
Rnd 45-49. (5 rounds) 42 sc
Rnd 50. (1 dec, 5 sc)× 6 times = 36
Rnd 51. (2 sc, 1 dec, 2 sc) х 6 times = 30
Rnd 52. (3 sc, dec) х 6 times = 24
Rnd 53. (1 sc, dec, 1 sc) х 6 times = 18
Rnd 54. (1 sc, dec) х 6 times = 12
Add some hollow fibre.
Rnd 55. 6 dec (6)
Fasten off, cut off any excess yarn. Do not close off the loops of the last round just yet, you will do it later. You will do embroidery and decorate the face first and then hide yarn ends inside!
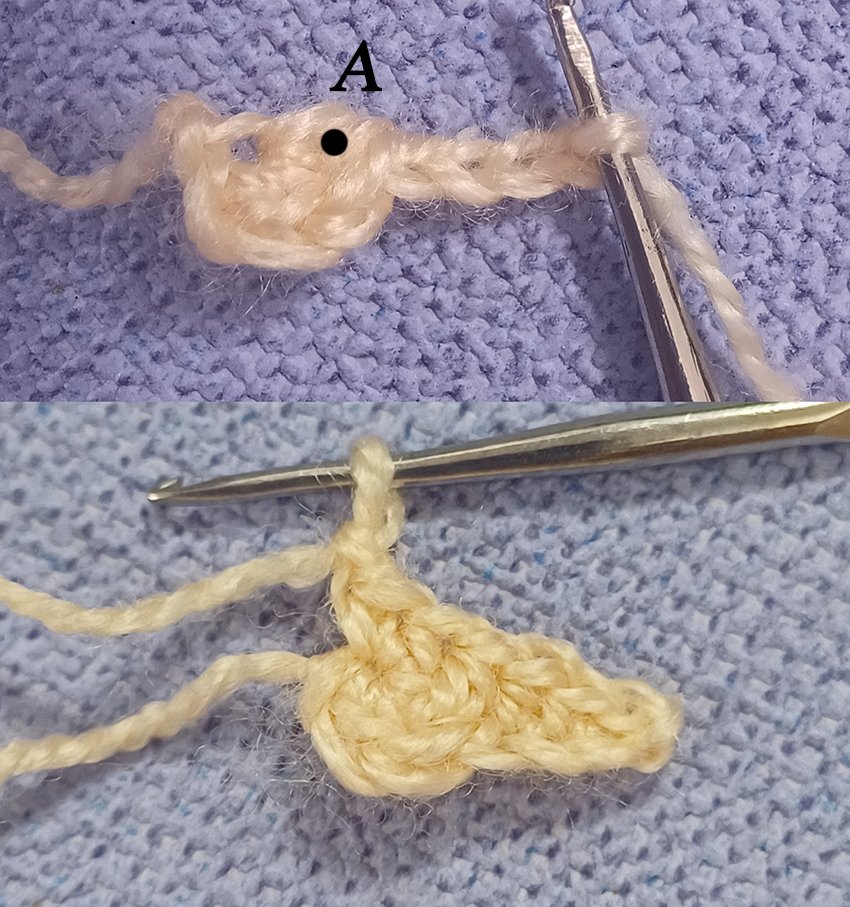
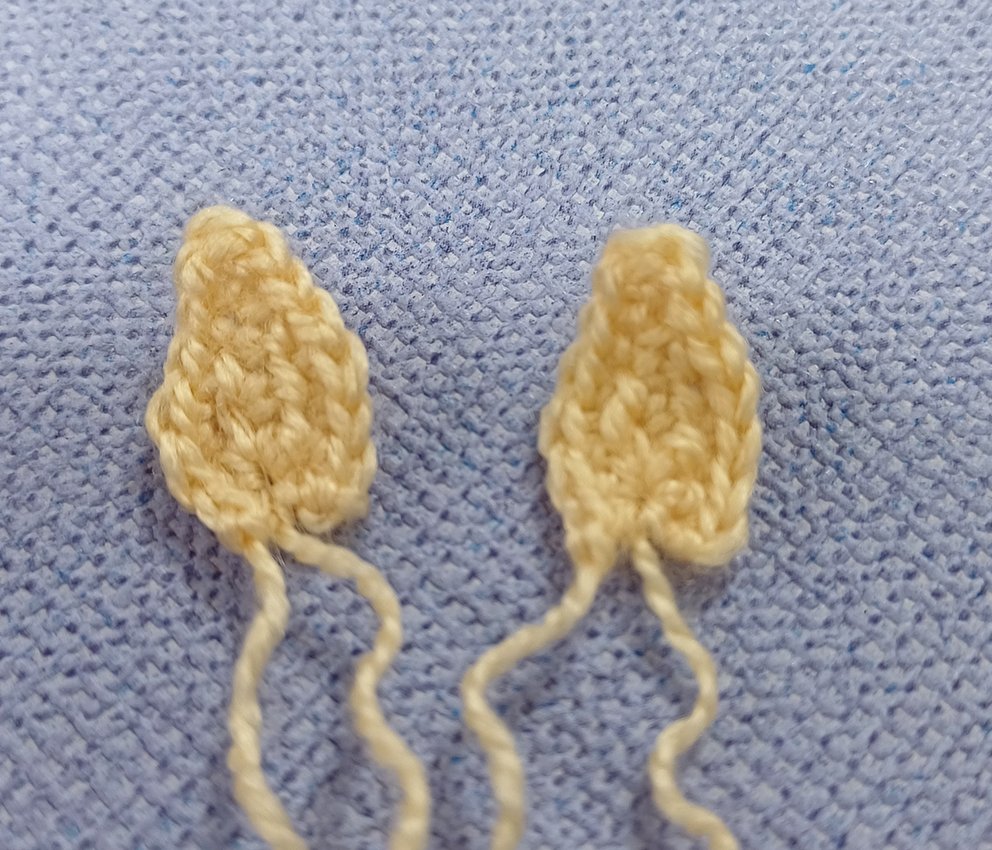
Ear (make 2)
Crochet with beige colour yarn.
Rnd 1. in a Magic Ring: 1 sc, 1 hdc, work 4 ch, starting from 2nd ch from hook 1 sl st, 1 sc, 1 hdc, 1 hdc into point А, in a Magic Ring again: 1 hdc, 1 sc, 1 ch, turn
Rnd 2. 3 sc, 3 sl st, on the other side of the ear: 3 sl st, 3 sc, 1 sl st in a Magic Ring
Cut off yarn, leave a tail for sewing.
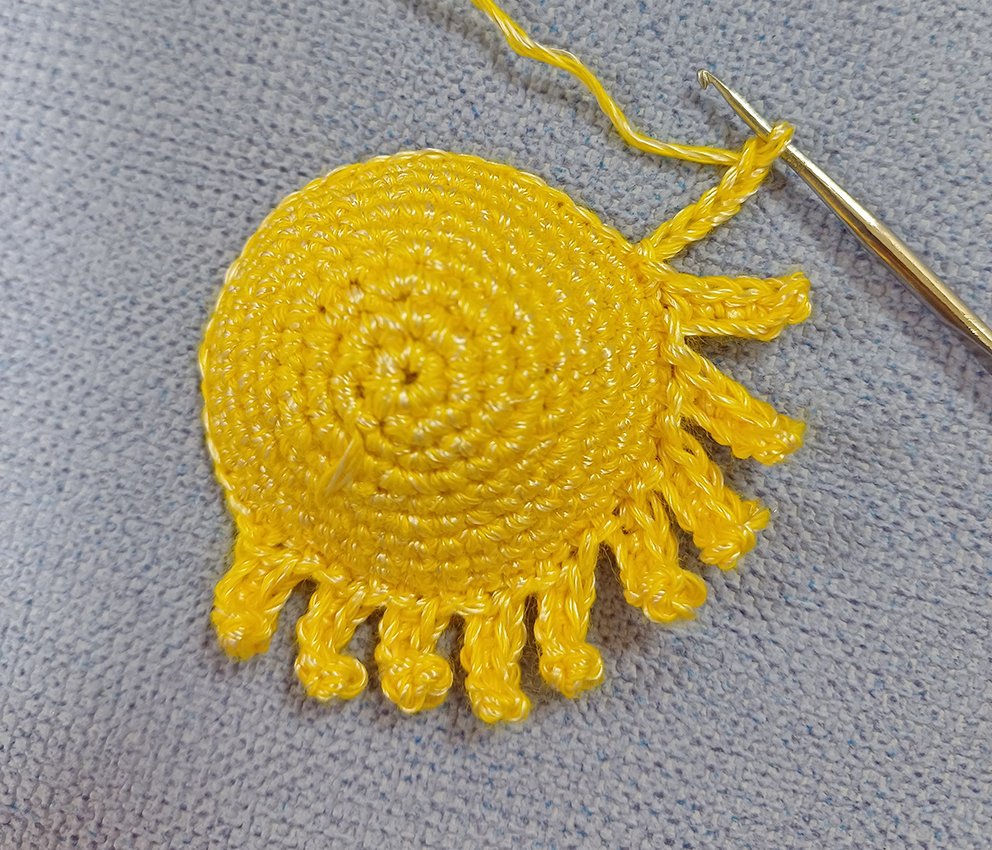
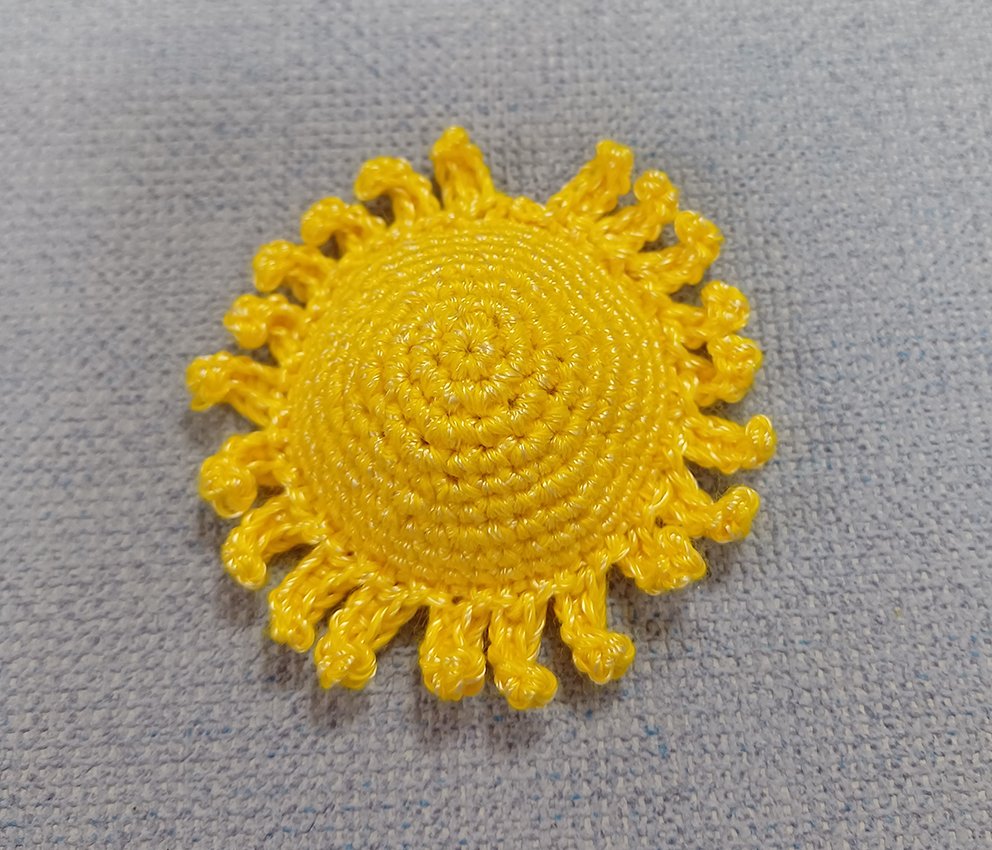
Hair
Work with any colour. I used yellow.
Rnd 1. 6 sc in a Magic Ring
Rnd 2. 6 inc = 12
Rnd 3. (1 sc, 1 inc)х 6 times = 18
Rnd 4. (1 sc, 1 inc, 1 sc)х 6 times = 24
Rnd 5. (3 sc, 1 inc)х 6 times = 30
Rnd 6. (2 sc, 1 inc, 2 sc)х 6 times = 36
Rnd 7. (5 sc, 1 inc)х 6 times = 42
Rnd 8-9. 42 sc
Rnd 10. (work 5 ch, starting from 2nd ch from hook 4 sc, continue along the main stitches: 2 sl st)х 21 times
Bind off, cut off any excess yarn.
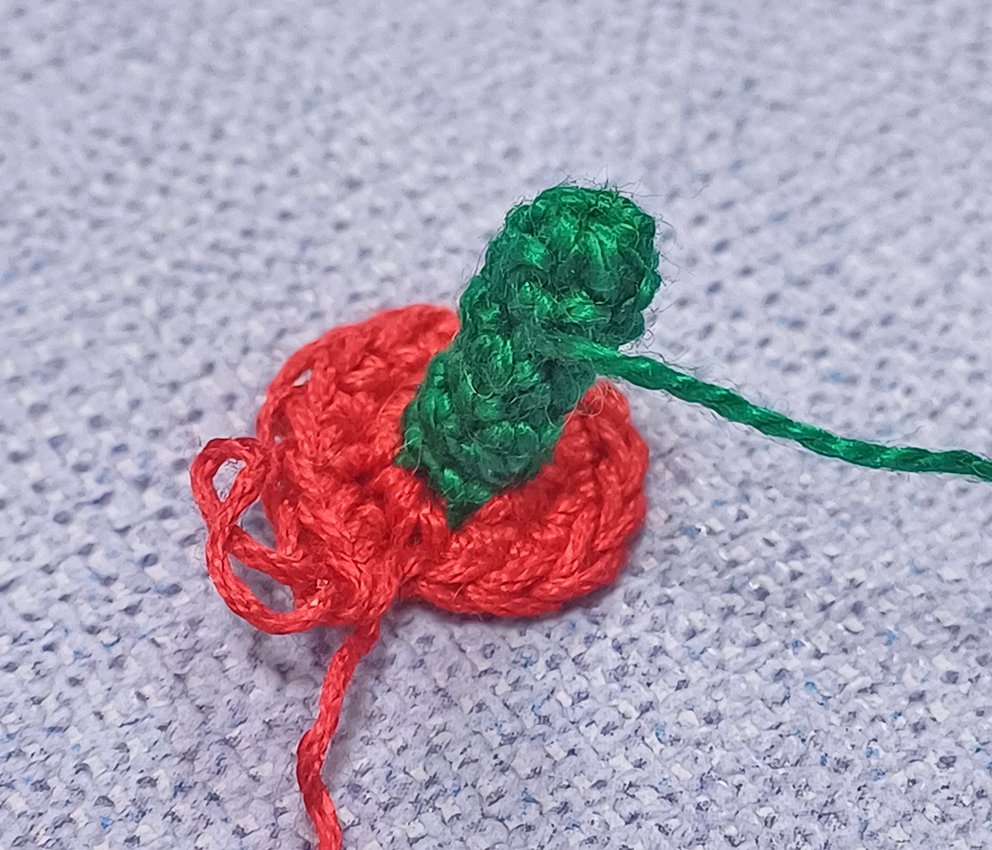
Strawberry hat
Start with green colour yarn
Rnd 1. 6 sc in a Magic Ring
Rnd 2-6. (5 rounds) 5 sc
Change to red yarn. Fasten and cut off the green colour yarn.
Rnd 7. 5 inc = 10
Rnd 8. (1 sc, 1 inc)х 5 times = 15
Rnd 9. (1 sc, 1 inc, 1 sc)х 5 times = 20
Rnd 10. (3 sc, 1 inc)х 5 times = 25
Rnd 11. (2 sc, 1 inc, 2 sc)х 5 times = 30
Rnd 12. (1 inc, 4 sc)х 6 times = 36
Rnd 13. (1 inc, 5 sc)х 6 times = 42
Rnd 14. (3 sc, 1 inc, 3 sc)х 6 times = 48
Rnd 15-18. (4 rounds) 48 sc
Fasten off, cut off any excess yarn, hide the end.
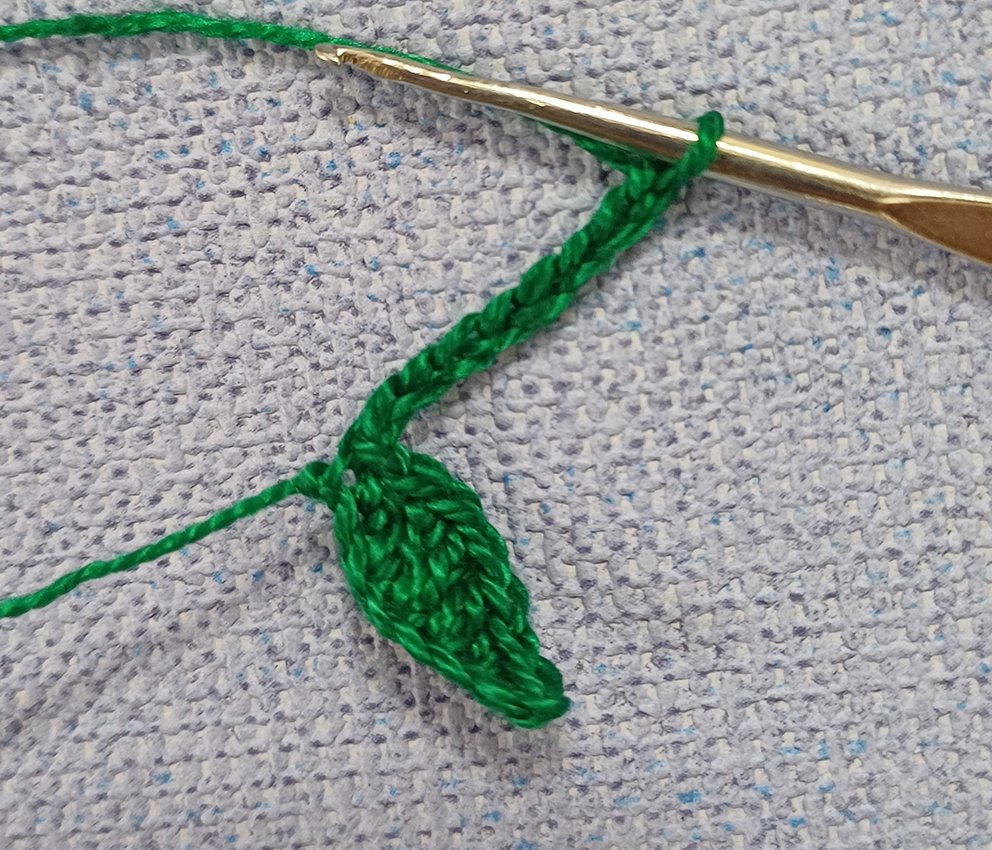
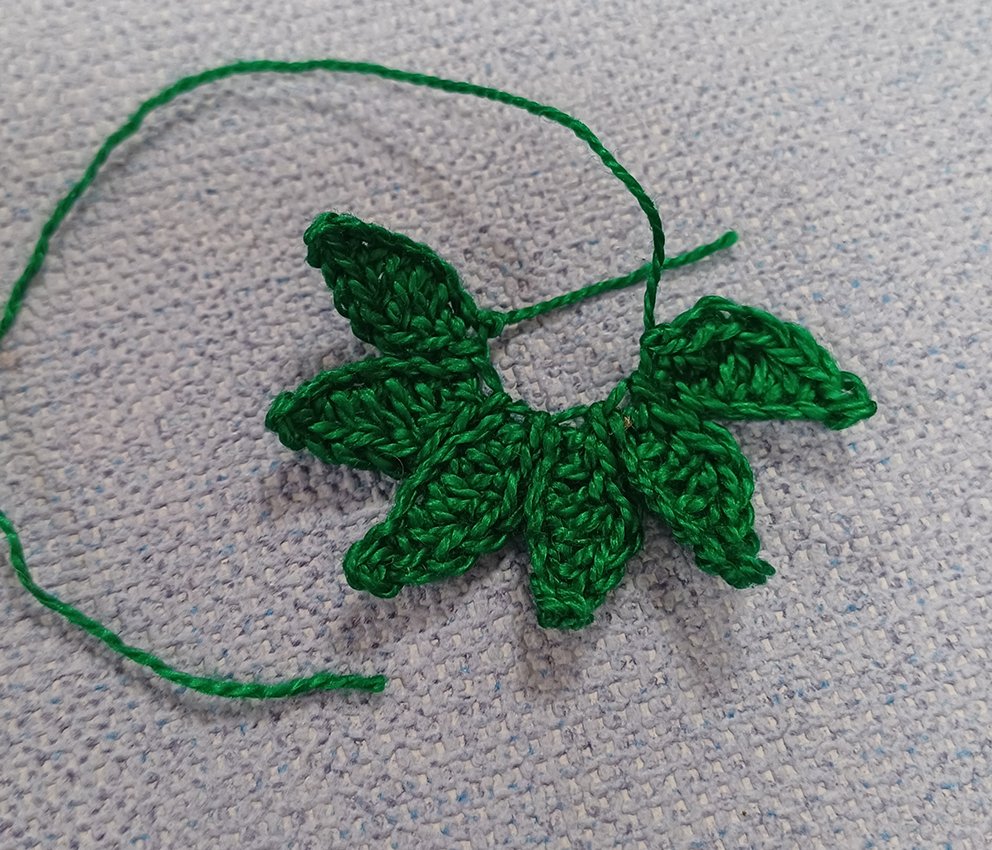
Sepals
Work with green colour yarn.
Rnd 1. (work 8 ch, starting from 2nd ch from hook: 1 sl st, 1 sc, 1 hdc, 2 dc, 1 hdc, 1 sl st) х 6 times
Cut off yarn, leave a tail for further operation.
Sew the leaves to the hat. Embroider seeds with yellow yarn.
.JPG)
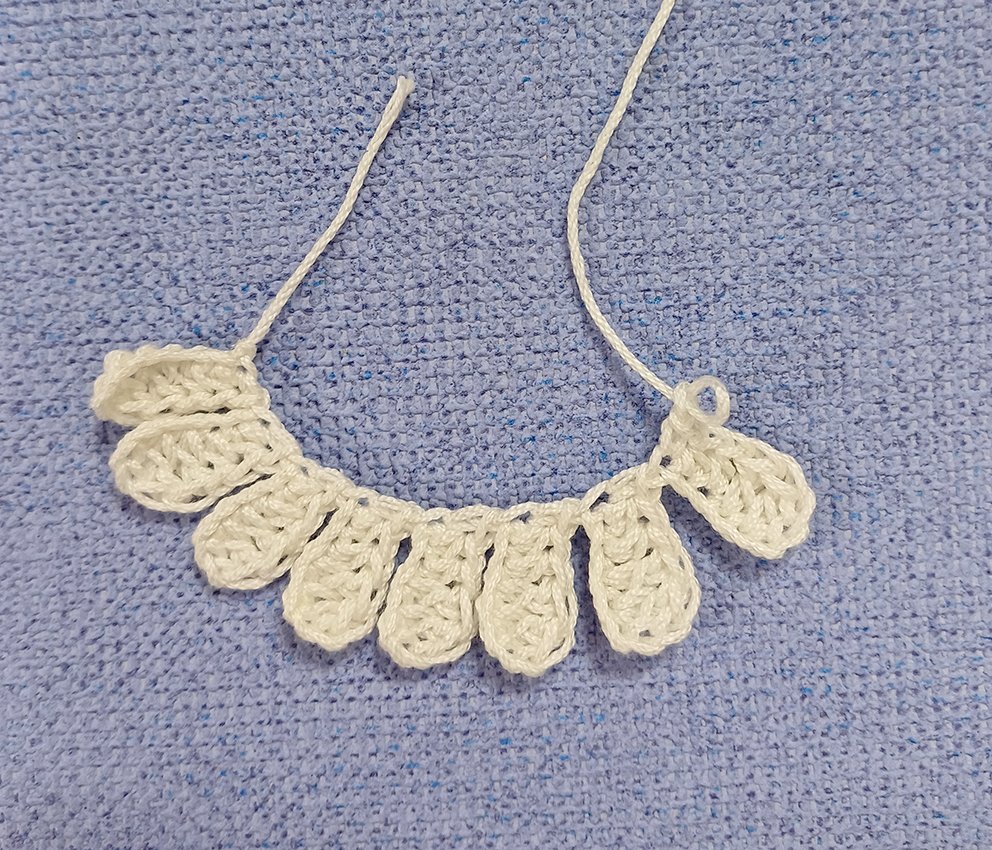
Collar
Work with white colour yarn
Rnd 1. (work 8 ch, starting from 4th ch from hook: 2 dc, 2 hdc, 1 sc) х 8 times
Cut off yarn, leave a tail for further operation.
Assembly and Decoration.
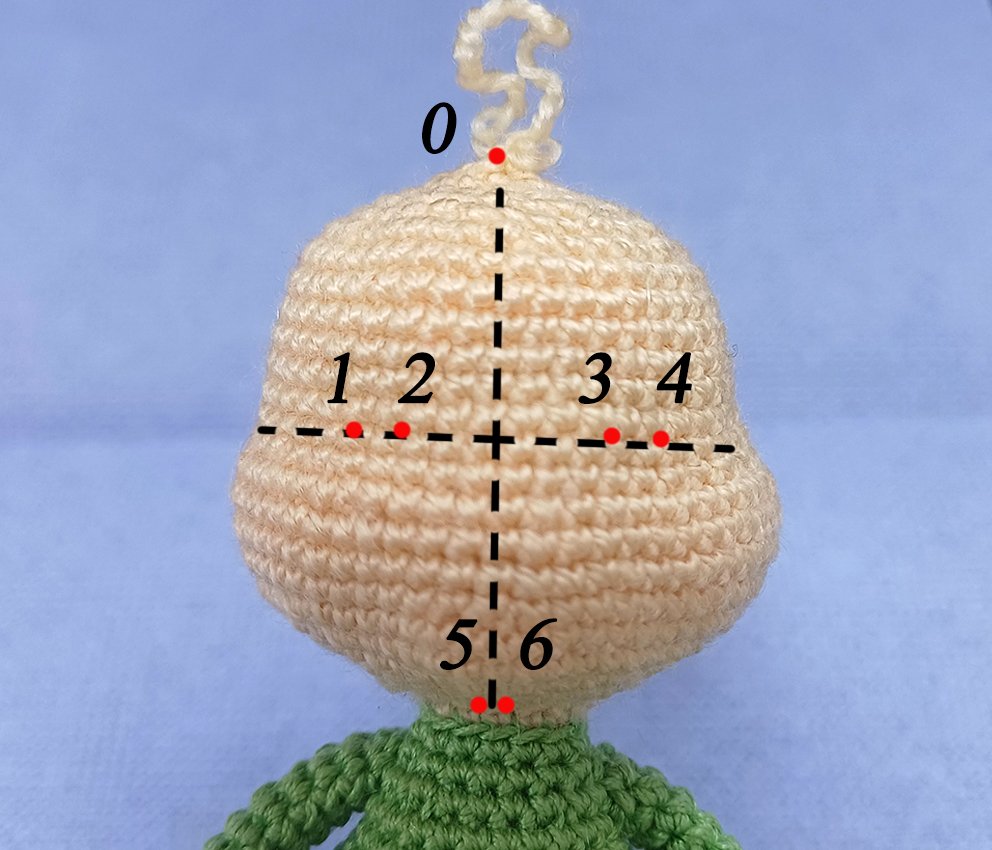
Find the points for sculpting as follows. Divide the head into halves both horizontally and vertically. See the pictures for guidance.
Point 0 is on the top of the head
Points 1 & 2; 3 & 4 - for eye sockets. Distance between points 1 & 2, (3 & 4) – 2 sc, between points 2 & 3 is 6 sc.
Points 5 & 6 - on the neck, they are 1sc apart.
Prepare a long needle for sculpting and a strong thread, make a knot.
Insert the needle in the opening in the head (spot 0), hide the knot in the hollow fibre, take the needle out in spot 6 on the neck. Make a very tiny stitch to fasten the thread. Insert the needle out in spot 5, take the needle out in spot 1 (thread runs inside the head). Insert the needle in spot 2 (thread runs over the work), take it out in spot 6. Tighten the thread, help with the fingers to keep it in place. Make a short stitch and a knot. Repeat the tightening once more.
Repeat sculpting for the left eye socket. Points #6-3-4-5. Tighten the thread, help with the fingers to keep it in place. Make a short stitch and a knot. Hide the end.

Sew on the ears. Sew on the collar.
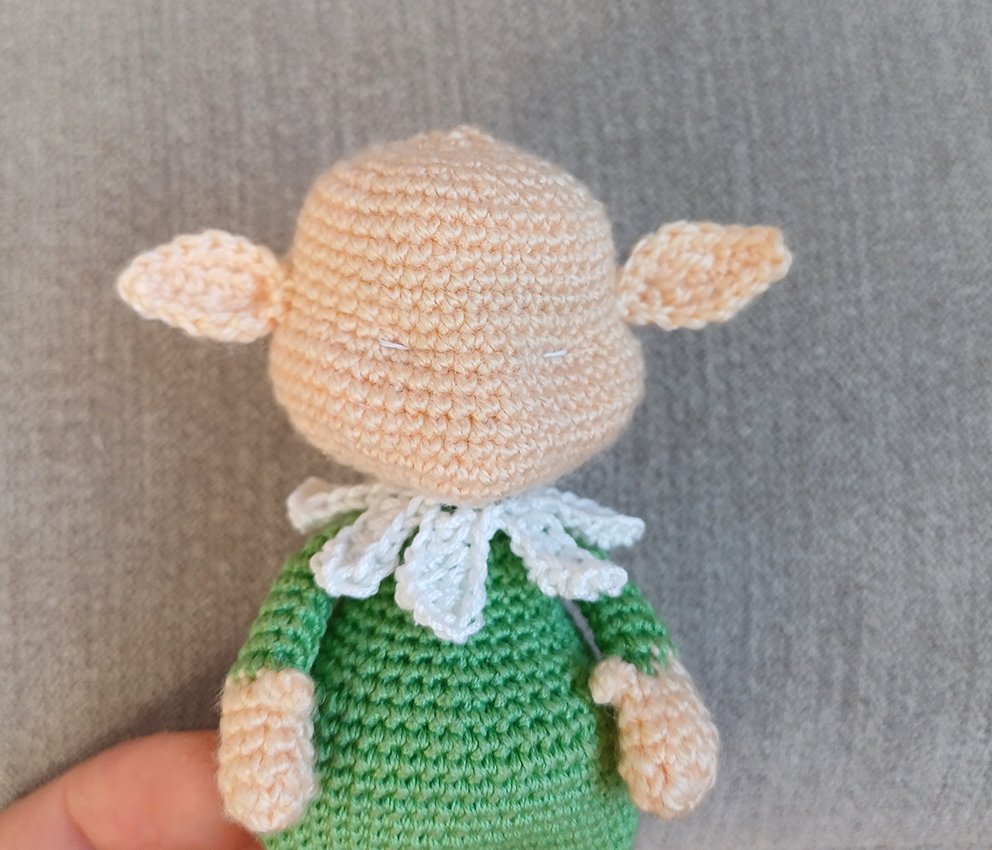
Glue on the eyes. Embroider the nose with beige yarn. Insert the needle in the opening on the head to hide the ends. Do not forget to pull the loops on the head once you have finished to embroider. Embroider the mouth with black yarn. Embroider the whites of the eyes with white colour yarn. Embroider eyelids, eyelashes and eyebrows.
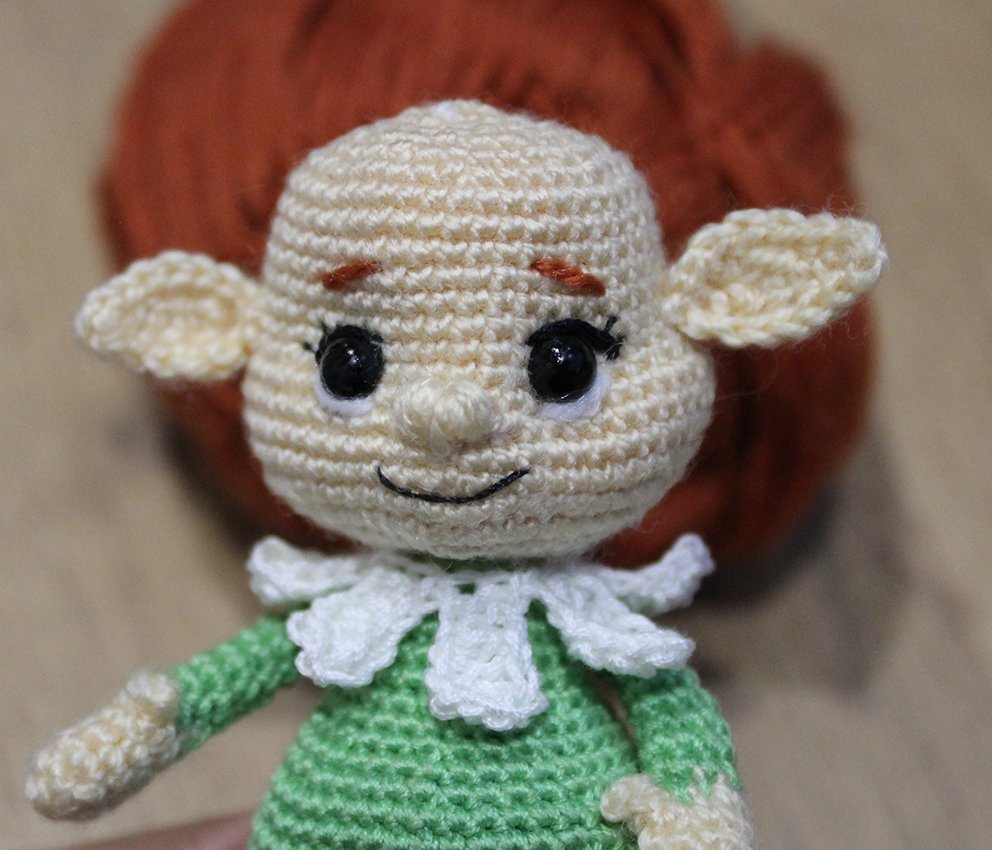
Sew or glue the hair.
Tint the cheeks with soft pastel. I used pink eye shadow. Use a marker to draw freckles.
Dress a hat on the elf.
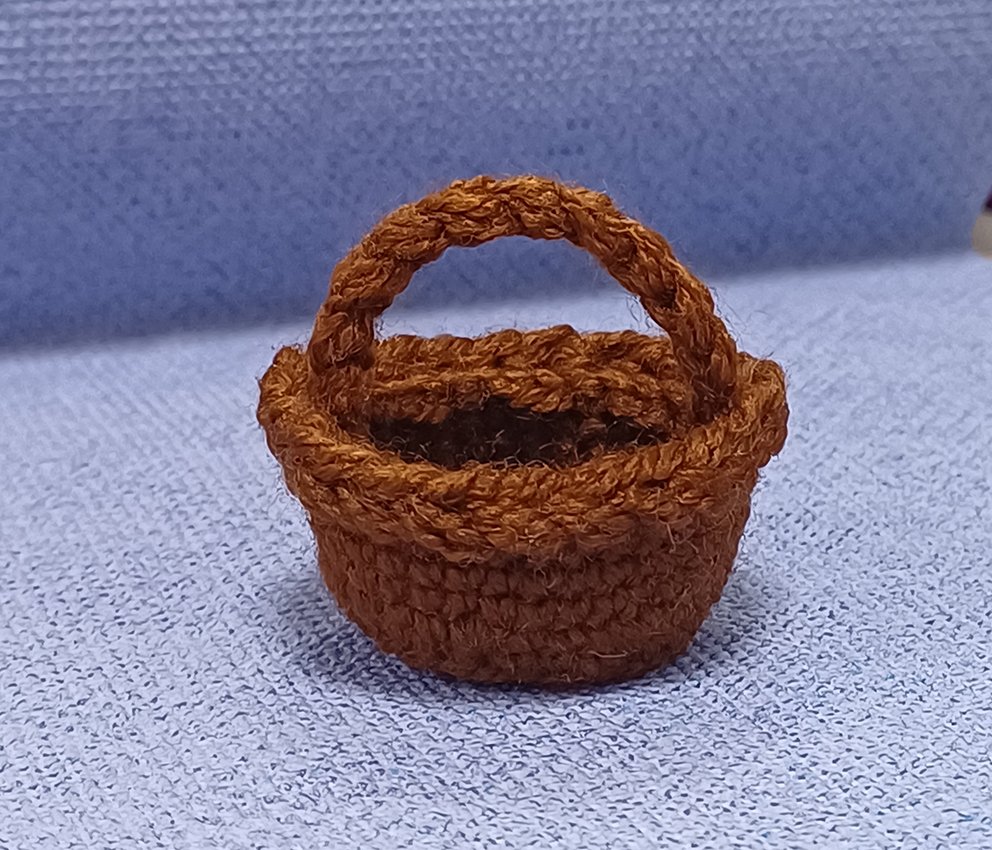
Basket
Work with brown colour yarn.
Rnd 1. 7 sc in a Magic Ring
Rnd 2. 7 inc = 14
Rnd 3. (1 sc, 1 inc)х 7 times = 21
Rnd 4. (1 sc, 1 inc, 1 sc)х 7 times = 28
Rnd 5. 28 sc into the back loops only
Rnd 6. (3 sc, 1 inc)х 7 times = 35
Rnd 7-10. (4 rounds) 35 sc
Fasten off, cut off any excess yarn, hide the end.
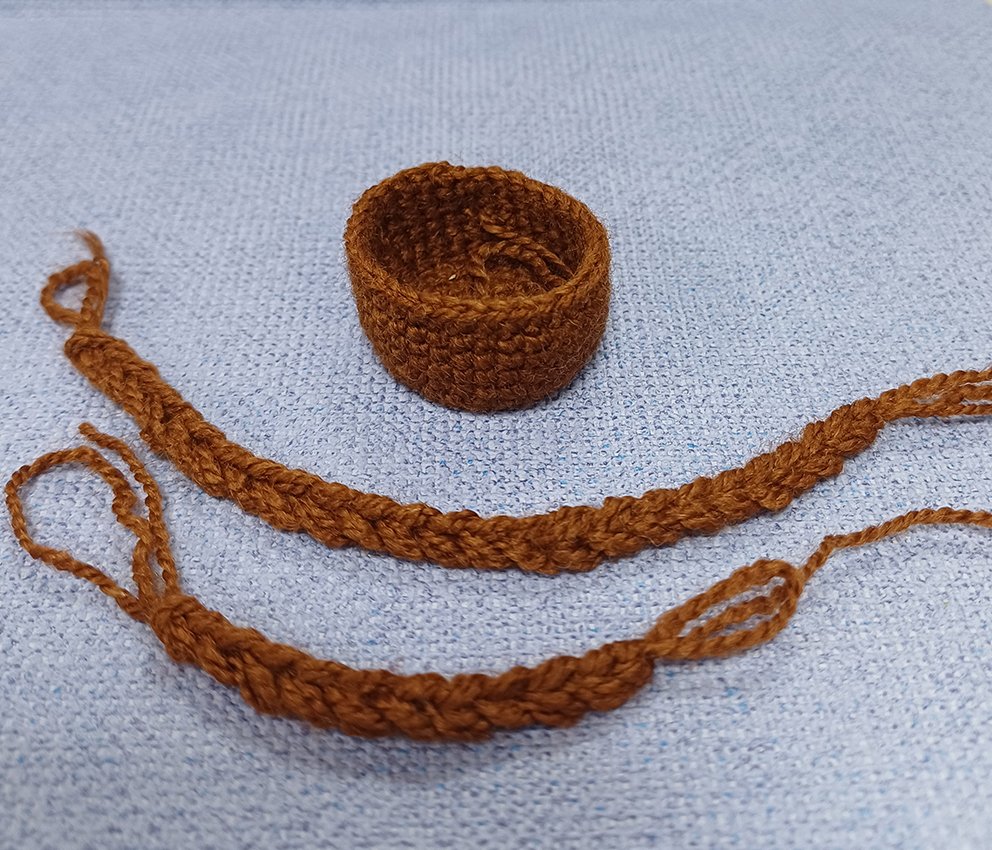
Basket handle
Crochet with yarn in 3 additions. For crocheting handle, take a larger hook.
Row 1. work 10 ch, fasten off, cut off.
Basket Decor
Crochet with yarn in 3 additions. Take a larger hook.
Row 1. work 22 ch, fasten off, cut off.
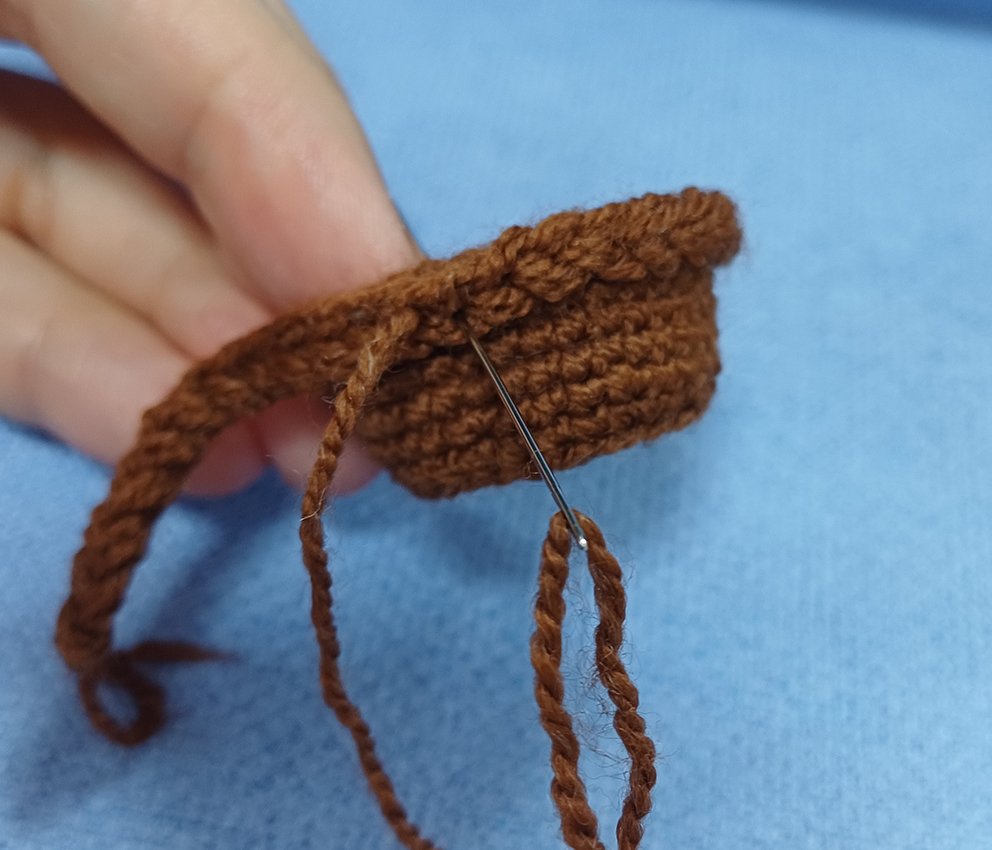
Sew the resulting pigtail to the upper edge of the basket. Sew handle to the basket. Hide all the tips on the wrong side.
The elf is complete!
.JPG)


