Schnell zur Zielseite
Community & Hilfe


Quick & easy to make with this stunning Fairie Strawberry crochet tote bag / basket. Dare to go shopping, you will turn heads wherever you go!
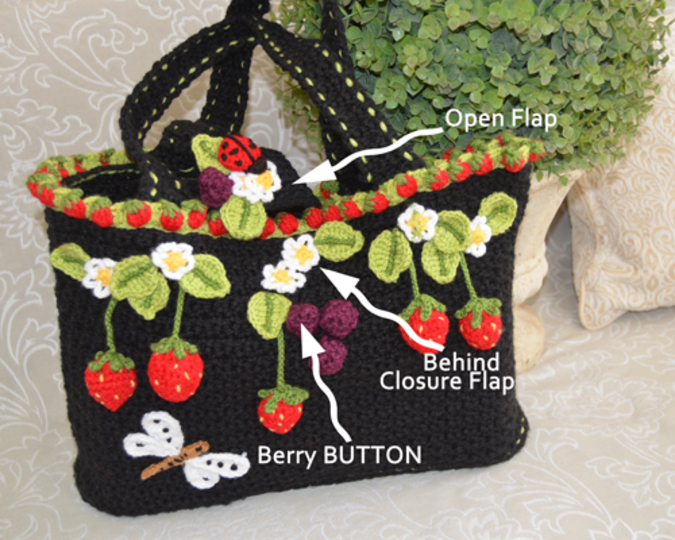
The bag has a closure strap, one of the blueberries act as the button for closure. You can leave out the closure strap if you want
Basic Skills Needed:
American terminology is used with US / Metric / UK sizes given
Basic crochet stitches are used
Both written & supporting photos are included in the instructions
As with all our patterns, as a gift to you, included in your instant downloadable .pdf pattern is a print-to-cut out & make matching envelop, to store your pattern
Du kannst die Anleitung sofort nach dem Eingang der Zahlung herunterladen.
Quick & easy to make with this stunning Fairie Strawberry crochet tote bag / basket. Dare to go shopping, you will turn heads wherever you go!
The bag has a closure strap, one of the blueberries act as the button for closure. You can leave out the closure strap if you want
Basic Skills Needed:
American terminology is used with US / Metric / UK sizes given
Basic crochet stitches are used
Both written & supporting photos are included in the instructions
As with all our patterns, as a gift to you, included in your instant downloadable .pdf pattern is a print-to-cut out & make matching envelop, to store your pattern
Sobald Käufer:innen dieses Produkt bewerten, erscheinen hier Produktbewertung, Verteilung und Erfahrungsberichte.


Teile deine Ideen, Werke und Erfahrungen.
Um diese Funktionen zu nutzen, brauchst du ein Benutzerkonto. Du kannst ein Konto erstellen oder einloggen.
42 Gewinne / 300 € Gesamtwert: 30×5 €, 10×10 €, 2×25 € – einfach Newsletter aktivieren. Kein Kauf nötig. Abmeldung jederzeit. Gewinne in Form von Crazypatterns‑Einkaufsguthaben. Mehr Informationen
Frage stellen
Fragen & Antworten (1)
First set your printer to “Fit on Page” and select “Print Both sides (Long Edge)”
ENVELOPE (1st page)
----------------------------
1. Tell the printer to only print the 1st page
2. Cut out the envelop along lines (see faint grey lines and along the bottom green line, of page)
3. Fold along lines, as indicated (faint grey lines) – glue where indicated i.e. bottom and side flap
PATTERN
-------------
1. Set your printer to “Fit on Page” & select “Print Both sides (Long Edge)” & select it to print on
DRAFT, then tell the printer to print from the 2nd page to the end
2. Fold your knitting pattern into half: (the top to the bottom & then again into half: left side to the
right side) i.e. it will be folded into 1/4 of it size, and viola, fits into your envelop