Size:
Approx. 20 x 20 cm
Material:
Knitting needles 4 mm and 3.5 mm
Crochet hook 3.5 mm
30 gr Cotton Aran yarn in 2 Colours for each design.
Gauge:
Is not that important as it just will affect the finished size
Abbreviations: (I use US Terms)
St: Stitch
E: Edge Stitch (At the beginning of the row, both strands are slipped together, and at the end of the row, both strands are knitted together)
M: Main Colour (Work the Main Colour of this side knit and the contrast Colour purl)
C: Contrast Colour (Work the Contrast Colour of this side knit and the Main Colour purl)
I find that these potholders knit up really quickly once you’re familiar with the technique.
This pattern assumes basic knowledge of double knitting. If you’re not that familiar with it yet, feel free to check out this blog post:
https://www.crazypatterns.net/de/blog/3627/free-pattern-for-a-starfish-potholder-dishcloth-washcloth
I also love using these potholders as pan protectors, placing them between my pots and pans. Over the years, I've knitted quite a collection of potholders, and many of the designs are simply too beautiful to just be tucked away in a drawer. That's why I like to place them between my cookware as well. They help protect against scratches while allowing the lovely patterns to be enjoyed every day.
How I hold my yarns for double knitting
To hopefully make this technique a little easier to follow, I thought I'd show how I hold my yarns when working double knitting. There are lots of different ways to carry the two yarns, and what works best can vary from person to person. I've tried a few different methods over the years, and this is the one that works best for me.
When I work double knitting, I hold both yarns in my left hand. I wrap both yarns once around my little finger. The contrast colour then runs over my middle finger, while the main colour runs underneath my middle finger. From there, both yarns are carried together over my index finger. I always make sure that the contrast colour stays to the right of the main colour.
Wrapping both yarns around my little finger helps me keep the yarn tension even and under control while I knit.
Knitting the stitch pairs
Each stitch pair consists of one knit stitch for the front side and one purl stitch for the back side.
To knit the first stitch of the pair, both yarns stay behind the work while the knit stitch is worked. Both yarns are then brought to the front, so the purl stitch can be worked. The yarn that is not being used stays to the left of the working yarn for the back colour. The purl stitch is then worked as usual.
Throughout this process, the yarns stay in the same position. It is only when the pattern begins that the colours swap places within the stitch pairs.
.jpg)
Knitting the pattern
To work a stitch pair in the contrast colour, knit the first stitch of the pair with the contrast colour and purl the second stitch with the main colour.
If I can see that the pattern continues over several stitches, I briefly switch the position of the yarns and hold the main colour on the right and the contrast colour on the left. This makes the pattern easier for me to knit. If it is only one or two stitches, I leave the yarns in their usual position and simply work the stitches, keeping the yarn that is not being used out of the way.
When knitting the knit stitch, both yarns stay behind the work. When purling the purl stitch, both yarns stay in front of the work. While working the purl stitch, I also make sure to move the unused yarn aside without crossing the two yarns.
.jpg)
If working from the chart
The white squares represent the main colour of the side currently facing you, while the black squares represent the contrast colour of the side you are working. The edge stitches are marked in red.
Even-numbered rows are read from left to right, and odd-numbered rows are read from right to left.
Cast on 36 stitches with both colours held together. In the next row, work the stitches separately. You may need to adjust a stitch or two so that the colour order is correct.
At the beginning of each row, slip the edge stitch purl wise with both yarns held together. At the end of the row, work the edge stitch as a purl stitch with both yarns held together. These are the red marked edge stitches.
Work the chart and then bind off as described below. The bind-off instructions can be found after the row-by-row instructions for the first design.
The hanger is then worked with both yarns held together. Using a 3.5 mm crochet hook, chain 17 stitches. Attach the chain to its starting point with a slip stitch to form the potholder hanger.
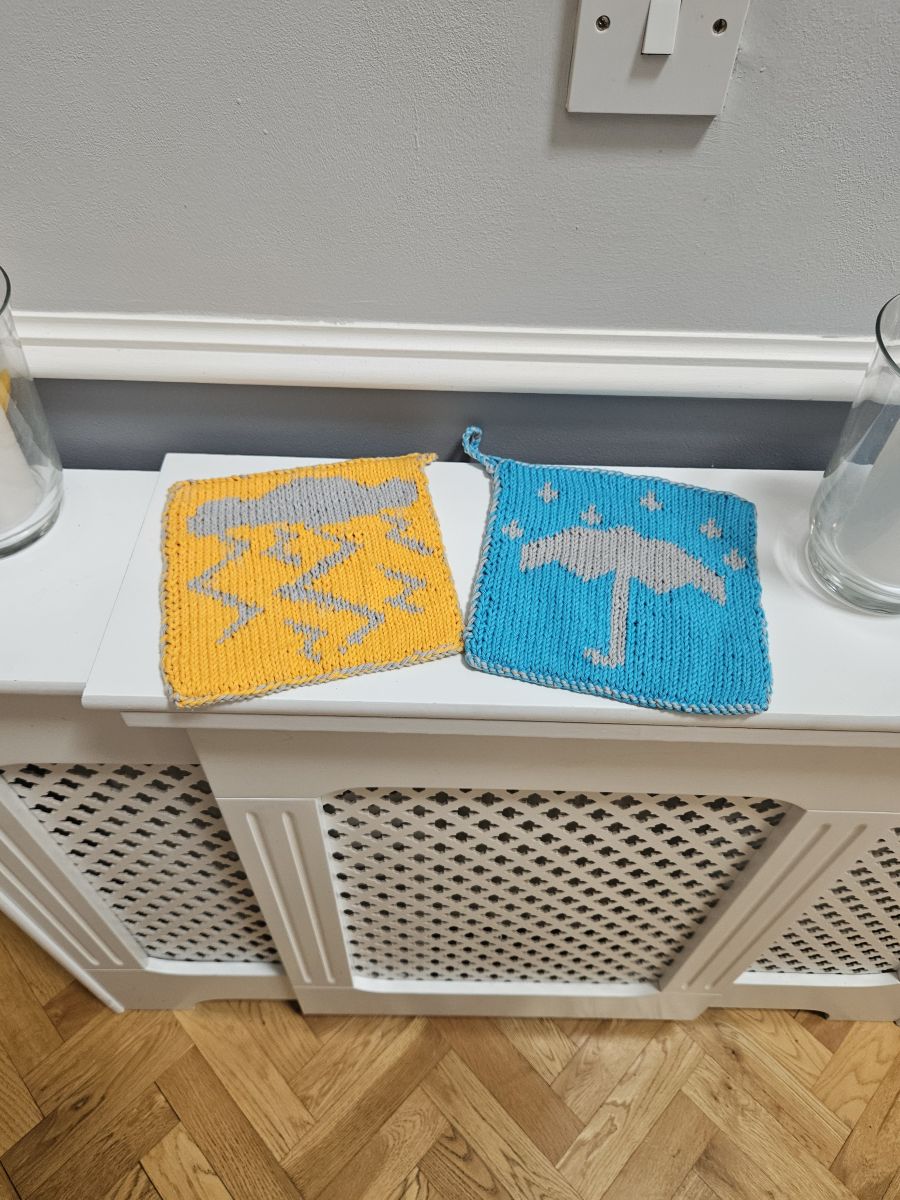
Design A: The umbrella
Let’s start
Cast on 36 stitches with both threads held together with the 4 mm knitting needle. Switch then to the 3.5 mm needle.
1. Row:
1 E, 34 M (as the stitches were cast on together, they might not be in the correct order and need to be worked separately, just make sure to work them in the right order) 1 R ( 36 St)
2. Row:
1 E, 34 M, 1 E (36 St)
3. Row:
1 E, 34 M, 1 E (36 St)
4. Row:
1 E, 14 M, 3 C, 17 M, 1 E (36 St)
5. Row:
1 E, 16 M, 5 C, 13 M, 1 E (36 St)
6. Row:
1 E, 13 M, 2 C, 1 M, 2 C, 16 M, 1 E (36 St)
7. Row:
1 E, 16 M, 2 C, 16 M, 1 E (36 St)
8. Row:
1 E, 16 M, 2 C, 16 M, 1 E (36 St)
9. Row:
1 E, 16 M, 2 C, 16 M, 1 E (36 St)
10. Row:
1 E, 16 M, 2 C, 16 M, 1 E (36 St)
11. Row:
1 E, 16 M, 2 C, 16 M, 1 E (36 St)
12. Row:
1 E, 16 M, 2 C, 16 M, 1 E (36 St)
13. Row:
1 E, 16 M, 2 C, 16 M, 1 E (36 St)
14. Row:
1 E, 16 M, 2 C, 16 M, 1 E (36 St)
15. Row:
1 E, 16 M, 2 C, 16 M, 1 E (36 St)
16. Row:
1 E, 16 M, 2 C, 16 M, 1 E (36 St)
17. Row:
1 E, 16 M, 2 C, 16 M, 1 E (36 St)
18. Row:
1 E, 16 M, 2 C, 16 M, 1 E (36 St)
19. Row:
1 E, 16 M, 2 C, 16 M, 1 E (36 St)
20. Row:
1 E, 16 M, 2 C, 16 M, 1 E (36 St)
21. Row:
1 E, 4 M, 1 C, 7 M, 1 C, 3 M, 2 C, 3 M, 1 C, 7 M, 1 C, 4 M, 1 E (36 St)
22. Row:
1 E, 4 M, 2 C, 5 M, 3 C, 2 M, 2 C, 2 M, 3 C, 5 M, 2 C, 4 M, 1 E (36 St)
23. Row:
1 E, 4 M, 3 C, 3 M, 5 C, 1 M, 2 C, 1 M, 5 C, 3 M, 3 C, 4 M, 1 E (36 St)
24. Row:
1 E, 4 M, 4 C, 1 M, 16 C, 1 M, 4 C, 4 M, 1 E (36 St)
25. Row:
1 E, 4 M, 26 C, 4 M, 1 E (36 St)
26. Row:
1 E, 4 M, 26 C, 4 M, 1 E (36 St)
27. Row:
1 E, 4 M, 26 C, 4 M, 1 E (36 St)
28. Row:
1 E, 5 M, 24 C, 5 M , 1 E (36 St)
29. Row:
1 E, 6 M, 22 C, 3 M, 1 C, 2 M, 1 E (36 St)
30. Row:
1 E, 1 M, 3 C, 3 M, 20 C, 4 M, 1 C, 2 M, 1 E (36 St)
31. Row:
1 E, 1 M, 3 C, 4 M, 18 C, 4 M, 3 C, 1 M, 1 E (36 St)
32. Row:
1 E, 2 M, 1 C, 6 M, 16 C, 5 M, 3 C, 1 M, 1 E (36 St)
33. Row:
1 E, 2 M, 1 C, 7 M, 14 C, 7 M, 1 C, 2 M, 1 E (36 St)
34. Row:
1 E, 15 M, 4 C, 12 M, 1 C, 2 M, 1 E (36 St)
35. Row:
1 E, 16 M, 2 C, 3 M, 1 C, 12 M, 1 E (36 St)
36. Row:
1 E, 11 M, 3 C, 20 M, 1 E (36 St)
37. Row:
1 E, 5 M, 1 C, 14 M, 3 C, 11 M, 1 E (36 St)
38. Row:
1 E, 12 M, 1 C, 14 M, 3 C, 4 M, 1 E (36 St)
39. Row:
1 E, 4 M, 3 C, 14 M, 1 C, 12 M, 1 E (36 St)
40. Row:
1 E, 6 M, 1 C, 21 M, 1 C, 5 M, 1 E (36 St)
41. Row:
1 E, 5 M, 1 C, 7 M, 1 C, 12 M, 3 C, 5 M, 1 E (36 St)
42. Row:
1 E, 5 M, 3 C, 11 M, 3 C, 12 M, 1 E (36 St)
43. Row:
1 E, 12 M, 3 C, 12 M, 1 C, 6 M, 1 E (36 St)
44. Row:
1 E, 6 M, 1 C, 13 M, 1 C, 13 M, 1 E (36 St)
45. Row:
1 E, 13 M, 1 C, 20 M, 1 E (36 St)
46. Row:
1 E, 34 M, 1 E (36 St)
47. Row:
1 E, 34 M, 1 E (36 St)
48. Row:
1 E, 34 M, 1 E (36 St)
Binding off
To bind off, I first work the edge stitch pair together as usual. After that, I work the stitch pairs one at a time and pass the previously worked stitch pair over the new one.
After the edge stitches, work as follows:
Knit 1 stitch, purl 1 stitch, then pass the previous stitch pair over.
Again, knit 1 stitch, purl 1 stitch, then pass the previous stitch pair over.
Continue like this across the entire row. At the end of the row, work the final edge stitch pair together and finish the bind-off row. Do not cut the yarns yet.
.jpg)
Using both yarns held together and a 3.5 mm crochet hook, chain 17 stitches. Then attach the chain to its starting point with a slip stitch. This creates the hanger for the potholder.
.png)
Design B: Thunder and Storm
Let’s start
Cast on 36 stitches with both threads held together with the 4 mm knitting needle. Switch then to the 3.5 mm needle.
1. Row:
1 E, 34 M (as the stitches were cast on together, they might not be in the correct order and need to be worked separately, just make sure to work them in the right order) 1 R ( 36 St)
2. Row:
1 E, 17 M, 1 C, 16 M, 1 E (36 St)
3. Row:
1 E, 15 M, 1 C, 3 M, 1 C, 14 M, 1 E (36 St)
4. Row:
1 E, 12 M, 2 C, 4 M, 2 C, 14 M, 1 E (36 St)
5. Row:
1 E, 15 M, 1 C, 4 M, 2 C, 12 M, 1 E (36 St)
6. Row:
1 E, 11 M, 2 C, 4 M, 2 C, 15 M, 1 E (36 St)
7. Row:
1 E, 16 M, 2 C, 4 M, 2 C, 10 M, 1 E (36 St)
8. Row:
1 E, 9 M, 2 C, 6 M, 2 C, 15 M, 1 E (36 St)
9. Row:
1 E, 14 M, 2 C, 7 M, 2 C, 3 M, 2 C, 4 M, 1 E (36 St)
10. Row:
1 E, 5 M, 2 C, 3 M, 2 C, 7 M, 1 C, 8 M, 1 C, 5 M, 1 E (36 St)
11. Row:
1 E, 6 M, 1 C, 6 M, 1 C, 7 M, 2 C, 3 M, 2 C, 6 M, 1 E (36 St)
12. Row:
1 E, 6 M, 3 C, 3 M, 3 C, 11 M, 2 C, 6 M, 1 E (36 St)
13. Row:
1 E, 7 M, 2 C, 9 M, 3 C, 6 M, 2 C, 5 M, 1 E (36 St)
14. Row:
1 E, 4 M, 2 C, 8 M, 3 C, 7 M, 2 C, 8 M, 1 E (36 St)
15. Row:
1 E, 8 M, 3 C, 5 M, 3 C, 10 M, 2 C, 3 M, 1 E (36 St)
16. Row:
1 E, 4 M, 2 C, 10 M, 4 C, 4 M, 2 C, 8 M, 1 E (36 St)
17. Row:
1 E, 7 M, 2 C, 4 M, 4 C, 10 M, 2 C, 5 M, 1 E (36 St)
18. Row:
1 E, 6 M, 2 C, 10 M, 4 C, 4 M, 2 C, 6 M, 1 E (36 St)
19. Row:
1 E, 6 M, 2 C, 5 M, 4 C, 9 M, 1 C, 7 M, 1 E (36 St)
20. Row:
1 E, 8 M, 1 C, 7 M, 3 C, 8 M, 2 C, 5 M, 1 E (36 St)
21. Row:
1 E, 4 M, 2 C, 10 M, 3 C, 15 M, 1 E (36 St)
22. Row:
1 E, 1 M, 1 C, 12 M, 3 C, 12 M, 2 C, 3 M, 1 E (36 St)
23. Row:
1 E, 2 M, 2 C, 14 M, 3 C, 10 M, 1 C, 2 M, 1 E (36 St)
24. Row:
1 E, 2 M, 2 C, 8 M, 3 C, 3 M, 1 C, 11 M, 2 C, 2 M, 1 E (36 St)
25. Row:
1 E, 3 M, 2 C, 9 M, 2 C, 4 M, 3 C, 6 M, 2 C, 3 M, 1 E (36 St)
26. Row:
1 E, 4 M, 2 C, 4 M, 3 C, 6 M, 2 C, 7 M, 2 C, 4 M, 1 E (36 St)
27. Row:
1 E, 5 M, 2 C, 5 M, 2 C, 7 M, 2 C, 4 M, 2 C, 5 M,1 E (36 St)
28. Row:
1 E, 5 M, 2 C, 5 M, 2 C, 6 M, 3 C, 3 M, 2 C, 6 M, 1 E (36 St)
29. Row:
1 E, 7 M, 2 C, 3 M, 2 C, 5 M, 2 C, 7 M, 2 C, 4 M, 1 E (36 St)
30. Row:
1 E, 3 M, 2 C, 9 M, 1 C, 4 M, 2 C, 3 M, 2 C, 8 M, 1 E (36 St)
31. Row:
1 E, 8 M, 2 C, 4 M, 2 C, 2 M, 1 C, 9 M, 2 C, 4 M, 1 E (36 St)
32. Row:
1 E, 5 M, 2 C, 12 M, 2 C, 4 M, 2 C, 7 M, 1 E (36 St)
33. Row:
1 E, 6 M, 2 C, 5 M, 1 C, 3 M, 6 C, 4 M, 1 C, 6 M, 1 E (36 St)
34. Row:
1 E, 7 M, 12 C, 8 M, 1 C, 6 M, 1 E (36 St)
35. Row:
1 E, 3 M, 4 C, 3 M, 22 C, 2 M, 1 E (36 St)
36. Row:
1 E, 1 M, 31 C, 2 M, 1 E (36 St)
37. Row:
1 E, 2 M, 31 C, 1 M, 1 E (36 St)
38. Row:
1 E, 1 M, 31 C, 2 M, 1 E (36 St)
39. Row:
1 E, 2 M, 31 C, 1 M, 1 E (36 St)
40. Row:
1 E, 1 M, 31 C, 2 M, 1 E (36 St)
41. Row:
1 E, 3 M, 29 C, 2 M, 1 E (36 St)
42. Row:
1 E, 3 M, 3 C, 2 M, 23 C, 3 M, 1 E (36 St)
43. Row:
1 E, 4 M, 5 C, 3 M, 13 C, 9 M, 1 E (36 St)
44. Row:
1 E, 10 M, 11 C, 13 M, 1 E (36 St)
45. Row:
1 E, 14 M, 9 C, 11 M, 1 E (36 St)
46. Row:
1 E, 16 M, 3 C, 15 M, 1 E (36 St)
47. Row:
1 E, 34 M, 1 E (36 St)
48. Row:
1 E, 34 M, 1 E (36 St)
The bind-off and hanger are worked in the same way as described for the first design.
.png)
I hope you enjoyed my pattern, If you knit this pattern I would appreciate a comment how you got along and if you upload a photo of your make on Instagram, please don’t forget to tag and follow me @_lovelyyarns
Categories
Quick to Target
Community & Help


