.jpg)
What is C2C?
C2C (Corner to Corner) means working from one corner to the other. It’s a crochet technique where you work diagonally in small blocks. These blocks create a beautiful texture when worked in a single colour, but they are also perfect for creating lovely designs, stripes, or pixel-style patterns which is one of the reasons why I love this technique so much.
I find this technique quick and easy to learn and ideal for making squares, rectangles, stripes, or graphic designs.
For larger blankets, I sometimes prefer to work several smaller squares separately and sew them together afterwards. This way, there aren’t too many different coloured yarn strands attached to one large piece, which keeps the project much easier to manage and makes more complex designs simpler to work.
What I especially love about this technique is the beautiful texture it creates. I also always feel like blankets made using C2C work up incredibly fast. My favourite moment is when both corners are reached — meaning the longest row is finished — and you notice that each following row becomes smaller again. From that point on, you can really see the project coming together. In my opinion, there are almost no limits when it comes to designs, and you can really let your creativity run free.
At the end, you can add a beautiful border to give your project an even more personal and unique finishing touch.
By the way, you can find the pattern for these cute cupcake potholders in my shop here:
https://www.crazypatterns.net/en/items/116325/beginner-s-step-by-step-guide-for-a-cupcake-potholder-corner-to-corner-croc
How to Work the C2C Technique?
C2C is worked in blocks, where each block consists of 3 chain stitches (ch) and 3 double crochet stitches (dc). (This will be explained in more detail further below.)
At the beginning of each row, you either work 6 chain stitches (for an increase) or 3 slip stitches along the side followed by 3 chain stitches (for a decrease), depending on whether the piece needs to grow or become smaller.
You begin in one corner — usually the bottom right — and work diagonally towards the opposite top corner.
C2C is usually worked using a graph that shows how the individual blocks are arranged.
The technique can be worked using either double crochet (dc) or half double crochet (hdc) stitches. I usually prefer double crochet because it works up faster and allows larger blankets to be completed with less effort.
Half double crochet, however, creates a denser fabric with smaller gaps. I find this especially ideal for larger or more detailed designs, or for baby blankets, so that little fingers don’t get caught in the larger spaces.
To create a square, you increase by one block in each row until the desired width is reached. From this point on, you begin decreasing one block in every following row, allowing the piece to gradually close towards the opposite corner.
To create a rectangle, you first increase by one block in each row until the desired width is reached. After that, you continue increasing on one side while already decreasing on the other side, keeping the number of blocks per row the same. Once the desired height is reached, you decrease on both sides until the piece closes towards the final corner and is finished.
I’ll explain this in more detail a little further down.
How to read the Graph:
.png)
You begin in the bottom-right corner and work your way diagonally across the piece towards the opposite top corner. Instead of working in straight rows, C2C is always worked diagonally, allowing the project to be built block by block.
Even-numbered rows are worked from left to right and form the back rows, while odd-numbered rows are worked from right to left and form the front rows.
You continue increasing until the widest part of the graph is reached (the full width or height). After that, you begin decreasing to shape the opposite side.
The easiest way to keep track of your progress is to print out the graph and cross off each completed row. This makes working diagonally much easier, as you always know exactly where you are in the pattern.
So when reading a graph, always remember:
- You start in the bottom-right corner and work diagonally upwards.
- Even-numbered rows (worked from left to right) are the back rows.
- Odd-numbered rows (worked from right to left) are the front rows.
In my C2C patterns, I always include written row instructions so you can easily follow the pattern step by step. I also include a graph for those who prefer working visually.
In the written instructions, I always indicate whether a row is an increase or decrease row and how many blocks are worked in each colour.
Now to the important part : How to work the rows (Square example)
Unless otherwise stated, a block always consists of 3 ch and 3 dc. (Double crochet us term)
In this example, you’ll work increase rows up to the 4th row, which is the widest diagonal. After that, you begin decreasing until you're back down to just one block.
First Row (1 Block)
.jpg)
Start with a chain of 6. Work 1 double crochet into the 4th chain from the hook, then 1 double crochet in each of the next 2 chains. Turn your work. (Photo 1–3)
Second Row: (2 Blocks, increasing)
.jpg)
First Block:
Start again with a chain of 6, work 1 double crochet in the 4th stitch from the hook and 1 double crochet in each of the next 2 stitches.
Work 1 Slip stitch into the top of the ch-3 from the previous row to attach the block to your work.
(Photo 4–6)
Second Block:
Work a chain of 3, followed by 3 double crochet stitches in the chain space and turn your work. (Photo 7 – 9)
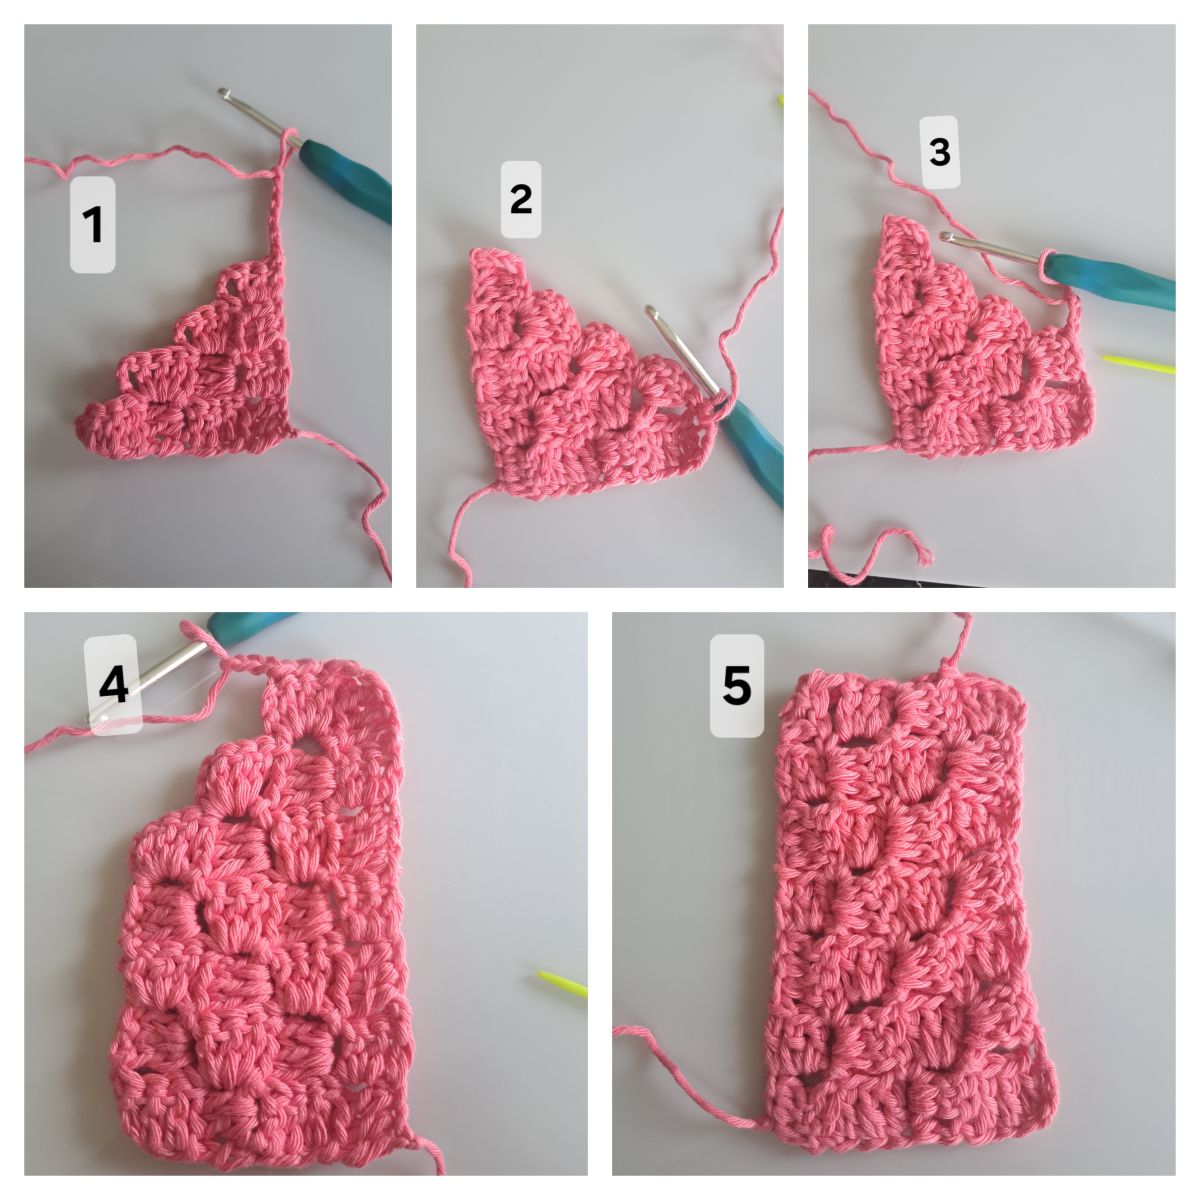
3. Row: (3 Blocks, increasing)
.jpg)
First Block:
Start again with a chain of 6, work 1 double crochet in the 4th stitch from the hook and 1 double crochet in each of the next 2 stitches.
Work 1 Slip stitch into the top of the 3rd chain stitch from the previous row to attach the block to your work. (Photo 10 - 11)
Second Block:
Work a chain of 3, followed by 3 double crochet stitches in the chain space and work 1 slip stitch into the top of the 3rd chain stitch from the previous row. (Photo 12)
Third Block:
Work a chain of 3, followed of 3 double crochet stitches in the chain space and turn your work. (Photo 13)
Tip: For a clean edge, work the very last double crochet stitch of the last block of the row in the top chain stitch from the previous row (green needle photo 13).
.jpg)
All following increase rows are worked in the same way as Row 3, continuing until the desired width is reached. Each new row will have one more block than the previous one. (Photo 14 + 15)
The Decreases:
.jpg)
When the maximum width is reached (meaning the longest diagonal row is finished), we begin decreasing on both sides. From this point on, each row will have one block less than the previous one.
After turning your work, crochet 3 slip stitches (sl st) along the side edge and then chain 3 to reach the height needed for the first block (instead of chaining 6 like we did in the increase rows).
Work the first block as usual by crocheting 3 double crochets (dc) into the next chain space and attach it to the piece with a slip stitch.
Continue working the remaining blocks for the row, turn your work, and repeat these steps for all following decrease rows until only one block is left, and the piece is finished.
How to work a Rectangle Instead of a Square:
To create a rectangle instead of a square, you simply continue increasing on both sides, just as shown earlier in Row 3. Each row begins with 6 chain stitches until the desired width is reached. In the example chart I’m using here, this happens in Row 4.
After that point, the work continues with 4 blocks per row until the desired height is reached (Row 7 in this example). This is done by continuing to increase on one side while already decreasing on the other side. This means that one row begins with 6 chains, while the next row begins with 3 slip stitches and 3 chains.
In my patterns, I always indicate whether a row is an increase or a decrease row.
If the instruction says increase, the row starts with 6 chains.
If it says decrease, the row starts with 3 slip stitches and 3 chains.
In this example here, where the rectangle is worked vertically, increases are always made on the right side (when the front side is facing you), while decreases are worked on the left side. If the rectangle is worked horizontally instead, this is simply reversed and the increases are made on the left side and the decreases on the right.
A stitch marker can be very helpful here to keep track of which side you are working the increases and which side the decreases.
When you have reached the length needed, decreases are worked on both sides — just like when making a square. From this point on, every row begins with 3 slip stitches and 3 chains.
So simply remember these key points for both shapes:
Square
- Increase on both sides until the desired width is reached
- Decrease on both sides until only one block remains
Rectangle
- Increase on both sides until the desired width is reached
- Increase on one side and decrease on the other until the desired length is reached
- Finally, decrease on both sides
So how do we work with colours?
.jpg)
In general, it's best to use a separate ball of yarn for each section of colour. When a section is finished, you can simply leave the yarn hanging and pick it up again in the next row when you need this colour once more.
When working with many colours — especially if the same colour appears in several places — you will quickly end up with multiple small yarn balls which makes it important to keep them all neat and tidy.
Sometimes the yarn can also be carried across, but I usually only recommend this when the next colour block is directly next to it. Often it takes a bit of trial and error to decide whether cutting the yarn or carrying it along is the better option, as this also depends a lot on the individual project.
How to work colour changes?
.jpg)
The colour change works just like in other crochet techniques you may already know.
The last double crochet of a block is started using the old colour but is not finished completely. Before making the final yarn over, pick up the new colour instead of the old and complete the stitch with it. The following slip stitch is also worked using the new colour.
The unused yarn can simply be dropped to the back of the work. Just make sure that all unused colours always stay on the back side of your project.
How to carry the yarn along?
.jpg)
Sometimes you can carry the yarn along instead of starting a new yarn ball for every small colour section.
If the yarn is needed again after only a few blocks, you can simply carry it across for a short distance and crochet over it in the following blocks. This only works when the neighbouring blocks in the previous row are worked in the same colour, otherwise the carried yarn might be visible through your work.
.png.png)
Sometimes a colour is needed again a few blocks earlier than where it ended in the previous row. In this case, you can carefully bring the yarn forward and crochet over it as you continue working.
It’s important to leave enough yarn length and to keep an even tension; otherwise the crochet piece can start to pull together, and the overall look may become uneven. Personally, I usually only do this over 3–4 blocks, as anything longer can quickly start to look messy.
It also helps to remember:
- In right-side rows, the yarn lies behind the work
- In wrong-side rows, the yarn lies in front of the work
Carrying yarn takes a bit of practice and might need some trial and error to find what works best for you
Sometimes I actually find it easier to just reattach the yarn instead of carrying it over.
I also like to crochet new yarn ends in as I go, which means far fewer ends need to be woven in later.
I hope you enjoyed this guide and that it inspired you to give this technique a try yourself. I’m always very happy to receive a comment or any feedback.
If you’d like to try this technique yourself, you’ll also find several C2C patterns in my shop and on my blog.
For example, these heart potholders, which you can find here in my shop:
.jpg)
https://www.crazypatterns.net/en/items/100501/the-heart-potholder-worked-in-c2c
You can also find this free heart wall hanging pattern here:
.png)
https://www.crazypatterns.net/en/blog/4798/free-c2c-crochet-pattern-heart-wall-hanger
You can find more free knitting and crochet patterns, tips and tricks on my blog here under “Posts”. Please don't hesitate to follow me so you don’t miss anything.


