Bunny Cushion – Knitting Pattern.
.JPG)
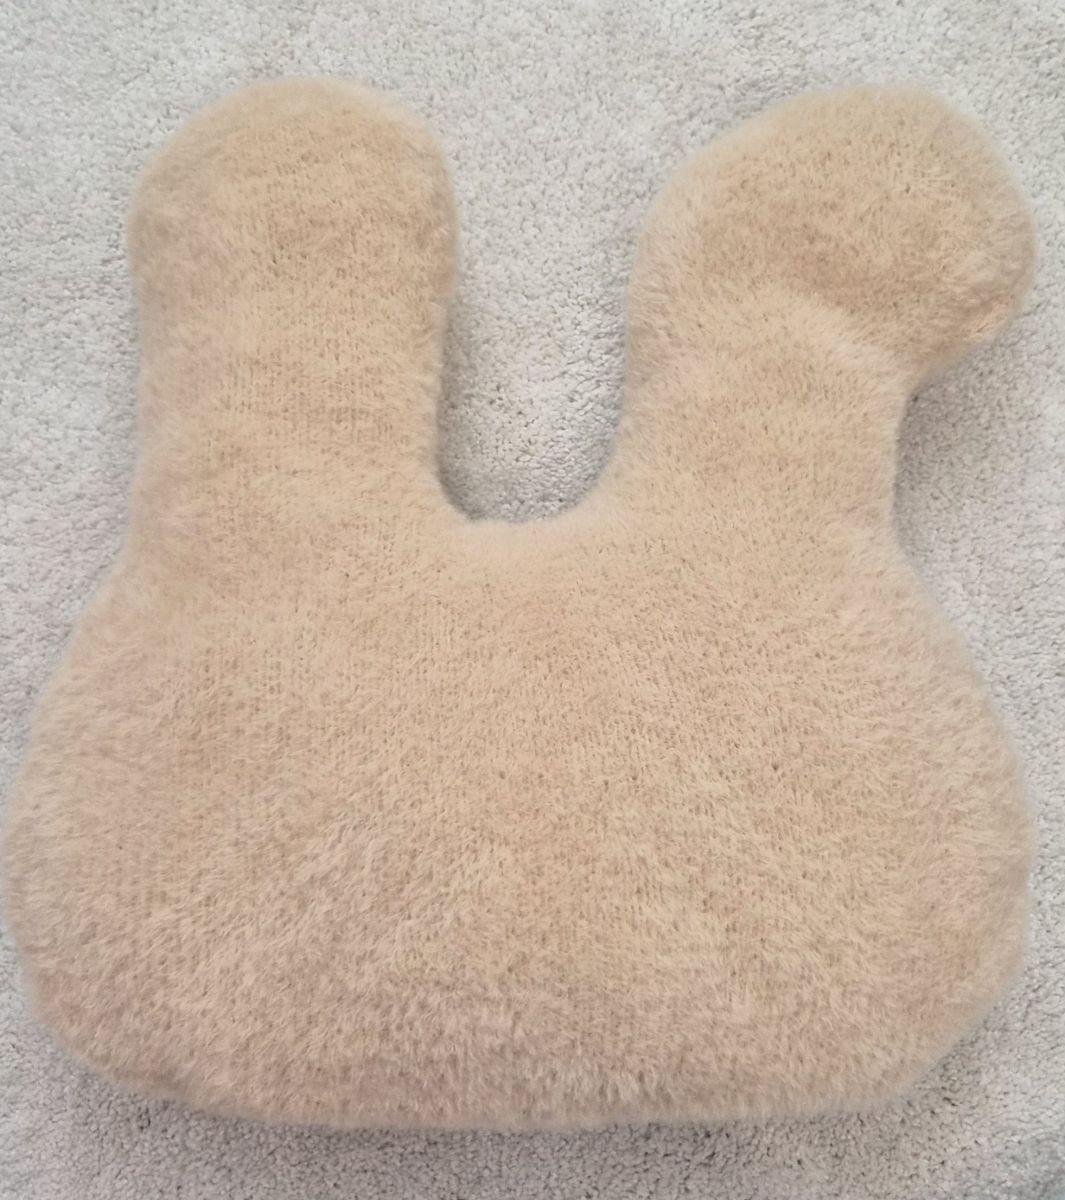
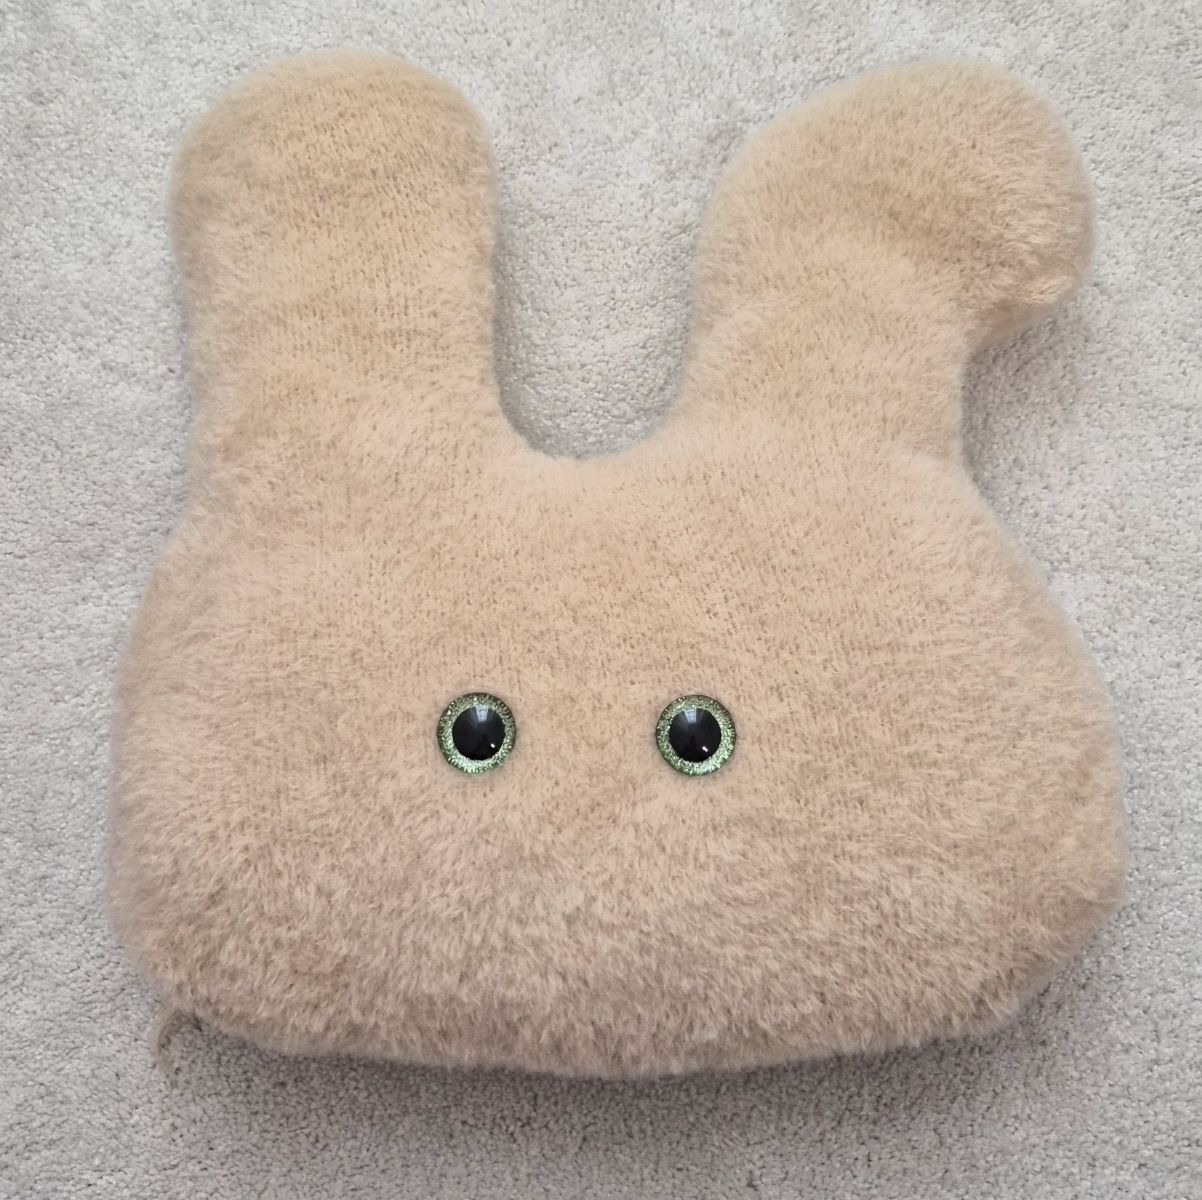
This knitting pattern shows you how to make a soft cushion shaped like a bunny — a truly cuddly project, perfect for children to hug and love, and also a charming Easter gift.
For my bunny, I chose a particularly fluffy yarn, which makes it even more airy and cozy. But feel free to experiment: chenille yarn creates a velvety surface, while cotton yarn gives a clearer, more defined texture. Simply choose the yarn and colors you like best and that suit your own bunny.
Size: approx. 40 cm long, 24 cm high, 50 cm including ears.
Knitting Instructions:
All parts are crafted entirely with two knitting needles.
Follow these steps:
First Row - Purl Stitches Begin by knitting the first row entirely in purl stitches. These will form the back side of your project, creating a neat texture.
Second Row - Knit Stitches In the second row, knit every stitch. This will produce a smooth, even front for your piece.
Repeating the Pattern Continue alternating between purl stitches in the odd-numbered rows and knit stitches in the even-numbered rows:
- Odd-numbered rows (e.g., 1st, 3rd, 5th): Work in purl stitches.
- Even-numbered rows (e.g., 2nd, 4th, 6th): Work in knit stitches.
This straightforward pattern of alternating knit and purl rows is ideal for beginners, offering an easy yet satisfying introduction to the craft.
You will need:
✓ Yarn for the bunny: Brown, 130 g of Leami Brush for Plush (160 m / 100 g)
✓ Knitting needles: 2.5 mm
Please note that yarn usage may vary depending on your knitting style — if you knit loosely, you will generally need a bit more yarn than someone who knits tightly.
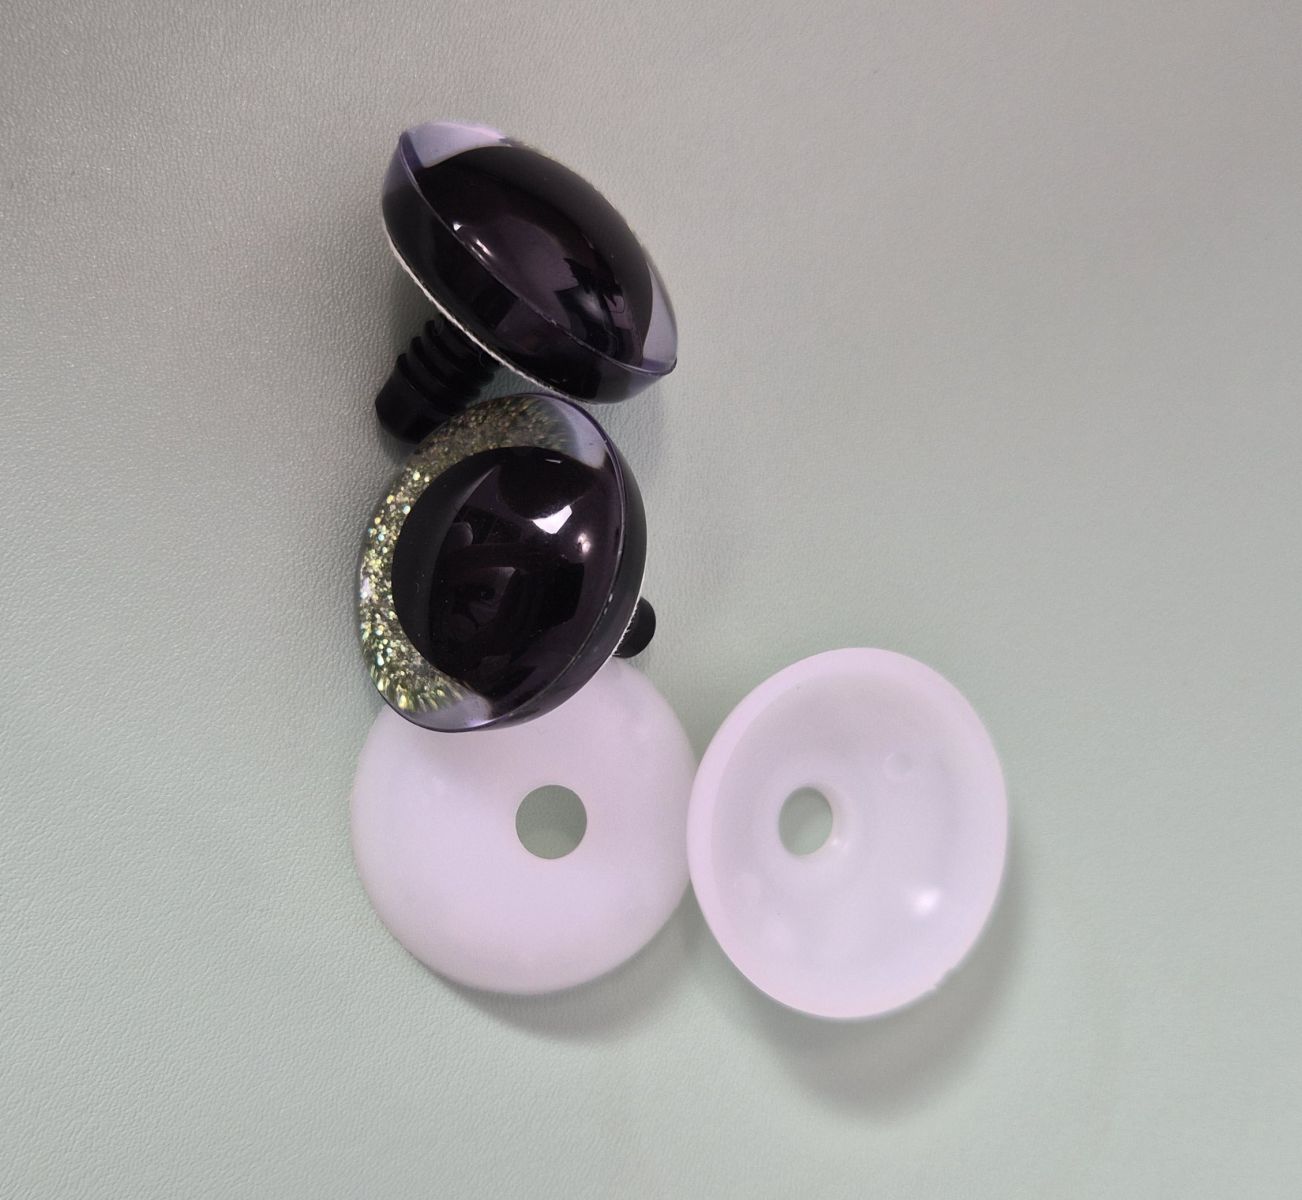
✓ Safety eyes 20 mm
✓ Stuffing, stitch holders or a scrap piece of yarn, tapestry needle, yarn for embroidery.
Abbreviations:
CH – Chain(s)
inc – increase
dec – decrease
X dec – X- times decrease
X inc – X- times increase
ST – Stitch
P – purl
K– knit (garter stitch)
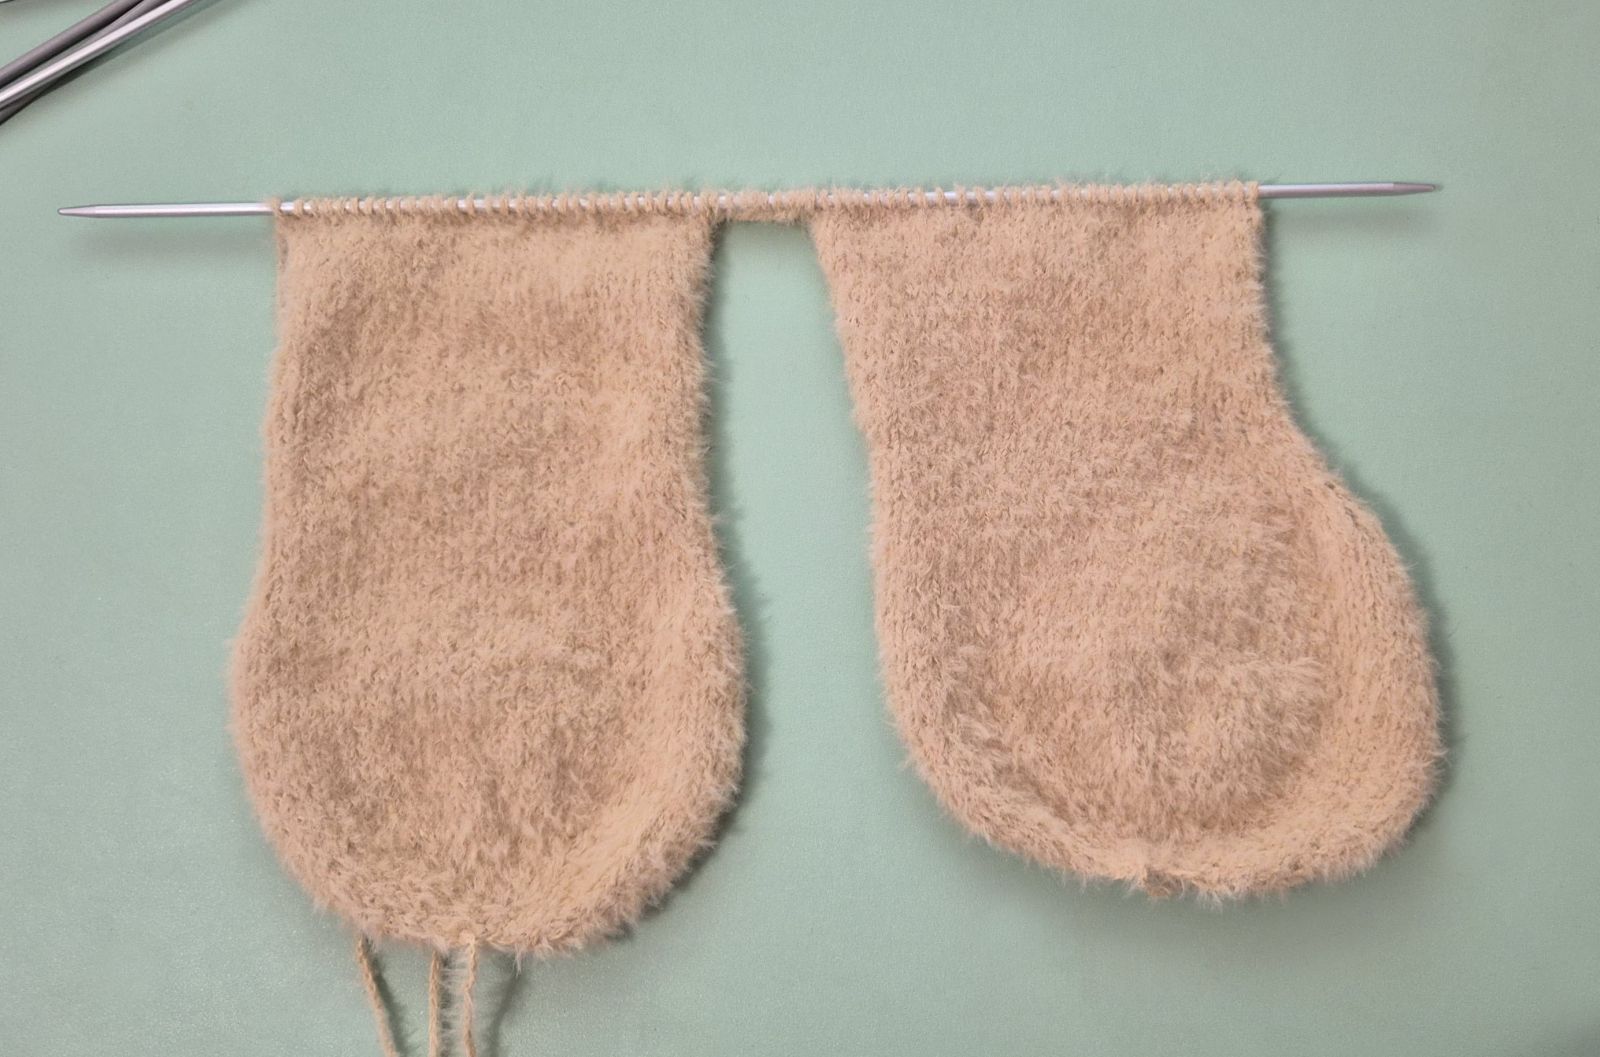
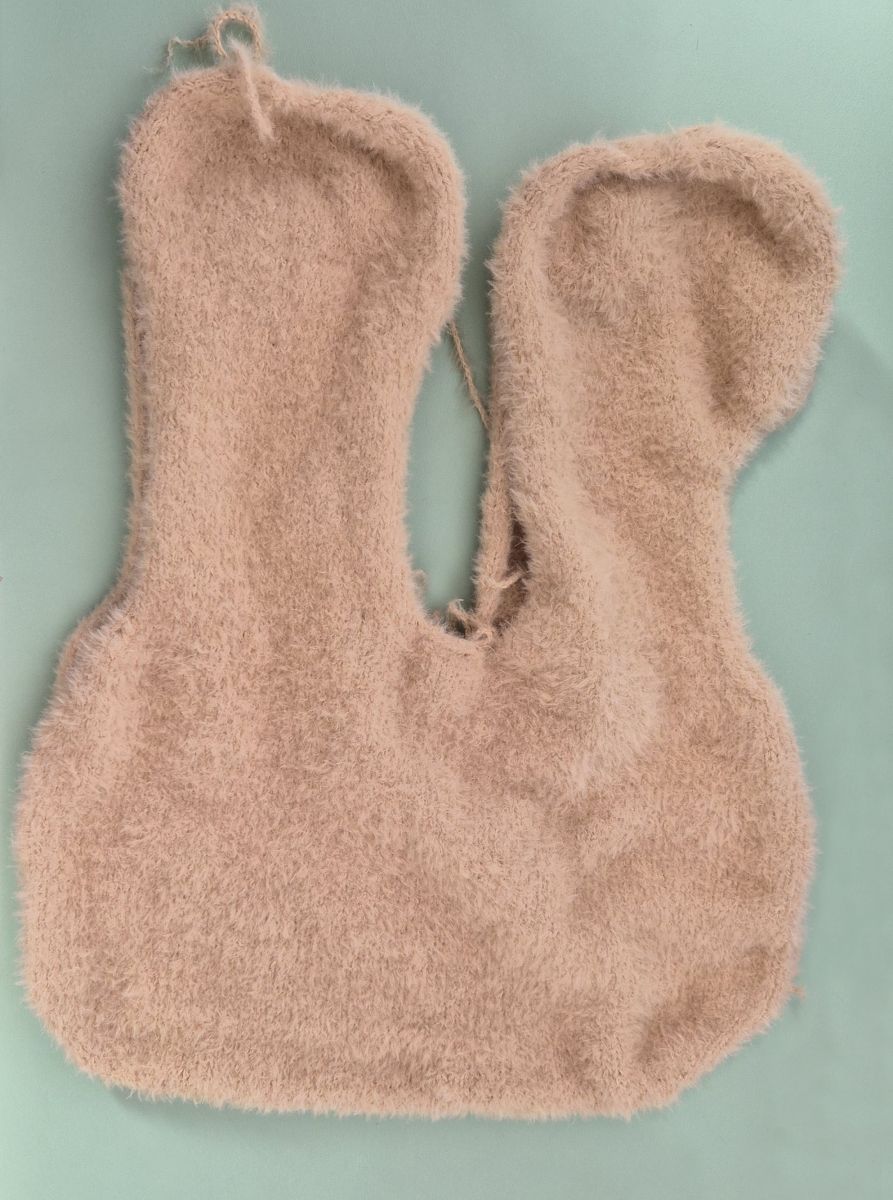
The pillow is knitted in one piece. You start with the ears.
Ears
The first ear
Cast on 6 stitches (ch) onto the knitting needle. Make sure the stitches are evenly stretched while knitting to ensure your knitted piece is nice and even.
1. 6 P (6)
2. 6 K inc. (12)
3. 12 P (12)
4. (1 K, 1 inc) x 6 (18)
5. 18 P
6. (2 K, 1 inc) x 6 (24)
7. 24 P
8. (3 K, 1 inc) x 6 (30)
9. 30 P
10. 30 K
11. 30 P
12. (4 K, 1 inc) x 6 (36)
Knit a total of 19 rows in stockinette stitch:
On the front side of the work, knit all stitches across the row.
On the back side of the work, purl all stitches across the row.
13. 15. 17. 19. 21. 23. 25. 27. 29. 31 - 36 P
14. 16. 18. 20. 22. 24. 26. 28. 30. - 36 K
32. 3 dec, 24 K, 3 dec (30)
Knit a total of 33 rows in stockinette stitch:
On the front side of the work, knit all stitches across the row.
On the back side of the work, purl all stitches across the row.
33. 35. 37. 39. 41. 43. 45. 47. 49. 51. 53. 55. 57. 59. 61. 63. 65– 30 P
34. 36. 38. 40. 42. 44. 46. 48. 50. 52. 54. 56. 58. 60. 62. 64 – 30 K
Cut the yarn. The stitches remain live and are not bound off.
If you have several knitting needles of the same size, you can simply leave the piece on the needle and set it aside. If not, slip all stitches onto a spare needle or a piece of yarn and set the piece aside.
The second ear
Cast on 6 stitches (ch) onto the knitting needle. Make sure the stitches are evenly stretched while knitting to ensure your knitted piece is nice and even.
1. 6 P (6)
2. 6 K inc. (12)
3. 12 P (12)
4. (1 K, 1 inc) x 6 (18)
5. 18 P
6. (2 K, 1 inc) x 6 (24)
7. 24 P
8. (3 K, 1 inc) x 6 (30)
9. 30 P
10. (4 K, 1 inc) x 6 (36)
11. 36 P
12. (5 K, 1 inc) x 6 (42)
Knit a total of 23 rows in stockinette stitch:
On the front side of the work, knit all stitches across the row.
On the back side of the work, purl all stitches across the row.
13. 15. 17. 19. 21. 23. 25. 27.29. 31. 33. 35. - 42 P
14. 16. 18. 20. 22. 24. 26. 28. 30. 32. 34. - 42 K
36. 6 dec, 30 K (36)
37. 36 P
38. 6 dec, 24 K (30)
39. 30 P
40. 30 K
41. 30 P
42. 30 K
43. 30 P
44. 6 dec, (2 fm, 1 inc)x 6 (30)
Knit a total of 21 rows in stockinette stitch:
On the front side of the work, knit all stitches across the row.
On the back side of the work, purl all stitches across the row.
45. 47. 49. 51. 53. 55. 57. 59. 61. 63. 65. – 30 P
46. 48. 50. 52. 54. 56. 58. 60. 62. 64. – 30 K
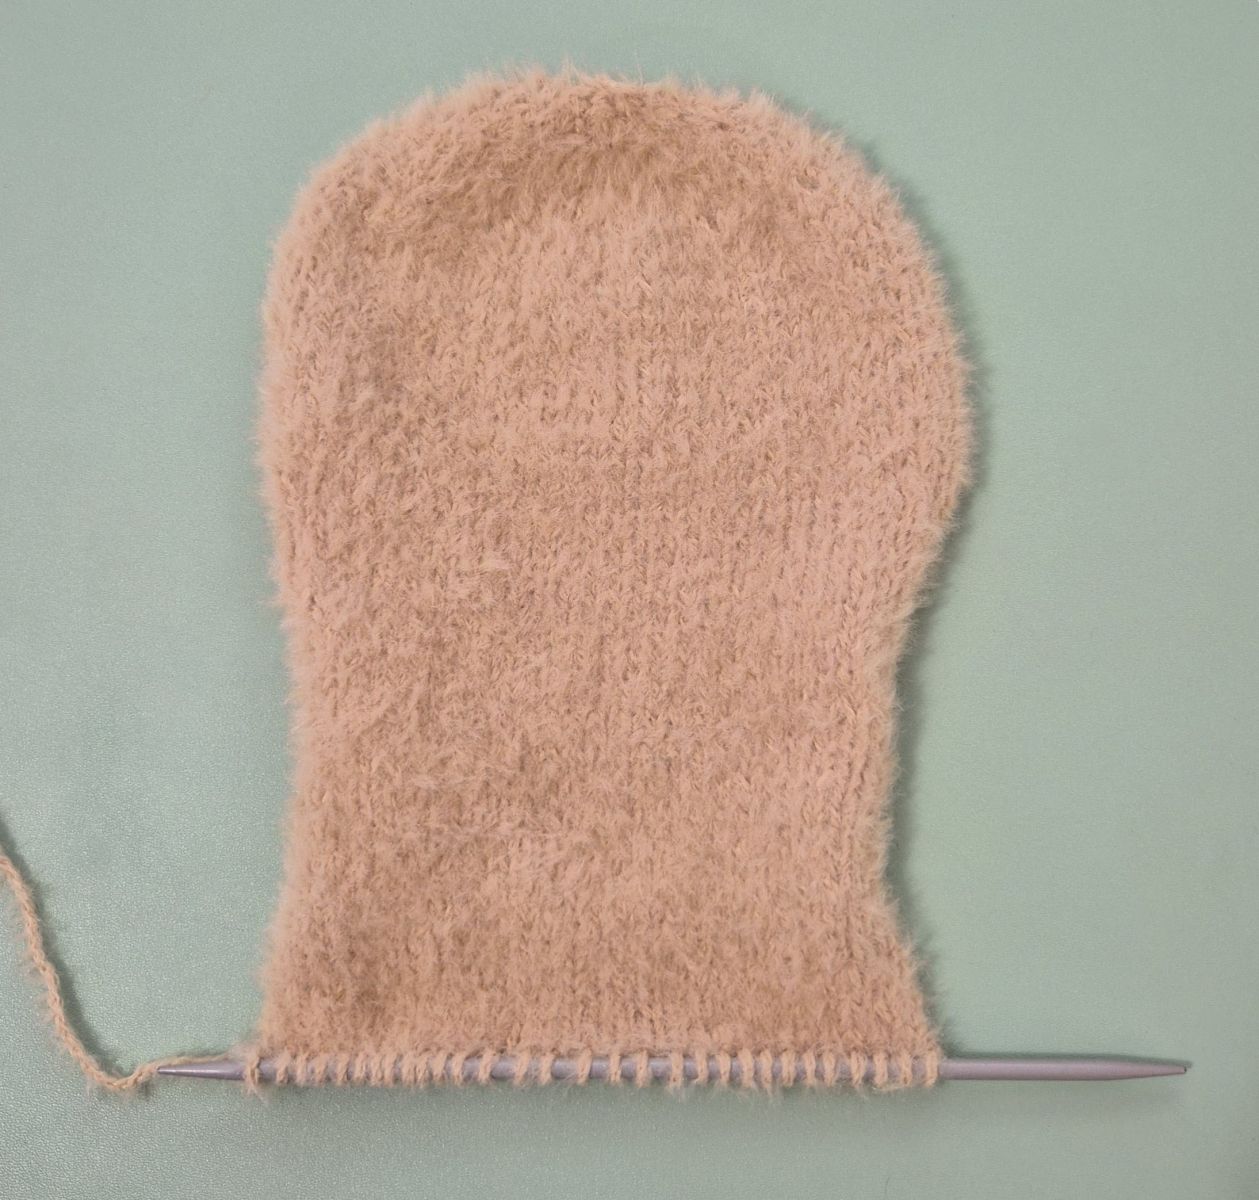
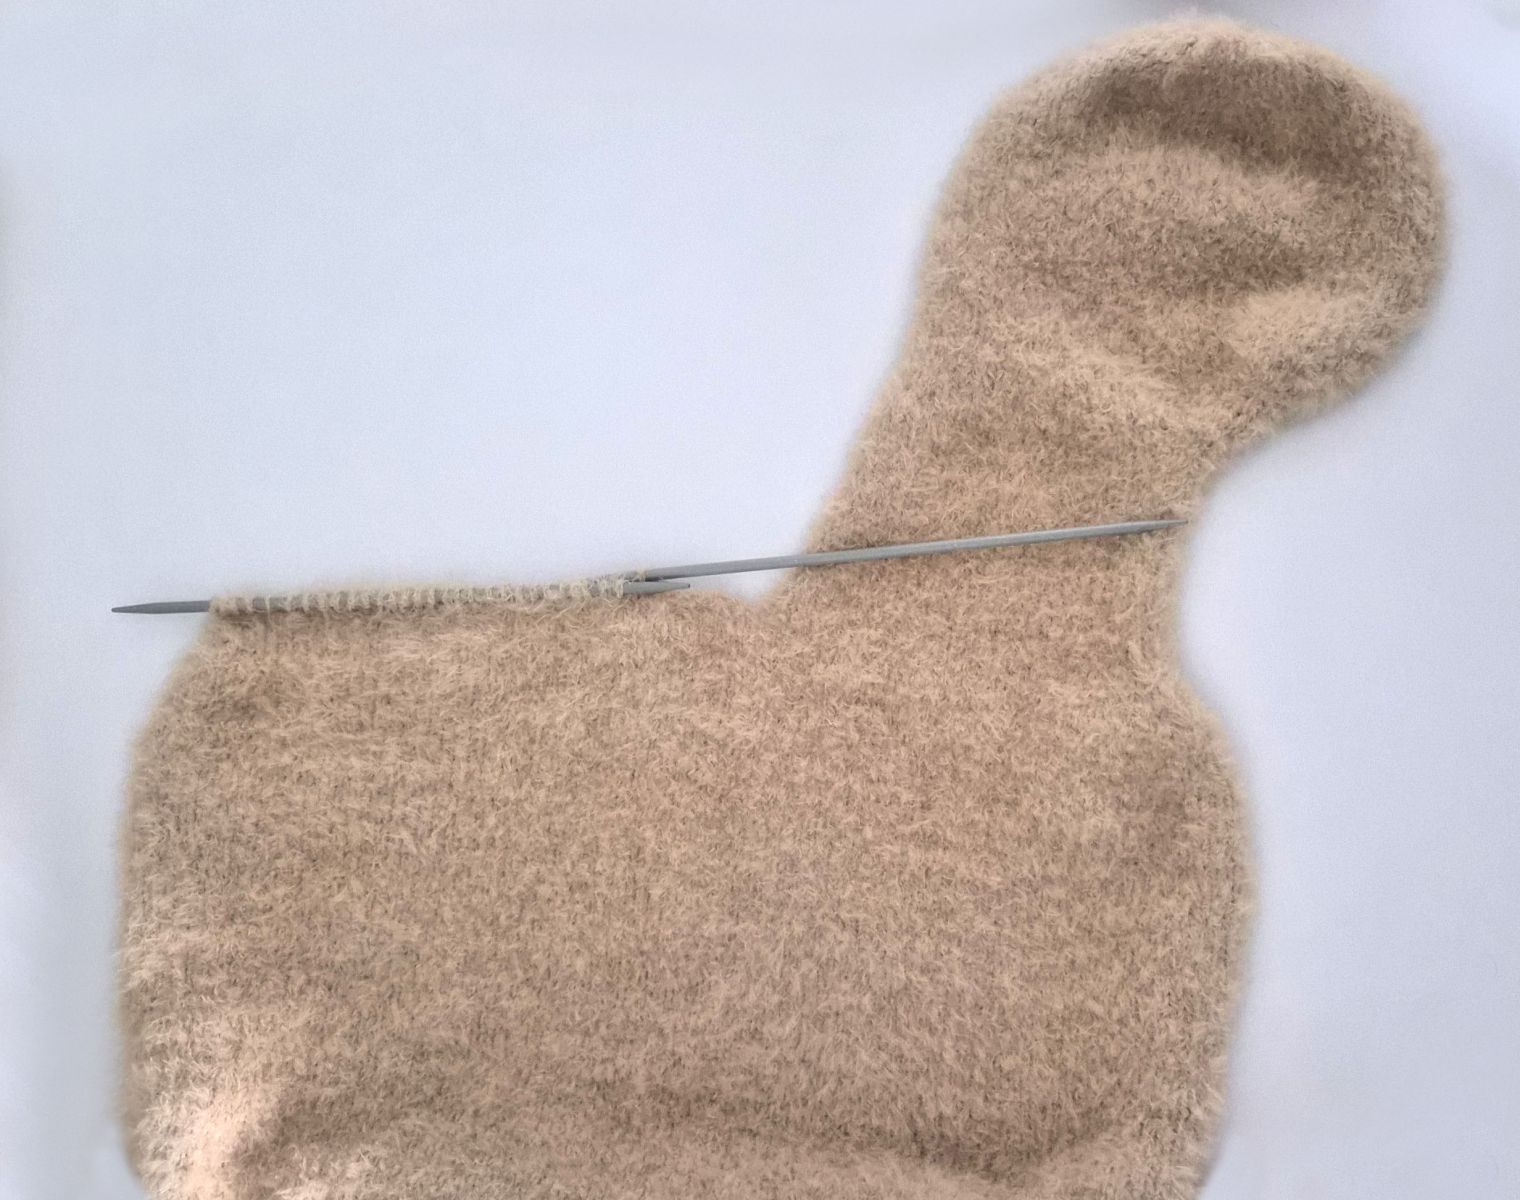
Since I worked the ears with a short knitting needle, I now need a long needle for the next step so I can distribute all the stitches evenly.
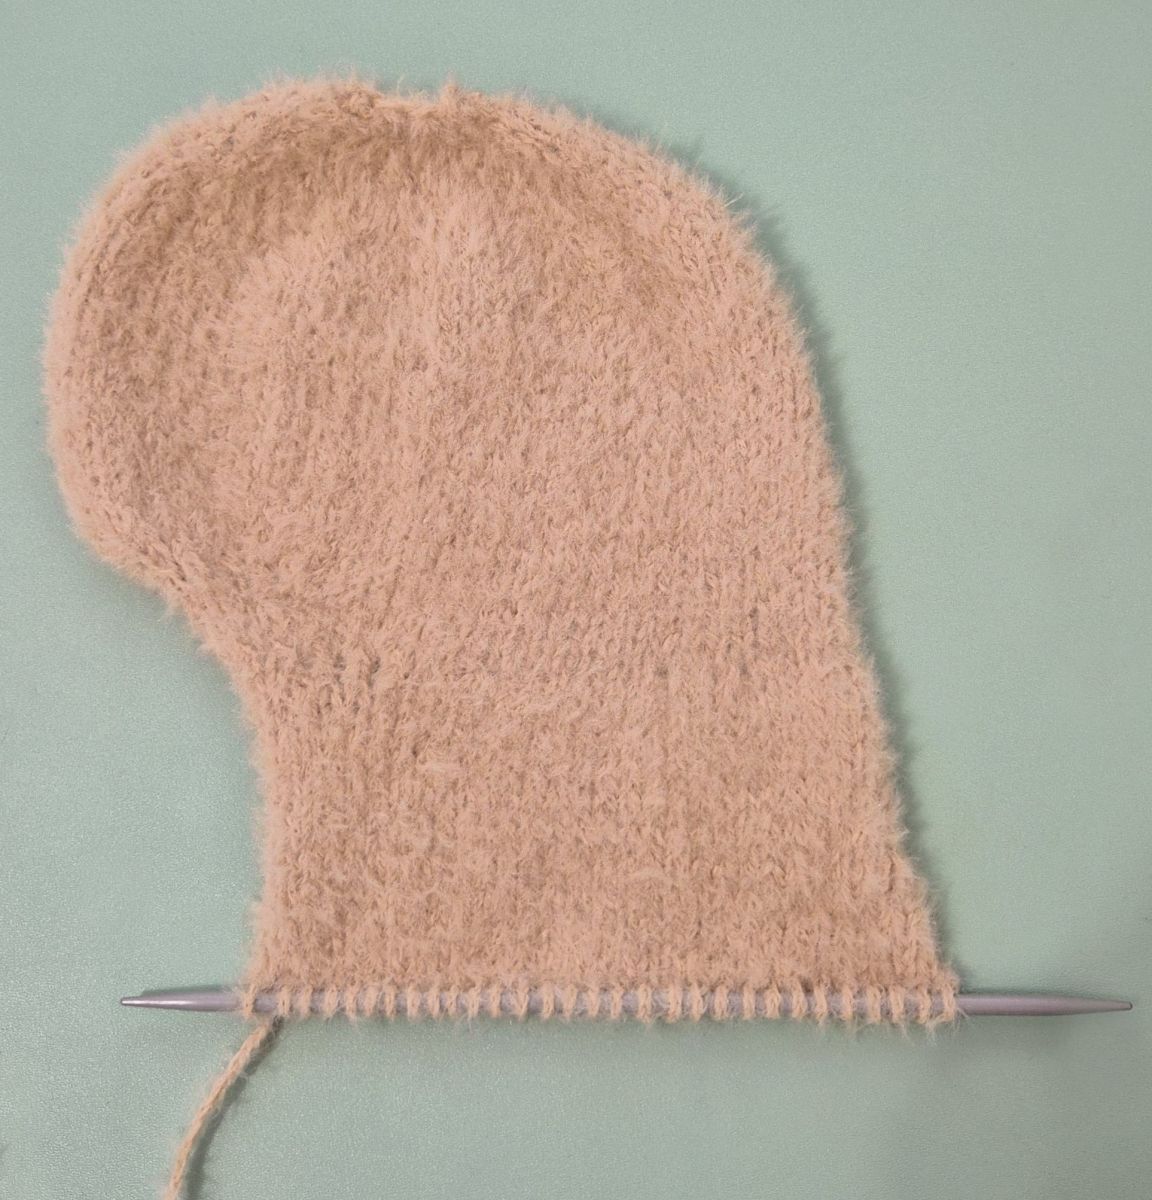
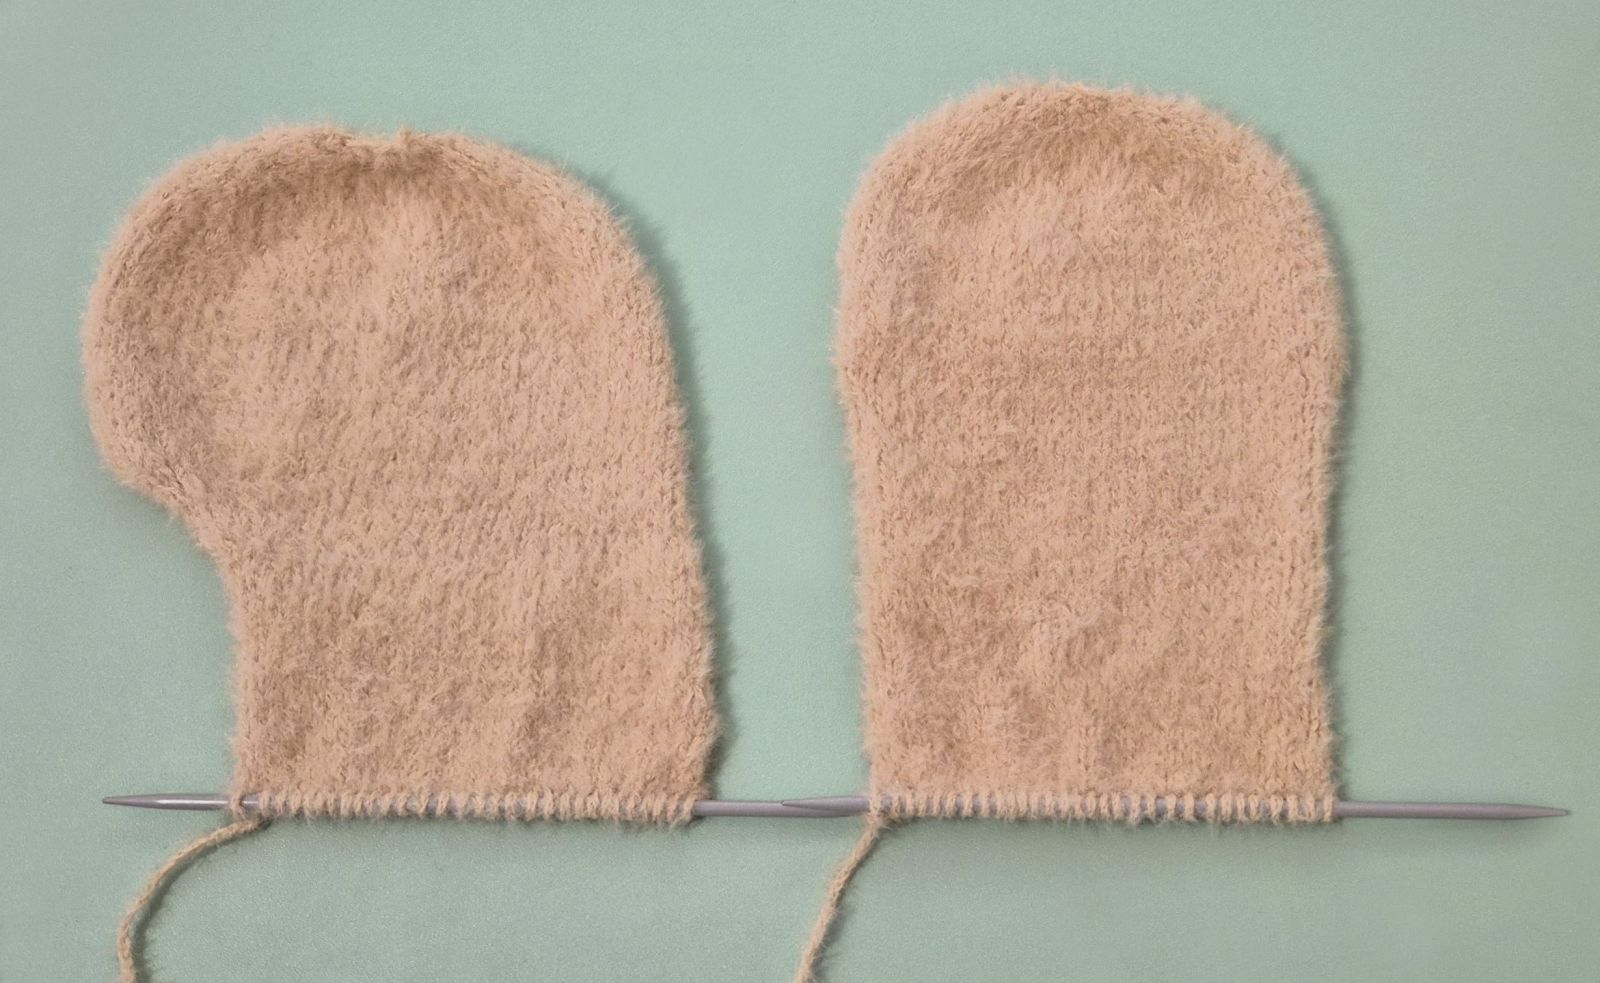
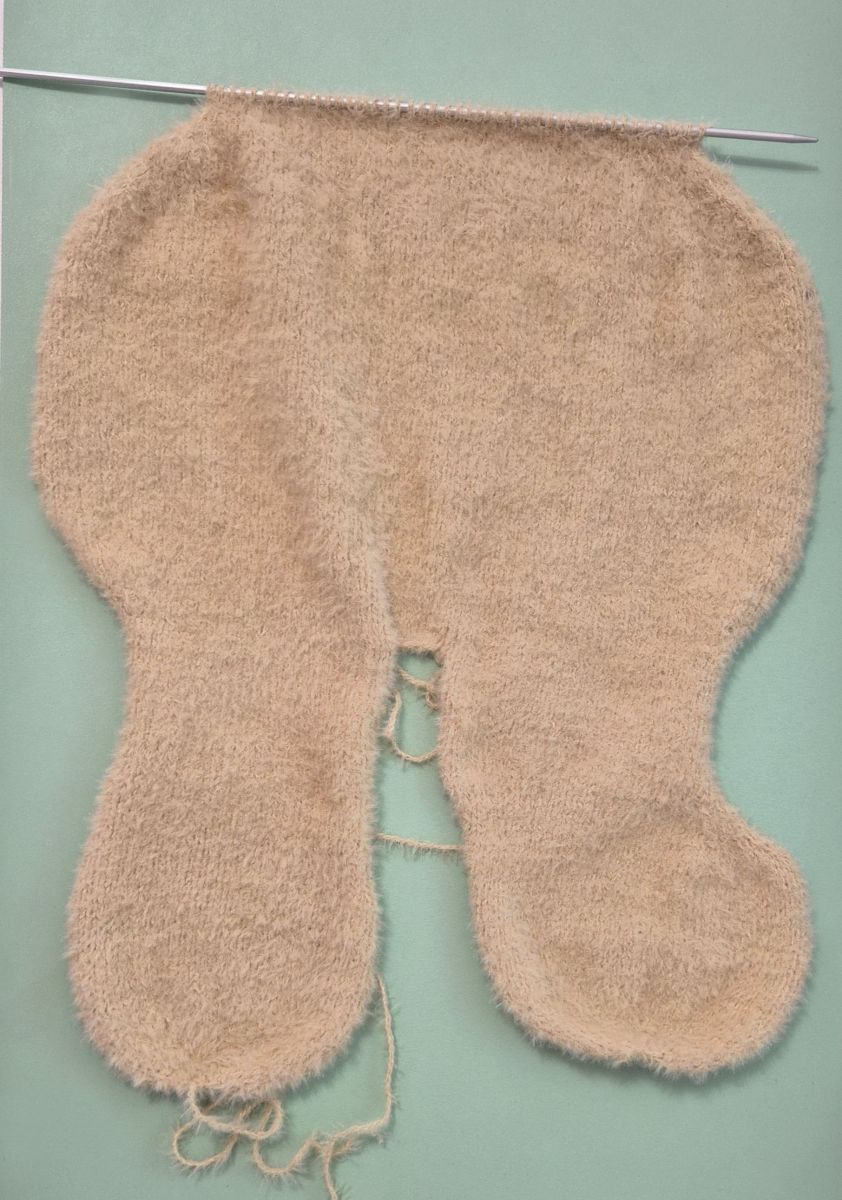
66. Knit 30 stitches on the second ear. Cast on 8 stitches, then join the first ear and knit 30 stitches across the first ear. You now have a total of 68 stitches. Continue working the head (Cushion).
67. 68 P
68. 3 K, 1 inc, 60 K, 1 inc, 3 K (70)
69.70 P
70. 3 K, 1 inc, 62 K, 1 inc, 3 K (72)
71. 72 P
72. 3 K, 1 inc, 64 K, 1 inc, 3 K (74)
73. 74 P
74. 1 K, 1 inc, 1 K, 1 inc, 1 K, 1 inc, 62, 1 inc, 1 K, 1 inc, 1 K, 1 inc, 1 K (80)
75. 80 P
76. 80 K
77. 80 P
78. 80 K
79. 80 P
80. 1 K, 1 inc, 1 K, 1 inc, 1 K, 1 inc, 68, 1 inc, 1 K, 1 inc, 1 K, 1 inc, 1 K (86)
Knit a total of 41 rows in stockinette stitch:
On the front side of the work, knit all stitches across the row.
On the back side of the work, purl all stitches across the row.
81. 83. 85. 87. 89. 91. 93. 95. 97. 99. 101. 103. 105. 107. 109. 111. 113. 114. 115. 117. 119. 121 – 86 P
82. 84. 86. 88. 90. 92. 94. 96. 98. 100. 102. 104. 106. 108. 110. 112. 114. 116. 118. 120. – 86 K
122. 1 K, 1 dec, 1 K, 1 dec, 1 K, 1 dec, 68, 1 dec ,1 K, 1 dec, 1 K, 1 dec, 1 K (80)
123. 80 P
124. 1 K, 1 dec, 1 K, 1 dec, 1 K, 1 dec, 62, 1 dec ,1 K, 1 dec, 1 K, 1 dec, 1 K (74)
125. 74 P
126. 3 K, 1 dec, 64 K, 1 dec, 3 K (72)
127. 72 P
128. 3 K, 1 dec, 62 K, 1 dec, 3 K (70)
129. 70 P
130. 3 K, 1 dec, 60 K, 1 dec, 3 K (68)
131. 68 P
132. 1 K, 1 dec, 1 K, 1 dec, 1 K, 1 dec, 50, 1 dec ,1 K, 1 dec, 1 K, 1 dec, 1 K (62)
133. 62 P
134. 1 K, 1 dec, 1 K, 1 dec, 1 K, 1 dec, 44, 1 dec ,1 K, 1 dec, 1 K, 1 dec, 1 K (56)
135. 56 P
136. 1 K, 1 dec, 1 K, 1 dec, 1 K, 1 dec, 38, 1 dec ,1 K, 1 dec, 1 K, 1 dec, 1 K (50)
137. 50 P
138. 50 K
139. 50 P
140. 1 K, 1 inc, 1 K, 1 inc, 1 K, 1 inc, 38, 1 inc ,1 K, 1 inc, 1 K, 1 inc, 1 K (56)
141. 56 P
142. 1 K, 1 inc, 1 K, 1 inc, 1 K, 1 inc, 44, 1 inc ,1 K, 1 inc, 1 K, 1 inc, 1 K (62)
143. 62 P
144. 1 K, 1 inc, 1 K, 1 inc, 1 K, 1 inc, 50, 1 inc ,1 K, 1 inc, 1 K, 1 inc, 1 K (68)
145. 68 P
146. 3 K, 1 inc, 60 K, 1 inc, 3 K (70)
147. 70 P
148. 3 K, 1 inc, 62 K, 1 inc, 3 K (72)
149. 72 P
150. 3 K, 1 inc, 64 K, 1 inc, 3 K (74)
151. 74 P
152. 1 K, 1 inc, 1 K, 1 inc, 1 K, 1 inc, 62, 1 inc ,1 K, 1 inc, 1 K, 1 inc, 1 K (80)
153. 80 P
154. 1 K, 1 inc, 1 K, 1 inc, 1 K, 1 inc, 68, 1 inc ,1 K, 1 inc, 1 K, 1 inc, 1 K (86)
Knit a total of 41 rows in stockinette stitch:
On the front side of the work, knit all stitches across the row.
On the back side of the work, purl all stitches across the row.
155. 157. 159. 161. 163. 165. 167. 169. 171. 173. 175. 177. 179. 181. 183. 185. 187. 189. 191. 193. 195. - 86 P
156. 158. 160. 162. 164. 166. 168. 170. 172. 174. 176. 178. 180. 182. 184. 186. 188. 190. 192. 194. - 86 K
196. 1 K, 1 dec, 1 K, 1 dec, 1 K, 1 dec, 68, 1 dec ,1 K, 1 dec, 1 K, 1 dec, 1 K (80)
197. 80 P
198. 80 K
199. 80 P
200. 80 K
201. 80 P
202. 1 K, 1 dec, 1 K, 1 dec, 1 K, 1 dec, 62, 1 dec ,1 K, 1 dec, 1 K, 1 dec, 1 K (74)
203. 74 P
204. 3 K, 1 dec, 64 K, 1 dec, 3 K (72)
205. 72 P
206. 3 K, 1 dec, 62 K, 1 dec, 3 K (70)
207. 70 P
208. 3 K, 1 dec, 60 K, 1 dec, 3 K (68)
209. 68 P
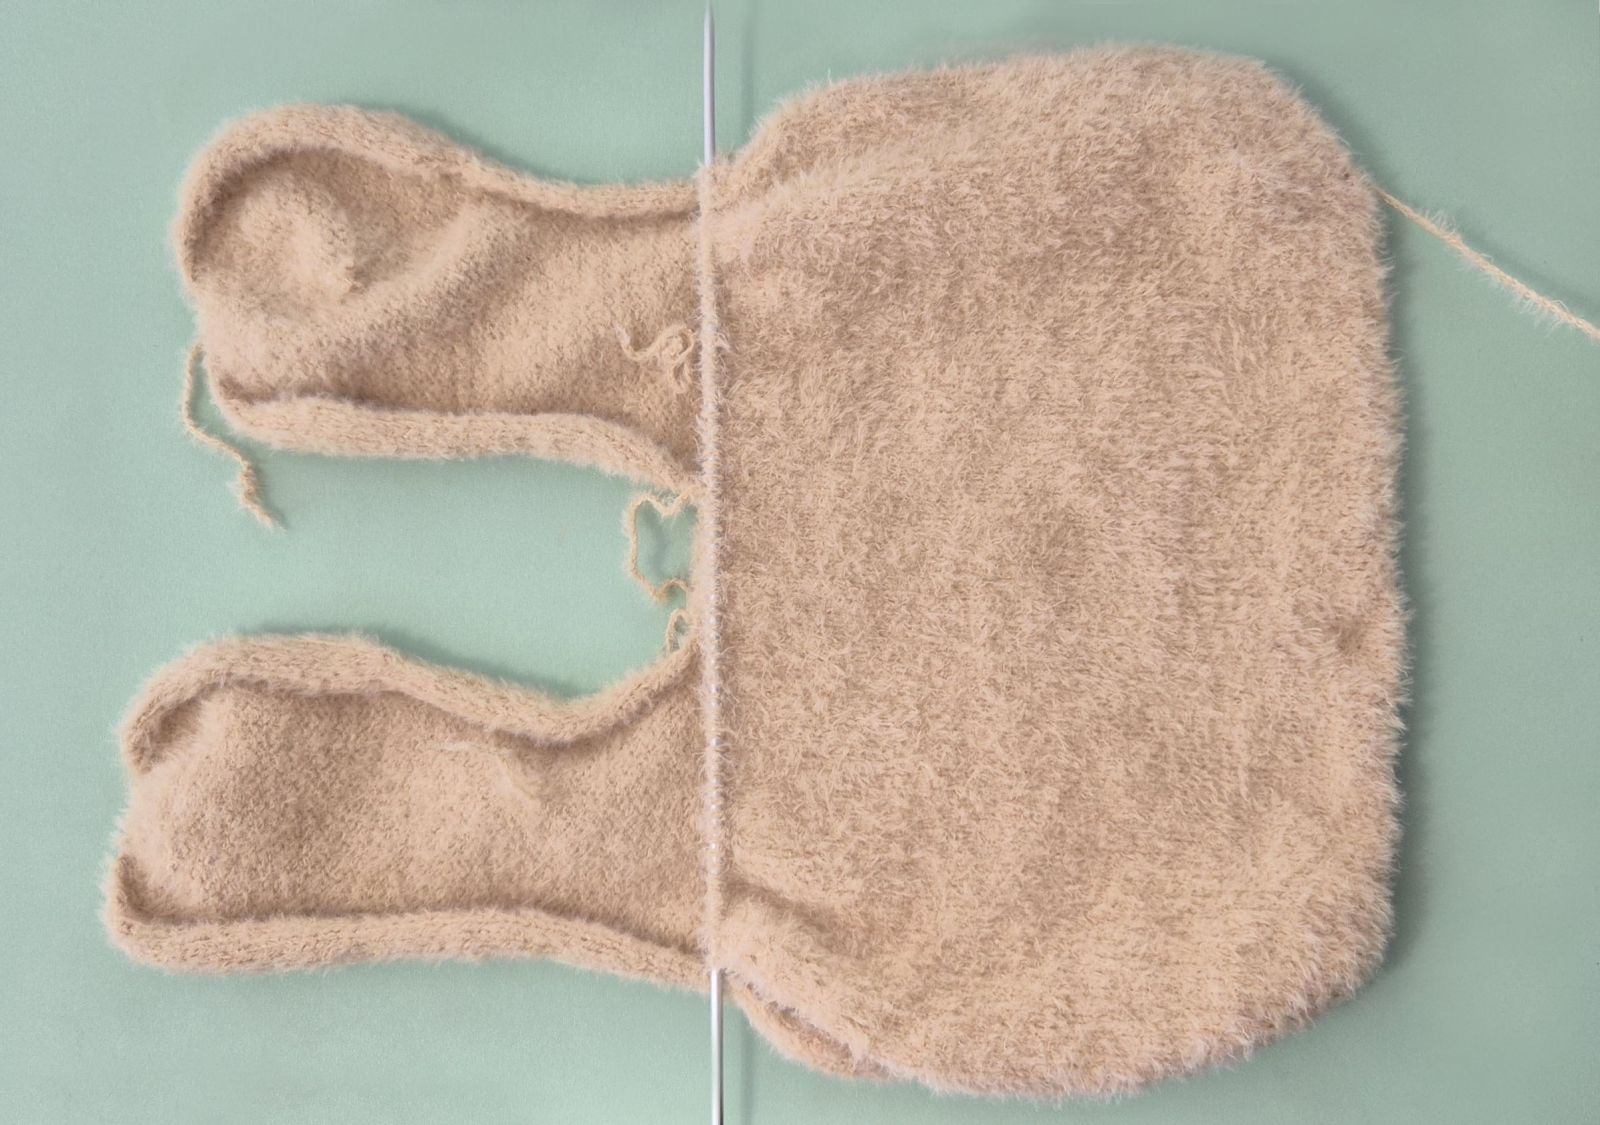
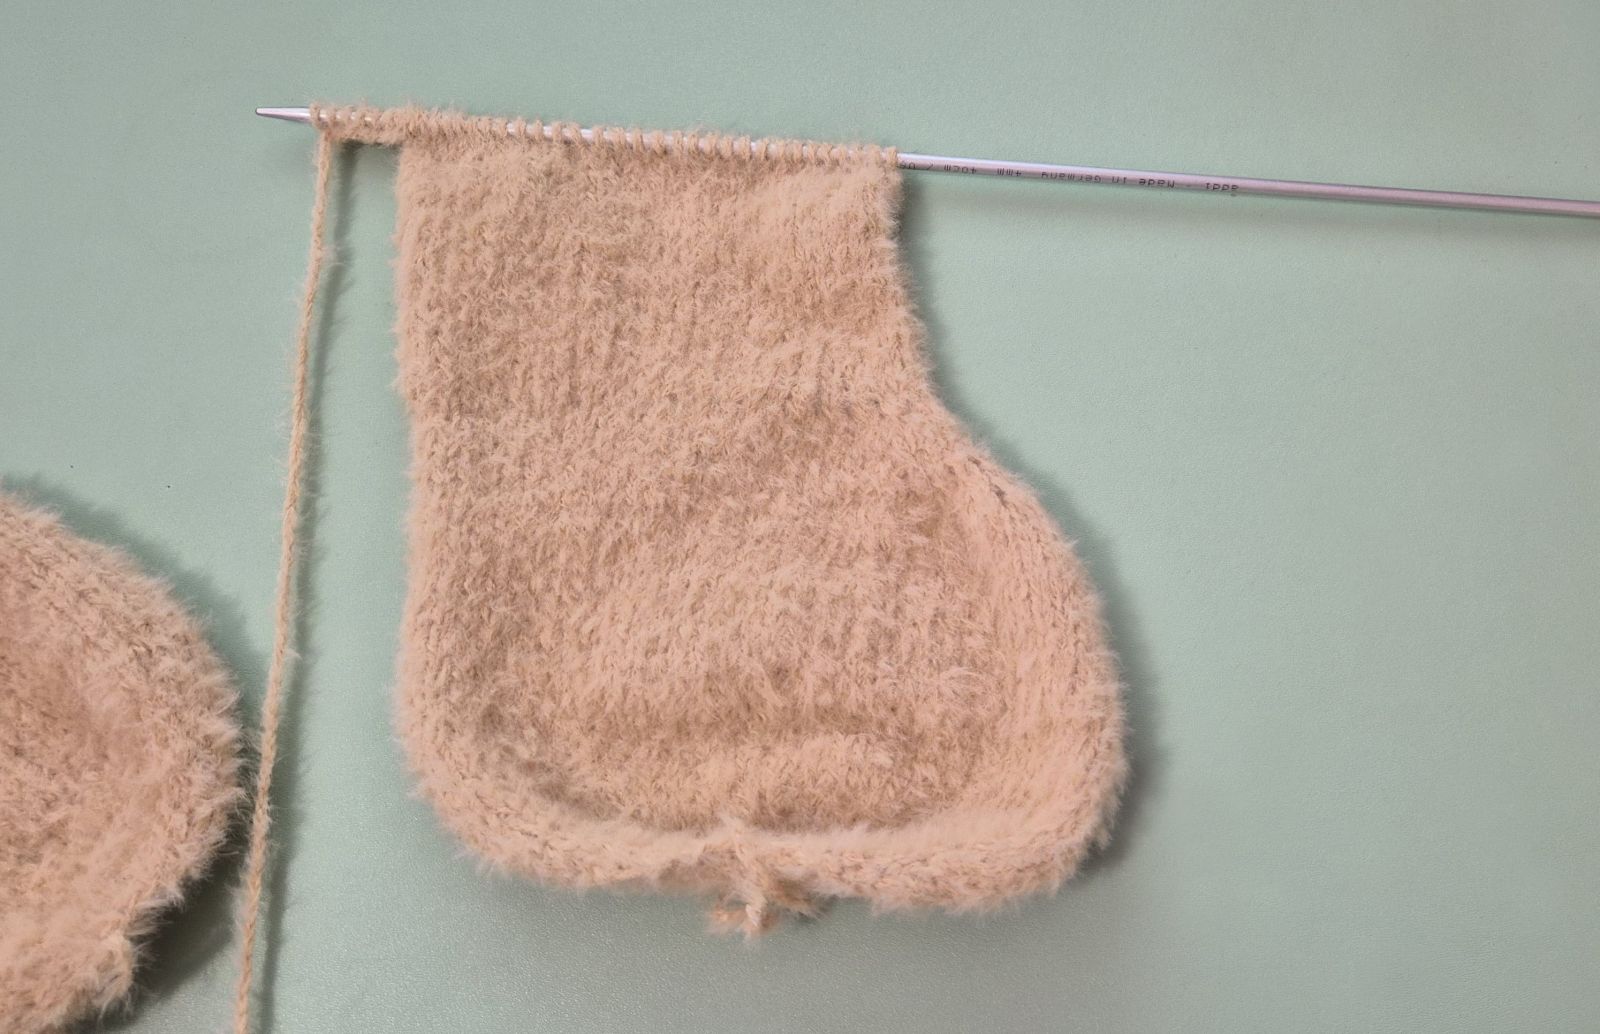
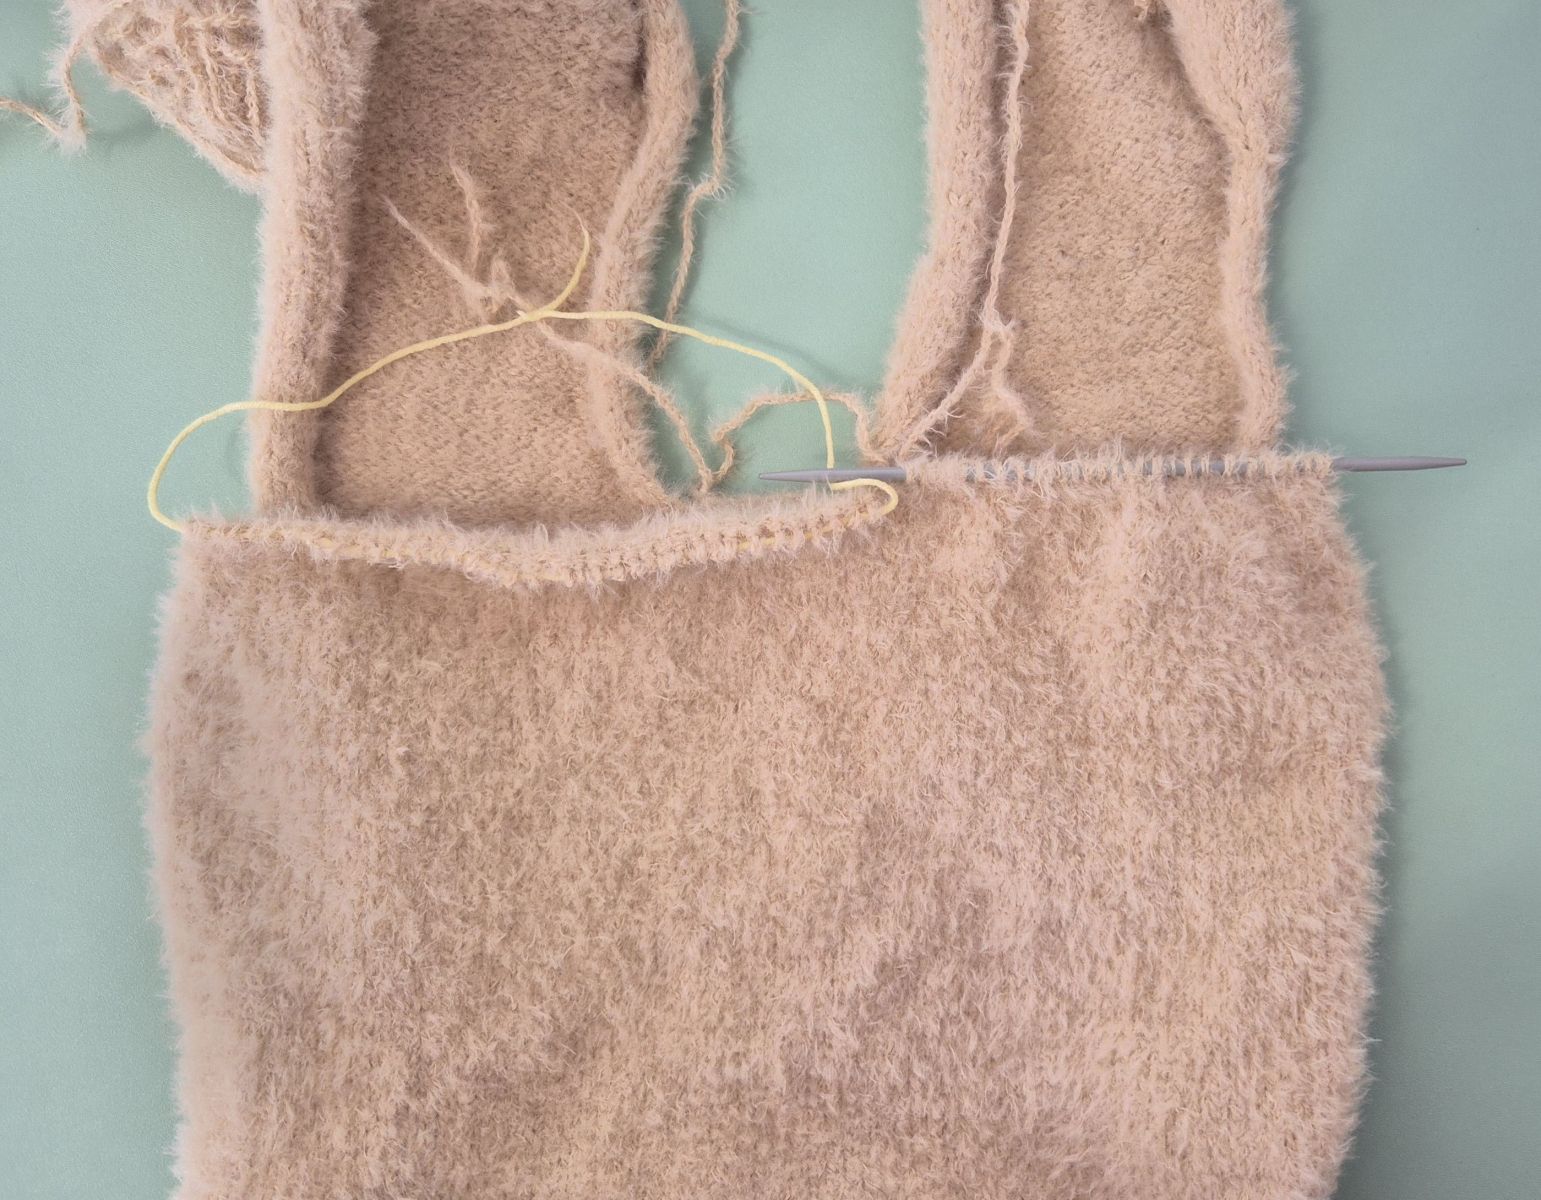
The ears are now worked further in crochet, so the piece is divided into two sections. Start by working the first 30 stitches. I placed the remaining 38 stitches on a spare thread — it’s much easier this way, and you don’t have to worry about anything slipping off a long knitting needle.
Knit 30 stitches, then continue as described:
Knit a total of 21 rows in stockinette stitch:
On the front side of the work, knit all stitches across the row.
On the back side of the work, purl all stitches across the row.
1. 3. 5. 7. 9. 11. 13. 15. 17. 19. 21. – 30 P
2. 4. 6. 8. 10. 12. 14. 16. 18. 20. – 30 K
22. 6 inc, (2 fm, 1 dec)x 6 (30)
23. 30 P
24. 30 K
25. 30 P
26. 30 K
27. 30 P
28. 6 inc, 24 K (36)
29. 36 P
30. 6 inc, 30 K (42)
Knit a total of 23 rows in stockinette stitch:
On the front side of the work, knit all stitches across the row.
On the back side of the work, purl all stitches across the row.
31. 33. 35. 37. 39. 41. 43. 45. 47. 49. 51. 53. - 42 P
32. 34. 36. 38. 40. 42. 44. 46. 48. 50. 52. - 42 K
54. (5 K, 1 dec) x 6 (36)
55. 36 P
56. (4 K, 1 dec) x 6 (30)
57. 30 P
58. (3 K, 1 dec) x 6 (24)
59. 24 P
60. (2 K, 1 dec) x 6 (18)
61. 18 P
62. (1 K, 1 dec) x 6 (12)
63. 12 P
64. 6 dec
Secure the yarn and cut it.
Return to round 209. Reattach the yarn and immediately cast off 8 stitches, leaving 30 stitches on the needle for the second ear. As you can see in the photos, I’m using short needles again here because they’re more comfortable to work with.
Knit 30 stitches, then continue as described:
Knit a total of 33 rows in stockinette stitch:
On the front side of the work, knit all stitches across the row.
On the back side of the work, purl all stitches across the row.
1. 3. 5. 7. 9. 11. 13. 15. 17. 19. 21. 23. 25. 27. 29. 31. 33. – 30 P
2. 4. 6. 8. 10. 12. 14. 16. 18. 20. 22. 24. 26. 28. 30. 32. – 30 K
34. 3 inc, 24 K, 3 inc (36)
Knit a total of 19 rows in stockinette stitch:
On the front side of the work, knit all stitches across the row.
On the back side of the work, purl all stitches across the row.
35. 37. 39. 41. 43. 45. 47. 49. 51. 53.– 36 P
36. 38. 40. 42. 44. 46. 48. 50. 52.– 36 K
54. (4 K, 1 dec) x 6 (30)
55. 30 P
56. 30 K
57. 30 P
58. (3 K, 1 dec) x 6 (24)
59. 24 P
60. (2 K, 1 dec) x 6 (18)
61. 18 P
62. (1 K, 1 dec) x 6 (12)
63. 12 P
64. 6 dec
Secure the thread and cut it off. Then sew the pillow together and stuff it with fiberfill.
f you want to use safety eyes, leave a small opening when sewing the pieces together so you can attach them from the inside. Afterwards, carefully check that the eyes are securely fastened and cannot be pulled or loosened.
Alternatively, you can use sew‑in eyes. These are stitched directly onto the cloud, ideally from the inside as well. Again, make sure they are firmly attached and cannot come off, especially if the pillow is intended for small children. Small eyes can pose a choking hazard, so you are solely responsible for ensuring they are securely fastened.
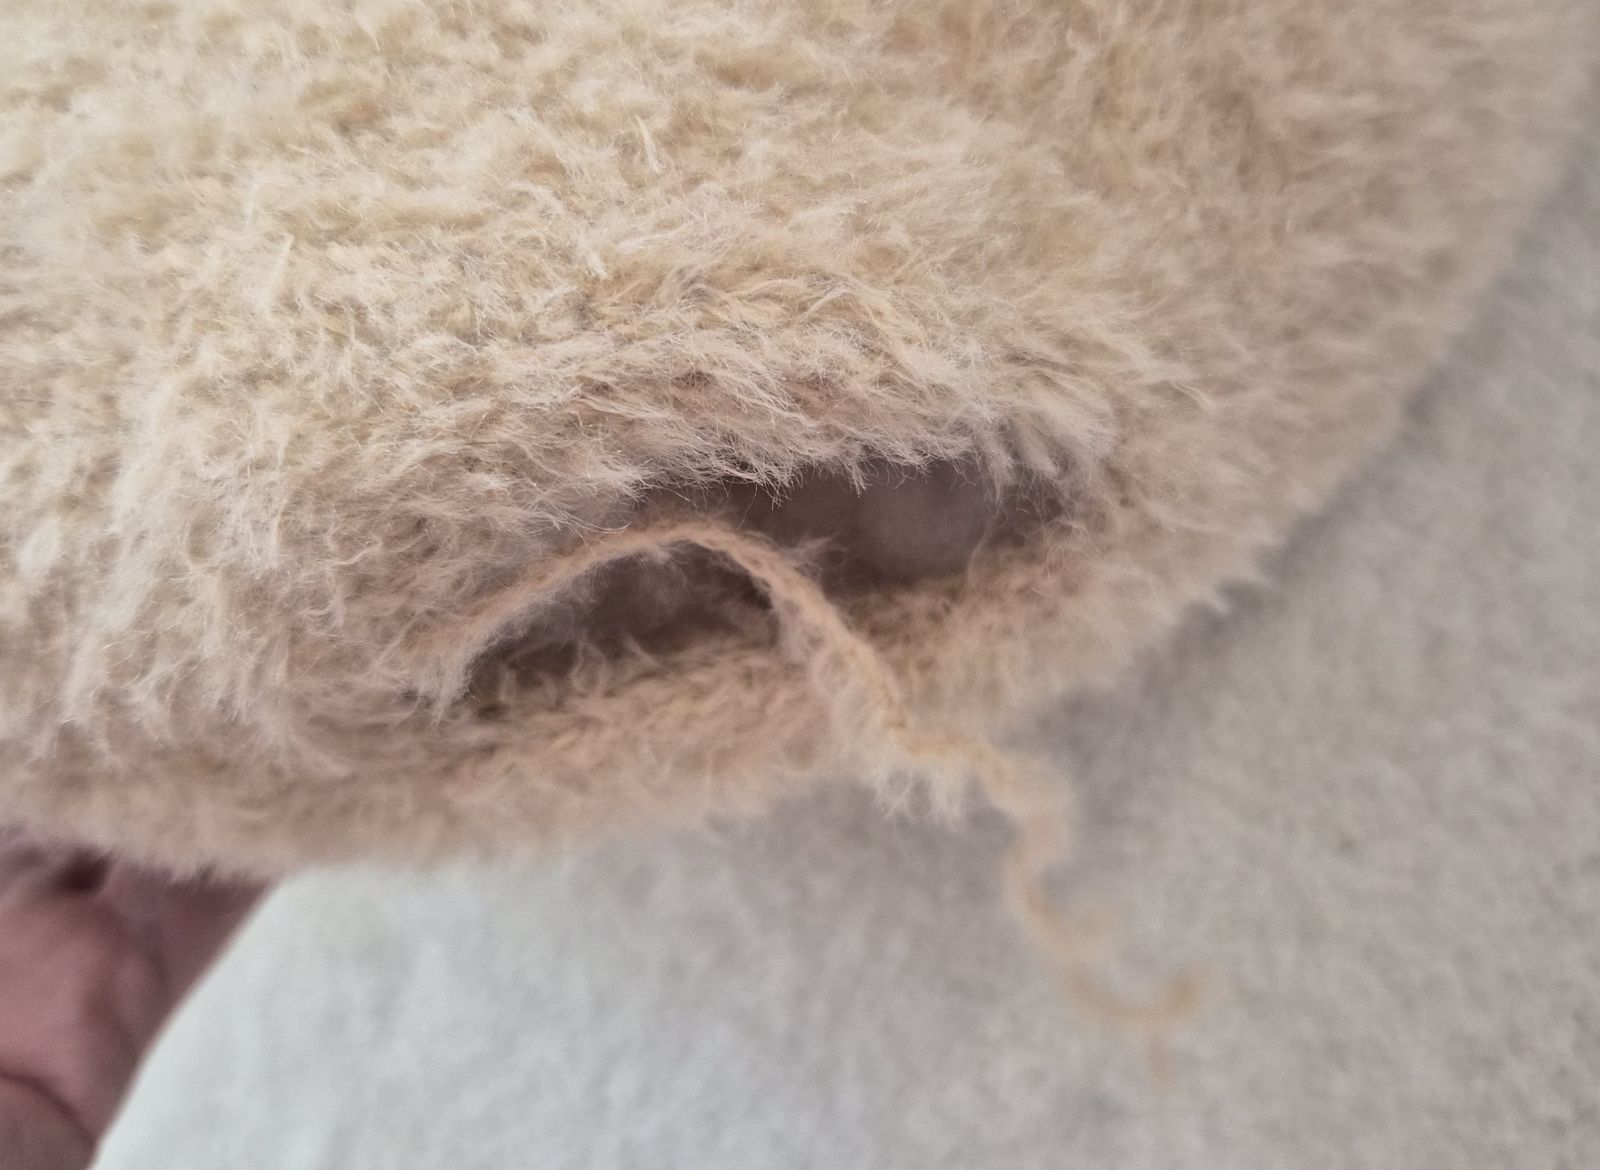
You can also crochet the eyes. There are many tutorials on YouTube showing different styles and techniques. For this project, I chose safety eyes. They are inserted through the stitches and secured firmly on the inside with the special plastic washer.
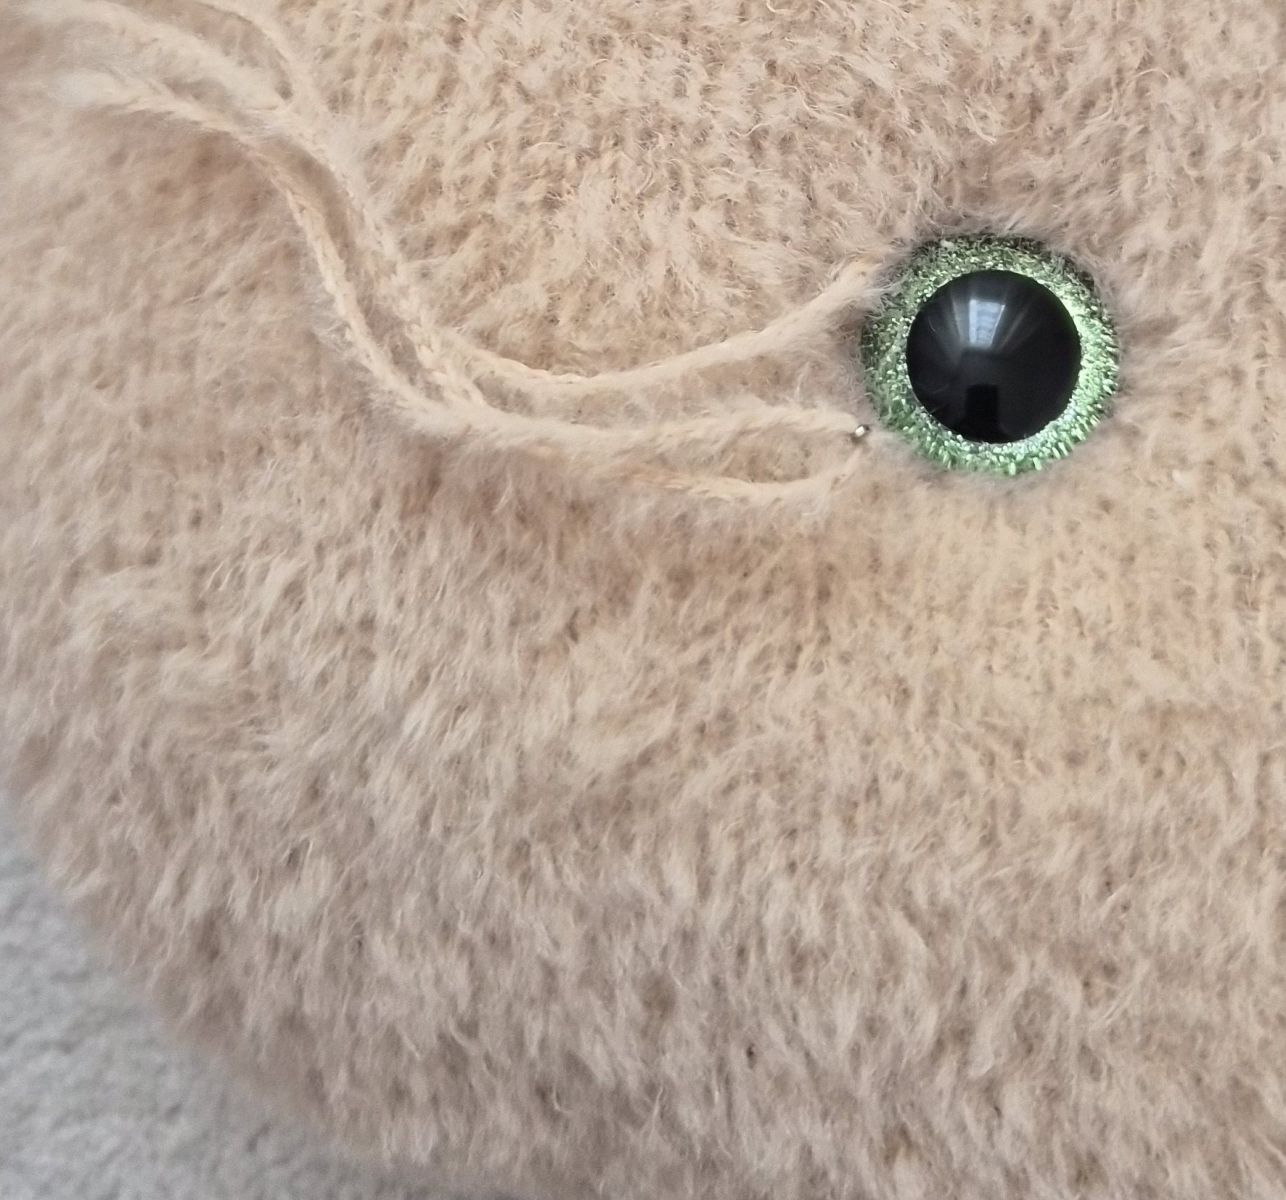
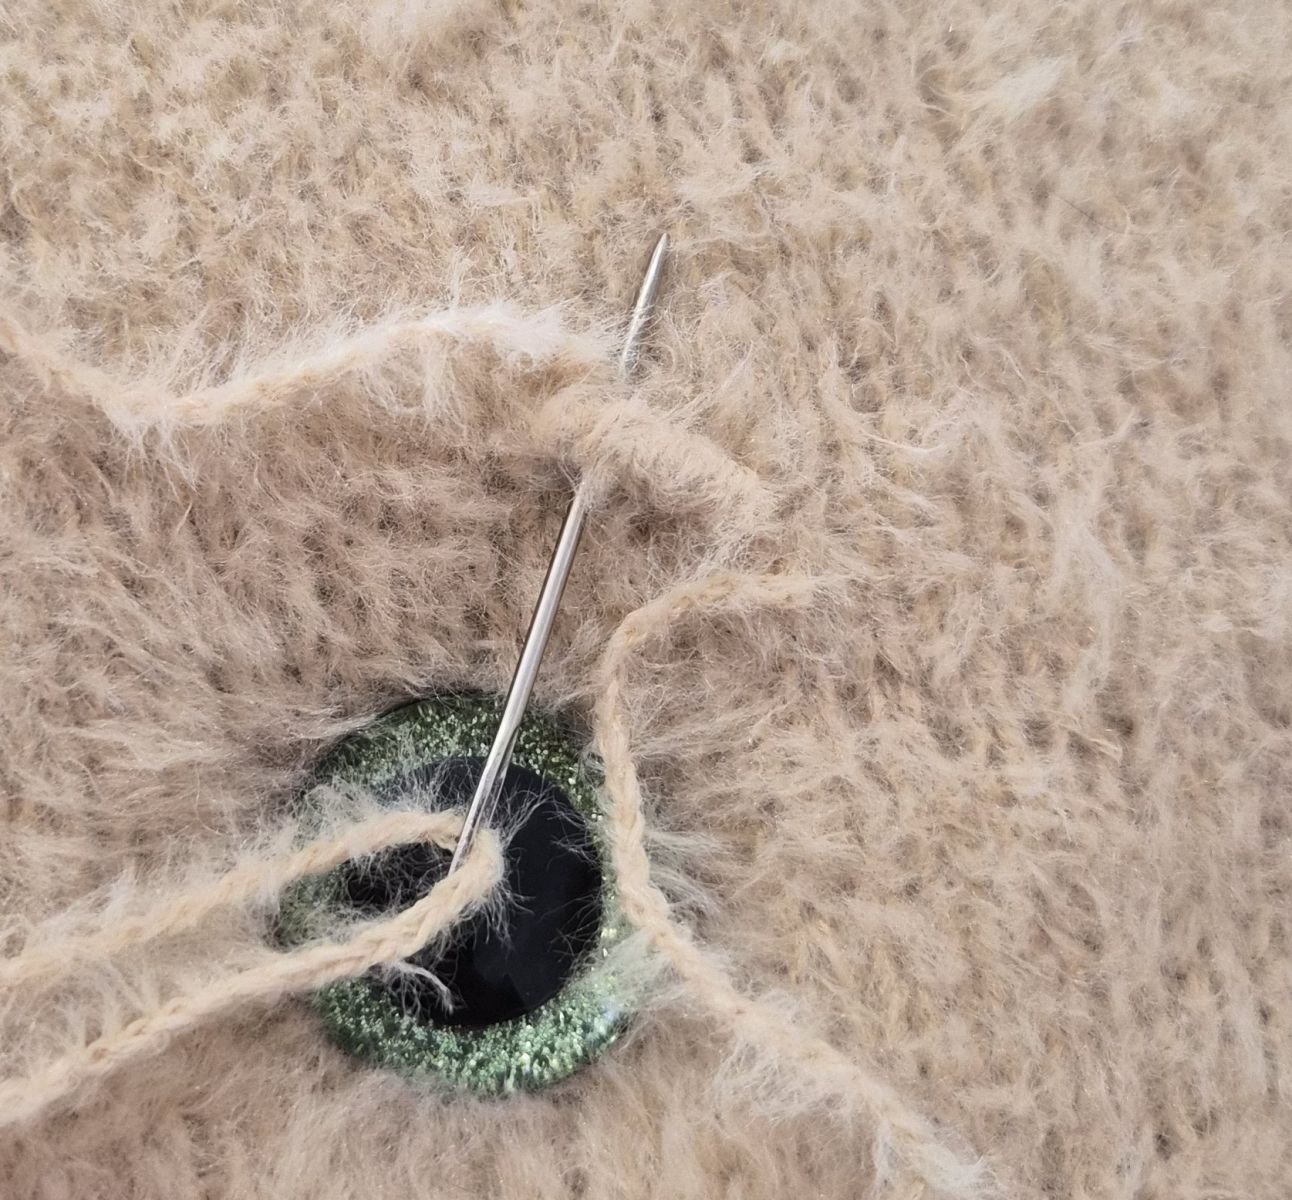
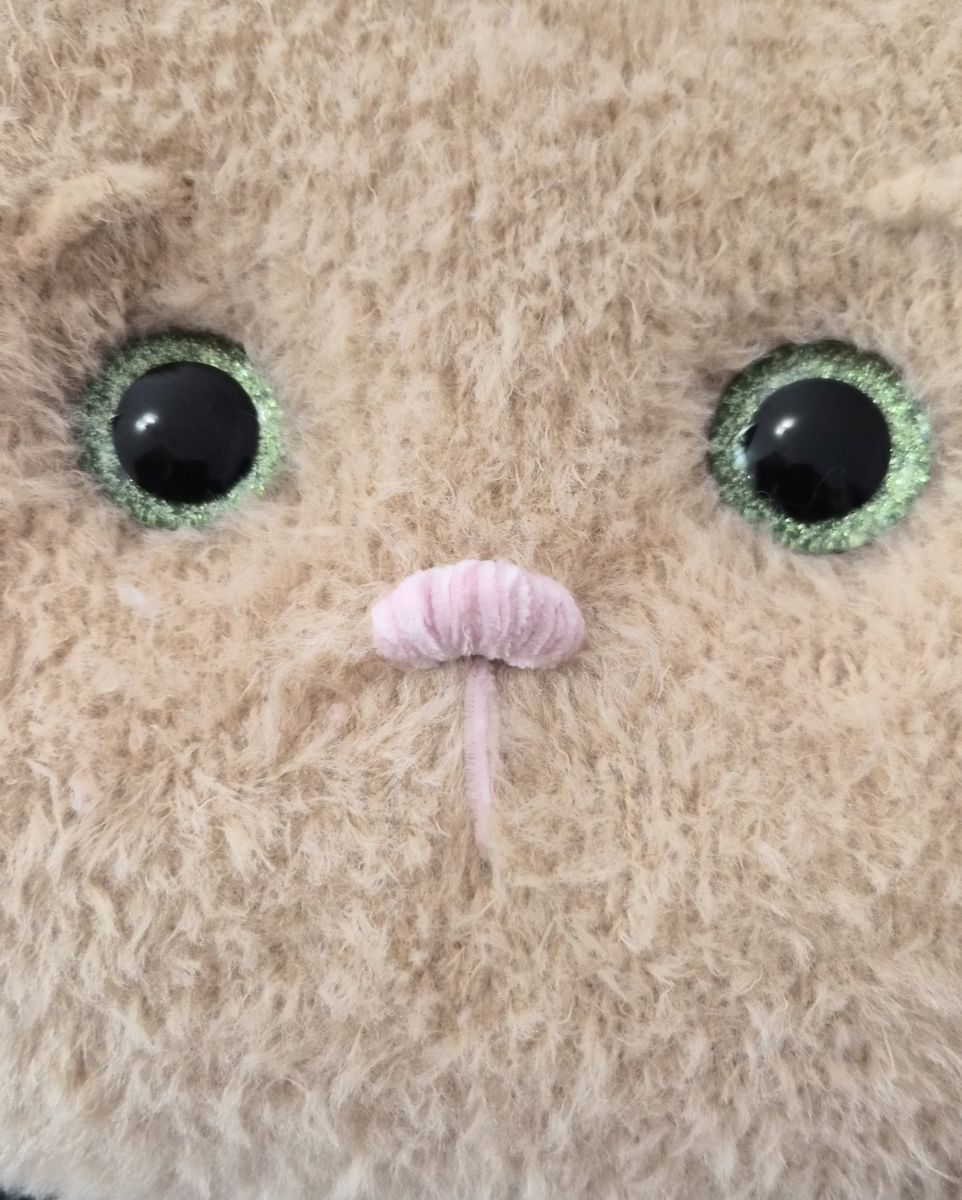
When positioning the eyes, I experimented with different placements — further forward or further back, closer together or farther apart. You’ll quickly notice how much the eye placement influences the bunny’s expression and personality.
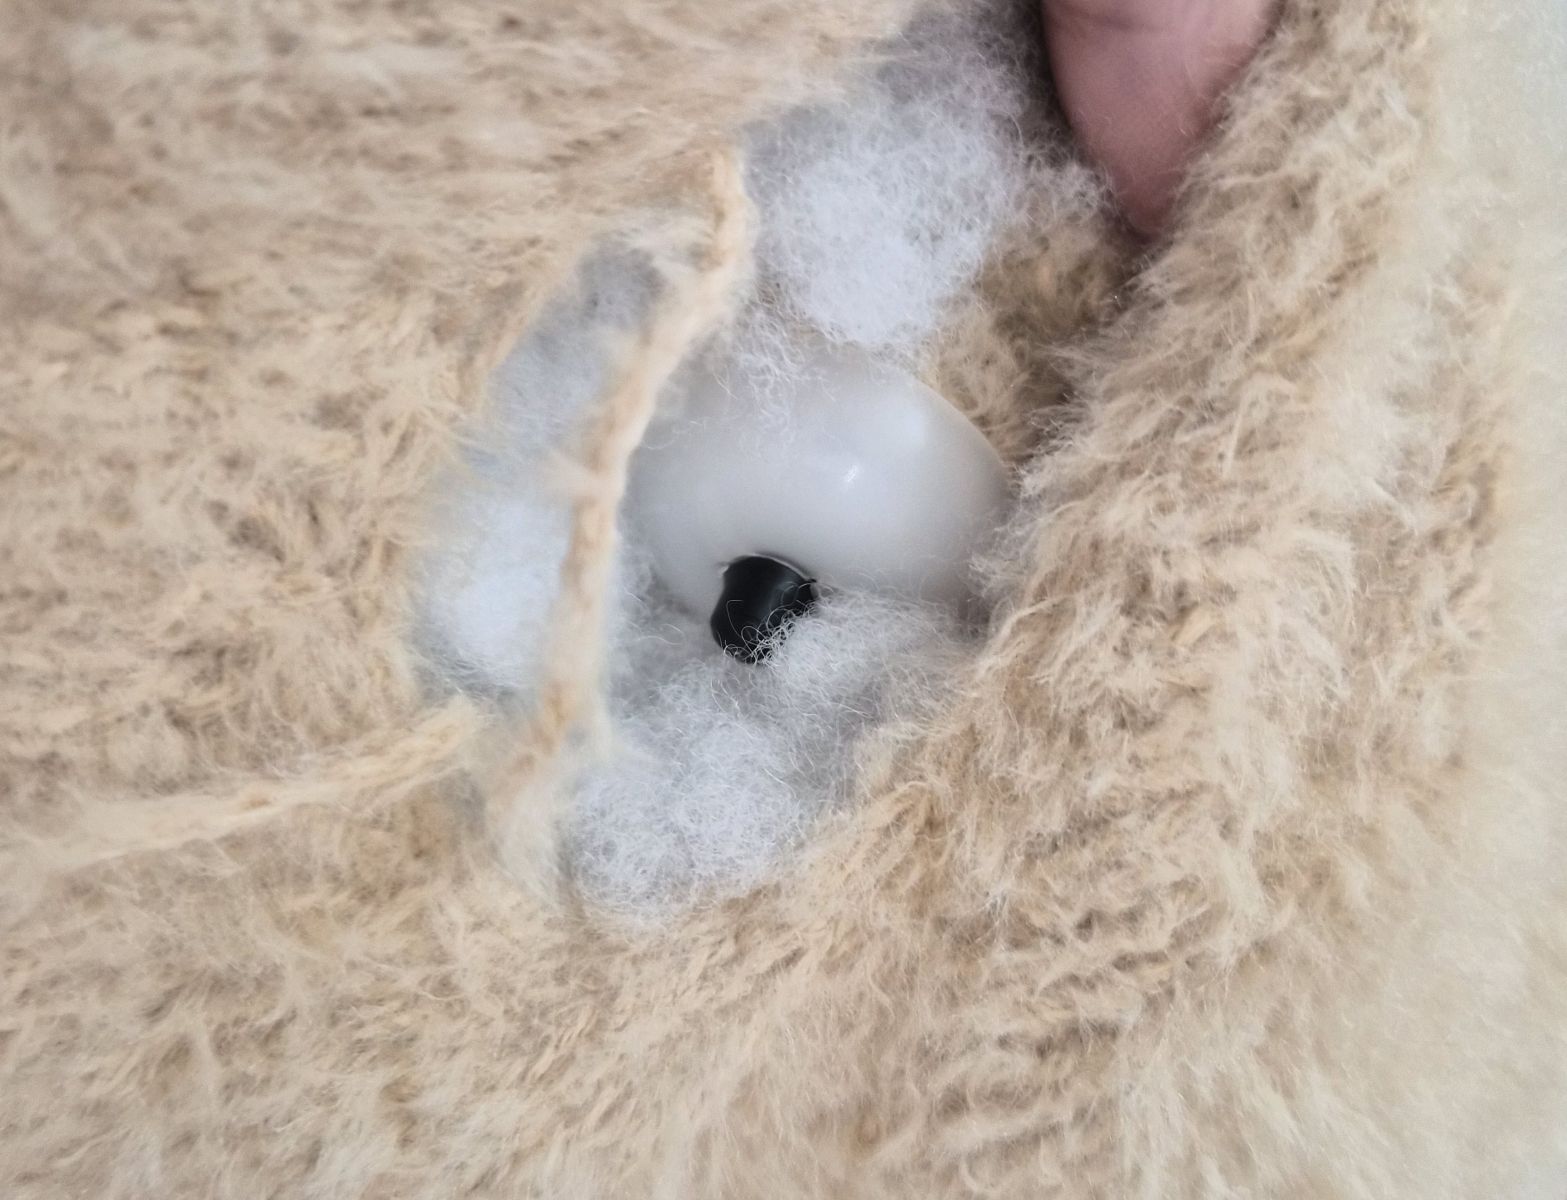
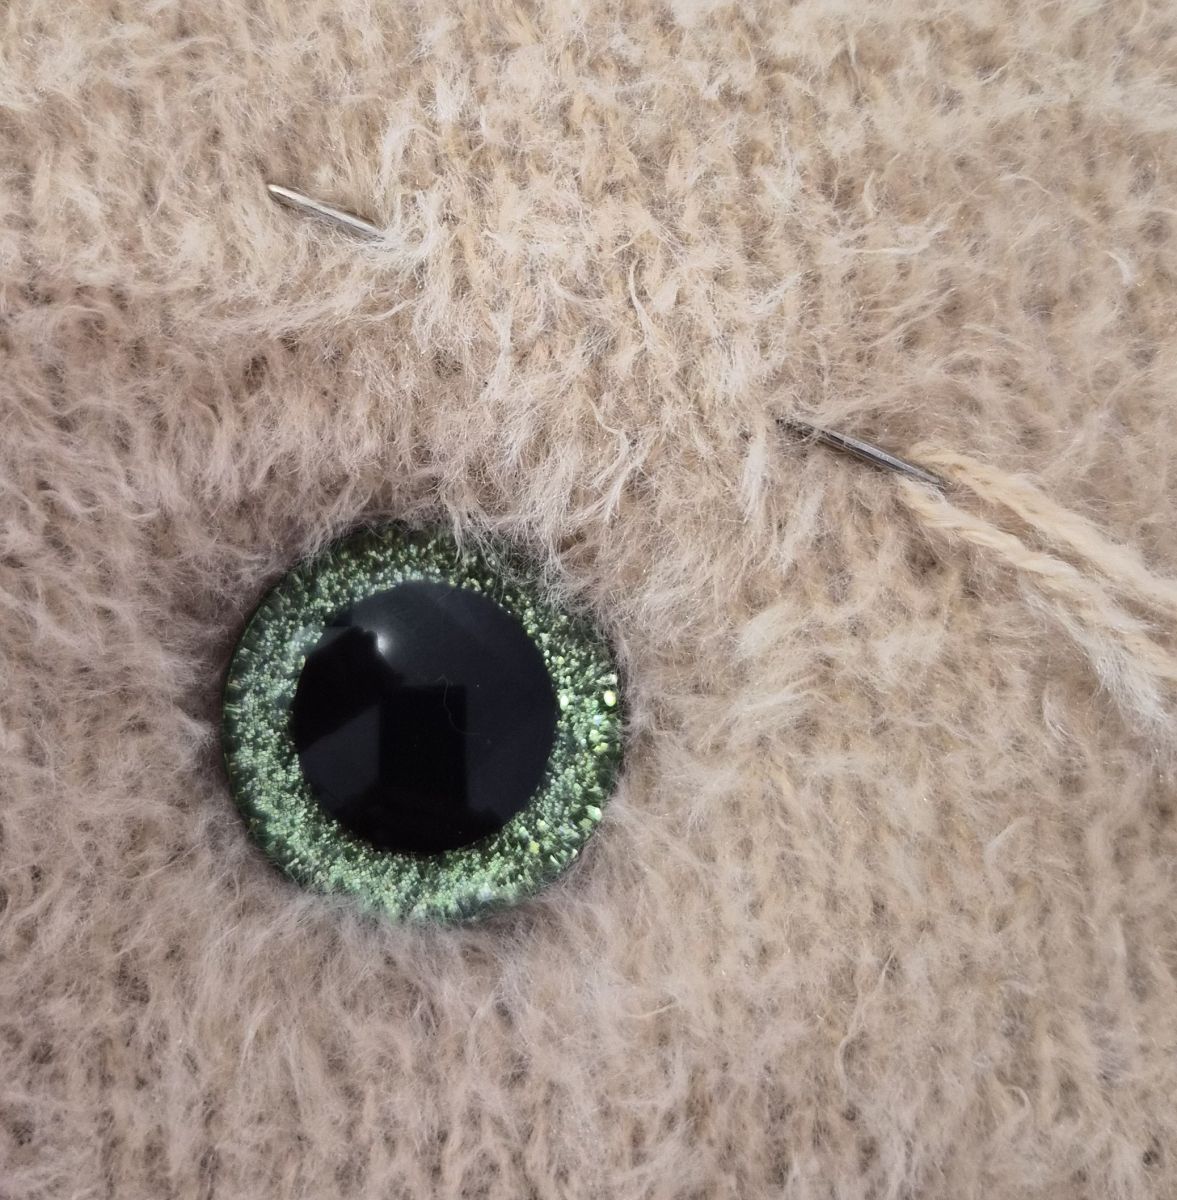
Once the eyes are in place, you can — if you like — deepen them slightly. This step is optional, but it adds a bit more character and expression.
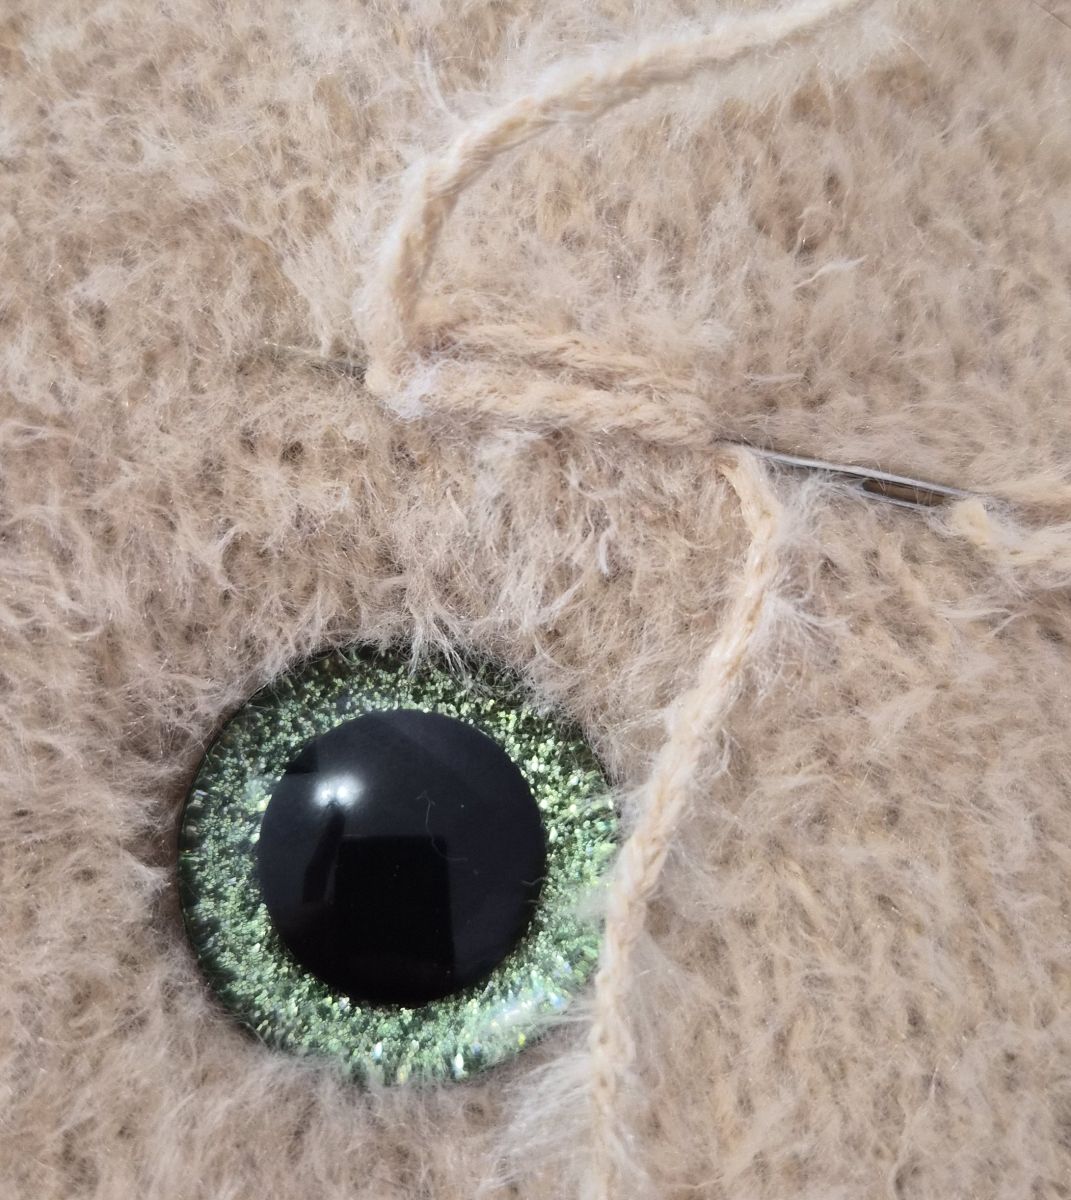
To do this, insert the needle at the back of the cushion and guide it through the inside to the front, coming out right next to the eye. Then insert the needle again just below the eye and return to the back. Gently pull the thread so the eye is drawn inward a little.
Repeat the same process on the opposite side of the same eye: insert the needle from the back to the front, this time emerging on the other side of the eye. Insert the needle again just below the eye and return to the back. Pull the threads tight once more. This gives the eye a noticeably deeper, more defined look.
Then repeat the entire process for the second eye.
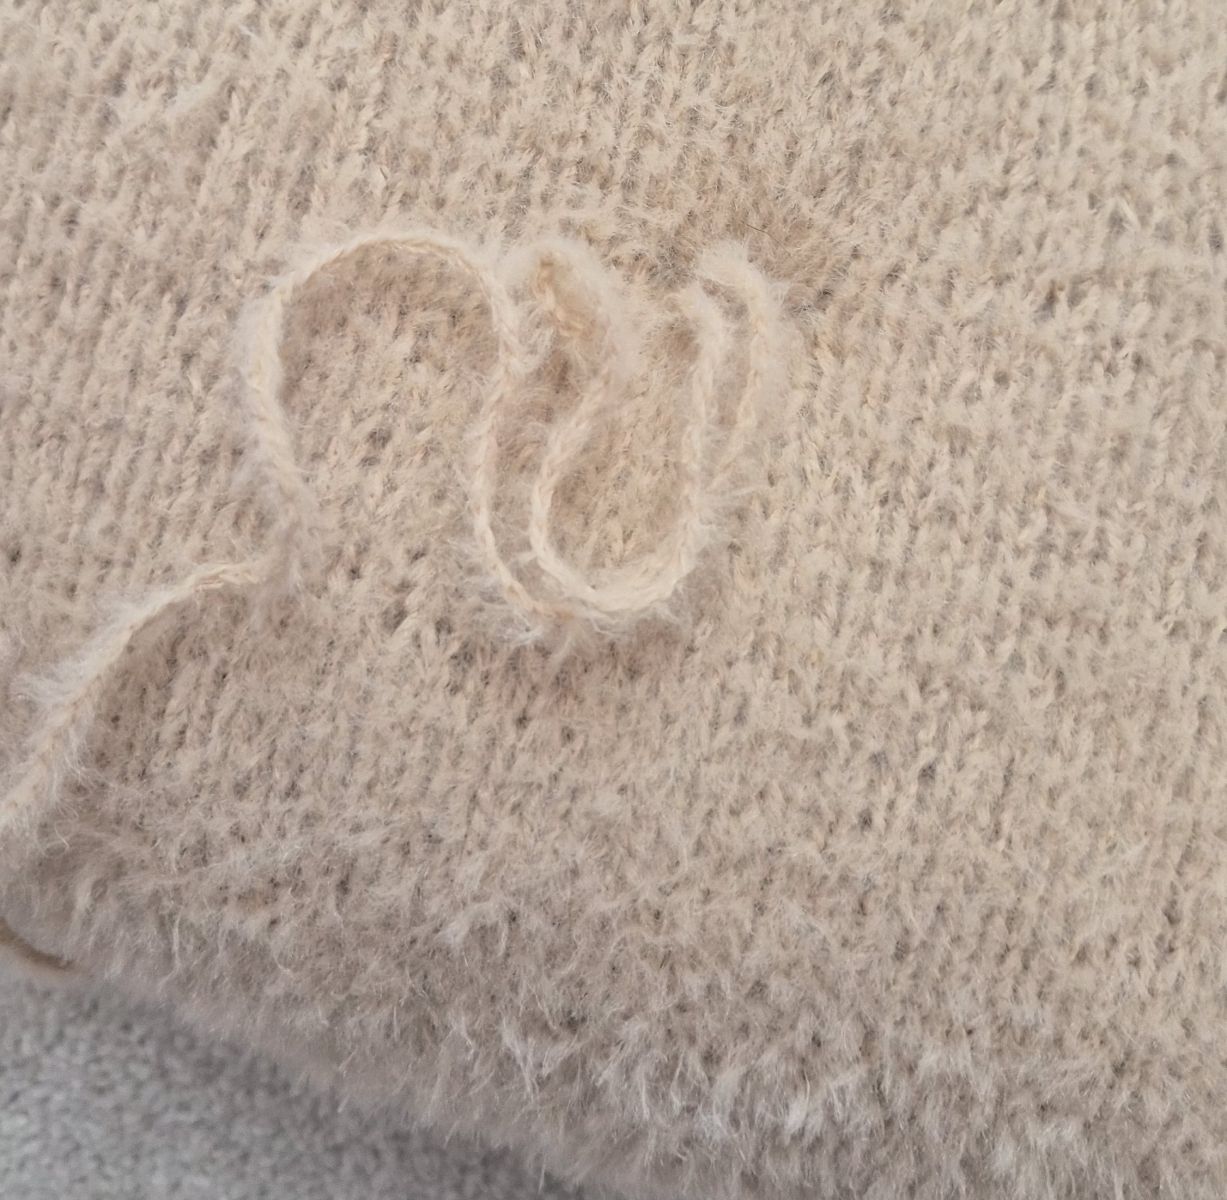
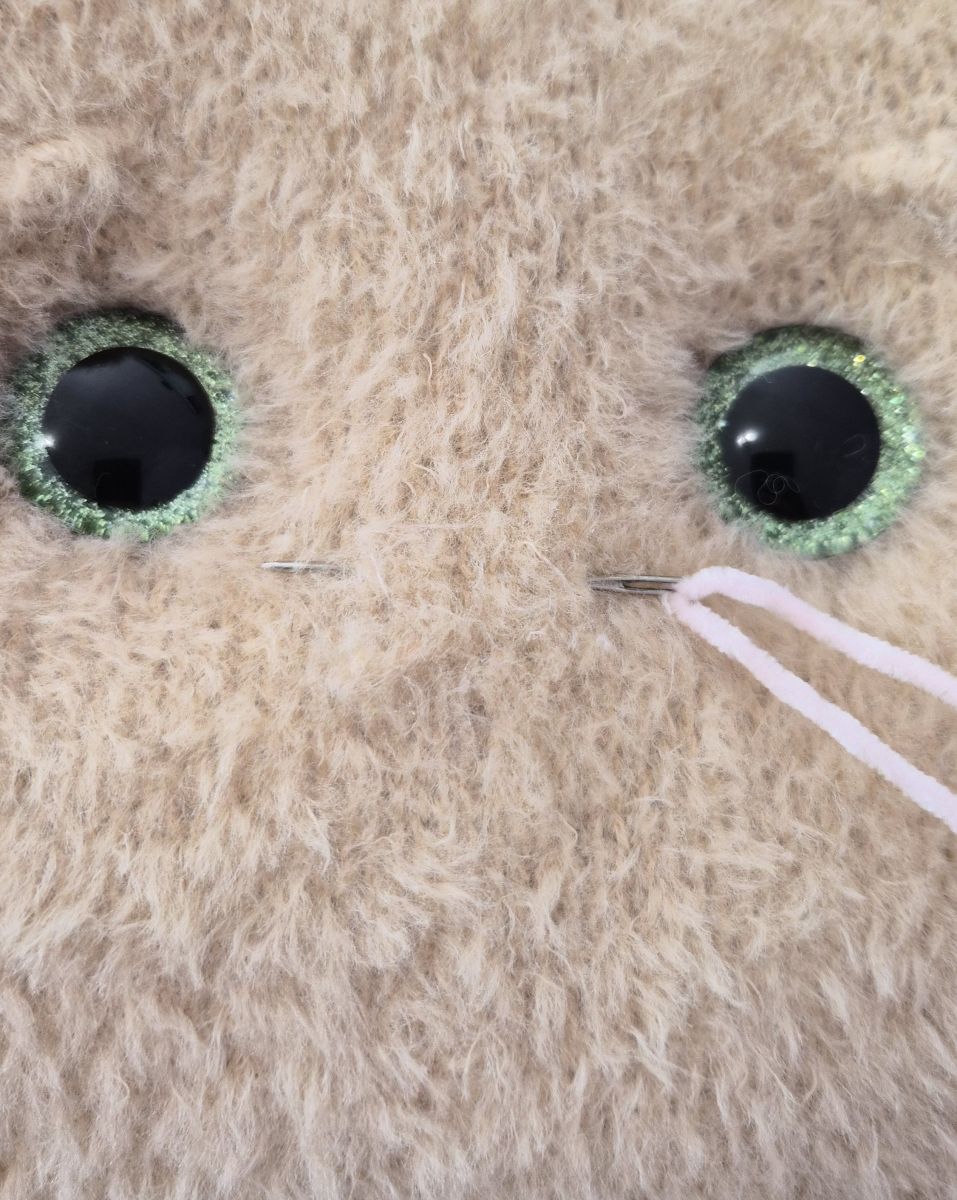
For the eyebrow, I first made a few small stitches with the same yarn and then stitched around them to create a neat, closed eyebrow shape.
Next, I worked on the nose. I placed it centered between the eyes, about 1 cm lower.
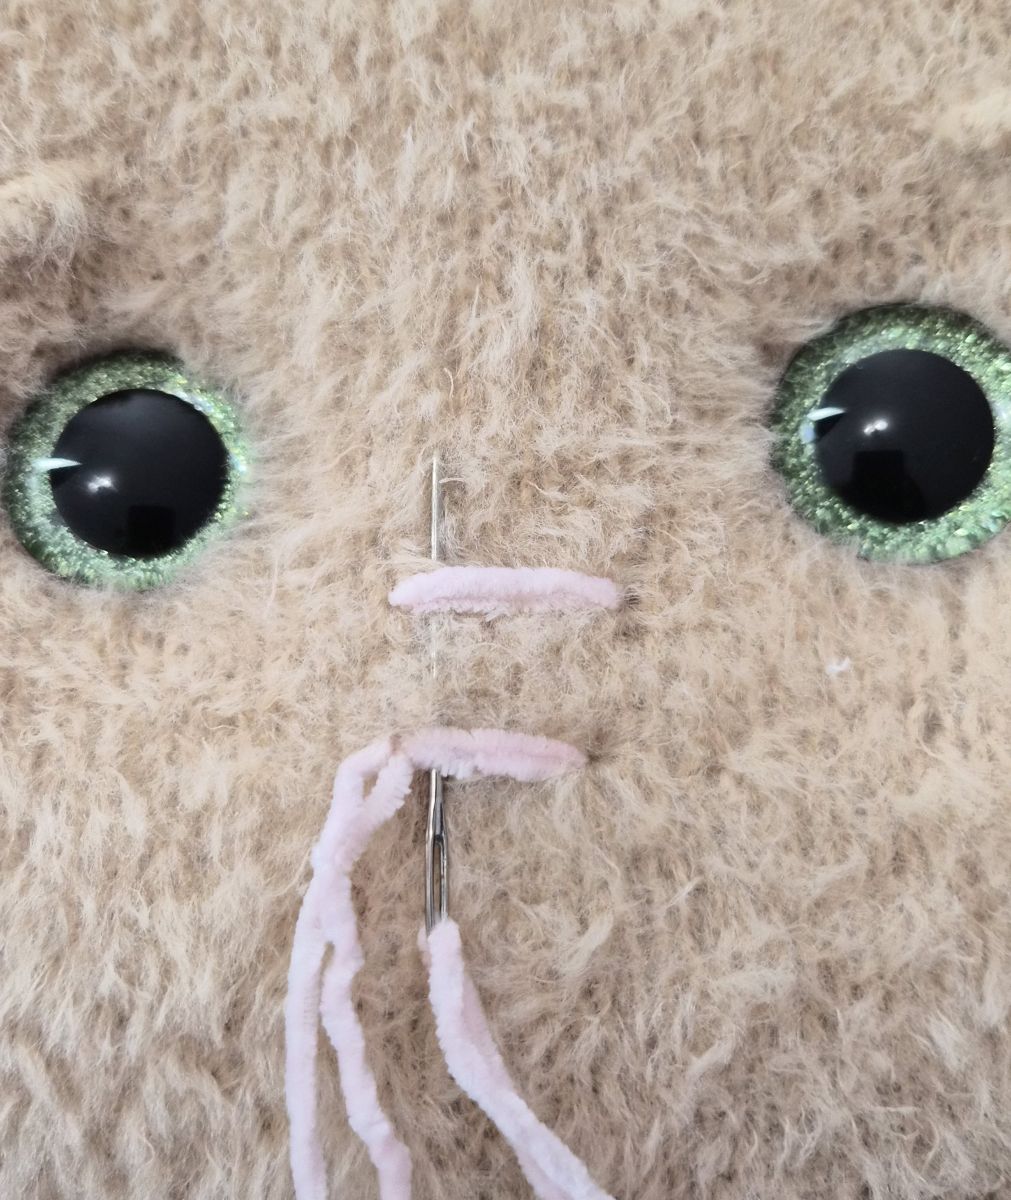
To begin, I made two parallel stitches, spaced about 1 cm apart. These two foundation stitches define the width of the nose.
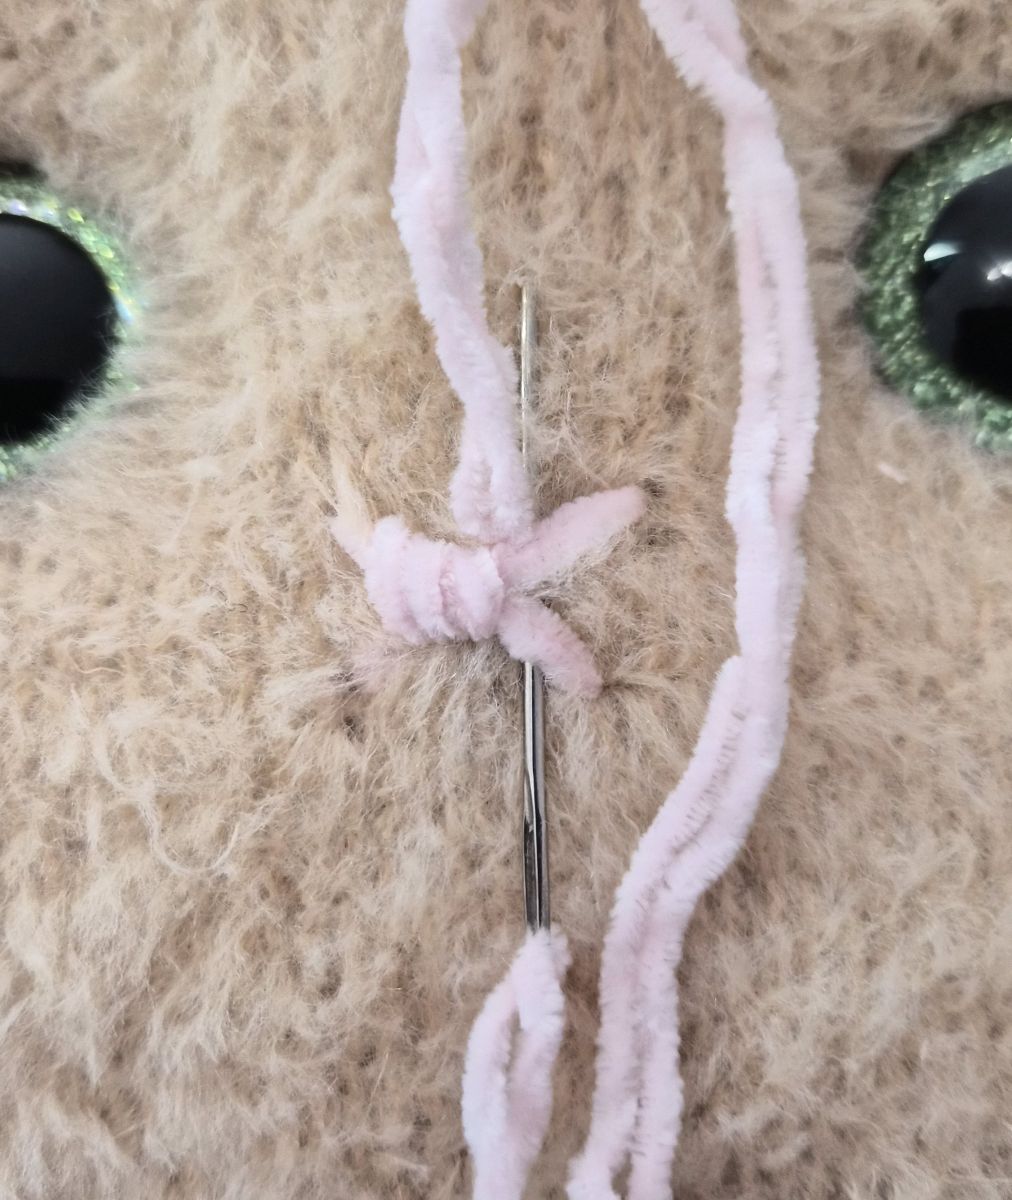
Then I stitched over these two stitches several times — from left to right and back again — always covering both stitches at once. With each pass, the nose becomes fuller and more defined. Continue until you reach the desired size and shape. Add a small mark in the center.
.jpg)
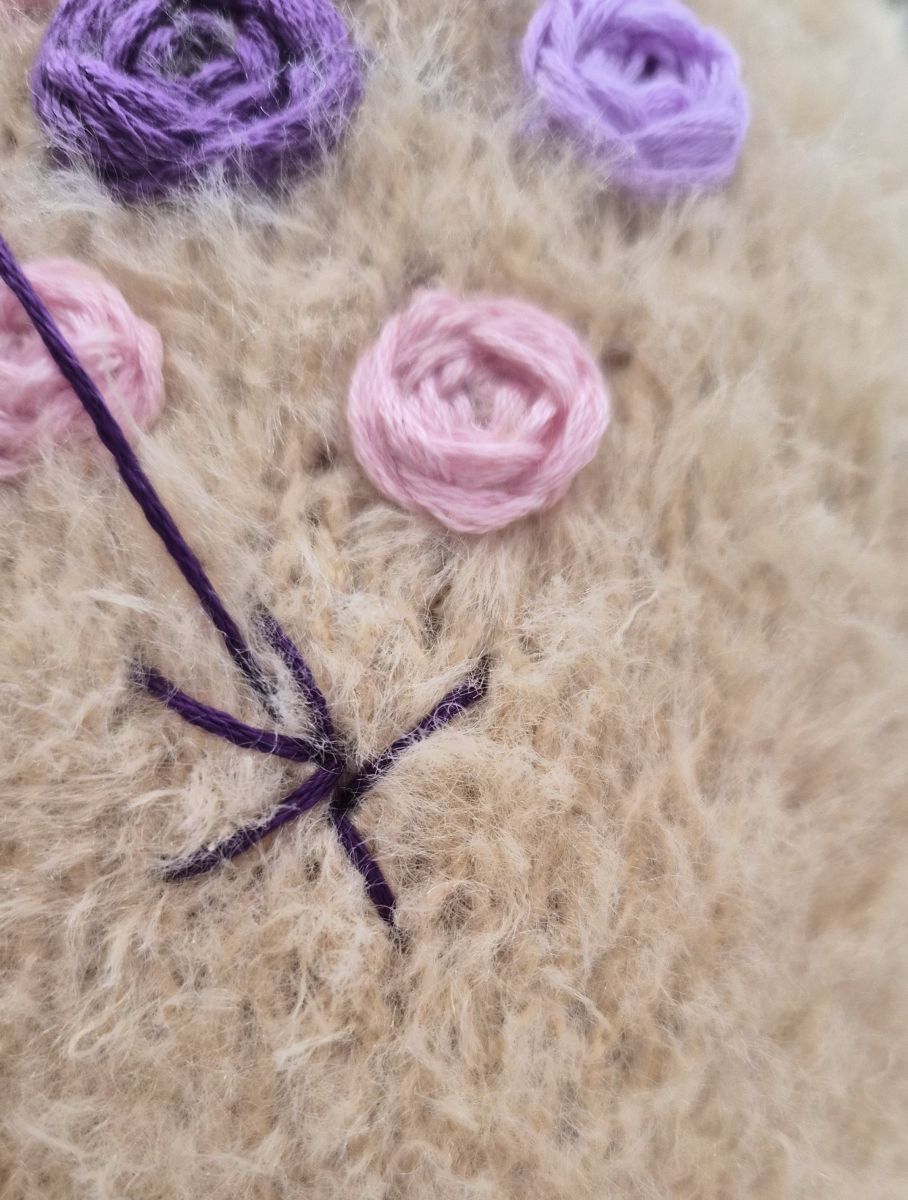
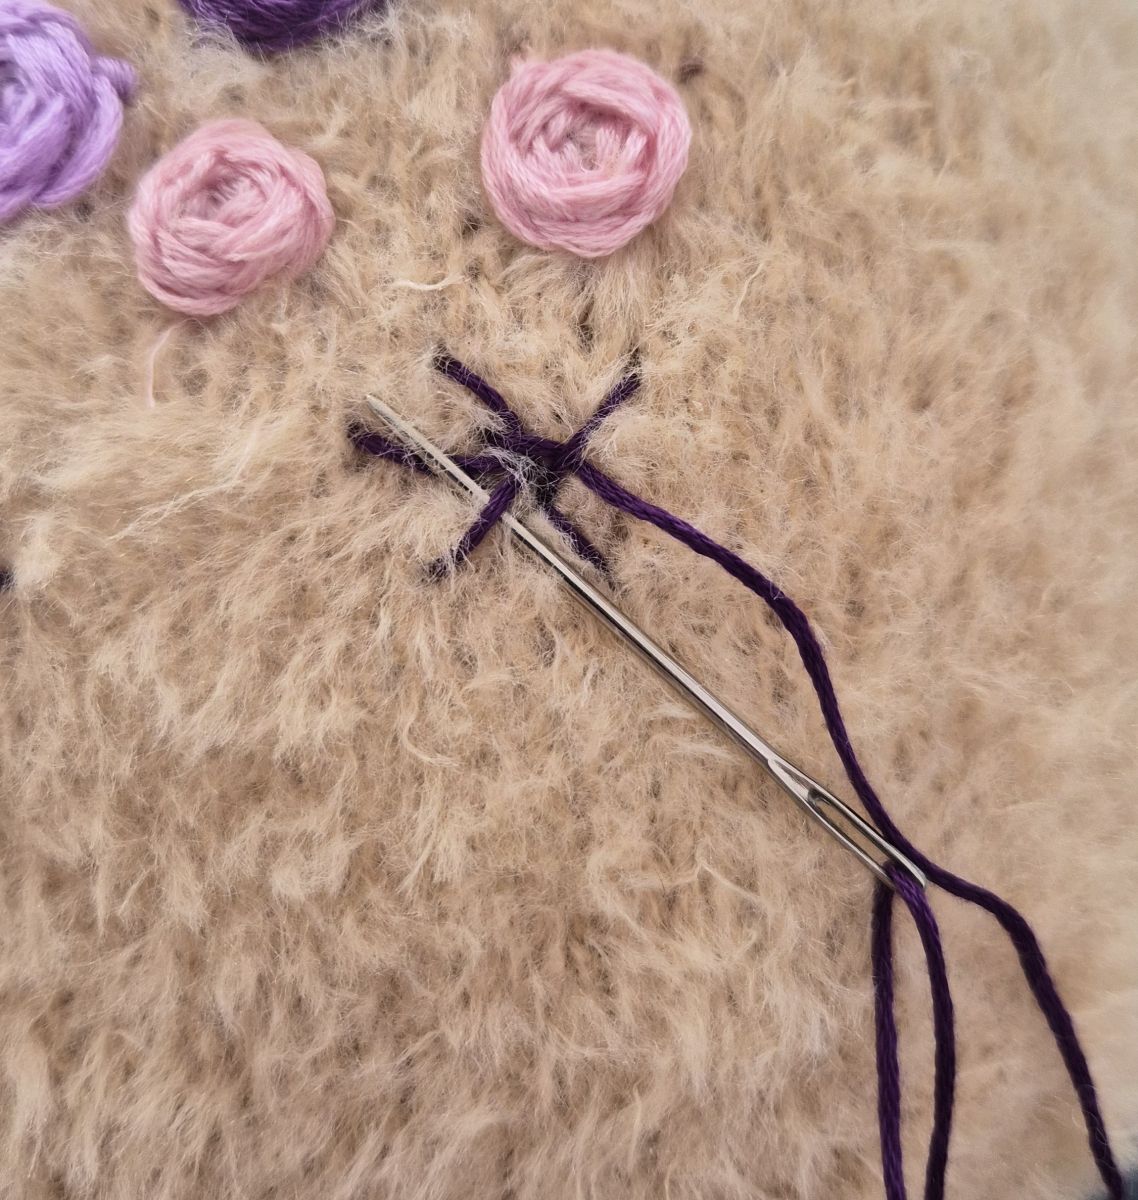
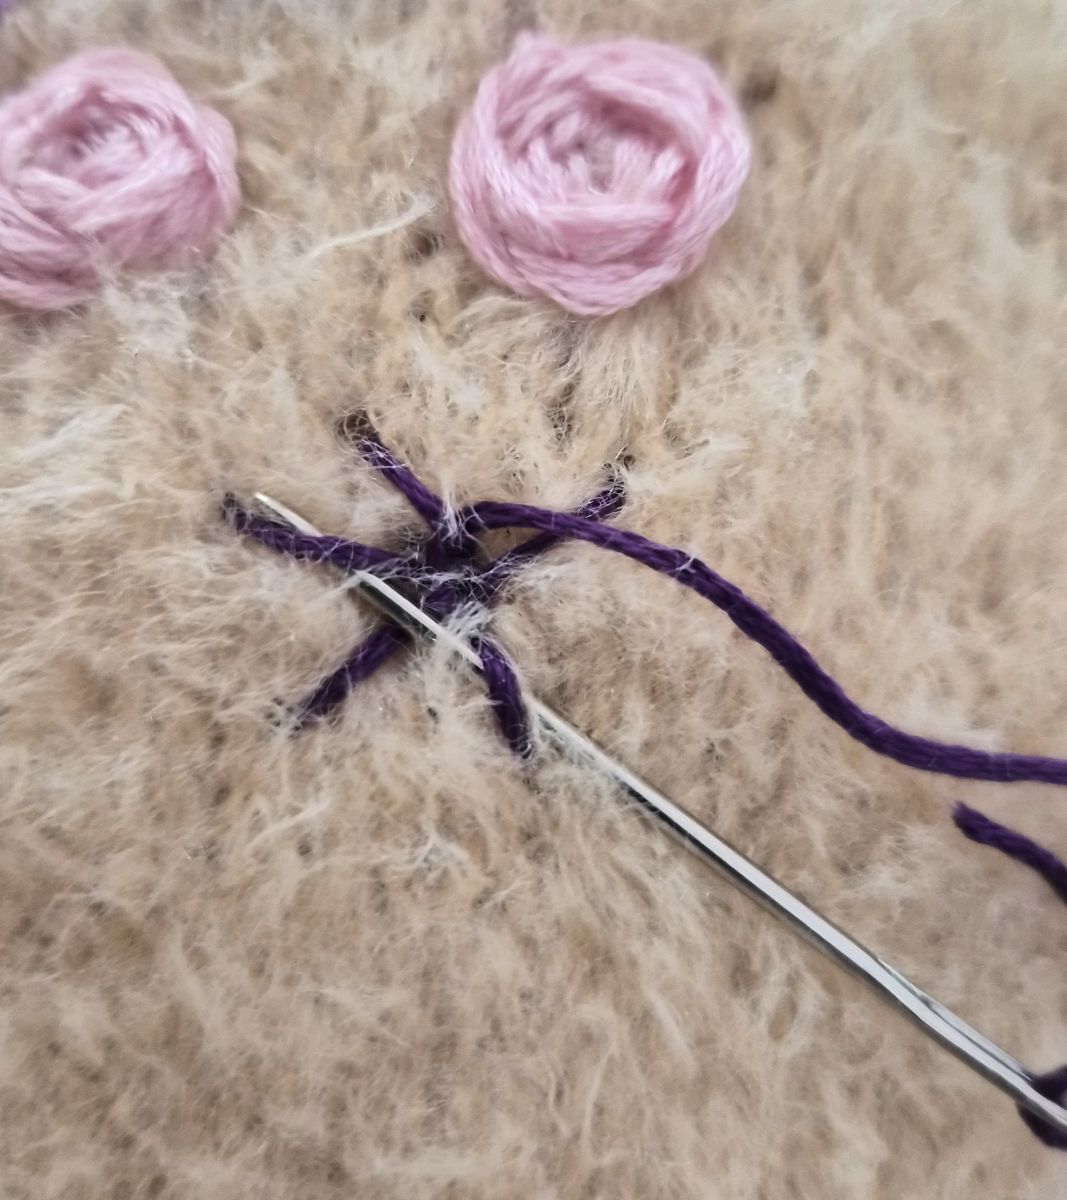
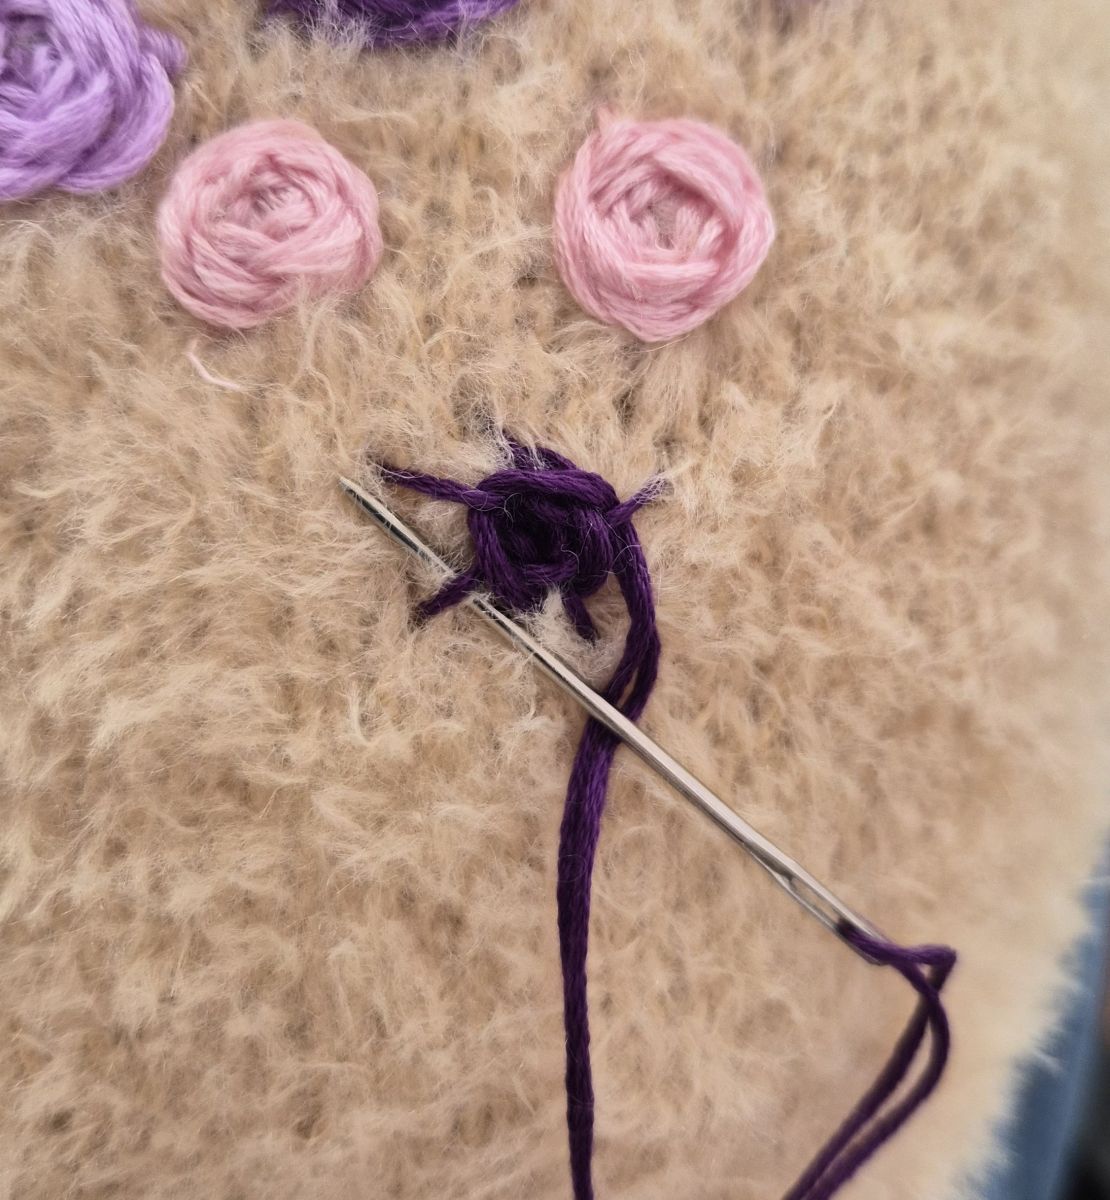
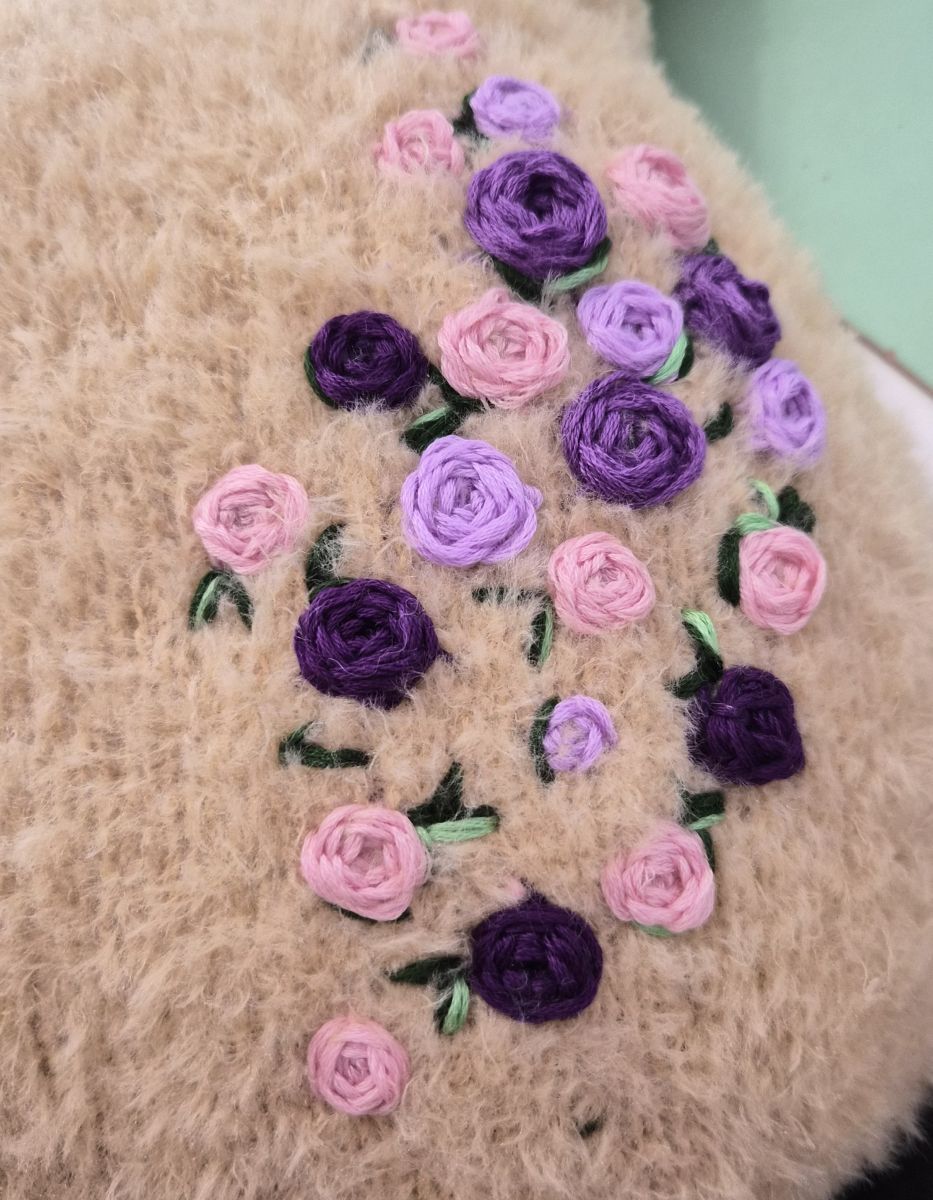
Then I really wanted to embroider a few flowers. The colors and the bunny reminded me of spring and blossoms, so I decided to add some embroidered details. I chose three coordinating colors for this. Feel free to look at the photos — they show the flower embroidery step by step.
FLOWERS
The flowers can all look the same or vary in size. Larger stitches create larger flowers, while small stitches result in smaller ones.
Start by making 5 stitches radiating outward from a central point, like a star. Beginning with the 5th stitch, start weaving the needle under the stitches: skip the second stitch, slide the needle under the third; skip the fourth stitch, slide the needle under the fifth. Continue this alternating pattern until the flower is complete. As the thread spirals over the stitches, it forms a small rose.

LEAVES
Twist the thread slightly. Insert the needle from the underside of the fabric. Bring the needle up, move it a little to the right or left, and then return to the original insertion point. This creates a leaf shape. You can embroider several leaves next to each other. Adjust the spacing depending on how large you want each leaf to be.
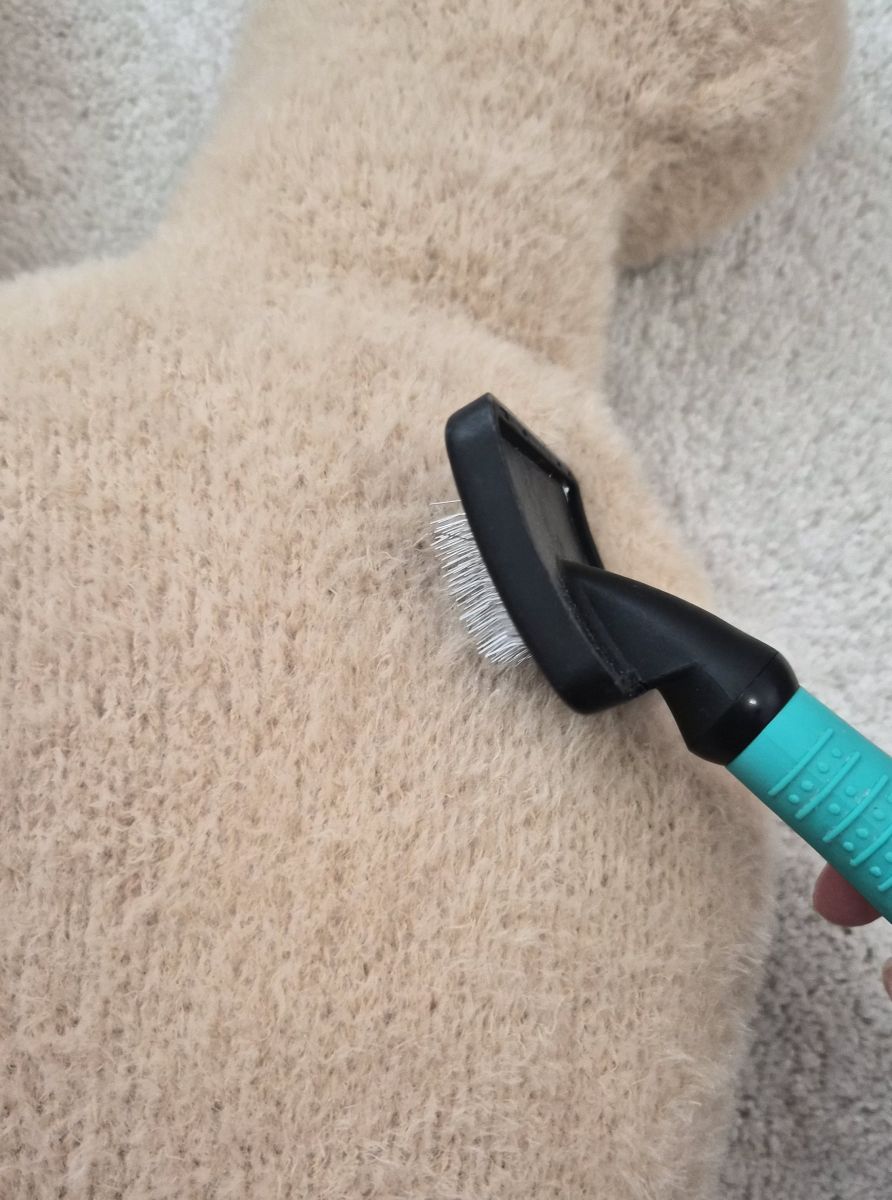
Finally, I gently brushed my bunny with a special grooming brush. Be careful around the eyes, nose, and embroidered flowers so nothing gets damaged.
Your cushion is finished!


