
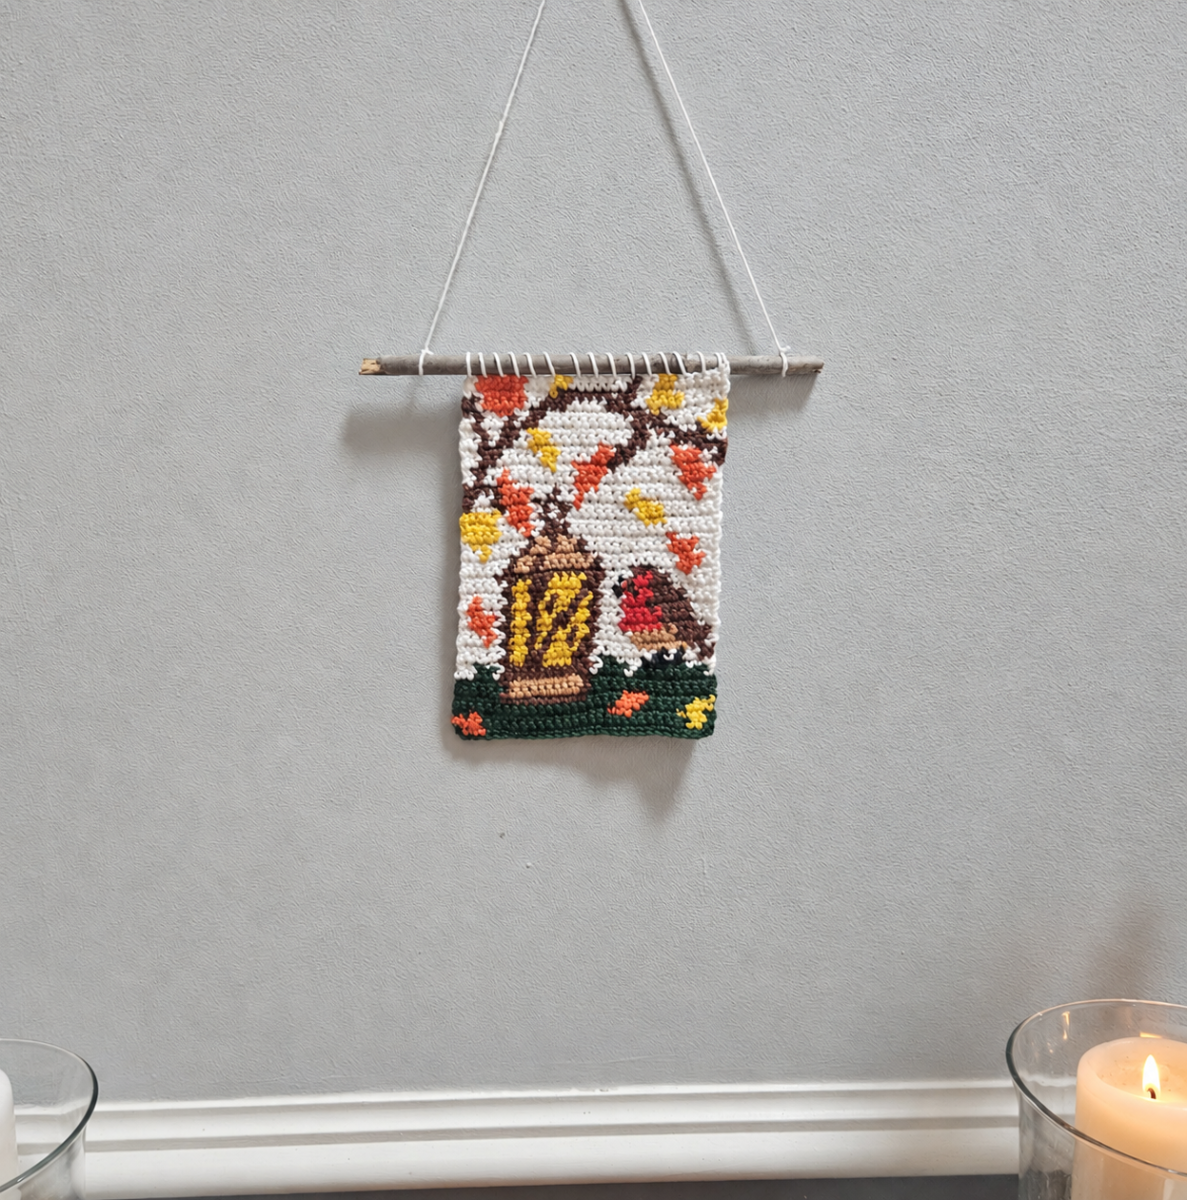
The days are getting shorter, the autumn leaves are falling, and sometimes a little mist creeps up the hills. The trees are changing colour, and the garden is slowly taking on those lovely shades of red, orange, yellow and brown. It really feels like autumn, and all these little changes in nature inspired me to create this cute autumn wall hanging.
I always enjoy seeing robins in the garden, especially at this time of year. They seem to pop up everywhere, appearing from the hedges and bushes and hopping around in search of food. One of my favourite things is spotting them perched on the wall just outside my kitchen window. They are such lovely little birds, and I never get tired of watching them going about their day.
Since robins are such a familiar sight in the garden during autumn, I thought one would be the perfect addition to my wall hanging. Combined with colourful falling leaves and warm autumn shades, it makes a lovely little decoration to bring some of the beauty of the season into your home.
Size:
With DK Yarn: 12 x 16 cm
Materials needed for this pattern:
3 mm crochet hook
A little twig to hang up the Wall hanger approximately 20 cm long
Cotton DK yarn in various Colours:
Yellow (Y): 4 g
Orange (O): 4 g
Green (G): 4 g
Dark Brown (B1): 5 g
Light Brown (B2): 3 g
Red: (R): 2 g
White (W): 11 g
Black (BL) 1 g
Abbreviations: (I use US Terms)
St: Stitch
Sc: Single Crochet
Ch: Chain stitch
Dc: Double Crochet
ss: Slip Stitch
Important information’s for the pattern:
-The beginning chain stitch is not counted as a stitch.
- Knowledge of tapestry crochet is a must as its not explained.
- Knowledge about how to carry colours is a must as I do not explain where I carried the yarn and where I started a new ball for the same colour.
- The even rows are back rows and the uneven rows are always the front rows. This is important so you know where to leave the unused yarn hanging on the back.
- If the first stitch of the next row is a different colour from the last stitch of the current row, make sure to finish the last stitch of the current row with the new colour. This is done in the same way as a regular colour change.
Autumn wall Hanger
Let’s start:
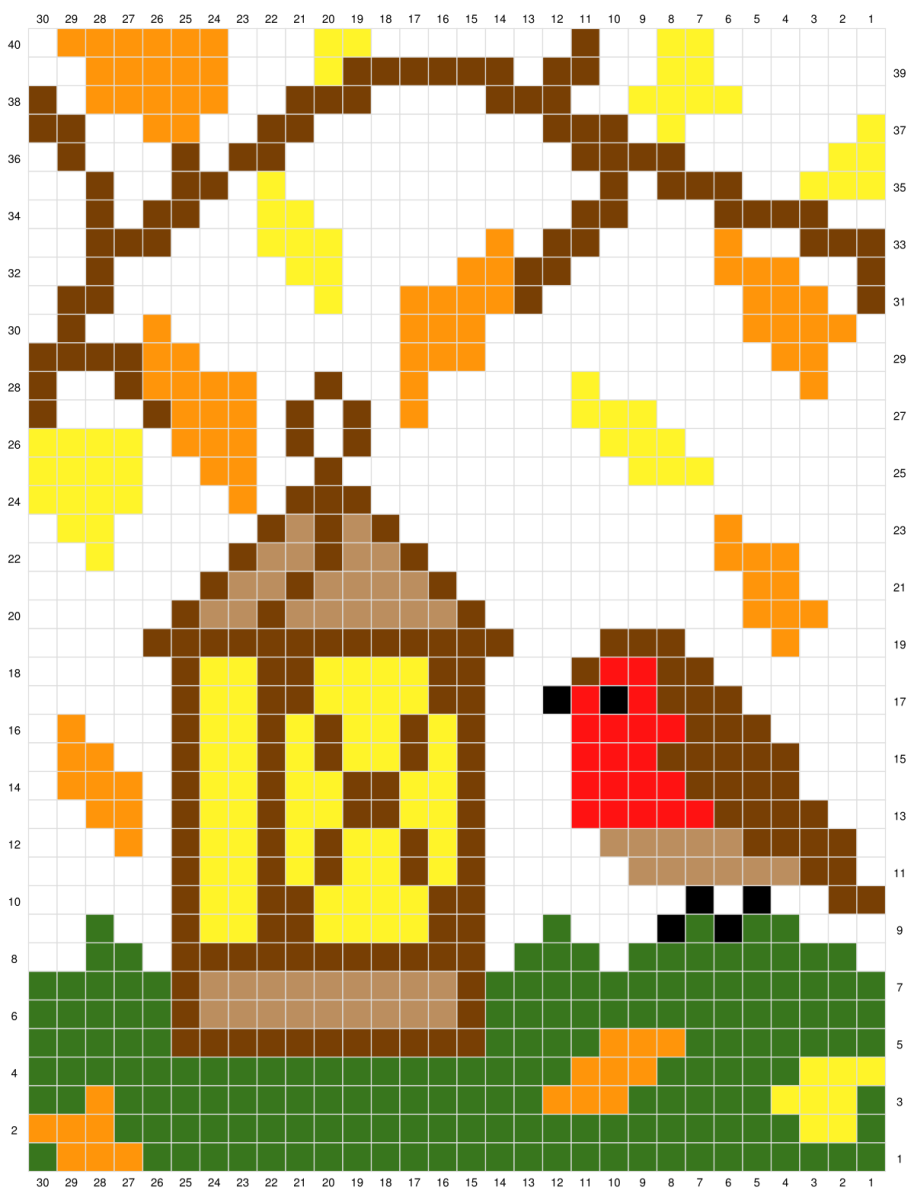
Cast on 31 stitches in Green and work the first stitch in the second from the hook
1. Row: 1 Ch, 26 G, 3 O, 1 G (30 St)
2. Row: 1 Ch, 3 O, 24 G, 2 Y, 1 G (30 St)
3. Row: 1 Ch, 1 G, 3 Y, 5 G, 3 O, 15 G, 1 O, 2 G (30 St)
4. Row: 1 Ch, 19 G, 3 O, 5 G, 3 Y (30 St)
5. Row: 1 Ch, 7 G, 3 O, 4 G, 11 B1, 5 G (30 St)
6. Row: 1 Ch, 5 G, 1 B1, 9 B2, 1 B1, 14 G (30 St)
7. Row: 1 Ch, 14 G, 1 B1, 9 B2, 1 B1, 5 G (30 St)
8. Row: 1 Ch, 2 W, 2 G, 1 W, 11 B1, 1 W, 3 G, 1 W, 8 G, 1 W (30 St)
9. Row: 1 Ch, 3 W, 2 G, 1 BL, 1 G, 1 BL, 3 W, 1 G, 2 W, 2 B1, 4 Y, 2 B1, 2 Y, 1 B1, 2 W, 1 G, 2 W (30 St)
10. Row: 1 Ch, 5 W, 1 B1, 2 Y, 2 B1, 4 Y, 2 B1, 7 W, 1 BL, 1 W, 1 BL, 2 W, 2 B1 (30 St)
11. Row: 1 Ch, 1 W, 2 B1, 6 B2, 5 W, 1 B1, 1 Y, 1 B1, 2 Y, 1 B1, 1 Y, 1 B1, 2 Y, 1 B1, 5 W (30 St)
12. Row: 1 Ch, 3 W, 1 O, 1 W, 1 B1, 2 Y, 1 B1, 1 Y, 1 B1, 2 Y, 1 B1, 1 Y, 1 B1, 4 W, 5 B2, 4 B1, 1 W (30 St)
13. Row: 1 Ch, 2 W, 4 B1, 5 R, 3 W, 1 B1, 2 Y, 2 B1, 2 Y, 1 B1, 2 Y, 1 B1, 1 W, 2 O, 2 W (30 St)
14. Row: 1 Ch, 1 W, 3 O, 1 W, 1 B1, 2 Y, 1 B1, 2 Y, 2 B1, 2 Y, 1 B1, 3 W, 4 R, 4 B1, 3 W (30 St)
15. Row: 1 Ch, 3 W, 5 B1, 3 R, 3 W, 1 B1, 1 Y, 1 B1, 2 Y, 1 B1, 1 Y, 1 B1, 2 Y, 1 B1, 2 W, 2 O, 1 W (30 St)
16. Row: 1 Ch, 1 W, 1 O, 3 W, 1 B1, 2 Y, 1 B1, 1 Y, 1 B1, 2 Y, 1 B1, 1 Y, 1 B1, 3 W, 4 R, 3 B1, 4 W (30 St)
17. Row: 1 Ch, 5 W, 3 B1, 1 R, 1 BL, 1 R, 1 BL, 2 W, 2 B1, 4 Y, 2 B1, 2 Y, 1 B1, 5 W (30 St)
18. Row: 1 Ch, 5 W, 1 B1, 2 Y, 2 B1, 4 Y, 2 B1, 3 W, 1 B1, 2 R, 2 B1, 6 W (30 St)
19. Row: 1 Ch, 3 W, 1 O, 3 W, 3 B1, 3 W, 13 B1, 4 W (30 St)
20. Row: 1 Ch, 5 W, 1 B1, 2 B2, 1 B1, 6 B2, 1 B1, 9 W, 3 O, 2 W (30 St)
21. Row: 1 Ch, 3 W, 2 O, 10 W, 1 B1, 4 B2, 1 B1, 2 B2, 1 B1, 6 W (30 St)
22. Row: 1 Ch, 2 W, 1 Y, 4 W, 1 B1, 2 B2, 1 B1, 2 B2, 1 B1, 10 W, 3 O, 3 W (30 St)
23. Row: 1 Ch, 5 W, 1 O, 11 W, 1 B1, 1 B2, 1 B1, 1 B2, 1 B1, 5W, 2 Y, 1 W (30 St)
24. Row: 1 Ch, 4 Y, 3 W, 1 O, 1 W, 3 B1, 18 W (30 St)
25. Row: 1 Ch, 6 W, 3 Y, 10 W, 1 B1, 2 W, 2 O, 2 W, 4 Y (30 St)
26. Row: 1 Ch, 4 Y, 1 W, 3 O, 1 W, 1 B1, 1 W, 1 B1, 8 W, 3 Y, 7 W (30 St)
27. Row: 1 Ch, 8 W, 3 Y, 5 W, 1 O, 1 W, 1 B1, 1 W, 1 B1, 1 W, 3 O, 1 B1, 3 W, 1 B1 (30 St)
28. Row: 1 Ch, 1 B1, 2 W, 1 B1, 4 O, 2 W, 1 B1, 2 W, 1 O, 5 W, 1 Y, 7 W, 1O, 2 W (30 St)
29. Row: 1 Ch, 2 W, 2 O,10 W, 3 O, 7 W, 2 O, 4 B1 (30 St)
30. Row: 1 Ch, 1 W, 1 B1, 2 W, 1 O, 8 W, 3 O, 9 W, 4 O, 1 W (30 St)
31. Row: 1 Ch, 1 B1, 1 W, 3 O, 7 W, 1 B1, 4 O, 2 W, 1 Y, 7 W, 2 B1, 1 W (30 St)
32. Row: 1 Ch, 2 W, 2 B1, 5 W, 2 Y, 4 W, 2 O, 2 B1, 5 W, 3 O, 2 W, 1 B1 (30 St)
33. Row: 1 Ch, 3 B1, 2 W, 1 O, 4 W, 2 B1, 1 W, 1 O, 5 W, 3 Y, 3 W, 3 B1, 2 W (30 St)
34. Row: 1 Ch, 2 W, 1 B1, 1 W, 2 B1, 2 W, 2 Y, 9 W, 2 B1, 3 W, 4 B1, 2 W (30 St)
35. Row: 1 Ch, 3 Y, 2 W, 3 B1, 1 W, 1 B1, 11 W, 1 Y, 1 W, 2 B1, 2 W, 1 B1, 2 W (30 St)
36. Row: 1 Ch, 1 W, 1 B1, 3 W, 1 B1, 1 W, 2 B1, 10 W, 4 B1, 5 W, 2 Y (30 St)
37. Row: 1 Ch, 1 Y, 6 W, 1 Y, 1 W, 3 B1, 8 W, 2 B1, 2 W, 2O, 2 W, 2 B1 (30 St)
38. Row: 1 Ch, 1 B1, 1 W, 5 O, 2 W, 3 B1, 4 W, 3 B1, 2 W, 4 G, 5 W (30 St)
39. Row: 1 Ch, 6 W, 2 Y, 2 W, 2 B1, 1 W, 6 B1, 1 Y, 3 W, 5 O, 2 W (30 St)
40. Row: 1 Ch, 1 W, 6 O, 3 W, 2 Y, 7 W, 1 B1, 2 W, 2 Y, 6 W (30 St)
Do not cut the white yarn yet, but you can cut and weave in all the other yarn ends.
Attaching to the Twig:
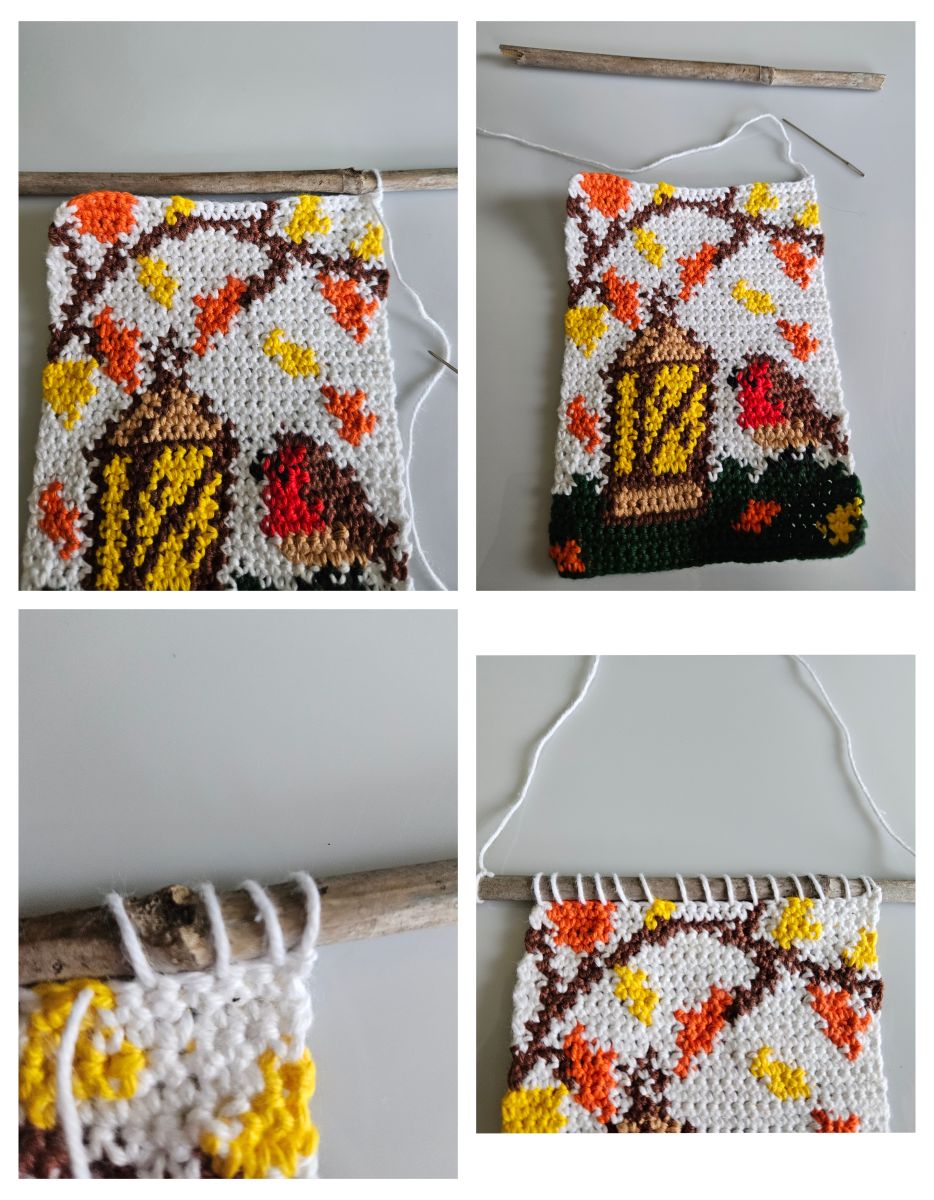
Before attaching the crochet piece to the twig, I blocked it with my iron to help it keep its shape. This is a quick and easy way to block cotton yarn.
I then used a regular sewing needle to stitch the piece onto the twig. To make sure I had enough yarn, I loosely wrapped it around the twig about 18 times before cutting it to length. I attached the crochet piece by sewing every second stitch onto the twig, then secured and wove in the yarn end.
Finally, I added the hanger. I cut a piece of yarn approximately 40 cm long and tied a secure knot at each end.
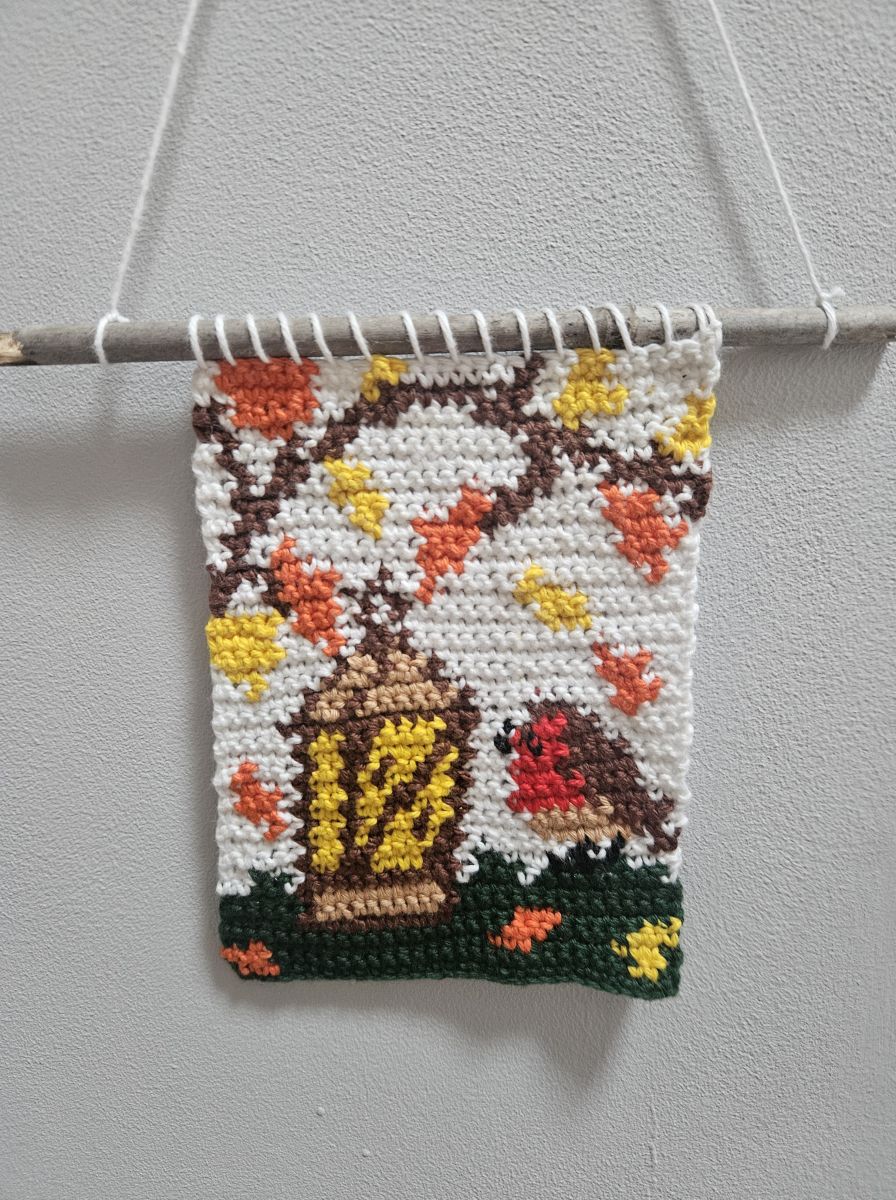
I hope you enjoyed this pattern. I would love to hear your comments or feedback if you worked the decoration. In the future, you will find many more free patterns on my blog at Crazypatterns. Just click on the “Posts” tab at the top. To make sure you don’t miss any updates, follow me here—you’ll always stay up to date!
Categories
Quick to Target
Community & Help


