
Some places stay with us not only as memories, but as a very particular feeling.
There was a time when I travelled constantly for work and, for a while, had to fly to Hamburg three or four times a week. Lots of work, lots of appointments, lots of hours in the air – and yet what stayed with me from that time was my love for that very special feeling of the North.
At some point, one of my trips also took me to Sylt. Sea, wind, beach, that incredible sense of space – and, of course, the colours you almost automatically associate with it: blue and white, with a small accent of red.
Maybe this is also a little glimpse into my creative process:
I see something, notice a colour combination, a shape or simply a mood, and store it somewhere in the back of my mind. Sometimes quite consciously, sometimes without even realising it. And at some point it resurfaces – and suddenly a memory becomes an idea, and that idea becomes a new pattern.
That’s how SYLT came to life.
A little nautical baby set consisting of a dress, a hat and tiny booties. Three pieces that work beautifully together, but can of course also be knitted individually.
And now I’ll show you step by step how to bring your own little piece of Sylt onto your needles.
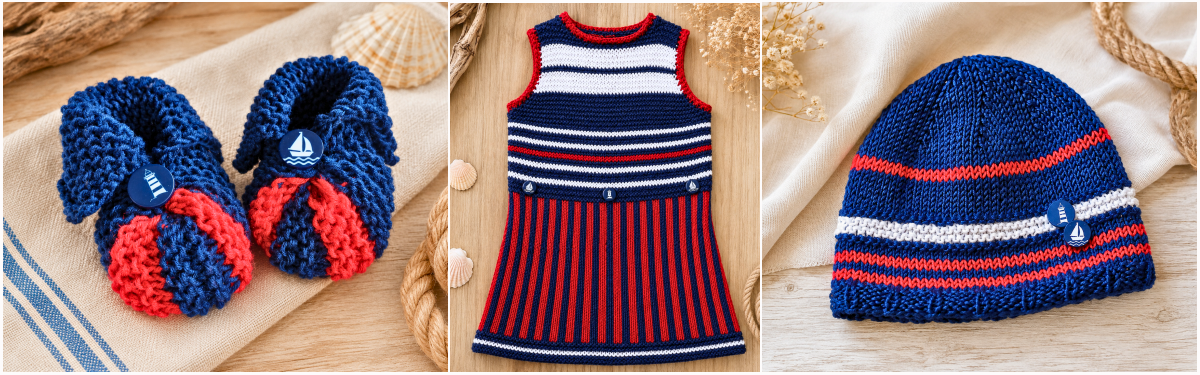
The SYLT Baby Dress
The dress is knitted traditionally in separate front and back pieces, which are then sewn together. Side decreases gradually narrow the skirt towards the top, while the different stitch patterns and nautical colour sequence create the signature SYLT look.
If you don’t have much experience knitting garments yet, don’t worry. We’ll work our way up section by section – and I’ll always let you know when something changes.
Size
80 - 86
Materials
The original sample was knitted with LANA GROSSA Classico in shades No. 016 (Blue), No. 005 (Red) and No. 018 (White).
Of course, you don’t have to use exactly the same yarn. You may even have a suitable cotton yarn in your stash already. The most important thing is to choose a yarn with a similar weight and yardage and to make sure you can achieve the specified gauge.
Not sure how to choose a substitute yarn?
I’ve written a detailed article on exactly this topic. In it, I show you in 6 simple steps what to look for when choosing a yarn substitute – especially helpful when the original yarn is no longer available.
👉 #StitchWisdom: Original Yarn Discontinued? 6 Steps to Find the Right Yarn Substitute
Yarn Requirements
- Blue: approx. 115 g / 253 m (277 yds)
- Red: approx. 60 g / 132 m (144 yds)
- White: approx. 15 g / 33 m (36 yds)
You Will Also Need
- Knitting needles 4.5 mm / US 7 / UK 7
- Circular needle or double-pointed needles 4.5 mm / US 7 / UK 7 for the edgings
- Tapestry needle
- Stitch markers, if needed
- Measuring tape and scissors
- 3 buttons of your choice (optional)
Gauge
18 stitches × 26 rows = 10 × 10 cm / 4 × 4 in
My tip: When knitting a garment, it really is worth taking the time to make a gauge swatch. Especially with baby clothes, even a difference of just a few stitches can make quite a difference to the finished size.
Before You Begin
The dress consists of a back and a front piece. Both are worked from the lower edge of the skirt upwards.
Regular decreases at both sides gradually create the gently flared shape of the skirt. We’ll then work the armholes, followed by the respective necklines.
The neckline and armholes are finished with edgings at the end.
Stitch Patterns
Pattern A – Garter Stitch
Knit all stitches in every row, on both right-side and wrong-side rows.
This creates the characteristic even, lightly textured appearance of garter stitch.
Pattern B – Vertical Stripes
Pattern B is worked in stockinette stitch using two colours at the same time.
Work continuously as follows:
k2 in Blue, k2 in Red
and repeat this sequence to the end of the row.
Knit the stitches on right-side rows and purl the stitches on wrong-side rows.
Important: Maintain the colour sequence throughout to create the blue and red vertical stripes. Carry the colour not currently in use loosely across the back of the work. Make sure not to pull the carried yarn too tightly, as this could cause the fabric to pucker.
Edge Stitches
Every row begins and ends with an edge stitch worked as a knotted edge.
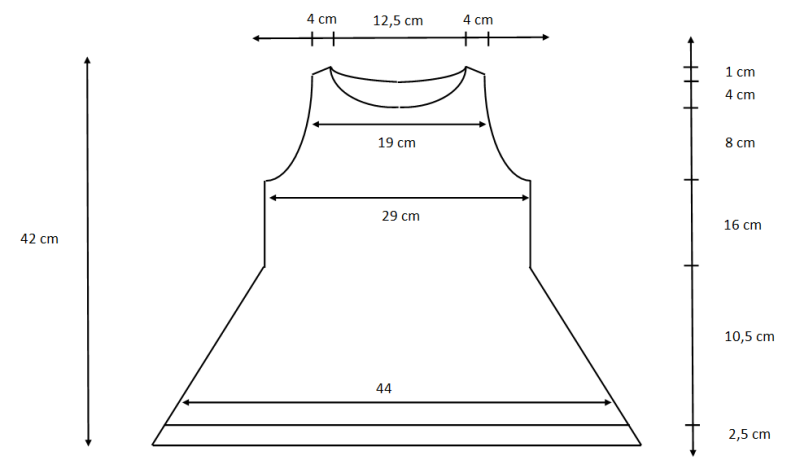
Schematic in cm (proportions are not to scale)
Back
We begin at the lower edge of the dress and work our way upwards.
Cast-On and Lower Edge
Using 4.5 mm / US 7 / UK 7 needles and Blue, cast on 98 stitches, including the edge stitches.
Begin by working in Pattern A:
- 3 rows Blue
- 2 rows White
- 4 rows Blue
The lower edge of the dress is now complete.
When the piece measures approximately 2.5 cm (1 in) from the cast-on edge, change to Pattern B.
Skirt Shaping
Now begin the decreases at both sides. These gradually narrow the dress towards the top and create the flared shape of the skirt.
Decrease at both sides as follows:
- 2 stitches 4 times in every 2nd row
- then 2 stitches 3 times in every 4th row
- then 2 stitches once in the 8th row
After completing the skirt shaping, the piece measures approximately 13 cm (5.1 in) from the cast-on edge.
My tip: It’s worth keeping track of the decreases here or ticking them off on a small piece of paper as you go. Since the intervals change, a simple tally is much more relaxing than wondering later: “Was that the third decrease already – or only the second?” 😉
Continue Straight
After completing the skirt decreases, continue working straight in Pattern B without any further increases or decreases until the piece measures approximately 21 cm (8.3 in) from the cast-on edge.
Back to Pattern A
Now change back to Pattern A.
From this point, work the following colour sequence:
- 6 rows Blue
- 2 rows White
- 4 rows Blue
- 2 rows White
- 2 rows Blue
- 2 rows Red
- 2 rows Blue
- 2 rows White
- 4 rows Blue
- 2 rows White
- 6 rows Blue
Please note: Begin Pattern A with a right-side row.
Continue following the colour sequence while working the shaping described below. From this point onwards, also use the specified overall measurements as your guide – you do not need to complete the entire colour sequence before beginning the armhole shaping.
Armholes
When the piece measures 29 cm (11.4 in) from the cast-on edge, begin shaping the armholes.
Continue working in Pattern A, maintaining the established colour sequence.
Decrease at both sides in every 2nd row as follows:
- 2 stitches 3 times
- then 1 stitch 6 times
After completing the decreases, continue straight in Pattern A without any further decreases.
Neckline and Shoulders
When the piece measures 40 cm (15.7 in) from the cast-on edge, begin shaping the neckline and shoulders.
For the back neckline, bind off the centre 16 stitches.
Continue working each side separately.
At each neckline edge, decrease in every 2nd row as follows:
- 2 stitches once
- 1 stitch once
At the same time as you work the neckline decreases, begin the shoulder shaping at the outer edge.
Bind off at the shoulder edge in every 2nd row as follows:
- 3 stitches twice
- 4 stitches once
After the final shoulder bind-off, all stitches have been worked off.
And that’s the back finished. 😊
Front
Work the front initially exactly as for the back.
This means: cast on 98 stitches, work the lower edge in Pattern A, change to Pattern B, work the skirt shaping and, when the piece measures approximately 21 cm (8.3 in), change back to Pattern A and the specified colour sequence.
Everything remains identical to the back up to the beginning of the armholes.
Armholes
When the piece measures 29 cm (11.4 in) from the cast-on edge, begin shaping the armholes.
Continue working in Pattern A, maintaining the specified colour sequence.
In Blue, decrease at both sides in every 2nd row as follows:
- 2 stitches 3 times
- 1 stitch 2 times
Then change to White and continue decreasing at both sides in every 2nd row as follows:
- 1 stitch 4 times
The armhole shaping on the front is therefore slightly different from the back – so don’t simply repeat the back decreases on autopilot here. 😉
Continue After the Armhole Shaping
After completing the decreases, continue working in Pattern A, following the specified colour sequence.
Work:
- 2 rows Blue
- 8 rows White
Then change back to Blue.
Front Neckline
When the piece measures 37 cm (14.6 in) from the cast-on edge, begin shaping the front neckline.
Bind off the centre 10 stitches and continue working each side separately.
At each neckline edge, decrease in every 2nd row as follows:
- 3 stitches once
- 2 stitches once
- 1 stitch once
Shoulders
After completing the final neckline decrease, begin the shoulder shaping.
Work as for the back:
- bind off 3 stitches twice in every 2nd row
- then bind off 4 stitches once
After the final shoulder bind-off, all stitches have been worked off.
And that’s the front finished too.
Finishing the Dress
Now the front and back finally get to come together. 😊
If needed, gently wet-block both pieces into shape and allow them to dry completely.
Weave in all loose ends, then sew the shoulder and side seams.
Take care to align the colour changes and stripes as neatly as possible along the side seams.
Neck Edging
Using a 4.5 mm / US 7 / UK 7 needle, pick up approximately 70 stitches evenly around the neckline.
Knit 1 round, then bind off all stitches loosely.
My tip: The 70 stitches are a guideline. The most important thing is that the neckline lies nice and flat without pulling or flaring. If you need to pick up a few more or fewer stitches to achieve this, that’s absolutely fine.
Armhole Edgings
Using a 4.5 mm / US 7 / UK 7 needle, pick up approximately 50 stitches evenly around one armhole.
Knit 1 round, then bind off all stitches loosely.
Work the second armhole edging in the same way.
And then?
Check that all ends are securely woven in, give the dress one final gentle shaping – and your SYLT dress is finished.
The SYLT Baby Hat
The hat is knitted in the round from the bottom up. You begin with a ribbed band, followed by sections worked in stockinette stitch and a garter-stitch stripe. Finally, evenly spaced decreases shape the crown.
If you haven’t worked with double-pointed needles very often, don’t worry. After the first few rounds, it gets much easier – and because the hat is worked seamlessly in the round, there’s no seam to sew at the end. 😊
Size
Head circumference: approx. 45 cm (17.7 in)
Yarn Requirements
- Blue: approx. 40 g / 88 m (96 yds)
- Red: approx. 10 g / 22 m (24 yds)
- White: approx. 3 g / 7 m (8 yds)
You Will Also Need
- Double-pointed needles 4.5 mm / US 7 / UK 7
- Tapestry needle
- Stitch markers, if needed
- Scissors
- 2 buttons of your choice (optional)
Gauge
18 stitches × 26 rounds = 10 × 10 cm / 4 × 4 in
My tip: It’s worth making a gauge swatch even for a baby hat. When it comes to head circumference, a difference of just a few stitches can quickly determine whether the hat fits comfortably or keeps slipping down towards those little eyes. 😉
Stitch Patterns
Pattern A – Garter Stitch in the Round
Work alternately:
1 round knit, 1 round purl
Pattern B – Rib Pattern
Work continuously:
k1, p4
and repeat this sequence to the end of the round.
Pattern C – Stockinette Stitch in the Round
Knit all stitches in every round.
Let’s Get Started!
Using Blue, cast on 80 stitches and distribute them evenly across four double-pointed needles – 20 stitches per needle.
Join to work in the round.
Make sure the cast-on edge is not twisted when joining. This is one of those little moments where a second look really is worth it. 😉
Ribbed Band
Work 5 rounds in Pattern B.
The band should now measure approximately 2.5 cm (1 in).
First Stripe Section
Change to Pattern C and work:
- 2 rounds Blue
- 2 rounds Red
- 2 rounds Blue
- 2 rounds Red
- 3 rounds Blue
Garter-Stitch Centre Stripe
Now change to Pattern A.
Important: This section begins with a purl round.
Work:
- 1 round Blue – purl
- 1 round White – knit
- 1 round White – purl
- 1 round White – knit
- 1 round White – purl
- 1 round Blue – knit
- 1 round Blue – purl
This creates the distinctive white garter-stitch stripe of the SYLT hat.
Second Stripe Section
Change back to Pattern C and work:
- 7 rounds Blue
- 2 rounds Red
- 4 rounds Blue
Then continue in Blue.
Crown Decreases
Now it’s time to shape the crown.
The decreases are worked evenly at 8 points around the round. This keeps the decreases neatly aligned and creates an even crown.
Between each decrease round, work 1 round knitting all stitches without any decreases.
Decrease Round 1
[ k8, ssk ] 8 times
→ 72 stitches
Knit 1 round.
Decrease Round 2
[ k7, ssk ] 8 times
→ 64 stitches
Knit 1 round.
Decrease Round 3
[ k6, ssk ] 8 times
→ 56 stitches
Knit 1 round.
Decrease Round 4
[ k5, ssk ] 8 times
→ 48 stitches
Knit 1 round.
Decrease Round 5
[ k4, ssk ] 8 times
→ 40 stitches
Knit 1 round.
Decrease Round 6
[ k3, ssk ] 8 times
→ 32 stitches
Knit 1 round.
Decrease Round 7
[ k2, ssk ] 8 times
→ 24 stitches
Knit 1 round.
Decrease Round 8
[ k1, ssk ] 8 times
→ 16 stitches
Knit 1 round.
Decrease Round 9
Work ssk around.
→ 8 stitches
Cut the working yarn, leaving a sufficiently long tail. Thread the tail onto a tapestry needle and draw it through the remaining 8 stitches.
Pull firmly to close the opening and secure the yarn carefully on the inside.
Weave in all remaining ends.
And that’s your SYLT baby hat finished.
The SYLT Baby Booties
The little booties are worked flat in rows, creating an L-shaped knitted piece first.
Only through folding, sewing and gathering does the piece take on its final bootie shape.
It may sound a little more unusual than it actually is. I’ll guide you through the finishing step by step – and the photos will help you follow each stage easily.
Size
Foot length: approx. 9 cm (3.5 in)
Materials
For the original sample, I again used LANA GROSSA Classico in shades No. 016 (Blue) and No. 005 (Red).
As mentioned above, you can of course use a different yarn. The important thing is that the yardage and gauge are as close as possible to the original yarn.
If your chosen yarn behaves differently, make sure to work a gauge swatch first and adjust the needle size if necessary.
For One Pair You Will Need
- Blue: approx. 25 g / 55 m (60 yds)
- Red: approx. 5 g / 11 m (12 yds)
- a small amount of White yarn for the decorative detail
- Knitting needles 4.5 mm / US 7 / UK 7
- Tapestry needle
- 2 buttons of your choice (optional)
Gauge:
18 stitches × 26 rows = 10 × 10 cm / 4 × 4 in
My tip: Even with such a small project, it’s worth taking the time to check your gauge. With baby booties, just a few stitches can make the difference between a perfect fit and a bootie that ends up too large or too small.
Stitch Pattern
Pattern A – Garter Stitch
Knit all stitches on both right-side and wrong-side rows.
Every row begins and ends with an edge stitch (chain edge).
Let’s Get Started
Using Blue, cast on 24 stitches, including the edge stitches.
Work a chain edge and knit 35 rows in garter stitch.
Your knitted piece should now measure approximately 10.5 cm (4.1 in) in height.
Creating the L-Shape
At the beginning of the next row, bind off 12 stitches.
Continue working over the remaining 12 stitches.
1st Stripe – Blue
1st row: knit all stitches
2nd–5th rows: purl all stitches
6th row: knit all stitches
2nd Stripe – Red
1st row: knit all stitches
2nd–5th rows: purl all stitches
6th row: knit all stitches
3rd Stripe – Blue
1st row: knit all stitches
2nd–5th rows: purl all stitches
6th row: knit all stitches
4th Stripe – Red
1st row: knit all stitches
2nd–5th rows: purl all stitches
6th row: knit all stitches
5th Stripe – Blue
1st row: knit all stitches
2nd–5th rows: purl all stitches
6th row: knit all stitches
Then bind off all 12 stitches loosely.
You should now have an L-shaped knitted piece.
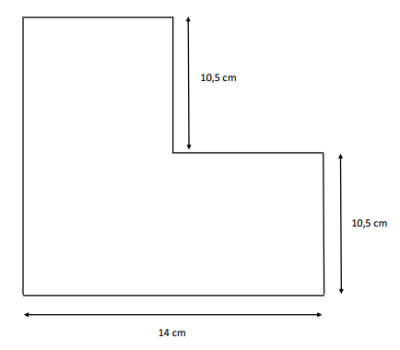
Turning the “L” into a Baby Bootie
This is the part where the step-by-step photos are especially helpful. Place your knitted piece in front of you in the same position as shown in the pictures and work through the steps one at a time.
.png)
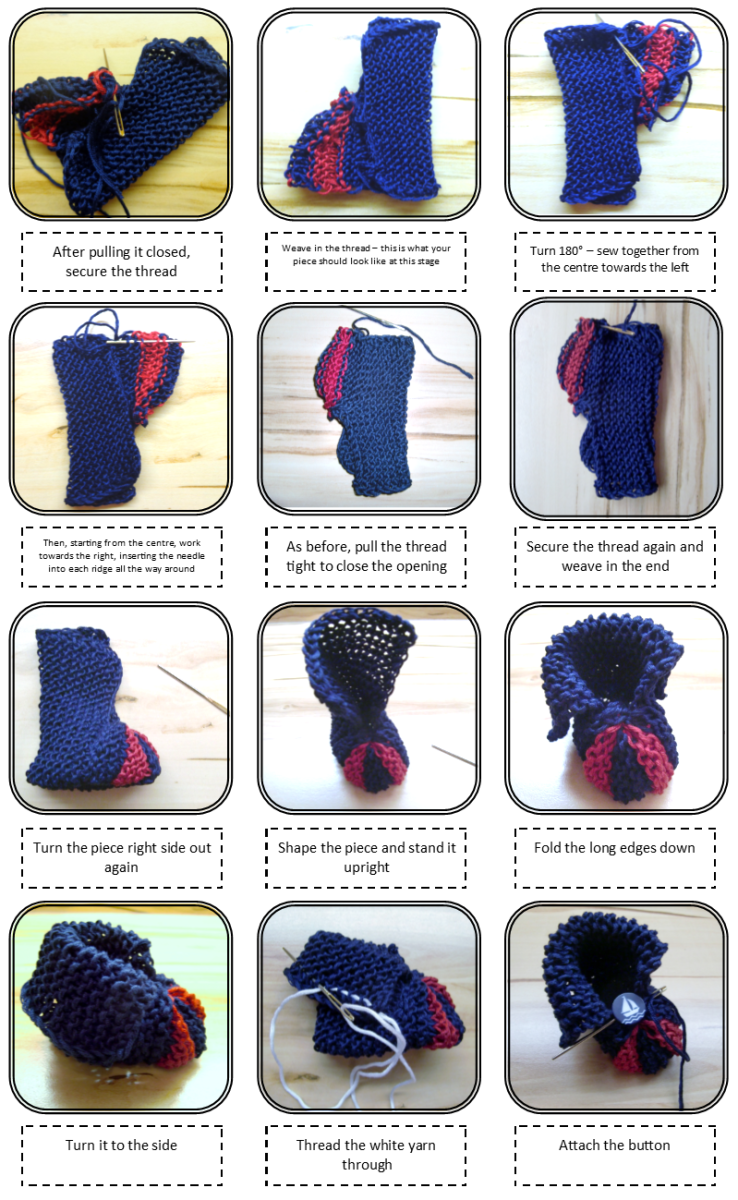
Here’s a Quick Written Guide Too:
Step 1 – Turn the knitted piece over
Place the finished knitted piece in front of you and turn it over to the wrong side.
Step 2 – Fold up the long edge
Fold the long lower edge upwards so that long edge meets long edge.
Step 3 – Fold down the short edge
Then fold the short upper edge downwards so that short edge meets short edge.
Step 4 – Sew the edges together
Carefully sew the matching edges together.
As you sew, turn the knitted piece clockwise until you reach the short edge on the right.
Step 5 – Turn inside out
Once the edges are completely sewn together, turn the piece inside out.
Continue working on this side.
Shape the Toe
Now for the little magic trick behind this construction. 😉
Thread a sufficiently long piece of Blue yarn onto your tapestry needle.
Insert the needle into each ridge, working all the way around the open edge.
Once you return to your starting point, carefully but firmly pull the yarn tight.
This gathers and closes the opening, forming the toe of the bootie.
Secure the yarn well and weave in the end.
Close the Heel
Turn the bootie 180°.
Begin in the centre of the remaining open edge and sew from the centre towards the left.
Then return to the centre and work towards the right.
Just as you did for the toe, insert the needle into each ridge, working all the way around the remaining opening.
Pull the yarn firmly to close the opening.
Secure the yarn well and weave in the end.
Finishing the Booties
Turn the bootie right side out again and gently shape it.
Fold the long upper edges down to create the little cuff.
If you like, thread a piece of White yarn through as a decorative detail and sew a small decorative button onto the side.
Work the second bootie in the same way.
And your little pair of SYLT baby booties is finished. ❤️
Easily Adjust the Size
With the specified gauge and stitch count, the finished bootie has a foot length of approximately 9 cm (3.5 in).
If you would like to make the booties larger, you can adjust the pattern accordingly using your gauge.
For reference, the following chart gives you an overview of foot lengths and the corresponding EU shoe sizes:
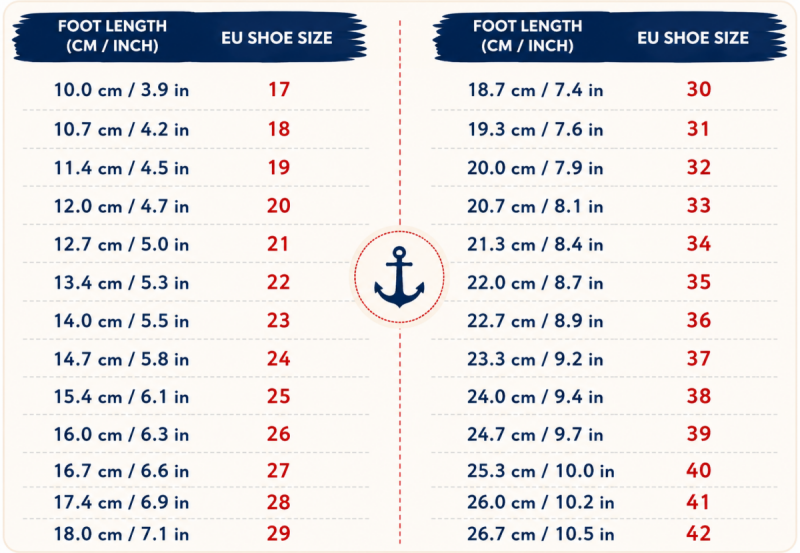
My tip: If you change the size, you should not only adjust the number of cast-on stitches according to your gauge, but also increase the overall proportions of the knitted piece accordingly.
Simply casting on more stitches would not be enough with this particular folding construction.
Enjoy knitting your SYLT set! ⚓
🧶 Now It’s Your Turn!
Maybe you’ll knit SYLT in the classic nautical colours of Blue, White and Red – or give this little set a completely new look with your own favourite colour combination.
📸 If you knit your own SYLT set, I’d love to see your finished projects here on CrazyPatterns.
It always makes me so happy to see how differently the same pattern can be interpreted and all the personal touches you bring to your projects.
✨ And if you enjoy my posts, I’d be delighted if you followed me here on CrazyPatterns. That way, you won’t miss any new #FreeStitches with free knitting and crochet patterns or new #StitchWisdom posts with tips, ideas and practical know-how for knitting and crochet.
.png)
🧡 Perhaps you'll also enjoy exploring more articles on my CrazyPatterns blog - or maybe you'll discover your next favourite pattern in my shop.
With love
Kathrin, Emma & Muki
Photos, designs & content © Kathrin | stricken-im-trend.com


