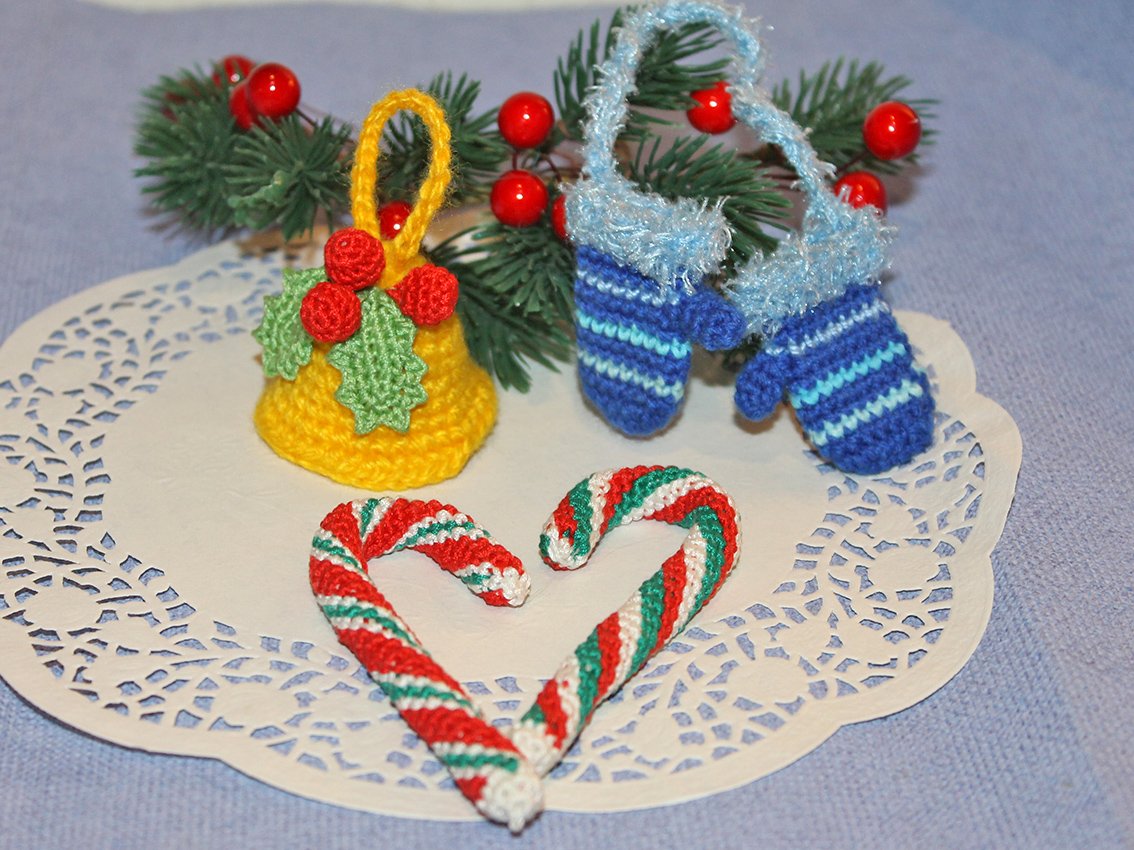
Three Christmas tree decorations made from leftover yarn.
This crochet pattern includes three small Christmas decorations: a bell, mittens and a candy cane. They can be crocheted quickly and easily. The difficulty level is easy, making them suitable for beginners. You can use any leftover yarn, as the amount needed is minimal.
Abbreviations:
ch – chain
sl st – slip stitch
sc – single crochet
hdc – half double crochet
inc – increase (2 sc in 1 st)
dec – decrease (single crochet two stitches together)
(...) x N times – repeat instructions in brackets N times
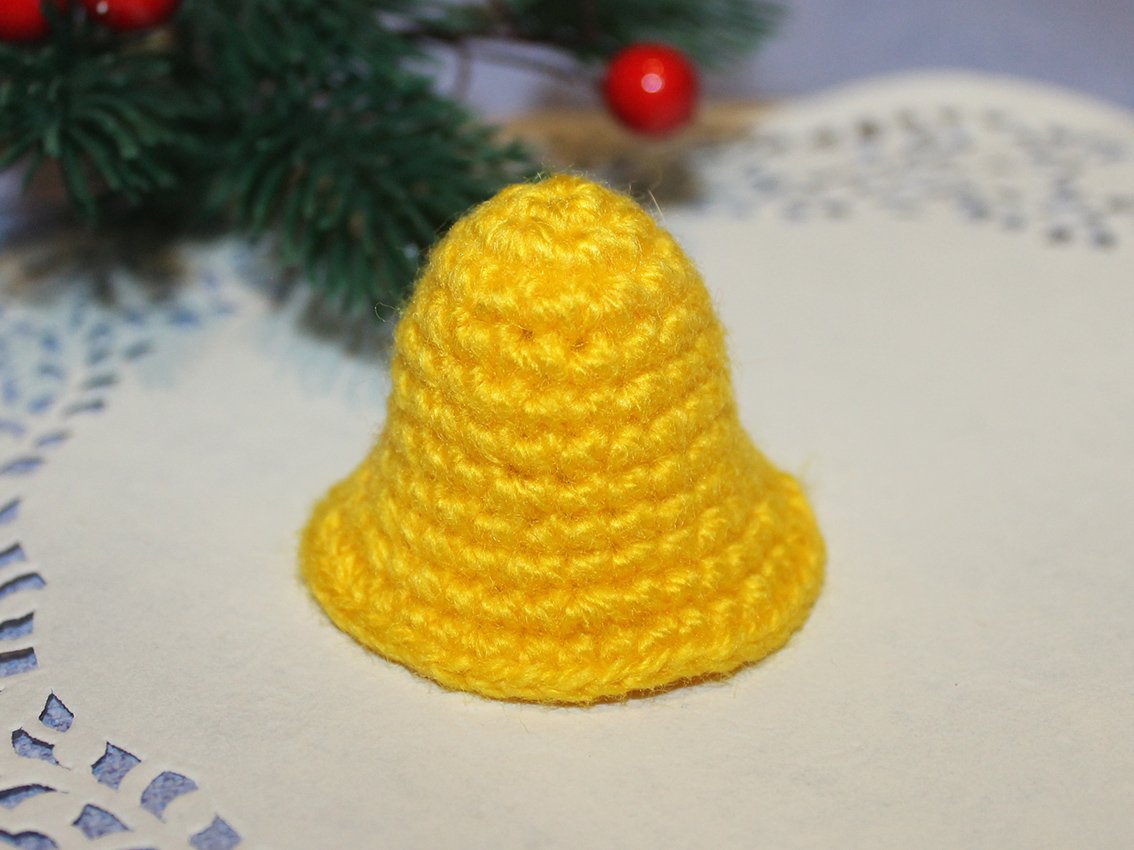
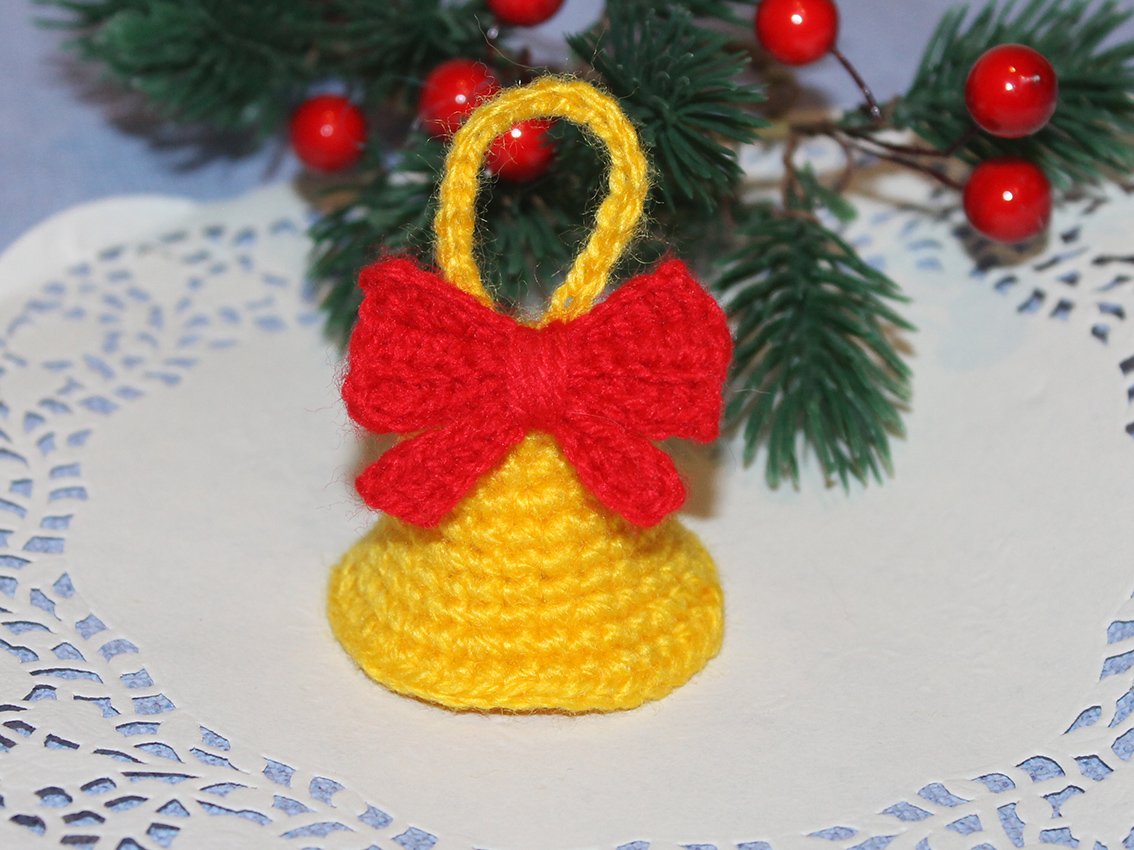
A bell for the Christmas tree.
Materials:
Same thickness yarn of your choice (acrylic, cotton). I used yellow, red and green yarn.
- A crochet hook
- A small amount of hollow fibre
- A sewing needle, matching sewing threads.
Part 1 - Bell.
Work with any color, I used yellow.
Rnd 1. 6 sc in a Magic Ring
Rnd 2. 6 inc = 12
Rnd 3. (3 sc, 1 inc) х 3 times = 15
Rnd 4. 2 sc, (1 inc, 4 sc) х 2 times, 1 inc, 2 sc = 18
Rnd 5. (5 sc, 1 inc) х 3 times = 21
Rnd 6. 21 sc
Rnd 7. 3 sc, (1 inc, 3 sc) х 2 times, 1 inc, 3 sc = 24
Rnd 8. 24 sc
Rnd 9. (1 inc, 3 sc) х 6 times = 30
Rnd 10. (5 sc, 1 inc) х 5 times = 35
Rnd 11. 3 sc, (1 inc, 3 sc) х 4 times, 1 inc, 1 sc, 2 sl st = 40
Fasten off, cut off any excess yarn, hide the end.
Part 2 - Clapper.
Rnd 1. 6 sc in a Magic Ring
Rnd 2. 6 inc = 12
Rnd 3-4 (2 rounds). 12 sc
Rnd 5. 6 dec = 6
Add a small amount of hollow fibre. Cut off yarn, leaving approx. 30 cm long tail for further operation.
Pull off the loops.
.JPG)
Sew part No. 2 to part No. 1.
Work 20 ch, then fasten with a slip stitch into the top of the bell to create a hanging loop.
.JPG)
Decorate the bell with a bow or a sprig of holly.
A variant with bow
The bow consists of 2 parts.
Work with any color, I used red.
Part 1.
Work 14 ch.
Row 1. starting from 3rd ch from hook: 3 hdc, 2 sc, 2 sl st, 2 sc, 3 hdc, 2 ch, turn = 12
Row 2. into the back loops only: 3 hdc, 2 sc, 2 sl st, 2 sc, 3 hdc, 2 ch, turn = 12
Row 3. into the back loops only: 3 hdc, 2 sc, 2 sl st, 2 sc, 3 hdc = 12
Fasten off, cut off any excess yarn, hide the end.
Part 2.
Work 12 ch.
Row 1. starting from 3rd ch from hook: 2 hdc, 2 sc, 3 sl st, 2 sc, 2 hdc = 11
Fasten off, cut off any excess yarn, hide the end.
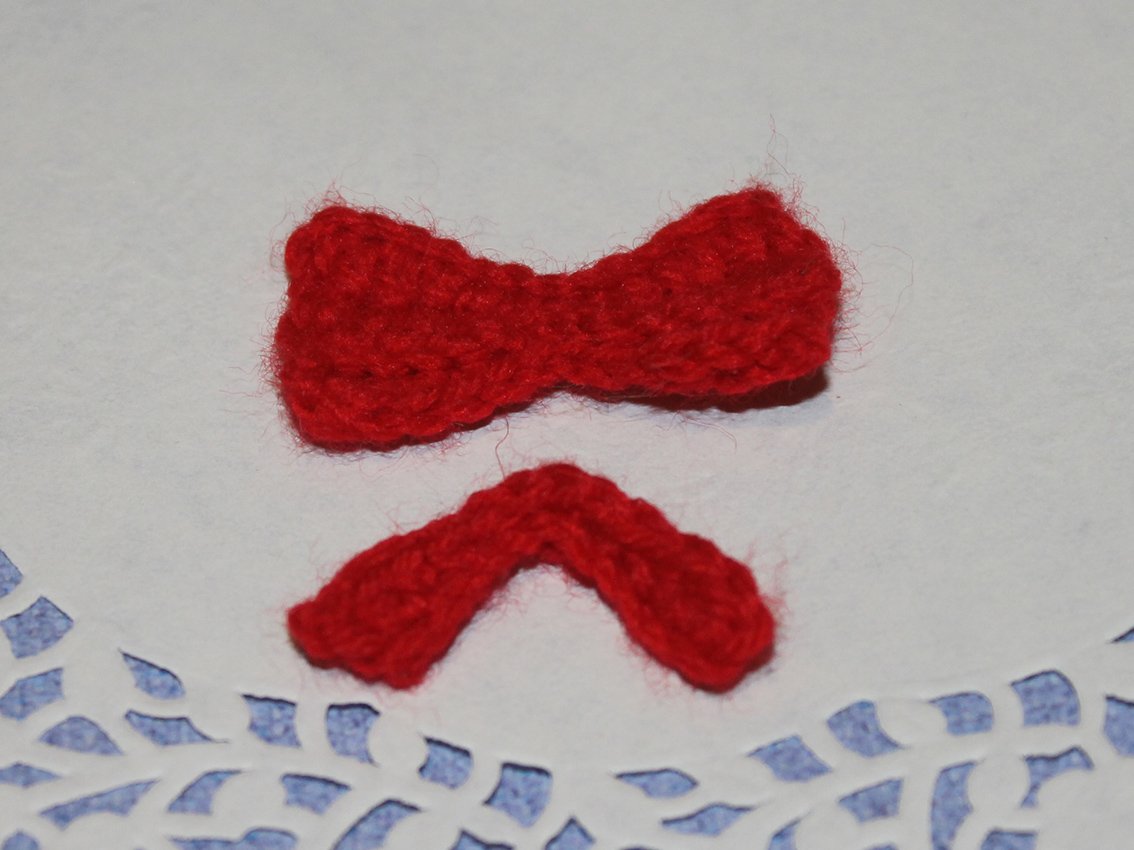
Sew both parts as shown in the photo. Twist the yarn several times in the middle, secure and fasten off.
Sew a bow to the bell.
A variant with sprig of holly.
Holly leaves (make 2)
Work with green colour yarn.
Rnd 1. Work 8 ch, starting from 2nd ch from hook: 6 sc, 3 sc in the last stitch, continue along the other side of chain: 6 sc = 15
Rnd 2. 2 ch, 2 sl st, 2 sc, next, crochet a clove: 2 ch, starting from 2nd ch from hook: 1sc, continue along the main loops: 2 sc, (crochet a clove: 2 ch, starting from 2nd ch from hook: 1sc, continue along the main loop: 1 sc) х 4 times, 1 sc, crochet a clove: 2 ch, starting from 2nd ch from hook: 1sc, continue along the main loops: 2 sc, 2 sl st
Fasten off, cut off any excess yarn.
.JPG)
.JPG)
Berries (make 3)
Work with red colour yarn.
Rnd 1. 6 sc in a Magic Ring
Rnd 2. 6 inc = 12
Rnd 3-4 (2 rounds). 12 sc
Rnd 5. 6 dec = 6
Add a small amount of hollow fibre. Pull off the loops. Cut the thread.
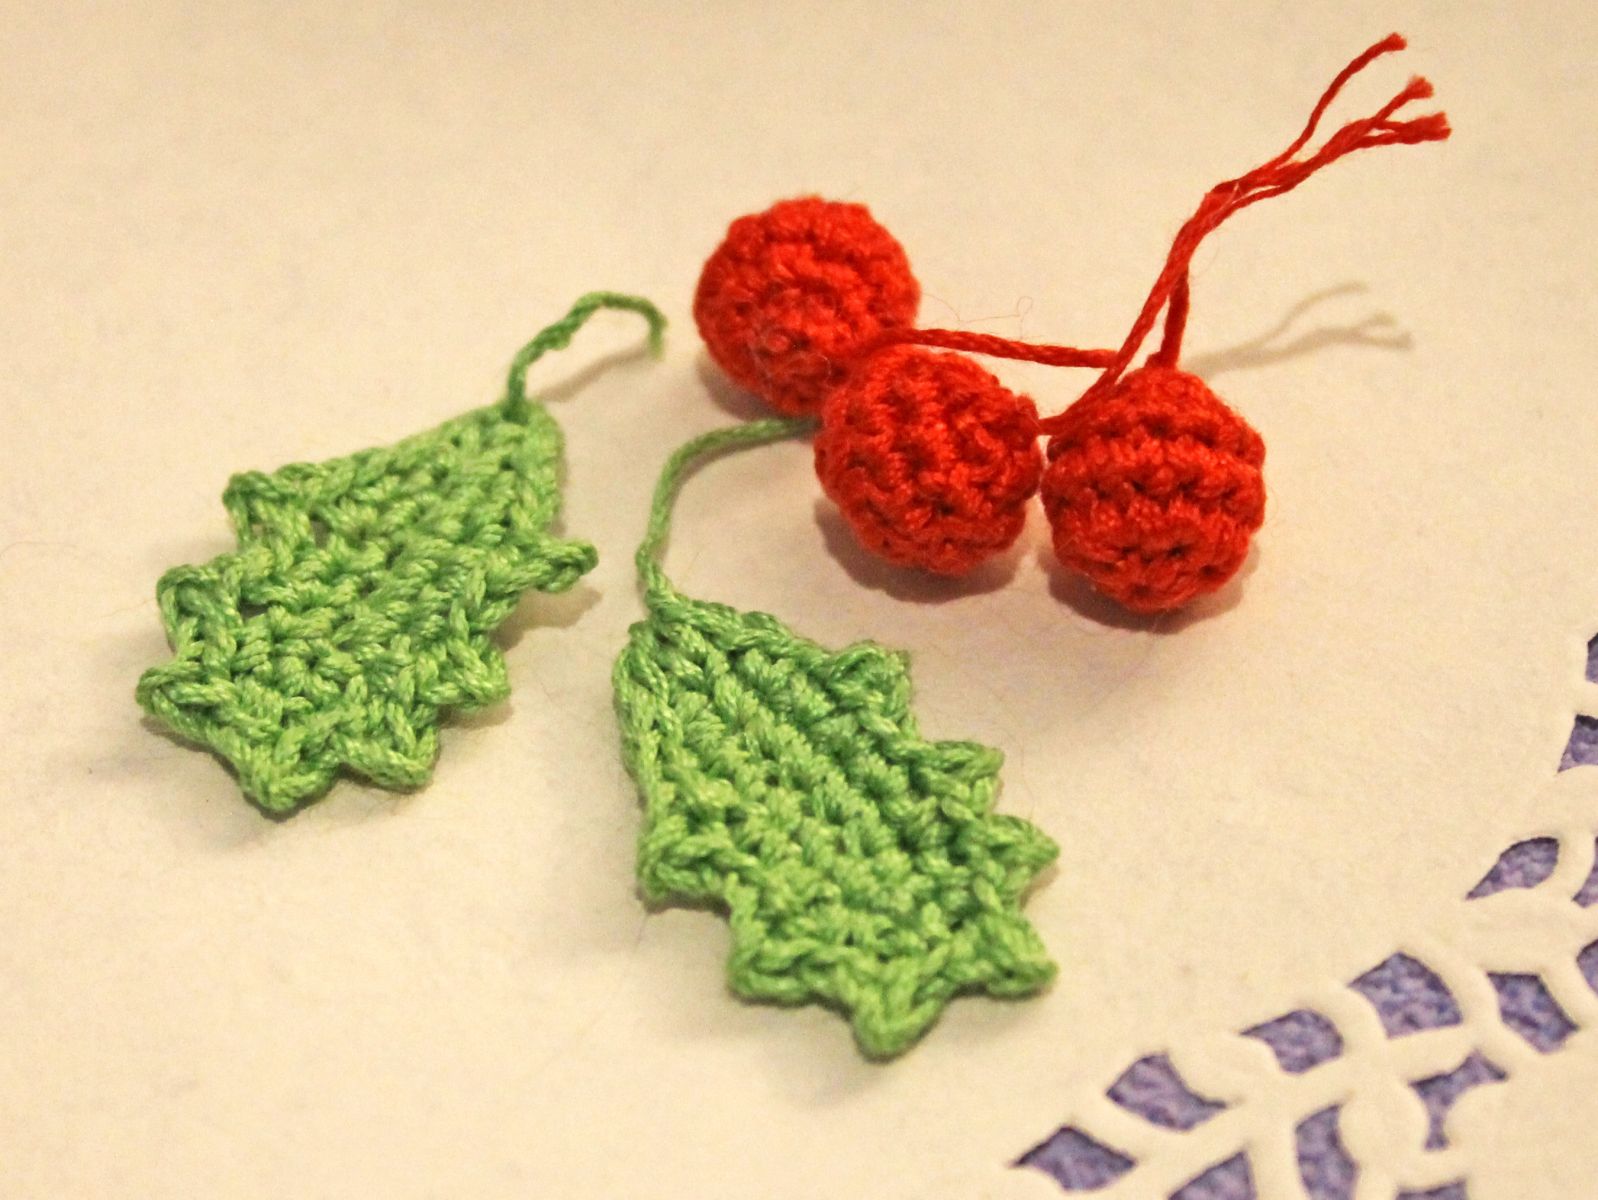
Sew the leaves and berries to the bell.
The Christmas bell is completed!

Mittens - decor for the Christmas tree.
Materials:
Same thickness yarn of your choice (acrylic, cotton). I used several shades of blue and some fluffy yarn. I choose one colour as the main color and three complementary colours.
- A crochet hook
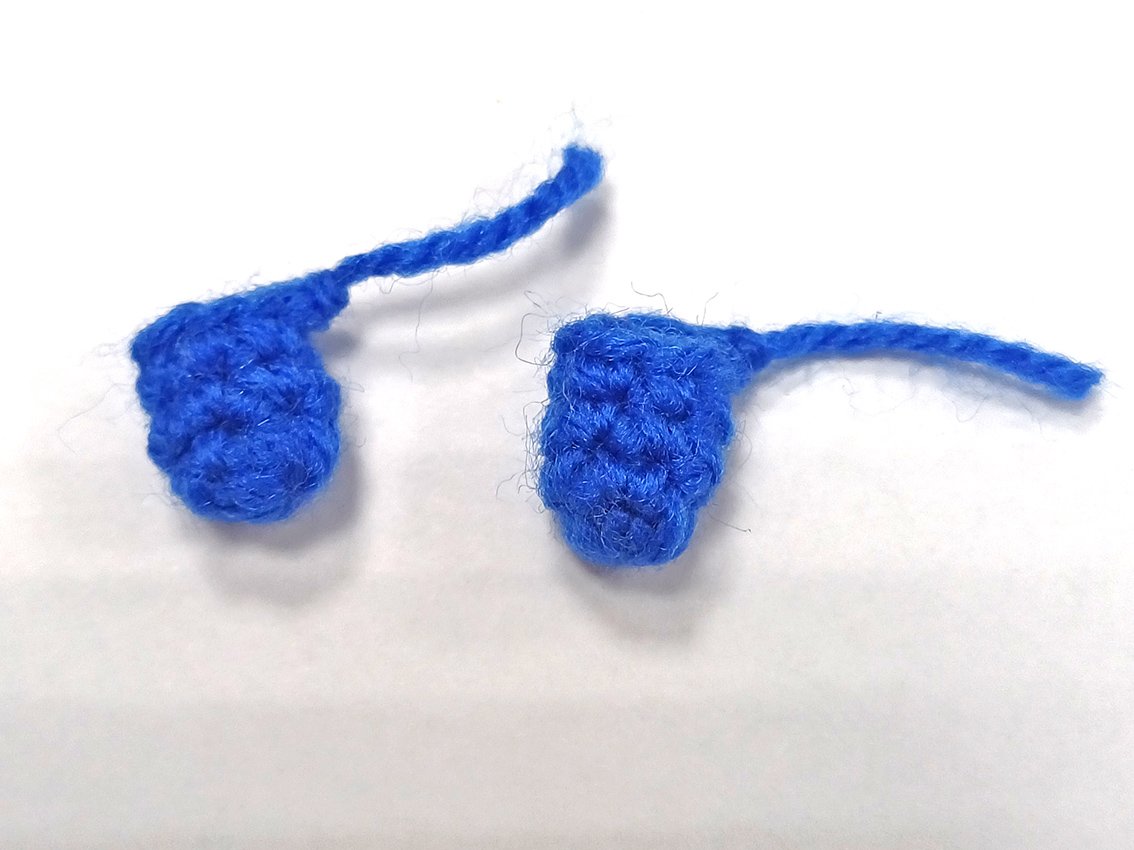
First, crochet the thumb of the mittens. Work with the main colour.
Rnd 1. 6 sc in a Magic Ring
Rnd 2-4 (3 rounds). 6 sc
Fasten off, cut off any excess yarn.
Mittens
Start with main colour yarn.
Work 5 ch
Rnd 1. starting from 2nd ch from hook: 3 sc, 3 sc in the last stitch, continue along the other side of chain: 2 sc, 1 inc = 10
Rnd 2. 1 inc, 2 sc, 3 inc, 2 sc, 2 inc = 16
Rnd 3. (7 sc, 1 inc) х 2 times = 18
Change to the complementary colour yarn.
Rnd 4. 18 sc
Change to the main colour yarn.
Rnd 5-6 (2 rounds). 18 sc
Change to the complementary colour yarn.
Rnd 7. 18 sc
Change to the main colour yarn.
Rnd 8. 18 sc
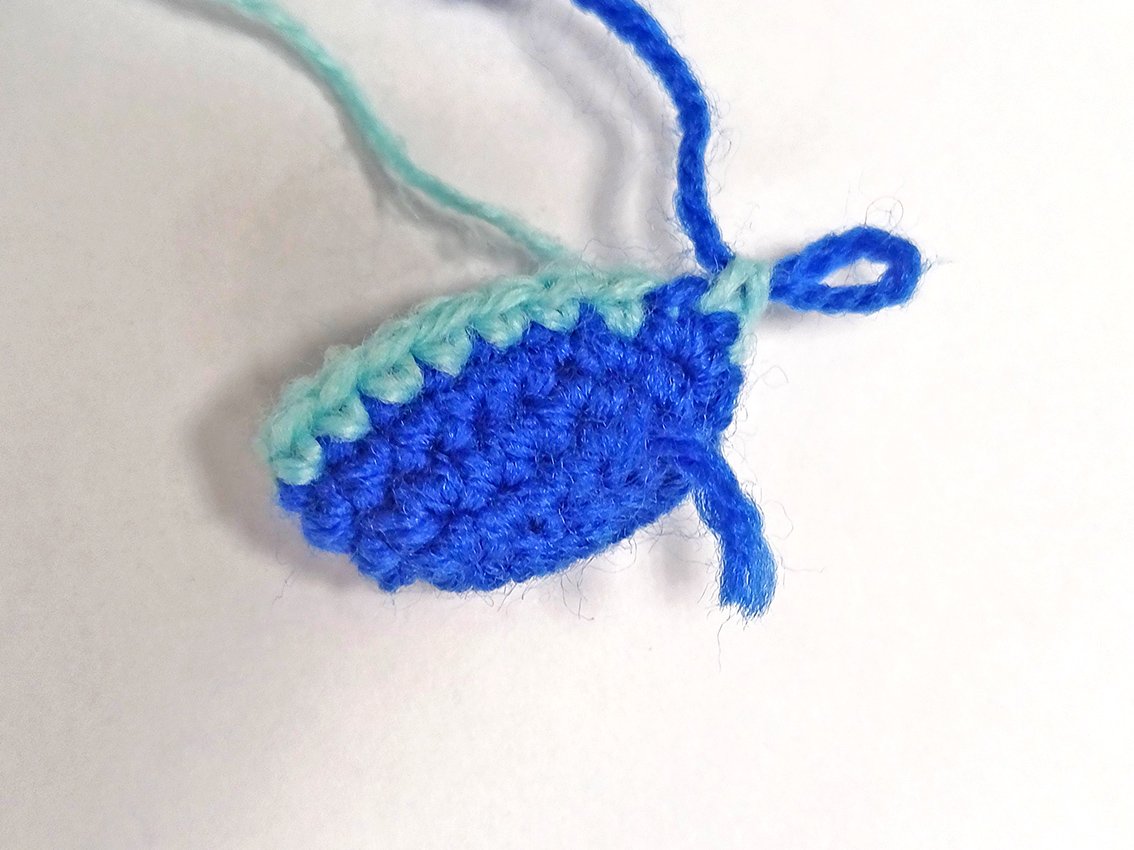
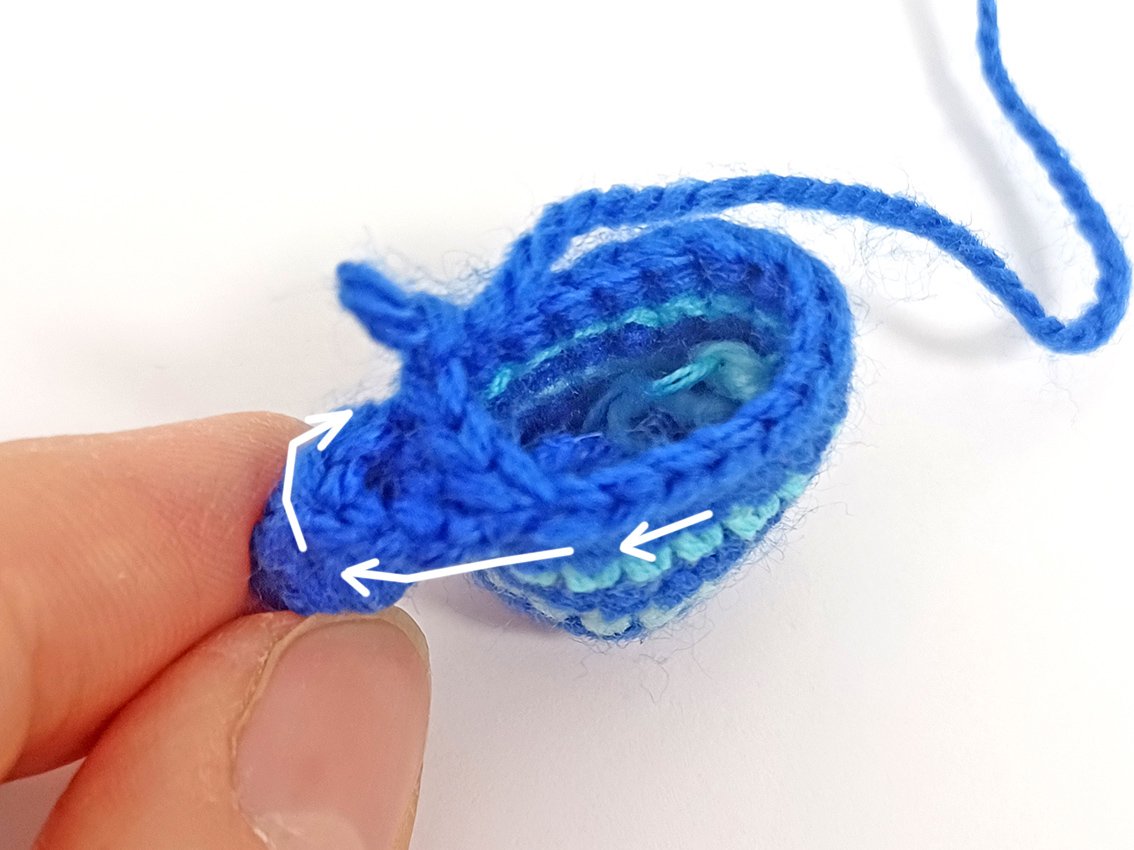
Rnd 9. 7 sc, attach the thumb, work the loops of the thumb and mittens together: 3 sc, work along the main loops: 8 sc = 18

Change to the complementary colour yarn.
Rnd 10. 7 sc, 3 sc along the thumb, continue work along the main loops: 8 sc = 18
See the white arrows on the photo below.

Change to the main colour yarn.
Rnd 11-12 (2 rounds). 18 sc
Change to fluffy yarn.
Rnd 13. 18 hdc, work 26 ch, fasten with 1 sl st – this is a loop for hanging.
Fasten off, cut off any excess yarn, hide the end.
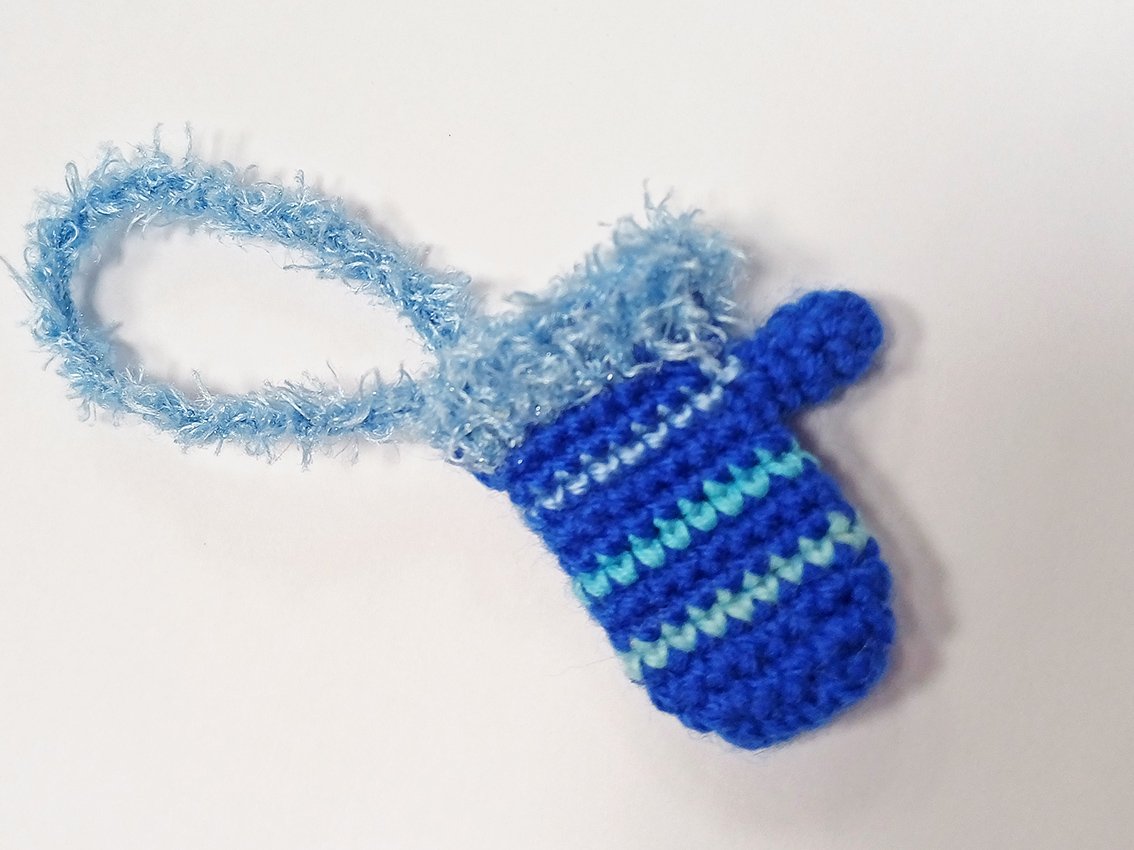
2nd design option: crochet 2 mittens, connect them with a long chain.
.JPG)
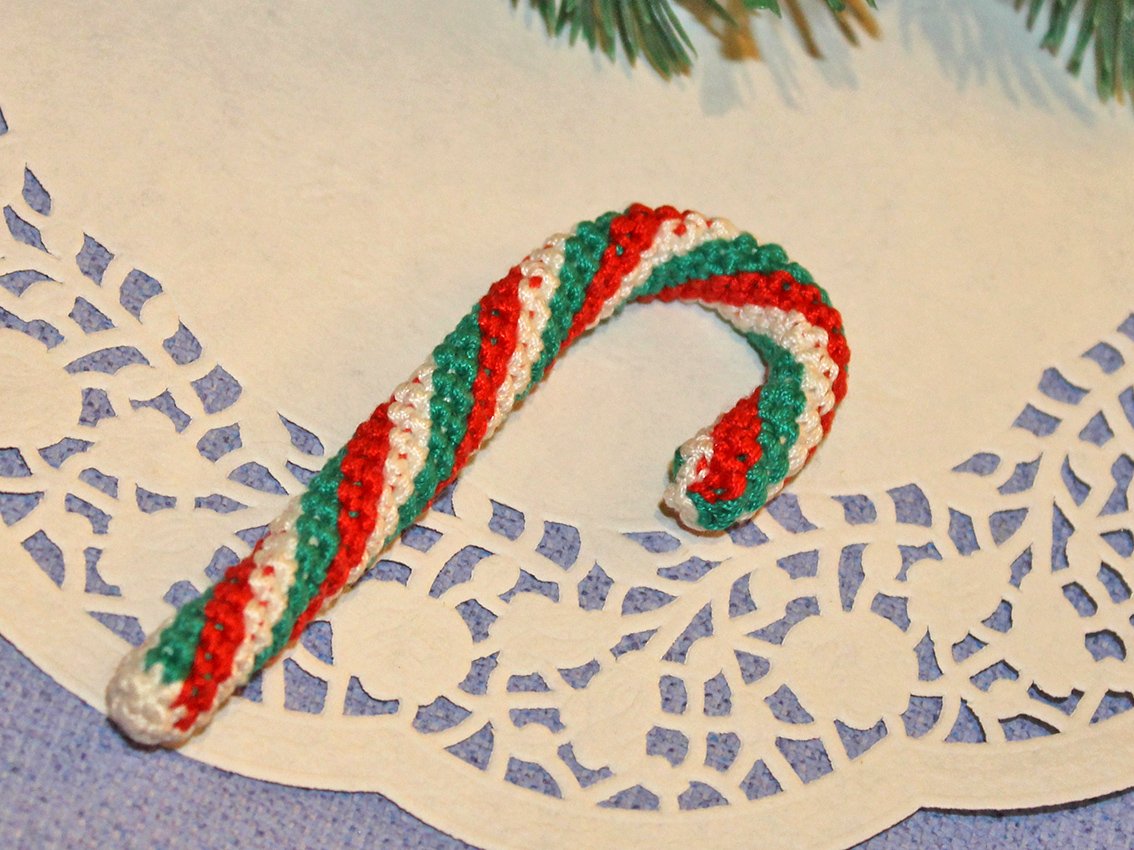
A candy cane for the Christmas tree.
I suggest two variants of a tricolor crochet pattern for a candy cane.
Materials:
Same thickness yarn of your choice (acrylic, cotton). Colors: red, green and white.
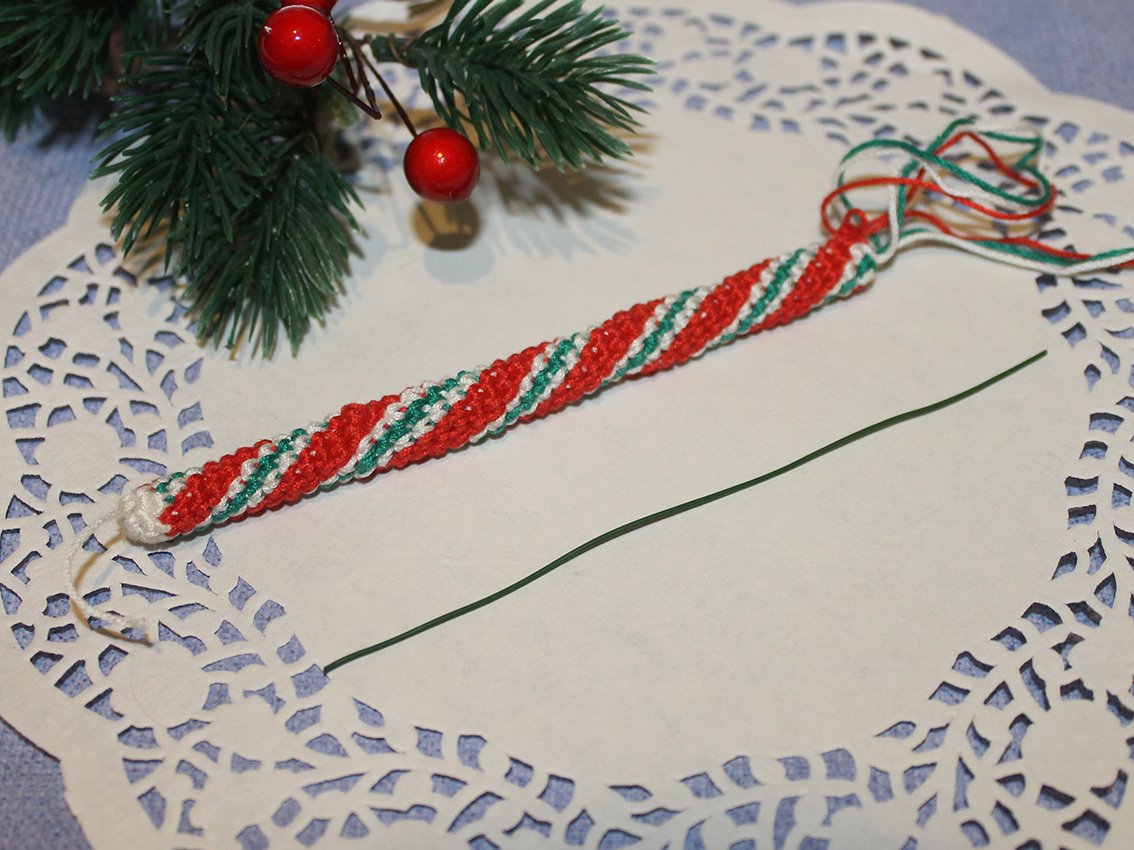
- A crochet hook
- A piece of wire with a diameter of 1-1,5mm approx. 15cm long
Here’s how to switch colors when crocheting.
Stop crocheting with old colour, right before the last loop is pulled through and before you wish to start a new colour. Then, put new colour on the hook, and use new colour to pull through the last two loops on the hook. After that, you can continue crocheting with new colour.
1st version of the crochet pattern.
Start with white colour yarn.
Rnd 1. 6 sc in a Magic Ring
Rnd 2. 5 inc, 1 sc = 11
Change colours as described below:
Rnd 3. Red yarn: 2 sc, green yarn: 2 sc, white yarn: 2 sc, red yarn: 2 sc, green yarn: 2 sc, white yarn: 1 sc = 11
Rnd 4. white: 1 sc, red: 2 sc, green: 2 sc, white: 2 sc, red: 2 sc, green: 2 sc = 11
Rnd 5. white: 2 sc, red: 2 sc, green: 2 sc, white: 2 sc, red: 2 sc, green: 1 sc =11
Rnd 6. Green: 1 sc, white: 2 sc, red: 2 sc, green: 2 sc, white: 2 sc, red: 2 sc = 11

Rnd 7. green: 2 sc, white: 2 sc, red: 2 sc, green: 2 sc, white: 2 sc, red: 1 sc = 11
Rnd 8. red: 1 sc, green: 2 sc, white: 2 sc, red: 2 sc, green: 2 sc, white: 2 sc = 11
.JPG)
Repeat rounds 3 to 8 to achieve the desired length. I crocheted 46 rounds, and my candy cane is 11 cm long.
Last round: (white yarn) 5 dec, 1 sc = 6
Prepare a piece of wire equal in length to the tube. Wrap some adhesive fabric tape around wire. Insert the wire into the tube. Pull off the loops. Cut the thread, hide the end. Bend the wire into the shape of a cane.
2nd version of the crochet pattern.
Start with white colour yarn.
Rnd 1. 6 sc in a Magic Ring
Rnd 2. 5 inc, 1 sc = 11
Change colours as described below:
Rnd 3. Red: 3 sc, white: 1 sc, green: 1 sc, white: 1 sc, red: 3 sc, white: 1 sc, green: 1 sc = 11
Rnd 4. green: 1 sc, white: 1 sc, red: 3 sc, white: 1 sc, green: 1 sc, white 1 sc, red: 3 sc = 11
Rnd 5. white: 1 sc, green: 1 sc, white: 1 sc, red: 3 sc, white: 1 sc, green: 1 sc, white: 1 sc, red: 2 sc = 11
Rnd 6. Red: 1 sc, white: 1 sc, green: 1 sc, white: 1 sc, red: 3 sc, white: 1 sc, green: 1 sc, white: 1 sc, red: 1 sc = 11
Rnd 7. Red: 2 sc, white: 1 sc, green: 1 sc, white: 1 sc, red: 3 sc, white: 1 sc, green: 1 sc, white: 1 sc = 11
.JPG)
Repeat rounds 3 to 7 to achieve the desired length. I crocheted 46 rounds, and my candy cane is 11 cm long.
Last Rnd: (white yarn) 5 dec, 1 sc = 6
Prepare a piece of wire equal in length to the tube. Insert the wire into the tube. Pull off the loops. Cut the thread, hide the end. Bend the wire into the shape of a cane.
.JPG)
The Christmas decorations are completed!


