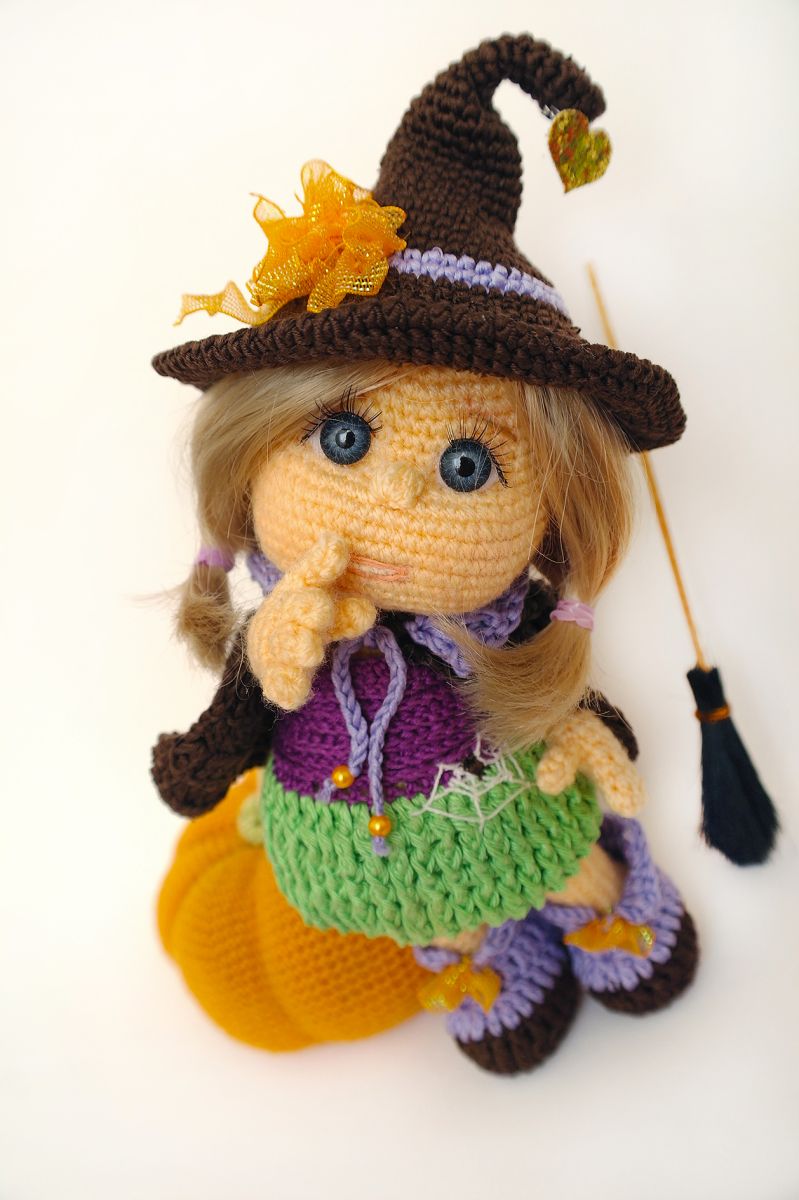
Crochet Pattern: Witch Outfit for Doll Rosalie
Hello everyone! Today I’d like to share a crochet pattern for a witch costume for my doll Rosalie. With Halloween just around the corner, this outfit is perfectly timed and ideal for the season.
You can find the description of doll Rosalie on the first page of my blog. The witch outfit fits Rosalie perfectly, but it’s also suitable for other dolls of a similar size (approximately 20 cm).
I think it’s especially fun to have several outfits to choose from—this way, children can always invent new scenes and stories while playing. Enjoy crocheting and getting creative!
Materials Needed:
Cotton yarn for clothing:
Brown and light purple for the cape, shoes, and hat – 125 m / 50 g
Purple and green for the dress, and white for the panties – 240 m / 50 g
Orange for the pumpkin – 240 m / 50 g
Crochet hooks: 2 mm and 1.5 mm
Hot glue gun
Extra-long sewing needle, wooden skewers, fishing line
Abbreviations:
sc - single crochet
ch - chain
dec - decrease
inc - increase
3 sc in 1 - crochet 3 single crochets in one
(...)x times - repeat in brackets x times
dc – double crochet
sl st – slip stitch
Dress Crochet hook size: 1.5 mm.
Crochet the dress from top to bottom, starting with purple yarn.
While working, it's a good idea to try the dress on your doll from time to time. The pattern is very easy to follow, so even beginners should have no trouble with it.
If you notice that the dress is turning out too large or too small, you can easily adjust the number of chain stitches—depending on whether you need it a bit wider or narrower. Then simply continue crocheting as described, using your customized number of chains.
Crochet 38 ch
1. Starting from the 3 nd chain from the hook, 36 dc, Turn the work,
2. ch 2, crochet 36 front post double crochets (FPdc) Turn the work(36)
3. ch 2, 1 back post double crochet increase, 34 back post double crochets, 1 back post double crochet increase (38) Turn the work
4. ch 2, crochet 38 front post double crochets. Turn the work
5. ch 2, 1 back post double crochet increase, 36 back post double crochets, 1 back post double crochet increase (40) Turn the work
6. ch 2, crochet 40 front post double crochets. Turn the work
7. ch 2, 1 back post double crochet increase, 38 back post double crochets, 1 back post double crochet increase,(42) Turn the work
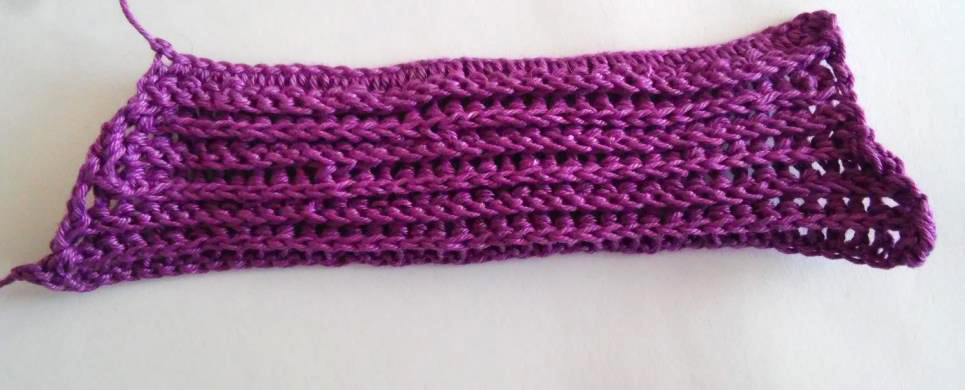
Color change, green.
8. ch 2, 1 Dc, 40 Dc inc, 1 Dc (82) Turn the work
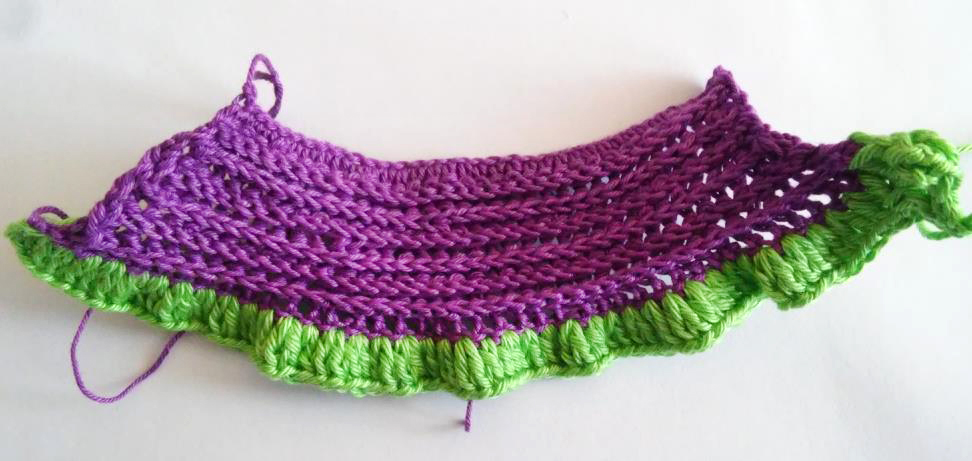
9.- 13. ch 2, Crochet 82 post double crochets, alternating front post and back post stitches. Always turn at the end (82)
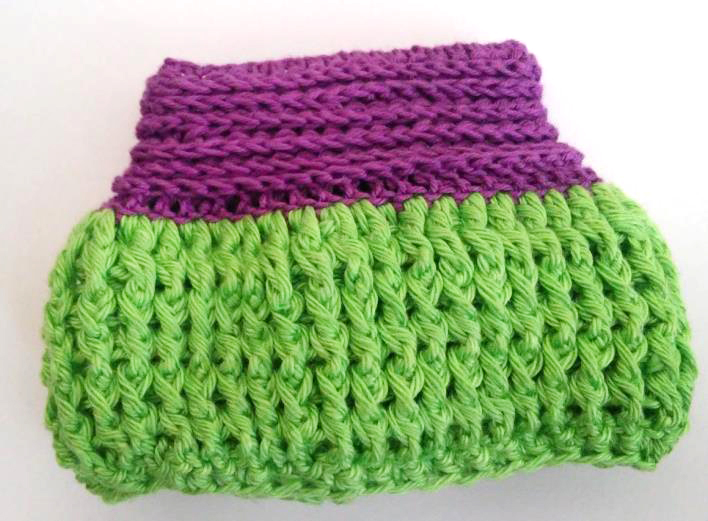
14. ch 1, Crochet two stitches together, 41 times. (41)
The green section is carefully sewn together from the bottom up to the purple section.
Next, crochet 30 chain stitches and thread them through the top edge of the purple section to create a decorative lacing. If you prefer, you can use small buttons instead of the cord.
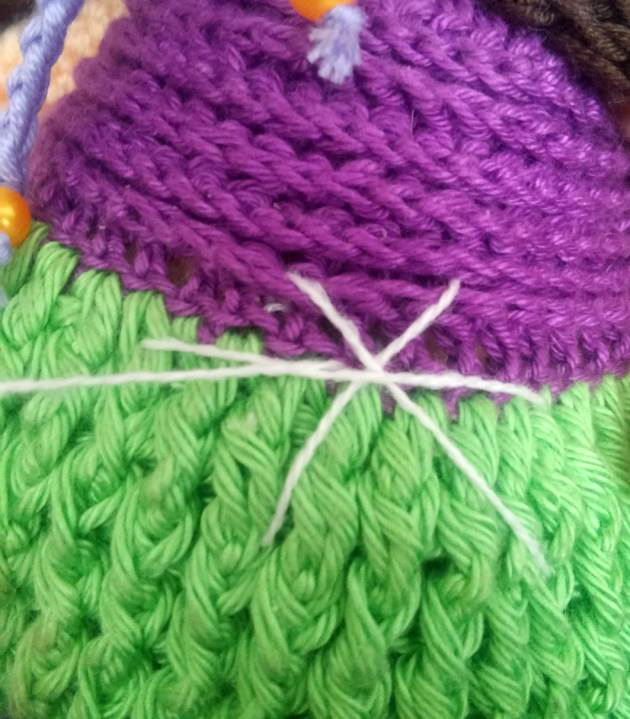
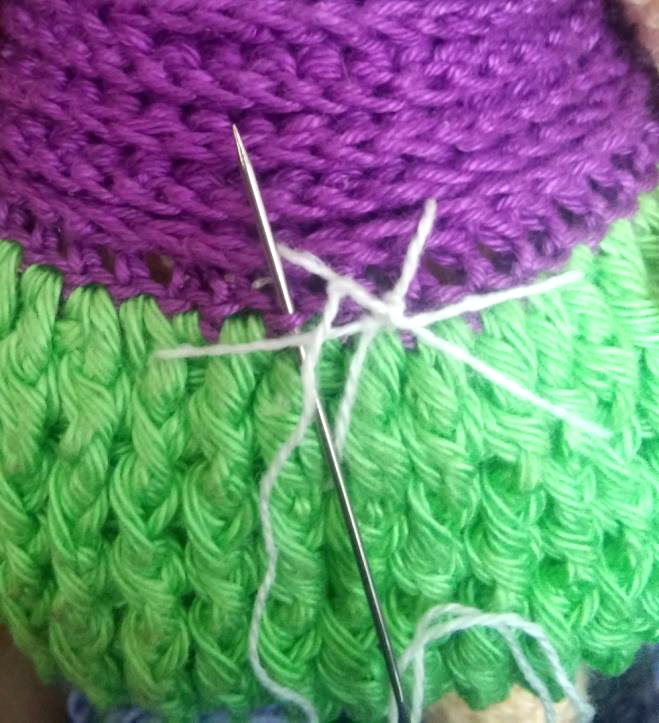
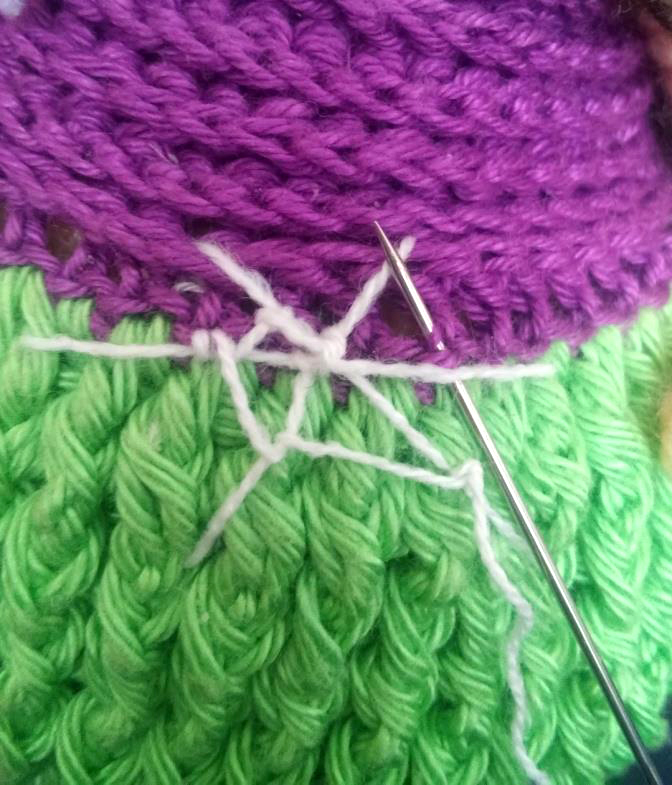
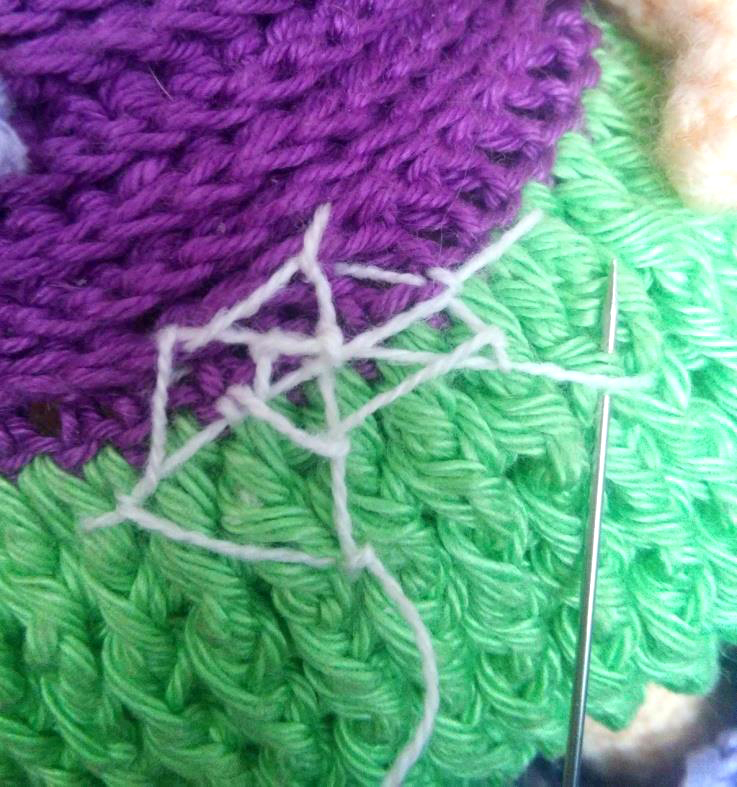
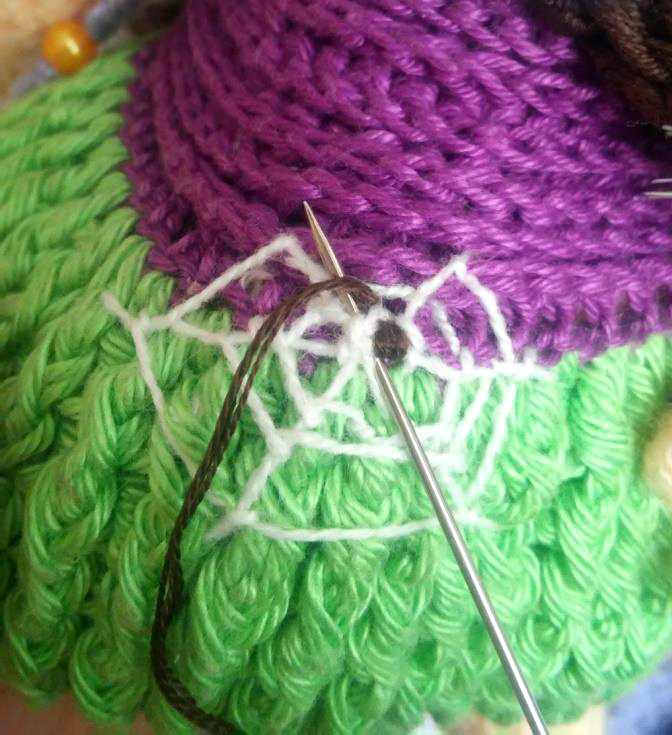
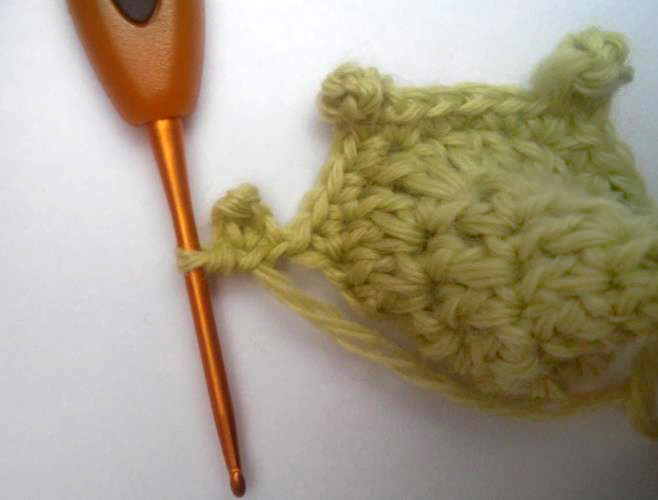
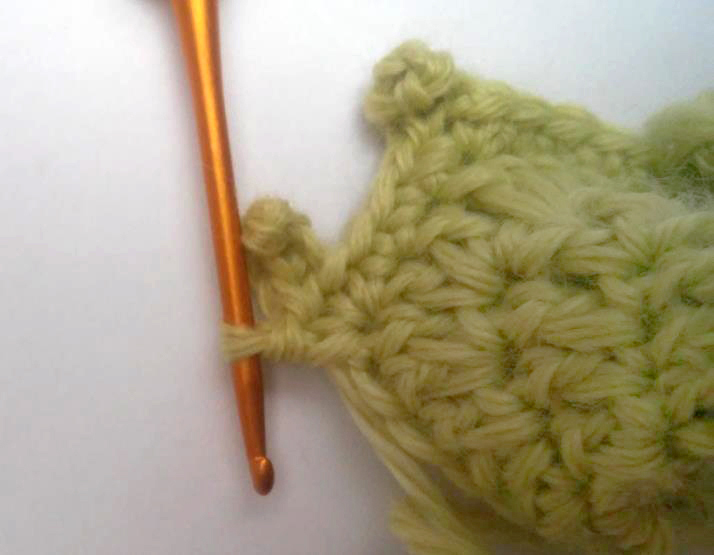
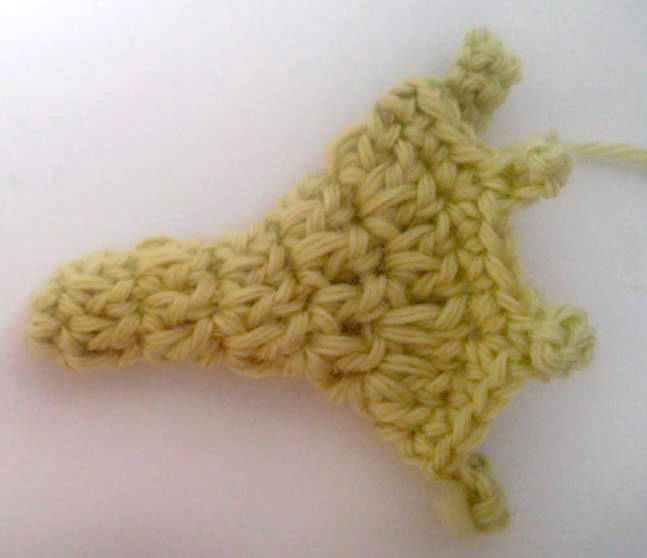
Sewing on the spider web Now crochet a spider web — refer to the pictures for step-by-step instructions. When attaching it, make sure to sew through the stitches of the dress so that the web sits firmly and securely in place.
Embroidering a Spiderweb
- Cross three stitches: Start by crossing three simple straight stitches, as shown in the picture. These form the basic framework of your spiderweb.
- Embroider around the edges: Next, embroider around the crossed stitches in circular rounds. Work three rounds to make the web stand out clearly.
- Add a spider (optional): If you like, you can embroider a small spider onto the web at the end. This adds a fun and playful Halloween touch to the outfit!
Dress is ready!
Cape use crochet hook No. 2
Crochet 37 ch
1. Starting from the 3 nd chain from the hook, 35 Dc, Turn the work,
2. ch 2, (5 Dc, crochet 1 front post double crochets)x5, 5 Dc.(35) Turn the work
3. ch 2, (5 Dc, Crochet 1 back post double crochet)x5, 5 Dc.(35) Turn the work
4. ch 2, 1 Dc inc, 4 Dc, crochet 1 front post double crochets, (5 Dc, crochet 1 front post double crochets,)x 4, 4 Dc, 1 Dc inc (37) Turn the work
5. ch 2, 1 Dc inc, 5 Dc, Crochet 1 back post double crochet, (5 Dc, Crochet 1 back post double crochet)x4, 5 Dc, 1 Dc inc (39) Turn the work
6. ch 2, 1 Dc inc, 6 Dc, crochet 1 front post double crochets, (5 Dc,1 crochet 1 front post double crochets)x4, 6 Dc, 1 Dc inc (41) Turn the work
7. ch 2, 1 Dc inc, 7 Dc, Crochet 1 back post double crochet, (5 Dc, Crochet 1 back post double crochet)x4, 7 Dc, 1Dc inc (43) Turn the work
8. ch 2, 1 Dc inc, 8 Dc, crochet 1 front post double crochets, (5 Dc, crochet 1 front post double crochets)x4, 8 Dc, 1 Dc inc (45) Turn the work
9. ch 2, 1 Dc inc, 9 Dc, Crochet 1 back post double crochet, (5 Dc, Crochet 1 back post double crochet)x4, 9 Dc, 1 Dc inc (47) Turn the work
10. ch 2, 1 Dc inc, 10 Dc, crochet 1 front post double crochets, (5 Dc,1 Reliefstäbchen von vorne häkeln)x4, 10 Dc, 1 Dc inc (49) Turn the work
For the Collar.
Starting from the top: Chain 2, work 2 double crochet increases, then 31 double crochets, followed by 2 more double crochet increases. (You should have 39 stitches total.) Turn your work.
Next row: Chain 2, then work 39 post double crochets, alternating front post and back post stitches across the row.
Finishing touch: Crochet 30 chain stitches and thread them through the first row of double crochets to create a decorative lacing.

Hat
Crochet hook size: 2 mm
6 sc in a magic ring
1. 6 sc
2. 6 inc. (12)
3.- 10. 12 sc
11. (1 sc, 1 inc)х6 (18)
12.- 15. 18 sc
16. (2 sc, 1 inc)х6 (24)
17.-19. 24 sc
20. (3 sc, 1 inc)х6 (30)
21. 30 sc
22. (4 sc, 1 inc)х6 (36)
23. 36 sc
24. (5 sc, 1 inc)х6 (42)
25. 42 sc
26. (6 sc, 1 inc)х6 (48)
27. Color change to purple 48 sc
28. (7 sc, 1 inc)х6 (54)
29. Color change to brown 54 sc
30. (8 sc, 1 inc)х6 (60)
31. (9 sc, 1 inc)х6 (66)
32. (10 sc, 1 inc)х6 (72)
33-34. 72 sc
35. (11 sc, 1 inc)х6 (78)
36. (12 sc, 1 inc)х6 (84)
37. (13 sc, 1 inc)х6 (90)
38. 90 sc
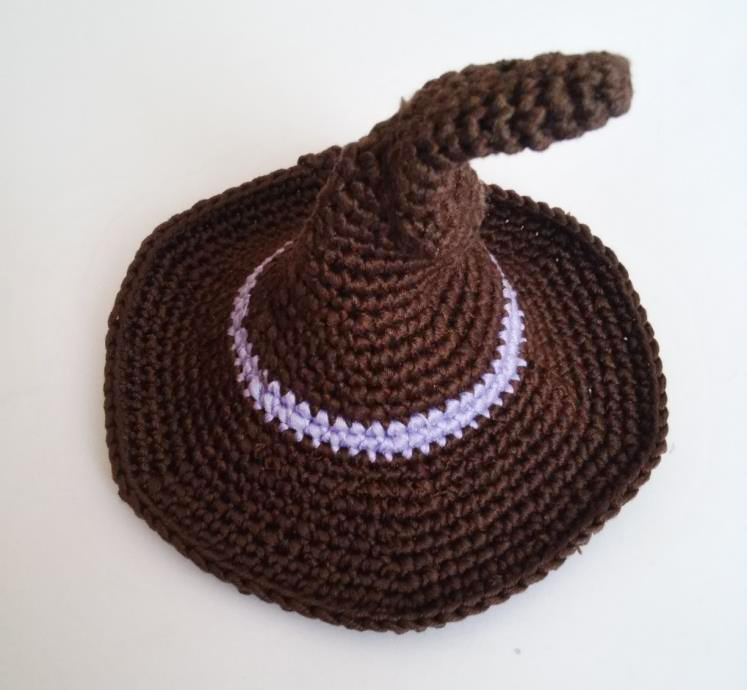
Finally, crochet around the edge of the hat using reverse single crochet stitches. This creates a beautiful, decorative border. The reverse single crochet is worked backward and gives the edge a slightly wavy texture — perfect for the witchy look.
Decorate the hat however you like: Add small flowers, buttons, or a colorful ribbon. I shaped a flower from ribbon and attached it to the front of the hat. On top, I sewed a small fabric heart.
You can also use seasonal embellishments — such as tiny pumpkins, stars, or glittery threads — for a magical touch!
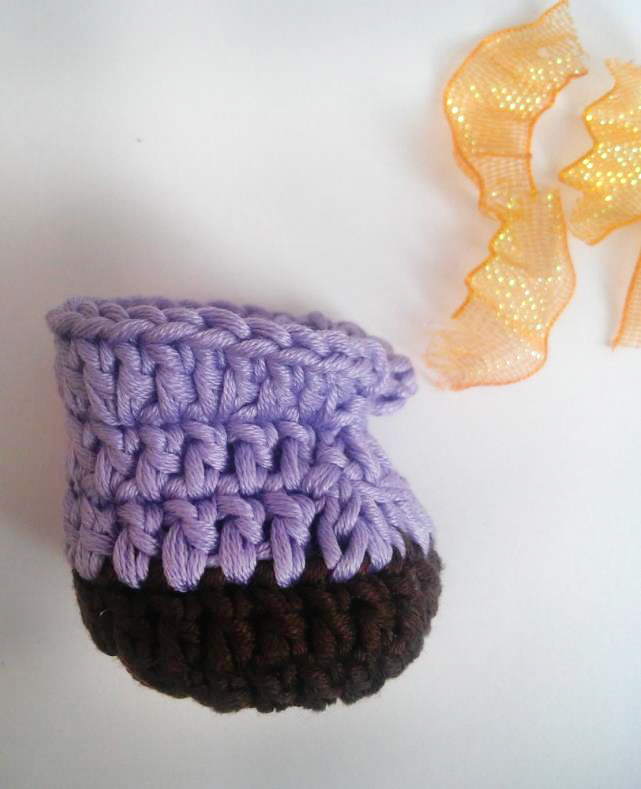
Shoes
Crochet hook size: 2 mm
Each round begins with ch 3 and ends with a slip stitch (sl st) into the top of the previous round’s stitch. Start by crocheting the sole.
Crochet 6 ch
1. Starting from the 3 nd chain from the hook, 2 Dc, 5 Dc in 1, 2 Dc, 5 Dc in 1. (14)
2. 3 Dc, 4 Dc inc, 3 Dc, 4 Dc inc. (22)
3. 22 Dc
4. Color Change and New Round Start Now count 11 stitches from the end of Round 3. On the opposite side, begin a new section. Chain 3 (see image below), then crochet 16 double crochets (dc), followed by 3 decreases (dc2tog). You should have 19 stitches in total.
5. 16 Dc, 3 Dc together (17)
6. Increase every 2nd double crochet (dc). (34)
At the end, cut the yarn and fasten off. Do not join with a slip stitch. Secure and weave in the yarn tail carefully. Decorate the front with a ribbon or trim of your choice.
Underpants
Crochet hook size: 1.5 mm
Work in rounds. Each round begins with ch 3 and ends with a slip stitch (sl st) into the top of the previous round’s stitch.
Part 1: Chain 27 and join to form a ring. Crochet 1 round of 27 double crochets (dc).
Part 2: Chain 27 and join to form a second ring. Crochet 1 round of 27 double crochets (dc). Then chain 3 and join this part to Part 1.
1. 27 Dc on part 1, 3 Dc on 3 ch, 27 Dc on Part 2, 3 Dc on 3 ch = 60
2. 27 Dc, 3 Dc tog, 27 Dc, 3 Dc tog = 56
3. 12 Dc, 3 Dc tog, 26 Dc, 3 Dc tog, 12 Dc = 52
4. 9 Dc, 1 dec, 1 Dc, 1 dec, 8 Dc, 3 Dc tog, 8 Dc, 1 dec, 1 Dc, 1 dec, 8 Dc, 1 dec = 45
Fasten off and cut the yarn.
To complete the overall look, I decided to crochet a pumpkin and a broom for the witch — perfect little accessories to enhance the Halloween theme.
Pumpkin
Crochet hook size: 2 mm
6 sc in a magic ring
1. 6 inc. (12)
2. (1 sc, 1 inc)х6 (18)
3. (2 sc, 1 inc)х6 (24)
4. (3 sc, 1 inc)х6 (30)
5. (4 sc, 1 inc)х6 (36)
6. (5 sc, 1 inc)х6 (42)
7. (6 sc, 1 inc)х6 (48)
8. (7 sc, 1 inc)х6 (54)
9. (8 sc, 1 inc)х6 (60)
10. (9 sc, 1 inc)х6 (66)
11. (10 sc, 1 inc)х6 (72)
12. (11 sc, 1 inc)х6 (78)
13. (12 sc, 1 inc)х6 (84)
14. (13 sc, 1 inc)х6 (90)
15. (14 sc, 1 inc)х6 (96)
16.- 26. 96 sc
27. (14 sc, 1 dec)х6 (90)
28. (13 sc, 1 dec)х6 (84)
29. (12 sc, 1 dec)х6 (78)
30. (11 sc, 1 dec)х6 (72)
31. (10 sc, 1 dec)х6 (66)
32. (9 sc, 1 dec)х6 (60)
33. (8 sc, 1 dec)х6 (54)
34. (7 sc, 1 dec)х6 (48)
35. (6 sc, 1 dec)х6 (42)
36. (5 sc, 1 dec)х6 (36)
37. (4 sc, 1 dec)х6 (30)
38. (3 sc, 1 dec)х6 (24)
39. (2 sc, 1 dec)х6 (18) stuff
40. (1sc, 1 dec)х6 (12)
41. 6 dec, Fasten off, leaving a yarn tail for sewing.

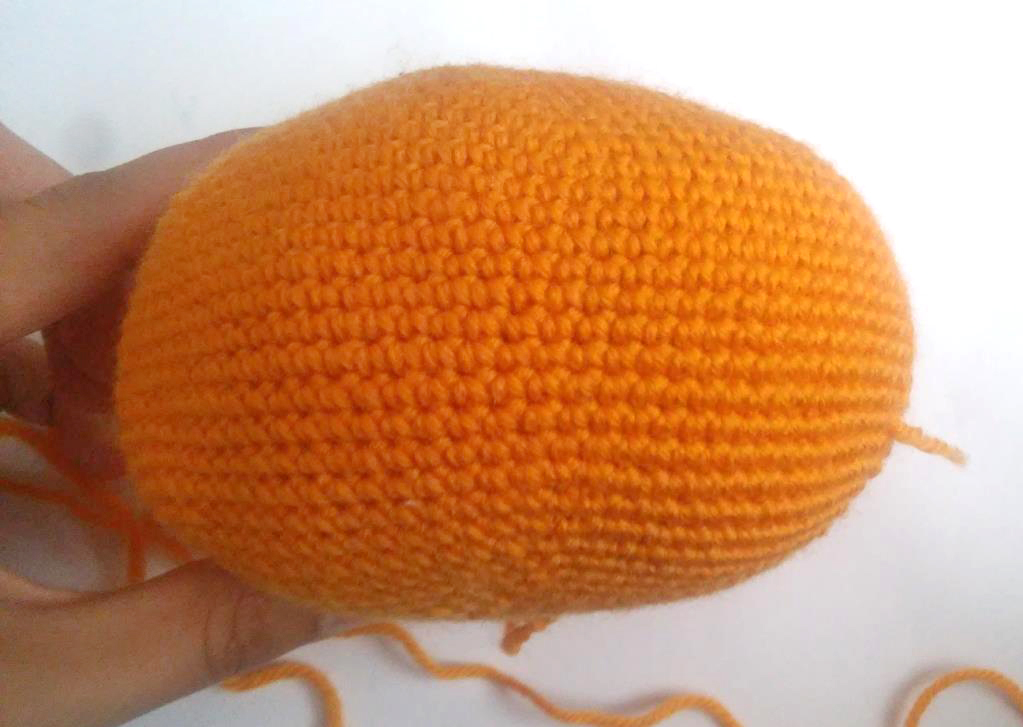
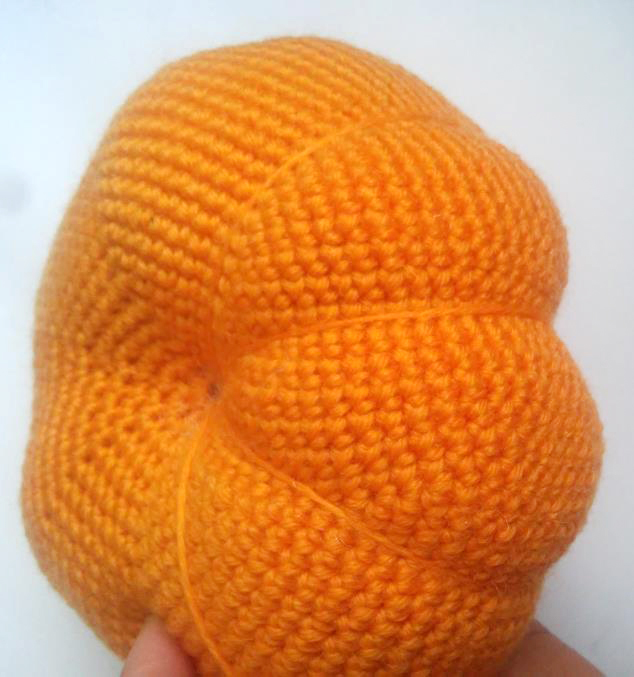
Shaping the Crocheted Pumpkin
To give your crocheted pumpkin its classic ribbed look, follow these steps:
Insert the needle through the center of the pumpkin and pull the yarn over the outside of the piece. On the opposite side, insert the needle back through the center and bring the yarn to the front again.
Move the yarn slightly to the next position and repeat the process — always inserting the needle through the center and pulling the yarn around the outside. Do this five more times to form evenly spaced ridges around the pumpkin.
Once all ridges are in place, tie the yarn securely to maintain the shape. The tighter you pull the yarn, the more defined the ridges will be — but take care not to warp or distort the crocheted fabric.


Green
1. 6 sc in a magic ring
2.-3. Ch 3, 6 Dc, slst (8)
4. 1 Dc inc, 4 Dc, 1 Dc inc, slst (8)
5. 3 Dc, 1 Dc inc, 3 Dc, 1 Dc inc, slst (10)
6. 10 inc (20)
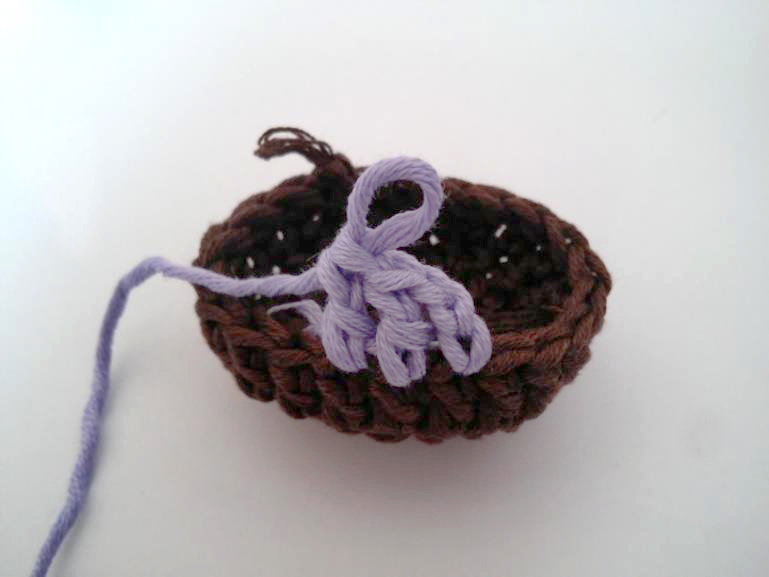
7. (Crochet 3 single crochets, then: (1 single crochet, chain 4, work 3 single crochets back starting from the 2nd chain from the hook, finish with 1 single crochet into the same stitch)) × 5 times. Sew this decorative detail to the top of the pumpkin.

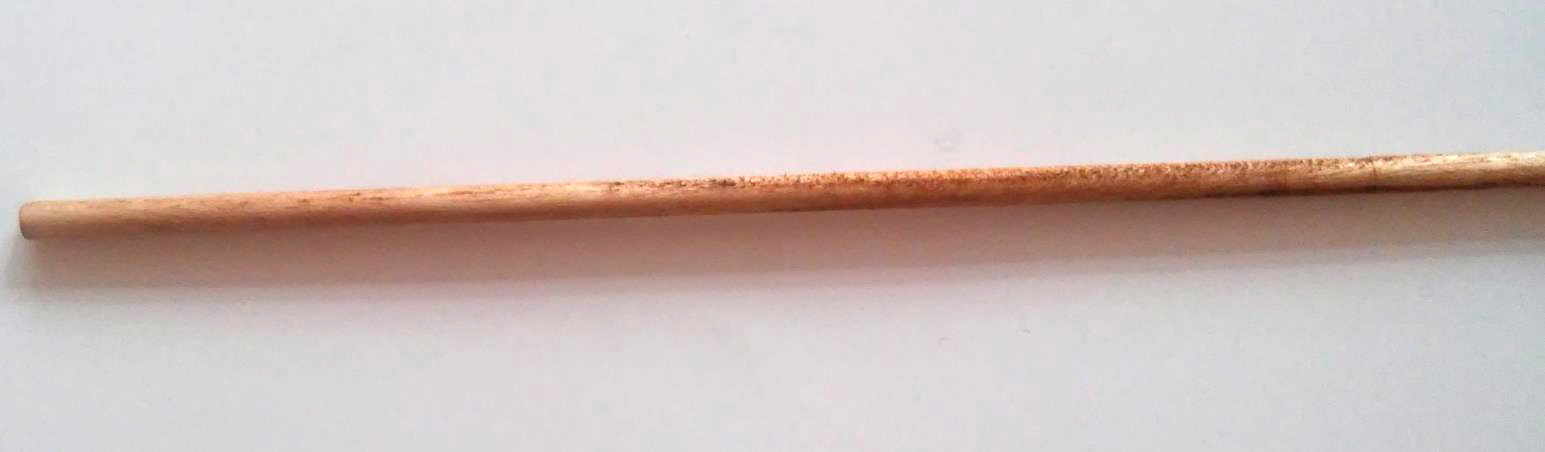
The Witchs Broom
For the witch’s broom, I colored a kebab stick with chalk. You can also use a thin wooden stick or a small branch — this gives the broom a more natural and creative look.
I made the bristles from fishing line:
Cut several strips of fishing line, each about 5 cm long.
Attach the strips to the bottom end of the stick using a hot glue gun.
Once the bristles are in place, wrap the glued area with thread or yarn to cover the joint and give the broom a neat, finished appearance.

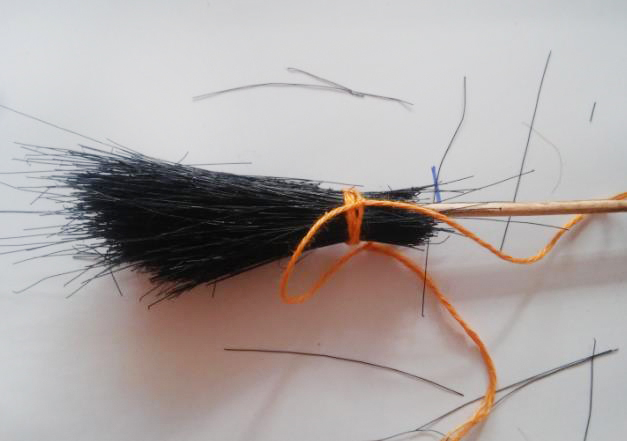
Ready!