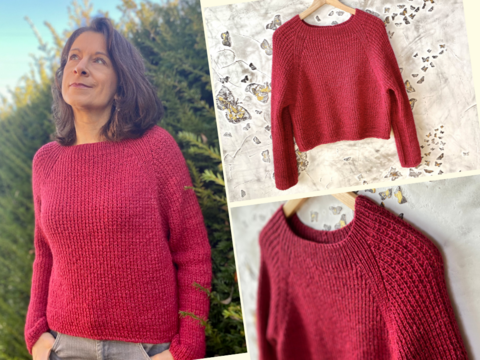
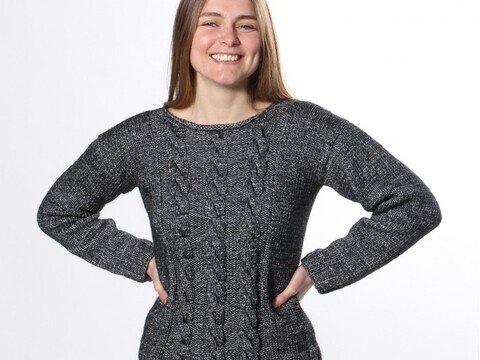
A cozy oversized raglan sweater for toddlers is a timeless piece that every child’s wardrobe should include. Not only does it provide plenty of freedom of movement, but the slightly generous fit also allows it to grow with the child. This sweater is perfect for everyday wear, kindergarten, or as a gift for a baby shower, birthday, or other special occasion. Thanks to the top-down raglan construction, it can be knitted seamlessly, without complicated seams, making it both comfortable and easy to create.
In this guide, I will walk you through the steps to knit an oversized sweater in size 86, suitable for toddlers aged approximately 12 to 18 months. The tutorial includes detailed instructions on materials, gauge, increases, and raglan lines, so even beginners can achieve a professional-looking result. Additionally, I have included a table showing how to easily adapt the sweater to different sizes.
(1).png)
Materials and Gauge
For this sweater, you will need approximately 200 grams of yarn with a length of 65 m per 50 g. Soft cotton blends or acrylic yarns are ideal, as they are gentle on a child’s skin and easy to care for. I used NKD “Melissa” yarn, consisting of 67% polyacrylic and 33% polyester.
You will also need a 40 cm circular needle, size 5–6 mm, and optionally, a set of double-pointed needles for the sleeves if you prefer knitting them in the round.
Before you start, it is essential to knit a gauge swatch. With this yarn, 10 cm = approximately 13 stitches × 18 rows in stockinette stitch. If your gauge differs, adjust the needle size to ensure the sweater isn’t too tight or too loose.
Finished measurements for size 86:
-
Chest circumference: 64 cm
-
Total length from neckline: approx. 36 cm
-
Sleeve length from underarm: approx. 22 cm
Abbreviations
-
st = stitch
-
rnd = round
-
k = knit
-
p = purl
-
yo = yarn over
-
inc = increase
-
k2tog = knit 2 stitches together
All increases are worked from the bar between stitches or as yarn overs, blending seamlessly into the raglan lines.
Sweater Construction
The sweater is knitted from the top down in rounds, so there are no side seams. First, you will knit the neckband, then the raglan yoke with the marked raglan lines, where the increases are made. Once the yoke has reached the desired width, the sleeves are set aside, and the body is knitted separately in rounds. Finally, the sleeves are worked individually. This method ensures that the sweater can be easily pulled over the head and that the neckline fits comfortably.
Neckband
Cast on 48 stitches for size 86 and join to knit in the round. Make sure to cast on loosely so the neckband remains stretchy. Knit six rounds in 1 knit, 1 purl rib. This elastic neckband ensures that the neckline sits comfortably while allowing plenty of room for the sweater to slip over the child’s head.
(5).png)
Raglan Yoke
The stitches are divided as follows: the front piece receives 14 stitches, the first sleeve 8 stitches, the back piece again 14 stitches, and the second sleeve 8 stitches. Between these sections, four stitches are marked as raglan lines, one stitch between each section. These stitches indicate where the increases are worked and later create the characteristic raglan shape. Every second round, an increase is worked before and after each raglan stitch. This technique ensures that the front and back as well as the sleeves grow evenly in width. Repeat the increases until the front and back are about 34 to 36 stitches wide and the sleeves reach approximately 28 stitches. Stitch markers help identify the raglan lines and place the increases precisely.
Size Adjustment: From Newborn to Toddler
The same method can be applied to different sizes by adjusting the cast-on stitches and the number of increase rounds.
Raglan Sweater Size Chart (Baby to Toddler):
| Size | Cast-On | Front/Back | Sleeve | Raglan St | Increases | Body Length | Sleeve Length |
|---|---|---|---|---|---|---|---|
| 50/56 (0–3 mo) | 36 sts | 10 | 6 | 4 | 6–7 rnds | 24 cm | 12 cm |
| 62/68 (3–6 mo) | 42 sts | 12 | 7 | 4 | 8–9 rnds | 28 cm | 14 cm |
| 74/80 (6–12 mo) | 44 sts | 12 | 8 | 4 | 9–10 rnds | 32 cm | 18 cm |
| 86 (12–18 mo) | 48 sts | 14 | 8 | 4 | 10–11 rnds | 36 cm | 22 cm |
| 92/98 (18–24 mo) | 52 sts | 16 | 9 | 4 | 11–12 rnds | 40 cm | 26 cm |
By following this chart, you can easily adjust the sweater for newborns, babies, and toddlers, ensuring a comfortable oversized fit for each age group.
Separating the Sleeves
Once the raglan yoke is complete, set the sleeve stitches aside to knit them later. The easiest way is to thread a piece of yarn through the stitches on the needle with a yarn needle and secure them into a loop so no stitches are lost.
(5).png)
Knitting the Body
Under the arms, cast on three new stitches on each side to connect the front and back. Knit the body in the round in stockinette stitch until the total length from the neckline is about 36 cm. For the hem, knit six rounds in 1 knit, 1 purl rib or any rib pattern you prefer, and then bind off loosely.
(5).png)
(3).png)
Sleeves
Pick up the reserved sleeve stitches onto double-pointed needles or a short circular needle. Include the three cast-on stitches under the arms, giving approximately 31 stitches per sleeve. Knit in the round until the sleeve measures about 22 cm from the underarm. Optionally, decrease 2–4 stitches evenly for a slimmer fit. Finish with six rounds of 1 knit, 1 purl rib and bind off loosely.
(3).png)
(3).png)
Finishing
Weave in all ends carefully. Depending on the yarn, you can gently block or steam the sweater to even out the stitches. If desired, reinforce the neckline with additional rib rounds.
(3).png)
(3).png)
Tips and Variations
For larger children or longer wear, simply add more increase rounds in the raglan yoke and extend the body and sleeves. Ribbing can be varied, e.g., 2×2 rib or garter stitch. To personalize the sweater, you can add stripes, color blocks, or patterns in the yoke or body.
(3).png)
Your New Raglan Sweater is Ready!
I hope you enjoyed this pattern. If you have any questions or encounter difficulties, feel free to leave a comment. I would also appreciate your feedback :)
Have fun knitting! Don’t forget to check out my other free blog posts or visit my shop, where you’ll find many more sewing and crochet patterns for practical items, cute stuffed animals, and amigurumi.