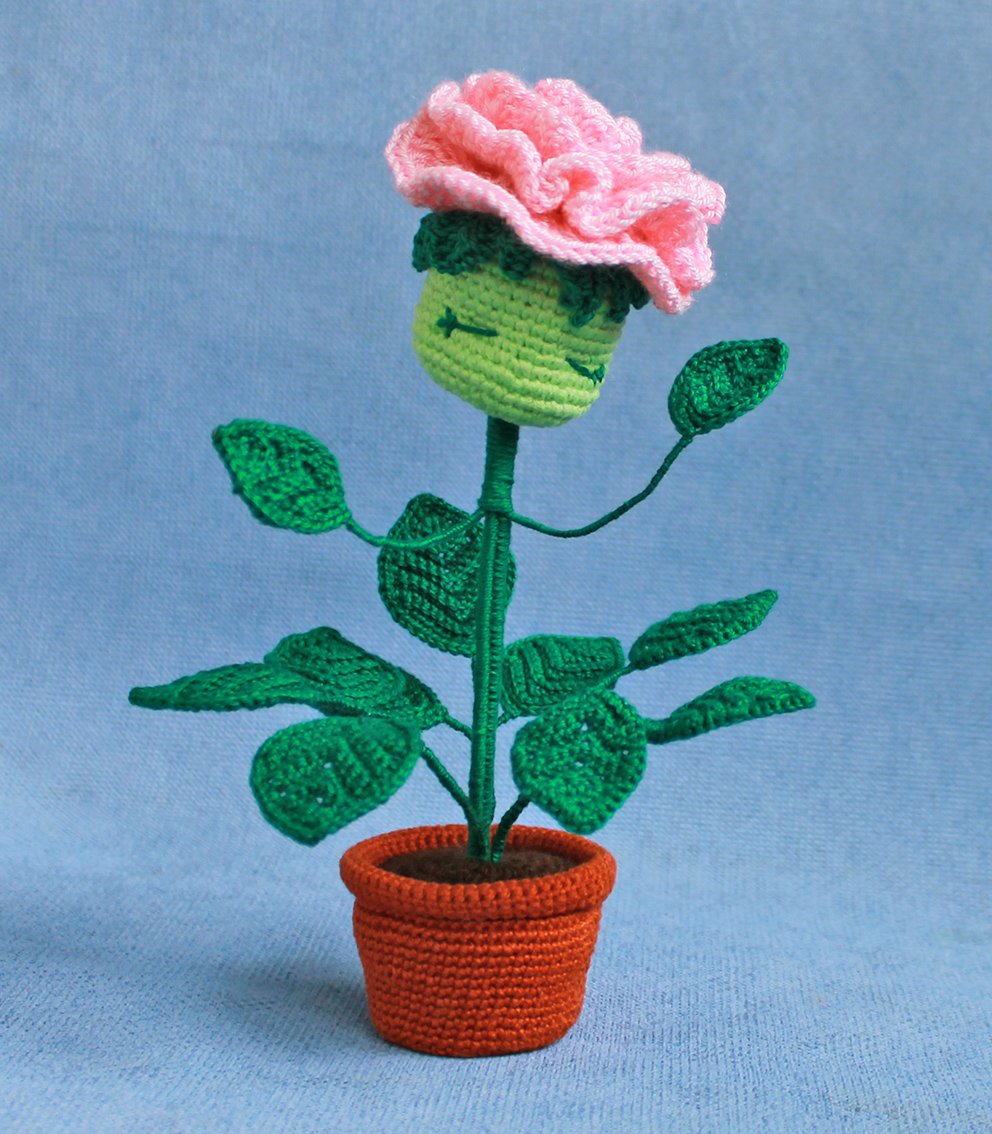
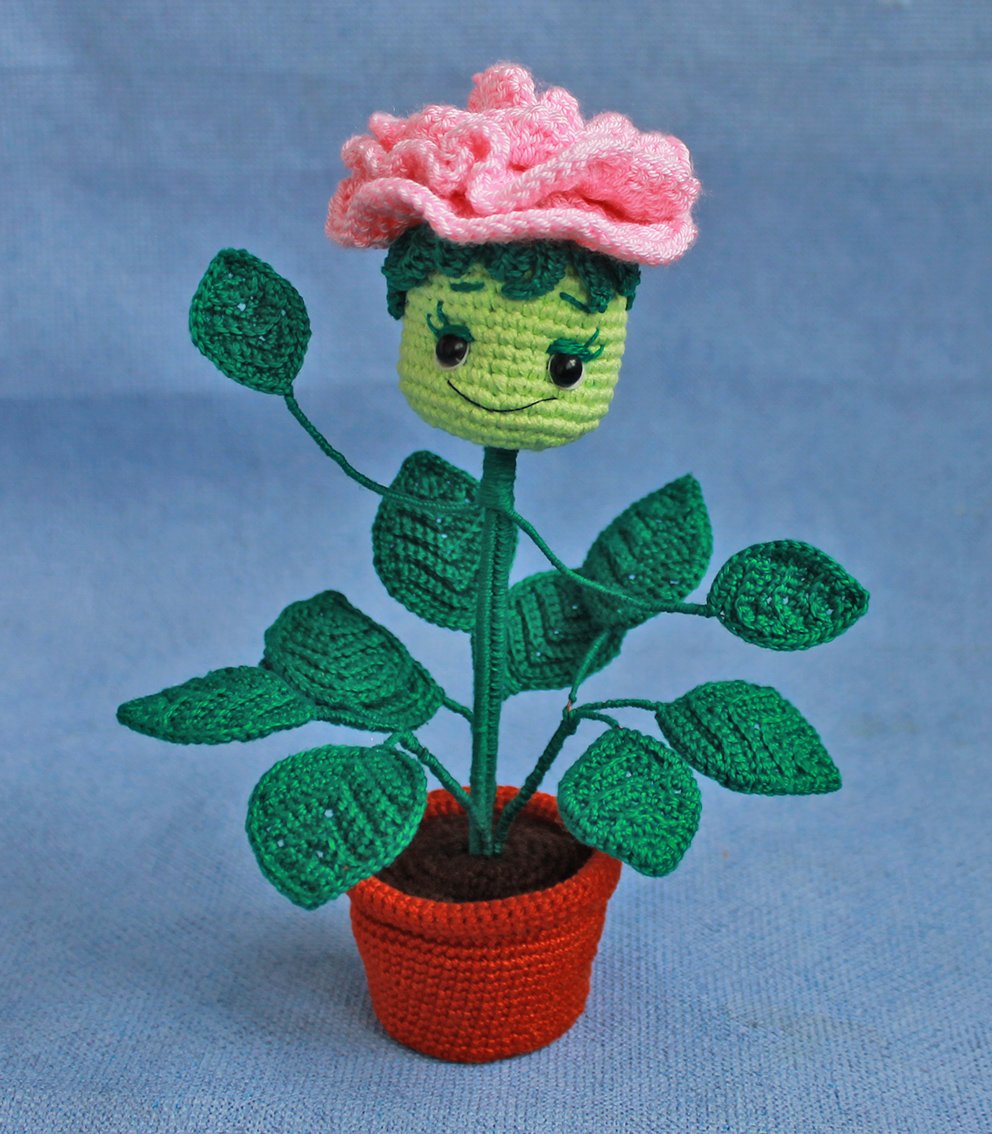
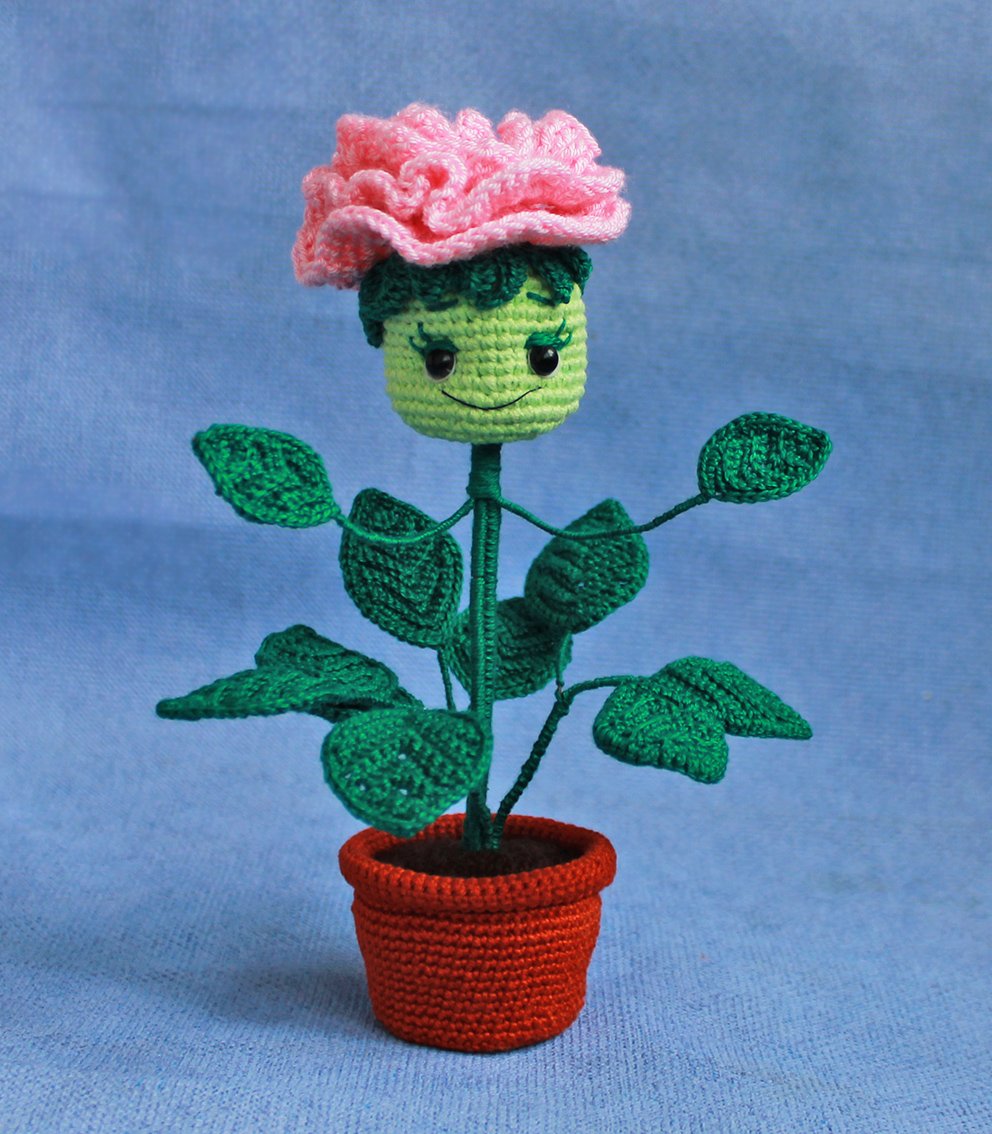
A potted rose
I have two design options to suggest. Please note, the difficulty level is medium+. However, if you truly want to make it, stay patient and focused—it’s achievable!
.JPG)
Materials:
You can choose the yarn at your discretion, of a similar color, composition and thickness. Acrylic, wool, velour or cotton will do. I used 450 m/100g acrylic yarn. Yarn consumption depends on its thickness and a crochet hook size. The height of my rose is 18 cm. Depending on the thickness of yarn, the finished toy size may differ.
Yarn of the following colours is required:
- For leaves and stem – dark green (approx. 10 g), for the head - light green (approx. 5 g);
- For a flower pot, I would recommend brown (approx. 10 g), as well as a small amount of black or dark brown;
- For roses, in the color of your choice (approx. 15 g), pink, red, yellow or white would be great;
- A crochet hook, I used 1,25 mm crochet hook;
- Hollow fibre for stuffing;
- A piece of wire with a diameter of 1.5-2.0mm approx. 30cm long – for the stem;
- Thin wire 1.0mm (I have a bead wire) about 3.0m.
Choose the wire, depending on the thickness of the yarn you choose. Accordingly, the wire consumption may be different.
- A piece of foam rubber 5 cm × 5 cm × 5 cm (optional, can be replaced with hollow fibre);
- A piece of thick cardboard 5 cm × 5 cm;
- Needle, sewing threads of various colours;
- A long needle for sculpting, strong thread for sculpting;
- For the eyes: a tiny amount of black colour yarn, 2 pairs of half-beads or 1 pair of ready-made eyes (I used 4 mm diam half-beads);
- A small amount of green and black yarn for embroidery;
- All purpose clear transparent glue, e.g. UHU.
Abbreviations:
ch – chain
sl st – slip stitch
sc – single crochet
hdc – half double crochet
dc - double crochet
tr - treble crochet
inc – increase (2 sc in 1 st)
dec – decrease (single crochet two stitches together)
(...) x N times – repeat instructions in brackets N times
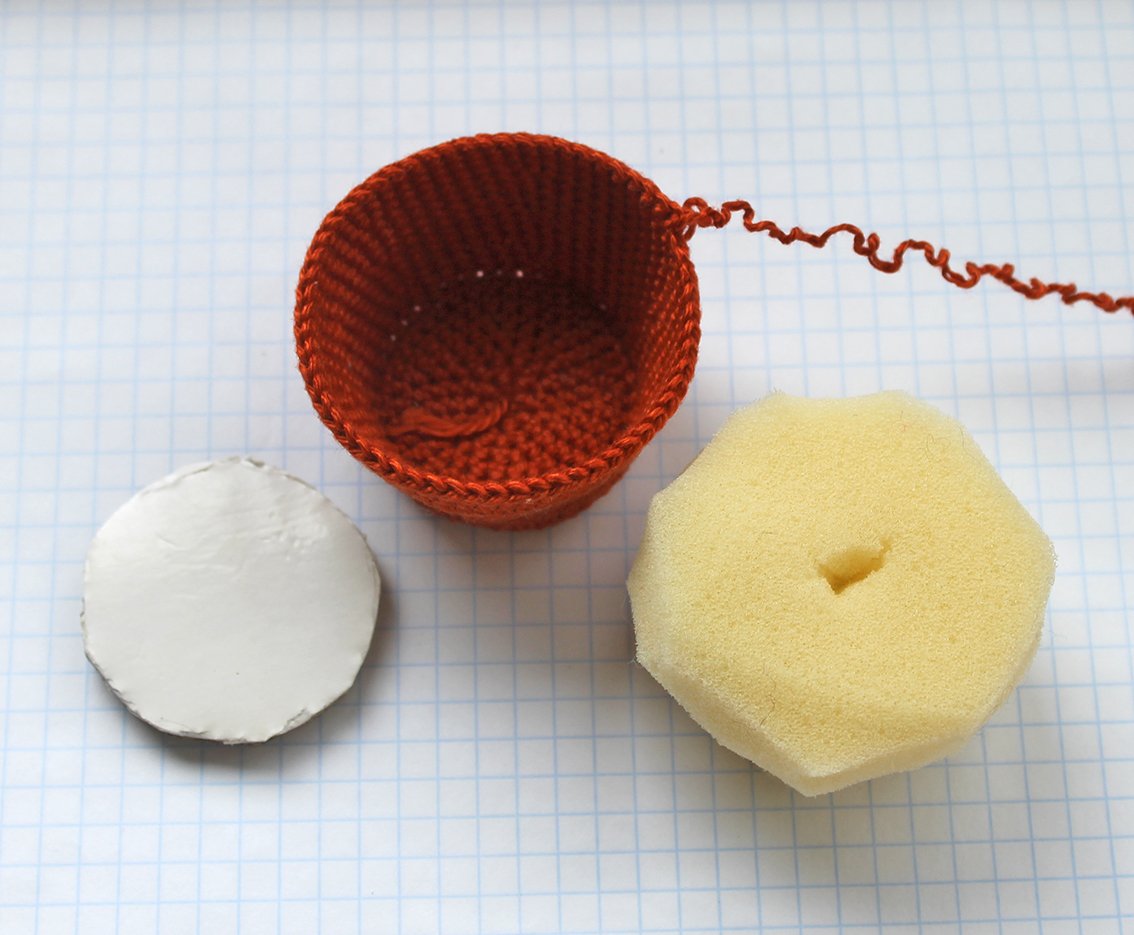
Flower pot
Work with brown colour yarn.
Rnd 1. 6 sc in a Magic Ring
Rnd 2. 6 inc = 12
Rnd 3. (1 inc, 1 sc) х 6 times = 18
Rnd 4. (1 inc, 2 sc) х 6 times = 24
Rnd 5. (1 inc, 3 sc) х 6 times = 30
Rnd 6. (1 inc, 4 sc) х 6 times = 36
Take a piece of cardboard, place the circle onto the cardboard and make a contour. Cut with scissors.
Rnd 7. (1 inc, 5 sc) х 5 times, 1 inc, 3 sc, 2 sl st = 42
Rnd 8. Work 42 sc into the back loops only
.JPG)
Rnd 9. 42 sc
Rnd 10. (6 sc, 1 inc) х 6 times = 48
Rnd 11-14. (4 rounds) 48 sc
Rnd 15. (7 sc, 1 inc) х 6 times = 54
Rnd 16-19. (4 rounds) 54 sc
Rnd 20. Work 54 sc into the front loops only
Rnd 21. (8 sc, 1 inc) х 6 times = 60
Rnd 22-25. (4 rounds) 60 sc
Rnd 26. 58 sc, 2 sl st
Fasten off, cut off any excess yarn, hide the end.

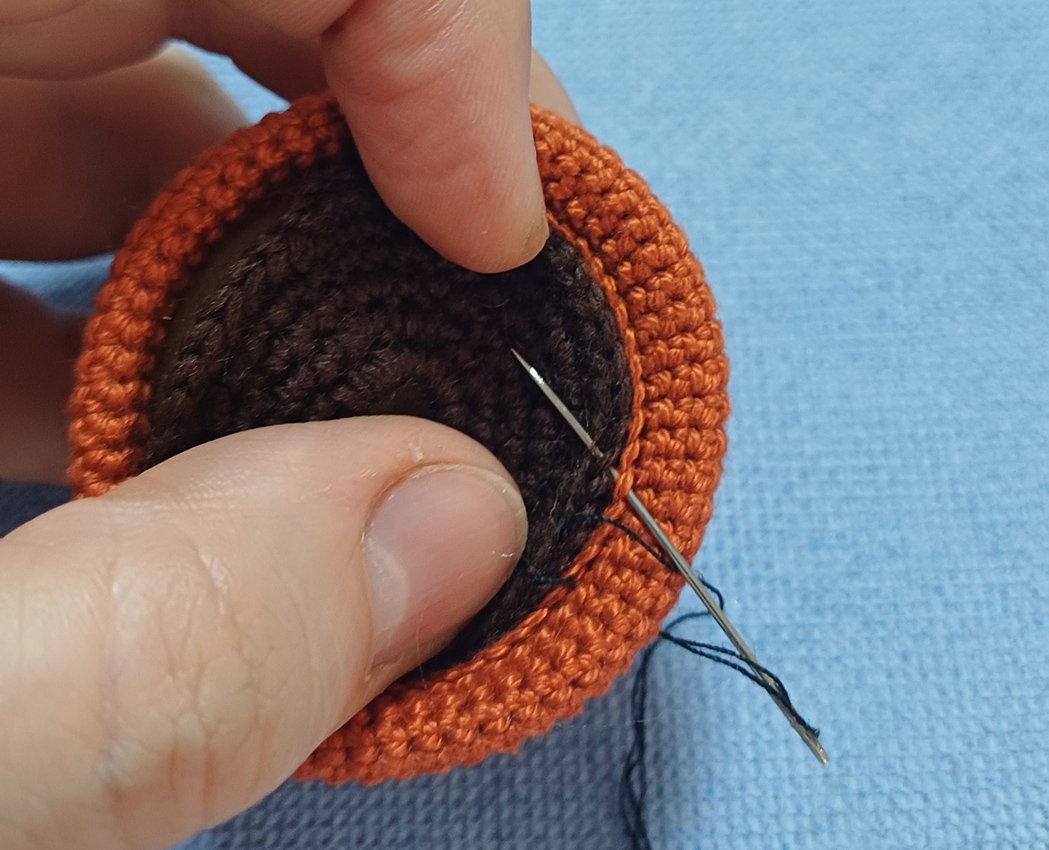
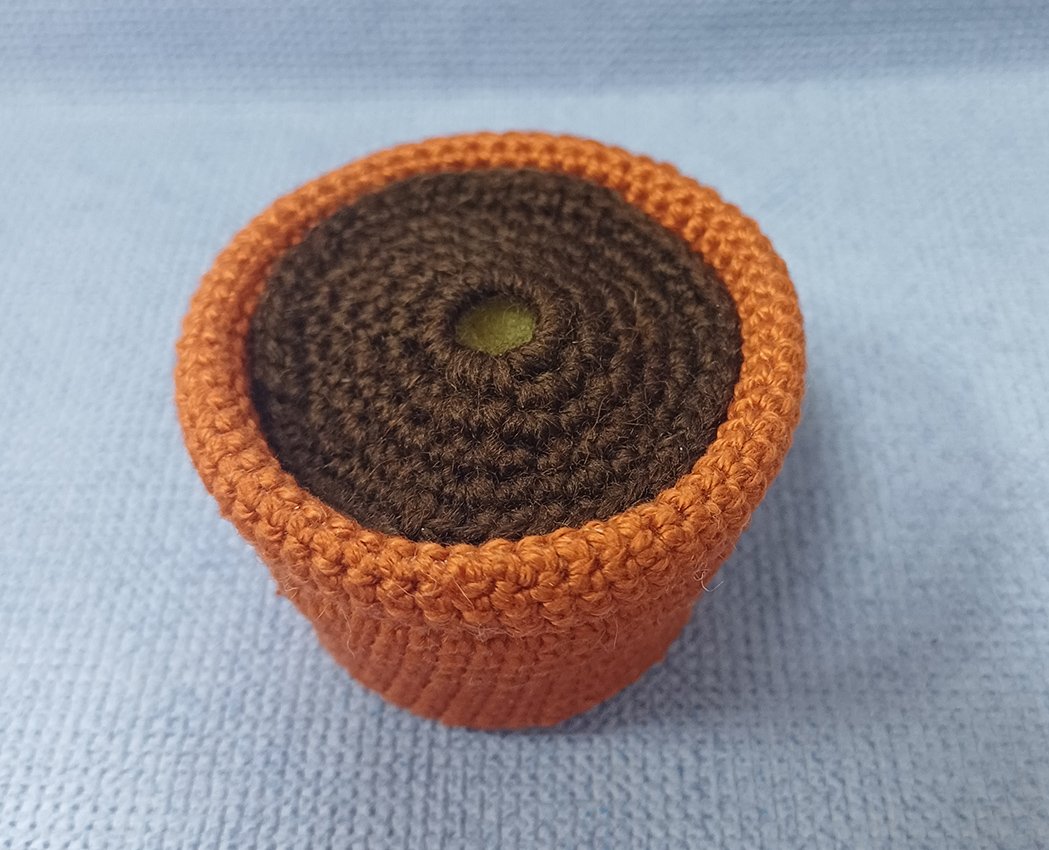
Take a piece of foam rubber and cut out a part to fill the pot. Use sharp scissors to carefully create a small hole in the center of the foam rubber, where the stem will go.
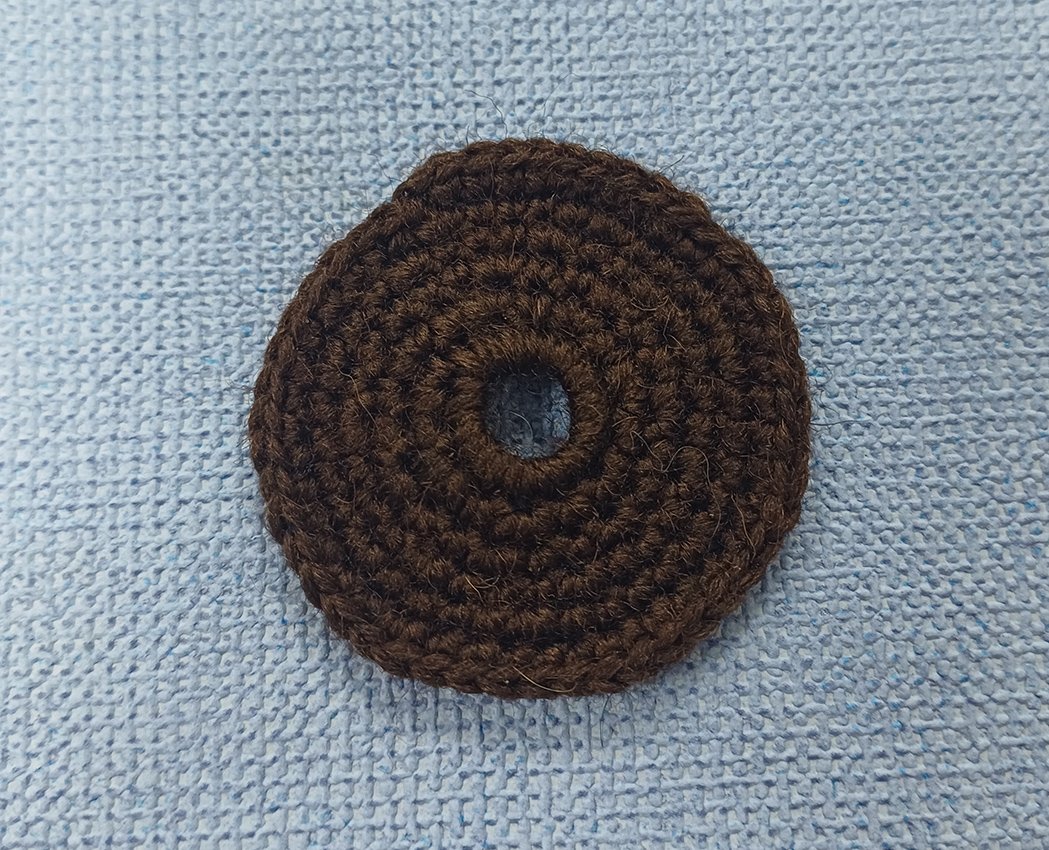
Soil
Work with dark brown or black colour yarn.
Rnd 1. 14 sc in a Magic Ring - do not tighten the loops, there should be a hole through which the stem.
Rnd 2. (1 inc, 1 sc) х 7 times = 21
Rnd 3. (1 sc, 1 inc, 1 sc) х 7 times = 28
Rnd 4. (3 sc, 1 inc) х 7 times = 35
Rnd 5. (2 sc, 1 inc, 2 sc) х 7 times = 42
Rnd 6. (5 sc, 1 inc) х 7 times = 49
Cut off yarn, leave a tail for sewing.
Fold the edges of the pot to the outer side at round 20 level where you’ve made half loops. Place a cardboard circle to the bottom of the pot, then place a foam rubber part at the top. You may use hollow fibre instead of the foam rubber. Sew soil to the half loops of Rnd 20. Roll the edge of the pot up a bit as on the photo.
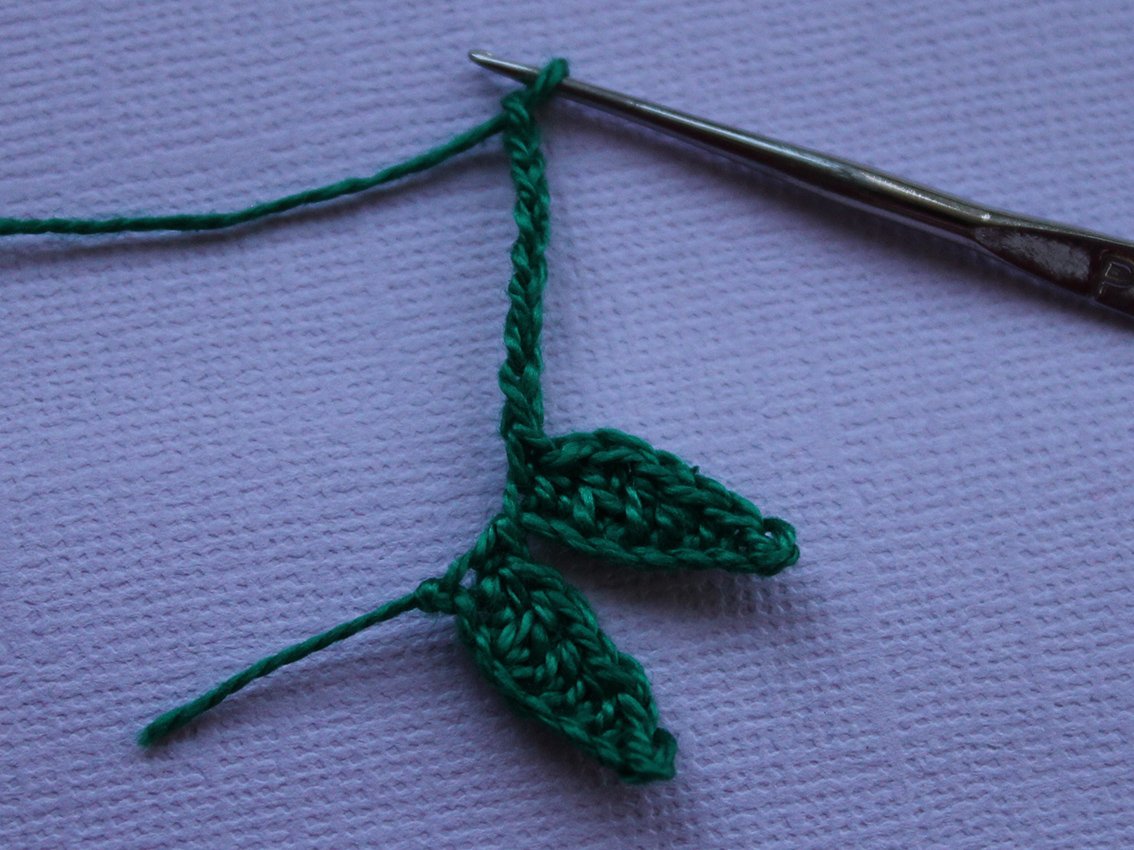
A twig with leaves (make 3)
There are 3 leaves on each twig.
Work with dark green colour yarn.
Work 2 ch
Row 1. starting from 2nd ch from hook: 1 sc, 1 ch, turn = 1
Furter crochet all rows into the back loops only.
Row 2. 3 sc in 1 loop, 1 ch, turn = 3
Row 3. 1 sc, 3 sc in 1 loop, 1 sc, 1 ch, turn = 5
Row 4. 2 sc, 3 sc in 1 loop, 2 sc, 1 ch, turn = 7
Row 5. 3 sc, 3 sc in 1 loop, 3 sc, 1 ch, turn = 9
Row 6. 4 sc, 3 sc in 1 loop, 4 sc, 1 ch, turn = 11
Row 7. 5 sc, 3 sc in 1 loop, 5 sc, 1 ch, turn = 13
Row 8. skip 1 loop, 5 sc, 3 sc in 1 loop, 5 sc, leave the last stitch unworked, 1 ch, turn = 13
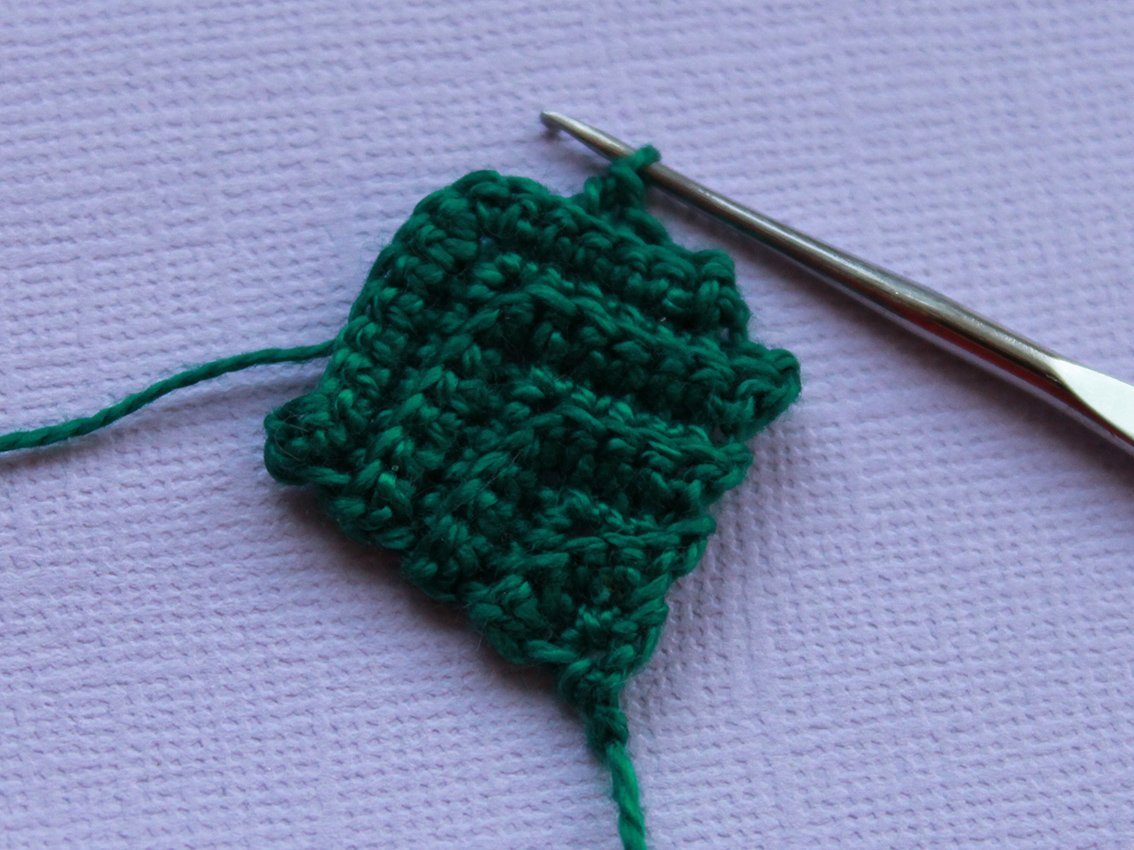
Row 9. skip 1 loop, 5 sc, 3 sc in 1 loop, 5 sc, leave the last stitch unworked, 1 ch, turn = 13
Row 10. skip 1 loop, 5 sc, 3 sc in 1 loop, 5 sc, leave the last stitch unworked, 1 ch, turn = 13
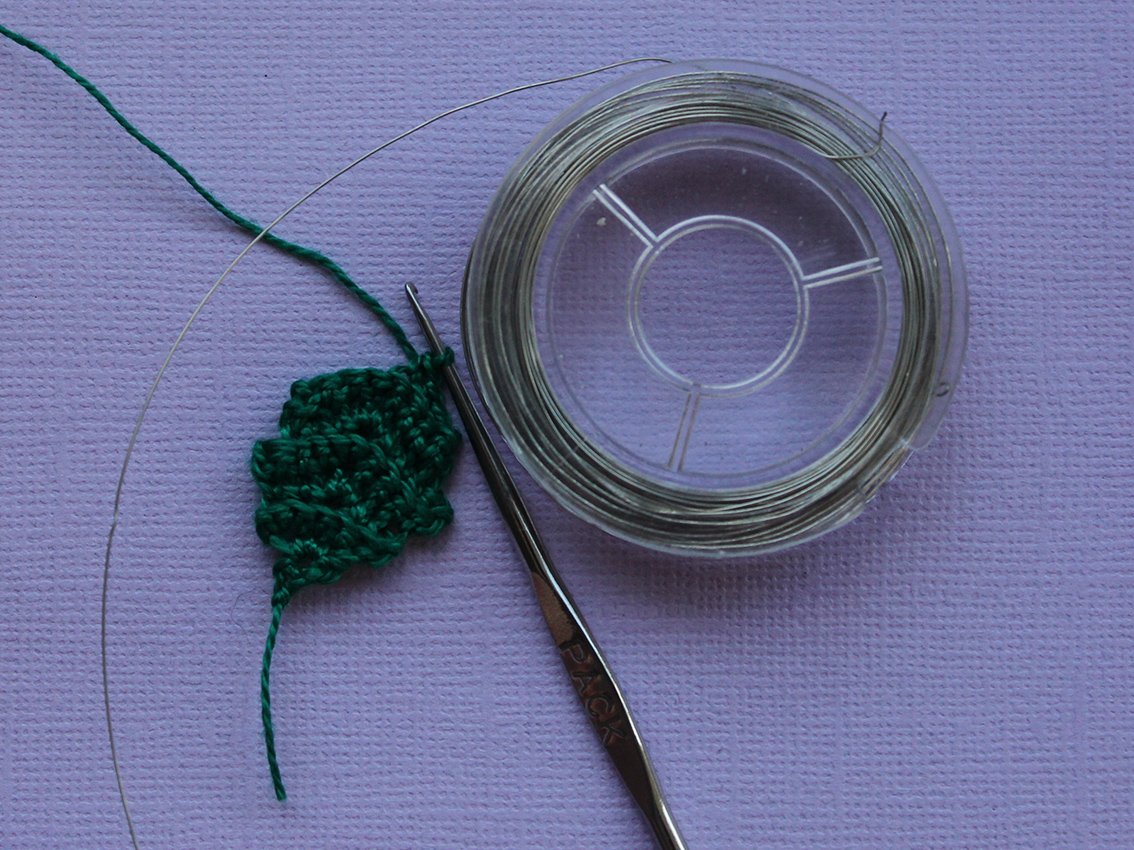
Row 11. skip 1 loop, 5 sc, 1 inc, do not cut the yarn!
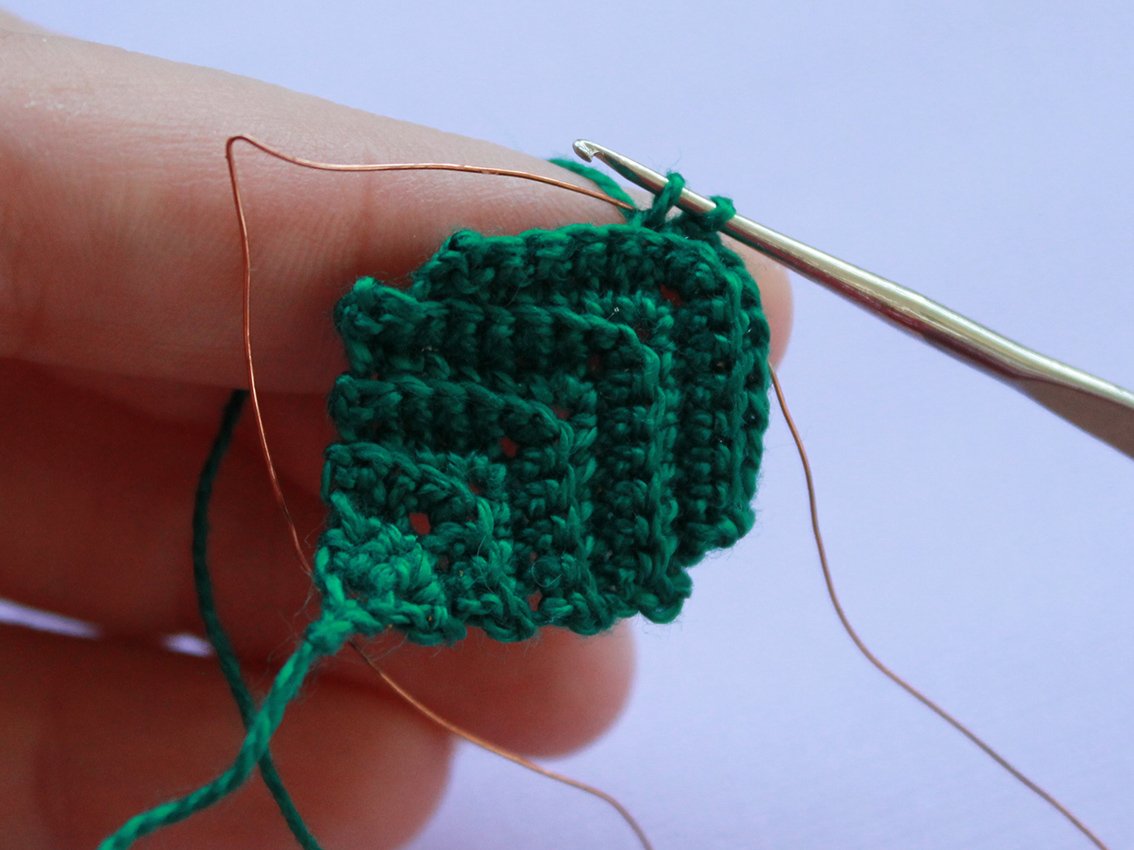
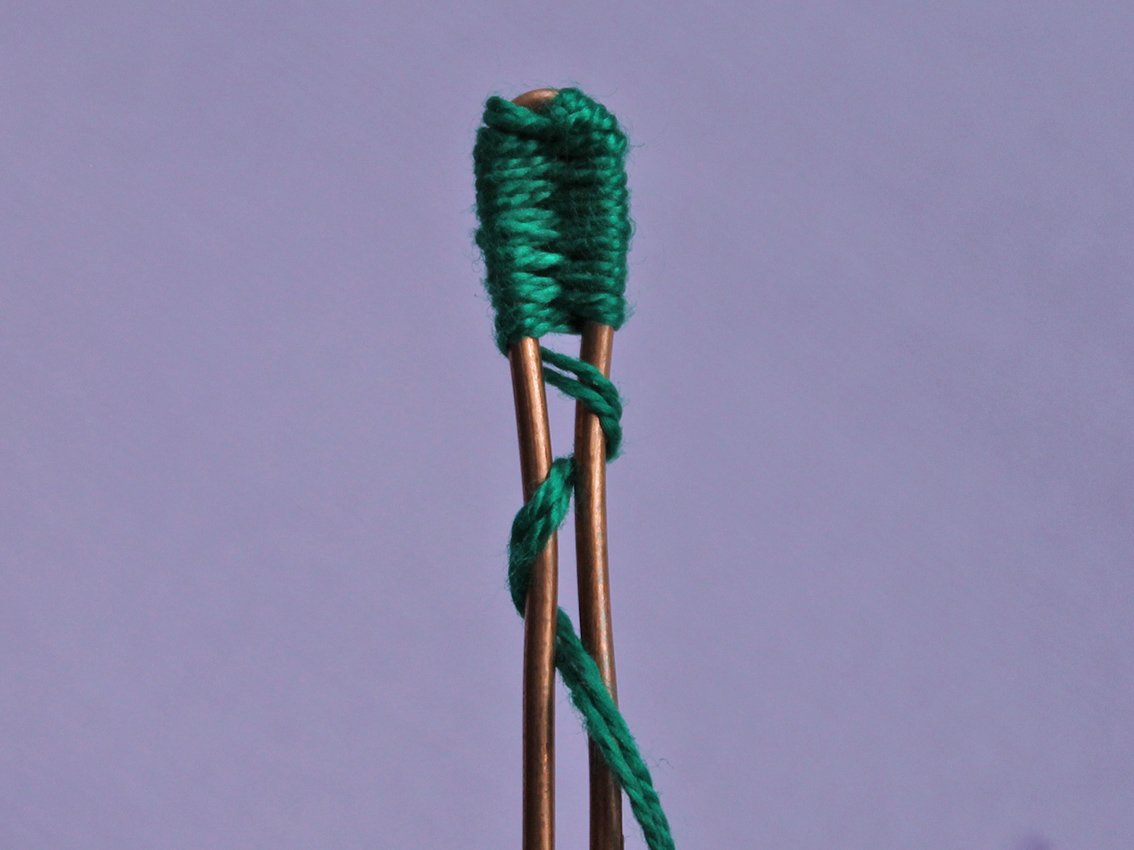
Put a thin wire around the edge of the leaf, leaving a tip about 10 cm long (I used a wire for beads). Crochet a piece grabbing the loops and wire at the same time. On the other side leave the tip of the wire about 10 cm long.
.JPG)
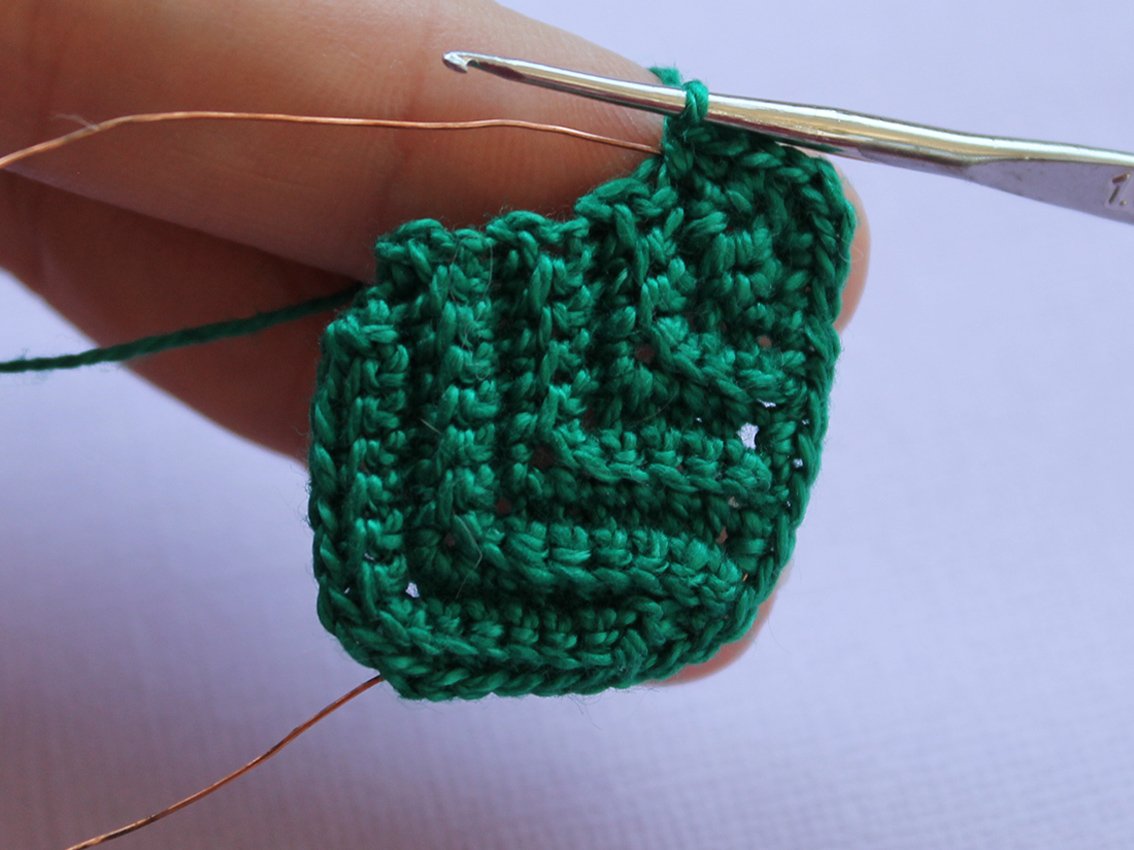
Connect the end and the beginning of the strapping with sl st. Cut the thread, leaving a long tip for next work.
.JPG)
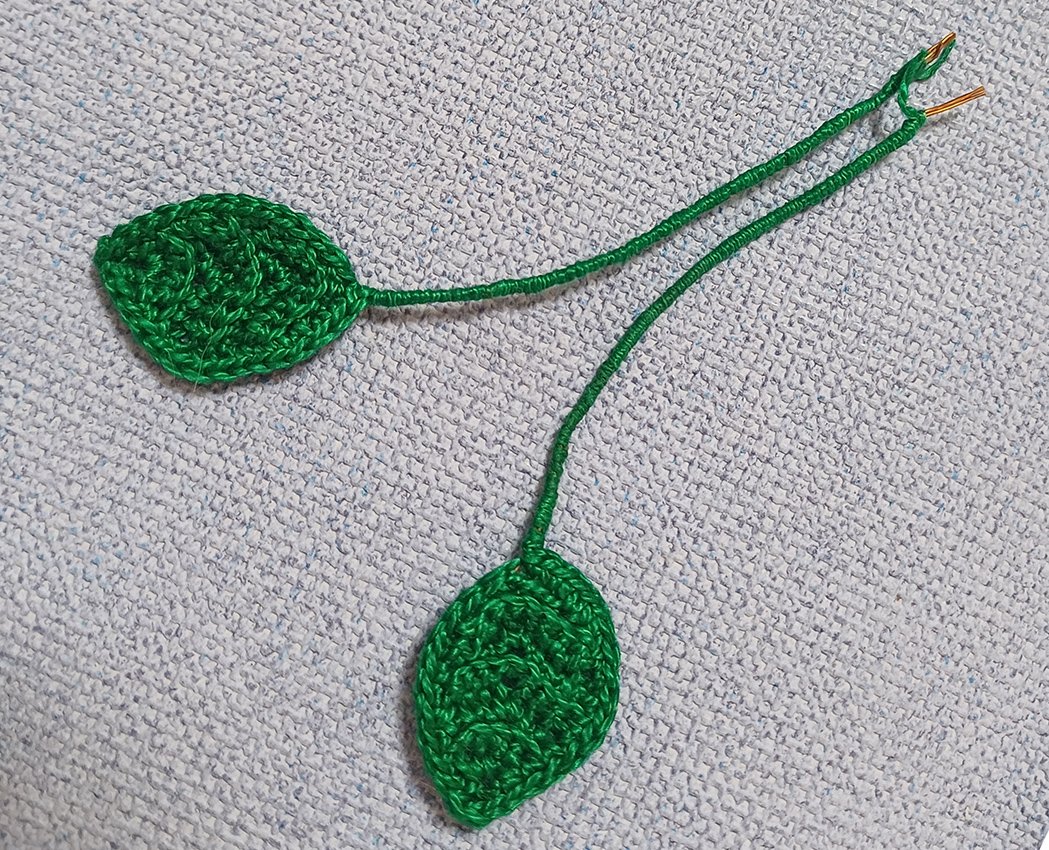
Apply a small amount of transparent glue onto a length of approx. 3cm and make neat wraps around it with green yarn, this will be a stem.
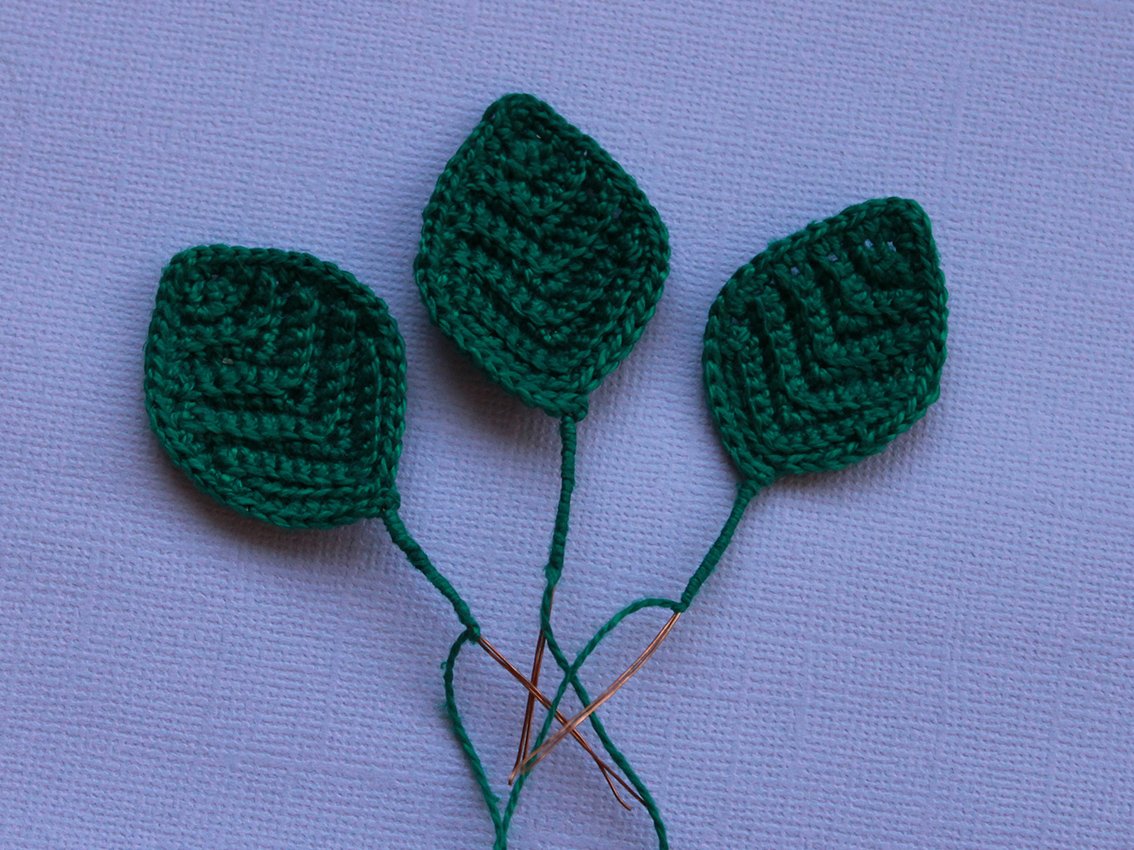
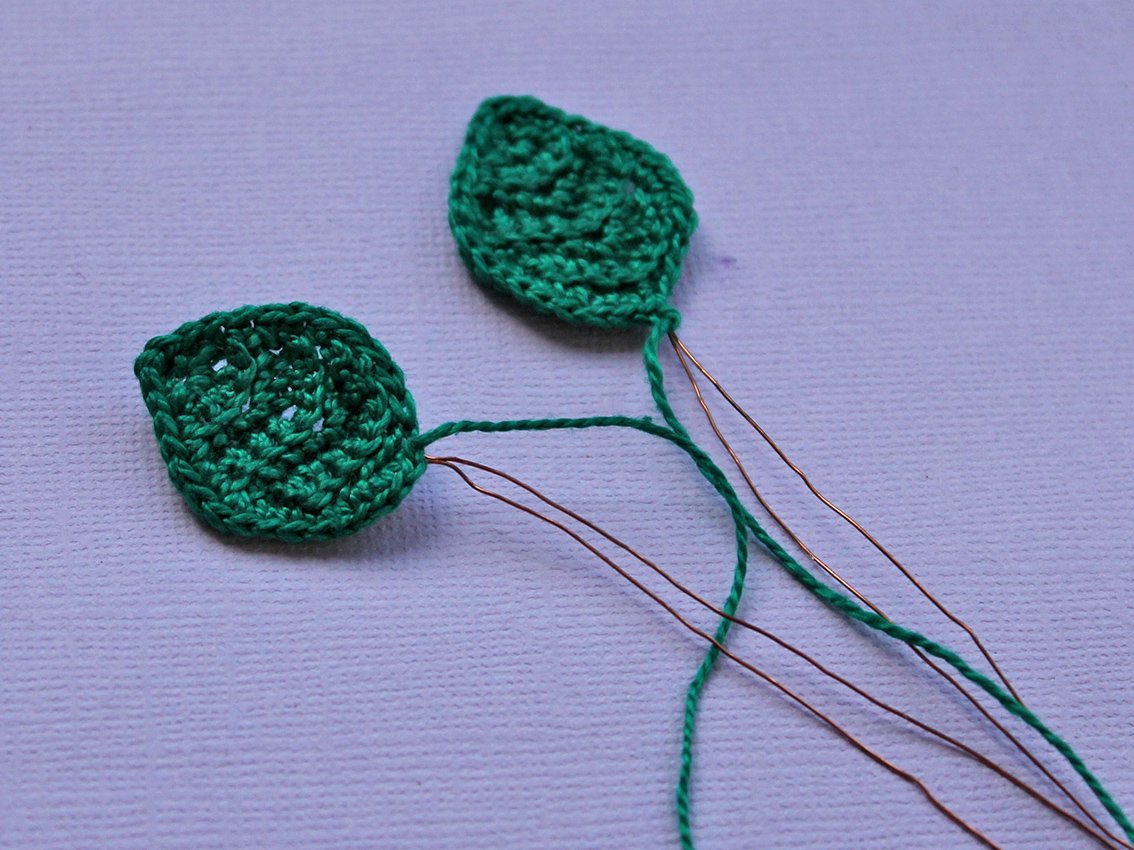
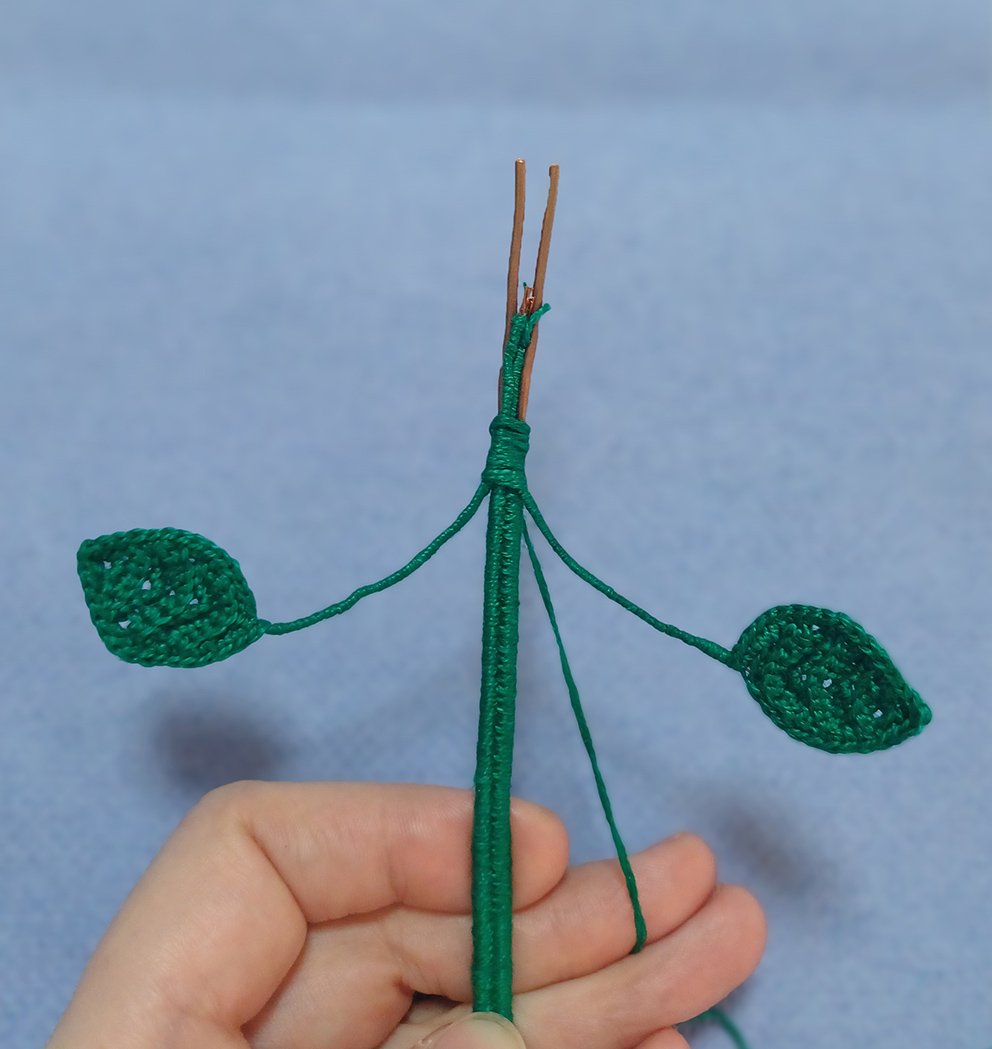
Connect the wire from the three leaves to a twig and twist them together. Apply a small amount of transparent glue onto a length of approx. 6-7cm and make neat wraps around it with green yarn.
Make 3 such twigs.
Hands - leaves (make 2)
Work with dark green colour yarn.
Work 2 ch
Row 1. starting from 2nd ch from hook: 1 sc, 1 ch, turn = 1
Furter crochet all rows into the back loops only.
Row 2. 3 sc in 1 loop, 1 ch, turn = 3
Row 3. 1 sc, 3 sc in 1 loop, 1 sc, 1 ch, turn = 5
Row 4. 2 sc, 3 sc in 1 loop, 2 sc, 1 ch, turn = 7
Row 5. 3 sc, 3 sc in 1 loop, 3 sc, 1 ch, turn = 9
Row 6. skip 1 loop, 3 sc, 3 sc in 1 loop, 3 sc, leave the last stitch unworked, 1 ch, turn = 9
Row 7. skip 1 loop, 3 sc, 3 sc in 1 loop, 3 sc, leave the last stitch unworked, 1 ch, turn = 9
Row 8. skip 1 loop, 3 sc, 1 inc, do not cut the yarn!
Put a thin wire around the edge of the leaf, leaving a tip about 8 cm long (I used a wire for beads). Crochet a piece grabbing the loops and wire at the same time. On the other side leave the tip of the wire about 8 cm long. Connect the end and the beginning of the strapping with sl st. Cut the thread, leaving a long tip for next work.
Apply a small amount of transparent glue onto a length of approx. 3cm and make neat wraps around it with green yarn, this will be a stem.
Stem
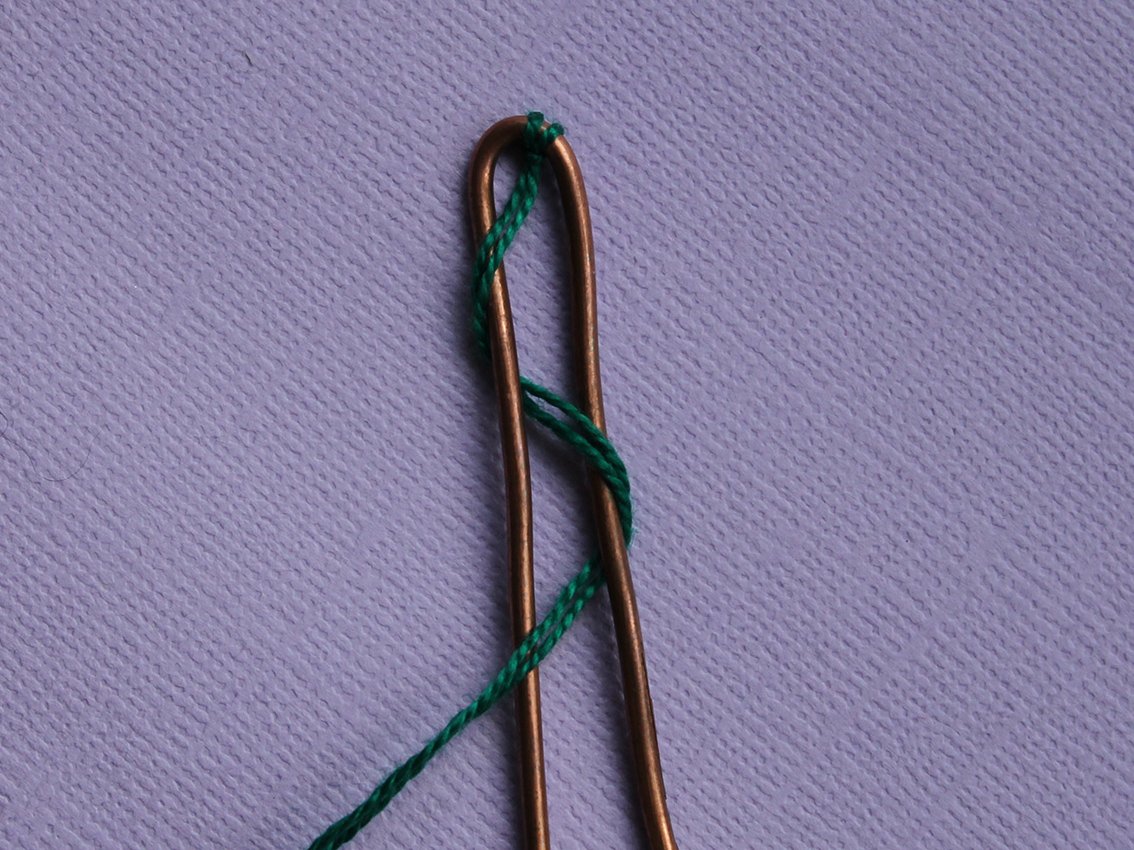
Fasten the dark green thread with a knot, start winding the wire as an eight to a height of 10 cm. See photo for guidance. Attach hands, continue to wind another 4 cm at once both ends of the wire. Secure the tip of the thread with glue. Wrap the remaining ends of the wire with a plaster.
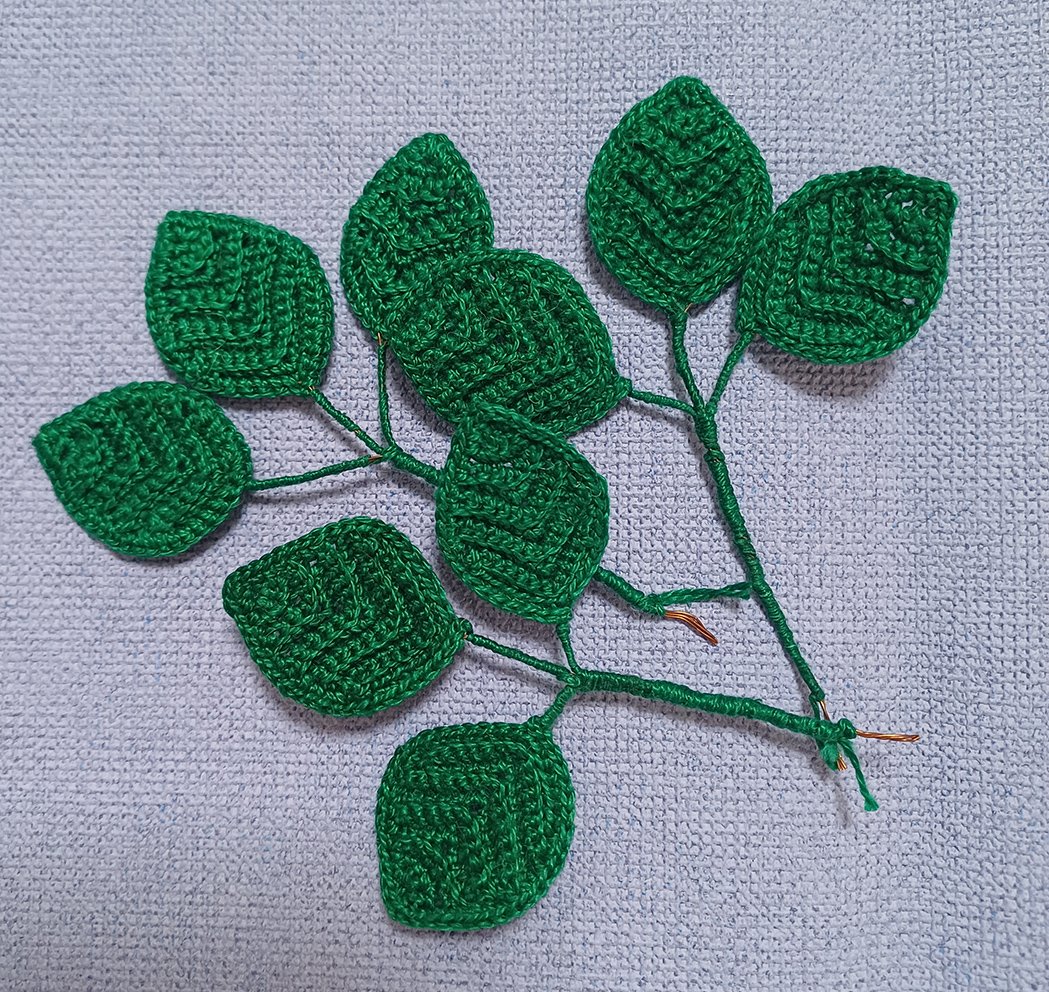
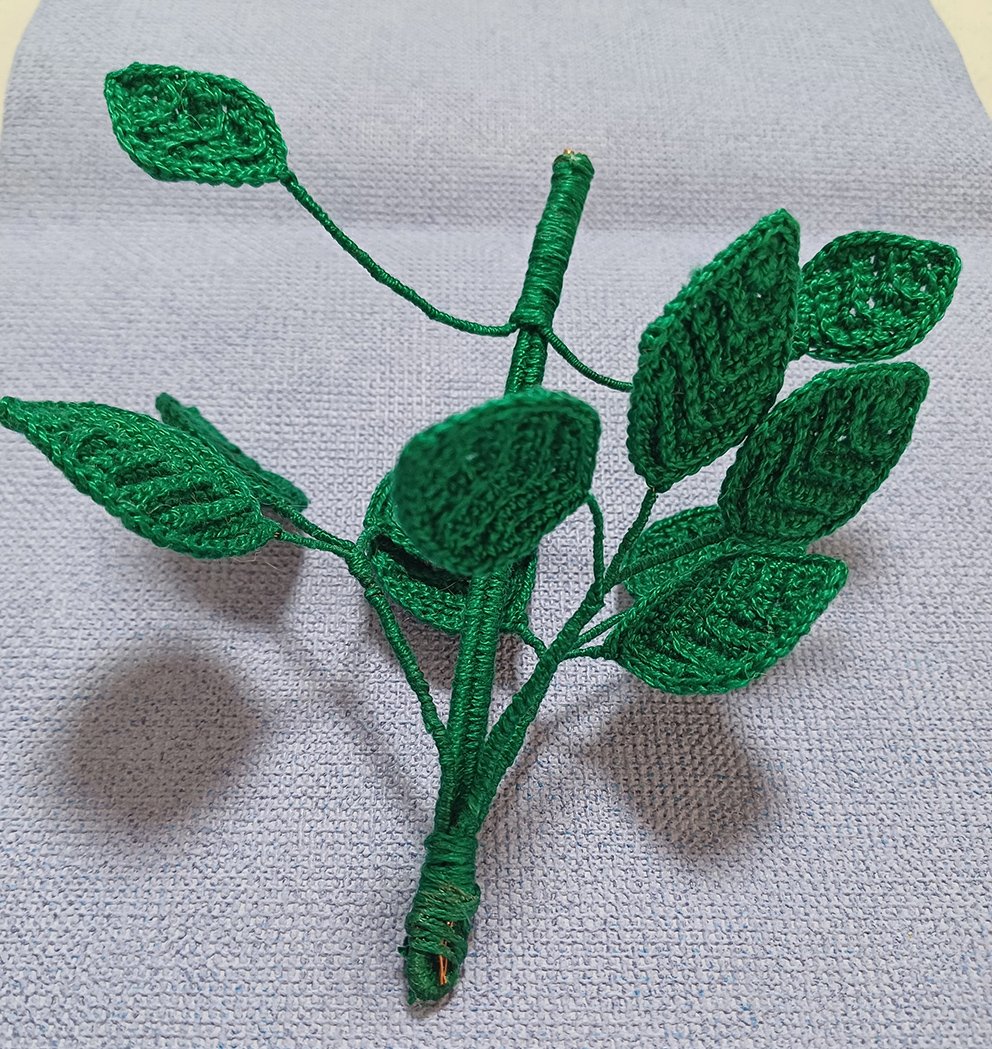
Attach the twigs to the stem, fix them with dark green yarn.
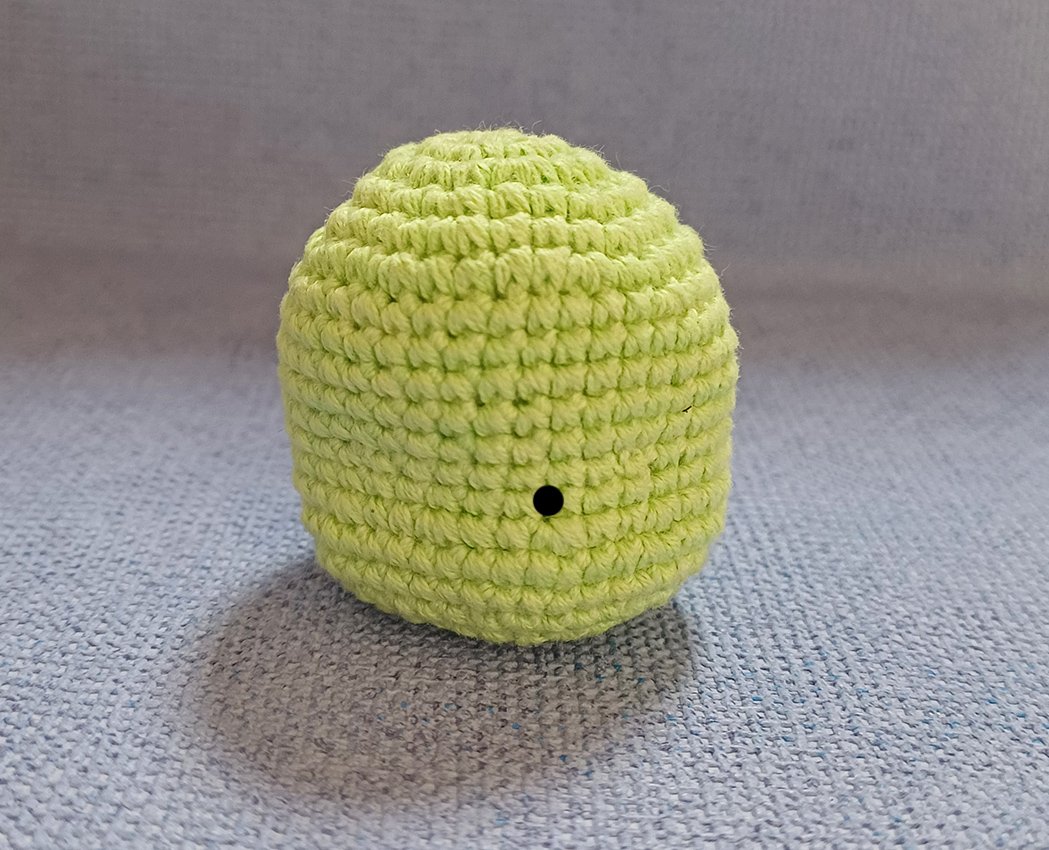
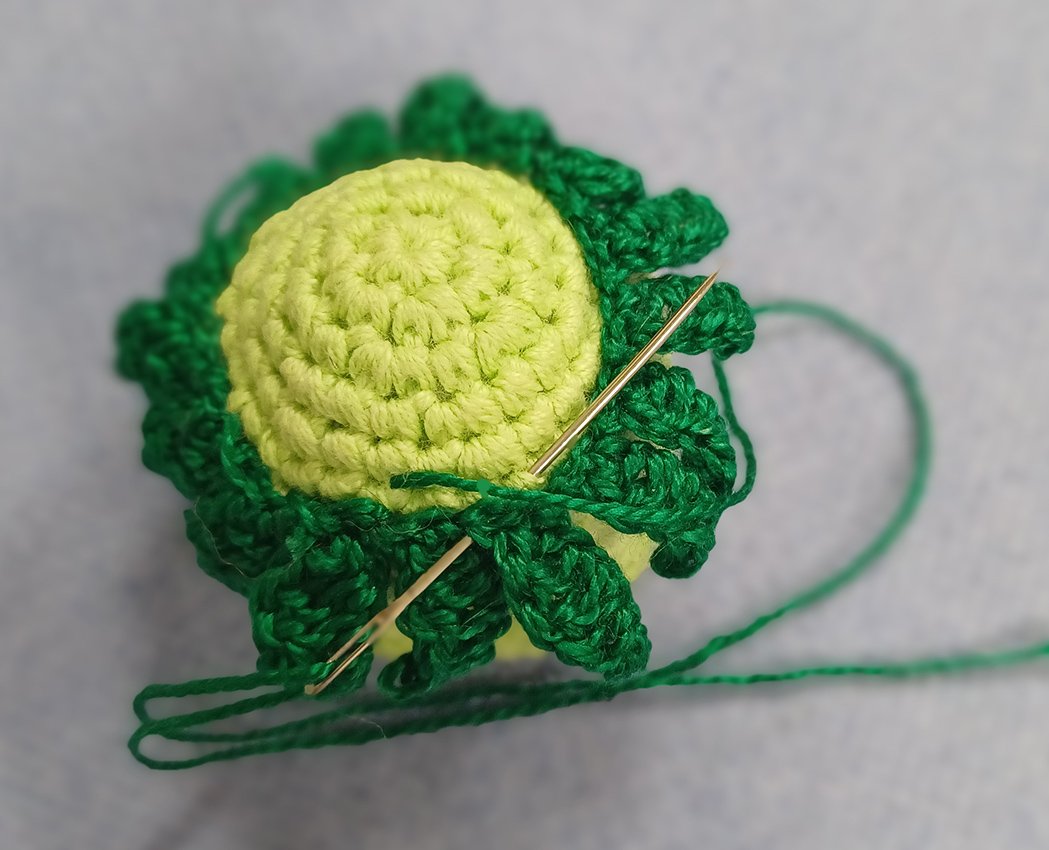
Head
Work with light green colour yarn.
Rnd 1. 6 sc in a Magic Ring
Rnd 2. 6 inc = 12
Rnd 3. (1 sc, 1 inc) х 6 times = 18
Rnd 4. (1 sc, 1 inc, 1 sc) х 6 times = 24
Rnd 5. (3 sc, 1 inc) х 6 times = 30
Rnd 6. (2 sc, 1 inc, 2 sc) х 6 times = 36
Rnd 7. (11 sc, 1 inc) х 3 times = 39
Rnd 8-11. (4 rounds) 39 sc
Rnd 12. 15 sc, 1 dec, 6 sc, 1 dec, 14 sc = 37
Rnd 13. 18 sc, put an additional marker here, 19 sc = 37
Rnd 14. 11 sc, (1 inc, 2 sc) х 5 times, 1 inc, 10 sc = 43
Rnd 15. 1 dec, 41 sc = 42
Rnd 16. 42 sc
Rnd 17. (2 sc, 1 dec, 2 sc) х 7 times = 35
Rnd 18. (3 sc, 1 dec) х 7 times = 28
Rnd 19. (1 sc, 1 dec, 1 sc) х 7 times = 21
Add hollow fiber. Fill cheeks well.
Rnd 20. (1 sc, 1 dec) х 7 times = 14
Rnd 21. 7 dec = 7
Fasten off, cut off. Do not close off the loops of the last round!
Sepals
Work with dark green colour yarn.
Row 1. (work 8 ch, starting from 2nd ch from hook: 1 sl st, 1 sc, 1 hdc, 2 dc, 1 hdc, 1 sc) х 16 times
Cut off yarn, leave a tail for sewing.
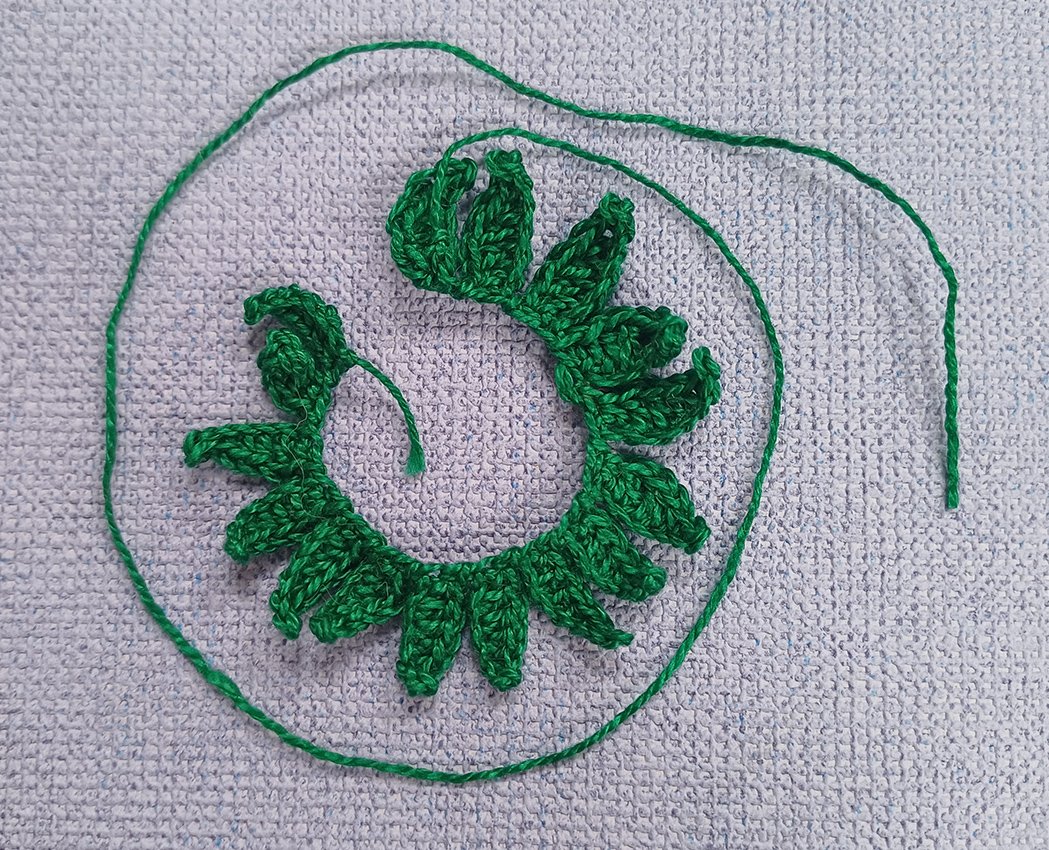
Sew them on at the level of the 5th round of the head.
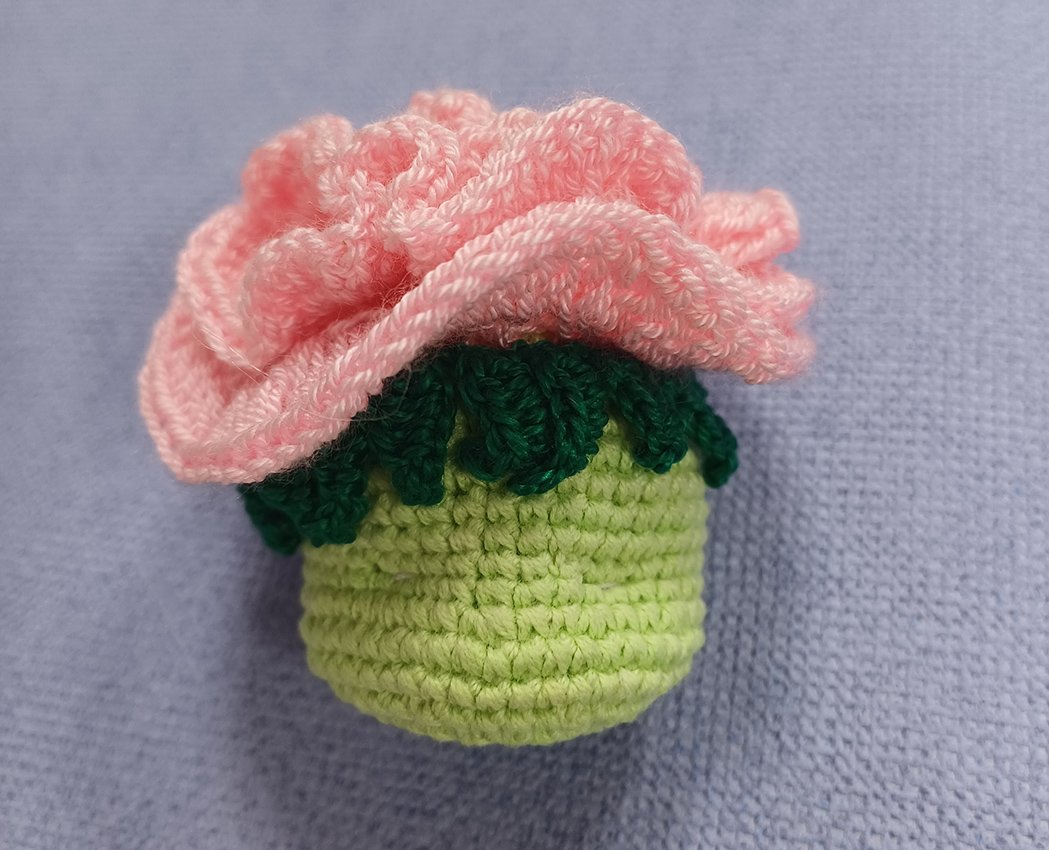
Rose
Work with yarn of your chosen colour.
Work 40 ch
Row 1. in 3rd ch from hook: 1 dc, 3 ch, 1 dc – it turned out to be an arch, then into each loop until the end of the round: 1 dc, 3 ch, 1 dc, turn work, 2 ch
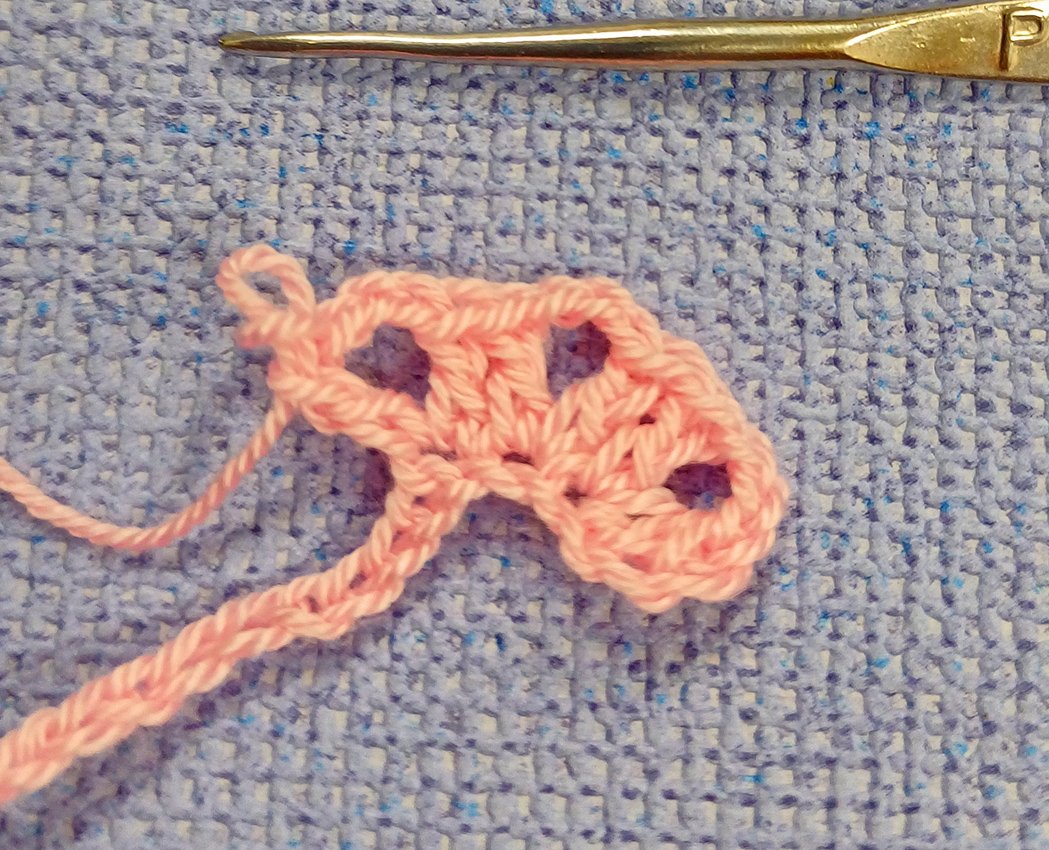
Row 2. into each arch of the previous round: 2 dc, 3 ch, 2 dc, turn work, 2 ch
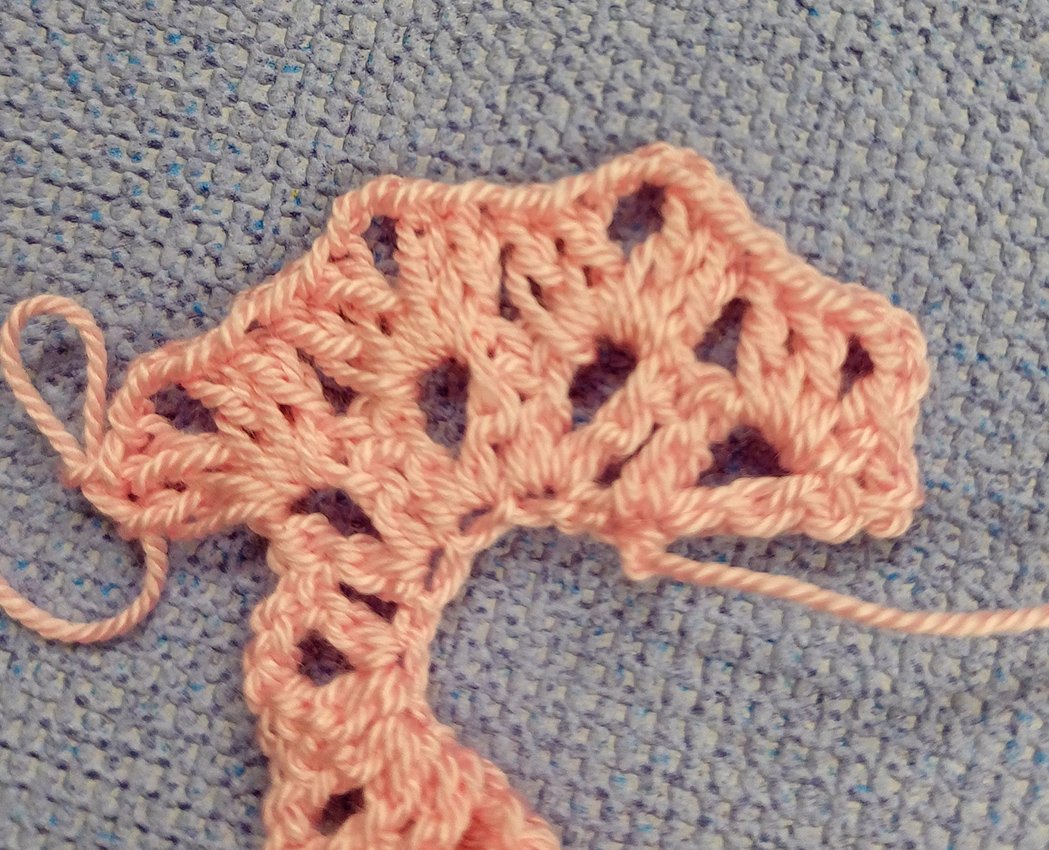
Row 3. (6 dc into each arch of the previous round) х 15 times, (3 dc in each stitch of the previous round) х 15 times, then 2 tr in each loop until the end of the round.
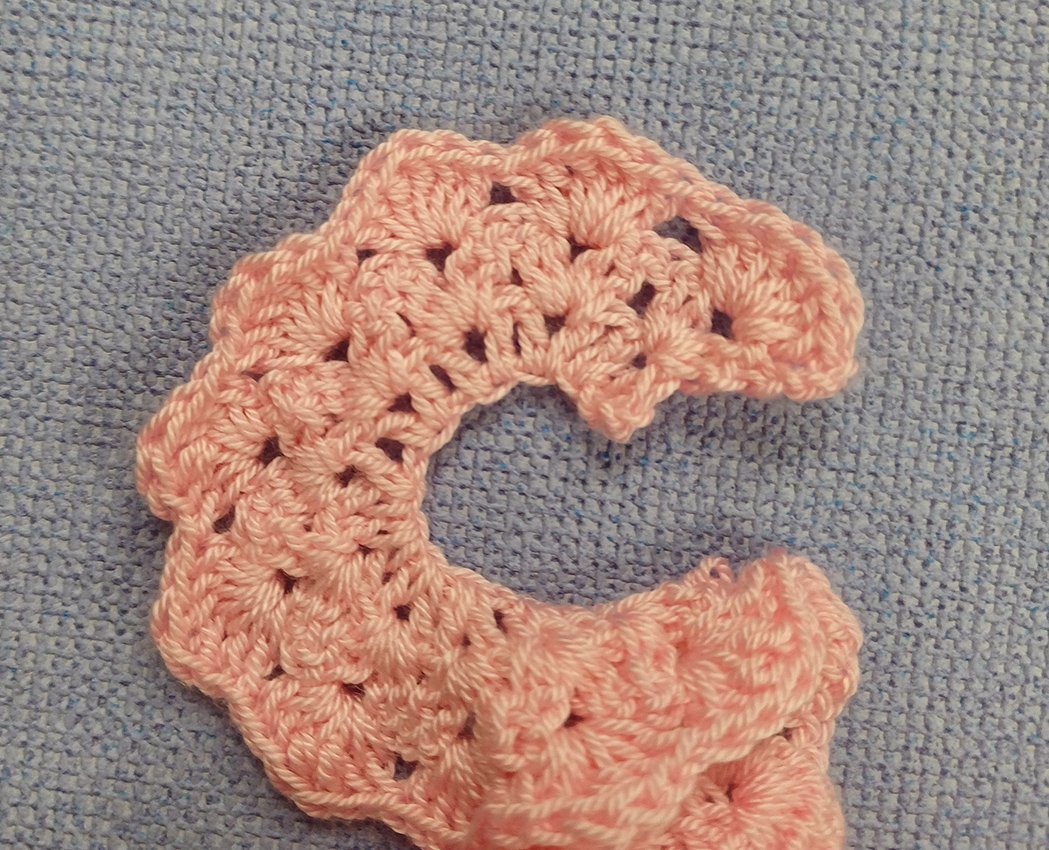
You may work into every stitch 3 tr – control and make it as frequently and dense as you like.
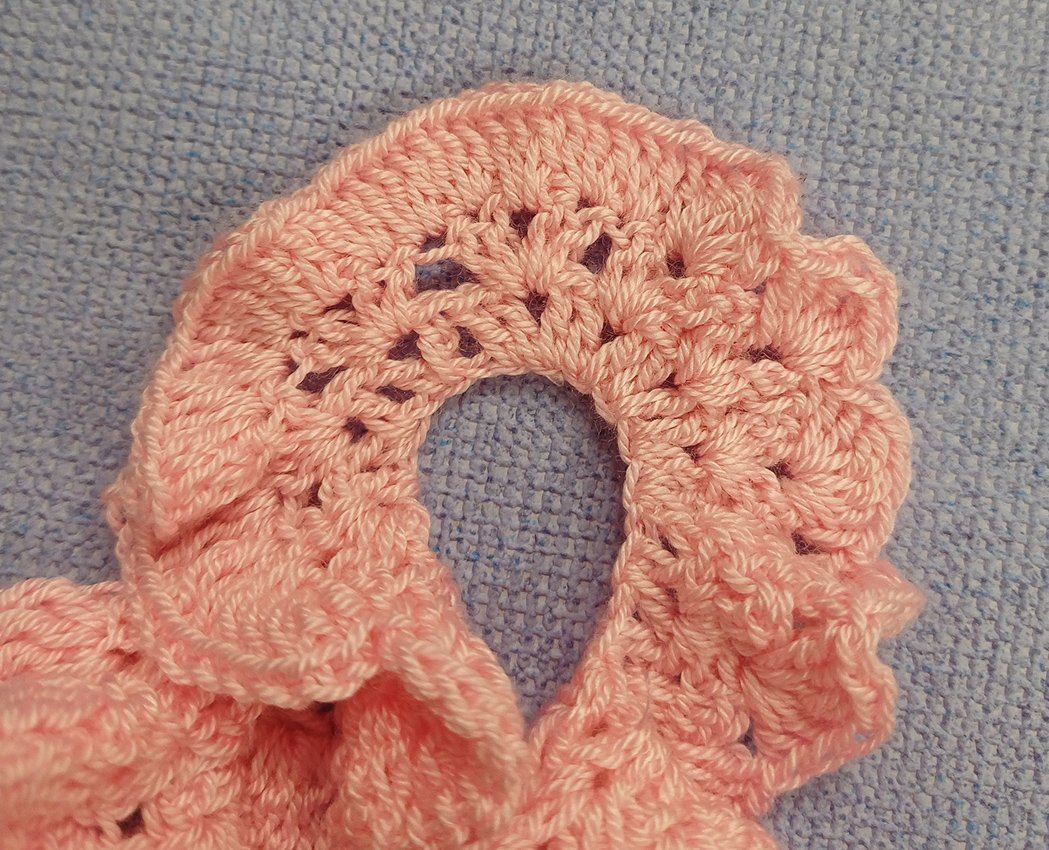
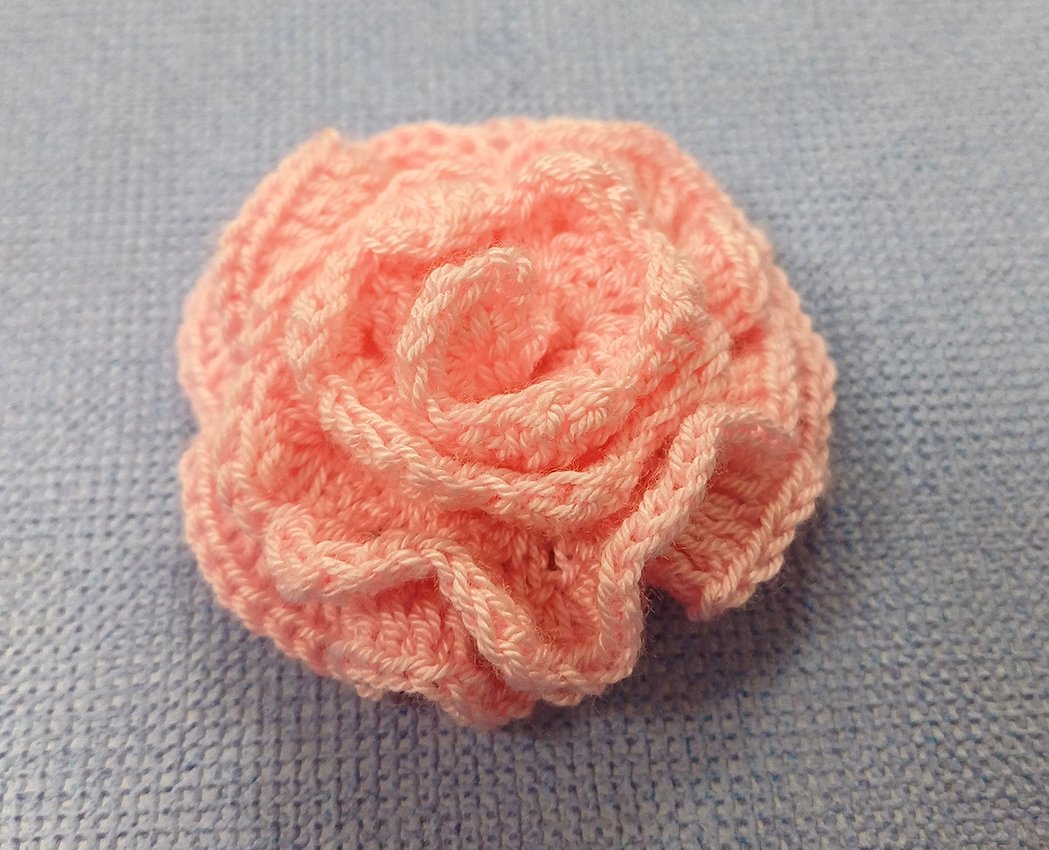
Fasten off, cut off any excess yarn, hide the end.
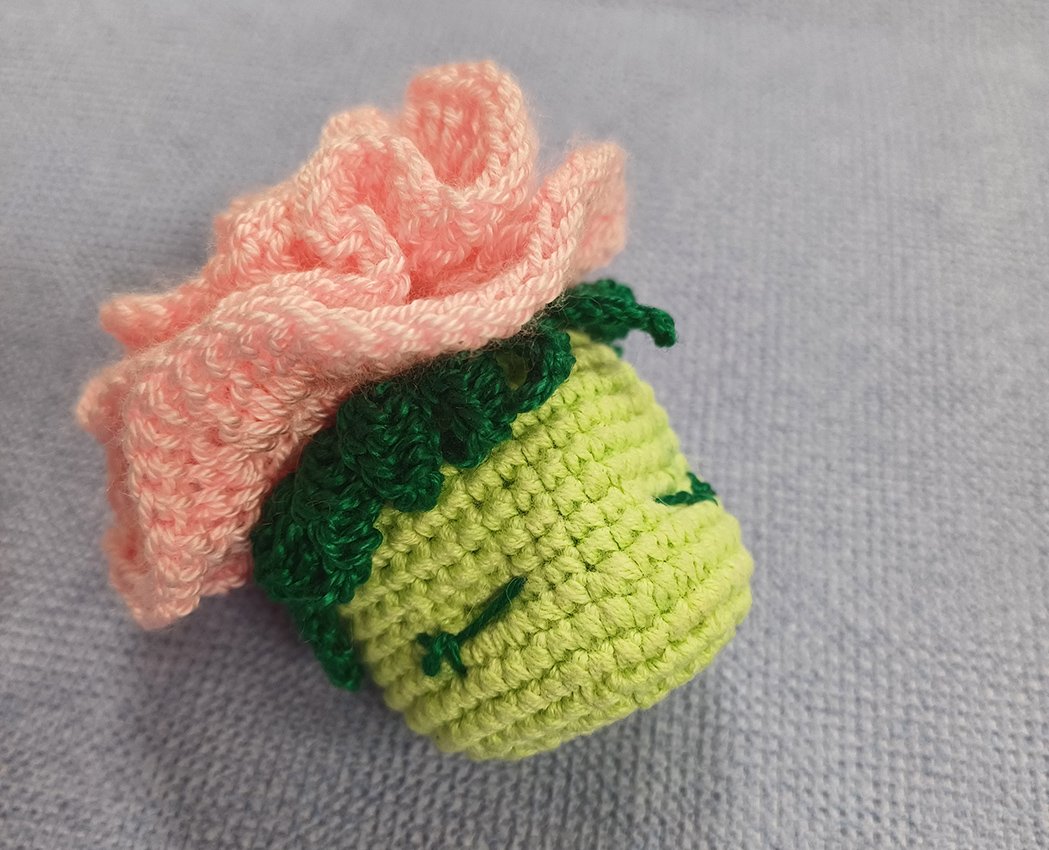
Roll the rose, sew through Rnd 1 a few times, make sure you pierce through all layers of the part. Sew it to the head.
Choose the right eyes. You can choose ready-made eyes, make them out of polymer clay, paint with paints, crochet or embroider with yarn.
I have two design options to suggest. Which design is your favorite?
A variant with sleeping eyes.
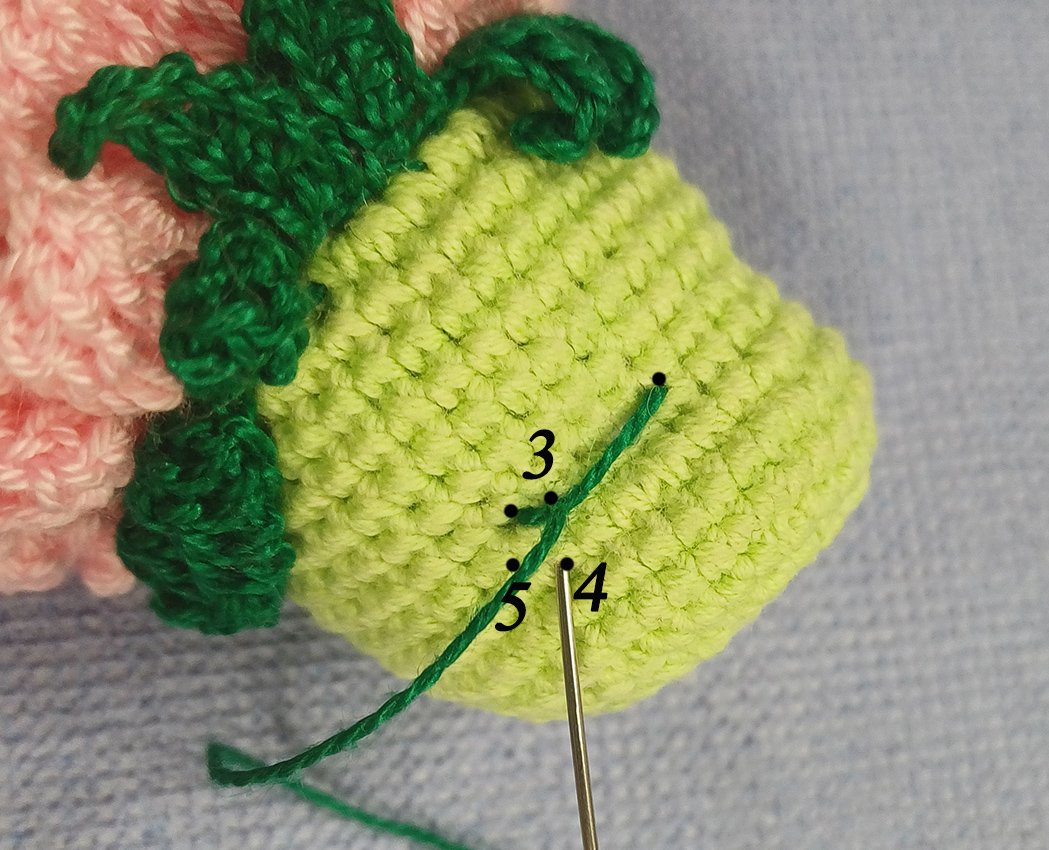
The eyes are between the 13th and 14th rounds. The length of the eye is 4 stitches, the distance between the eyes is 6 stitches. Use a green thread.
- Embroider the right eye with stitches:
1. Fasten the thread in an inconspicuous place (for example, at the bottom of the head), withdraw the needle at the inner point of the eye (point 1).
2. Insert the needle into point 2 - the outer part of the eye.
3. Step aside 1 stitch and pull out the needle at point 3
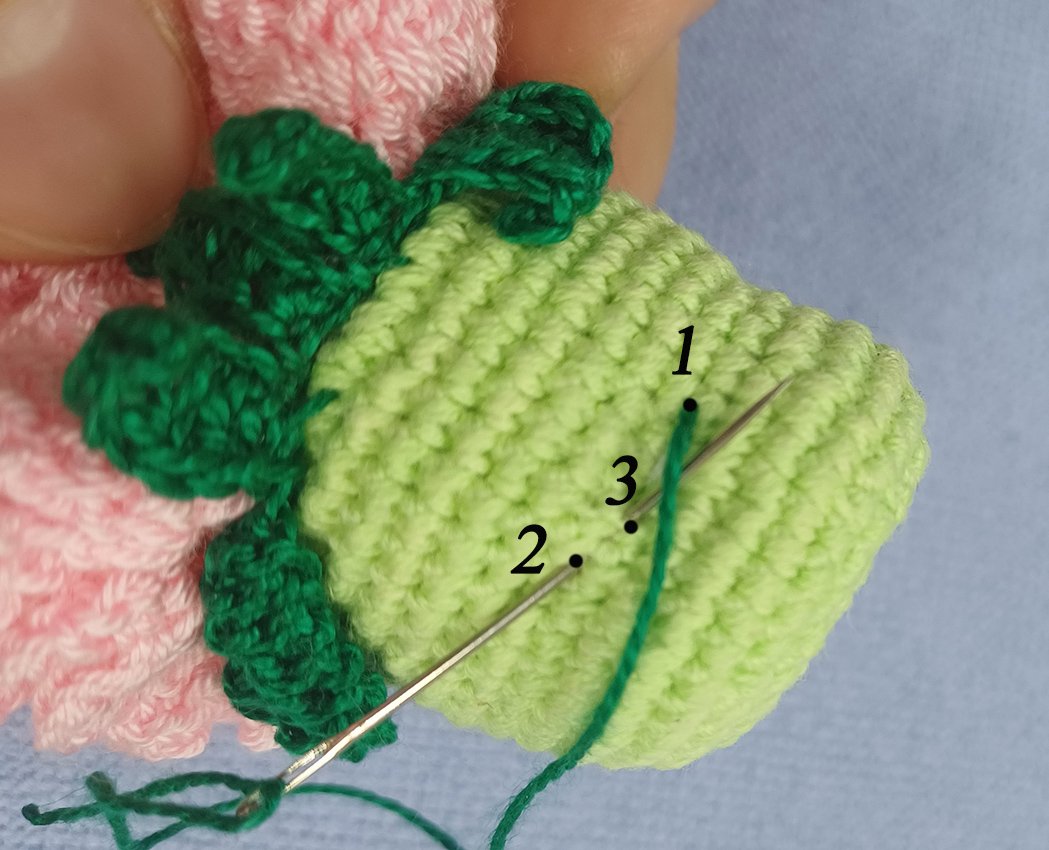
4. Wrap the working thread around the "eyelid" and embroider the cilia (points 4 and 5)
Embroider the left eye similarly. Fasten off, cut off.
A variant with beady eyes.
From the additional marker count three stitches to the left and mark point #2. Count two more stitches from point #2 and mark point #3. Mark points #4 &5 on the right side (same as you did for points #2&3). Point #1 is an opening at the bottom.
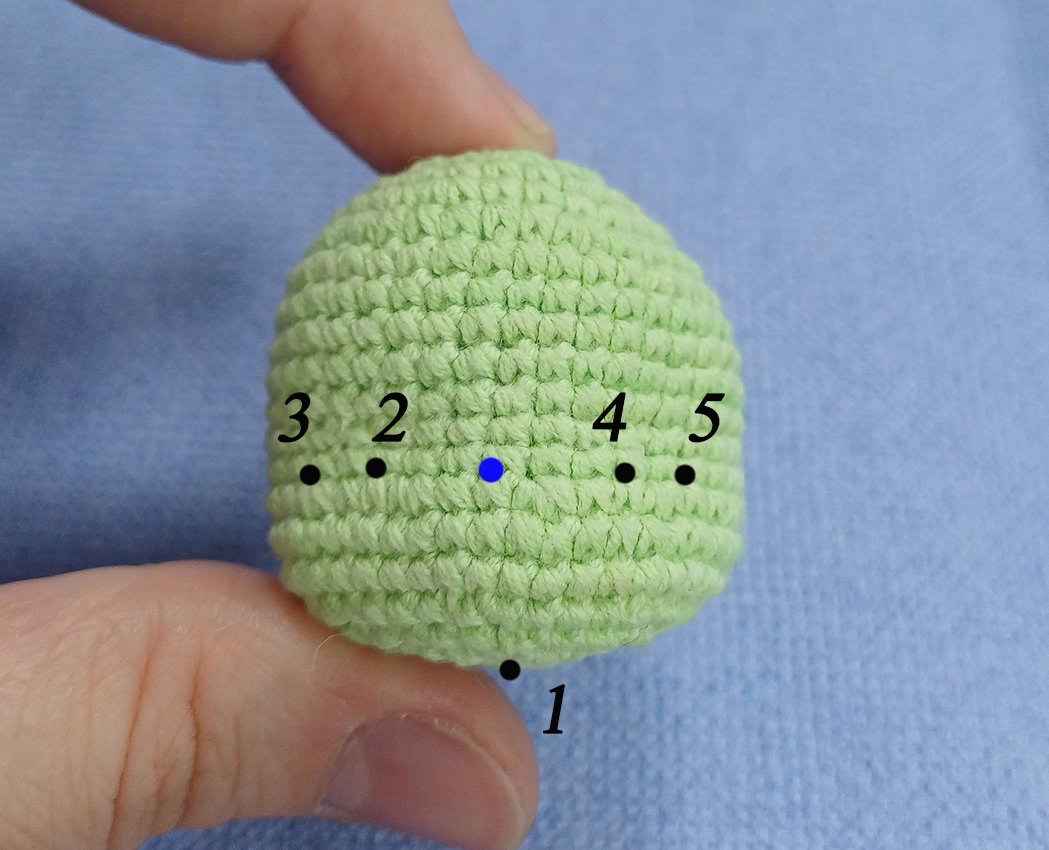
Prepare a long needle and a strong thread for sculpting. Insert the needle into the opening (point #1), leave a tail for further operation, take the needle out in point #2. Insert the needle in point #3 (the thread runs over the work), take the needle out in point #1. Tighten the thread and make a knot. Repeat sculpting for the right eye socket. Points #1-4-5-1. Tighten the thread, help with the fingers to keep it in place and make a knot. Hide the thread in the opening of the head.
Take a pair of half – beads or ready - made eyes. Take a piece of white felt and cut out 2 circles to make the whites of the eyes. They should be slightly larger in diam than the beads. Glue the eyes on. Make sure the side of the white felt is showing.
Glue the eyes into the eye sockets.
.jpg)
Embroider eyelids, eyelashes and eyebrows. Insert the needle in the opening on the head to hide the ends.
Take a short piece of thread and play with it to find an emotion that suits you best. Once you’ve found it, embroider the smile.
.JPG)
.JPG)
Tint the cheeks with soft pastel (optional). Use a marker to draw freckles (optional).
Grease the upper top of the stem with glue, gently push the head over it through the left hole.
Insert the flower into the pot through the left hole and spread out the leaves. The rose is completed!