
.png)
Granny Squares are one of those crochet classics that somehow never really disappear.
Sometimes they’re colorful and playful, sometimes beautifully simple, and sometimes they become blankets, cushions or garments.
Today, we’re turning them into something a little different: a small crochet shoulder bag.
And it has one big advantage: you don’t need huge amounts of yarn. Quite the opposite – this project is perfect for combining smaller yarn leftovers and creating your very own color palette.
Perhaps you have a few balls or scraps left over from previous projects tucked away somewhere, and every time you see them you think: I’ll find a use for those someday.
Well – maybe “someday” is today. 😉
Some crochet projects are made once – and that’s the end of the story. And then there are those designs you keep coming back to, because a different color, a different yarn or one small detail suddenly sparks a completely new idea.
For me, this crochet bag definitely belongs to the second category.
The basic idea is simple: small Granny Squares form the two outer sections of the bag, with a straight crocheted center panel in between. Together, they create a compact shoulder bag that can easily be adapted to your own style – and, most importantly, to the yarn you already have in your stash.
And that’s exactly what I’ve enjoyed playing around with again and again with this design.
I crocheted my original bag in different shades of green. And because I was curious to see just how different the same bag could look, I started experimenting with different color palettes: understated natural shades, nautical blues and cream, warm burgundy and rose tones, or a really colorful mix of pink, turquoise, orange and violet.
The exciting part is this: the pattern stays exactly the same – but the finished look changes completely.
You can also play around with the strap. The original version uses two crocheted-over rings, but I’ve also tried versions with just one ring, attaching the other end of the strap directly to the bag.
And that’s exactly why I don’t simply want to show you how to recreate my bag today.
I’ll give you the basic idea and the complete pattern – and you can make it your own.
What color will your bag be?
This is where one of the best parts begins: you get to decide exactly what your bag will look like.
For my original version, I combined four colors. You can do exactly the same – but you certainly don’t have to. Especially if you want to use yarn leftovers, it’s worth having a good look through your drawers, baskets and yarn stash first to see what might be hiding there.
The individual leftovers don’t even need to be the same size. You only need small amounts of yarn for the different rounds of the Granny Squares, and you can also play with the colors you already have in the striped center panel.
If you prefer a calmer look, choose different shades from the same color family and combine them with a neutral tone. Natural shades, greys or blues, for example, create a bag that’s easy to pair with lots of different outfits.
Warm shades such as burgundy, rose, rust or cream give the very same design a completely different feel.
And of course, you can go in exactly the opposite direction: pink next to orange, turquoise next to violet, with a little yellow thrown in too? Why not?
Granny Squares can handle plenty of color. And sometimes the yarn leftovers that don’t seem to belong together at all when they’re sitting in your stash end up creating the most exciting combination.
Tip: Lay your chosen yarns next to each other before you start crocheting. Repeating one color throughout the design can help tie even a very colorful mix together visually.
.png)
What you need for your crochet bag
My original bag measures approximately 18 × 28 cm (7 × 11 in) and was made using a 3.0 mm (US C/2) crochet hook.
For the original version, I used four cotton yarns:
Grass Green
approx. 20 g / approx. 50 m (55 yds)
Yellow Green
approx. 25 g / approx. 65 m (71 yds)
Dark Green
approx. 45 g / approx. 115 m (126 yds)
Grey Green
approx. 20 g / approx. 50 m (55 yds)
That’s only around 110 g of yarn in total – perfect for using up smaller amounts of leftover yarn.
For the original version, you will also need:
2 crochet rings, approx. 39 mm (1.5 in) in diameter
1 snap fastener, approx. 13 mm (0.5 in) in diameter
a yarn needle
scissors
The rings aren’t essential, though. As you can see in my different versions, you can also use just one ring and attach the other end of the strap directly to the bag.
Which yarn works best?
Of course, you don’t have to use exactly the same yarns I used.
However, if you’re working with leftover yarn, try to choose yarns that are approximately the same weight/thickness. Cotton yarns or cotton blends work particularly well because they give the bag a little stability and show off the Granny Squares beautifully.
If you use a significantly thinner or thicker yarn, the finished size of your bag will change accordingly.
The gauge of the original bag is:
22 tr (US dc) = 10 cm / 4 in wide
11 rows = 10 cm / 4 in high
For this project, the most important thing is that all your Granny Squares end up approximately the same size.
Let’s get started – crocheting the Granny Squares
You will need a total of 8 Granny Squares for the bag.
They are all worked in the same way and consist of four rounds.
And this is where you can really have fun with your leftover yarn.
How I arranged the colors
For my original bag, I used four colors. Instead of working the four colors in the same order for every Granny Square, I changed their position from one Granny to the next.
This creates four different color combinations.
Crochet 2 Granny Squares in each color combination.
4 color combinations × 2 Squares gives you the 8 Grannys you need in total.
Color combination 1 – make 2
Round 1: Grey Green
Round 2: Yellow Green
Round 3: Dark Green
Round 4: Grass Green
Color combination 2 – make 2
Round 1: Grass Green
Round 2: Grey Green
Round 3: Yellow Green
Round 4: Dark Green
Color combination 3 – make 2
Round 1: Dark Green
Round 2: Grass Green
Round 3: Grey Green
Round 4: Yellow Green
Color combination 4 – make 2
Round 1: Yellow Green
Round 2: Dark Green
Round 3: Grass Green
Round 4: Grey Green
The lovely thing about this method is that each of the four colors moves through each of the different positions within the Granny Square.
This means the Grannys don’t all look identical, but they still clearly belong together. If you’re using leftover yarn, you can follow exactly the same principle: choose four colors and simply rotate them through the four rounds.
Of course, you can also do things differently. These color combinations are just an example, not a rule. If you only have a small amount of one color left, it may still be enough for a single round. And that’s exactly what this project is all about.
How to crochet the Granny Square
All 8 Granny Squares are worked from the same crochet chart.
Important: The turquoise and grey colors in the crochet chart are only used to make the individual rounds easier to distinguish. They do not indicate yarn colors.
Abbreviations
ch = chain
sl st = slip stitch
tr (US dc) = treble crochet (US double crochet)
Crochet chart
.png)
The Granny Square is worked from a magic ring over a total of 4 rounds.
The first round begins with 3 chains to replace the first treble crochet (US double crochet), followed by 3 more tr (US dc). Then work 3 chains between each of the four groups of treble crochet stitches. Close the round with a slip stitch, then pull the magic ring closed.
In the second round, the square shape begins to form. Work each of the four corners with 2 tr (US dc), ch 3 and 2 tr (US dc) into the chain space from the previous round.
Continue in the same way for two more rounds, so that each Granny Square has a total of 4 rounds.
Work a total of 8 Granny Squares in this way – 2 in each of the four color combinations.
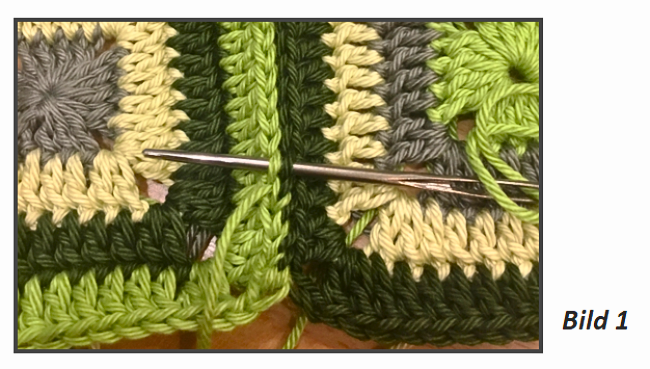
Turning 8 Granny Squares into 2 Granny strips
Once you have crocheted all 8 Granny Squares, it’s time to join them together.
First, arrange 4 Granny Squares in a strip. Pay attention to how your different color combinations are positioned until you’re happy with the overall look.
Then sew the Grannys together using whip stitch.
This gives you 2 Granny strips, each consisting of 4 Squares.
The center panel of the bag
Now crochet the center panel onto one of the two Granny strips.
Work 12 rows of treble crochet (US double crochet).
For my original bag, I used the following color sequence:
2 rows Dark Green
1 row Yellow Green
3 rows Grey Green
2 rows Grass Green
1 row Dark Green
2 rows Yellow Green
1 row Dark Green
Of course, you can use your own leftover yarn here too and arrange the stripes in any order you like.
How to crochet onto the Granny strip
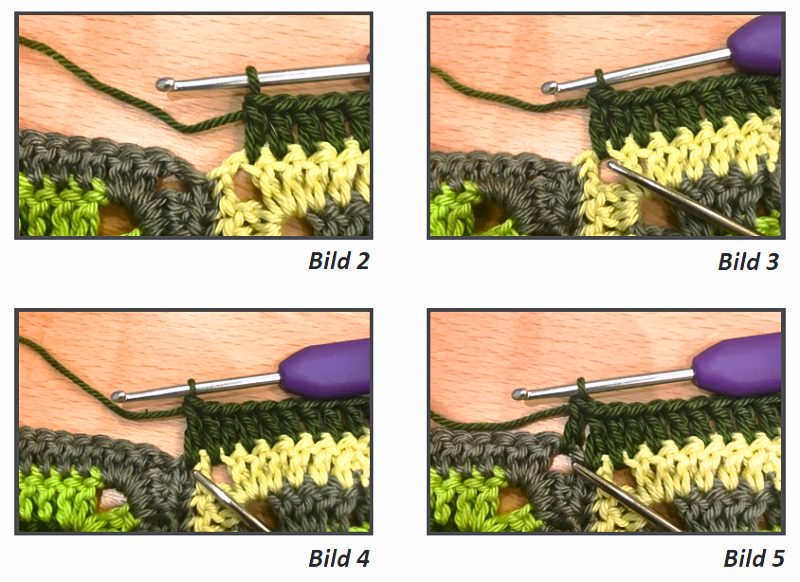
Work a total of 75 tr (US dc) across the entire Granny strip.
Work as follows:
- 1 tr (US dc) into each corner of a Granny Square
- 1 tr (US dc) at the seam between two Granny Squares
The photos show you exactly where to insert your hook at the joins between the Grannys.
Then continue working until you have completed all 12 rows in your chosen color sequence.
Joining the second Granny strip
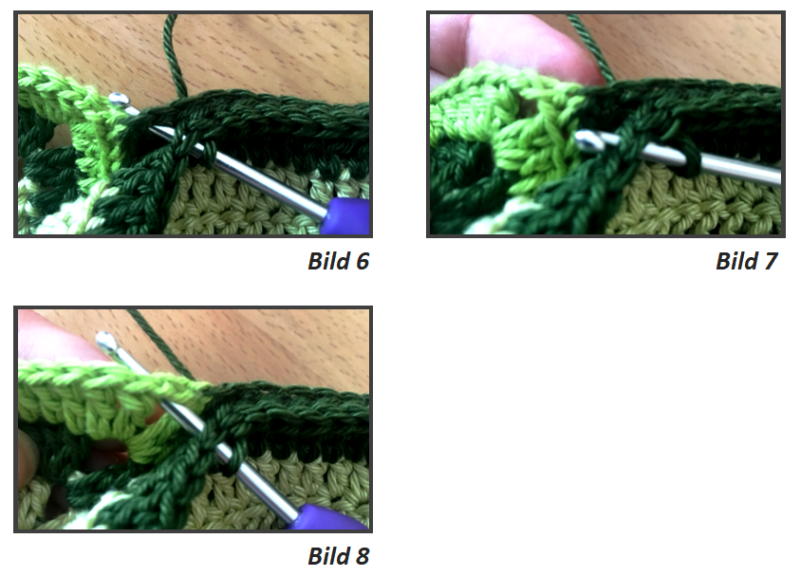
Now attach the second Granny strip to the other side of the center panel.
Join it to the crocheted piece using slip stitches.
Make sure to work the slip stitches loosely so that the edge doesn’t pull in.
As with the first Granny strip, work:
- 1 sl st into each corner
- 1 sl st at the seam between the Granny Squares
The side row of treble crochet
Now work 1 row of treble crochet (US double crochet) along each side of the Granny Squares.
For my original bag, I used Grass Green and Grey Green for these rows.
Of course, you can play with your leftover yarn here too and choose whichever colors you have available.
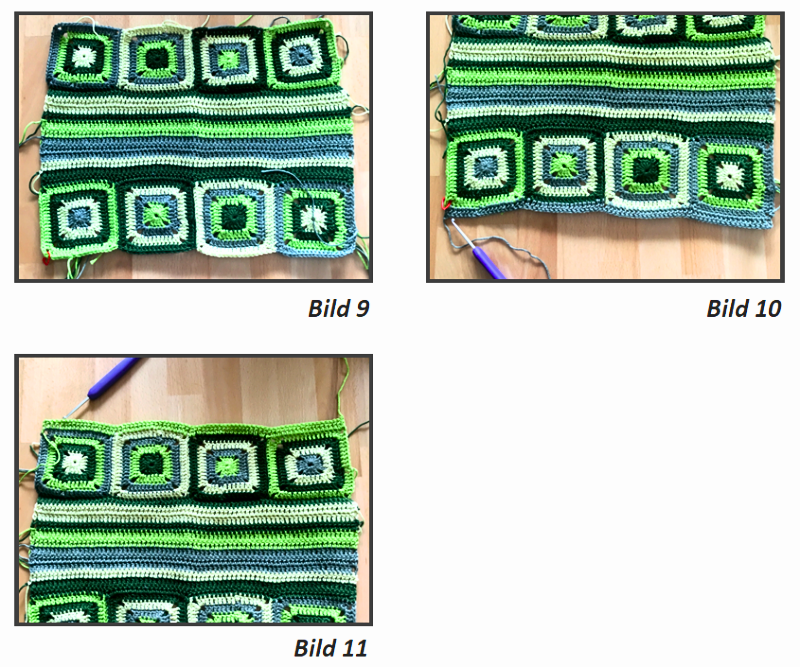
By this point, you can already get a really good idea of what the finished bag will look like.
Now turn the rectangle into a bag
Lay your crocheted piece in front of you with the wrong side facing up and fold it towards the center.
The two Granny strips will now be on the outside, while the striped center panel forms the bottom and center of the bag.
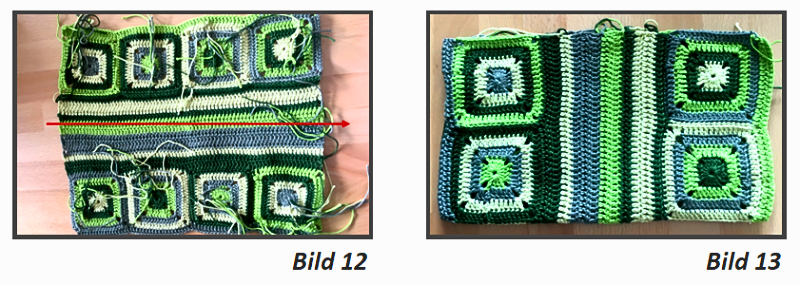
Now close the two sides on the left and right using slip stitches.
The basic shape of your bag is now complete.
Crocheting around the bag opening
To create a stable top edge, work 2 rounds of treble crochet (US double crochet) around the bag opening.
For my original bag, I used Dark Green.
Begin each round with ch 3 to replace the first tr (US dc) and close with 1 sl st into the 3rd chain.
Work a total of 136 tr (US dc) per round, including the turning chains.
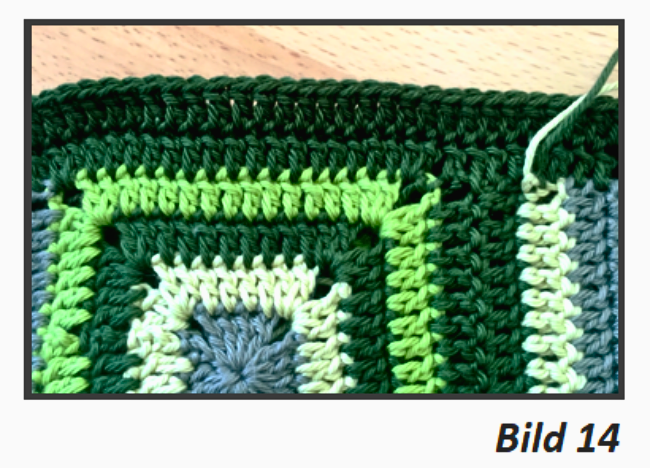
At the Granny Square corners
Work 2 tr (US dc) into each corner of the Granny Squares.
Along the horizontal treble crochet stitches
Work 2 tr (US dc) into each horizontal treble crochet stitch as well.
If possible, try to insert your hook under 2 loops of the horizontal stitch. This will create a more stable edge.
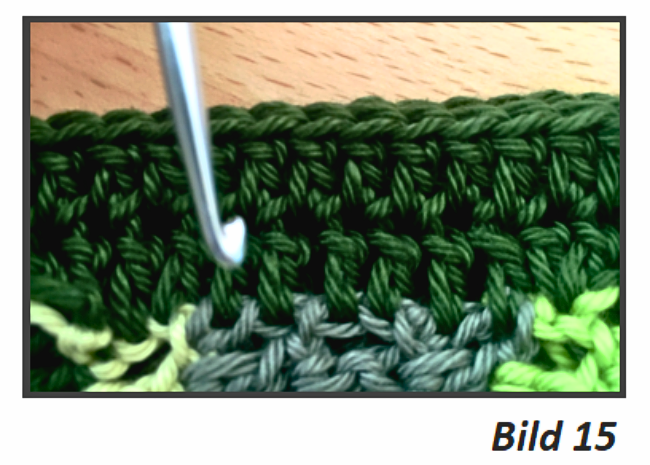
Do not crochet into the slip stitches of the side seams.
Version with crochet rings
For the original bag, I used 2 crochet rings.
Work 46 double crochet stitches (US single crochet) around each ring.
Then attach each ring to the side of the bag across 8 stitches.
You can follow the original version exactly, or – as I did with some of my later versions – use just one ring and attach the other end of the strap directly to the bag.
It’s amazing how one small detail can change the whole look.
Crocheting the strap
For the strap, make as many chains as needed to achieve your desired length.
Use your gauge as a guide.
For the original bag, 22 stitches measure approximately 10 cm / 4 in.
For a strap measuring approximately 174 cm (68.5 in), I started with 151 chains. Beginning in the 2nd chain from the hook, work double crochet stitches (US single crochet) – 150 stitches in total.
The strap is worked over a total of 8 rows:
3 rows Dark Green
2 rows Yellow Green
3 rows Dark Green
In some of my later versions, I played around with the colors of the strap too, using different leftover yarns for the individual rows. This is a lovely way to coordinate the strap with the color palette of your bag.
Then attach the strap centrally to each ring across 8 stitches.
If you’re using just one ring, you can sew or crochet the other end directly to the bag.
Finishing
If you like, you can add a snap fastener to the inside of the bag.
Then check the magic rings of your Granny Squares once more, carefully tighten them if necessary, and neatly weave in all loose ends.
And that’s it – your very own Granny Square bag is finished.
One bag – endless possibilities
And that’s exactly what I love so much about this design:
The basic construction always stays the same, but colors and small details can completely change the finished look.
Natural shades create a calm, modern look.
Blue and cream instantly bring to mind the sea and summer.
Burgundy and rose give the bag a softer, more elegant feel.
And pink, turquoise, orange and violet turn it into a wonderfully cheerful project.
You can play around with the rings too: two rings, one ring or attaching the strap directly to the bag – anything goes, as long as you love the result.
.png)
And that’s exactly why this bag is such a great project for leftover yarn.
You don’t need to buy four new balls of yarn. Just have a look at what you already have in your stash.
Your next favorite bag might already be hiding in your leftover yarn basket. 😄
🧶 Now it’s your turn!
Have a look through your leftover yarn stash, play with colors and turn this bag into your very own one-of-a-kind creation. Whether you go for harmonious shades, a nautical look, autumn colors or a bright and colorful mix – anything goes. 😄
📸 I’d love to see your finished bags here on CrazyPatterns.
I can’t wait to see which leftover yarns get a new lease of life in your creations. 💛
✨ And if you enjoy my posts, I’d be delighted if you followed me here on CrazyPatterns. That way, you won’t miss any new #FreeStitches with free knitting and crochet patterns, or new posts from #KnowledgeStitches, where I share tips, ideas and practical know-how about knitting and crochet.
.png)
🧡 Perhaps you'll also enjoy exploring more articles on my CrazyPatterns blog - or maybe you'll discover your next favourite pattern in my shop.
Have fun crocheting, combining colors and turning your leftover yarn into something new! 💛
All the best,
Kathrin with Emma & Muki
Photos, designs & content © Kathrin | stricken-im-trend.com


