
Between Plants, Craftsmanship, and Knowledge That Almost Disappeared
If you spend enough time with wool, yarn, knitting, and crochet, something rather strange happens sooner or later.
You begin to see the world differently. 😅
Onion skins are no longer just kitchen waste.
Avocado pits don't automatically end up in the compost bin.
And during a walk, you may suddenly find yourself wondering which plants might produce interesting colours.
That's exactly what happened to me.
After so many years of working with wool and yarn, it was only a matter of time before I started asking myself where all those beautiful colours actually come from. After all, most of us buy our yarn already dyed. It's blue, green, red, or beige – and that's exactly how it ends up in our shopping basket.
What we often forget is that for thousands of years, things were completely different.
Colors were precious.
Not just figuratively, but quite literally.
A rich blue, a vibrant red, or a deep purple could once mean the difference between everyday clothing and a true luxury item.
Some dyes were traded across continents. Others were closely guarded secrets, passed down through families or guilds of skilled craftspeople.
Today, many of these ancient techniques are experiencing a small renaissance.
More and more knitters, crocheters, and fibre enthusiasts are discovering natural dyeing. Not only because of sustainability, but because it offers a fascinating way to connect more deeply with the materials we love to work with.
Once you've seen delicate yellow emerge from chamomile flowers or watched red cabbage shift from purple to blue simply by changing the pH level, you start looking at colours differently – at least that's what happened to me.
And yet, this is also where one of the biggest misconceptions about natural dyeing begins.
Many tutorials make it seem as though all you have to do is boil a few plants, add some wool, and instantly end up with a beautiful, permanent colour.
The reality is a little more complex.
Why can a skein dyed with walnut hulls retain its colour for years, while turmeric often fades much more quickly?
Why does sheep's wool absorb the same plant dye far more intensely than cotton?
And why do experienced natural dyers keep talking about mordants when many beginners would happily skip that step altogether?
These are exactly the questions I would like to explore with you today.
Because natural dyeing is far more than a creative experiment. It is a fascinating blend of traditional craftsmanship, fibre knowledge, chemistry, and centuries of accumulated experience.
When Colors Were More Valuable Than Fabrics
The deeper I immersed myself in the world of natural dyeing, the more one thought fascinated me:
Today, we can buy yarn in almost any colour imaginable. A few clicks in an online shop are all it takes, and a few days later the perfect skein arrives in the mailbox.
For many centuries, however, that was anything but normal.
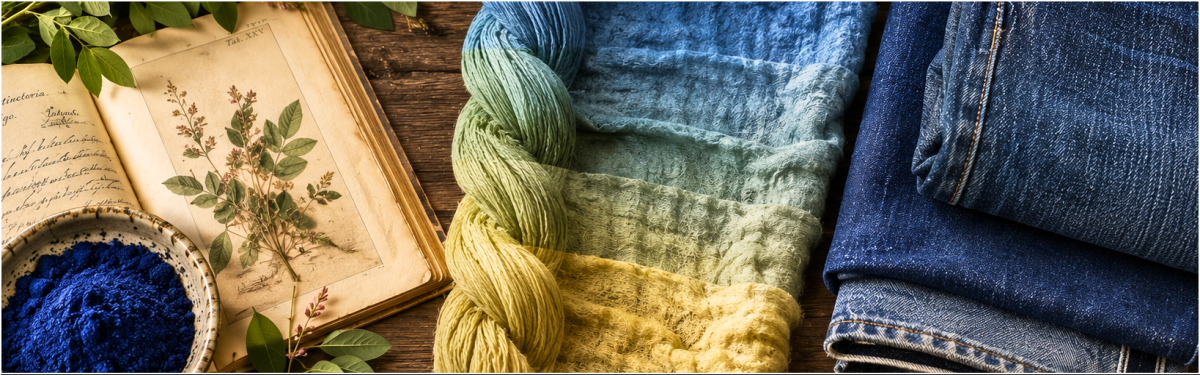
.png)
Long before synthetic dyes were developed, nature was humanity's primary source of color.
Plants, minerals, bark, roots, lichens, and in some cases even insects provided the dyes used to colour textiles.
Archaeological discoveries show that dyed fabrics were already being produced thousands of years ago. And it wasn't just about beauty or fashion.
Colors often carried social meaning.
Certain shades were reserved for the wealthy, while others signified religious affiliation, power, or social status.
Particularly sought after were rich reds and deep blues.
While yellow, brown, and beige tones could often be obtained from locally available plants, vibrant colours were far more difficult to produce and therefore much more valuable.
One famous example is indigo.
This natural blue dye is among the oldest textile dyes in the world.
In Europe, another plant played an equally important role for centuries: woad (Isatis tinctoria).
Entire regions depended on the cultivation of this plant and the trade of its highly prized blue dye.
Madder was equally indispensable for a very long time.
The roots of the madder plant produced rich reds and terracotta shades and remained one of Europe's most important dye plants for centuries.
Over time, specialised dyers' guilds emerged.
Those who knew how to create colors possessed valuable expertise. Knowing which plants to use, how long a dye bath should steep, or which mordant worked best for a particular colour was far from common knowledge.
As a result, many recipes were guarded like precious treasures and often passed down only within families or professional guilds.
Today, access to this knowledge is much easier.
Yet despite modern tools and resources, many natural dyeing techniques still rely on the very same principles that were used hundreds of years ago – and that is exactly what makes this ancient craft so fascinating even today.
Why Some Natural Dyes Last While Others Fade
Sooner or later, almost every natural dyeing project raises the same question:
"Will the color stay like this?"
You may have experienced it yourself.
A freshly dyed skein of wool looks beautiful. The color is vibrant, rich, and exactly what you hoped for.
But a few months later, something seems different.
Some shades appear slightly lighter. Others have deepened over time. And some look almost exactly the same as they did on the day they were dyed.
.png)
So what is the honest answer when it comes to color longevity?
It depends.
Not every natural dye behaves the same way.
While some plant-based dyes are remarkably durable, others are more sensitive to light, water, or everyday wear.
To understand why, it helps to look at three important concepts that appear again and again in the world of natural dyeing.
Lightfastness
Lightfastness describes how well a color withstands exposure to sunlight.
Most of us have seen curtains or garments that faded after years in a sunny room.
The exact same thing can happen to naturally dyed wool.
Some natural dyes are sensitive to UV light and gradually lose intensity over time. Others remain surprisingly stable.
Walnut hulls and indigo, for example, are considered relatively lightfast. Turmeric, on the other hand, produces a stunning yellow but is not known for exceptional long-term color stability.
Washfastness
Water also plays an important role.
The better a dye bonds with the fiber, the less likely it is to wash out over time.
This is where mordants come into play – a topic we'll explore in more detail in the next chapter.
If you've ever compared two similarly dyed yarns, you may have noticed that one retains its color through repeated washing while the other fades much more quickly.
Rub Fastness
Besides light and water, everyday use can also affect color durability.
Scarves are worn. Sweaters are stretched and moved. Bags are constantly handled.
Over time, this mechanical wear can gradually reduce color intensity.
The more heavily a project is used, the more important the quality of the dyeing process becomes.
There Is Never Just One Cause
This is where natural dyeing becomes especially fascinating.
The longevity of a color is never determined by a single factor.
Instead, it is the result of an interaction between:
- the plant material used
- the fiber being dyed
- the mordant
- the dyeing process
- the way the finished item is cared for
And that is precisely why two seemingly identical dye baths can produce very different long-term results.
To truly understand natural dyes, you have to look at the entire system – not just the plant that went into the dye pot.
The Role of Mordants – The Step Many People Skip
If experienced natural dyers were allowed to give beginners only one piece of advice, one word would come up surprisingly often: Mordanting.
And that's exactly why I'm always surprised by how frequently this step is underestimated – or skipped altogether.
.png)
After all, most people simply want to achieve one thing: get color into their wool.
To many beginners, mordanting seems like an extra step that may even feel unnecessary.
Honestly, it sometimes reminds me of the famous gauge swatch in knitting and crochet. Almost nobody enjoys making one, many would happily skip it, and in the end it often turns out there was a very good reason for doing it after all. 🤣
This is one of the most common misconceptions in natural dyeing.
In many cases, the mordant is what determines whether a color remains beautiful for years or loses intensity after only a few washes.
What Does Mordanting Actually Do?
Simply put, a mordant helps create a lasting bond between the fiber and the dye.
I like to think of a mordant as a translator. The fiber speaks one language, and the dye speaks another. The mordant helps them communicate – and, ideally, stay happily married for years to come. 😅
Or to put it another way: the plant dye wants to cling to the wool, but often struggles to do so on its own. The mordant helps the dye and the fiber form a stronger connection. As a result, colors are often more vibrant, more even, more durable, and more resistant to washing. Some plant dyes can certainly work without mordants, but the results are often weaker or less permanent.
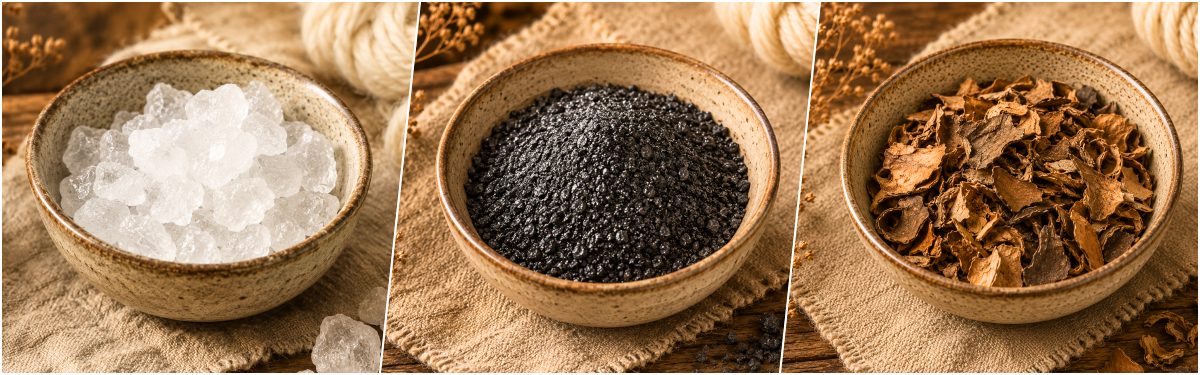
Alum – The Most Popular Mordant for Hobby Dyers
Whenever natural dyeing is discussed, the name alum almost always appears – and for good reason.
For centuries, alum has been one of the most important mordants for animal fibers such as wool and silk. It is relatively easy to use, has minimal impact on the final color, and helps many plant dyes bond permanently to the fiber.
For this reason, alum is often the first mordant beginners encounter when they start exploring natural dyeing.
Iron – For Muted and Antique Tones
Another commonly used mordant is iron.
Iron is often used to intentionally modify colors. Many yellows, reds, and browns become darker, more muted, or slightly antique-looking after an iron treatment.
This can be especially appealing for natural dye projects with a vintage aesthetic.
However, the same rule applies here: more is not always better.
Excessive amounts of iron can weaken fibers over time, which is why it is usually used much more sparingly than alum.
Tannins – Especially Useful for Plant Fibers
While animal fibers such as wool and silk generally absorb natural dyes quite well, plant fibers are often more demanding.
Cotton and linen frequently require additional preparation before dyeing.
This is where tannins come into play.
Traditionally, tannins have been used to improve dye uptake in plant fibers and to help create a stronger bond between the fiber and the dye.
Myth or Fact? Does Vinegar Really Fix Colors?
Few topics create as much confusion online as vinegar.
Countless tutorials claim: "Just add a little vinegar to the water and the color will be fixed."
Unfortunately, it isn't quite that simple.
Vinegar can alter the pH level of a dye bath and therefore influence the final color. Some shades become lighter, others darker, and some may shift in hue altogether.
What vinegar does not do is replace a proper mordant.
Anyone hoping to achieve long-lasting natural dye results should understand the difference.
So yes, vinegar can be useful – but usually for reasons other than those commonly claimed.
Do You Always Need a Mordant?
Interestingly, the answer is: No.
Some plants naturally contain compounds that bond relatively well with fibers on their own.
Walnut hulls are a well-known example. Many natural dyers achieve beautiful results with them even without extensive pre-treatment.
That said, anyone seeking reproducible and long-lasting colors will eventually find themselves exploring the world of mordants.
And this is where one of the most fascinating aspects of natural dyeing reveals itself.
Natural dyeing is not simply about boiling plants and coloring yarn.
It is about understanding how color, fiber, and material interact with one another.
And it is precisely this interaction that transforms a simple DIY project into a fascinating craft that has captivated people for centuries.
Not Every Fiber Takes Color the Same Way
Many knitters, crocheters, and fiber enthusiasts experience their first surprise during their second or third natural dyeing project.
They use the same plant.
The same mordant.
The same dyeing time.
And yet the result suddenly looks completely different.
The reason often isn't the dye bath at all – it is the yarn itself.
In fact, the type of fiber frequently has a greater influence on the final result than the plant used for dyeing.
Anyone who wants to understand natural dyeing should therefore pay attention not only to colors and dye plants, but also to the material itself.
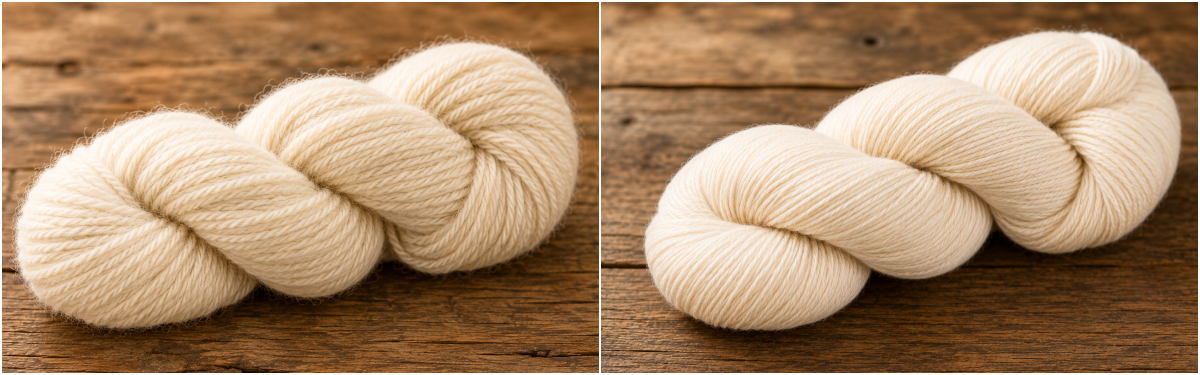
Wool – The Classic Choice for Natural Dyes
When people think of natural dyeing, they usually think of wool—and for good reason.
The protein structure of animal fibers absorbs many natural dyes exceptionally well. Colors often appear rich, even, and vibrant. That is why wool remains one of the most popular materials for plant-based dyeing and often delivers beautiful results, especially for beginners.
Merino Wool – Fine, Soft, and Rich in Color
Merino behaves similarly to traditional wool but often produces colors that appear slightly clearer and more uniform.
Its fine fibers allow color transitions and tonal variations to develop particularly smoothly. For this reason, many hand dyers prefer merino yarns for high-quality projects where both softness and color brilliance are important.
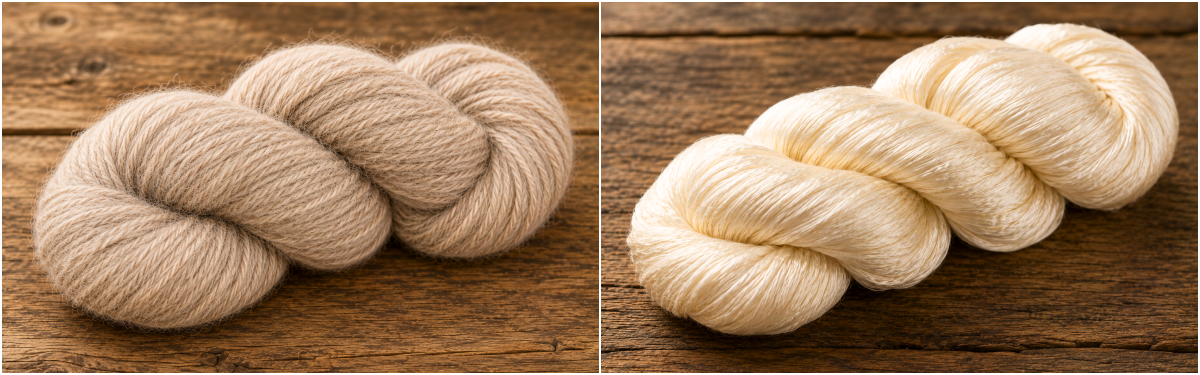
Alpaca – Natural Elegance
Alpaca fibers also absorb natural dyes well, but the resulting colors often appear softer and more muted.
Earthy shades in particular tend to develop remarkable depth on alpaca. Anyone who loves warm, natural color palettes will find plenty of exciting possibilities with this luxurious fiber.
Silk – The Unexpected Showstopper
Silk is one of the most fascinating materials in the world of natural dyeing. Thanks to its natural sheen, many colors appear more vibrant and luminous than they do on other fibers.
Even subtle plant-based dyes can suddenly come to life on silk, revealing an intensity that often surprises first-time dyers. It is no wonder that silk was frequently dyed with great care and attention in many historical cultures.
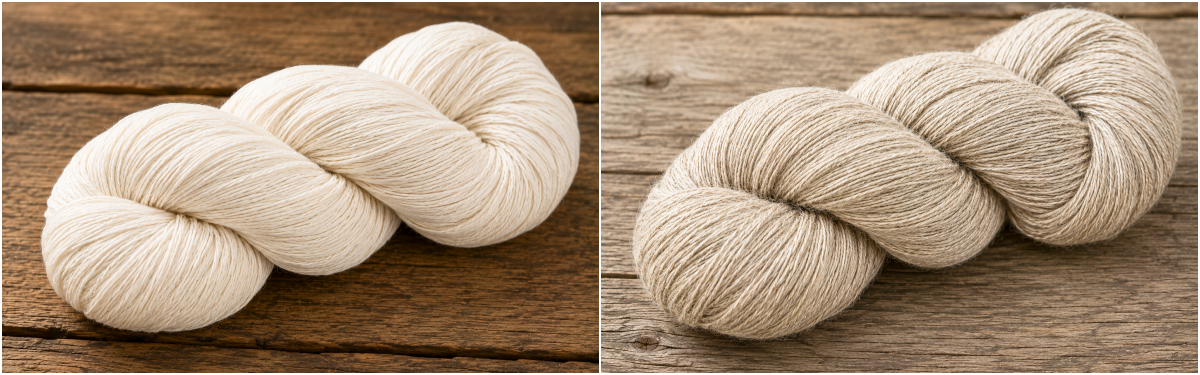
Cotton – More Challenging Than Many People Expect
For many natural dyers, this is where the first real challenge begins.
Cotton is a plant-based fiber and behaves very differently from wool or silk.
Many natural dyes do not bond as readily with cotton, which is why additional preparation steps or specialized mordanting methods are often required.
People dyeing cotton for the first time are frequently surprised by how differently the same dye plant can behave on wool compared to cotton.
Linen – Subtle Yet Full of Character
Linen shares many characteristics with cotton.
The fiber often absorbs color more gently, resulting in soft, natural-looking shades. Yet this understated appearance is part of its unique charm.
Many natural dyers appreciate the calm, elegant color effects that linen can produce, especially when working with earthy or muted plant-based dyes.
Why Understanding Fibers Matters
Once you understand the characteristics of different fibers, it becomes much easier to predict and interpret your results.
Not every dye plant produces the same shade on every fiber. Not every mordant behaves the same way on every material. And not every dye bath develops in exactly the same way.
These differences are precisely what make natural dyeing so fascinating – and, let's be honest, occasionally a little adventurous.
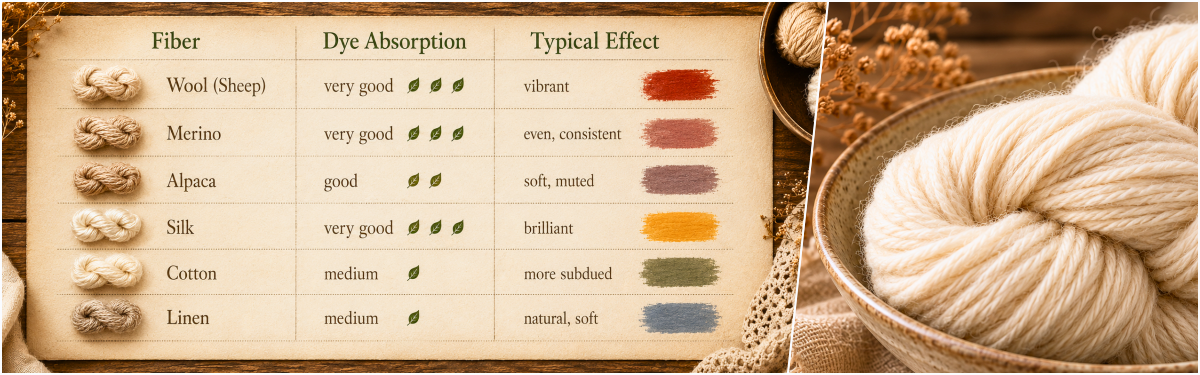
Even when the same dye source is used, each fiber tells its own story.
The Biggest Mistakes in Natural Dyeing – and How to Avoid Them
If there's one thing I've learned about crafting, it's this:
Most mistakes don't happen because we don't know something—they happen because we think we've found a shortcut. 😂
That applies to knitting, crochet, and especially to natural dyeing.
Some of the following mistakes I discovered in books and articles. Others are things people tend to learn the traditional way: by making them themselves.
The good news is that most of them are easy to avoid once you understand the cause.
Mistake 1: Using Temperatures That Are Too High
One of the most common beginner mistakes is excessive heat. When dyeing wool, it's tempting to crank up the temperature in the hope of achieving a stronger color.
Unfortunately, wool doesn't appreciate extremes.
High temperatures can cause fibers to become rough or even begin to felt. As a result, the yarn may lose both softness and quality.
That is why many experienced dyers rely on patience rather than maximum heat. A gentle simmer usually produces better results than a vigorously boiling pot.
Mistake 2: Using Too Little Plant Material
Another classic mistake is underestimating how much plant material is actually needed. Many beginners assume that a small amount of dye material will produce intense colors.
In reality, natural dyeing often requires far more plant material than expected. This is especially true for lighter shades, where the quantity of dye material can make a significant difference.
As a general rule in natural dyeing: It's usually better to be generous than too conservative.
Mistake 3: Impatience
Natural dyeing is pretty much the opposite of instant coffee.
Many colors continue to develop as the dye bath cools. Some skeins may look rather unimpressive immediately after dyeing and only reveal their true color several hours later.
Those who judge the result too early often miss the real surprise.
Patience is therefore one of the most important tools in natural dyeing – even if, unfortunately, it cannot be purchased at a craft store. 🙈
Mistake 4: Choosing the Wrong Fiber
Not every fiber behaves the same way.
A color that appears rich and vibrant on wool may look considerably softer on cotton. Beginners often compare their results to photos online without paying attention to the fiber that was actually used.
Yet the choice of fiber alone can make a dramatic difference.
Mistake 5: Poor Documentation
This mistake often becomes apparent during the second dyeing project.
The result is beautiful. Exactly the shade you hoped for.
You take photos, show the skein to friends, and admire your success.
Then, a few weeks later, a question arises:
How did I actually achieve that color?
Which plant did I use?
How much alum went into the mordant bath?
How long did the yarn remain in the dye bath?
Without notes, many people find themselves starting from scratch.
A simple dye journal can be incredibly valuable. Even a few brief notes are often enough to reproduce successful results later on.
And honestly, writing down a handful of details is much easier than spending weeks trying to remember the exact formula behind the perfect shade.
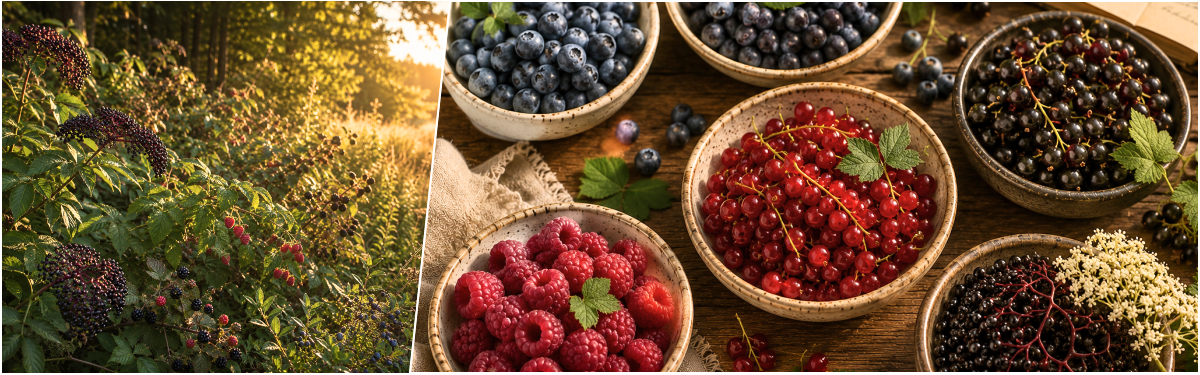
The Color Palette Hidden in Your Compost Bin
Anyone who thinks natural dyeing is limited to onion skins and avocado pits is in for a surprise.
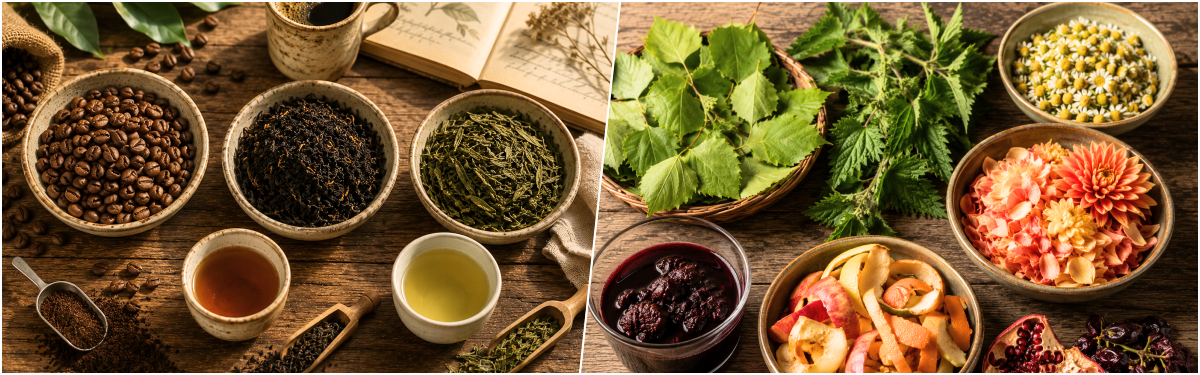
In reality, many kitchen scraps, garden plants, and seemingly ordinary natural materials can produce remarkable colors.
Some have been used for centuries, while others have gained popularity only recently through the growing natural dyeing community.
Among the best-known natural dye sources are:
- Onion skins – golden yellow to rusty orange
- Avocado pits and skins – pink, salmon, and terracotta shades
- Coffee grounds – beige, taupe, and warm browns
- Black tea – brown and reddish-brown tones
- Red cabbage – blue, purple, and fascinating color experiments
- Walnut hulls – rich brown and dark chocolate shades
And the list goes far beyond these familiar favorites.
Five Dye Treasures Many People Overlook
.png)
- Pomegranate Peels - Pomegranate peels have long been used as natural dyes in various parts of the world. Depending on the fiber and mordant, they can produce warm yellow, golden, or slightly olive-toned shades.
- Carrot Greens - Most carrot tops end up in the compost without a second thought. Yet these often-overlooked leaves can create surprisingly beautiful yellow-green and olive tones.
- Alder Cones - Alder cones are among the lesser-known natural dye materials. They produce warm brown shades and were historically used in some regions to dye wool and textiles.
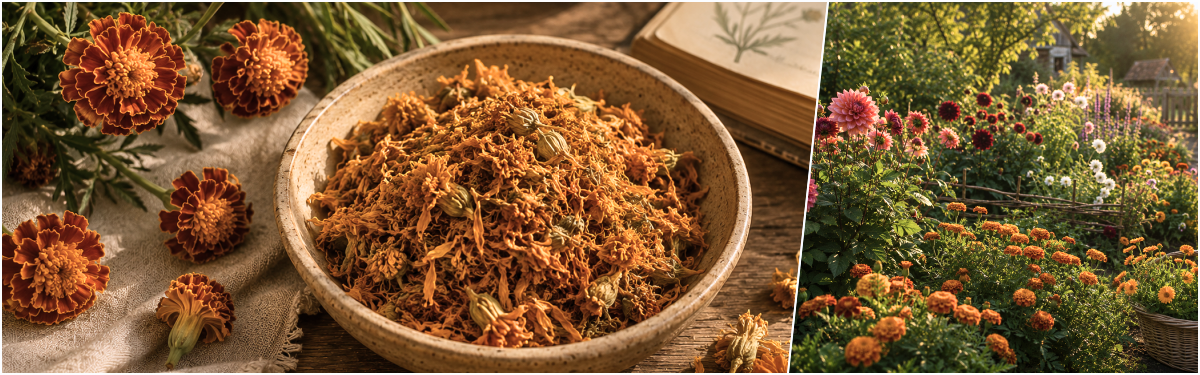
- Tagetes Flowers (Marigolds) - Tagetes flowers often yield vibrant yellows, oranges, and rust tones, bringing a little sunshine directly into the dye pot.
- Chestnut Husks - Depending on how they are processed, chestnut husks can create subtle browns, grays, and taupe shades that work beautifully in naturally inspired projects.
Gardens and Walks Suddenly Become More Interesting
The longer you explore the world of natural dyeing, the more possibilities you begin to notice.
- Birch leaves can produce yellow to olive-green shades.
- Nettles may yield delicate yellow-green tones depending on how they are processed.
- Chamomile flowers create warm yellows,
- while dahlias can surprise you with beautiful apricot and orange hues.
Even leftover red wine or certain fruit peels suddenly become interesting dye experiments for some natural dyers.
And this is often where the real fascination begins.
Since researching this article, I'm no longer entirely sure whether natural dyers own a compost bin – or a carefully curated color warehouse. 😉
And for those of us who share our lives with dogs, these little adventures come with an added bonus.

I've noticed that my walks with Emma and Muki have taken on a whole new dimension.
While the two of them are usually busy investigating exciting scents and exploring every corner of the trail, my attention keeps drifting toward leaves, cones, berries, bark, and plants along the path.
What used to be simply a pleasant walk in nature now sometimes feels like a stroll through a giant outdoor color catalog.
And honestly, there are moments when I wonder which of us is enjoying the outing more. 😄
For Emma and Muki, it's an adventure in the woods.
For me, it has become a chance to discover future dye materials hidden in plain sight.
And perhaps that is one of the most wonderful things about natural dyeing:
It teaches us to see the world a little differently.
More Than Just Sustainability
Of course, sustainability plays an important role.
But many knitters, crocheters, and fiber enthusiasts discover something else along the way: a new awareness of materials.
Once you start looking at onion skins, pomegranate peels, walnut hulls, or avocado pits as potential sources of color, you begin to see everyday objects differently.
And that is precisely what makes natural dyeing so appealing.
It combines creativity, craftsmanship, and resourcefulness in a way that feels surprisingly modern – even though many of the techniques behind it are centuries old.
And perhaps that is the most beautiful realization of all:
Sometimes the most fascinating colors are not hiding in a yarn shop. They are waiting right there in your own kitchen.
Three Plants That Changed the World of Color
Today, we can walk into a yarn shop and choose from hundreds of different shades.
For many centuries, however, things looked very different.
Certain colors were rare, expensive, and often difficult to produce. As a result, some dye plants became highly valuable commodities that influenced entire regions, economies, and trades.
Three names, in particular, appear again and again throughout the history of natural dyeing.

Indigo – The World's Most Famous Blue
Few natural dyes have shaped human history as profoundly as indigo.
For centuries, this natural blue dye was traded across vast distances and was considered extremely valuable in many parts of the world.
What makes indigo especially fascinating is the dyeing process itself.
At first, the dye bath often appears greenish or rather unremarkable. Only when the dyed fiber comes into contact with oxygen does the characteristic deep blue color gradually emerge.
Anyone who witnesses this transformation for the first time quickly understands why indigo is often described as almost magical.
Even today, the iconic blue color of traditional denim jeans is based on indigo.
Madder – Europe's Historic Red
While indigo was famous for blue, madder was one of the most important sources of red for centuries.
The roots of the madder plant produce warm reds, terracotta shades, and brick-colored tones. For generations, madder was cultivated on a large scale throughout many regions of Europe.
Long before modern dyes became available, madder ranked among the most important dye plants in existence. Entire industries depended on its cultivation, trade, and processing.
When we admire historical textiles today, there is a good chance that some of their red hues originally came from madder.
Woad – Europe's Answer to Indigo
Long before indigo became widely available in Europe, another plant played a crucial role in the production of blue dyes: woad (Isatis tinctoria).
Like indigo, woad can produce blue color. However, the process of extracting and preparing the dye was considerably more labor-intensive.
Even so, woad was so important for centuries that entire regions depended on its cultivation. Cities grew wealthy, trade routes developed, and specialized crafts emerged around the production of this highly sought-after blue dye.
Today, woad is far less well known than indigo, but it remains one of the most fascinating chapters in the history of European natural dyeing.
Why Blue and Red Were Once Luxury Colors
Yellow, brown, and beige shades could often be produced relatively easily from plants that were readily available in local regions.
Rich reds and deep blues, however, were far more difficult to create. The necessary plants had to be cultivated, processed, and in some cases transported over long distances.
As a result, vibrant colors were often associated with wealth, power, and social status.
Anyone who can choose from hundreds of yarn colors today ultimately benefits from a development that was shaped over thousands of years by dye plants, dyers, and skilled craftspeople.
And that is exactly why it is sometimes worth looking back.
Behind many colors that seem completely ordinary today lies a surprisingly fascinating story.
Natural Dyeing in Practice – Step by Step to Your Own Unique Colorway
After all this theory, the big question naturally comes up:
How does it actually work in practice?
The good news: natural dyeing is much less complicated than many people initially assume. Once you understand the individual steps, you can achieve surprisingly beautiful results with very simple materials.
Step 1: Choosing the Right Yarn
As we learned earlier, not every yarn is equally suitable for natural dyeing.
For your first experiments, I recommend using undyed wool. It absorbs many natural dyes reliably and is far more forgiving of beginner mistakes than some plant-based fibers.
Other excellent choices include:
- Wool
- Merino wool
- Alpaca
- Silk
Cotton and linen can also be dyed naturally, but they often require additional preparation steps and a bit more experience to achieve consistent results.
💡 Tip: It's usually better to dye a small skein first rather than experimenting with enough yarn for an entire sweater.
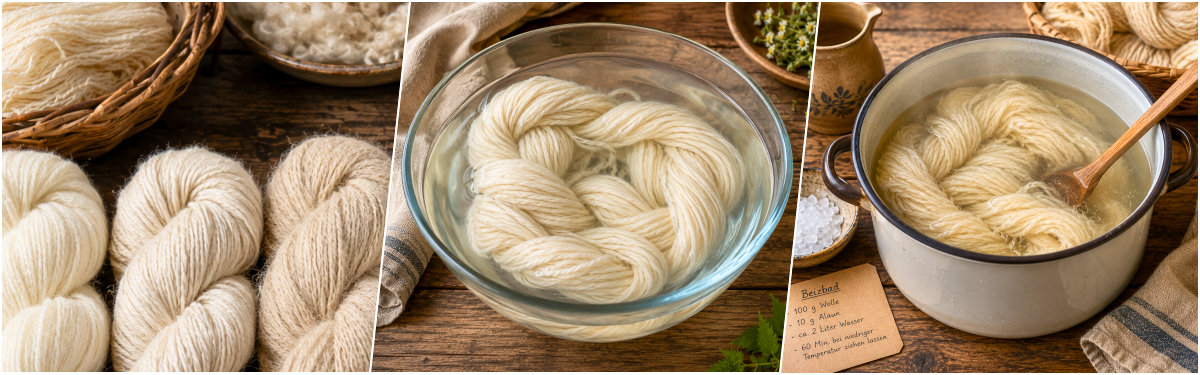
Step 2: Preparing the Yarn
Before any color comes into play, the yarn needs to be prepared.
- Tie the skein loosely in several places
- Soak it in lukewarm water for 30–60 minutes
- Do not wring it out
- Mordant the yarn afterward
Why Is This Step Important?
Dry fibers often absorb liquids unevenly. This can later result in lighter patches or unwanted variations in color.
By soaking the yarn beforehand, the fibers become fully saturated with moisture, allowing them to absorb the mordant more evenly and helping to create a more consistent dye result.
💡 Tip: If you're working with a skein, secure it loosely in several places before soaking. This helps prevent the yarn from turning into a tangled mess once it enters the dye pot.
A Quick Explanation: How Does Mordanting Work?
For many natural dyeing projects, wool is mordanted before the actual dyeing process begins.
The most commonly used mordant among hobby dyers is alum, which is available from yarn stores, natural dye suppliers, some pharmacies, and online retailers.
For a first experiment, the following rule of thumb is often sufficient:
- 100 g wool
- 10 g alum
- approximately 2 liters of water
The alum is dissolved completely in the water. The pre-soaked wool is then added to the mordant bath and allowed to soak for about 60 minutes at a low temperature.
Important: The water should be hot, but ideally not at a rolling boil.
After mordanting, the wool can either be dyed immediately or left to cool in the bath before moving on to the next step.
💡 Tip: Whenever possible, I use old pots, bowls, and kitchen utensils for natural dyeing and keep them separate from anything that will later be used for food preparation.
💡 One more tip: Alum is considered one of the most beginner-friendly mordants because it has very little impact on the final color. That is why it is often the traditional starting point for people exploring natural dyeing for the first time.
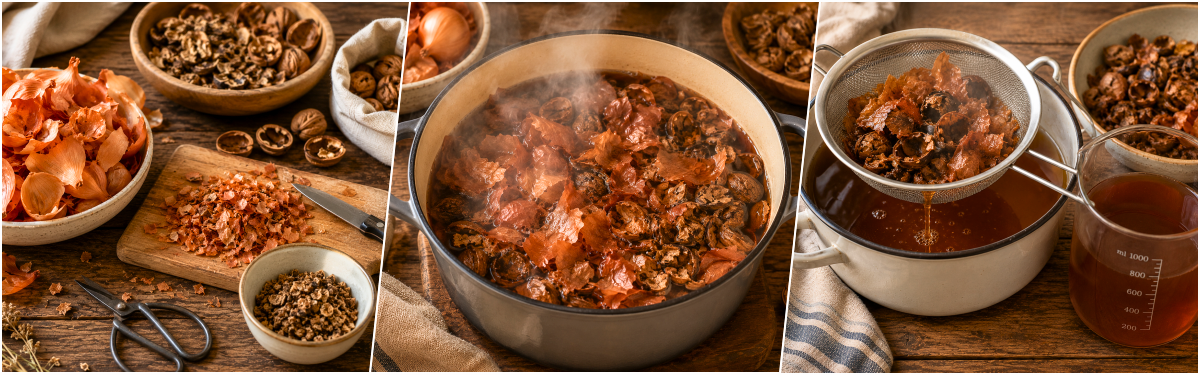
Step 3: Preparing the Dye Bath
Now it's time to start cooking – but not the wool just yet.
The plant material is:
- chopped or broken into smaller pieces
- covered with water
- usually simmered for 30–60 minutes
During this process, the natural pigments slowly dissolve into the water.
Once the extraction is complete, the plant material is strained out, leaving behind the actual dye bath.
💡 Rule of thumb: It's usually better to use more plant material than too little. Natural dyes often require larger quantities than many beginners expect.
By the way, the color of the dye bath itself is only a rough indication of the final result. Some dye baths look rather unimpressive but later surprise you with remarkably rich and vibrant colors.
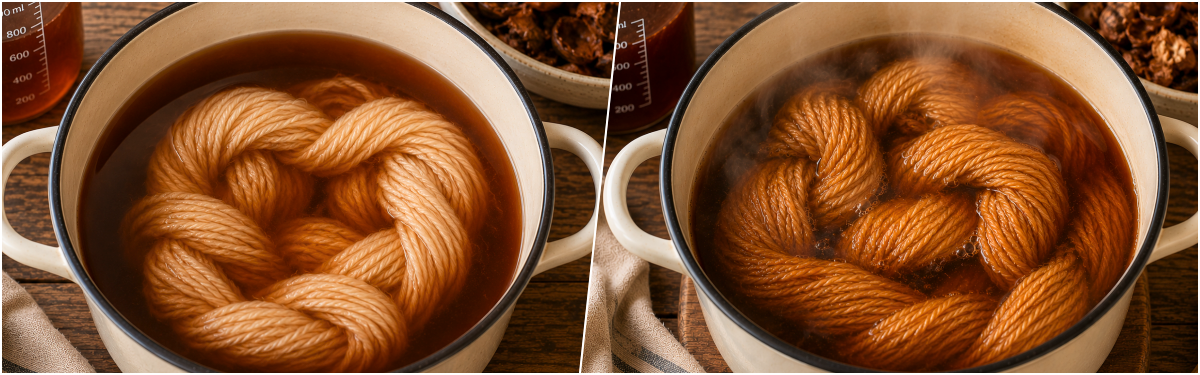
Step 4: Dyeing the Yarn
Now comes the most exciting part.
The mordanted wool is carefully placed into the warm dye bath.
💡 By the way: There is no need to rinse the wool after mordanting.
A few important things to keep in mind:
- The water should not be at a rolling boil.
- Move the yarn gently from time to time.
- Be patient.
Depending on the dye plant, the yarn often remains in the dye bath for anywhere between one and three hours. Some natural dyers even leave the skein in the cooling dye bath overnight to achieve deeper and more saturated colors.
However, excessive stirring should be avoided. Wool, in particular, can begin to felt when exposed to too much agitation combined with high temperatures.
And yes—natural dyeing is a wonderful exercise for anyone who would like to learn that not everything in life needs to be controlled immediately. 😉
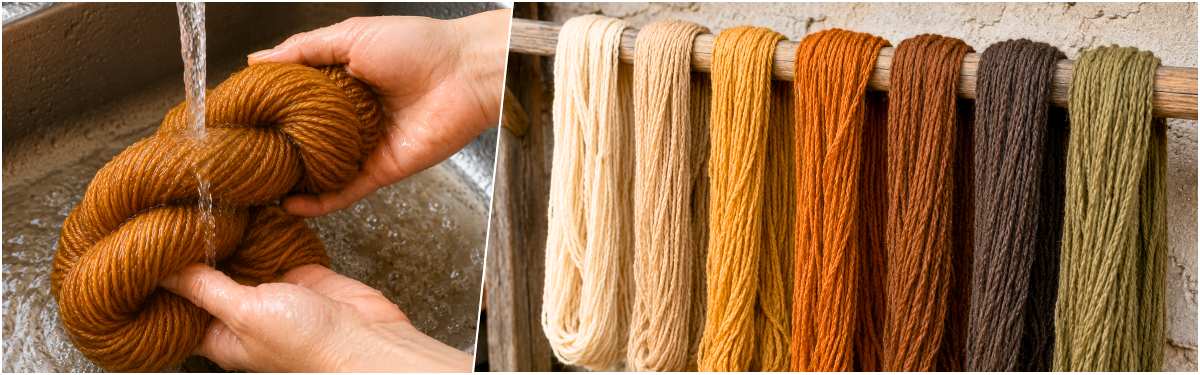
Step 5: Rinsing and Drying
After dyeing, the yarn should be rinsed gently in cool to lukewarm water until little to no excess dye remains.
After that:
- Gently squeeze out excess water
- Do not wring the yarn
- Allow it to air dry
- Avoid direct sunlight whenever possible
Freshly dyed yarns, in particular, should not be left to dry for hours in strong sunlight. Some natural dyes are sensitive to UV exposure and may begin to lose intensity even at this early stage.
And now comes my personal favorite moment:
When the yarn is completely dry and you finally get to see the color that has actually developed.
Some shades continue to change slightly during the drying process. Others suddenly appear more vibrant or reveal subtle undertones that were barely noticeable before.
Why No Two Dyeing Projects Are Ever Exactly the Same
Even when the same dye plant is used repeatedly, the results often vary slightly from one dye bath to the next.
Water chemistry, the season in which the plant was harvested, the quality of the dye material, the type of fiber, and the mordant used can all influence the final outcome. That is precisely why no hand-dyed skein is ever completely identical to another.
💡 My most important tip: Don't expect perfection on your first attempt. Natural dyeing thrives on small surprises. Very often, it is the unexpected shades and subtle color variations that create the most beautiful results.
And perhaps that is the greatest strength of natural dyeing:
In the end, you're not simply holding a skein of wool in your hands. You're holding a one-of-a-kind creation.
Caring for Naturally Dyed Yarn – Keeping Colors Beautiful for Years
Anyone who has invested time, patience, and love into a natural dyeing project naturally wants to enjoy the results for as long as possible.
The good news is that naturally dyed yarns do not require complicated special treatment. In most cases, a few simple guidelines are enough to help preserve both the fibers and their colors for many years.
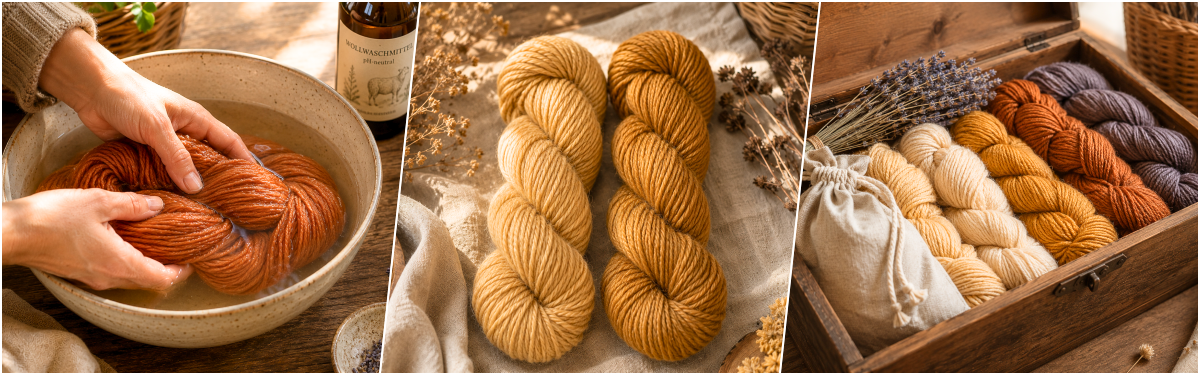
Gentle Washing
Naturally dyed yarns and finished projects appreciate gentle care.
Recommended practices include:
- Hand washing or a delicate wool cycle
- Cool to lukewarm water
- pH-neutral wool detergents
- As little mechanical agitation as possible
Harsh detergents, excessive rubbing, or frequent washing can place unnecessary stress on both the fibers and the dyes.
💡 Tip: Wash naturally dyed projects only when truly necessary. In many cases, thorough airing is all they need to feel fresh again.
Be Careful with Direct Sunlight
Light is one of the most important factors affecting color longevity.
Strong and prolonged exposure to sunlight can gradually fade sensitive natural dyes over time. This is not unique to natural dyes, by the way – even commercially dyed textiles slowly lose intensity when exposed to UV light for extended periods.
Of course, this does not mean that naturally dyed scarves and sweaters should spend their lives hidden away in a closet. However, if you plan to store dyed yarns or finished projects for a long time, it is wise to keep them out of direct sunlight whenever possible.
Natural Changes Are Part of the Story
One aspect of natural dyeing is often overlooked:
Natural colors are alive.
While commercial dyeing processes are usually designed for maximum consistency and repeatability, natural dyes are allowed to age and evolve over time.
A gentle deepening of color, subtle shifts in tone, or a slight fading are not automatically signs of poor quality.
Quite the opposite. Many fiber enthusiasts appreciate these gradual changes because they make each project even more unique and personal.
Proper Storage
If you would like to preserve naturally dyed yarns for years to come, a few simple precautions can make a big difference:
- Store yarn in a dry environment
- Avoid direct sunlight
- Ensure adequate air circulation
- Do not keep yarn in damp or humid spaces for extended periods
Following these simple guidelines will help keep both the colors and the fibers in excellent condition for as long as possible.
My Personal Perspective on Natural Colors
Perhaps this is one of the biggest differences between industrial and natural dyeing:
Natural dyes do not have to be perfect.
They are allowed to evolve, age, and sometimes even surprise us. Just like hand-knitted or hand-crocheted projects, they tell their own story.
And perhaps that is exactly what makes them so special.
Natural Dyes vs. Commercial Dyeing – Why It Doesn't Have to Be Either-Or
Sooner or later, anyone exploring natural dyeing encounters the same question:
Are natural dyes actually better than commercially dyed yarns?
The honest answer is:
No. But they are different.
And that is exactly why both approaches continue to have a place in the world of knitting, crochet, and fiber crafts today.
.png)
The Strength of Natural Dyes
Anyone who dyes a skein of wool by hand rarely knows with complete certainty what the final result will look like.
And for many people, that is exactly the appeal.
Every dye bath develops its own character. Small variations in plant material, water chemistry, temperature, or fiber type ensure that no two skeins ever look exactly alike.
Natural dyeing is therefore often associated with:
- Individuality
- Creativity
- Sustainability
- Regional traditions
- Mindful use of materials
For many knitters, crocheters, and fiber enthusiasts, the dyeing process itself becomes part of the hobby.
The Strength of Commercial Dyeing
On the other hand, there are very good reasons why commercially dyed yarns remain so popular.
As a designer, when I create a pattern, I naturally want other makers to achieve results that are as similar as possible to the original design.
This is exactly where commercial dyeing excels.
It provides:
- Reproducible colors
- Excellent color consistency
- A wide range of shades
- Predictable results
Anyone who wants to recreate a sweater or purchase multiple skeins in exactly the same color can benefit enormously from this reliability (always pay attention to the dye lot number).
Two Different Goals
Perhaps a comparison helps:
Commercially dyed yarn is a bit like a trusted recipe. You know fairly well what the final result will look like.
Naturally dyed yarn, on the other hand, is more like a creative experiment. You know the general direction, but you intentionally leave room for surprises.
Both approaches can produce beautiful results.
It's Not About Better or Worse
And that leads to perhaps the most interesting realization:
Natural dyes and commercial dyeing do not necessarily compete with one another.
In many cases, they fulfill different needs.
While one offers precision, consistency, and predictability, the other celebrates creativity, individuality, and hands-on craftsmanship.
And perhaps that is one of the most wonderful things about our hobby:
We do not have to choose one over the other.
We can enjoy both.
Is Natural Dyeing Actually Worth It?
This is a question many people ask before they prepare their very first dye pot.
My answer is simple:
It depends on what you're looking for.
If your goal is to achieve a specific, precisely defined color as quickly as possible, commercially dyed yarn will usually get you there more easily. Natural dyeing requires time, patience, and a willingness to embrace a certain degree of unpredictability.
Not everyone enjoys that – and that's perfectly okay.
However, those who love experimenting, trying new things, and valuing the creative process just as much as the finished project often discover an entirely new dimension of our craft.
Suddenly, it's no longer just about turning yarn into a scarf, a sweater, or a shawl.
It's about shaping the yarn itself.
And for many people, that is exactly where the magic begins.
You begin to notice colors more consciously. Onion skins, walnut hulls, avocado pits, and leftover plant materials are no longer seen simply as kitchen scraps—they become potential sources of color.
And sooner or later, you may even catch yourself wondering during a walk or while cooking:
"I wonder what color that would produce?"
By that point, natural dyeing has usually worked its magic.
And even if your first attempt doesn't turn out perfectly, something else often remains:
A deeper understanding of fibers, colors, and the remarkable possibilities hidden within the natural world around us.
For me, that is the greatest strength of natural dyeing.
It combines creativity, craftsmanship, knowledge, and a spirit of experimentation in a way that few hobbies can.
🧶 Fun Fact
If you're wearing a pair of blue jeans right now, you have a small piece of world history right in front of you – or on you. ☺️
The classic blue color of denim originally comes from indigo, one of the most famous and valuable natural dyes in human history.
As we've already learned, indigo was far more than just a color – it was a highly sought-after commodity of international importance for centuries.
The natural blue dye was produced in various parts of the world and transported along extensive trade routes. Its value was so high that entire industries depended on its cultivation, processing, and trade. In some regions, indigo was at times considered just as desirable as precious spices and other valuable commodities.
What makes indigo particularly fascinating is the dyeing process itself. Freshly removed from the dye bath, the fibers initially appear greenish or yellowish. Only through exposure to oxygen does the characteristic deep blue gradually emerge. To this day, this transformation remains one of the most spectacular moments in natural dyeing.
For people centuries ago, this remarkable color change must have seemed almost magical.
And although most modern jeans are now dyed with synthetic indigo, their iconic blue color can still be traced directly back to this centuries-old natural dyeing tradition.
A Personal Thought to Finish: More Than Just Adding Color to Wool
When I first started exploring natural dyeing, I was convinced the process was quite simple: boil a few plants, add some wool, and you're done.
Looking back, that was a remarkably optimistic plan. 😉
There were surprises, failed experiments, colors that looked nothing like I expected, and more than one pot that permanently lost its original purpose along the way.
And yet, the subject never let go of me.
There is now a rather thick natural dyeing book sitting on my shelf – one that I occasionally treat a bit like Gollum treated his precious treasure. Every time I open it, I discover new plants, new techniques, or new ideas that I want to try someday.
And that is exactly what continues to fascinate me about natural dyeing:
You never stop learning.
Even when using the same plant repeatedly, the results can be surprisingly different. You can plan, prepare, and document everything carefully – and still there is always that small element of surprise waiting at the end.
Perhaps that is exactly where the magic of natural dyeing lies.
It is not just about adding color to wool.
It is about becoming more aware of colors, developing a deeper understanding of materials, and sometimes even changing the way you look at everyday things.
Who knows – perhaps after reading this article, you'll start looking at onion skins, walnuts, or even the contents of your compost bin a little differently. 😉
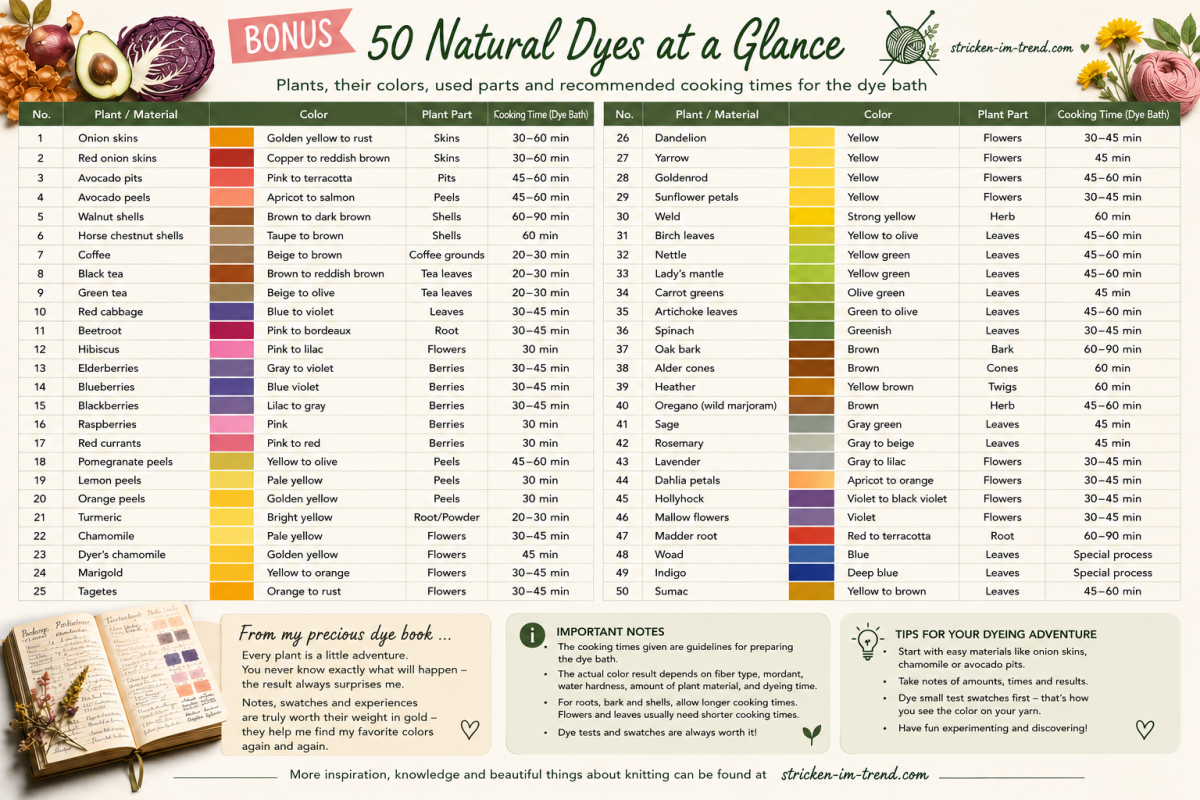
⭐ BONUS
Technically, the article should probably end after the conclusion.
And let's be honest – it has become quite a long read already. 😉
But because I mentioned my precious treasure in the final section—the natural dyeing book that has grown thicker and fuller over the years—I thought I would share a few notes from it with you.
Not as another wall of text.
Instead, I've deliberately turned them into a visual reference guide that you can save, revisit, and perhaps even use as inspiration for future dyeing projects.
Of course, no list can replace your own experiments. After all, that's a big part of what makes natural dyeing so fascinating.
But perhaps it will help you discover new ideas or find the next plant you'd like to try in your dye pot.
That's why this bonus is intentionally presented as an image you can save for later.
This way, you can pull it up whenever you find yourself wondering:
"What color do onion skins produce again?"
or
"Was it chestnuts or walnuts that create brown tones?"
Have fun exploring, experimenting, and discovering new colors!
📸 Save for future reference:
🧶 Have you ever experimented with natural dyes, or would you like to give them a try? Feel free to share your experiences, ideas, or favorite colors in the comments.
✨ And if you enjoy my articles, I'd be delighted if you followed me here on CrazyPatterns so you don't miss any future articles, ideas, or patterns.
.png)
🧡 You may also enjoy exploring more posts in my CrazyPatterns blog or discovering a pattern that inspires you in my shop.
All my love,
Kathrin with Emma & Muki
Photos, designs & content © Kathrin | stricken-im-trend.com


