
I’ve crocheted quite a few triangular shawls over the years...
And at first glance, you might think it’s pretty straightforward: You crochet a triangle, make it big enough, drape it around your shoulders – done. 😄
But it’s not quite that simple.
Because there are several completely different ways to create a triangle in crochet.
You can start at the bottom point and let the shawl grow wider row by row, or you can begin somewhere completely different and let the triangle grow from there.
And that’s exactly why today I don’t just want to crochet SALVIA with you.
SALVIA starts at the bottom point. At first, the rows are still short, then the shawl gets wider with every row. I like this construction because you can actually watch the triangle take shape – and because that tiny beginning eventually turns into a really large shawl.
But what actually happens if we simply turn the triangle around?
We’ll take a closer look at that later.
Because I’ve also designed shawls that are constructed in a completely different way: Here, the starting point is at the centre of what will later become the long top edge, and the triangle grows downwards and outwards to both sides from there.
Both methods give us a triangular shawl in the end.
But the way we get there is completely different.
For today, though, we’ll start right at the bottom – with the first tiny point of SALVIA.
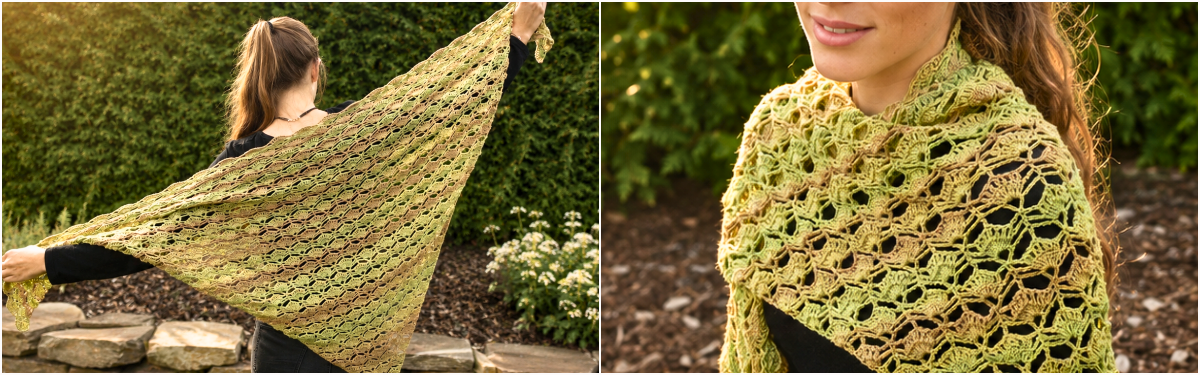
The SALVIA Triangular Shawl
SALVIA is a large, airy triangular shawl that starts at the bottom point and is worked upwards from there.
The pattern consists mainly of treble crochet stitches and chains. Increases along both sides make the shawl wider with each repeat – and little by little, that tiny beginning grows into a large triangle.
The original shawl measures approximately 195 × 93 cm (76¾ × 36½ in).
What You’ll Need
For the original shawl, I used ggh Calypso in colour 1.
Yarn required:
approx. 250 g / 925 m (1,012 yd)
Crochet hook: 3.0 mm (UK 11 / US C/2)
You’ll also need a yarn needle for weaving in the ends and a pair of scissors.
Gauge
22 stitches = 10 cm / 4 in wide
11 rows = 10 cm / 4 in high
With a triangular shawl, gauge is of course a little less unforgiving than it is with a sweater. 😄 After all, if your shawl ends up a few centimetres larger or smaller, nobody has to fit inside it.
It will still affect the finished size and, of course, the amount of yarn you’ll need.
So if you’re using a different yarn, I’d recommend choosing one with a similar weight and making sure the resulting fabric is reasonably close to the original.
Abbreviations
To help you find your way around the pattern and crochet chart, here are the abbreviations used throughout:
ch – chain
dc (US sc) – double crochet (US single crochet)
tr (US dc) – treble crochet (US double crochet)
t-ch – turning chain
st/sts – stitch/stitches
R – row
[ … ] – repeat the instructions within the square brackets continuously.
Let’s Start Crocheting
SALVIA is worked in rows from the bottom point upwards.
We begin with a small magic ring. Regular increases then make the shawl wider and wider.
The first two rows form the beginning. The actual pattern repeat is worked over Rows 3-5 and is then repeated continuously.
To show you how the triangle expands, Rows 6-8 are also written out in full as the first repeat.
Row 1
Work 3 ch + 6 tr into a magic ring.
Turn.
Row 2
Ch 3 to count as the first tr.
Then repeat:
[ ch 1, 1 tr into the next tr of the previous row ]
to the end of the row.
Turn.
Row 3
Work 3 ch to count as the first tr, 3 ch and 1 tr into the 1st st of the previous row,
ch 4,
1 tr into the 4th tr of the previous row – this is the centre tr,
ch 4,
into the last st – the 3rd ch of the turning chain from the previous row – work 1 tr, 3 ch and 1 tr.
Turn.
Row 4
Work 3 ch to count as the first tr and 6 tr around the first ch-space,
ch 4,
1 dc into the centre tr of the previous row,
ch 4,
6 tr around the next ch-space and 1 tr into the last st – the 3rd ch of the turning chain from the previous row.
Turn.
Row 5
Work 3 ch to count as the first tr and ch 1.
Then work 1 tr into the next tr of the previous row and ch 1 until you reach the dc of the previous row.
Work 1 dc into the dc of the previous row and ch 1.
Then continue working 1 tr into the next tr of the previous row and ch 1.
To finish, work 1 tr into the last tr of the previous row.
Turn.
Row 6
Work 3 ch to count as the first tr, 3 ch and 1 tr into the 1st st of the previous row,
ch 4,
1 tr into the 4th tr of the previous row – the centre tr,
ch 4,
into the dc of the previous row work 1 tr, 3 ch and 1 tr,
ch 4,
1 tr into the 4th tr of the previous row – the centre tr,
ch 4,
into the last st work 1 tr, 3 ch and 1 tr.
Turn.
Row 7
Work 3 ch to count as the first tr and 6 tr around the first ch-space,
ch 4,
1 dc into the tr of the previous row,
ch 4,
7 tr around the next ch-space,
ch 4,
1 dc into the tr of the previous row,
ch 4,
6 tr around the last ch-space and 1 tr into the last st.
Turn.
Row 8
Work 3 ch to count as the first tr and ch 1.
Then work 1 tr into the next tr of the previous row and ch 1 until you reach the first dc of the previous row.
Work 1 dc into the dc of the previous row and ch 1.
Then continue working 1 tr into the next tr of the previous row and ch 1 until you reach the next dc.
Work 1 dc into the dc of the previous row and ch 1.
Then continue working 1 tr into the next tr of the previous row and ch 1 to the end of the row.
To finish, work 1 tr into the last st.
Turn.
Excerpt from the Crochet Chart
In addition to the written instructions, you can also use the crochet chart as a guide.
I find it particularly helpful for SALVIA because it shows something that is much more complicated to explain in words: how the triangle expands with each repeat.
.png)
How to Continue
And by now, you can probably already see how the pattern works. 😄
The pattern repeat is worked over Rows 3-5 and is then repeated continuously. Rows 6–8 already show you the first repeat.
With each additional repeat, a new pattern section is added and SALVIA continues to grow wider from the bottom point.
For the original shawl, work the pattern repeat 29 times in total. Together with the two beginning rows, this gives you 89 rows altogether.
Finish SALVIA with a Row 5.
At the stated gauge, the finished shawl measures approximately 195 × 93 cm (76¾ × 36½ in).
But you don’t necessarily have to stick to this size.
If you’d like your SALVIA to be a little smaller, simply stop earlier. If you want a really large shawl to wrap yourself up in, just work a few more pattern repeats.
Just keep in mind that changing the size will, of course, also change the amount of yarn you’ll need.
Once you’ve reached your desired size, carefully weave in all the ends.
I would then recommend wet blocking SALVIA and leaving it to dry completely. It’s especially worthwhile with this airy pattern: the individual pattern sections can open up beautifully and the triangle will take on its final shape.
SALVIA Is Finished
So, technically, we could put our crochet hook down at this point.
But now that we’ve crocheted a complete triangle starting from the bottom point, there’s one more question we can ask:
Does a triangular shawl always have to start at the point?
No. 😄
With SALVIA, we started right at the bottom point. The first few rows were still quite short, and with every repeat our shawl became wider.
So the triangle has grown from the bottom upwards.
But if you’ve crocheted several triangular shawls before, you’ve probably also come across a different construction. Instead of starting at the bottom point, we begin in the centre of what will later become the long top edge.
From this small starting point, the shawl grows outwards to both sides while also extending further and further downwards.
In the end, both methods give us a triangle.
The way we get there is simply completely different.
Two Ways – the Same Shape
The easiest way to see the difference is to imagine the two constructions side by side.
With SALVIA, the starting point is here:
bottom point → upwards → getting wider
We start with just a few stitches. As the shawl expands, the rows become longer and longer, and the triangle gradually grows in width.
With the second construction, the starting point is here:
centre of the future top edge → outwards and downwards → getting larger
Again, we start very small. As the top edge becomes longer on both sides, the shawl also gains more and more depth – gradually creating the triangle.
And that’s exactly why two finished triangular shawls can look quite similar at first glance, even though they were constructed in completely different ways.
What Does This Do to the Pattern?
And I actually find this even more interesting than the shape itself.
Because changing the construction naturally also changes the direction in which the pattern develops across the shawl.
With SALVIA, the pattern builds up from the bottom point. Each new pattern repeat adds more width.
If we start in the centre of the long top edge instead, the pattern spreads symmetrically outwards to both sides while also growing downwards.
This can make quite a difference, especially with lace patterns. And with a gradient yarn, it becomes even more interesting because the direction of the colour changes follows the construction of the shawl as well.
So when you’re looking at a pattern for a triangular shawl, it’s definitely worth taking a second look.
Not just:
Do I like the finished shawl?
But also:
Where do I actually start – and in which direction will I be crocheting?
An Example of the Other Direction: BioTronik
For my BioTronik shawls, I used exactly this second construction.
Here, the triangle starts in the centre of what will later become the long top edge and grows outwards and downwards from there.
You can already see this clearly at the beginning of BioTronik #1: It starts with a small ring made from 5 chains. In the very first row, several groups of stitches are worked into this ring, and the triangle then develops from there.
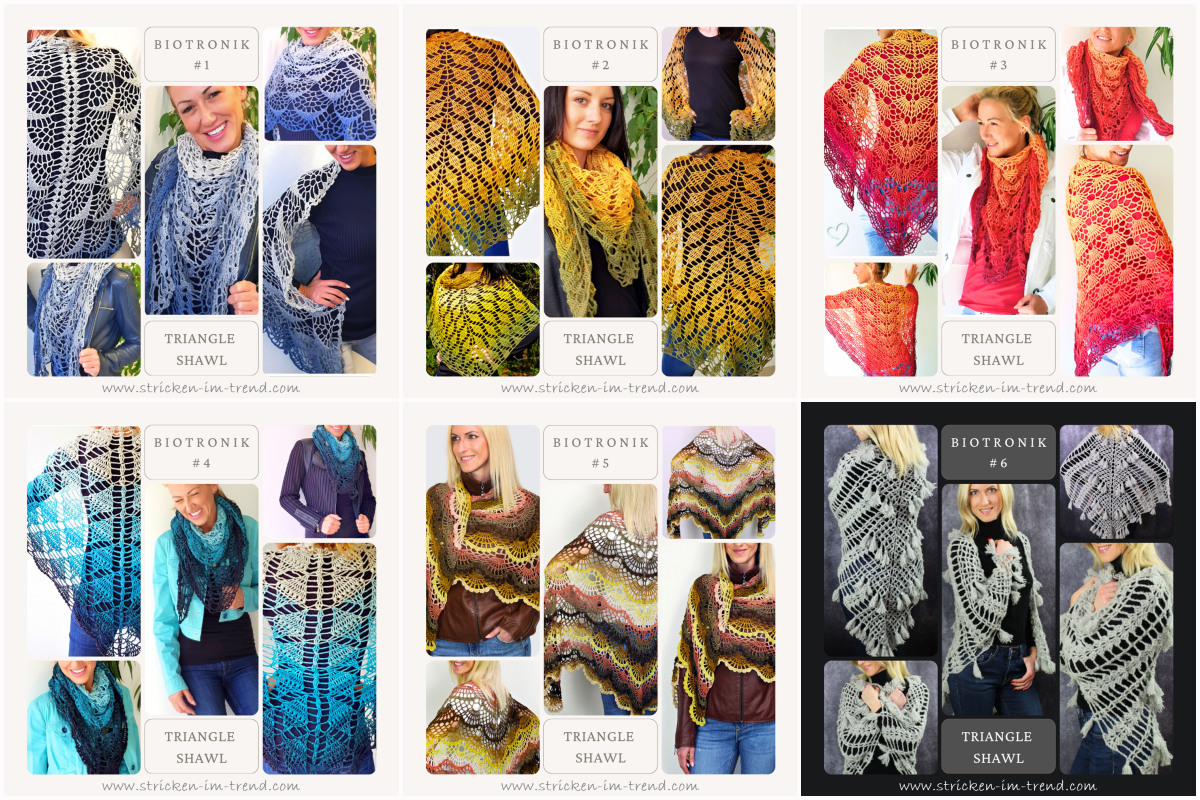
If you’d like to try this type of construction yourself, you’ll find several examples in my BioTronik Collection:
👉 Crochet Pattern Bundle for Triangular Shawls | BioTronik Collection
The different BioTronik patterns are of course also available individually – I’m simply linking to the Collection here because it gives you a nice overview of the different designs.
So Which Construction Is Better?
Neither. 😄
They’re simply two different ways to create a triangle.
What I like about SALVIA is that we really do start at that tiny bottom point and then get to watch the shawl grow larger and larger.
With the second construction, I like the way the triangle develops from the centre of the top edge, growing outwards to both sides at the same time.
And sometimes the stitch pattern itself determines which construction works best anyway.
But the next time you have a triangular shawl pattern in front of you, take a closer look at where those first stitches actually sit.
Because once you understand the construction behind it, you suddenly start looking at a triangle a little differently.
And that brings us to our little aha moment for this article:
A triangle isn’t always just a triangle after all. 😉
🧶 Now It’s Your Turn!
Maybe you’ll crochet SALVIA just like the original and let your triangle grow from the bottom point. Maybe you’ll make it a little smaller – or large enough to wrap yourself up in it beautifully. 😄
And perhaps, after our little look at the construction, you’ll feel inspired to start your next triangular shawl from the centre of the long top edge and see how different it feels to crochet.
However your SALVIA turns out in the end: Play with yarns, colours and size, and make it exactly the shawl that suits you. 💛
📸 If you crochet SALVIA, I’d love to see your finished projects here on CrazyPatterns.
I always love seeing how differently the very same pattern can turn out – which colours you choose, which yarns you use and how large your finished shawl becomes.
✨ And if you enjoy my posts, I’d of course be delighted if you follow me here on CrazyPatterns. That way, you won’t miss any new #FreeStitches with free knitting and crochet patterns or new #StitchWisdom posts with tips, ideas and practical knowledge about knitting and crochet.
.png)
🧡 Perhaps you'll also enjoy exploring more articles on my CrazyPatterns blog - or maybe you'll discover your next favourite pattern in my shop.
I hope you have lots of fun crocheting, experimenting – and, of course, enjoying your very own SALVIA.
All the best,
Kathrin with Emma & Muki
Photos, designs & content © Kathrin | stricken-im-trend.com


