Have you ever wondered how to make a biscornu? Ever since I came across these unusual and attractive pincushions, I've been eager to make one myself. If you feel the same way, take a look at my instructions and join in – it's easier than you might think. In my tutorial, I'll show you what's important when stitching and sewing the pieces together. I'm providing the cross-stitch pattern with maritime designs for the biscornu free of charge. I assume you already know how to do cross-stitch. I'll show you everything else so that even as a beginner, you can make your first biscornu. If you'd like to learn how to do cross-stitch first, feel free to check out this this blogpost (sorry, in german only) ....perhaps you might learn from the photos if you don't speak german. There I explain the basics of cross-stitch, such as how to read a cross-stitch pattern, how to stitch the cross-stitch, how to divide the floss, and so on.
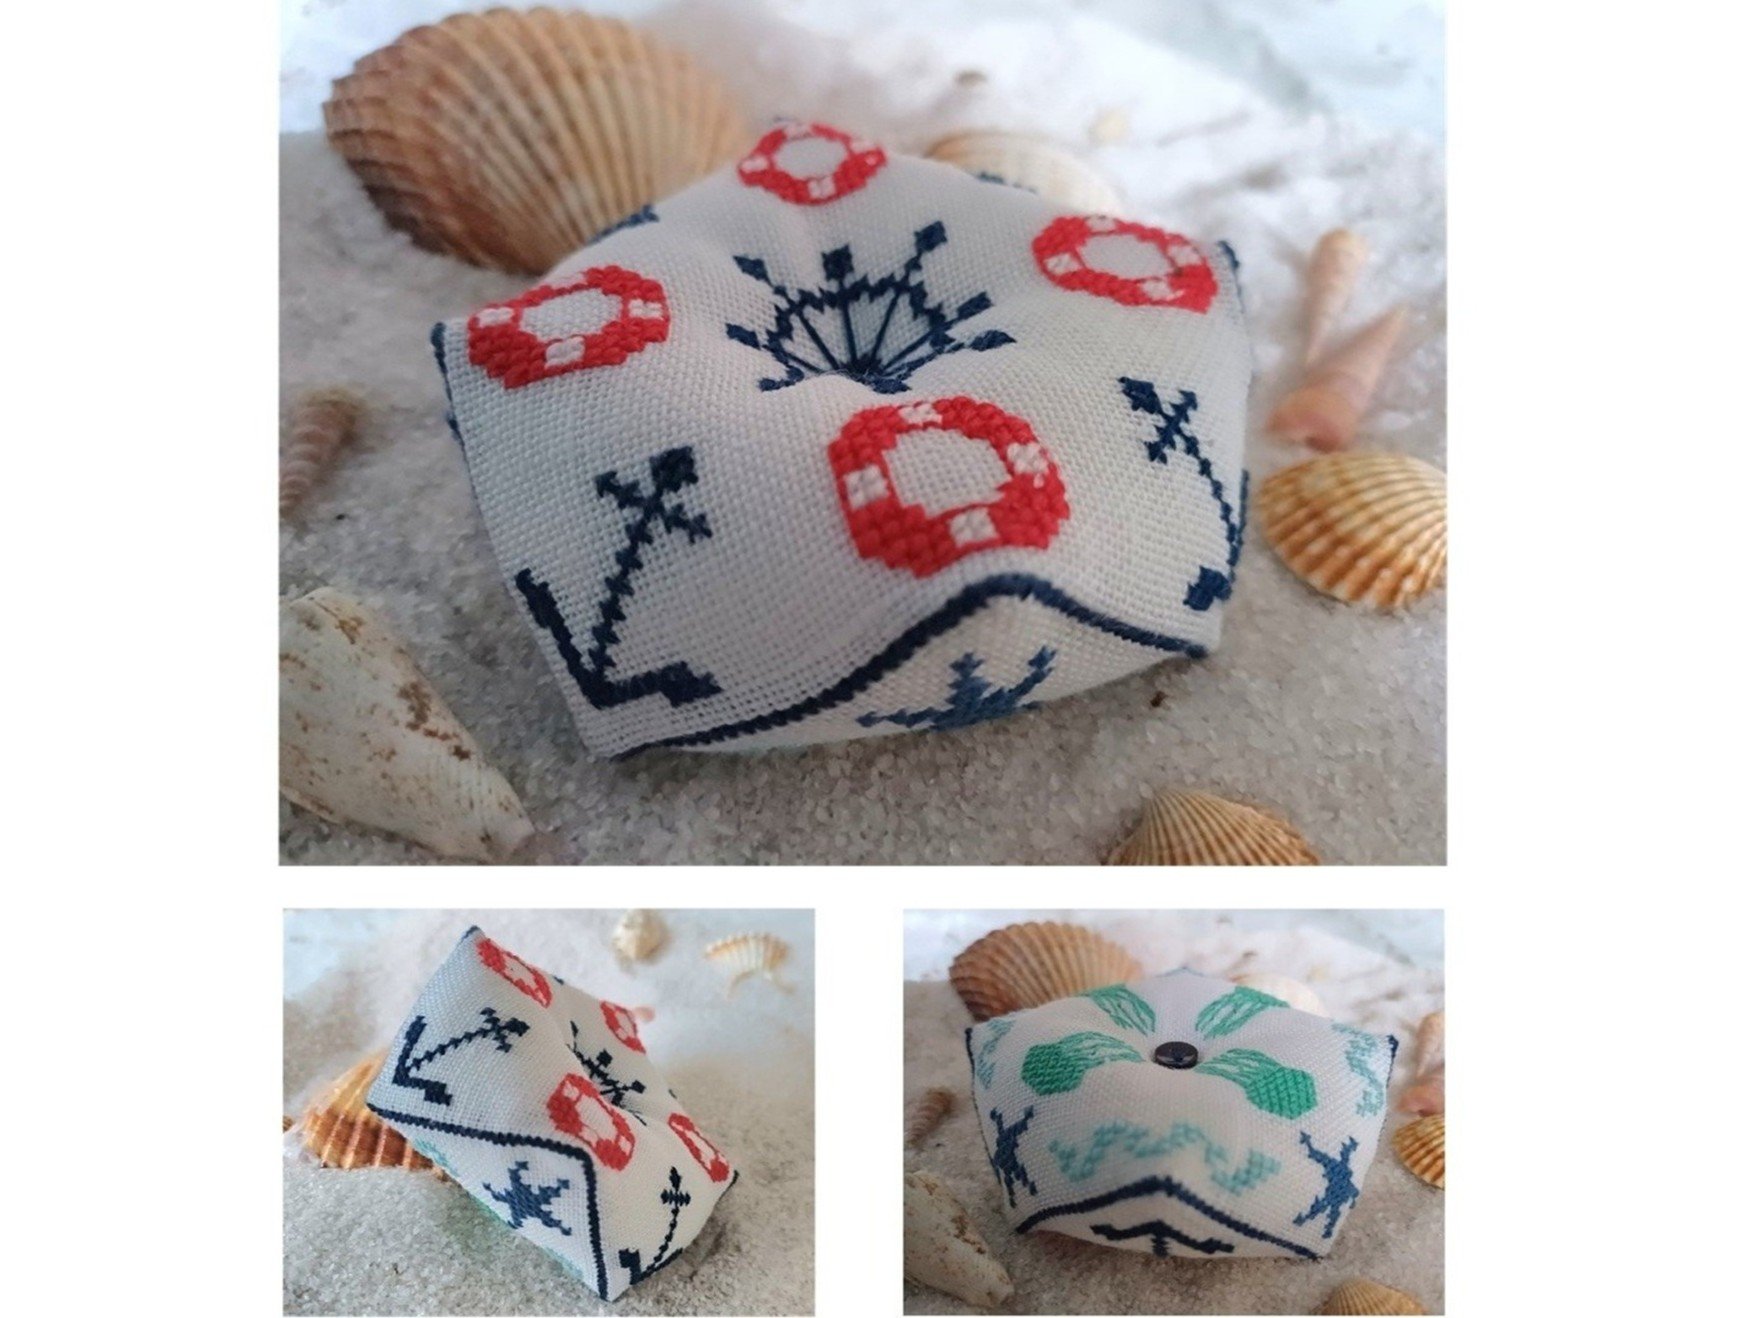
The french term biscornue is an adjective describing someone or something as eccentric, odd, crazy, bizarre, irregular or crooked. In the world of needlework, this term has become established for intricately decorated - usually embroidered - octagonal pincushions. They achieve their characteristic, original shape by joining two equally sized squares of fabric in such a way that the middles of the fabric edges of one square meet the corners of the other. This results in one corner of the finished piece pointing upwards, the next corner appearing downwards, and so on. Additionally, a depression is created in the center of the small pincushion by two sewn-together buttons or beads, which emphasizes its three-dimensional character.
What is a biscornu used for?
As described above, biscornus are typically used as pincushions. You can also make them into scented pillows or use them purely for decoration. With a sewn-in hanger, they can adorn christmas trees, easter branches, windows, wreaths, and much more, especially when decorated with seasonal motifs. Smaller biscornus make lovely scissor finder. Biscornus come in various sizes and with countless (embroidery) patterns to decorate them. The possibilities are endless. Some biscornus are lavishly decorated, adorned with beads along the seam or even all over, or, if hung, finished with a tassel at the bottom. My version, in comparison, looks quite simple.
What materials do you need to embroider and sew a biscornu?
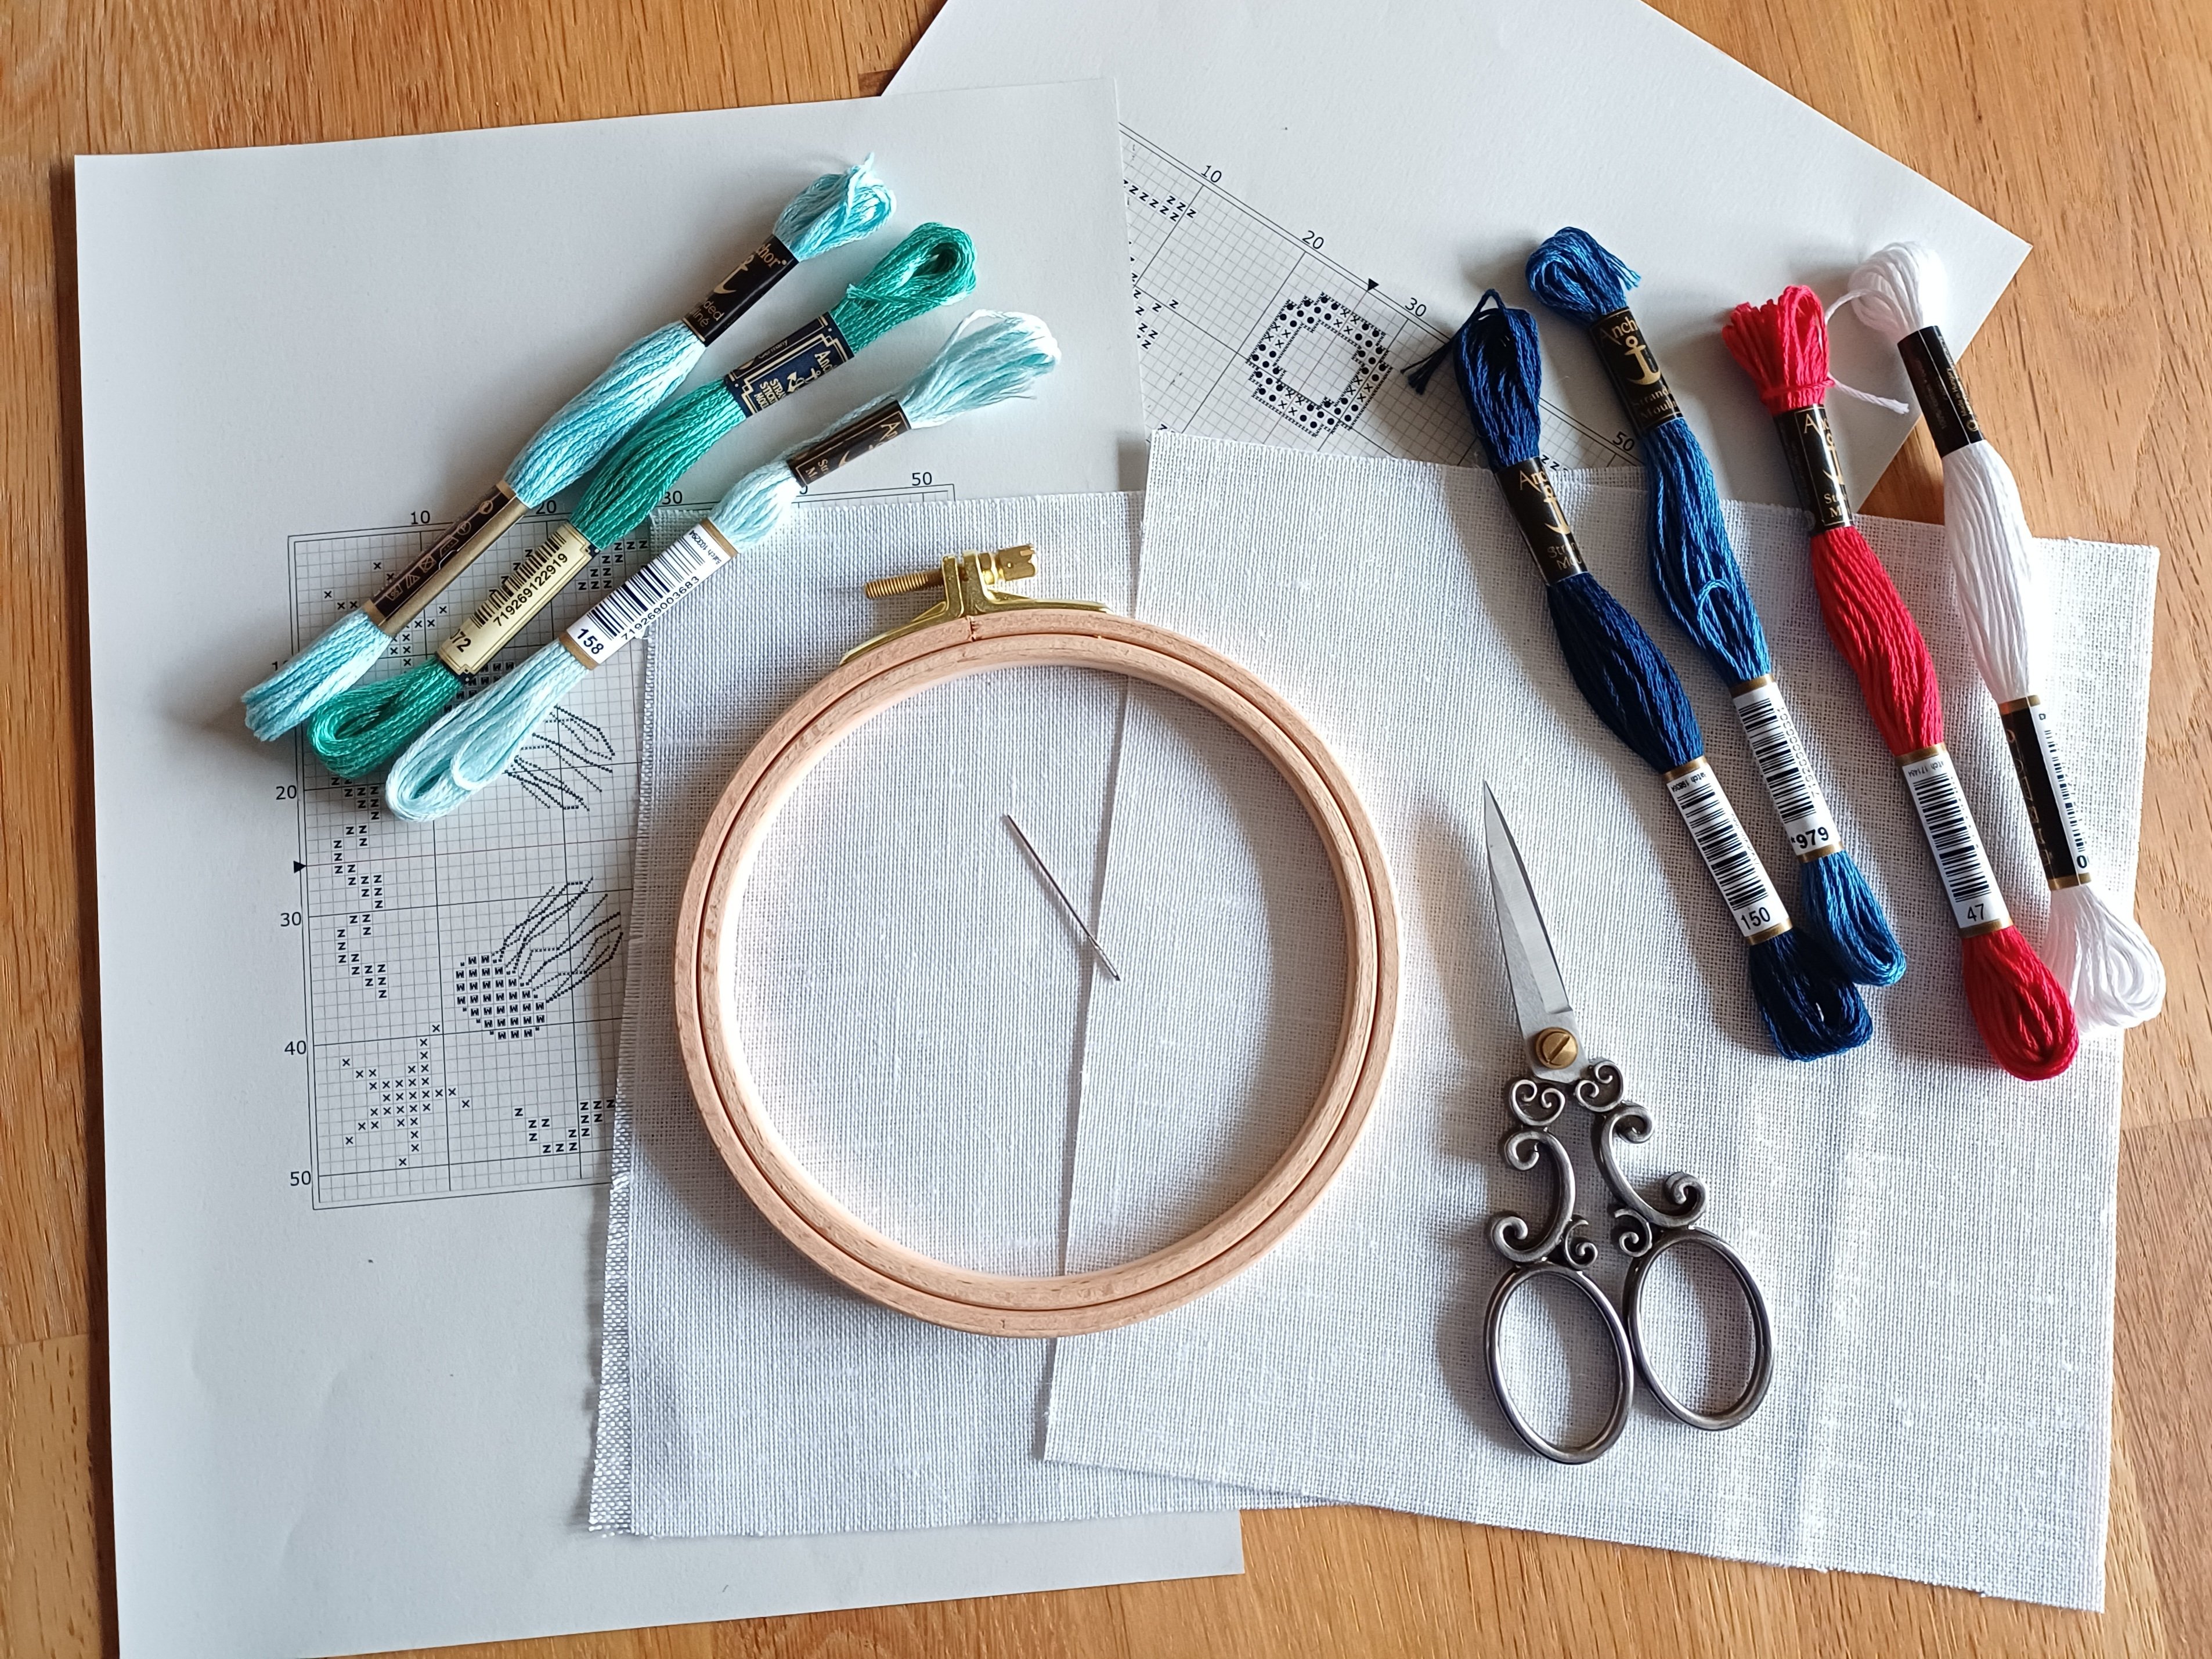
In general, you will need:
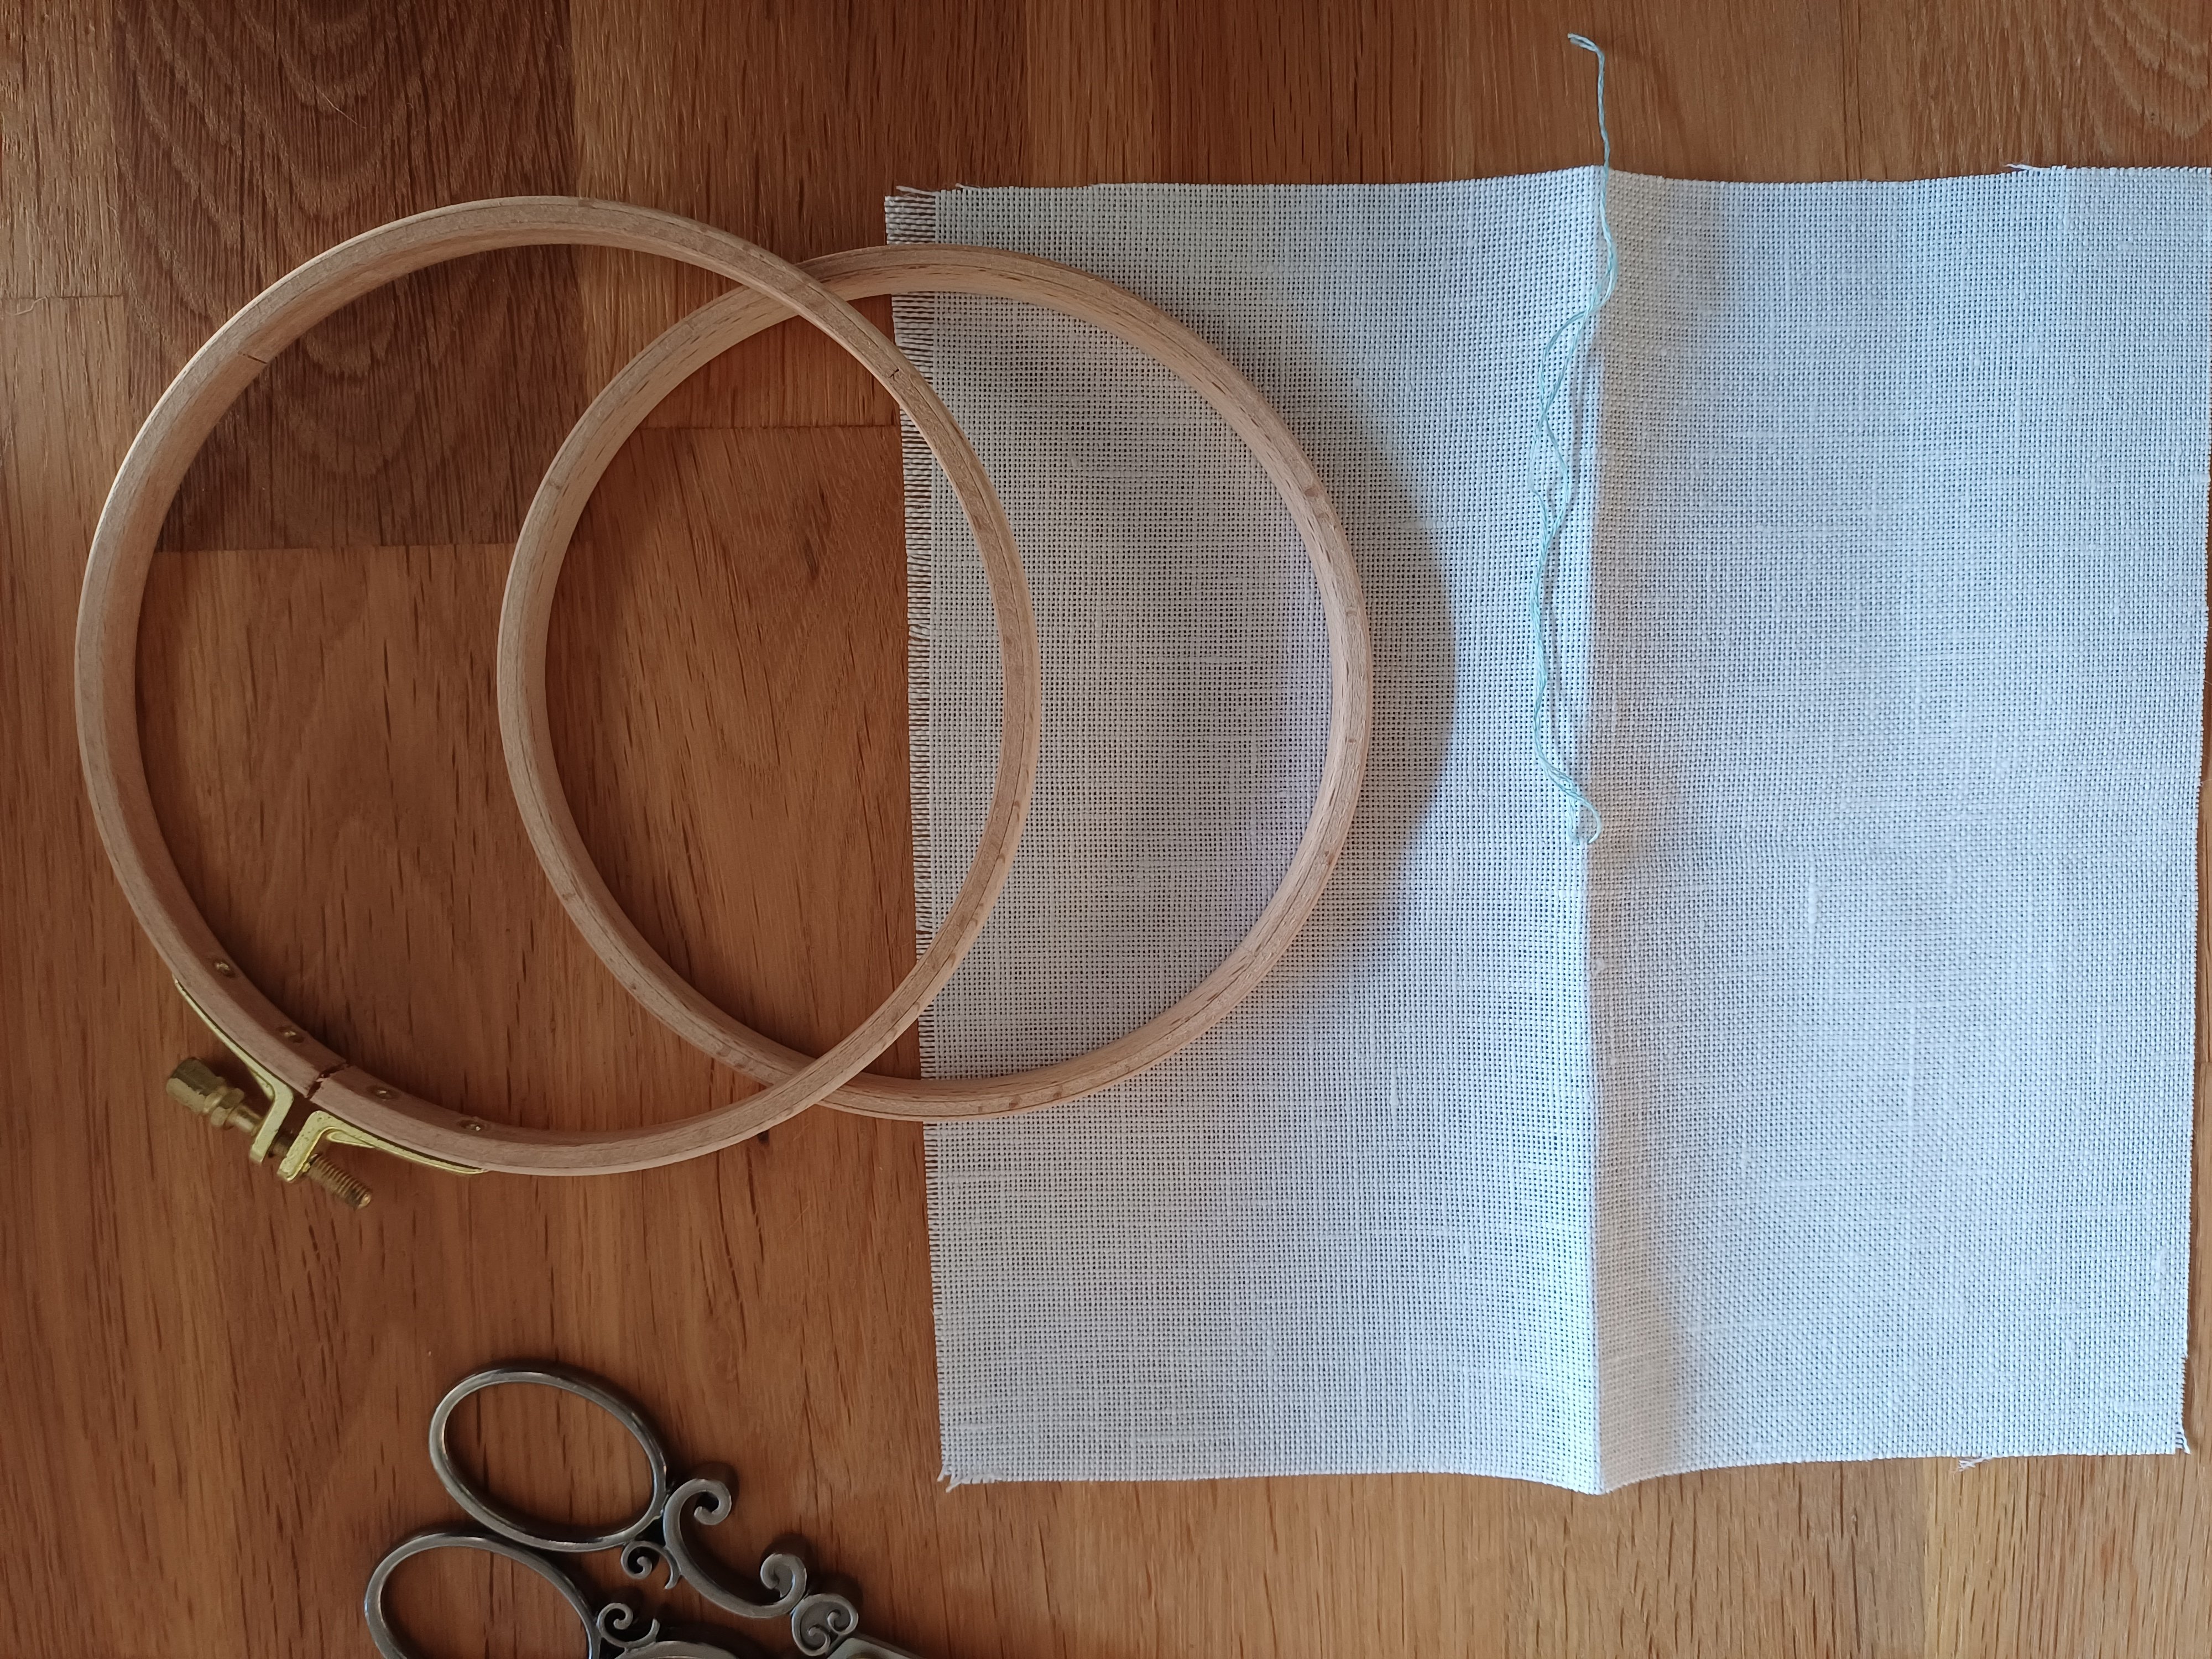
- two identical squares of fabric in linen, evenweave, or aida cloth
- an embroidery needle
- a pair of scissors
- some embroidery thread, 6 stranded, in colors of your choice
- a cross-stitch pattern (my cross-stitch pattern with maritime motifs can be found at the end of this blog post)
- optional an embroidery hoop
- one or two buttons or beads
- fiberfill
You will need the following materials specifically if you want to make the biscornu the way I did:
- two squares of Zweigart Linen Belfast fabric in white, 12.6 thread count/32 ct
- one small blue button
- some embroidery thread in the following colors
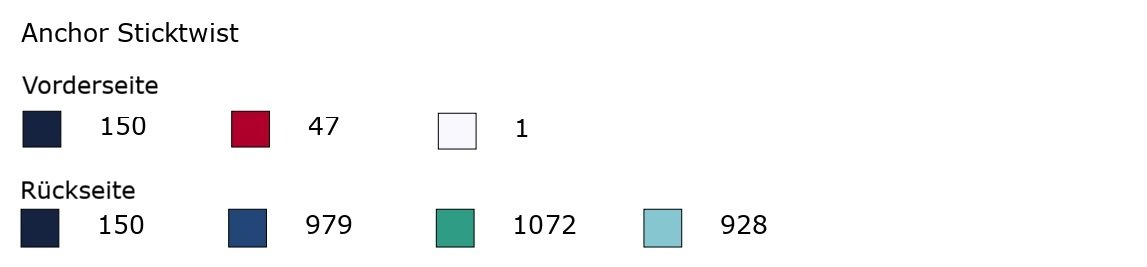
How to prepare the fabric for stitching
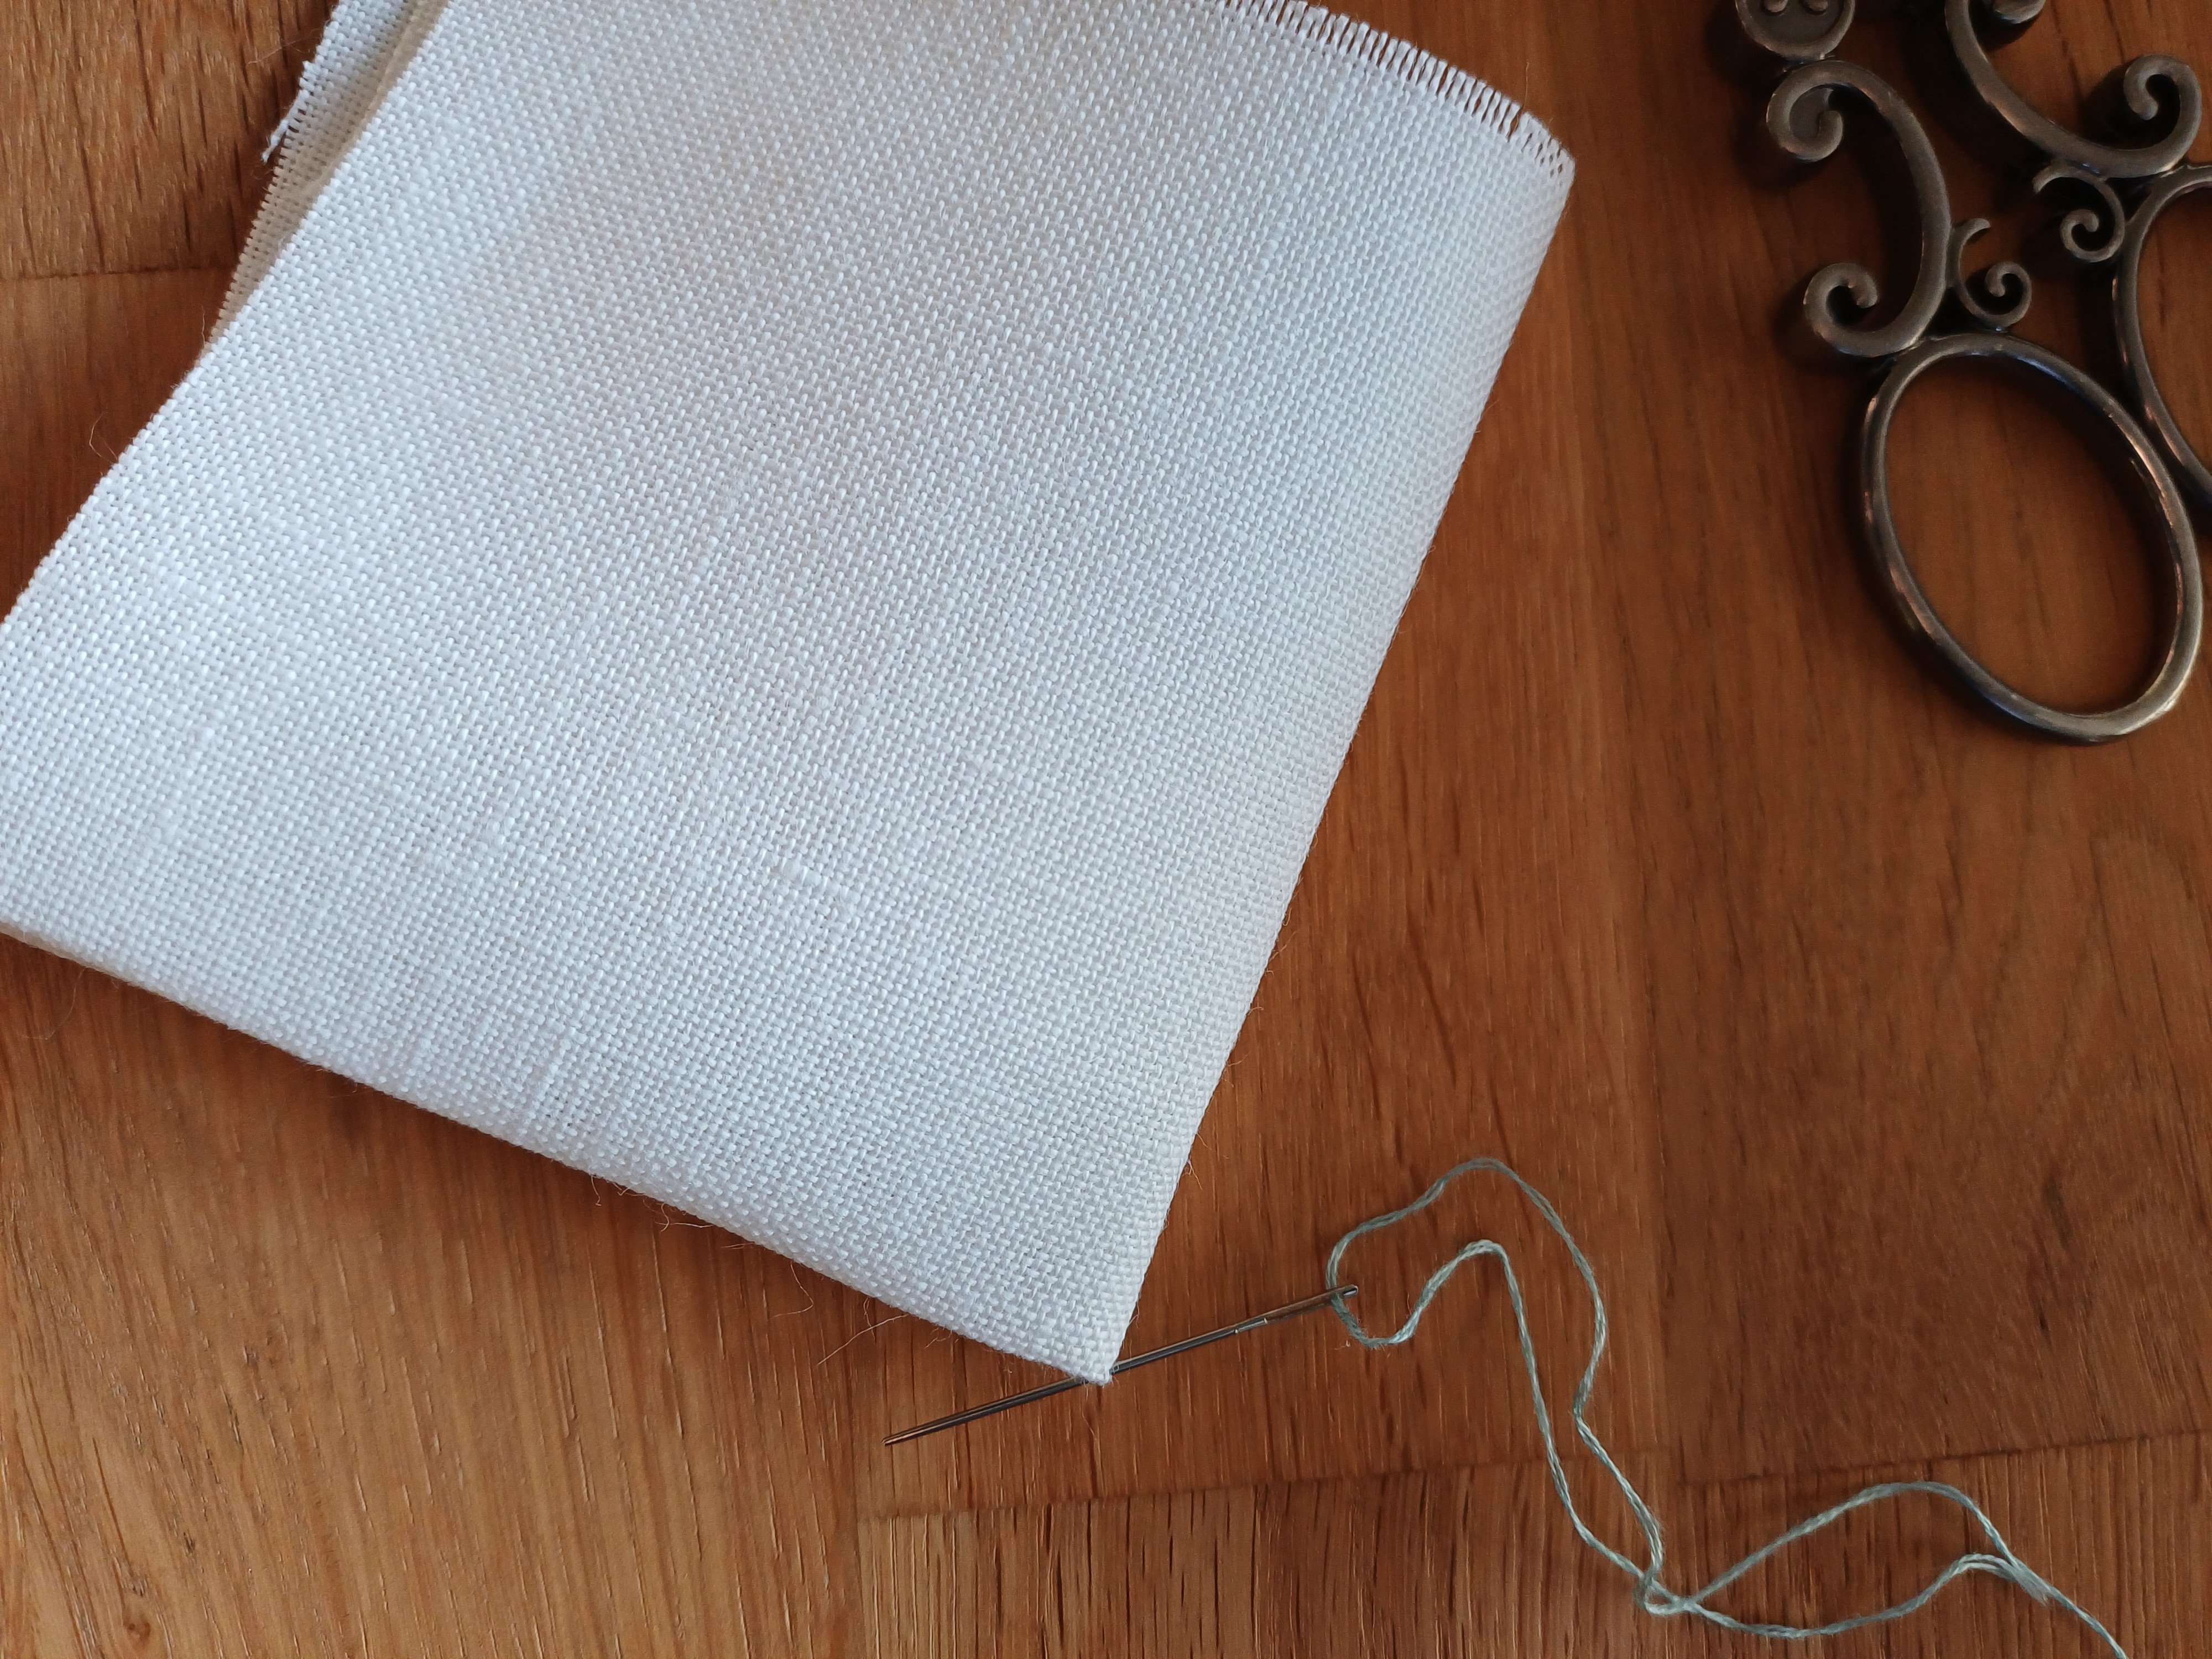
The linen is cut to approximately 20x20cm (7,87x7,87 inches) and ironed if necessary. I'm skipping securing the edges against fraying, as the project won't take that long to stitch. Instead, I cut the linen a few centimeters larger to have enough fabric in case an edge does fray. To find the center of the fabric square, fold the fabric in half twice, once lengthwise and once crosswise, and mark the resulting center point where the fold lines intersect with a thread. You can remove the marking thread later on the front, as the center of the embroidered steering wheel will mark the center of the motif. On the back, I would leave the mark until the button is sewn on, because it can be tricky to find the center once the cushion is stuffed and sewn together. The center mark is very useful if you like to start stitching the motif from the middle of the pattern like I do.
How to clamp the fabric into the embroidery hoop
(If you're using an embroidery hoop. I also enjoy stitching many projects without one.)
I used a 13cm diameter embroidery hoop. The smaller, closed ring rests on the table, the fabric is placed over it, and then stretched over the smaller one using the larger ring, which you first need to slightly loosen at the adjustment screw.
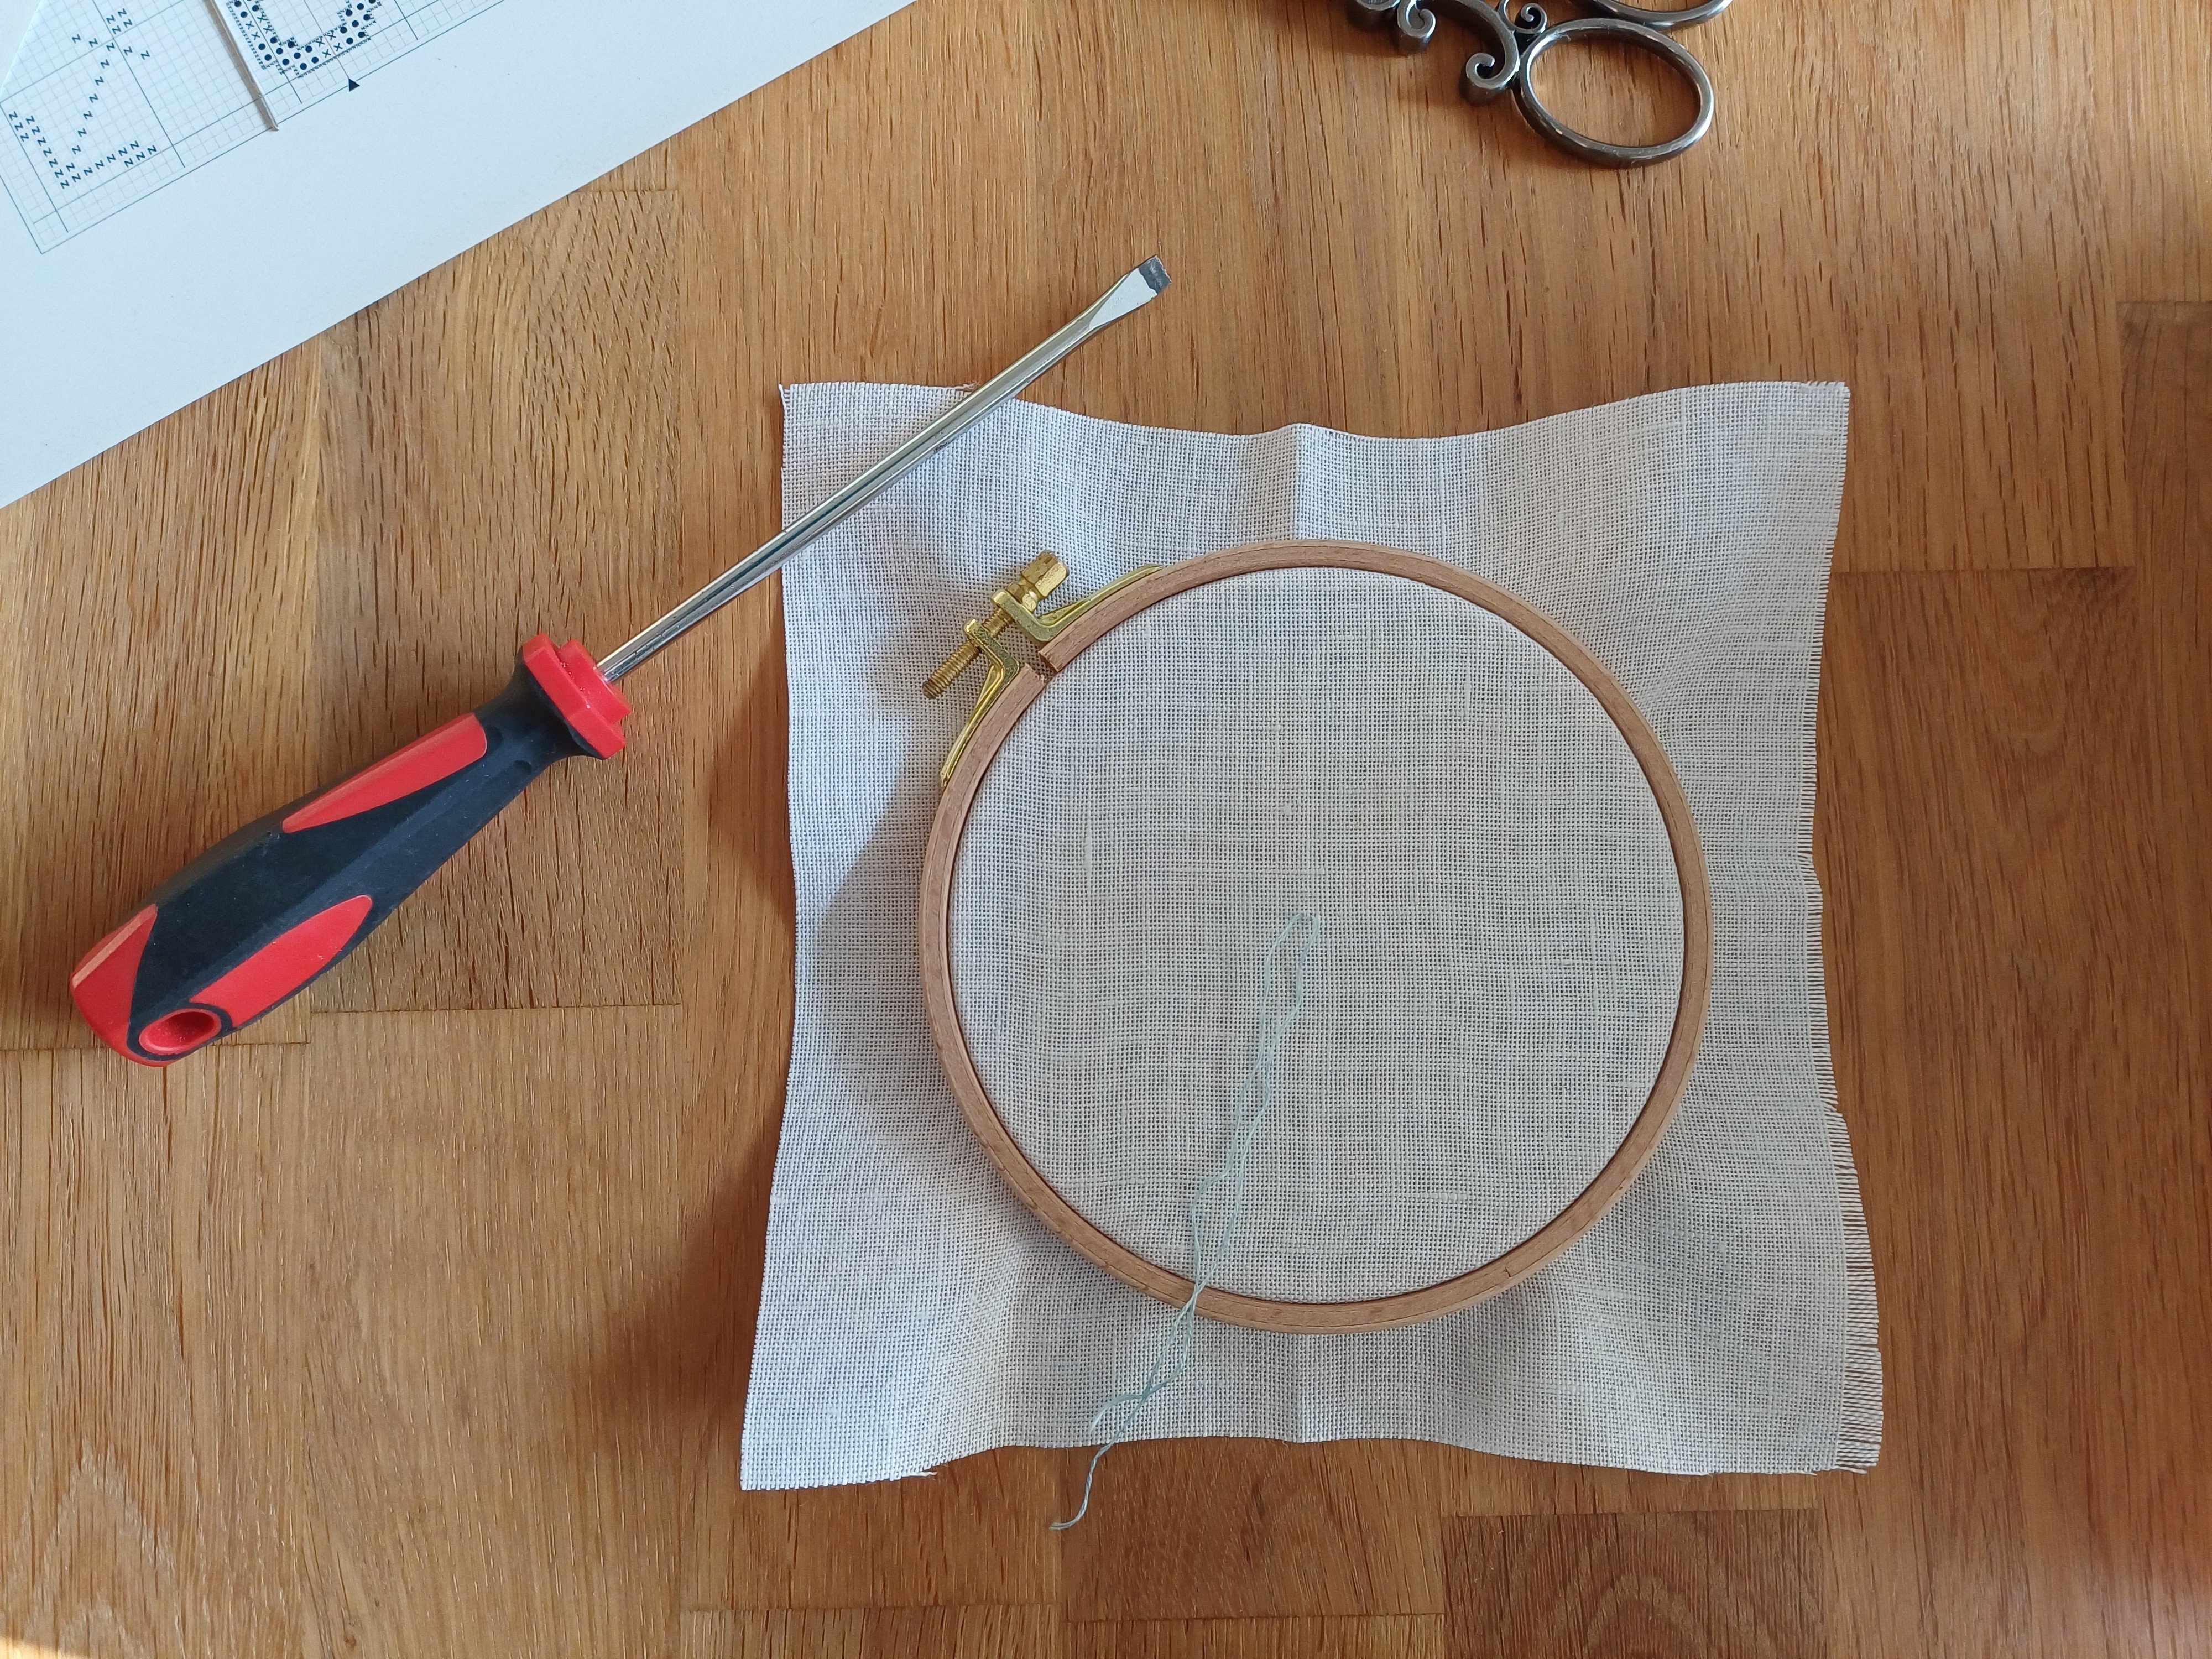
Before you tighten the adjustment screw (possibly with a screwdriver), you can adjust the fabric by grasping it at the sides and pulling. This will also increase the fabric tension. Be careful not to distort the fabric. The fabric should be stretched straight in the embroidery hoop. Otherwise, your embroidery could become uneven if the fabric is stretched in curves/waves or crookedly in the hoop while stitching. How much tension you give the fabric is up to you. I personally like it when the fabric is very taut in the hoop. Be careful not to rotate the hoop while stitching. The embroidery patterns for biscornus are usually divided into quarters, and in each quarter the repeating motif appears rotated by 45° and/or mirrored, which could easily tempt you to turn your work. If you turn your work while stitching, your cross stitches won't all be in the same direction once you've finished, resulting in a messy overall look. Since I'm right-handed, I prefer to have the hoop's closure in the top left corner; it doesn't get in my way there, and it's easy to remember which way is up. If you're stitching without a hoop, it's a good idea to mark the top and bottom with a thread or something similar - more as a clearly visible reminder, since you could, of course, use your already completed cross-stitches as a guide. The 13cm diameter hoop is a bit small for this design in combination with the 12.6 thread count linen fabric. The design just barely fits in the round hoop, making it fiddly to secure the threads near the edge of the design. To avoid this, you can temporarily hold the thread ends in the fabric and secure them at the end without the hoop.
We'll start with embroidery. I'll show you two ways to begin embroidery
Starting the embroidery with overstitching
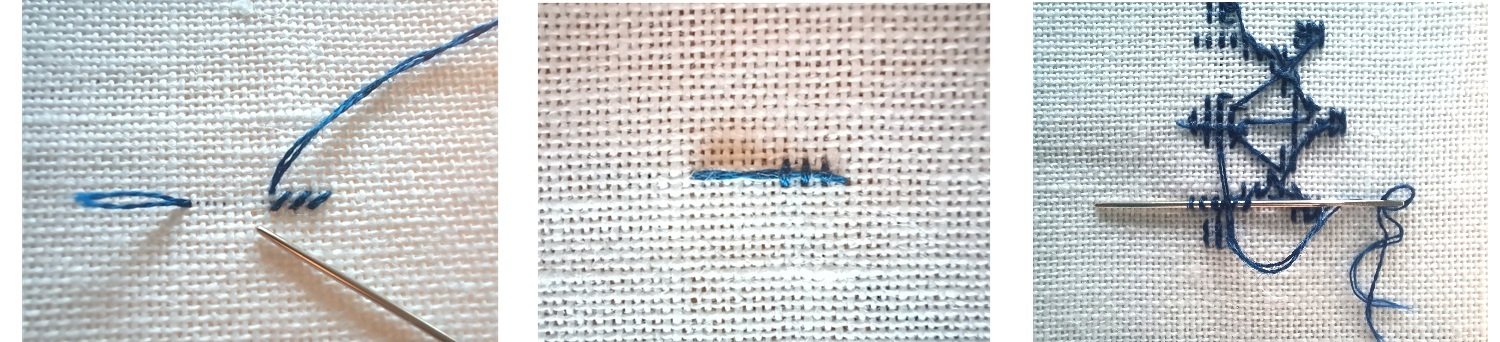
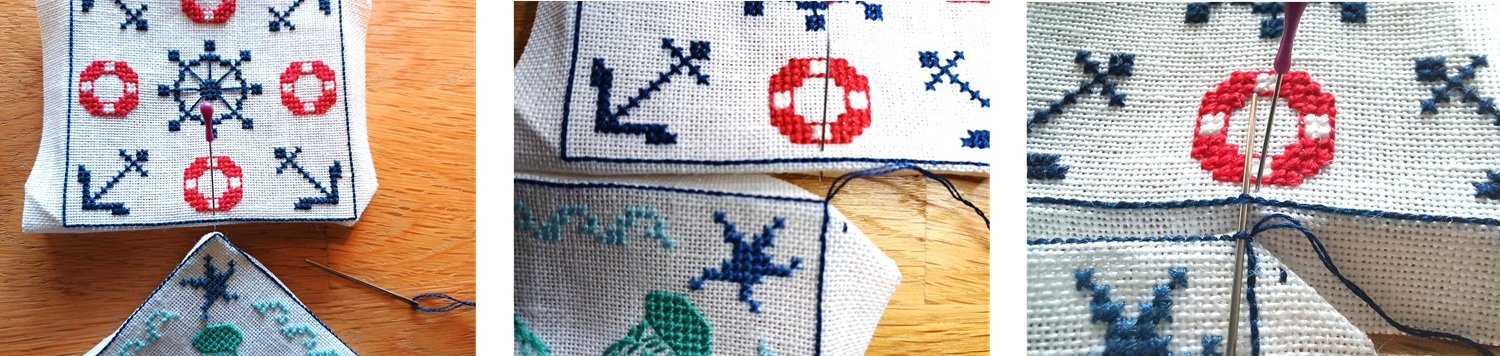
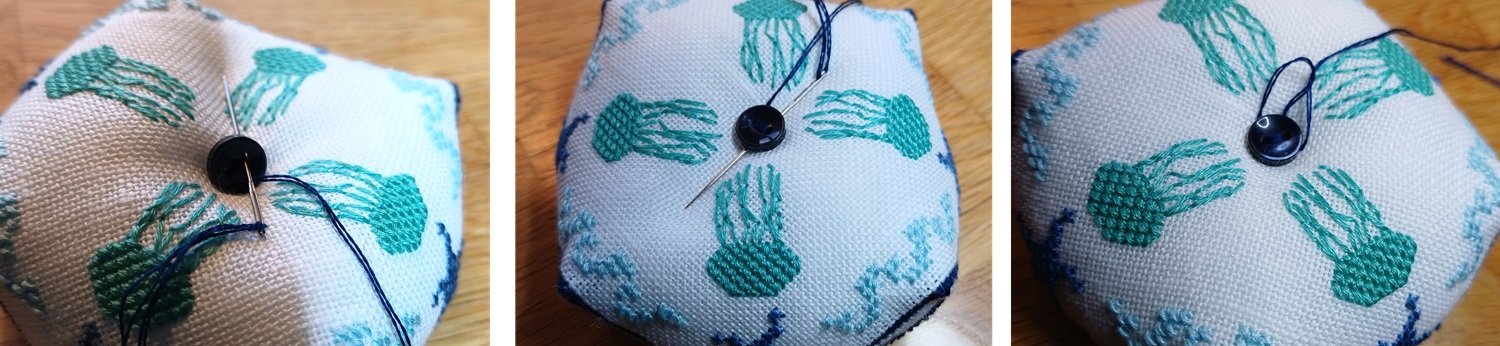
With this fabric density (12.6 threads per cm/32 ct), I'm stitching with two strands of 6-stranded embroidery floss over two threads of linen, as you can clearly see in the photo above. The shorthand for this is "two over two" stitching. You take your skein of embroidery floss, cut off a 6-strand strand, and divide the floss so you can stitch with two strands. When cross-stitching, you can start the thread and secure it simultaneously by stitching your cross-stitches as usual, thus working over the thread start on the back. Insert the embroidery needle from the front , centered, a few stitches away from your cross-stitches, and then begin your stitching as normal from the back, as shown in the first photo. The thread end must lie in the row and direction you are stitching in for the overstitching to work. If you like, you can tie a knot in the thread end. The back vertical stitches secure the thread start, as you can see in the second photo. Once you've stitched a few stitches, cut the thread/knot short and bring the end to the back. The third photo shows how you can sew the thread end under the vertical threads on the back in the same way.
The loop start or loop method in cross-stitching
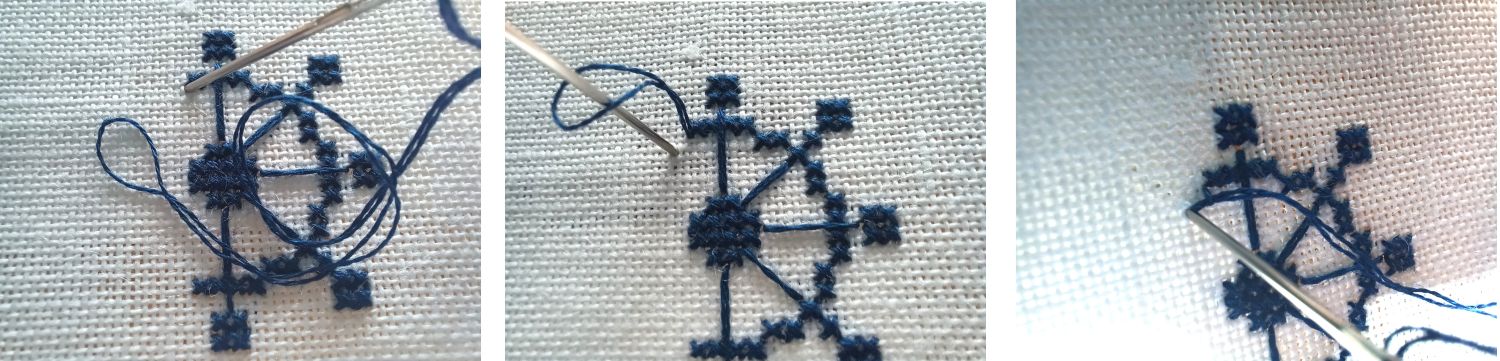
The loop start is a very charming way to begin cross-stitch with two threads. Take one strand of your embroidery floss and make it longer, or even twice as long, as your usual length. Double the strand and thread it onto the embroidery needle. The loop forms the longer end of your thread. Insert the needle from the front of the fabric, where you would normally begin your cross-stitch from the back (first photo). The loop will remain on the front of the fabric. At the diagonally opposite entry point, bring the needle back up from the back and pass it through the loop (second photo). Pull the thread through the loop to the front of the embroidery. Insert the needle back through the same "hole" you just came up through and pull the thread, along with the loop, through (third photo). Now the beginning of the thread is secured, and you can continue stitching your cross-stitches as usual.
How to embroider the three-quarter stitch
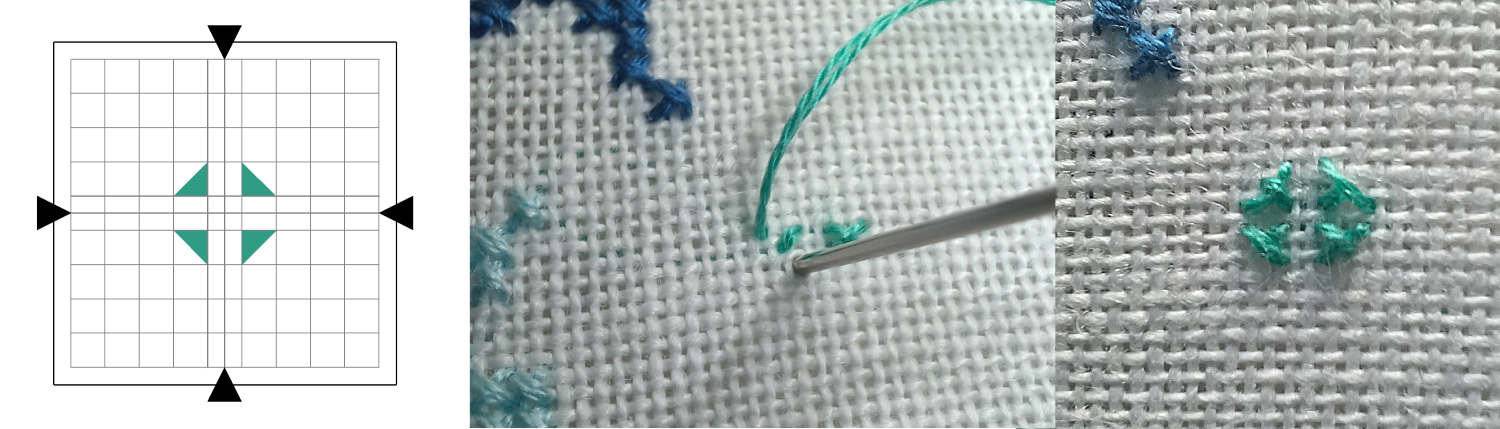
The jellyfish design incorporates three-quarter stitches. I used them to round off the jellyfish's shape. Photo one shows the three-quarter stitch symbol in the counted cross-stitch chart, photos two and three show the stitches worked. The symbol shows you exactly which corner of the cross-stitch square is filled with the three-quarter stitch. The long side of the symbol is worked as a half stitch across the entire diagonal of the square. From the right-angled corner of the symbol, a quarter stitch leads to the center of the square. I worked the three-quarter stitches in the same way as the cross-stitches, meaning I worked the understitch/backstitch and the topstitch in the same order/direction as always. This means that sometimes the half cross-stitch is on top, and sometimes the short quarter stitch. You can do it this way. It looks a bit more even, especially on the outlines of a stitched design, if you always work the short quarter stitch first, and then the half stitch on top of it.
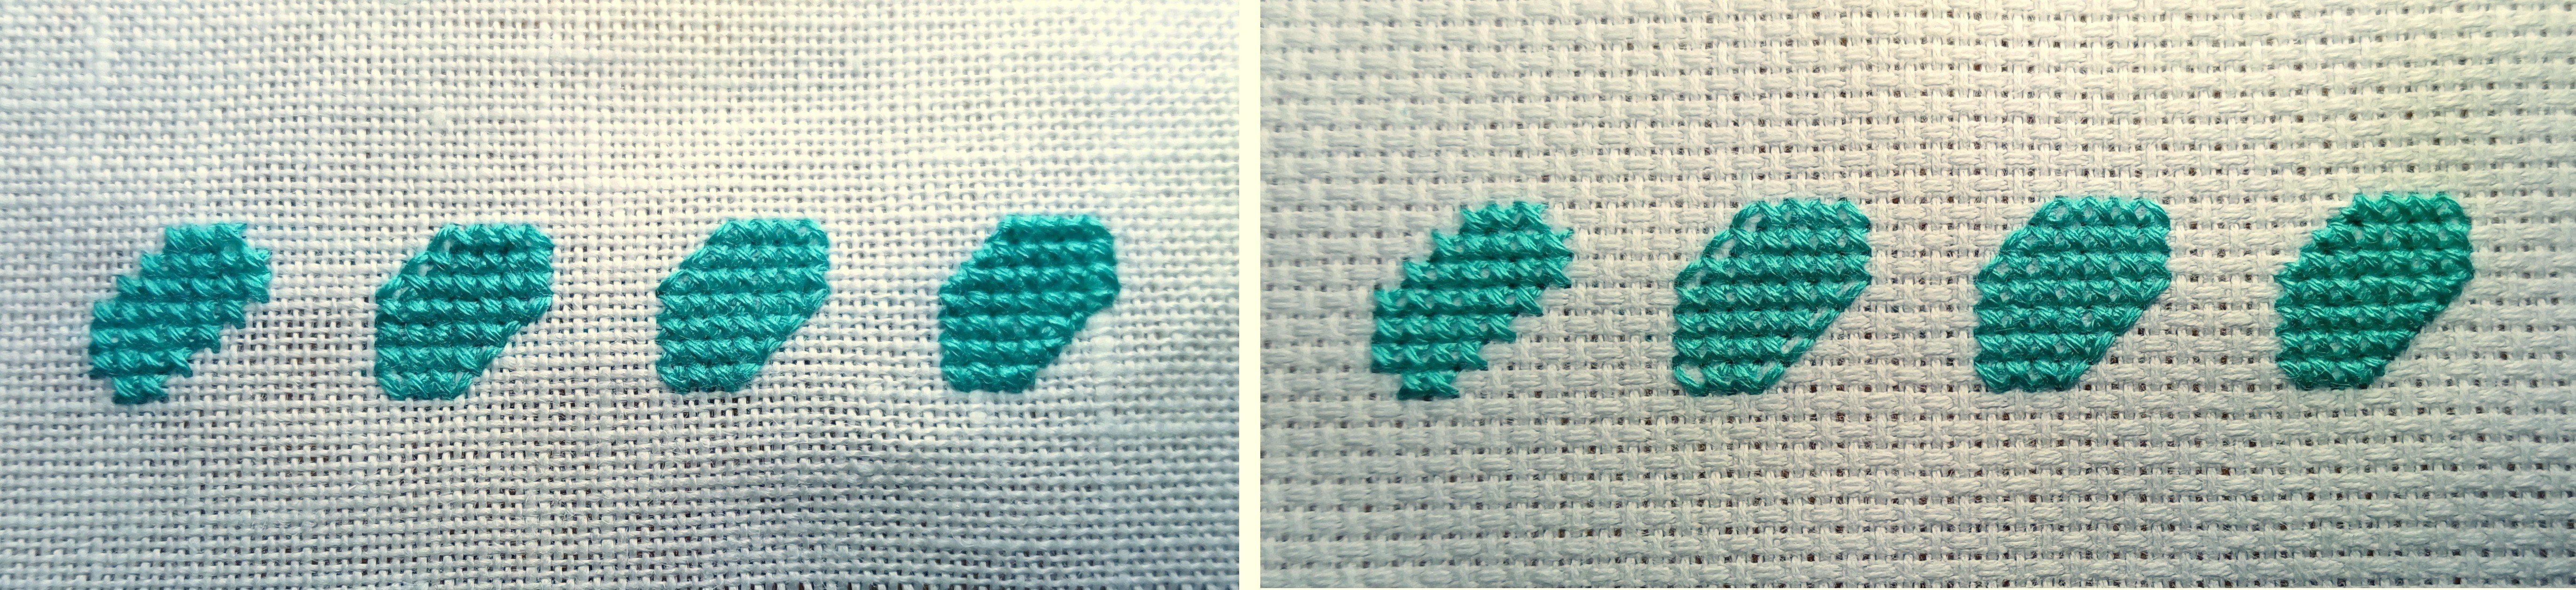
To illustrate, I've stitched different versions of the jellyfish design here on linen and Aida fabric. Pay particular attention to the slanted edges in the upper left and lower right. The first design is a jellyfish where I've worked only full cross-stitches. As you can see, it looks very angular, you can see the steps of the cross-stitches along the slant. For the second jellyfish, I omitted the quarter stitch as an alternative and only worked the half stitch. This would be one way to round off and smooth the shape of the jellyfish, for example, when using Aida fabric, without having to work the quarter stitch. Aida fabric has a closed weave in the center of the cross stitches, making it difficult to stitch right through. The third jellyfish represents the three-quarter stitch, specifically in the variation where the quarter stitch is always worked first, followed by the half stitch on top. This embroidery looks much denser than the previous version. For the last jellyfish, I stitched the partial stitches in the "correct" order, i.e., the way I generally stitch understitches/backstitches and cover stitches. Can you see the differences? The best way to find out which stitch type works best for your embroidery is to simply experiment.
As described above, partial stitches on Aida fabric are not as easy to execute as on linen or evenweave. It works best if any sizing is washed out beforehand and, as an exception, a sharp needle is used, at least for the partial stitches. Personally, for embroidery patterns that include many partial stitches, I would prefer to stitch on linen or evenweave and not use Aida fabric.
How the backstitch is stitched as an outline and frame for the subsequent seam
I also stitched the outlines of the lifebuoys, the straight stitches on the steering wheel, and the jellyfish tentacles with two strands of yarn. The backstitch outline will be more even if you insert the needle from the outside at the "edge" of the stitched design. As is usual with cross-stitch, you should be careful not to pierce or split the already stitched thread.

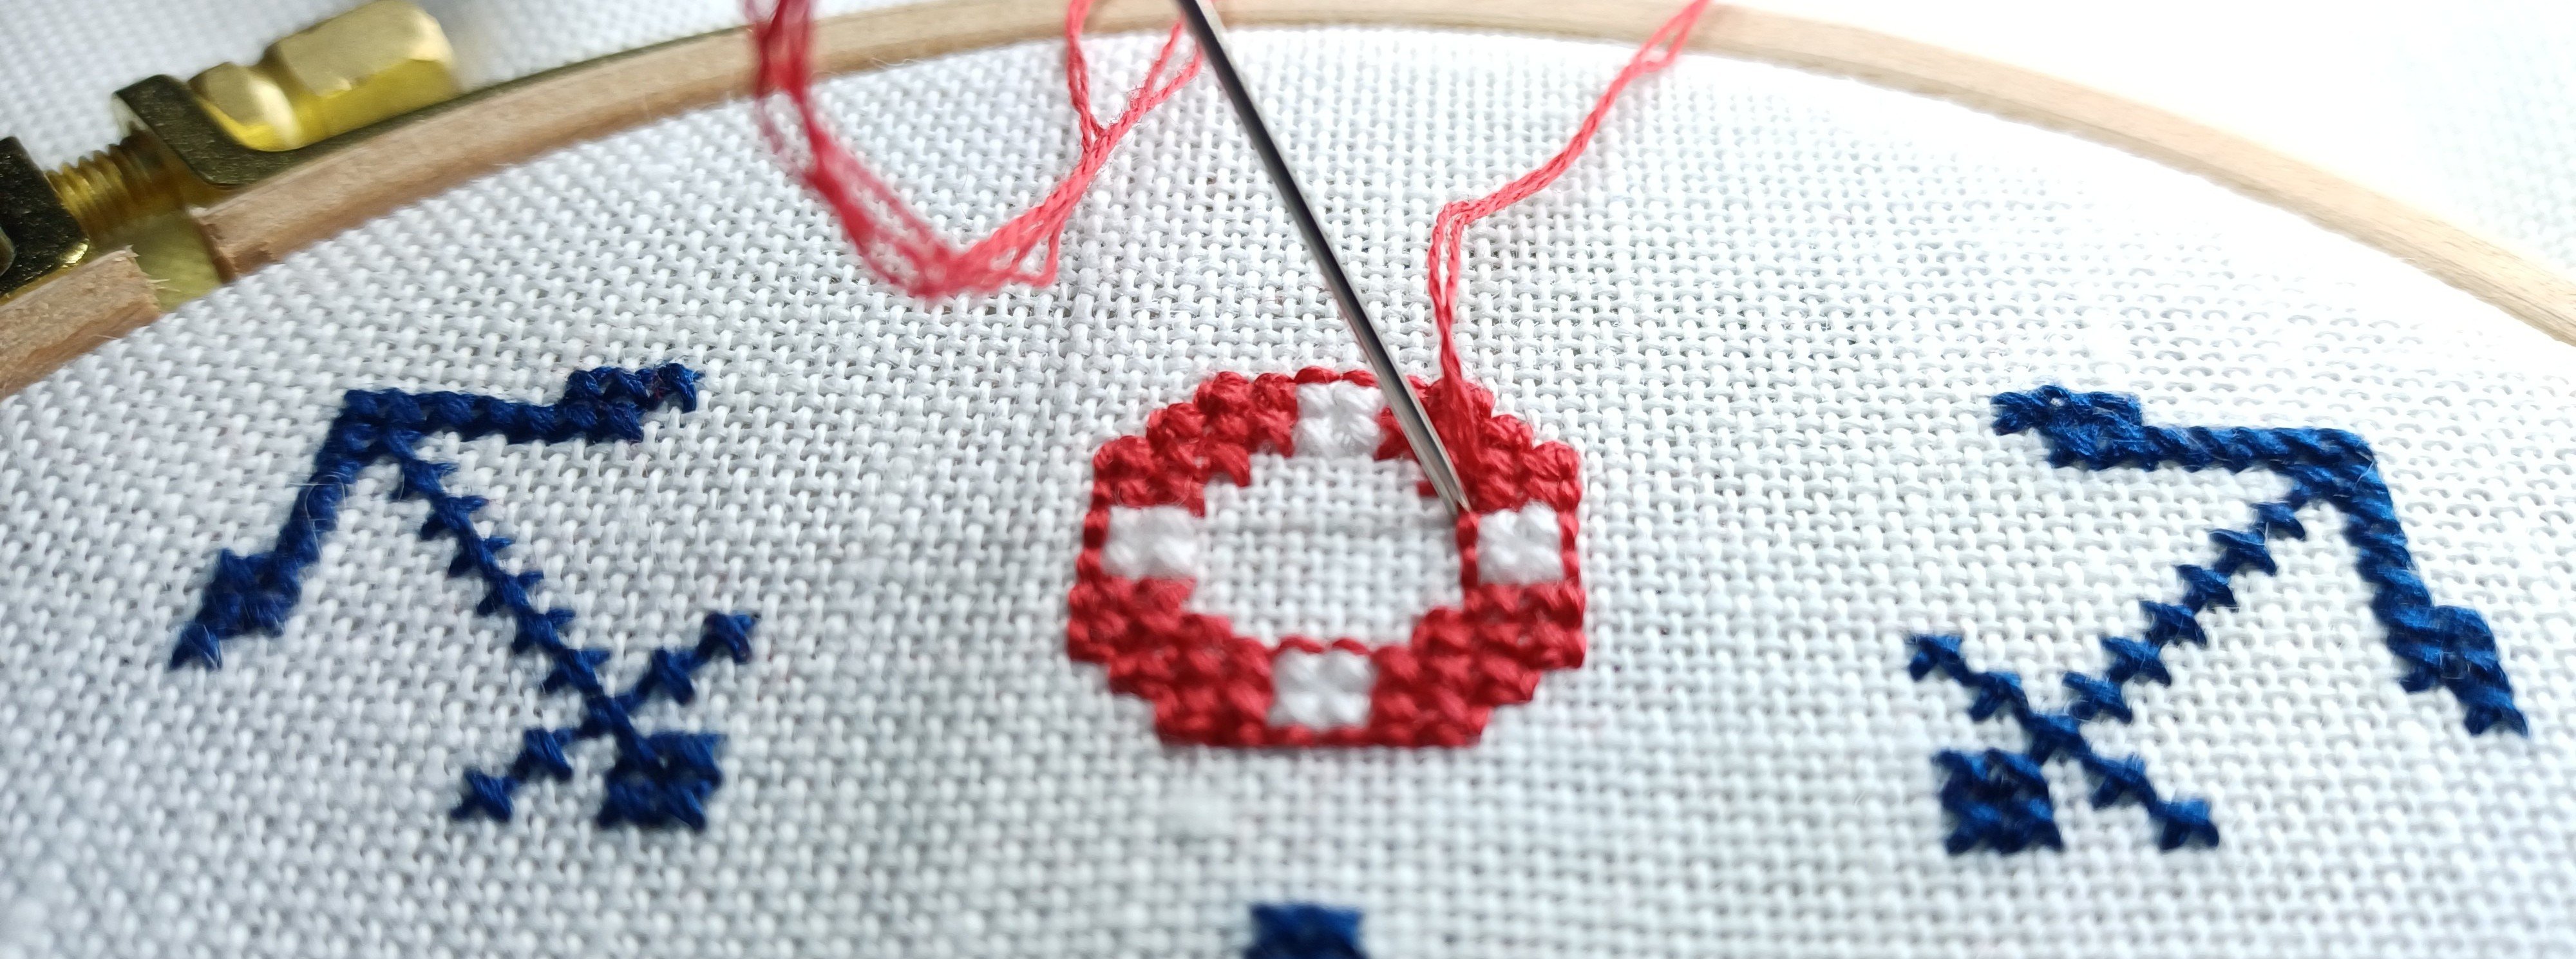
The frame around the entire embroidered design is also worked with two threads in backstitch. You always start from the back, one stitch before the starting point, then work one stitch back from the front (>backstitch) to close the line, and then from the back again two stitches forward. This gives you a stable backstitch line, which is important for our seam to join the two fabric squares. Even more important is that you are meticulous about counting the backstitches. The backstitch frame must be exactly square and have exactly the same number of stitches for both designs. Pay attention to the correct thread tension, but don't pull the thread too tight, as this would make sewing the biscornu together more difficult.
How to prepare the fabric for sewing
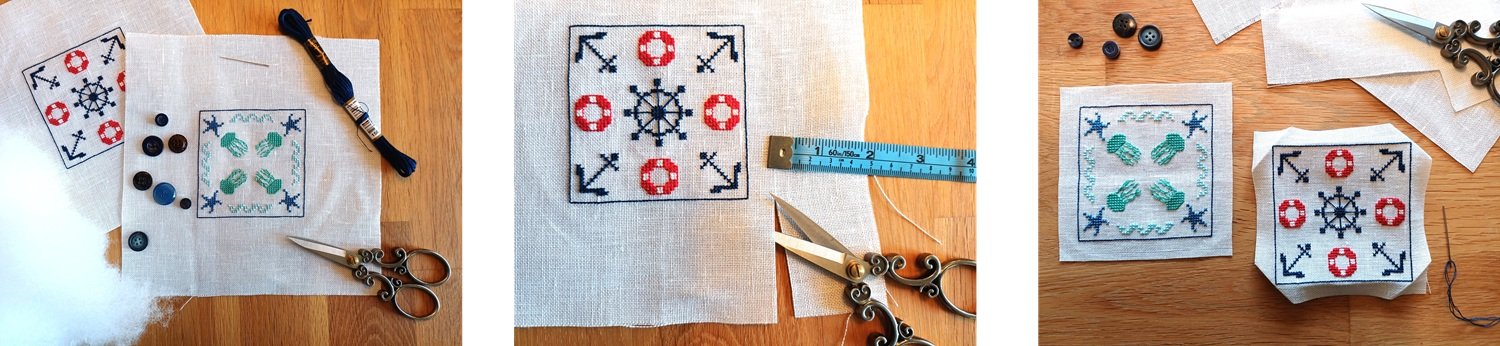
Once you've finished stitching both designs, I'd recommend ironing them again. You can get the stuffing and button ready. For sewing, we'll need embroidery thread in the same color as the frame. Cut out your embroidery with a 1 to 2 cm seam allowance. You can also cut the corners a bit; I forgot to. Fold the fabric back along the backstitch line and run your finger over the fold a few times. The corners are finished in the same way. If you prefer, you can also use an iron for this step.
How do you sew the biscornu together?
Mark the center of a backstitch line on the first square of fabric. I used a pin for this. Thread two strands of embroidery floss in the color of the backstitch line in your embroidery needle. You can secure the thread end with a loop start or a knot near the corner in the seam allowance. Then, insert your needle from the back, precisely into the corner of the second piece of fabric. Now, begin the seam by inserting your needle from the underside into the first backstitch of the second piece of fabric and into the backstitch directly to the left of the center of the first piece of fabric. The seam is worked from right to left.
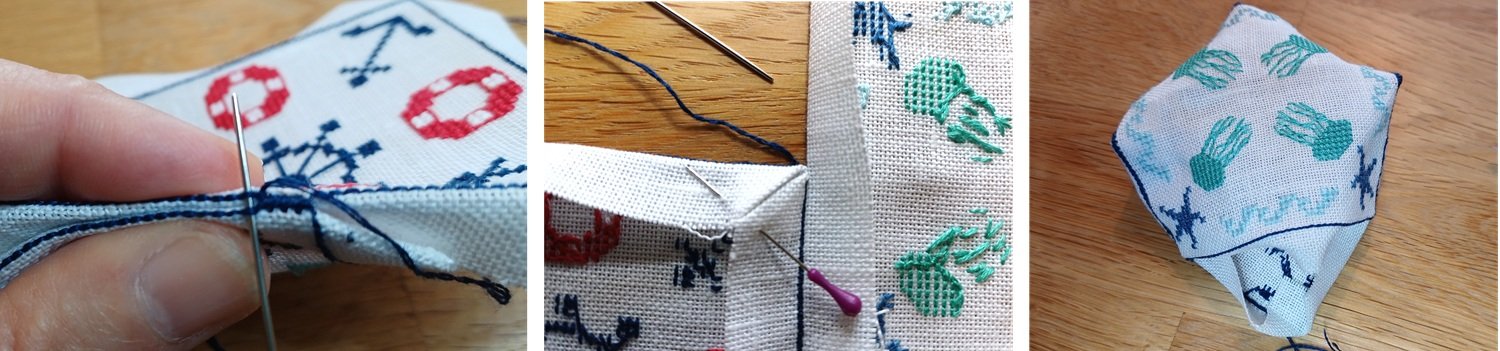
Continue stitch by stitch, always guiding the needle from bottom to top, through each subsequent backstitch of the two embroidery sections. Be careful to catch only the embroidery thread of the backstitches and not the fabric. If you have trouble guiding the needle through the backstitches because the stitches are very tight on the fabric, try a smaller needle size. After a few stitches, pull the current embroidery thread gently tight to ensure the seam is completely and evenly closed. Before you reach the first corner, carefully adjust the seam allowance. Fold the corner in first, then the long edges as shown in the middle illustration, and continue sewing the backstitches together. To reinforce the corners, you can double-stitch the stitches directly to the left and right of the corner, if desired. After sewing a few sides, you'll see the biscornu beginning to take its final shape. When you get to the last full fabric edge, the biscornu is filled with stuffing.
We fill the biscornu with fiberfill and close the seam
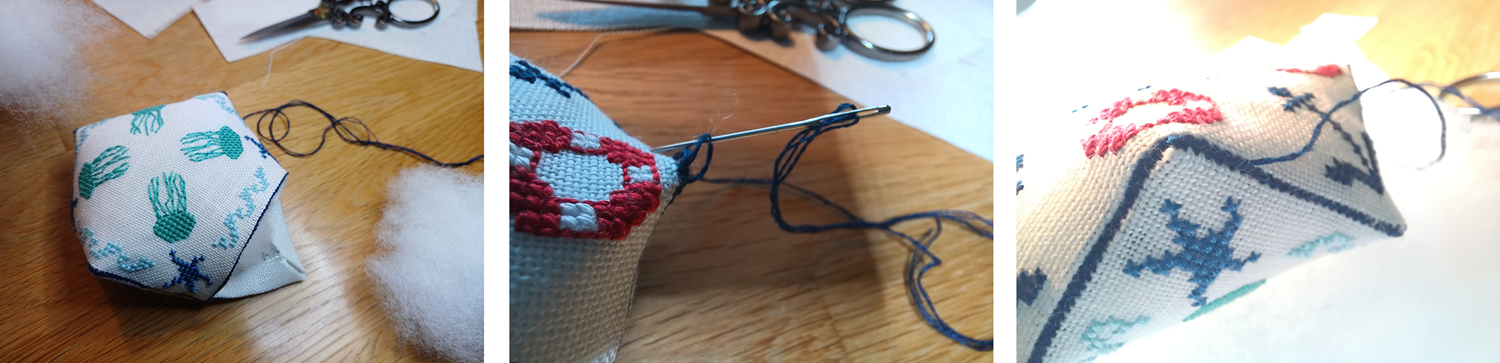
Make sure the corners are nicely filled. Don't overstuff the entire cushion, though; we want to "press in" the center of the biscornu. Once you have enough filling in the cushion, close the last seam. If necessary, add more filling while closing the seam. Secure the thread end by sewing a loop, threading the yarn through it, and pulling it tight. You can tuck the end under the seam and trim it short. To prepare for the next step, gently "knead" the stuffing to distribute it slightly from the center outwards towards the sides.
Finishing the biscornu: The button is sewn on
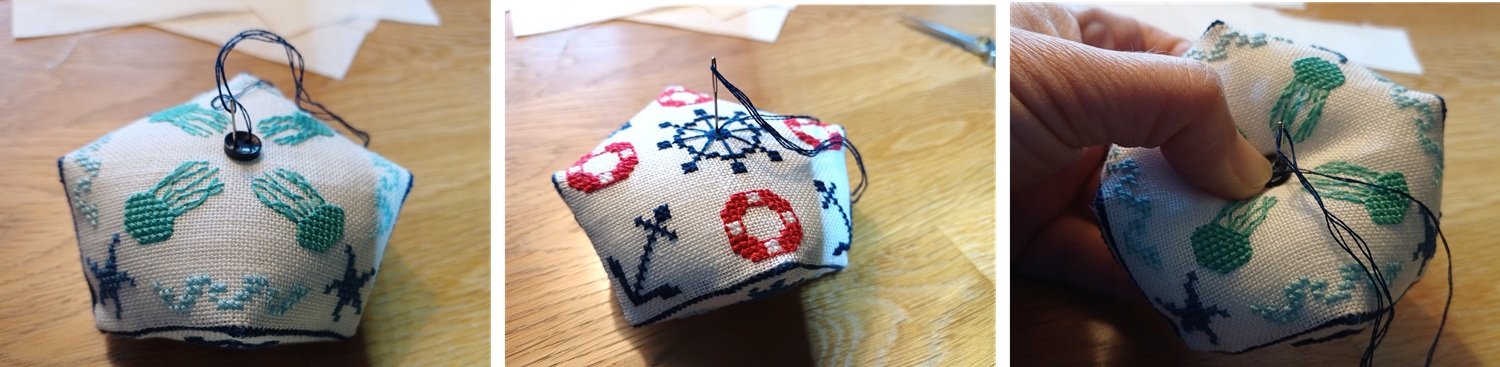
I hope you've left the marker for the center of the back on so far? Wonderful, you can remove it now and start again with a loop start right there, sewing on the button. When you insert the needle into the button and into the cushion, flatten the biscornu and use the needle tip to find the center of the embroidered steering wheel on the other side, then bring the needle out there. Insert the needle again just next to it, pulling the thread tight as you go, as tight as you want to press the biscornu in the center. Repeat this up-and-down motion through the button a few times until the button is sewn on.
To sew the end of the thread, loop the thread around the button two or three times, insert the needle through the vertical threads under the button, leave a loop, pass the thread through the loop, and pull the thread tight. You can "hide" the thread end by inserting the needle into the pillow under the button, bringing the needle out at any point, and cutting the thread while gently pressing the pillow in. This way, the thread will disappear into the pillow as if by itself.
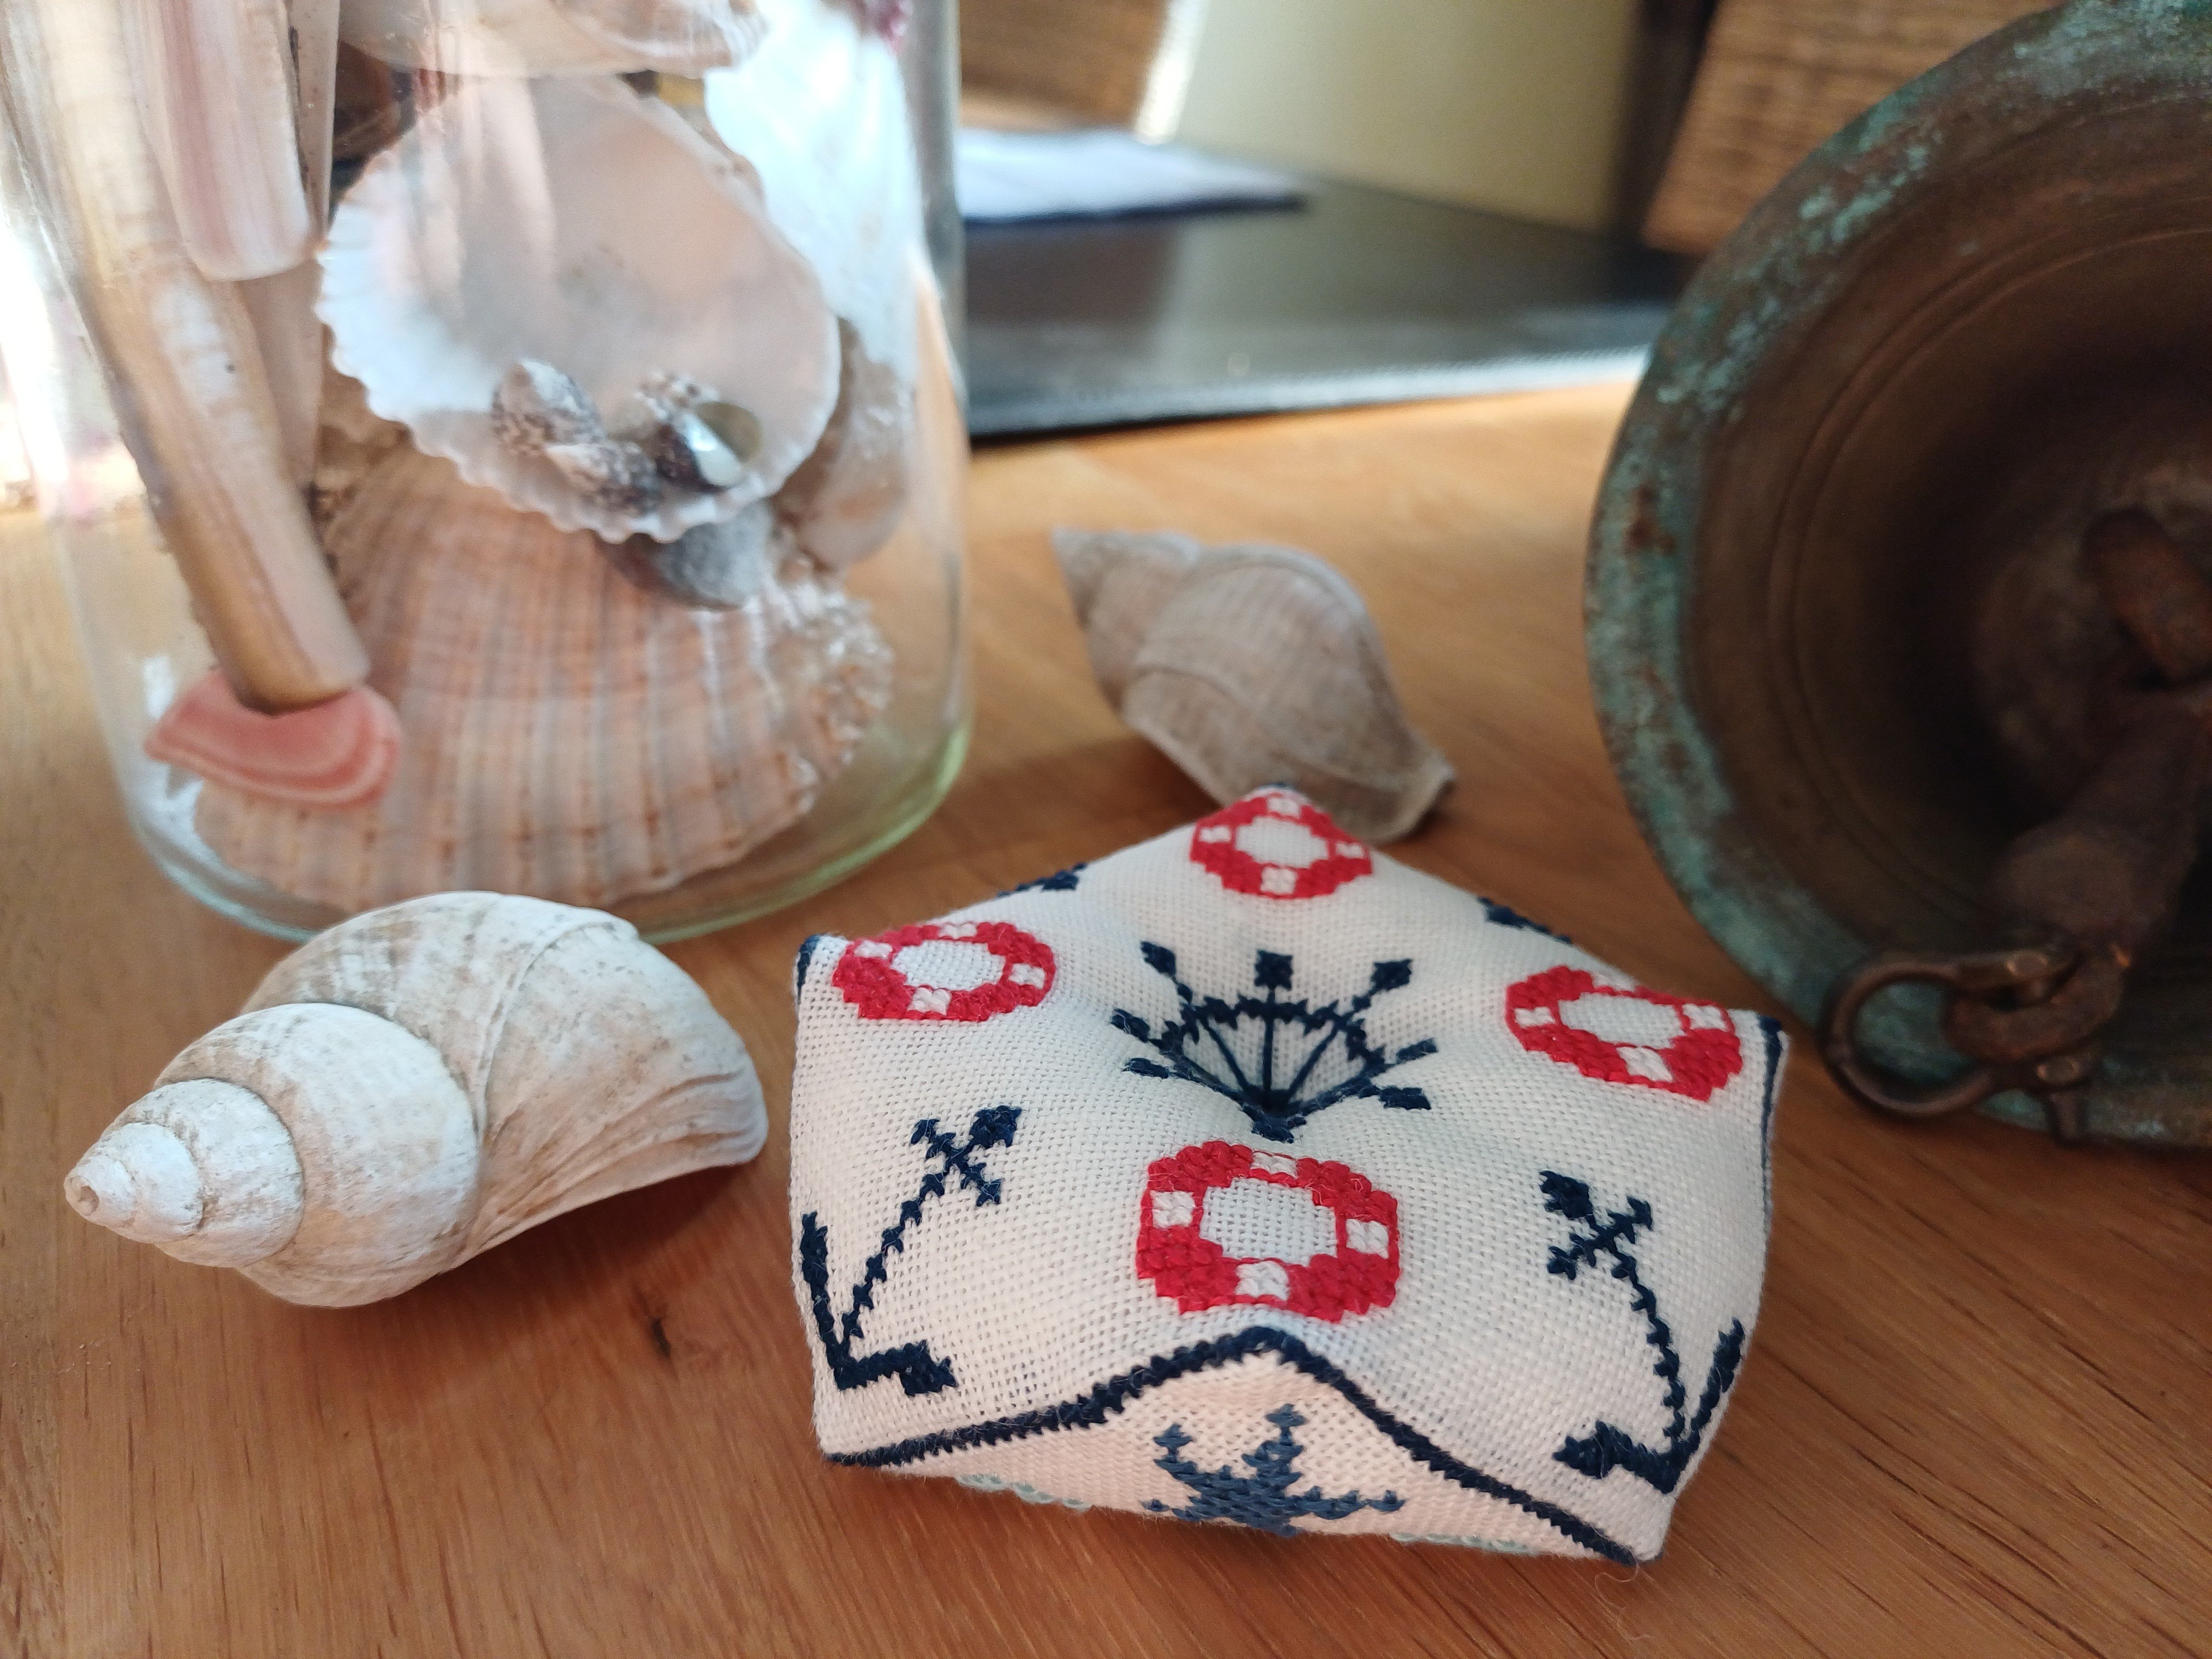
Congratulations! You have completed your biscornu.
I hope you enjoyed it. Have you found a nice place for it yet?
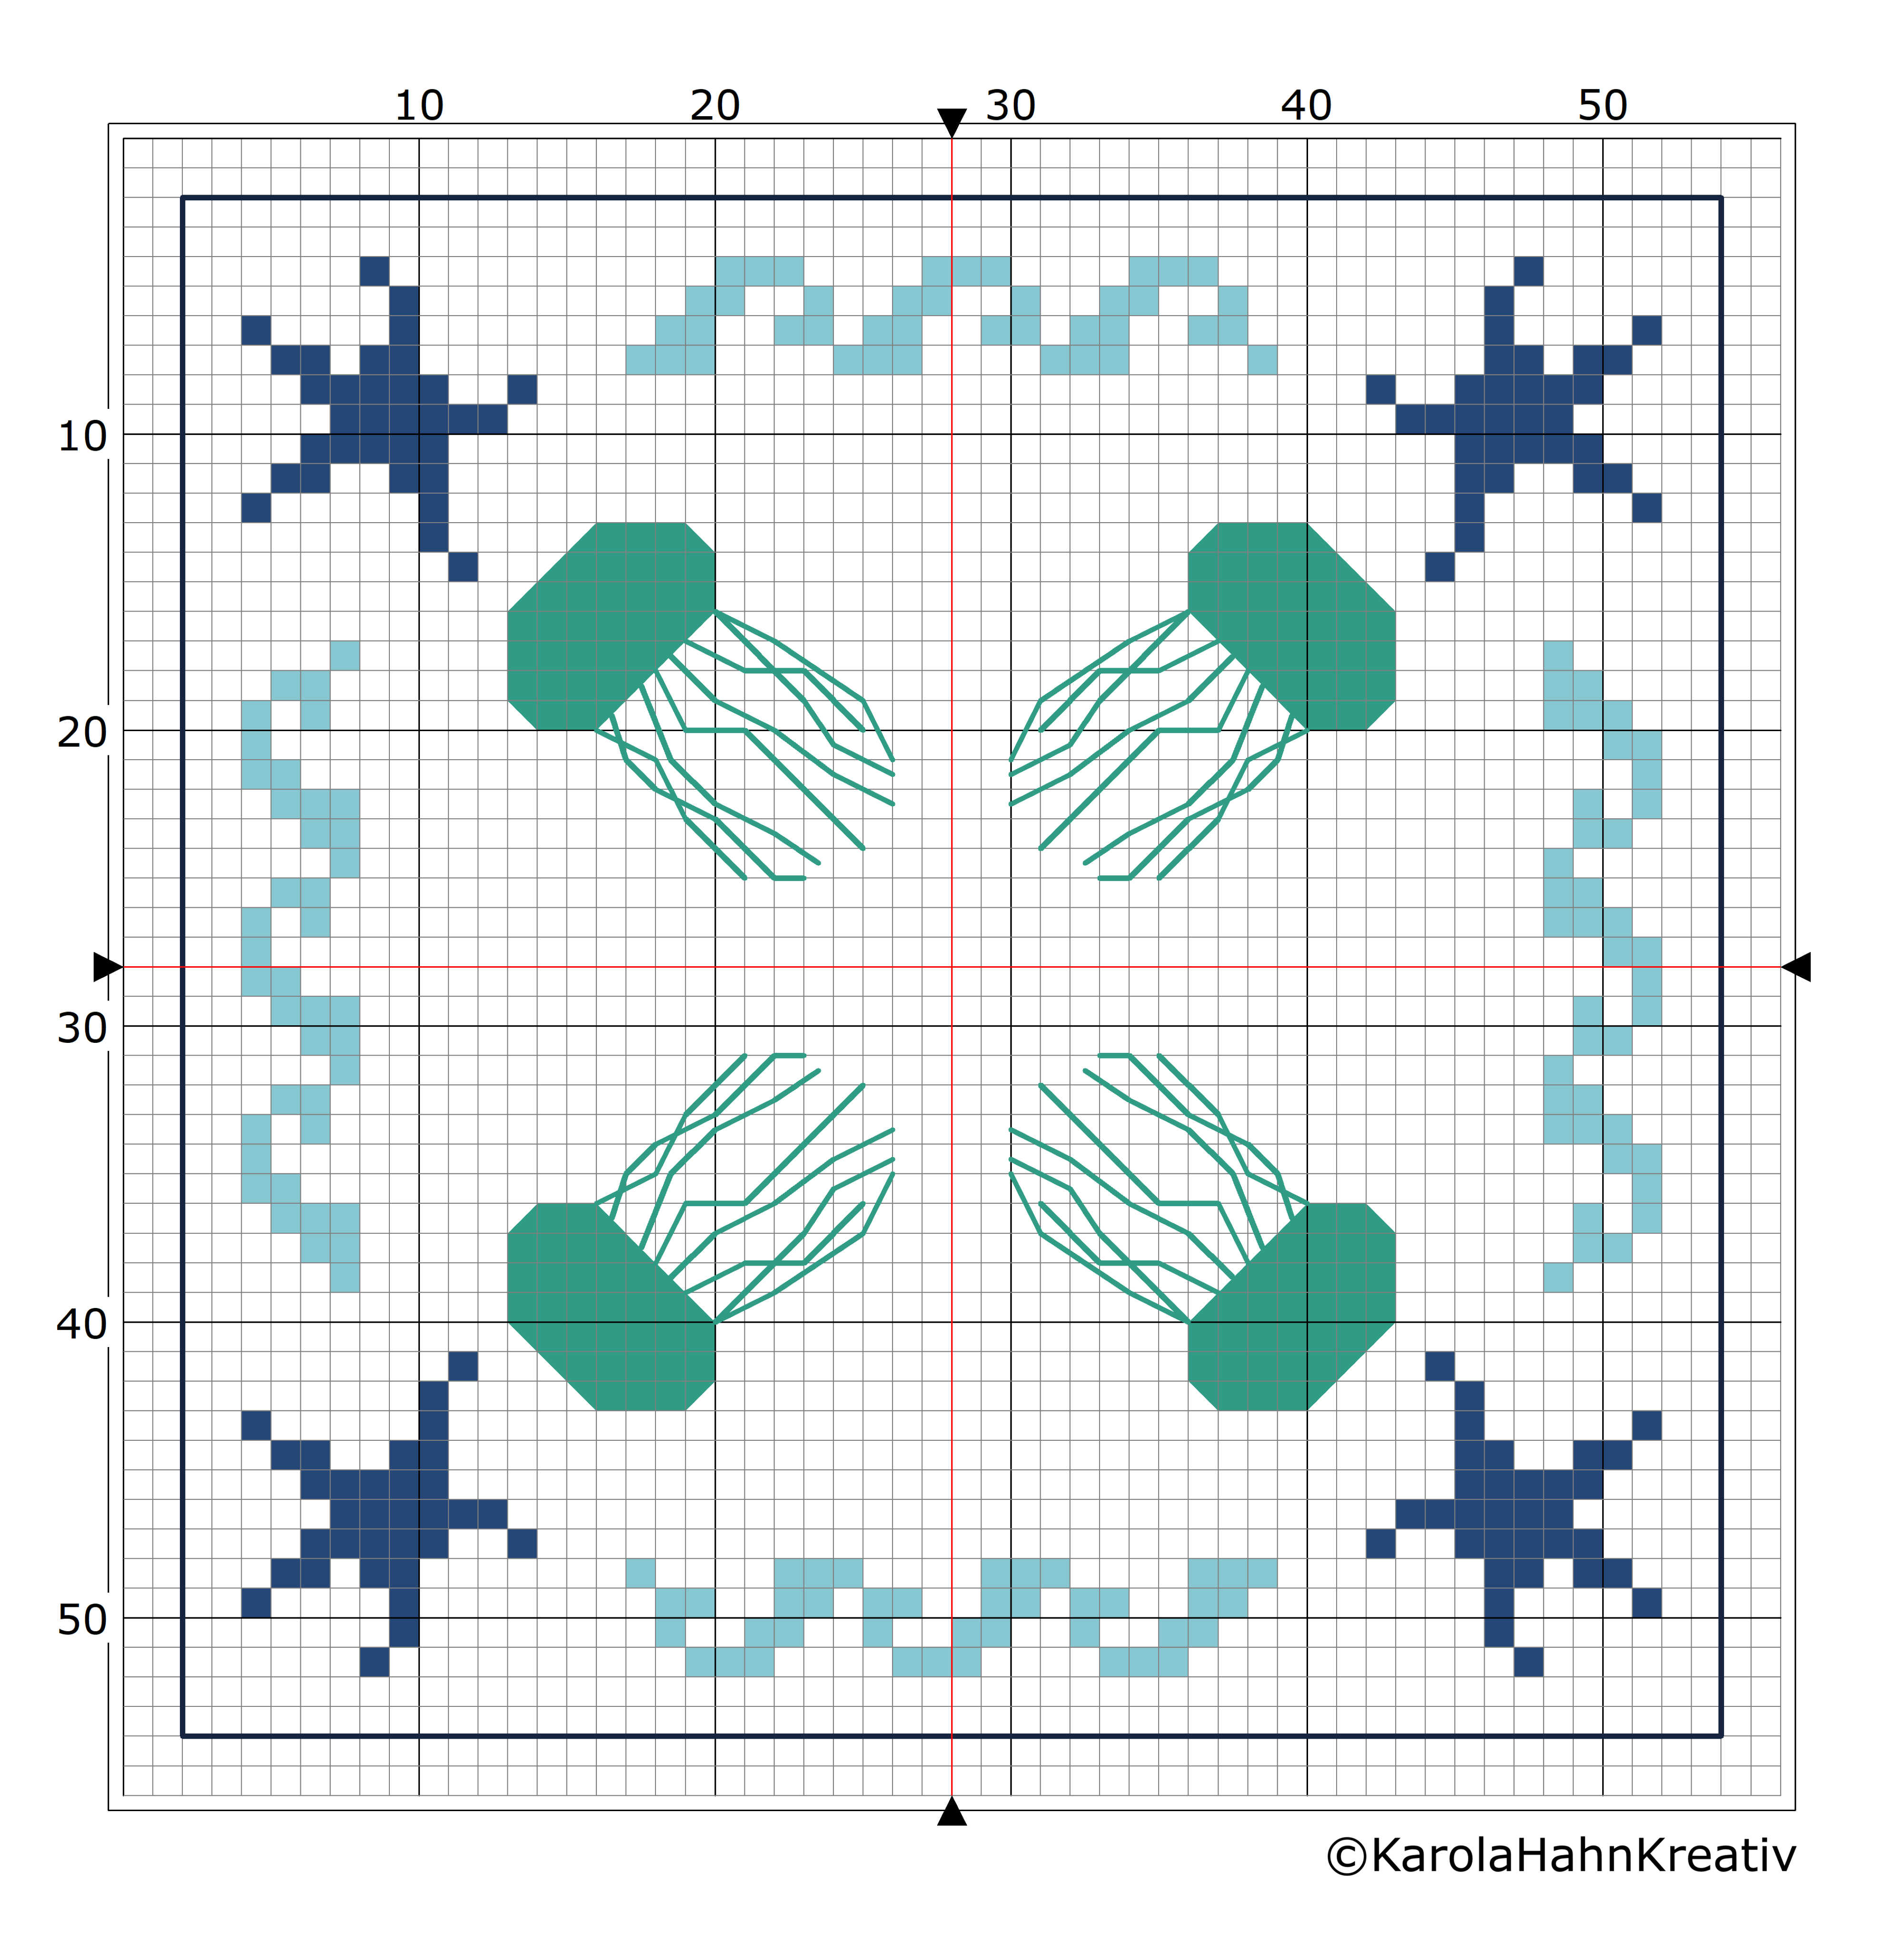
Free cross-stitch pattern for a maritime biscornu
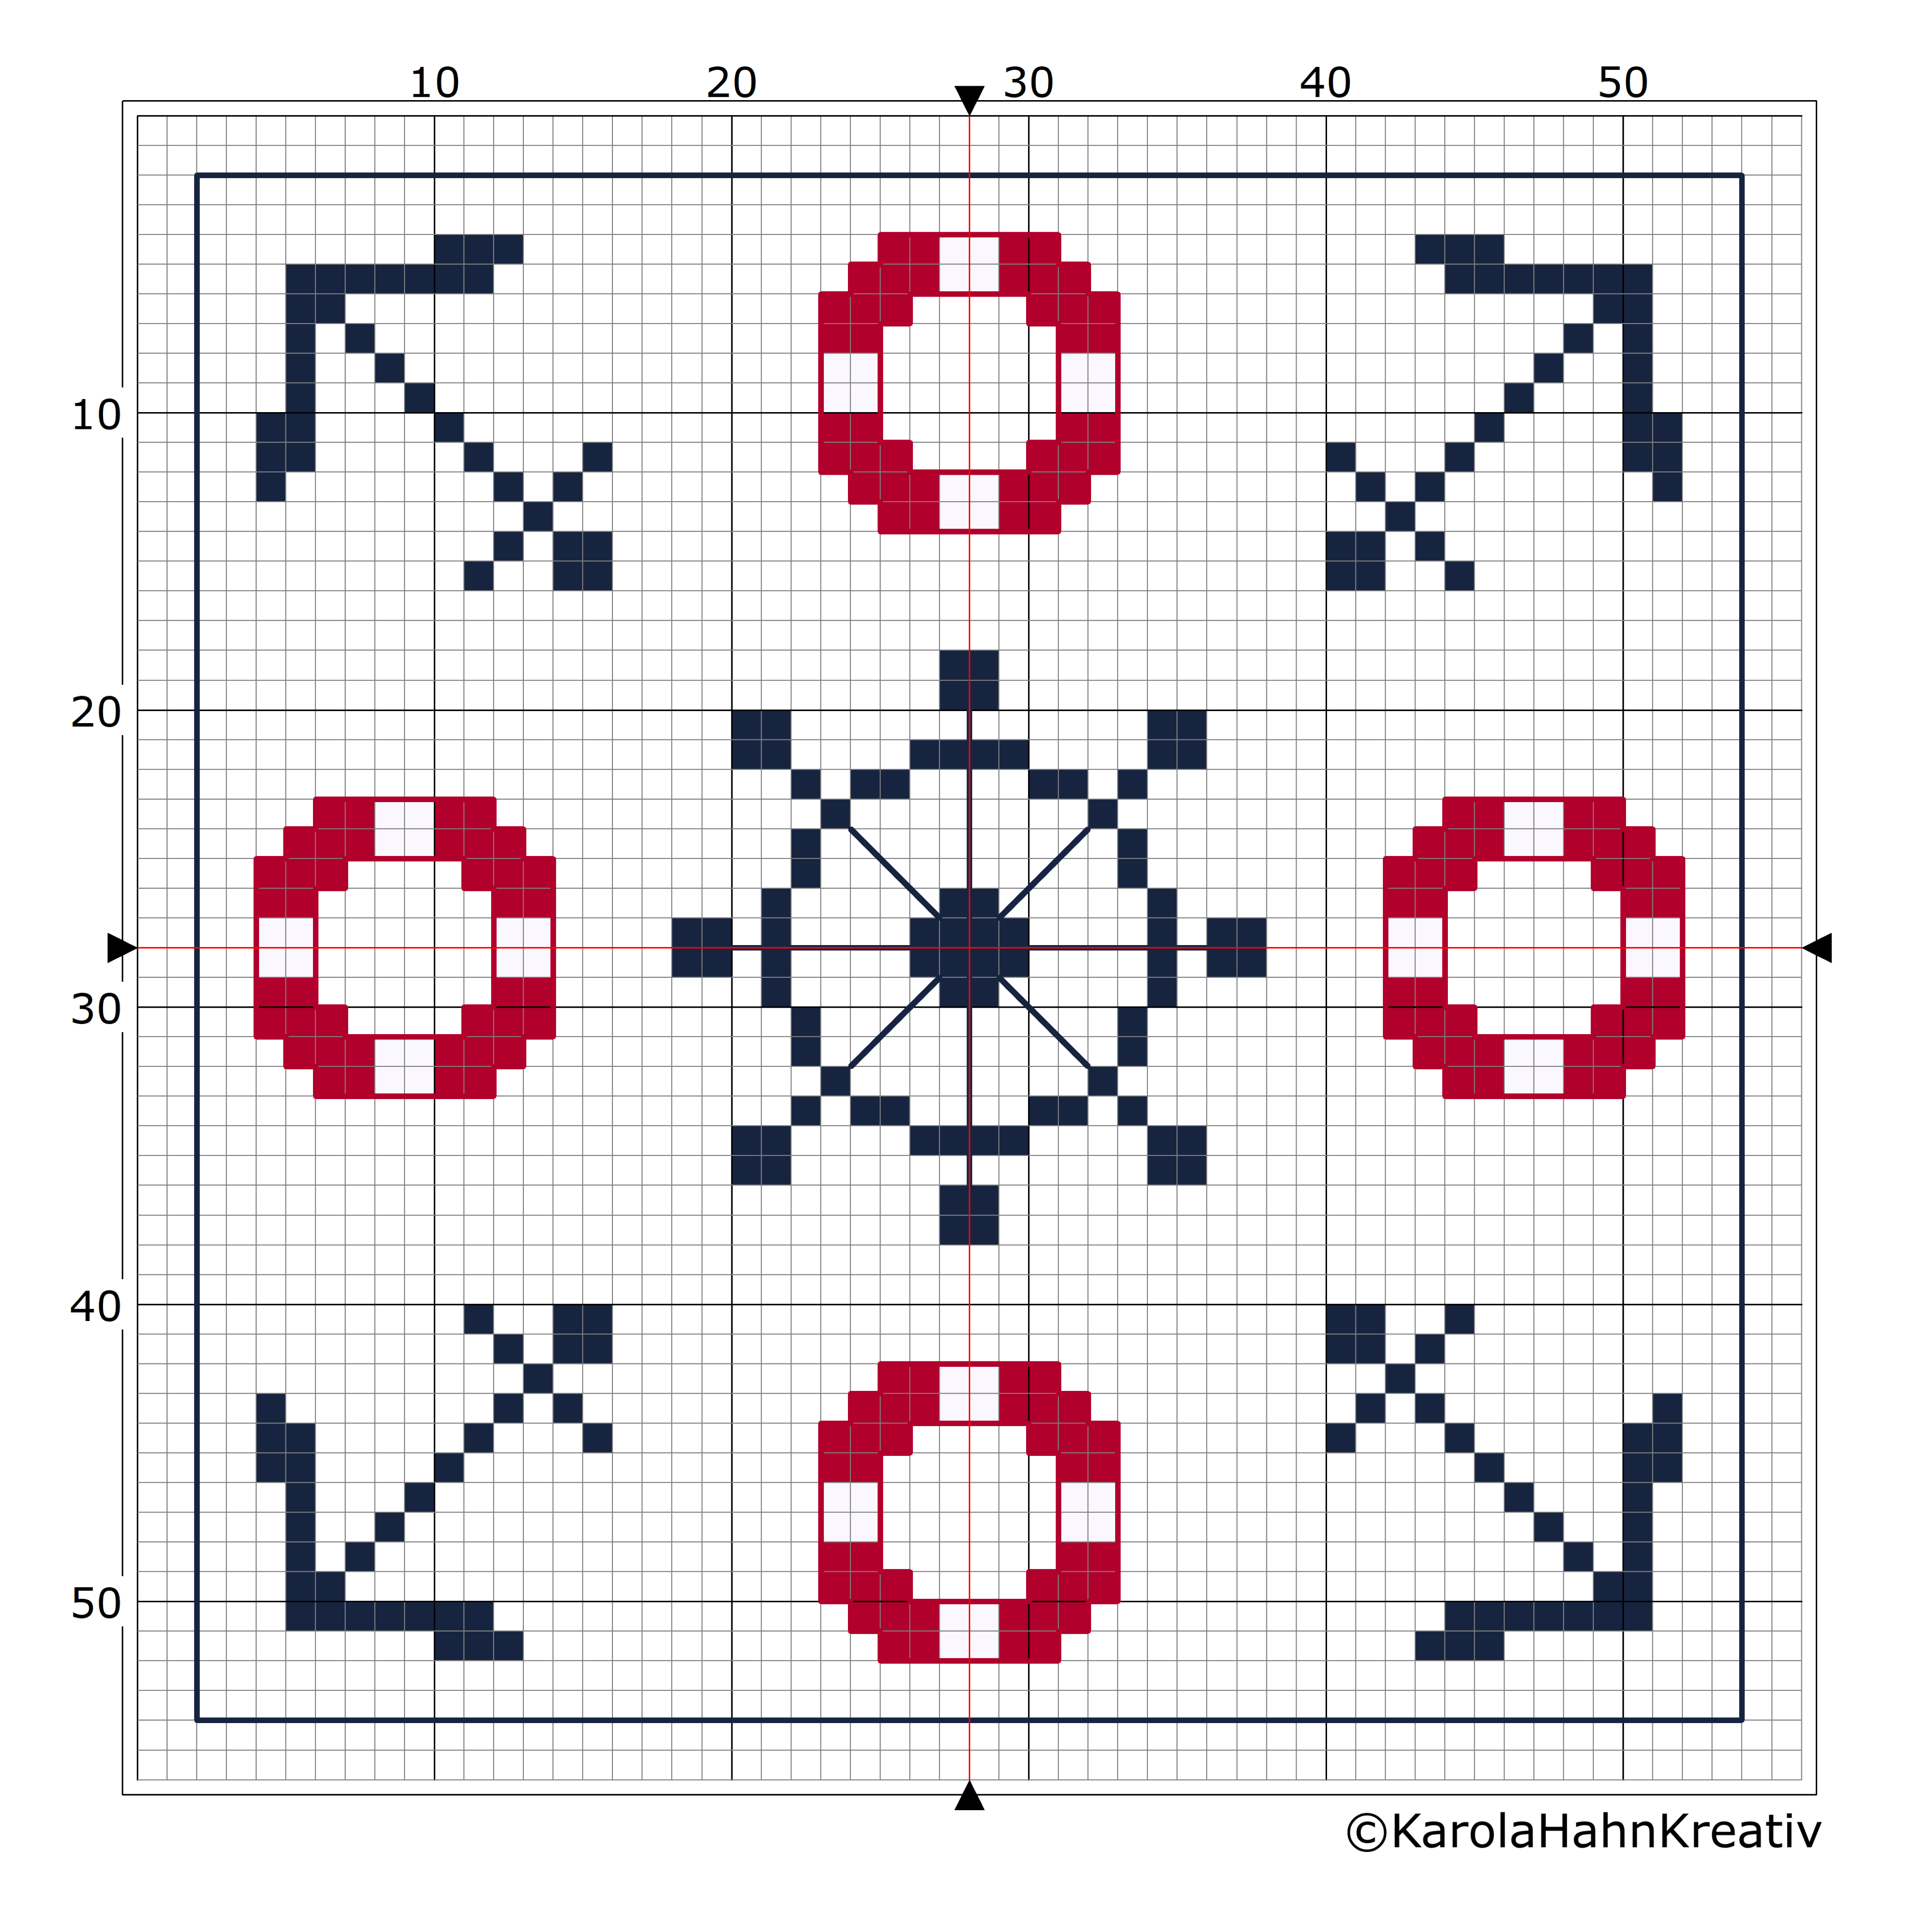
Size information
- the entire embroidery design measures 52 x 52 stitches
- the front has 448 cross stitches and 508 backstitches
- the back has 452 cross stitches and 442 backstitches
- with 12.6 threads per cm/32ct linen, the embroidery measures 8.66 x 8.66 cm
- the finished biscornu measures approximately 8 cm in diameter
- if you would like to use a different fabric with a different weave density, you have to calculate the required fabric size, perhaps this blogpost might help
Are you interested in more cross-stitch patterns? Feel free to browse my shop .
I'm so glad I could help you finish your first biscornu and share some tips and tricks for cross-stitch that you might not have known before. A photo of your biscornu in the Crazypatterns gallery would be fantastic – that would be the best thank you for this blog post. I'd also love a small thank you comment here on the blog. Perhaps you have some questions or comments on the topic? I'd love to hear from you here.
Happy stitching!
Best regards
Karola


