Quick to Target
Browse Categories
Community & Help

Wisteria bonsai tree - made of pearls and wire - and love

Wisteria bonsai tree - made of pearls and wire - and love

The lush blooms make the blue vine an extraordinary eye-catcher that immediately reminds you of balmy summer nights and vacations.

This bonsai made of beads and wire will bring this feeling into your home all year round.

You have never worked with beads and wire? That doesn't matter.

Have the courage - the many detailed and well-described step-by-step photos in the PDF instructions make this bonsai tree very easy for you to do it yourself.

The Wisteria bonsai from my tutorial was potted in a 6 cm = 2.4 inch tall shot glass and has a total height of 23 cm = 9 inches and a width of 14 cm = 5.5 inches.

approx. 24 gram 2,6mm Rocailles / glass beads with silver inlay
in the color light purple or white or light blue

approx. 10 grams 2,6 mm = 0,1 inch Rocailles / glass beads with silver inlay
in the color green

approx. 100 m / 100 yards black lacquered wire or craft wire or silver wire 26-28 gauge

Scissors

Pliers with grooves on the faces

pointed tweezers / jewelry tweezers

a "flower pot" (suitable are, for example.
small tea light holders, tapas bowls or shot glasses)

Decorative stones / granules (small stones, slightly coarser than normal sand)

approx. 30 grams craft glue

Wood or metal shish kebab skewer

optional:

1 block flower moss

1 teaspoon

Manufacturer: Nicole Kanzler, Harzstr. 28, 42579 Heiligenhaus, Germany, service@somethinks.de
Crazypatterns product ID: 52077
Purchase DIY Pattern

You can download the pattern immediately after receipt of payment.

Author: SomethinksDesign
Languages: English | Deutsch
Price: US $3.50*
With Prepaid-account: US $3.33*
All prices include VAT.
Buy Now - Starting at US $3.33

The lush blooms make the blue vine an extraordinary eye-catcher that immediately reminds you of balmy summer nights and vacations.

This bonsai made of beads and wire will bring this feeling into your home all year round.

You have never worked with beads and wire? That doesn't matter.

Have the courage - the many detailed and well-described step-by-step photos in the PDF instructions make this bonsai tree very easy for you to do it yourself.

The Wisteria bonsai from my tutorial was potted in a 6 cm = 2.4 inch tall shot glass and has a total height of 23 cm = 9 inches and a width of 14 cm = 5.5 inches.

approx. 24 gram 2,6mm Rocailles / glass beads with silver inlay
in the color light purple or white or light blue

approx. 10 grams 2,6 mm = 0,1 inch Rocailles / glass beads with silver inlay
in the color green

approx. 100 m / 100 yards black lacquered wire or craft wire or silver wire 26-28 gauge

Scissors

Pliers with grooves on the faces

pointed tweezers / jewelry tweezers

a "flower pot" (suitable are, for example.
small tea light holders, tapas bowls or shot glasses)

Decorative stones / granules (small stones, slightly coarser than normal sand)

approx. 30 grams craft glue

Wood or metal shish kebab skewer

optional:

1 block flower moss

1 teaspoon

Manufacturer: Nicole Kanzler, Harzstr. 28, 42579 Heiligenhaus, Germany, service@somethinks.de
Crazypatterns product ID: 52077
Product details
  • Created July 2, 2019
  • Updated November 16, 2023
  • File types PDF
  • Sales
    404
  • Questions & Answers 9
Categories
Crafts » Home & Deco
Crafts » Other Materials
Crafts » Other Materials » Metal / wire
Crafts » Other Materials » Seed beads

Reviews

    Lea64
    April 11, 2023
    April 11, 2023
    Auch eine super empfehlung
    Was this review helpful?
    Yes | No
    sabine-christ6
    November 25, 2022
    November 25, 2022
    Tolles Projekt
    Gute Erklärungen. Das war mein erstes Projekt dieser Art. Nach anfänglichen Schwierigkeiten hat es super geklappt...
    Show more
    Was this review helpful?
    Yes | No
    Lieblingsmutter
    October 18, 2021
    October 18, 2021
    Gut erklärt, Noch nicht verwirklicht
    Was this review helpful?
    Yes | No
    HelgaST
    October 13, 2021
    October 13, 2021
    super hab schon 10 stück gebastelt
    Was this review helpful?
    Yes | No
    Sommerwein
    December 31, 2020
    December 31, 2020
    Tolle Anleitung
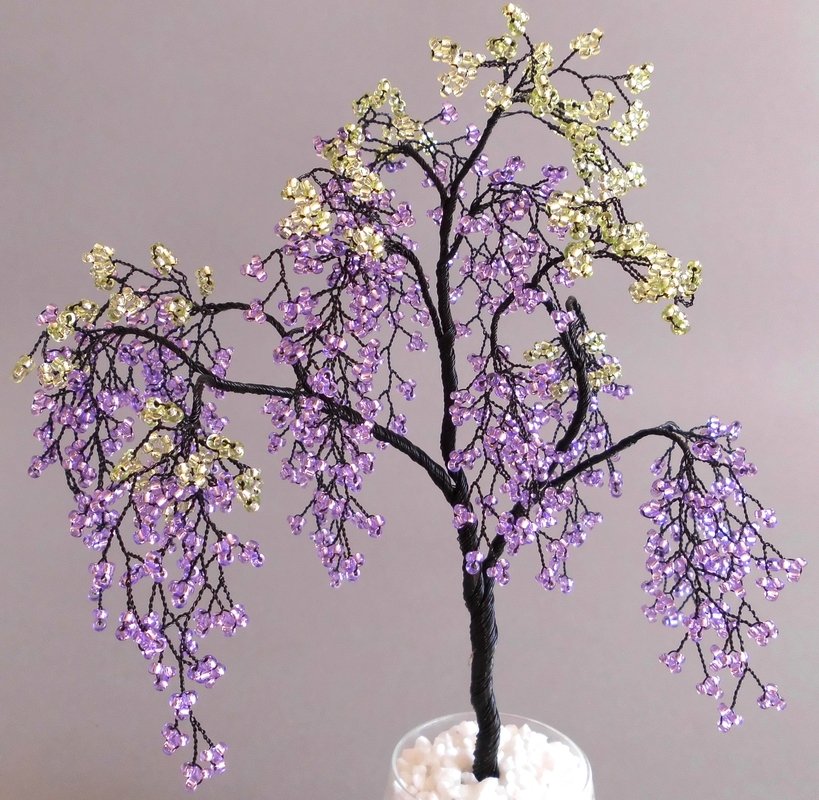
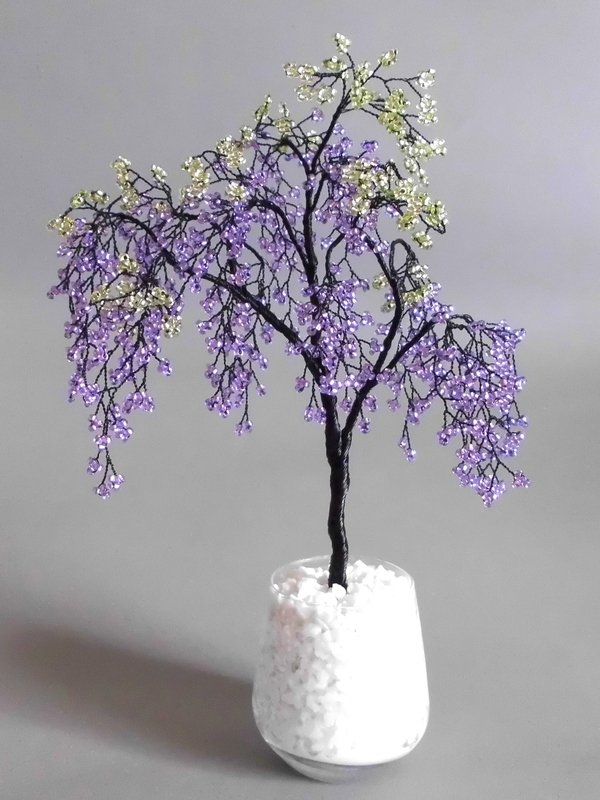
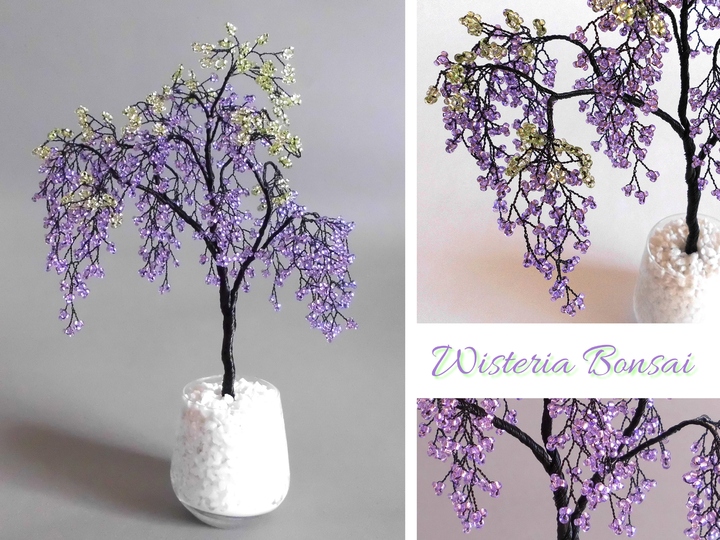
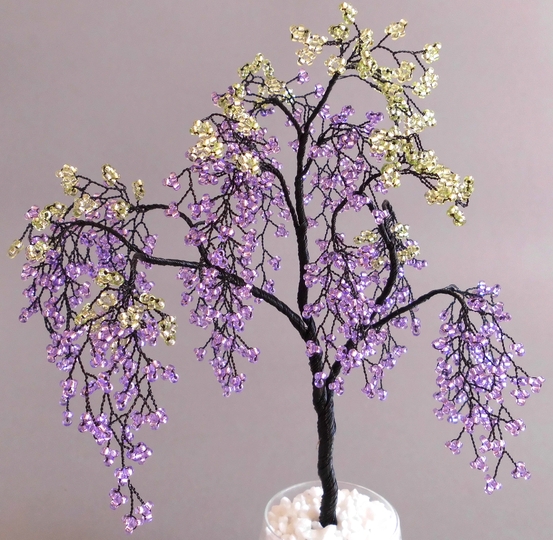
    Als " Glücksbäumchen " kann man die Perlenbäumchen kaufen, aber nach dieser sehr guten Anleitung sind viel schönere " Kunstwerke " entstanden. Schon so eine Anleitung zu erstellen ist für mich bewundernswert. Meine eigenen Bemühungen waren ne Katastrophe. Also vielen Dank Sommerwein
    Show more
    Was this review helpful?
    Yes | No
    InesMetzger
    May 10, 2020
    May 10, 2020
    Super
    Wenn man die Anleitung begriffen hat, macht das nacharbeiten echt Spaß.
    Show more
    Was this review helpful?
    1 Yes | No

Ask Question

Questions & Answers (9)

  • 1 years ago
    Hallöchen,
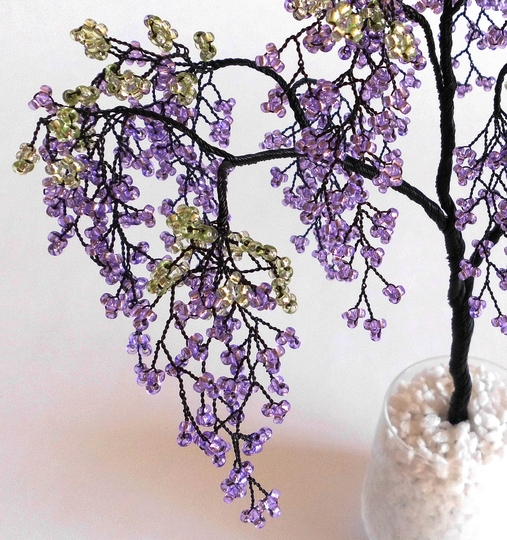
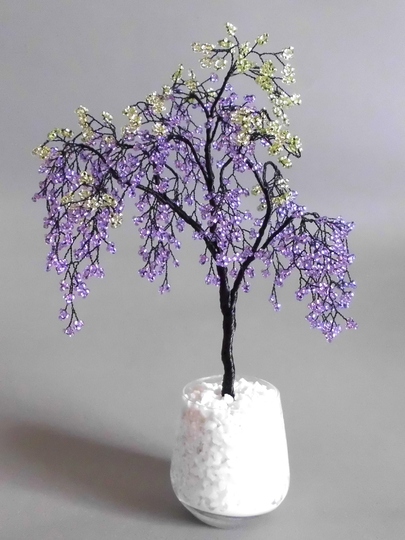
    Ich habe gestern 2 dieser hübschen Bäumchen "eingetopft" . Sie sehen einfach bezaubernd aus!!! Ich kann das Nachbasteln nur empfehlen.
    Ich bin allerdings mit den Perlen für die Blätter (lila) nicht ausgekommen. Ich habe Rayher Rocailles 2,6mm a 17g verwendet.
    Bei einem Baum habe ich eine 0.35mm Draht verwendet, dadurch ist der Stamm stabiler geworden.
    Danke für die Anleitung!
    Show more
  • 4 years ago
    Hallo,

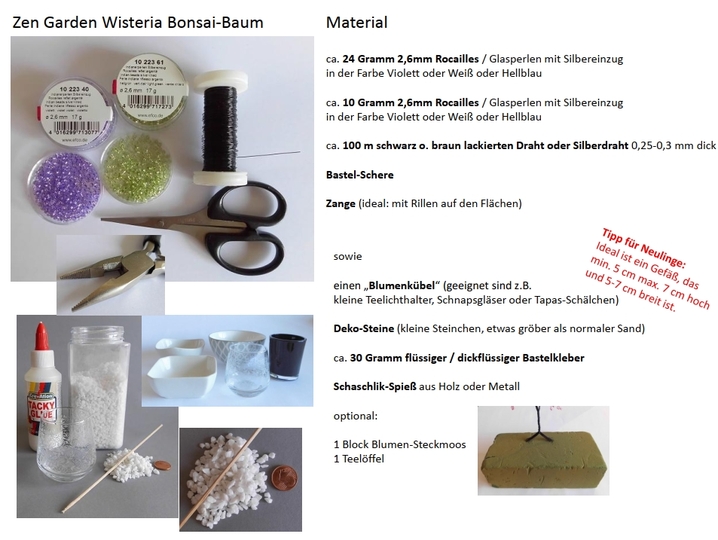
    ich habe die Anleitung eben gekauft, aber in der Materialliste ist ein kleiner Fehler, denn da steht:
    ca. 24 Gramm 2,6mm Rocailles / Glasperlen mit Silbereinzug in der Farbe Violett oder Weiß oder Hellblau
    ca. 10 Gramm 2,6mm Rocailles / Glasperlen mit Silbereinzug in der Farbe Violett oder Weiß oder Hellblau
    bei den 10 Gramm müsste es die Farbe Hellgrün sein.

    Vielleicht verbessern.

    Ansonsten muss ich das erst ausprobieren. Hab das noch nie gemacht. Bin schon sehr gespannt!

    LG,

    Davida
    Show more
    • SomethinksDesign Author Davida1975
      4 years ago
      Hallo Davida, ganz lieben Dank für Deinen Hinweis! Du hast natürlich Recht: ca. 10g Hellgrün ist richtig, so wie es in der Beschreibung steht (wurde schon korrigiert). Ich freue mich, dass der schöne Bonsai Dich dazu anregt, etwas ganz Neues auszuprobieren. Falls Du irgendwo mit der Anleitung nicht weiterkommst: schicke mir gerne eine Nachricht über Crazypatterns. Viel Freude beim Basteln und vor allem viel Freude mit dem fertigen Bonsai :-) Nochmals Dankeschön, LG Nicole
      Show more
  • 5 years ago
    Habe alle perlen angedrahtet. Morgen kommt der Rest.Es sieht jetzt schon super aus. Bin super damit klargekommen. Habe vielen Dank für alles.
    Kommen da noch mehr Bäumchen?
    LG Mona
    Show more
    • SomethinksDesign Author mona70
      5 years ago
      Liebe Mona, ich freue mich total, dass Du Spaß beim Bäumchen-basteln hast :-) Und warte erstmal, bis alle, die Dein Bäumchen sehen, sagen: "Ohhh, der sieht ja schön aus!" :-D Es ist so, wie Du in Deiner Bewertung schreibst: Wenn man den Dreh raus hat (im wahrsten Sinne des Wortes!), ist es ganz einfach und mal was ganz anderes. Und langweilig wird es auch nicht, weil die Perlen bei jedem Baum anders gefädelt und gedrahtet werden. Anfang des Jahres wird es wieder zwei neue Bäumchen geben. Aber mehr verrate ich noch nicht ;-) Ich wünsche Dir viel Freude mit Deinen kleinen Bonsai Bäumchen! Liebe Grüße, Nicole
      Show more
  • 5 years ago
    Ein sehr schönes Bäumchen. Habe noch nie mit Perlen gearbeitet. Ich möchte sowas auch mal probieren. Bin mir aber nicht sicher. Braucht man für so ein
    Bäumchen sehr lange? Und wo bekomme ich den kleber her?
    Show more
    • SomethinksDesign Author mona70
      5 years ago
      Hallo Mona70,
      solche Bäumchen zu basteln kann viel Spaß machen und das Ergebnis ist wirklich etwas Besonderes. Allerdings entsteht solch ein Bäumchen nicht als schnelles 1Stunden-Projekt. Du musst schon etwas Geduld haben. Wie lange es dauert, hängt davon ab, wie schnell Du Dich in die für Dich neue Basteltechnik rein findest. Ich habe für den Baum auf den Fotos etwa 6 Stunden gebraucht. Nun habe ich zwar mehr Erfahrung und bin deshalb schneller, aber ich habe jeden einzelnen Schritt mit mehreren Fotos dokumentiert, so dass sich das wahrscheinlich wieder ausgleicht.
      Bastelkleber bekommst Du preisgünstig in guter Qualität bei den Non-Food-Discountern.
      Viele Grüße, Nicole
      Show more
  • 5 years ago
    sieht wunderschön aus!
    Show more

-10% Sunflowers - simple from scraps of yarn
Sunflowers - simple from scraps of yarn
(38)
from US $2.91 US $3.40*
-10% Crochet pattern cherry blossom door wreath
Crochet pattern cherry blossom door wreath
(41)
from US $2.91 US $3.40*
-10% Bag Shopper market tote bag Large Flower - decorative and versatile
Bag Shopper market tote bag Large Flower - decorative and versatile
(43)
from US $2.91 US $3.40*
-10% Butterfly decor ornament- simple made from scraps of yarn
Butterfly decor ornament- simple made from scraps of yarn
(11)
from US $2.91 US $3.40*
-10% Hanging ornament decor large 3D flower - from scraps of yarn
Hanging ornament decor large 3D flower - from scraps of yarn
(24)
from US $2.91 US $3.40*
-10% Crochet decoration tulips in umbrella
Crochet decoration tulips in umbrella
(61)
from US $2.91 US $3.40*
-10% Heart hanging decor & flower pot stake 4-in-1 - simply from scraps of yarn
You might like
Apple tree bonsai from beads and wire - and love
(7)
from US $3.33
African Woman Brick Stitch
from US $4.57
Autumn Maple Bonsai made of beads and wire - and love
(7)
from US $3.33
-40% Chrysanthemum from beads
Chrysanthemum from beads
(1)
from US $1.44 US $2.52*
Colour Burst Peyote Stitch Bracelet
from US $4.10