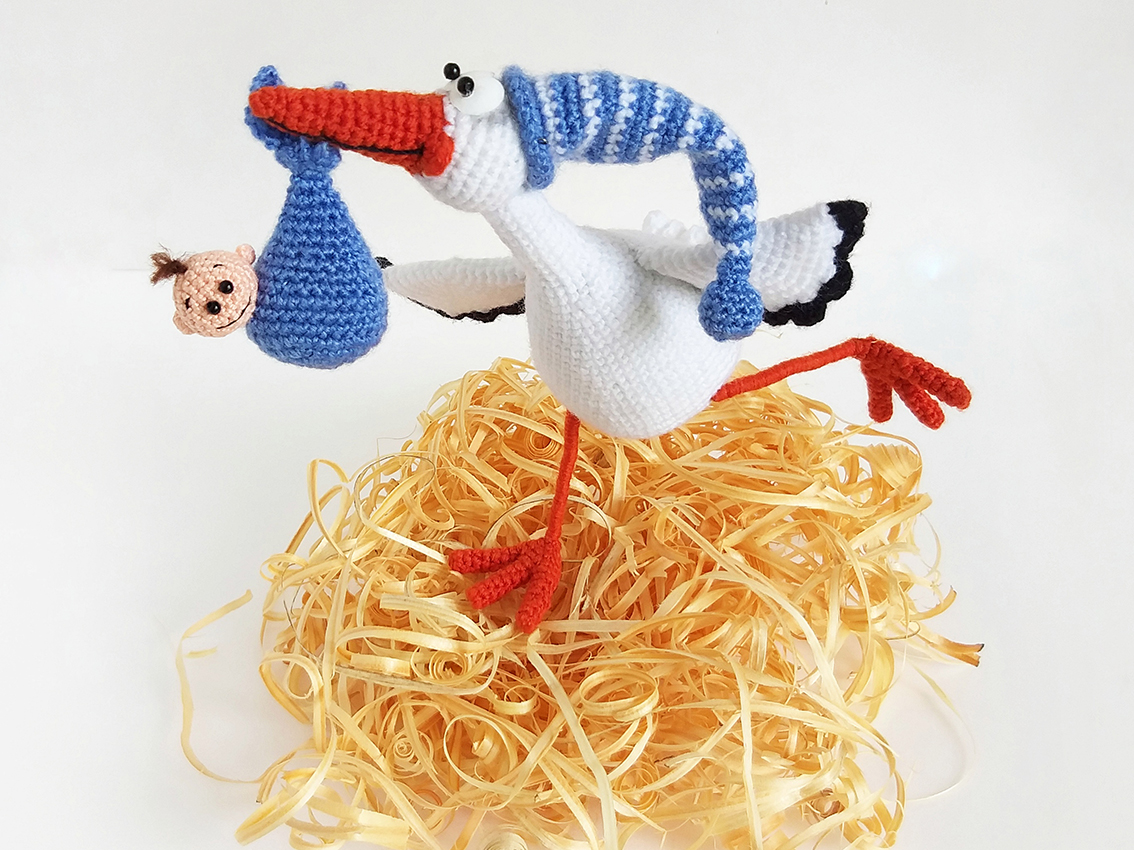
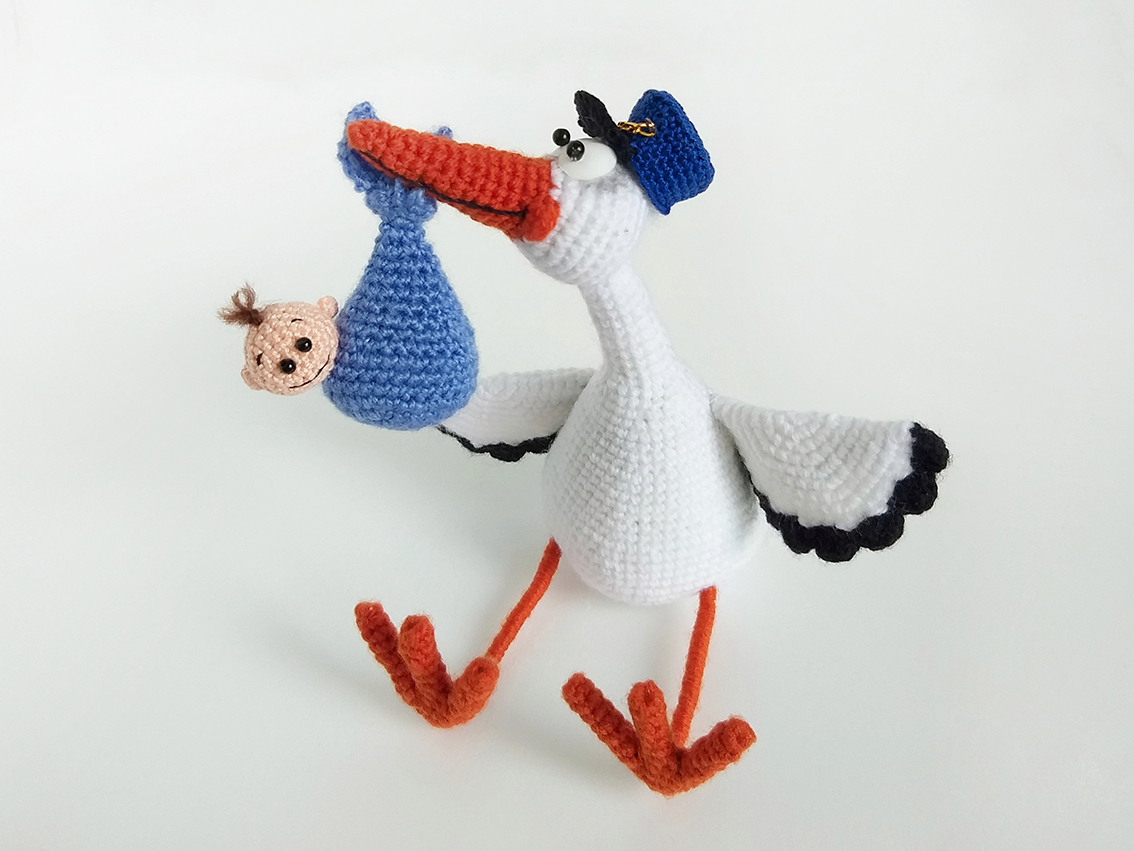
The size of a sitting stork is 12 cm.
Materials:
Yarn of your choice. Cotton, acrylic, wool will do. I used acrylic yarn, 400 m/100 g. For the baby's head and cap, choose a little thinner yarn than the main yarn. I used colour cotton yarn, 220 m/50 g.
Yarn of the following colours is required: white, terracotta (brown, red will do), black, blue, light blue, nude.
- Crochet hooks in two sizes. I used No.1.25 and No. 1.0.
- A sewing needle
- Hollow fibre for stuffing
- Transparent glue
- A piece of wire with a diameter of 1mm approx. 130cm long
- For stork eyes: 2 beads, I used 4 mm diam beads
- For baby's eyes: 2 beads, I used 2 mm diam beads
- For embroidery: a few threads of black.
Abbreviations:
ch – chain
st - stitch
sl st – slip stitch
sc – single crochet
hdc – half double crochet
dc - double crochet
inc – increase (2 sc in 1 st)
dec – decrease (single crochet two stitches together)
(...)* N times – repeat instructions in brackets N times
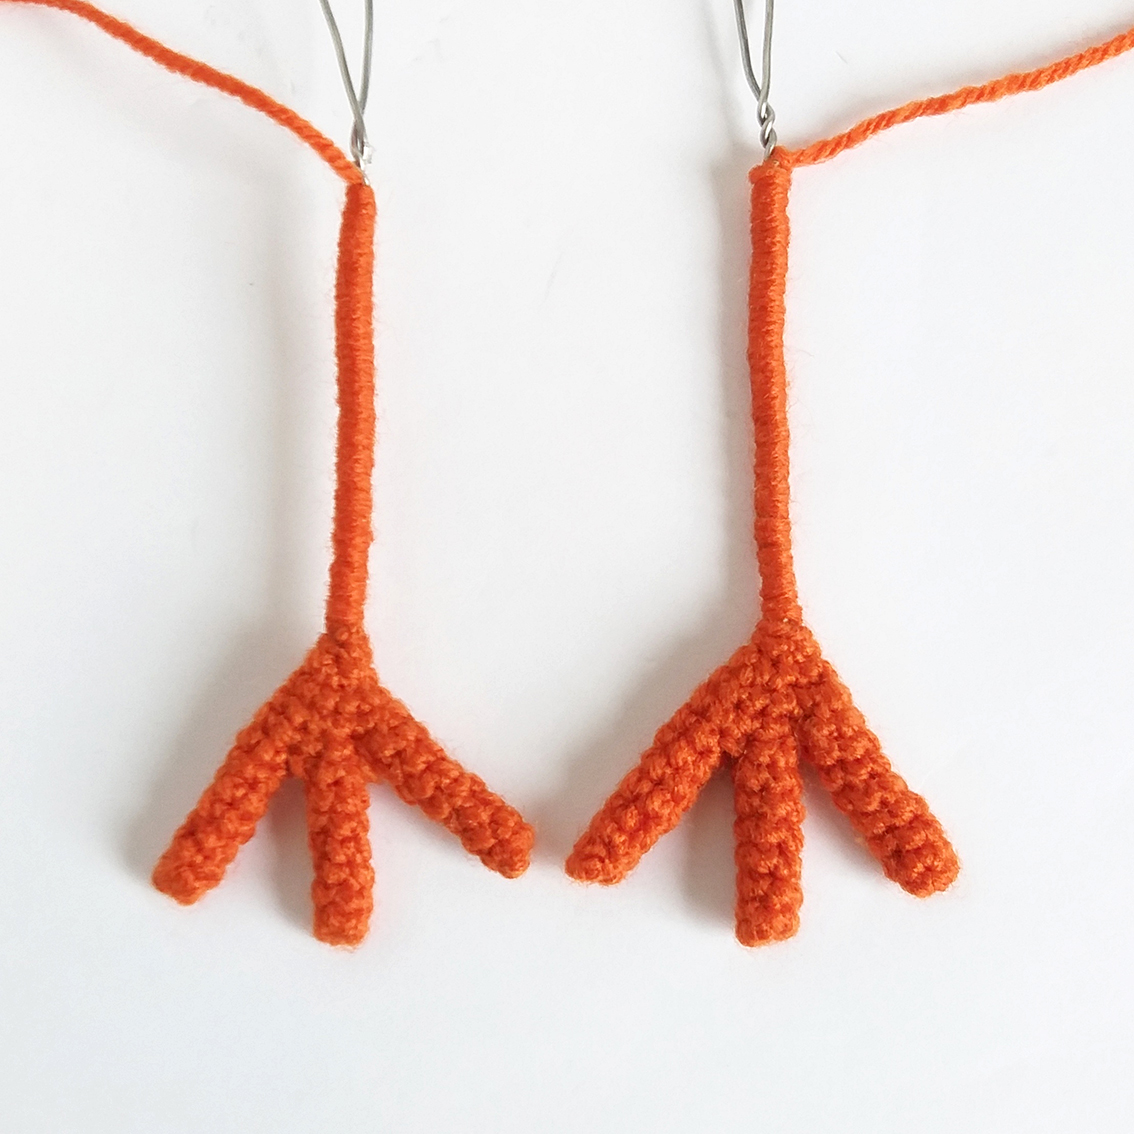
Legs (make 2)
Work with terracotta colour yarn.
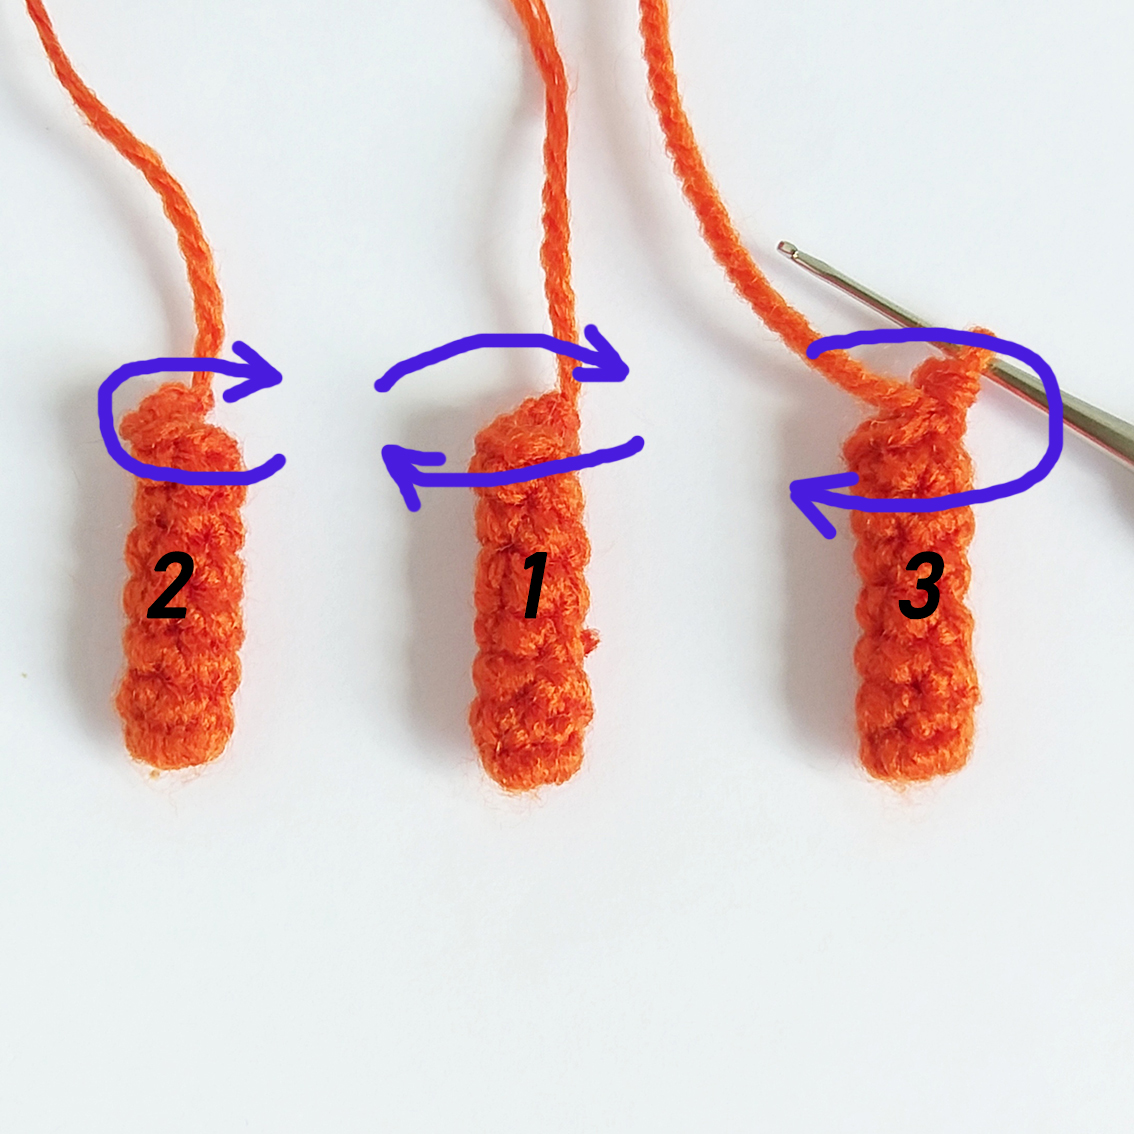
First crochet the toes (3 for each leg):
Rnd 1. 5 sc in a Magic Ring
Rnd 2 - 6. 5 sc
Fasten and cut off the thread on two of the toes. Leave the thread on toe no. 3 and continue crocheting. See the pictures for guidance:
Rnd 7. work into the loops of the 1st toe 2 sc, work into the loops of the 2nd toe 5 sc, work into the loops of the 1st toe 3 sc, work into the loops of the 3rd toe 5 sc = 15
Rnd 8. 4 sc, dec, 5 sc, dec, 2 sc = 13
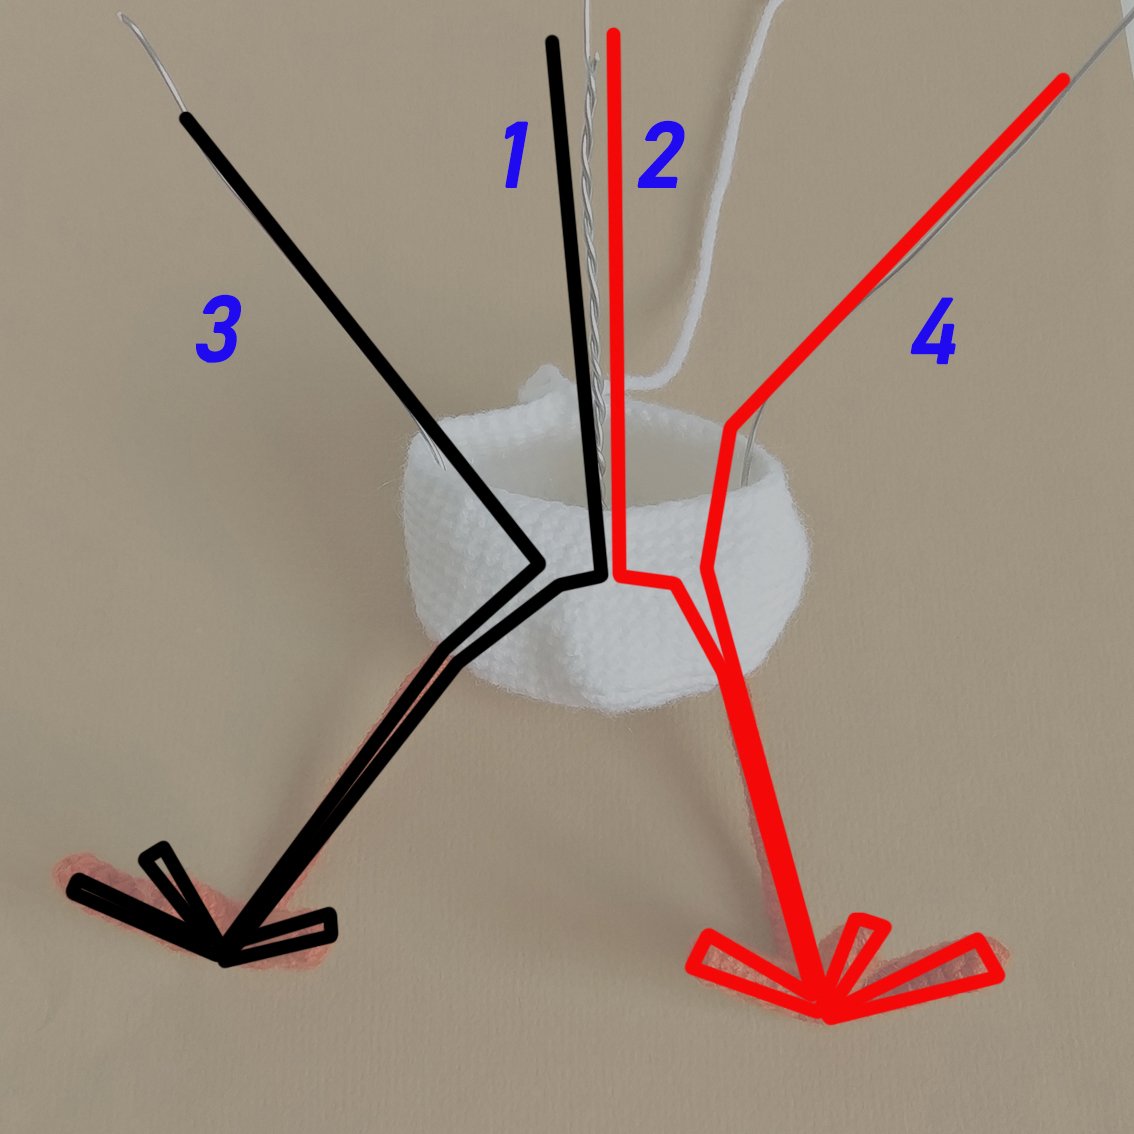
Making a wire frame.
The frame will run from the legs through the whole body into the wings and head. The frame consists of two identical parts for the right and left sides of the toy.
Step 1. Prepare 2 pieces of wire which is approx. 1,0 mm thick and 60-65 cm long each, fold them in half. Twist the wire to 2 cm – this is the frame for the middle toe.
Step 2. On each side of the middle toe, twist the wire for the frame of the first and third toes (see photo for guidance).
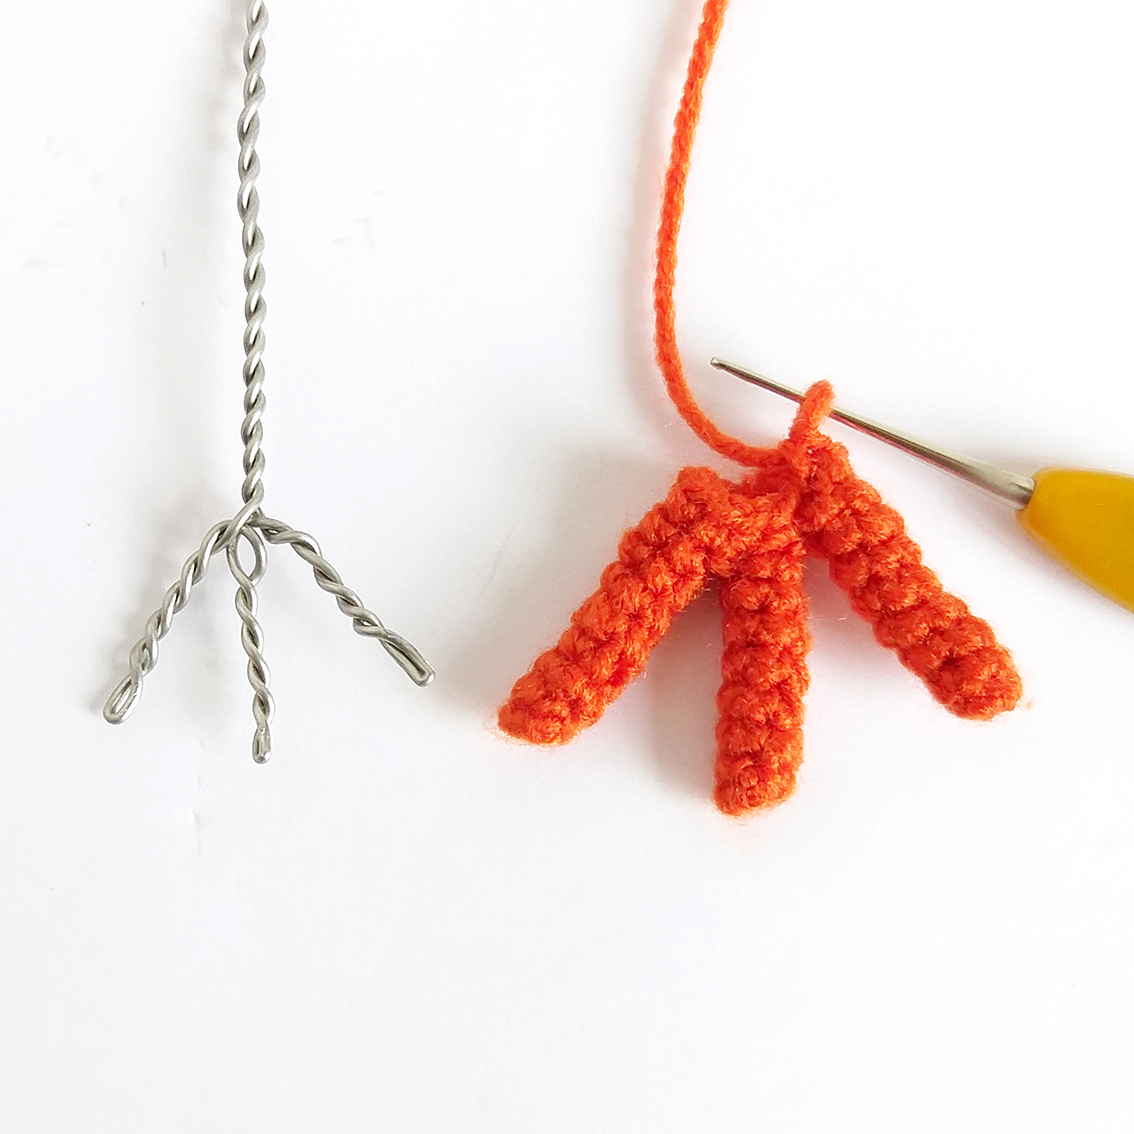
Step 3. Twist the ends of the wire together to a height of about 5 cm – this is a frame for the lower leg.
You will be left with long ends of the wire. Later on, the wires in the middle (no.1 & no.2 in the photo) will need to be twisted together – this will form the stork’s spine, while the wires marked with numbers 3 & 4 are for the wing framework.
Step 4. Insert the wire frame into the toes, continue crocheting.
Rnd 9. 6 sc, dec, 5 sc = 12
Rnd 10. 3 sc, dec, 4 sc, dec, 1 sc = 10
Rnd 11. 3 sc, dec, 2 sc, dec, 1 sc = 8
Rnd 12. 2 sc, dec, 1 sc, dec, 1 sc = 6
Rnd 13. dec, 4 sc = 5
Pull out a large loop, pass a skein of yarn through it, tighten the loop. Do not cut the thread!
.jpeg)
Apply some transparent glue onto the lower leg frame and make neat wraps around it with yarn. To create thickness, wrap the wire two more times. Fix the thread with glue. Cut the thread, leaving approx. 10 cm long end.
Make the second leg in the same way.
Body and neck
Work with white colour yarn.
Rnd 1. 6 sc in a Magic Ring = 6
Rnd 2. 6 inc = 12
Rnd 3. (1 sc, inc)*6 times = 18
Rnd 4. (1 sc, inc, 1 sc)*6 times = 24
Work 1sc, transfer your place marker here. The marker should be in line with the centre of the back. Adjust as and when to keep it straight.
Rnd 5. (3 sc, inc)*6 times = 30
Rnd 6. (2 sc, inc, 2 sc)*6 times = 36
Rnd 7. (5 sc, inc)*6 times = 42
Rnd 8. (3 sc, inc, 3 sc)*6 times = 48
Rnd 9. 8 sc, inc, 8 sc, put an additional marker for the leg here, inc, (5 sc, inc)*2 times, put an additional marker for the leg here, (8 sc, inc)*2 times = 54
Rnd 10. (4 sc, inc, 4 sc)*6 times = 60
Rnd 11-12. 60 sc
Rnd 13. (28 sc, dec)*2 times = 58
Rnd 14. (13 sc, dec, 14 sc)*2 times = 56
Rnd 15. (26 sc, dec)*2 times = 54
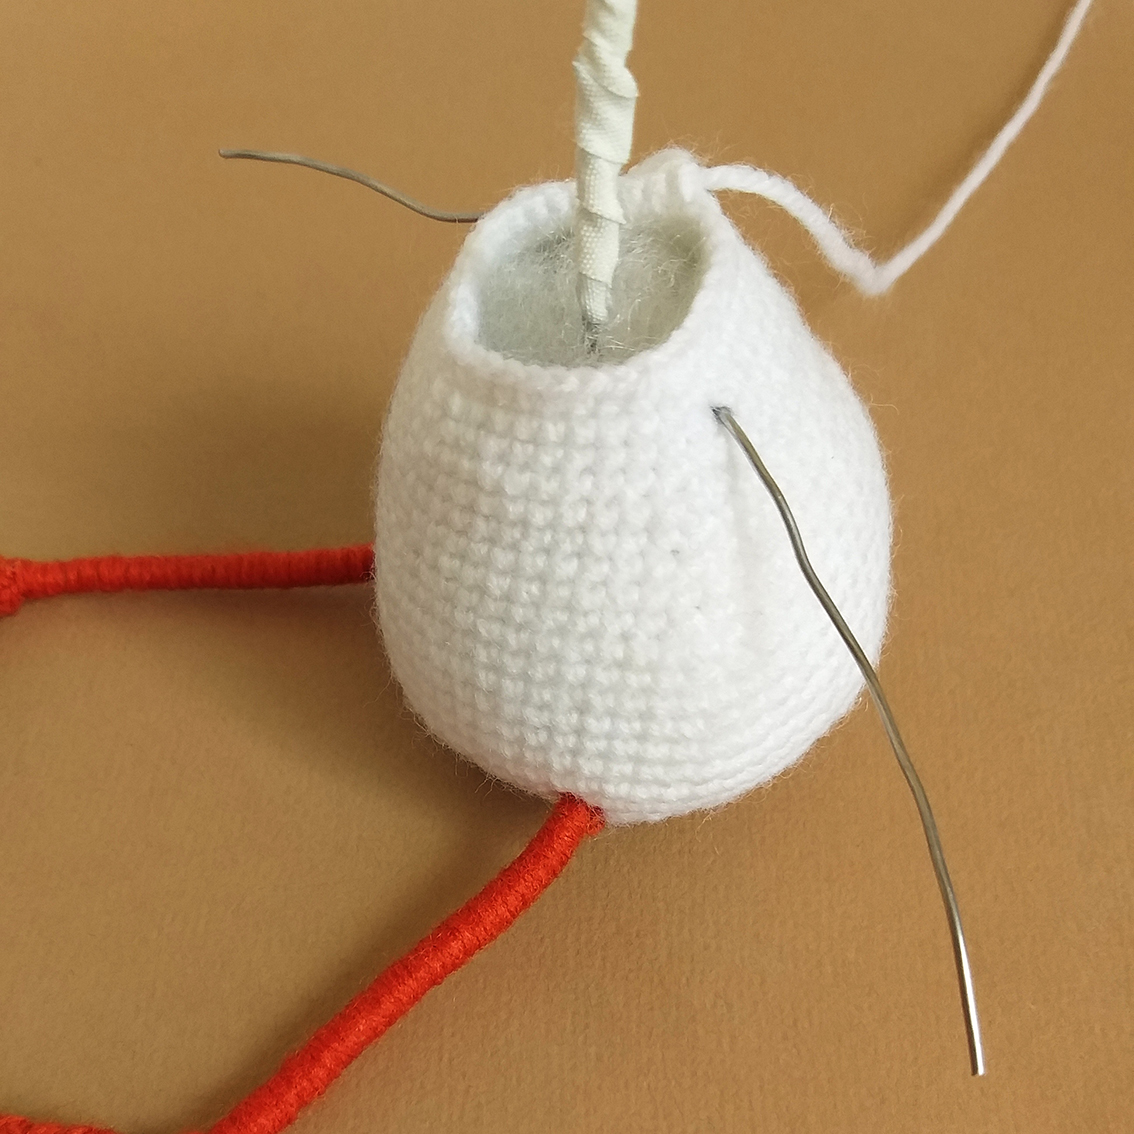
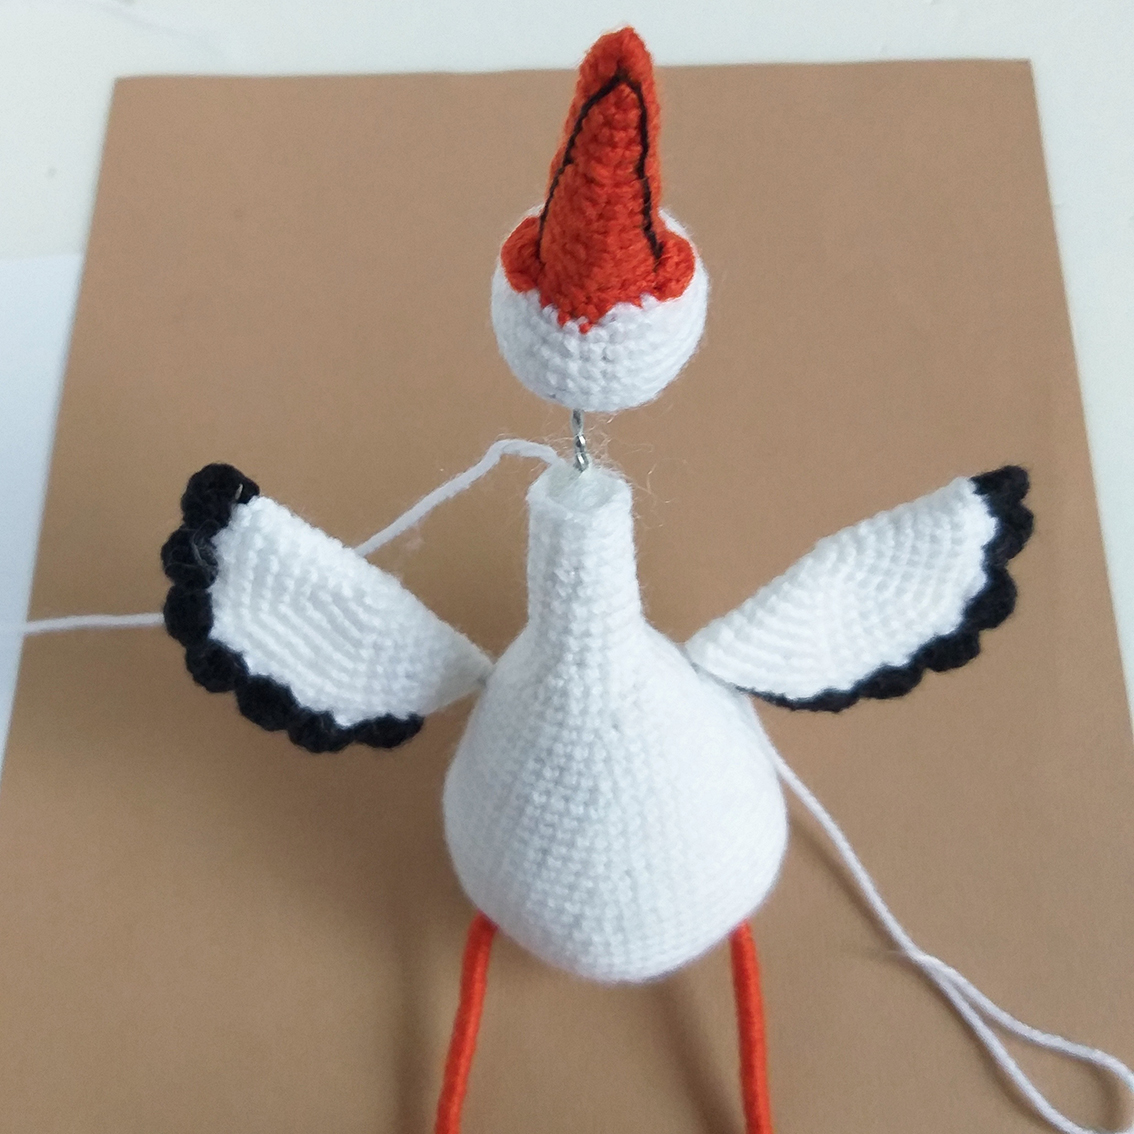
Insert the legs in the marked places. Twist the ends of the wires no.1 and no.2 together. Wrap some adhesive fabric tape around those. With the tip of the terracotta-coloured thread, fix the legs inside the body.
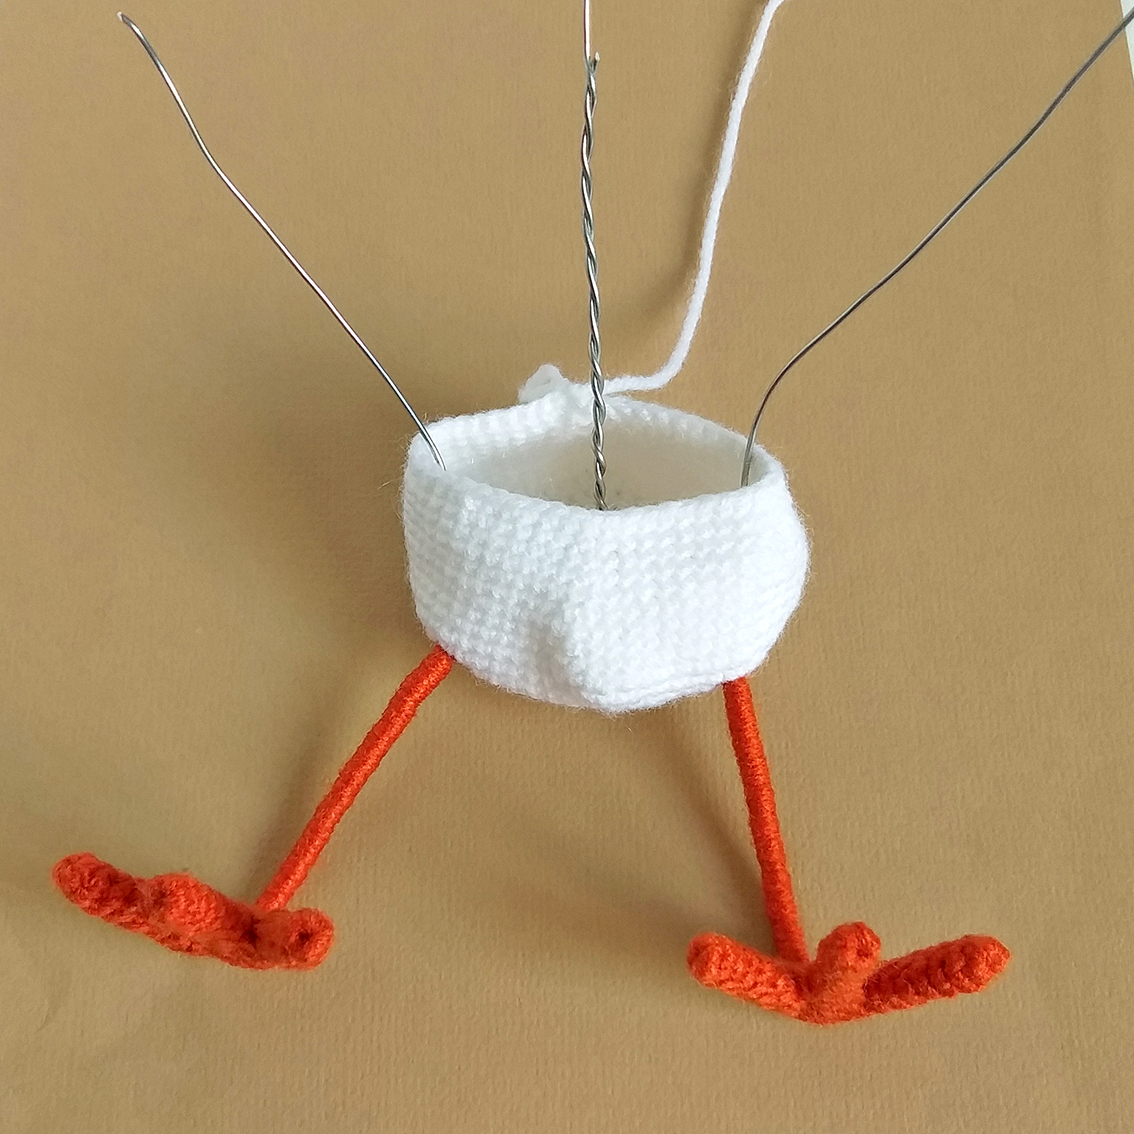
Add some hollow fibre. Next, stuff as you go.
Rnd 16. (12 sc, dec, 13 sc)*2 times = 52
Rnd 17. (24 sc, dec)*2 times = 50
Rnd 18. (11 sc, dec, 12 sc)*2 times = 48
Rnd 19. (22 sc, dec)*2 times = 46
Rnd 20. (10 sc, dec, 11 sc)*2 times = 44
Rnd 21. (20 sc, dec)*2 times = 42
Rnd 22. (9 sc, dec, 10 sc)*2 times = 40
Rnd 23. (18 sc, dec)*2 times = 38
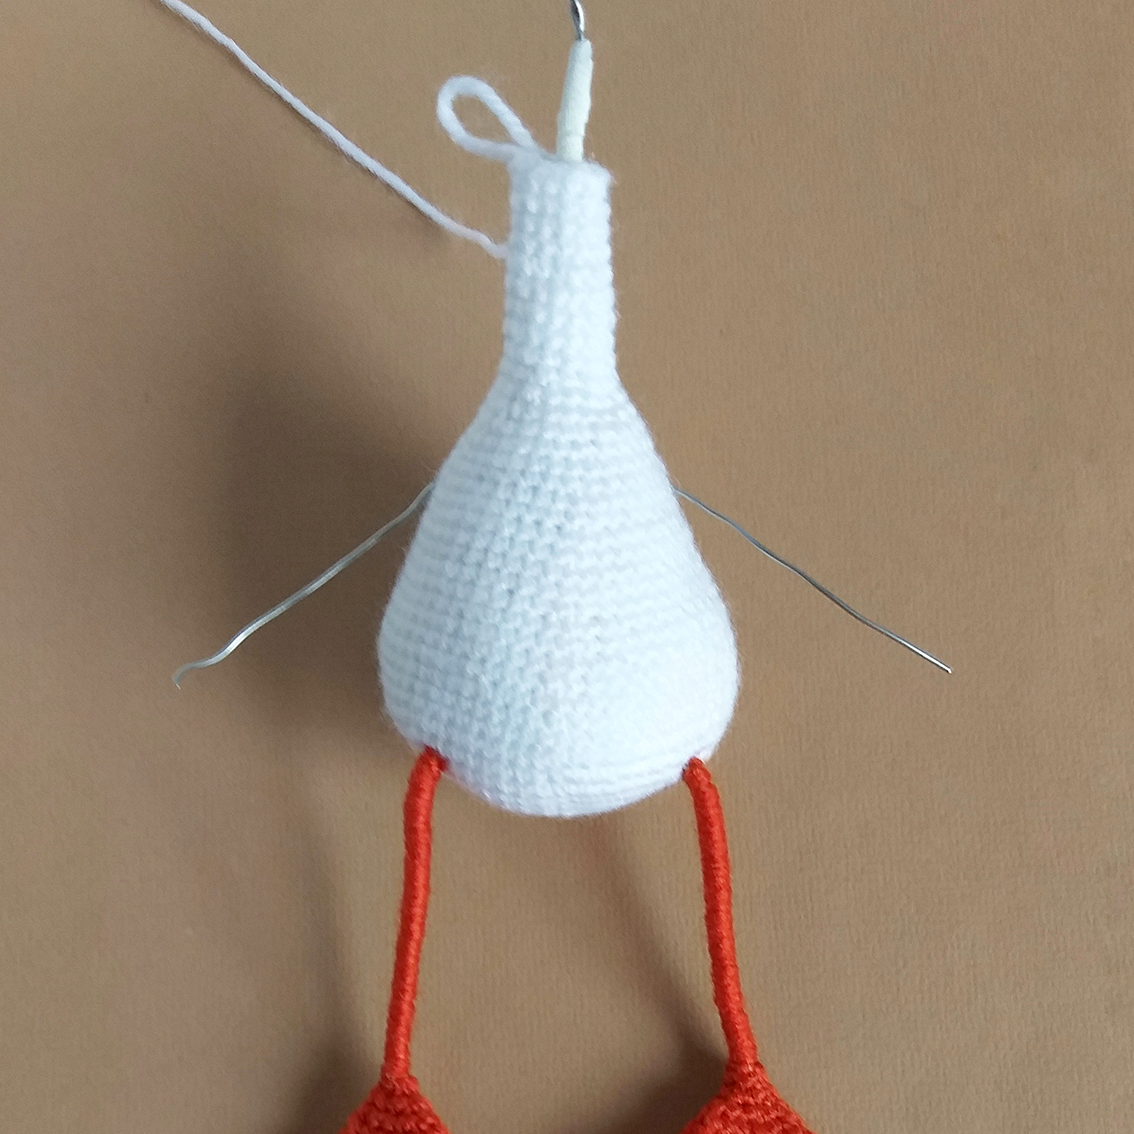
Rnd 24. 6 sc, at this point, take the wire out (for the wing), 2 sc, dec, 18 sc, dec, 2 sc, at this point, take the wire out (for the wing), 6 sc = 36
Rnd 25. (16 sc, dec)*2 times = 34
Rnd 26. (7 sc, dec, 8 sc)*2 times = 32
Rnd 27. (14 sc, dec)*2 times = 30
Rnd 28. (6 sc, dec, 7 sc)*2 times = 28
Rnd 29. (12 sc, dec)*2 times = 26
Rnd 30. (5 sc, dec, 6 sc)*2 times = 24
Rnd 31. (dec, 6 sc)*3 times = 21
Rnd 32. (dec, 5 sc)*3 times = 18
Rnd 33. (dec, 4 sc)*3 times = 15
Rnd 34-35. 15 sc
Rnd 36. dec, 13 sc = 14
Rnd 37. 14 sc
Rnd 38. dec, 12 sc = 13
Rnd 39-42. 13 sc.
Fasten off, cut the thread, leaving approx. 15 cm long tail for sewing.
Wings (make 2)
Work with white colour yarn.
Rnd 1. 6 sc in a Magic Ring = 6
Rnd 2. 6 inc = 12
Rnd 3. (1 sc, inc)*6 times = 18
Rnd 4. (1 sc, inc, 1 sc)*6 times = 24
Rnd 5. (3 sc, inc)*6 times = 30
Rnd 6. (2 sc, inc, 2 sc)*6 times = 36
Rnd 7. (5 sc, inc)*6 times = 42
Rnd 8. (3 sc, inc, 3 sc)*6 times = 48
Rnd 9. (7 sc, inc)*6 times = 54
Fold the part in two, work by hooking through both edges of the part:
Rnd 10. 8 sc, inc, 8 sc, inc, 6 sc = 26 leave the last stitches unworked, leave a small hole. This is the hole for the wire frame.
Fasten off, cut off any excess yarn, hide the end.
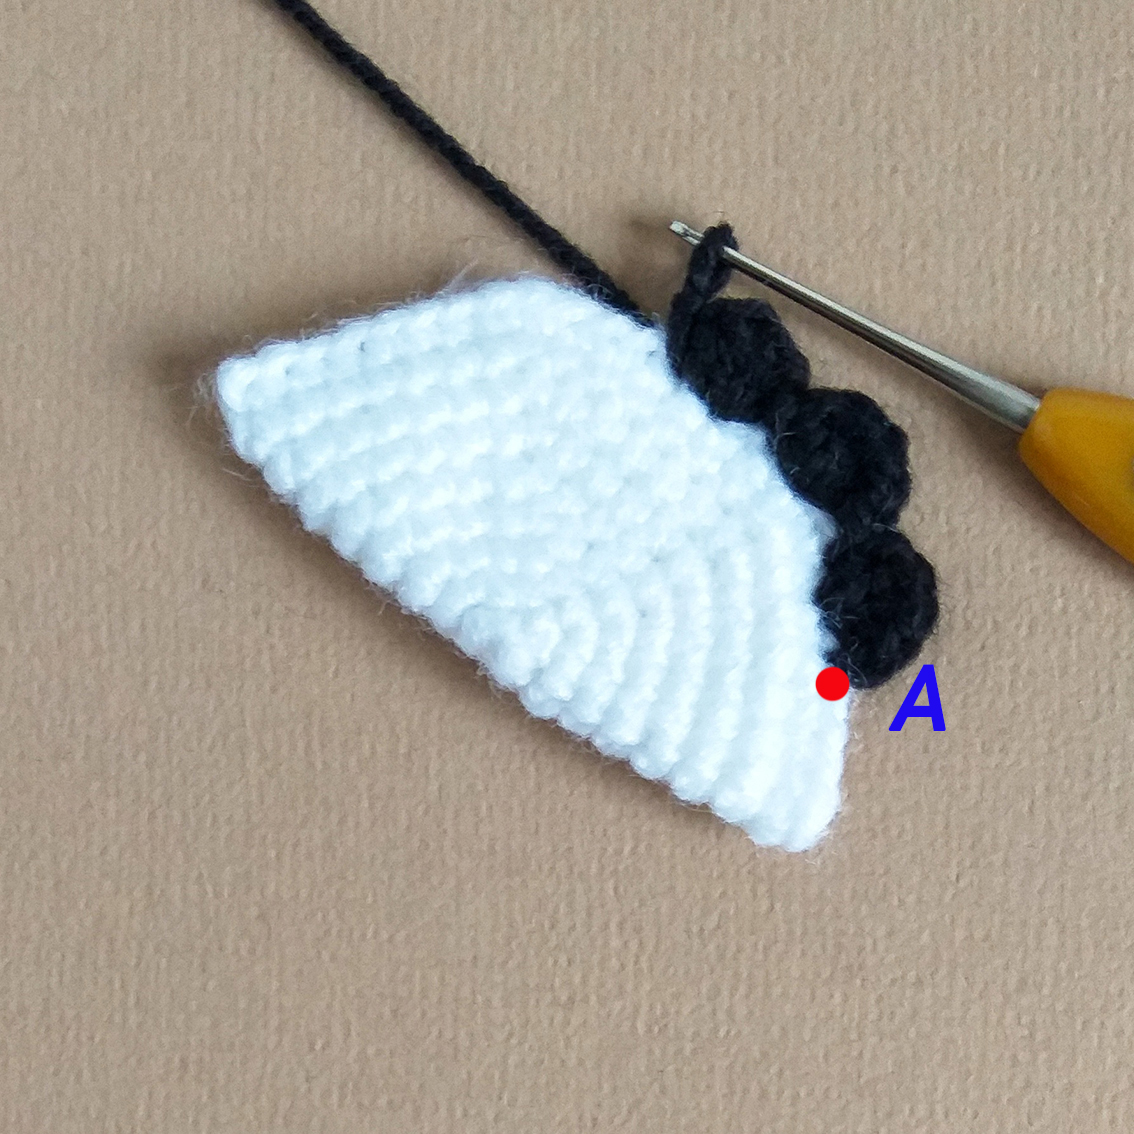
Plumage for the right wing
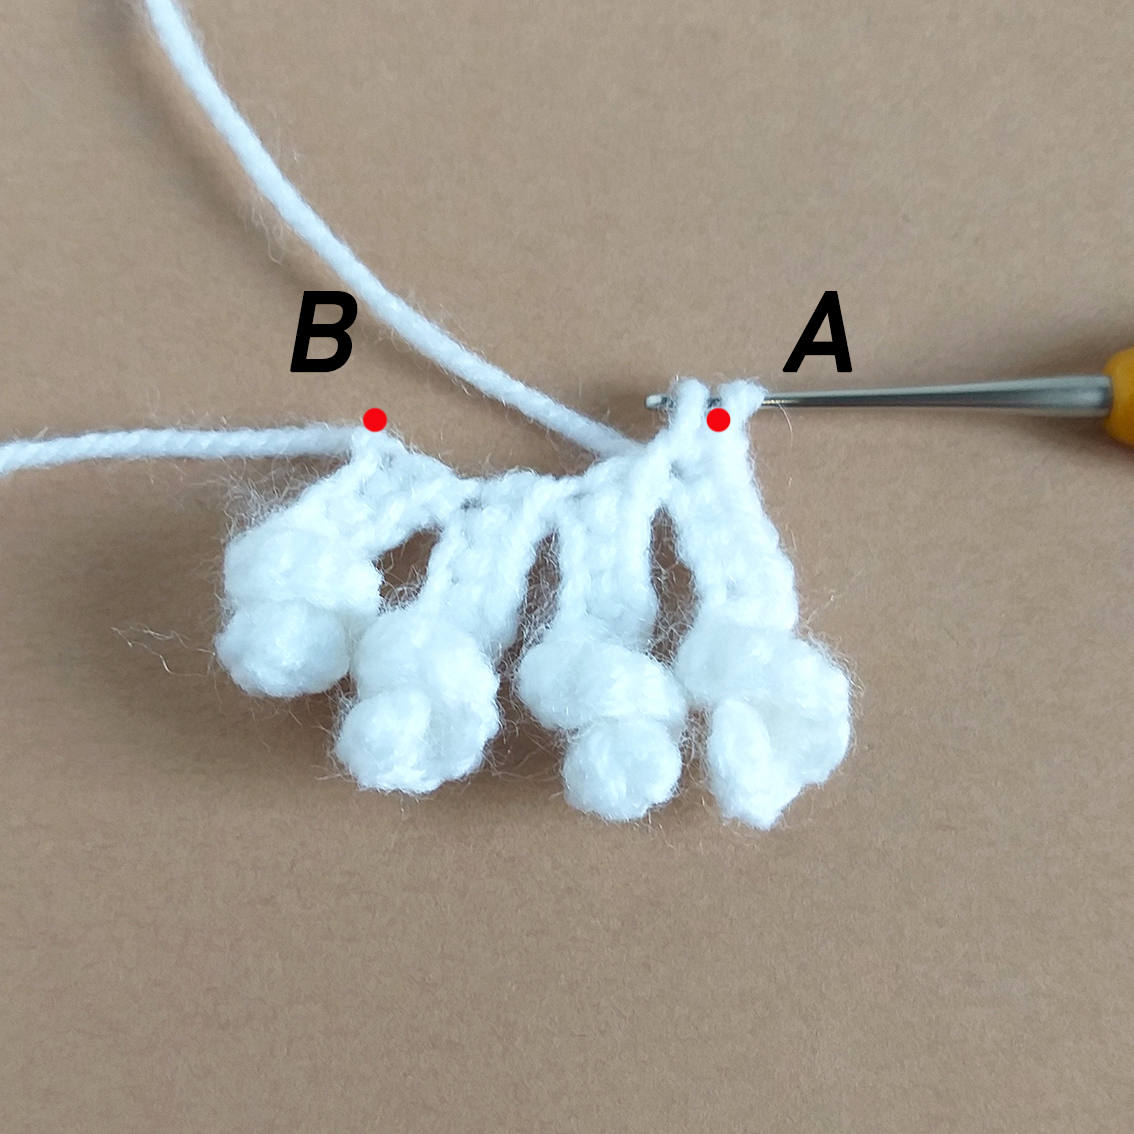
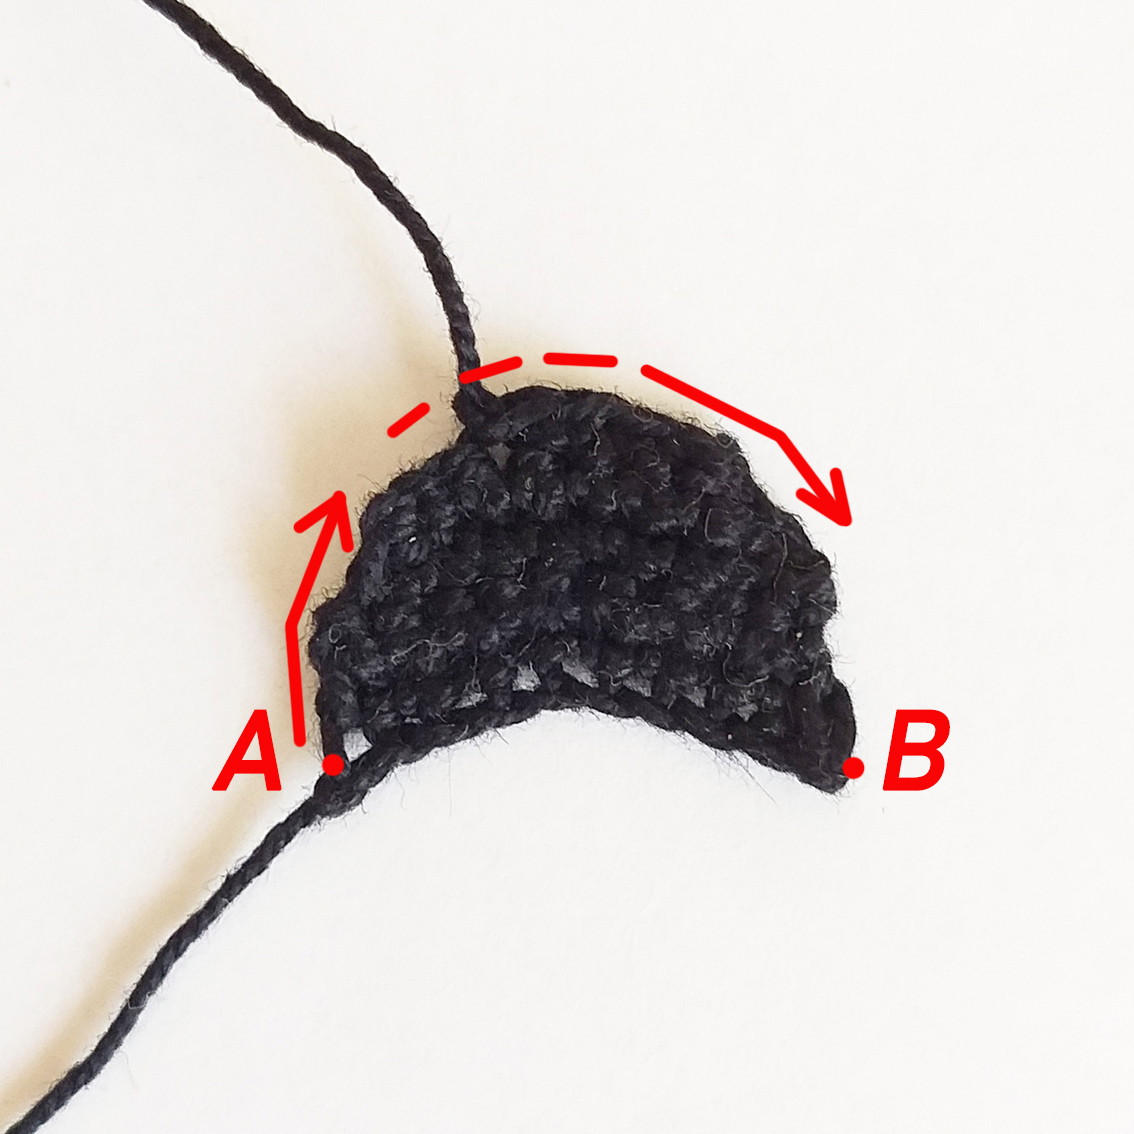
Step back 4 stitches from the edge of the wing with a hole, attach the black yarn to the 5th stitch (point A).
Row 1. (skip 1 loop, 5 dc into the next loop, 1 sl st)х 7 times
Fasten off, cut off any excess yarn, hide the end.
Plumage for the left wing
Attach the black thread on the opposite edge of the wing, (point B). Crocheting direction is marked with an arrow on the photo.
Row 1. (skip 1 loop, 5 dc into the next loop, 1 sl st)х 7 times
Fasten off, cut off any excess yarn, hide the end.

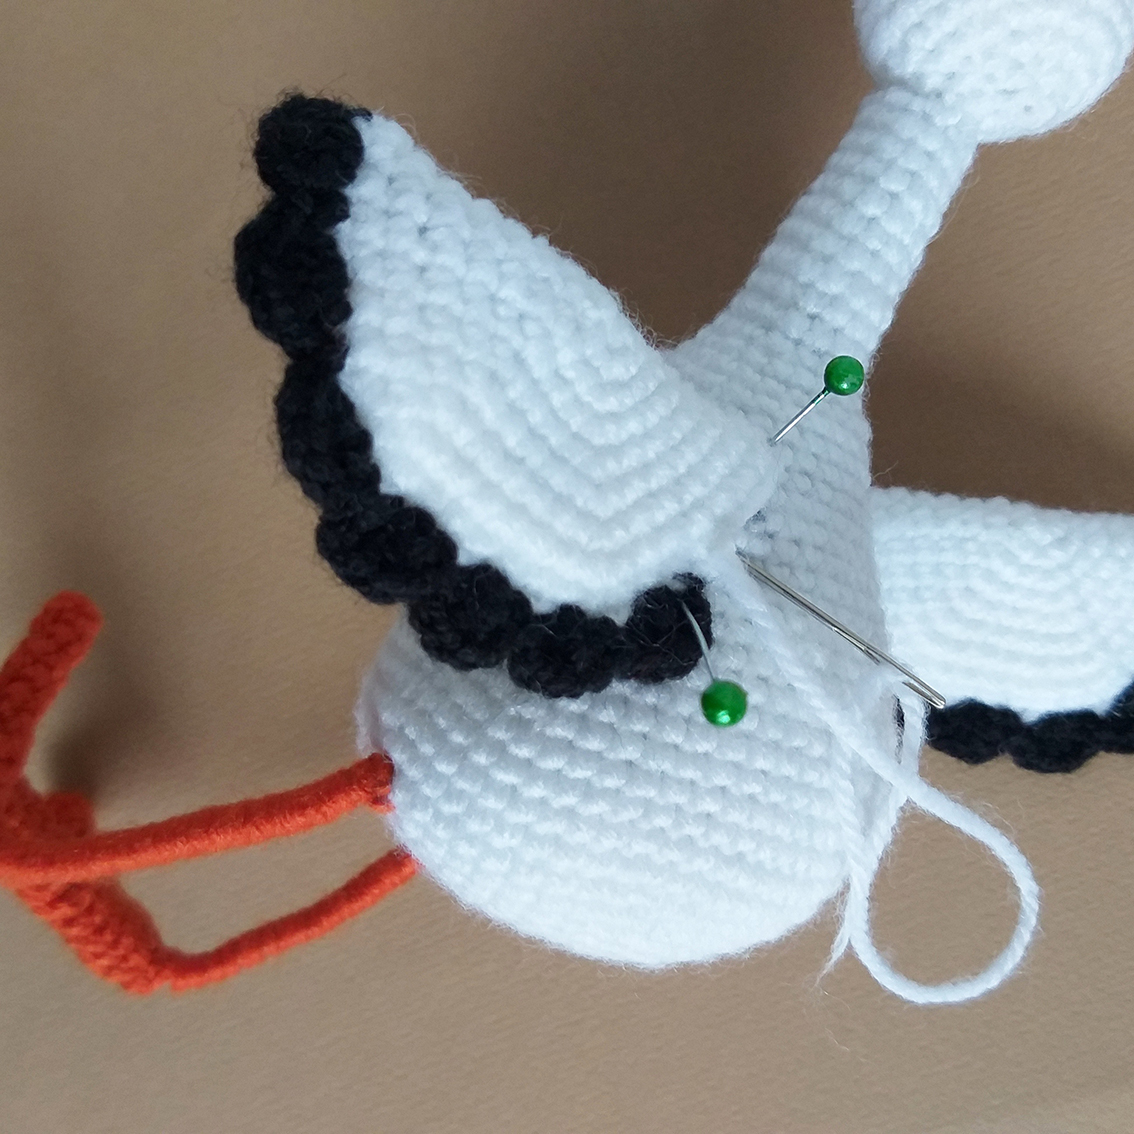
Measure the required length of the wire for each wing. Make a loop on the end of the wire. Cut off the excess wire. Insert the wire inside the wing.
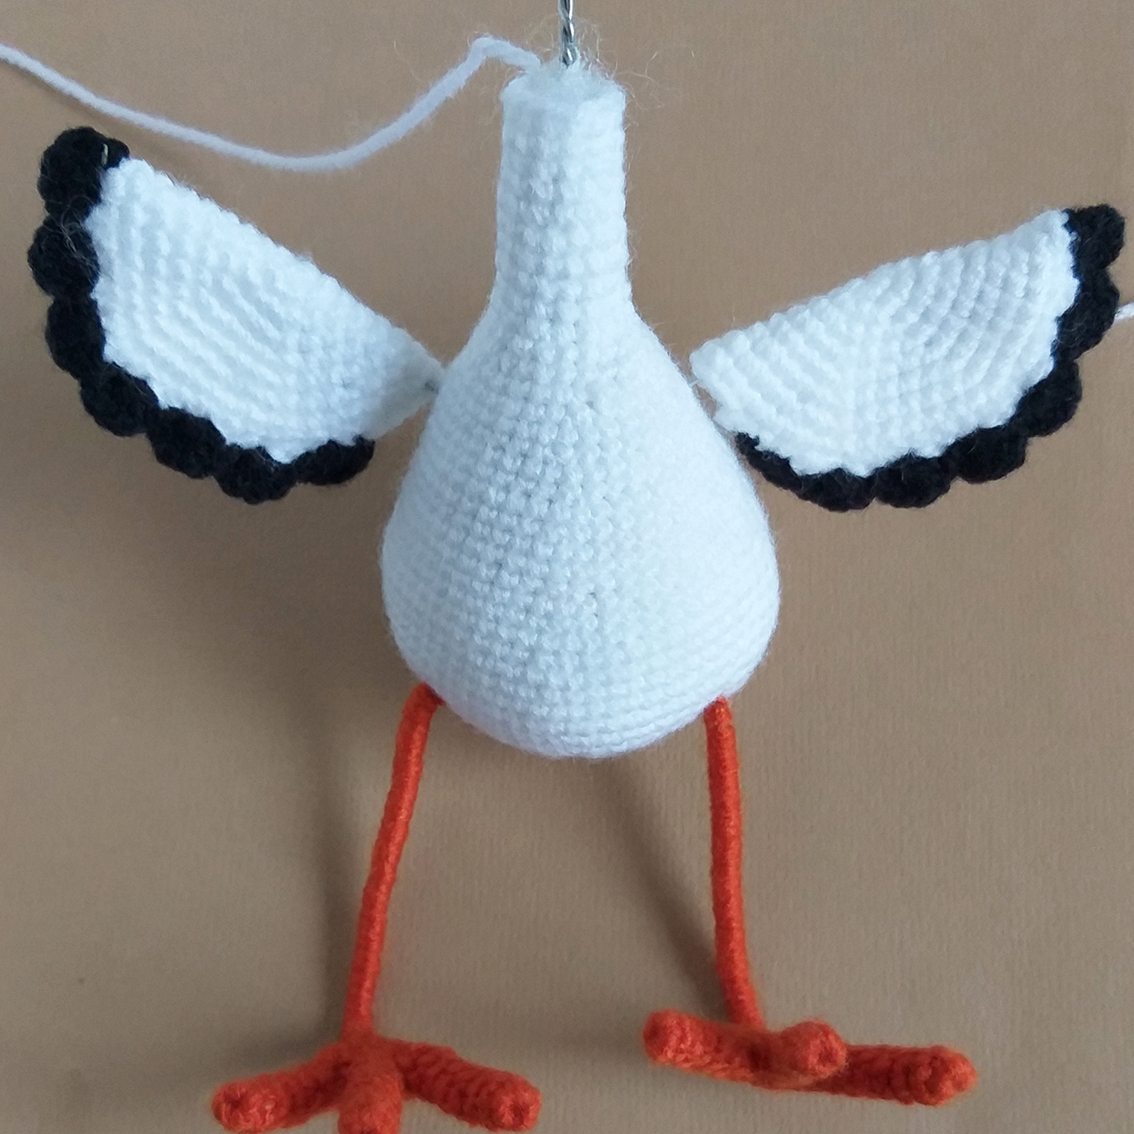
Sew on the wings before the black plumage begins.
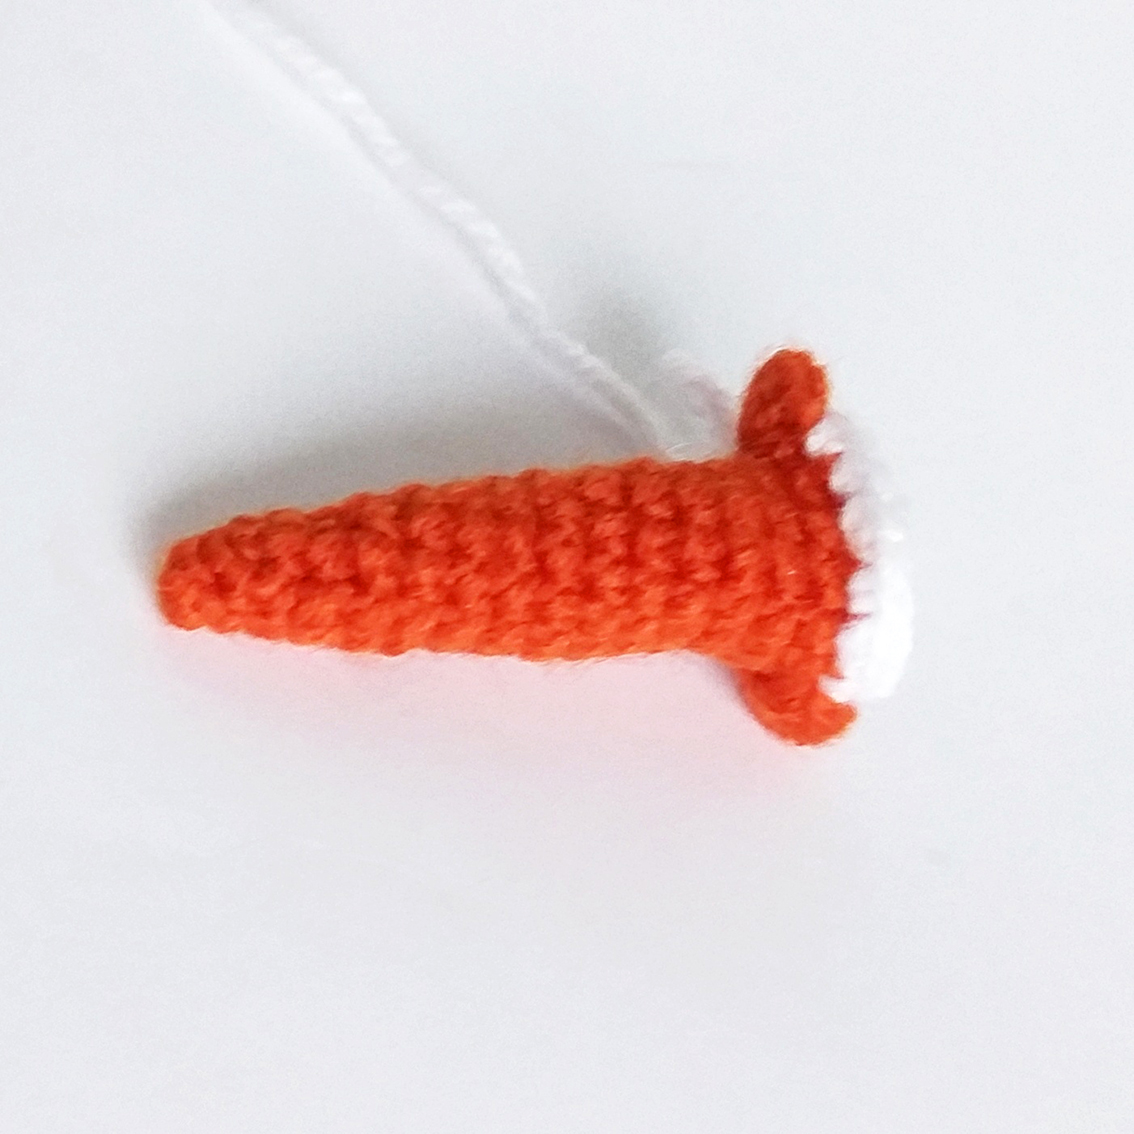
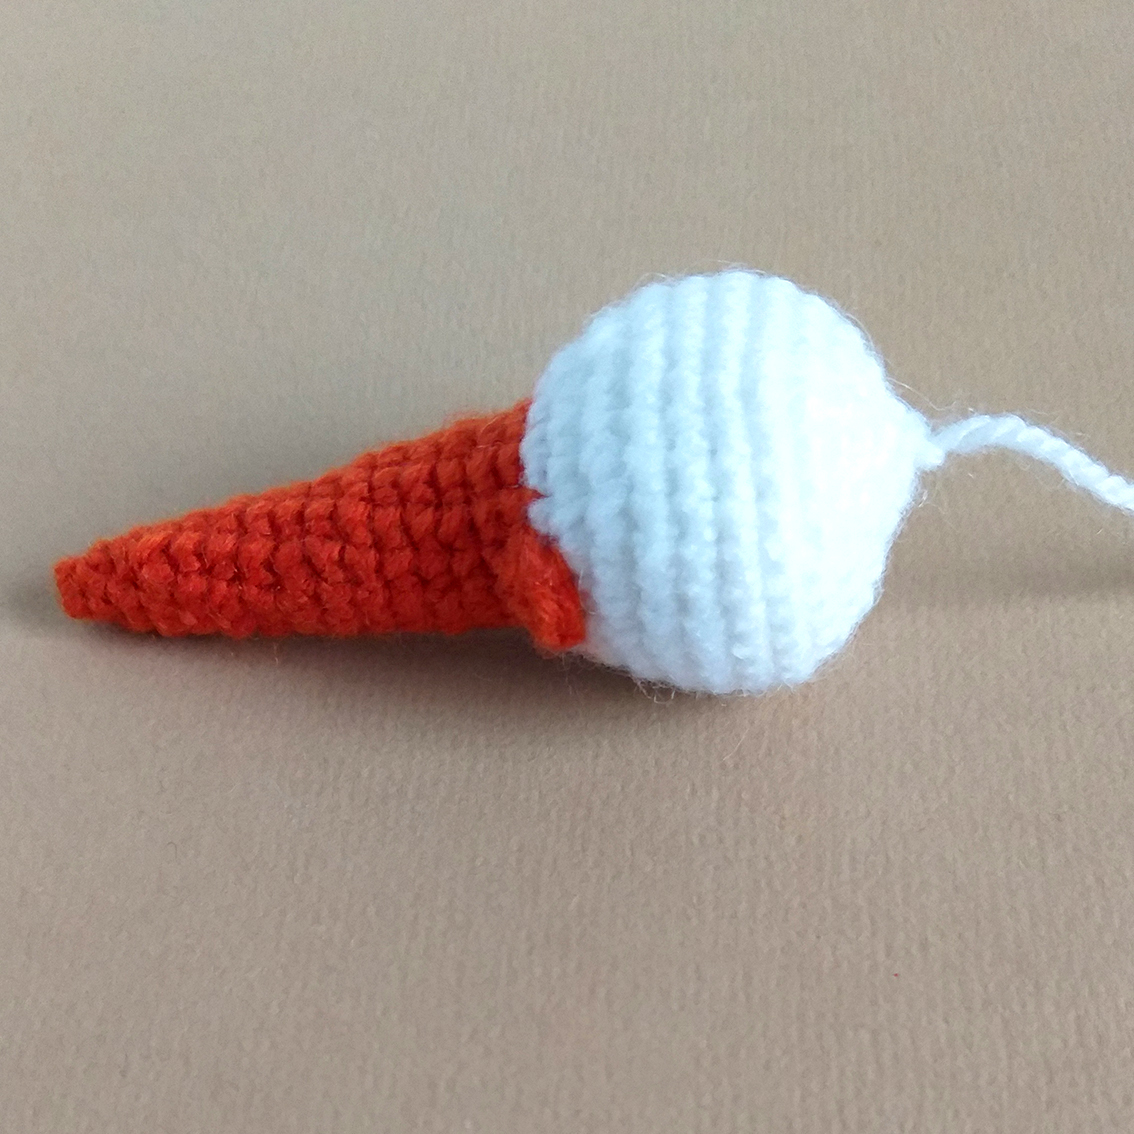
Beak and head
Start with terracotta colour yarn. Stuff as you go.
Rnd 1. 4 sc in a Magic Ring = 4
Rnd 2. Into the front loops only: 4 sc = 4
Rnd 3. 1 sc, inc, 3 sc = 5
Rnd 4. 4 sc, inc = 6
Rnd 5. 6 sc
Rnd 6. 2 sc, inc, 3 sc = 7
Rnd 7. 6 sc, inc = 8
Rnd 8. 8 sc
Rnd 9. 3 sc, inc, 4 sc = 9
Rnd 10. 8 sc, inc = 10
Rnd 11. 10 sc
Rnd 12. 4 sc, inc, 5 sc = 11
Rnd 13. 11 sc
Rnd 14. 9 sc, inc, 1 sc = 12
Rnd 15. 12 sc
Rnd 16. 3 sc, next crochet the cheek - in one front loop: (1 sc, 2 hdc, 1 sc), then into both loops: 5 sc, next crochet the cheek - in one front loop: (1 sc, 2 hdc, 1 sc), then into both loops: 2 sc = 18
Change to white yarn. Fasten off and cut off the terracotta yarn.
Rnd 17. 1 sc, inc, 1 sc, make an increase into the previously unworked back loop, skip 4 cheek loops, (1 sc, inc)*2 times, 1 sc, make an increase into the previously unworked back loop, skip 4 cheek loops, 1 sc, inc = 18
Rnd 18. (2 sc, inc)*6 times = 24
Rnd 19. (3 sc, inc)*6 times = 30
Rnd 20-23. 30 sc
Rnd 24. (3 sc, dec)*6 times = 24
Rnd 25. (1 sc, dec, 1 sc)*6 times = 18
Rnd 26. (1 sc, dec)*6 times = 12
Add some hollow fibre
Rnd 27. (dec)*6 times = 6
Pull off the loops. Cut the thread, hide the end.
Embroider a smile with black thread.
Sew the eyes – black beads. Tip: insert the needle from the underside of the head at the level of 23-24 rounds, after sewing the neck, the knot will hide.
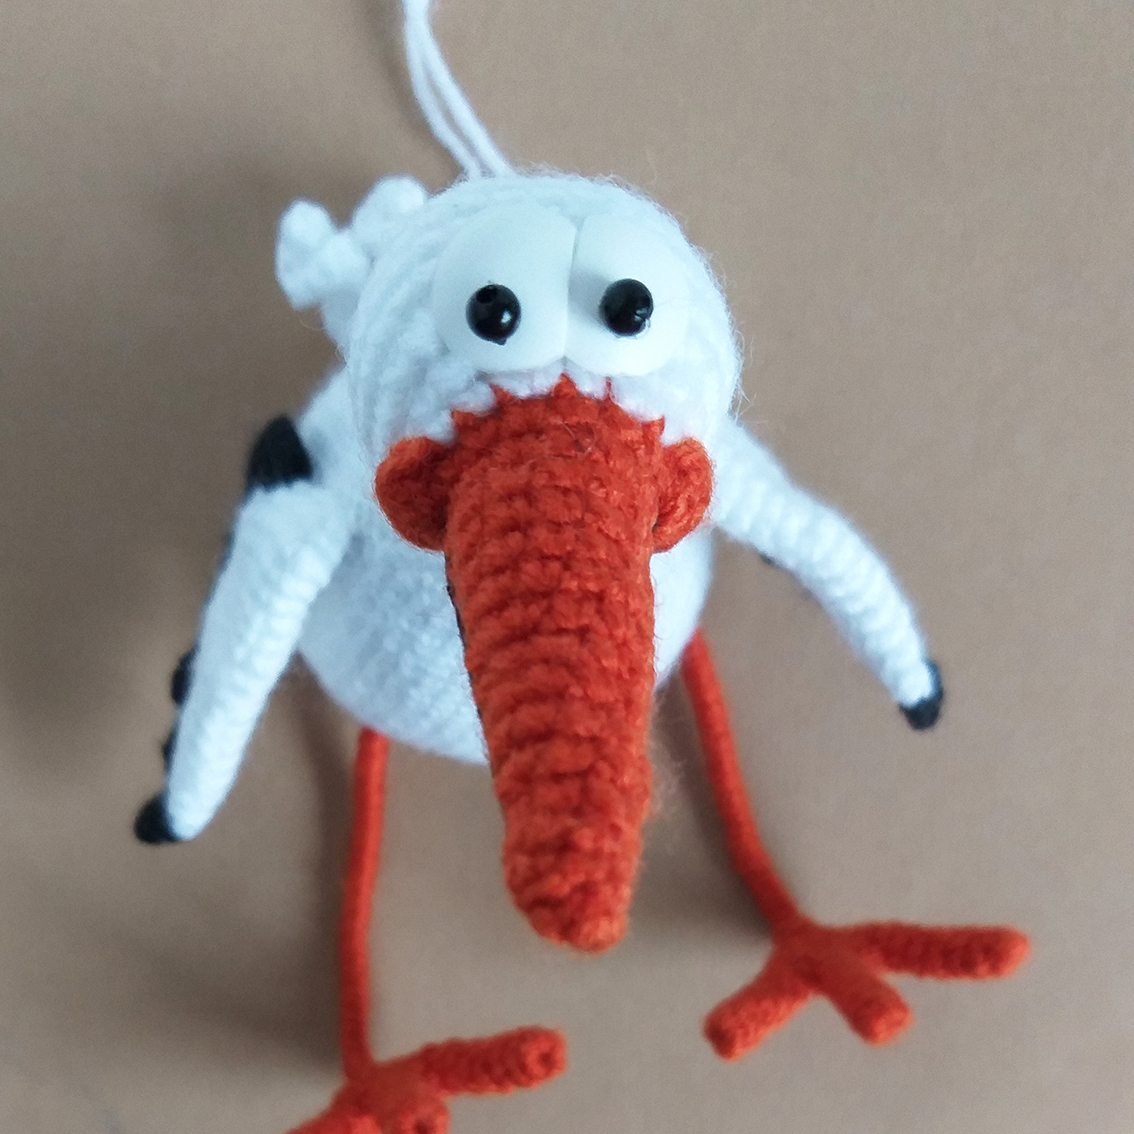
Measure the wire for the head (about 1.5 cm), cut off the excess wire. Insert the end of the wire into the head between rounds 23 and 24. Sew the head to the neck.
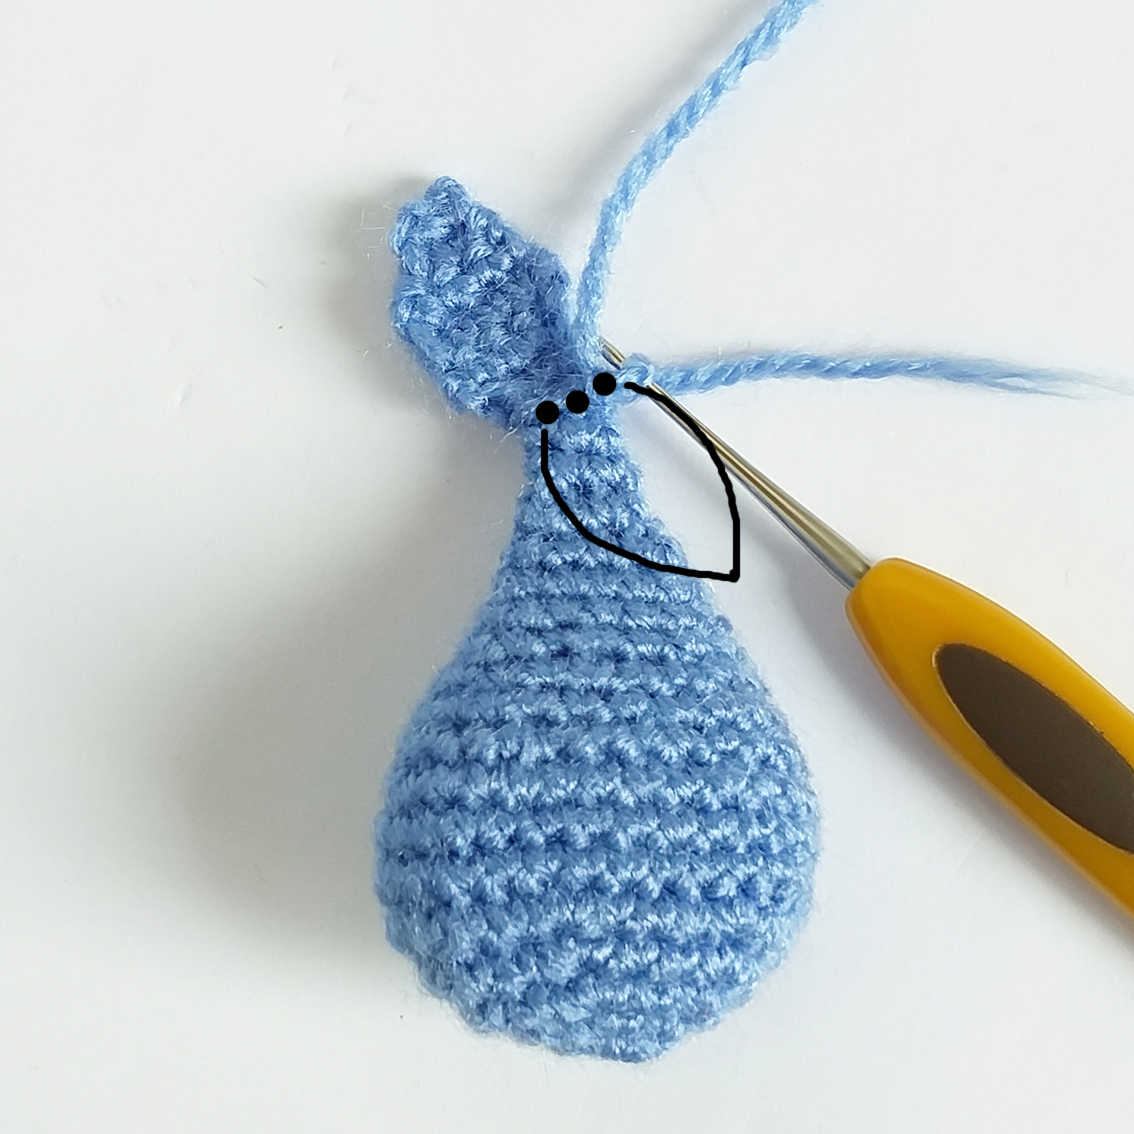
Tail
Row 1. (Work 12 ch, starting from 2nd ch from hook: inc* 8 times, 3 sc)*4 times
Row 2. 1 ch, crochet from A to B 7 sc
Fasten off, cut the thread, leaving approx. 15 cm long tail for sewing.
Sew the tail to the body.
.jpeg)
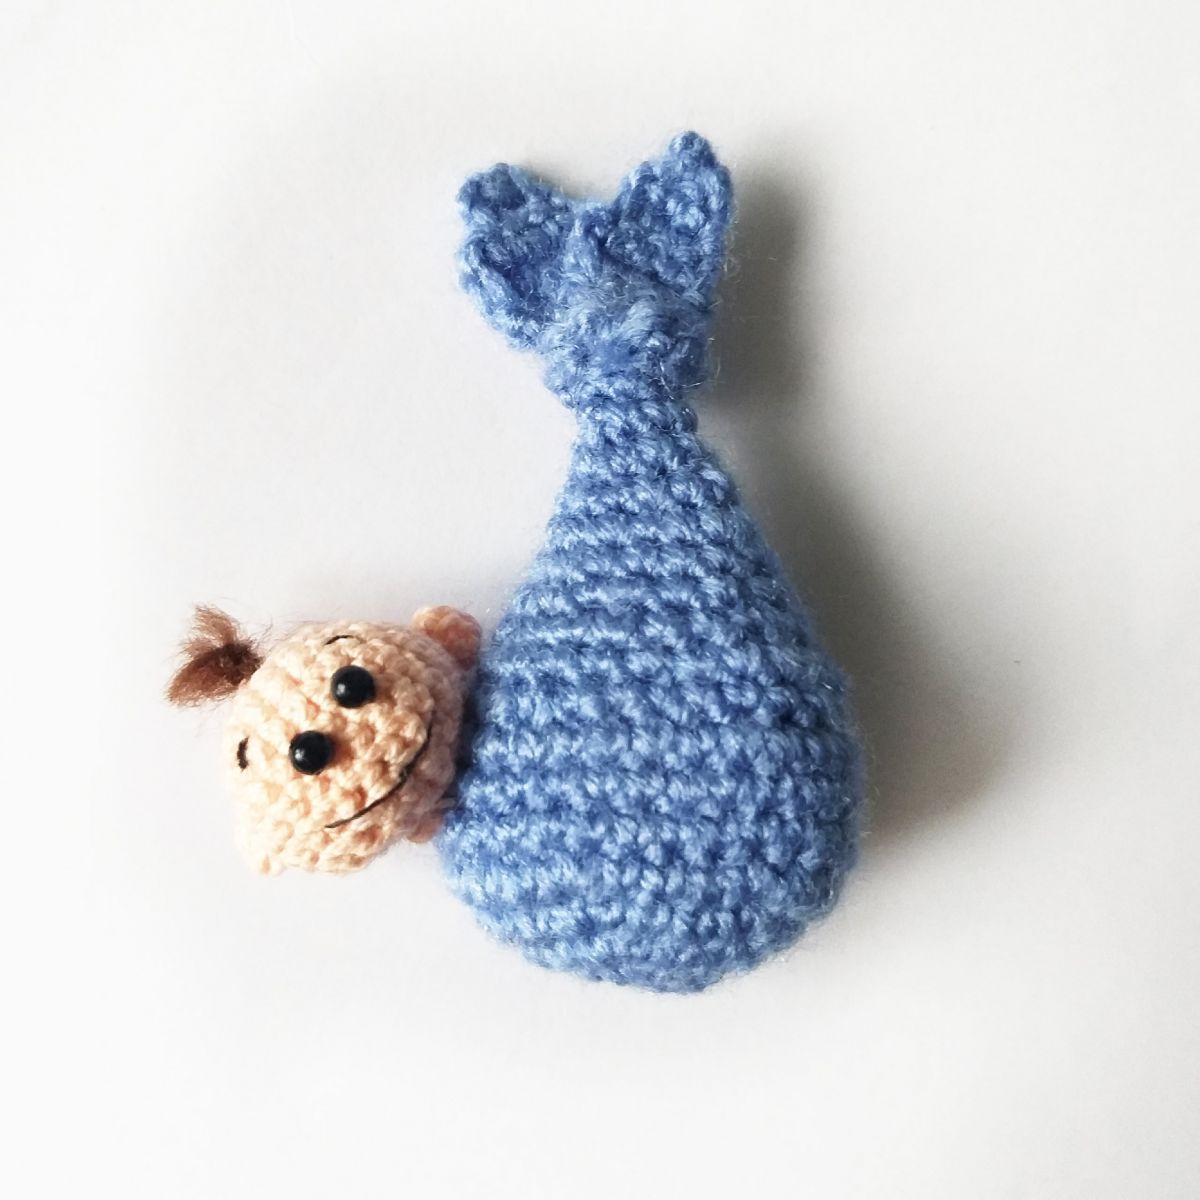
Baby swaddle
Work with light blue colour yarn.
Rnd 1. 6 sc in a Magic Ring = 6
Rnd 2. 6 inc = 12
Rnd 3. (1 sc, inc)*6 times = 18
Rnd 4. (1 sc, inc, 1 sc)*6 times = 24
Rnd 5. (3 sc, inc)*6 times = 30
Rnd 6-8. 30 sc
Rnd 9. (4 sc, dec, 4 sc) *3 times = 27
Rnd 10. (7 sc, dec) *3 times = 24
Rnd 11. (3 sc, dec, 3 sc) *3 times = 21
Rnd 12. (5 sc, dec) *3 times = 18
Rnd 13. (7 sc, dec) *2 times = 16
Rnd 14. (3 sc, dec, 3 sc) *2 times = 14
Rnd 15. (5 sc, dec) *2 times = 12
Rnd 16. (2 sc, dec, 2 sc) *2 times = 10
Add some hollow fibre.
Rnd 17. (3 sc, dec) *2 times = 8
Rnd 18. (2 sc, dec) *2 times = 6
Do not cut the thread!
Next, we crochet the "tip of the swaddle"
Row 1. 3 sc, 1 ch, turn =3
Row 2. 2 sc, inc, 1 ch, turn = 4
Row 3. 4 sc, 1 ch, turn = 4
Row 4. 2 sc, dec, 1 ch, turn = 3
Row 5. 1 sc, dec, 1 ch, turn = 2
Row 6. 1 dec
Fasten off, cut off any excess yarn, hide the end.
2nd tip of the swaddle
Crochet into the unworked 3 loops of the 18th round. Attach the thread in the 18th round.
Row 1. 3 sc, 1 ch, turn =3
Row 2. 2 sc, inc, 1 ch, turn = 4
Row 3. 4 sc, 1 ch, turn = 4
Row 4. 2 sc, dec, 1 ch, turn = 3
Row 5. 1 sc, dec, 1 ch, turn = 2
Row 6. 1 dec
Fasten off, cut off any excess yarn, hide the end.
Baby's head
Work with nude colour yarn. Tip: choose a little thinner yarn than the main yarn. Take a smaller hook.
Stuff as you go.
Rnd 1. 6 sc in a Magic Ring = 6
Rnd 2. 6 inc = 12
Rnd 3. (1 sc, inc)*6 times = 18
Rnd 4. (2 sc, inc)*6 times = 24
Rnd 5-8. 24 sc
Rnd 9. (2 sc, dec)*6 times = 18
Rnd 10. (1 sc, dec)*6 times = 12
Rnd 11. dec*6 times = 6
Pull off the loops. Cut the thread, hide the end.
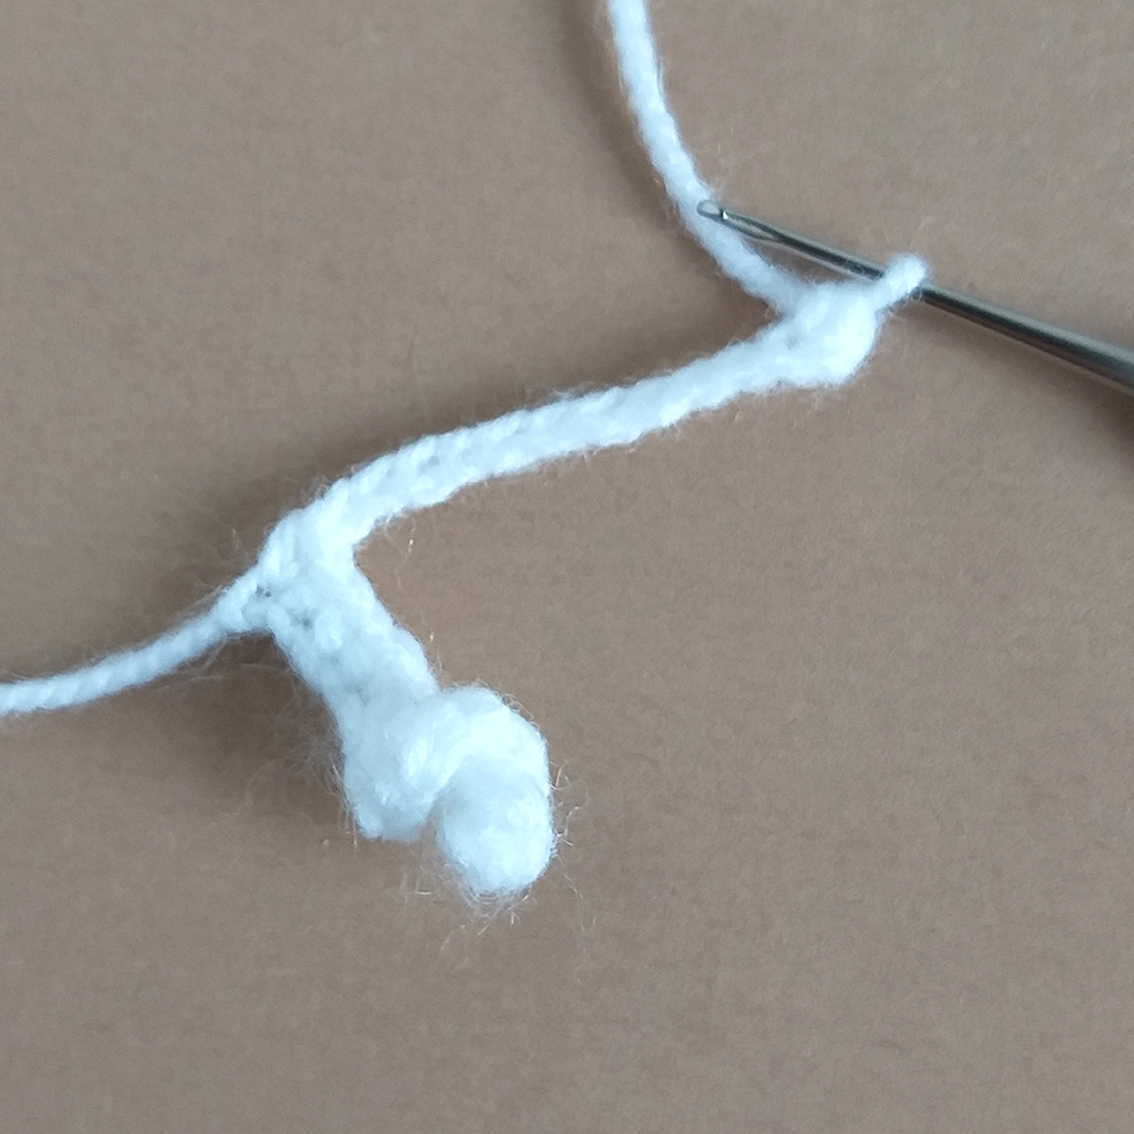
Ear (make 2)
Row 1. work 2 ch, starting from 2nd ch from hook: 3 sc
Fasten off, cut the thread, leaving approx. 10 cm long tail for sewing.

Attach the ears to the head. Sew them on.
Sew the eyes – black beads. Embroider eyebrows and smile.
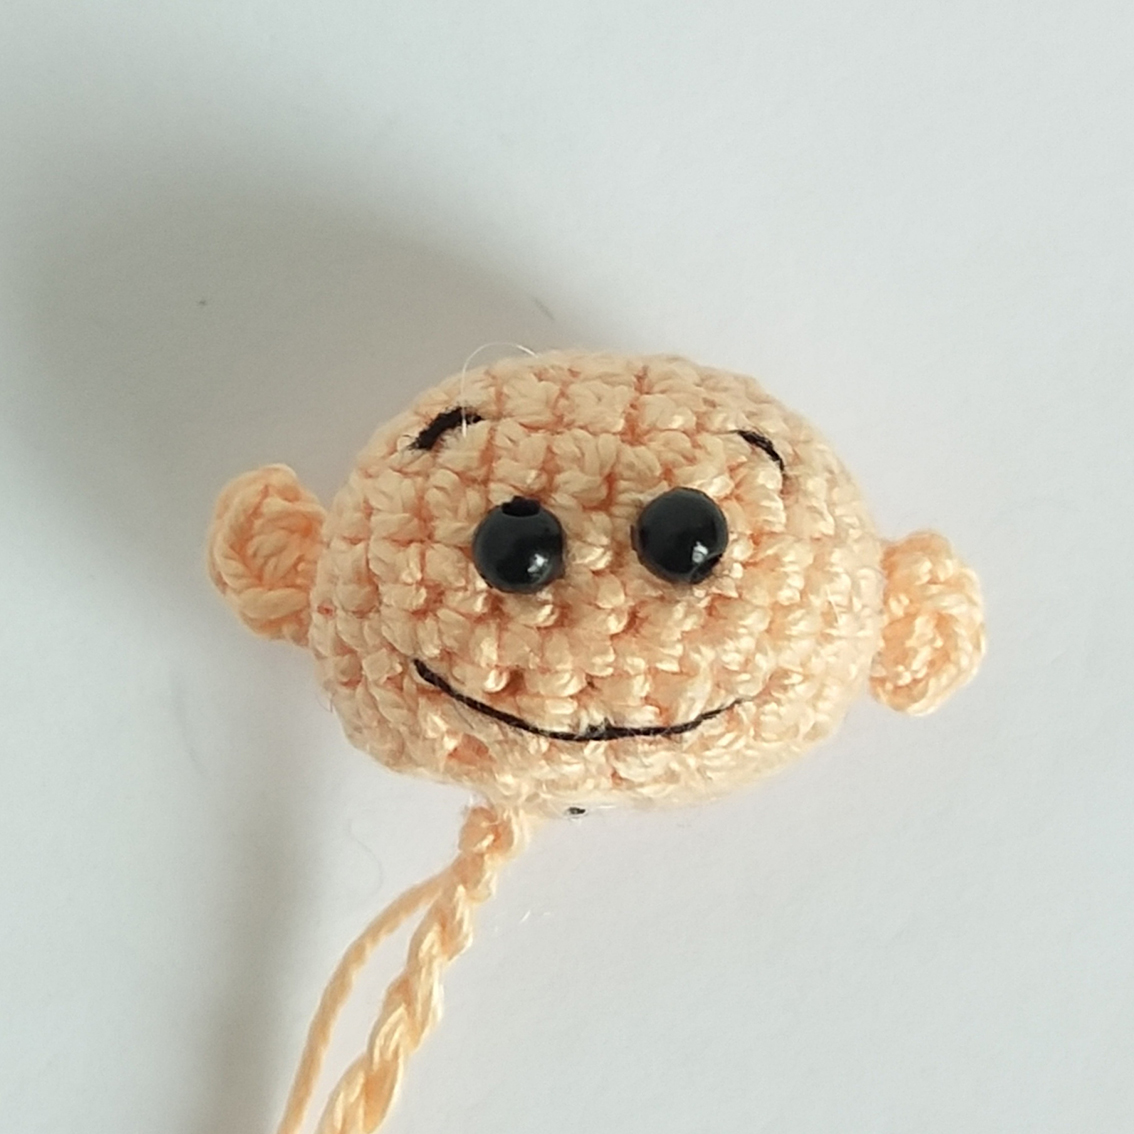
Sew the head to the swaddle.
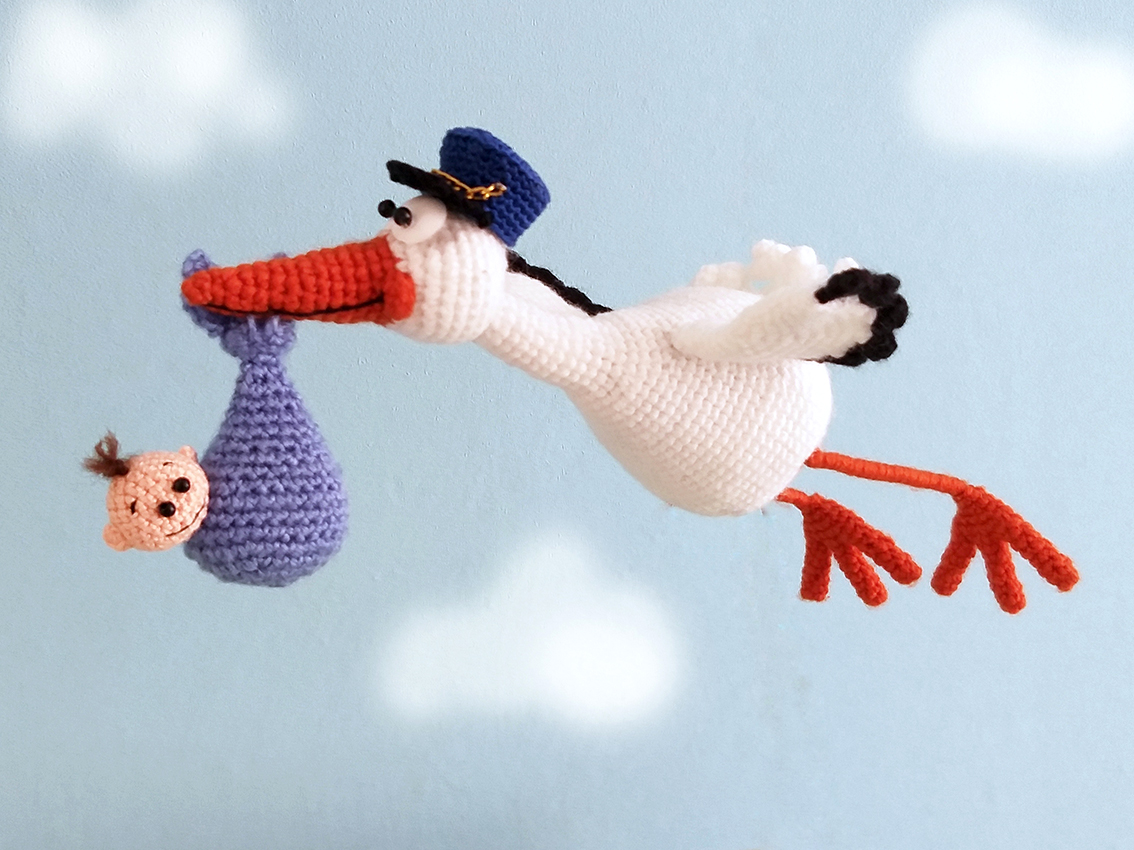
Crochet a hat or cap for the stork – according to your preference.
Hat
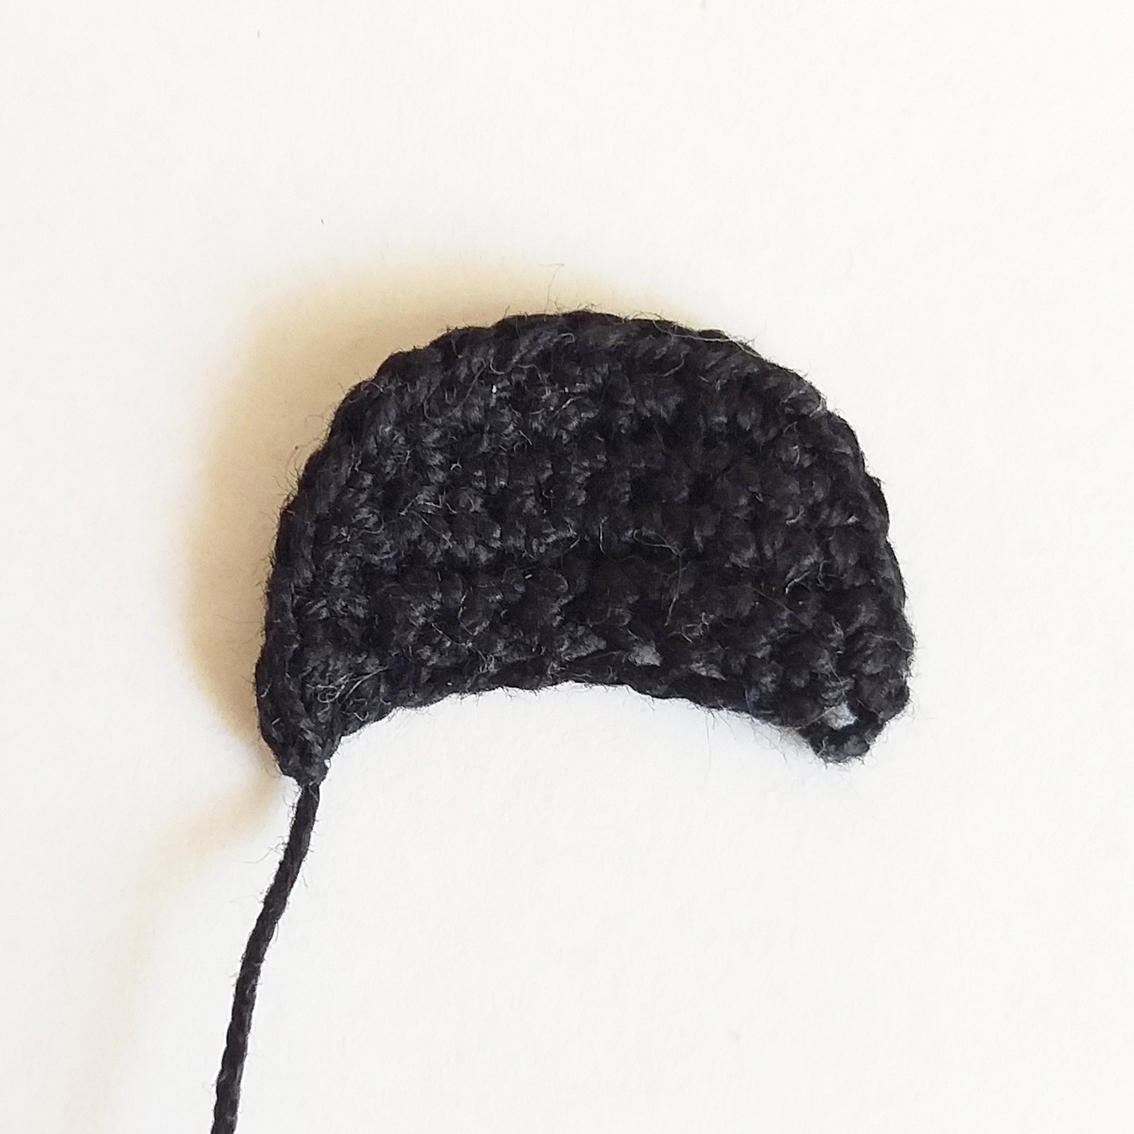
Visor
Work with black colour yarn. Before starting crocheting, leave a tail of yarn for further operation, about 50cm long.
Row 1. Work 10 ch, starting from 2nd ch from hook: 9 sc, 1 ch, turn =9
Row 2. skip 1 loop, (2 sc, inc) * 2 times, 2 sc, 1 ch, turn = 9
Row 3. skip 1 loop, 3 sc, inc, 4 sc, 1 ch, turn = 9
Row 4. skip 2 loops, 5 sc, dec, 1 ch, turn = 6
Row 5. skip 2 loops, 3 sc, 1 sl st = 4
Fasten off, cut off any excess yarn.
Row 6. Take a length of yarn that you left unworked previously and crochet from A to B: 4 sc, inc, 3 sc, inc, 4 sc
Fasten off, cut off any excess yarn, hide the end.
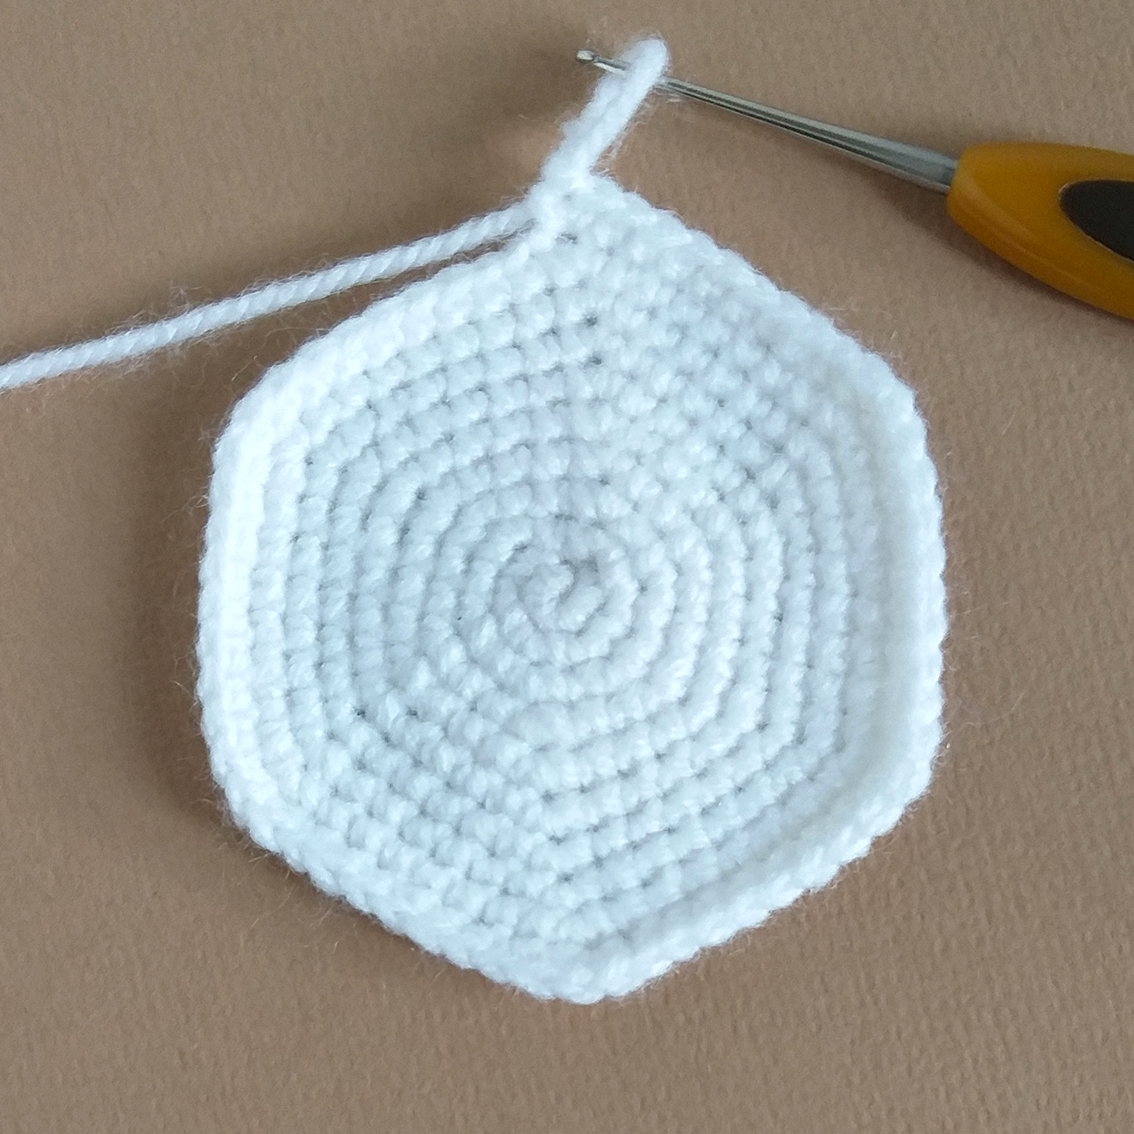
Crown
Work with blue colour yarn.
Rnd 1. 6 sc in a Magic Ring = 6
Rnd 2. 6 inc = 12
Rnd 3. (1 sc, inc)*6 times = 18
Rnd 4. (2 sc, inc)*6 times = 24
Rnd 5. (3 sc, inc)*6 times = 30
Rnd 6. Into the back loops only: 11 sc, dec, 5 sc, dec, 10 sc = 28
Rnd 7. 13 sc, dec, 13 sc = 27
Rnd 8. 27 sc = 27
Rnd 9. 25 sc, dec = 26
Rnd 10. 26 sc = 26
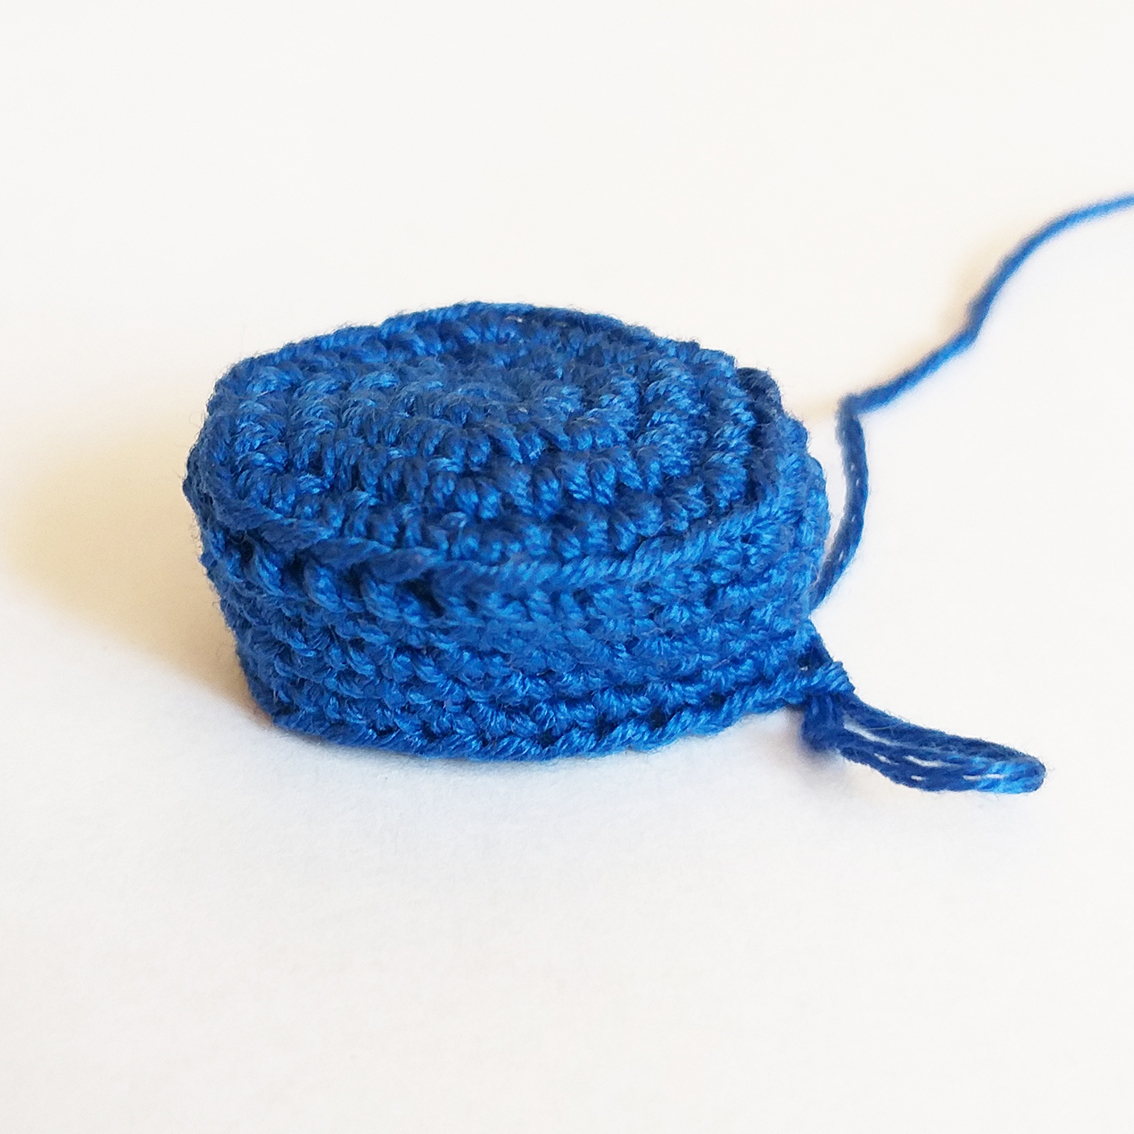
Rnd 11. 9 sc, attach visor, work the loops of the visor and hat together: 9 sc, 8 sc = 26
Fasten off, cut off any excess yarn, hide the end.
.jpeg)
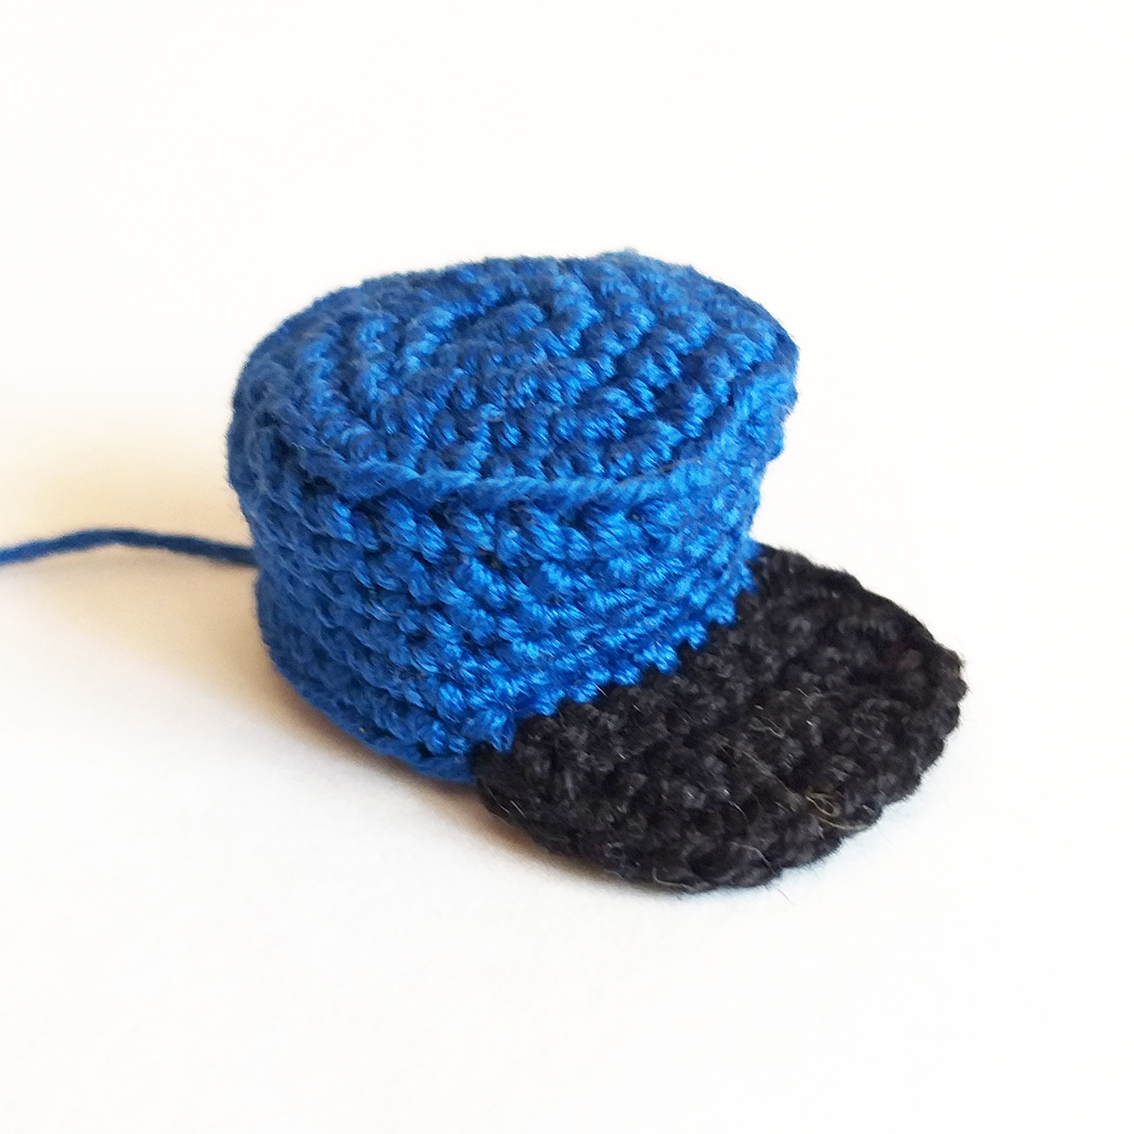
Sew the cap to the head. Add hollow fibre as you wish.
Cap
Start with light blue colour yarn.
Rnd 1. Work 22 ch, join into a ring with a sl st =22
Rnd 2-5. 22 sc
Change to white yarn.
Rnd 6. 22 sc
Change to light blue yarn.
Rnd 7. dec, 1 sc, dec, 17 sc = 20
Rnd 8. 20 sc
Change to white yarn.
Rnd 9. 20 sc
Change to light blue yarn.
Rnd 10. 20 sc
Rnd 11. dec, 1 sc, dec, 15 sc = 18
Change to white yarn.
Rnd 12. 18 sc
Change to light blue yarn.
Rnd 13-14. 18 sc
Change to white yarn.
Rnd 15. (1 sc, dec)* 2 times, 12 sc = 16
Change to light blue yarn.
Rnd 16-17. 16 sc
Change to white yarn.
Rnd 18. 16 sc
Change to light blue yarn.
Rnd 19. dec, 1 sc, dec, 11 sc = 14
Rnd 20. 14 sc
Change to white yarn.
Rnd 21. 14 sc
Change to light blue yarn.
Rnd 22. 14 sc
Rnd 23. (1 sc, dec)* 2 times, 8 sc = 12
Change to white yarn.
Rnd 24. 12 sc
Change to light blue yarn.
Rnd 25-26. 12 sc
Change to white yarn.
Rnd 27. (1 sc, dec)* 2 times, 6 sc = 10
Change to light blue yarn.
Rnd 28-29. 10 sc
Change to white yarn.
Rnd 30. 10 sc
Change to light blue yarn.
Rnd 31. dec, 1 sc, dec, 5 sc = 8
Rnd 32. 8 sc
Fasten off, cut off any excess yarn.
Pompom
Work with light blue colour yarn.
Rnd 1. 6 sc in a Magic Ring =6
Rnd 2. 6 inc =12
Rnd 3-5. 12 sc
Add some hollow fibre
Rnd 6. 6 dec = 6
Pull off the loops. Cut the thread, hide the end.
Sew the pompom to the cap. Sew the cap to the head.
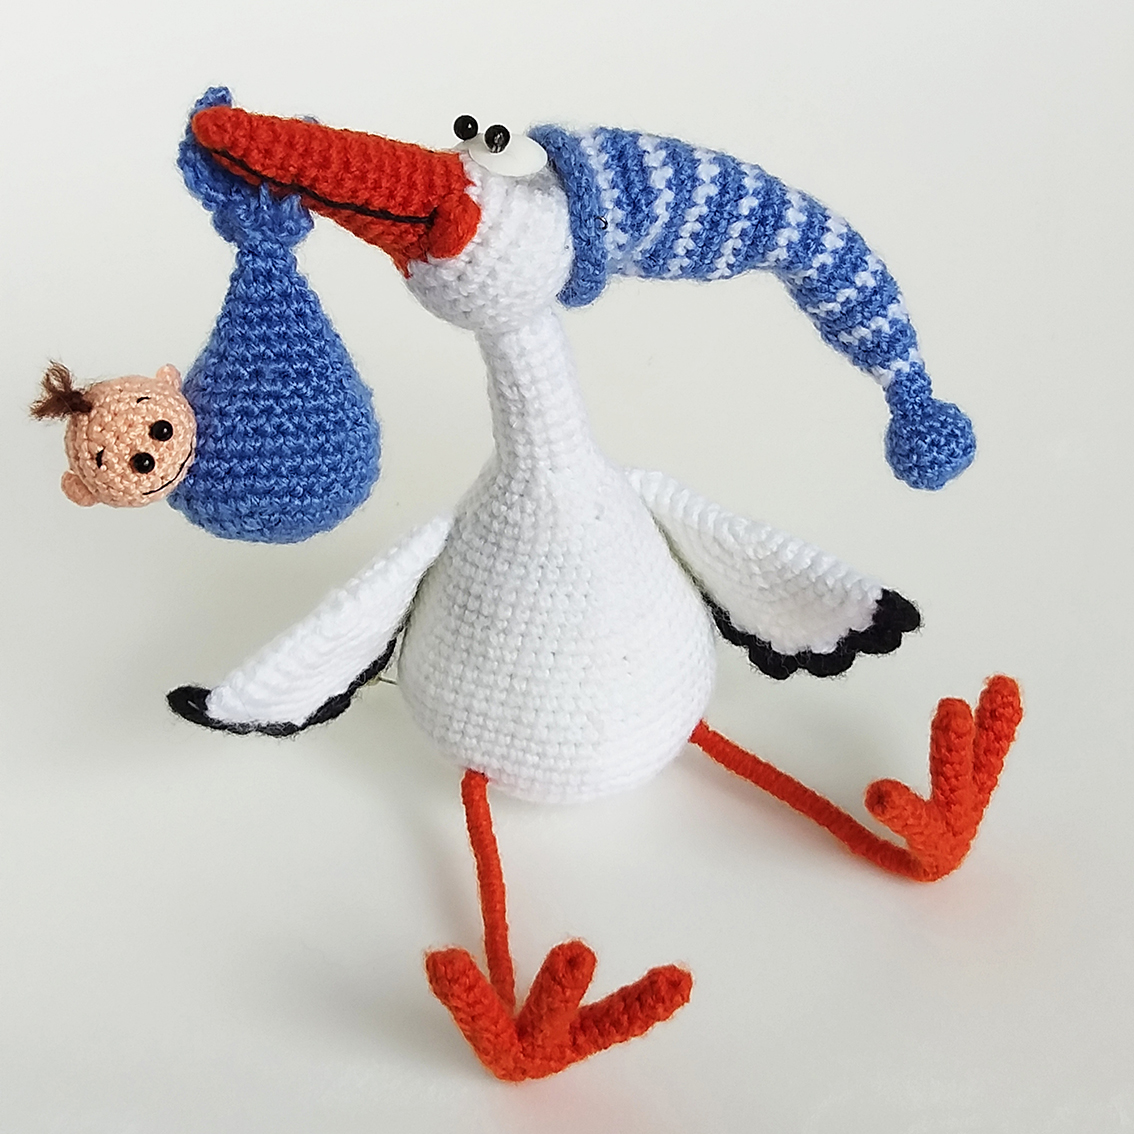
Sew the swaddle to the beak of a stork. The stork with the baby is completed!